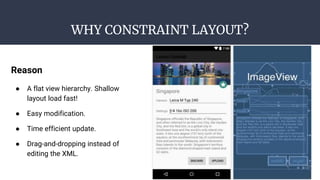
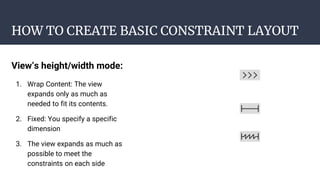
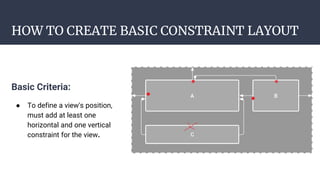
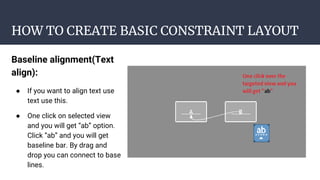
ConstraintLayout:
Why and how to use
Farhan Rahman Arnob • 21.01.2018
Overview
● ConstraintLayout allows you to create
large and complex layouts with a flat
view hierarchy (no nested view
groups).
● It's similar to RelativeLayout in that all
views are laid out according to
relationships between sibling views
and the parent layout, but it's more
flexible than RelativeLayout and
easier to use with Android Studio’s
Layout Editor.
WHY CONSTRAINT LAYOUT?
Reason
● A flat view hierarchy. Shallow
layout load fast!
● Easy modification.
● Time efficient update.
● Drag-and-dropping instead of
editing the XML.
HOW TO CREATE BASIC CONSTRAINT LAYOUT
View’s height/width mode:
1. Wrap Content: The view
expands only as much as
needed to fit its contents.
2. Fixed: You specify a specific
dimension
3. The view expands as much as
possible to meet the
constraints on each side
HOW TO CREATE BASIC CONSTRAINT LAYOUT
Basic Criteria:
● To define a view's position,
must add at least one
horizontal and one vertical
constraint for the view.
HOW TO CREATE BASIC CONSTRAINT LAYOUT
Guideline:
● want to allocate resource
space based on percentage
or split screen into a
dimension .
● If you click on red you get
different mode like
percentage, left fixed, right
fixed.
● Two types: vertical &
Horizontal
HOW TO CREATE BASIC CONSTRAINT LAYOUT
Barrier:
● want to create a barrier
based on multiple view’s
position range, use this.
● Here, View C got reposition
due to max length from A &
B.
HOW TO CREATE BASIC CONSTRAINT LAYOUT
Align:
● If you want to align based on
view do like like this.
● To create left align connect
child’s left point with parent’s
left point. & for right align
connect right points.
● For center align, connect left
and right both.
HOW TO CREATE BASIC CONSTRAINT LAYOUT
Baseline alignment(Text
align):
● If you want to align text use
text use this.
● One click on selected view
and you will get “ab” option.
Click “ab” and you will get
baseline bar. By drag and
drop you can connect to base
lines.
HOW TO CREATE BASIC CONSTRAINT LAYOUT
Constraint bias:
● When you add a constraint to
both sides of a view , the view
becomes centered between
the two constraints with a
bias(5) of 50% by default.
HOW TO CREATE BASIC CONSTRAINT LAYOUT
Chain layout:
● A chain is a group of views
that are linked to each other
with bi-directional position
constraints.
● Select both views (shift +
click) and then click right
button. Chin option will
appear.
● Can chain two to more.
HOW TO CREATE BASIC CONSTRAINT LAYOUT
Aspect Ratio:
● Useful for image view.
● Click on ratio enable bar (1).
Ratio box (4) will open.
● Need at least one match
parent(2) in vertically or
horizontally.
For more information
Visit: https://codelabs.developers.google.com/codelabs/constraint-layout/
Any Question?
Last conversation about this slide
Thank you

Constraint layout - Cutting edge Android layout design

  • 1.
    ConstraintLayout: Why and howto use Farhan Rahman Arnob • 21.01.2018
  • 2.
    Overview ● ConstraintLayout allowsyou to create large and complex layouts with a flat view hierarchy (no nested view groups). ● It's similar to RelativeLayout in that all views are laid out according to relationships between sibling views and the parent layout, but it's more flexible than RelativeLayout and easier to use with Android Studio’s Layout Editor.
  • 3.
    WHY CONSTRAINT LAYOUT? Reason ●A flat view hierarchy. Shallow layout load fast! ● Easy modification. ● Time efficient update. ● Drag-and-dropping instead of editing the XML.
  • 4.
    HOW TO CREATEBASIC CONSTRAINT LAYOUT View’s height/width mode: 1. Wrap Content: The view expands only as much as needed to fit its contents. 2. Fixed: You specify a specific dimension 3. The view expands as much as possible to meet the constraints on each side
  • 5.
    HOW TO CREATEBASIC CONSTRAINT LAYOUT Basic Criteria: ● To define a view's position, must add at least one horizontal and one vertical constraint for the view.
  • 6.
    HOW TO CREATEBASIC CONSTRAINT LAYOUT Guideline: ● want to allocate resource space based on percentage or split screen into a dimension . ● If you click on red you get different mode like percentage, left fixed, right fixed. ● Two types: vertical & Horizontal
  • 7.
    HOW TO CREATEBASIC CONSTRAINT LAYOUT Barrier: ● want to create a barrier based on multiple view’s position range, use this. ● Here, View C got reposition due to max length from A & B.
  • 8.
    HOW TO CREATEBASIC CONSTRAINT LAYOUT Align: ● If you want to align based on view do like like this. ● To create left align connect child’s left point with parent’s left point. & for right align connect right points. ● For center align, connect left and right both.
  • 9.
    HOW TO CREATEBASIC CONSTRAINT LAYOUT Baseline alignment(Text align): ● If you want to align text use text use this. ● One click on selected view and you will get “ab” option. Click “ab” and you will get baseline bar. By drag and drop you can connect to base lines.
  • 10.
    HOW TO CREATEBASIC CONSTRAINT LAYOUT Constraint bias: ● When you add a constraint to both sides of a view , the view becomes centered between the two constraints with a bias(5) of 50% by default.
  • 11.
    HOW TO CREATEBASIC CONSTRAINT LAYOUT Chain layout: ● A chain is a group of views that are linked to each other with bi-directional position constraints. ● Select both views (shift + click) and then click right button. Chin option will appear. ● Can chain two to more.
  • 12.
    HOW TO CREATEBASIC CONSTRAINT LAYOUT Aspect Ratio: ● Useful for image view. ● Click on ratio enable bar (1). Ratio box (4) will open. ● Need at least one match parent(2) in vertically or horizontally.
  • 13.
    For more information Visit:https://codelabs.developers.google.com/codelabs/constraint-layout/ Any Question? Last conversation about this slide
  • 14.