Downloaded 23 times
![Introduction to Java ME
for the Raspberry Pi
[JavaOne 2016 CON3189]
Kevin Hooke
Julio Palma Vazquez](https://image.slidesharecdn.com/con3189javaone2016-introductiontojavame-160926142524/85/CON3189-JavaOne-2016-Introduction-to-Java-ME-development-for-the-Raspberry-Pi-1-320.jpg)
![Introduction to Java ME
for the Raspberry Pi
[JavaOne 2016 CON3189]
Kevin Hooke
Julio Palma Vazquez](https://image.slidesharecdn.com/con3189javaone2016-introductiontojavame-160926142524/75/CON3189-JavaOne-2016-Introduction-to-Java-ME-development-for-the-Raspberry-Pi-1-2048.jpg)
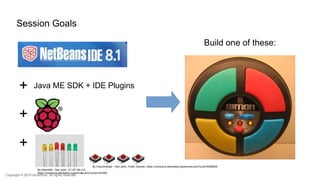
![Related Sessions JavaOne 2016
Monday, Sep 19 Tuesday, Sep 20 Wednesday, Sep 21
Introduction to Java ME 8
[CON3189]
Java ME and Single-Board
Computers for Creating
Industrial
Middleware [CON3187]
All Your Faces Belong to Us:
Building an Open Face
Recognition Platform
[CON6217]
12:30 p.m. - 1:30 p.m 2:30 p.m. - 3:30 p.m 3:00 p.m. - 4:00 p.m
Hilton - Golden Gate 6/7/8 Hilton - Golden Gate 6/7/8 Hilton - Golden Gate 6/7/8
Kevin Hooke
Julio Palma
Jorge Hidalgo
Julio Palma
Jorge Hidalgo
Mariano Rodriguez
Copyright © 2016 Accenture All rights reserved.](https://image.slidesharecdn.com/con3189javaone2016-introductiontojavame-160926142524/85/CON3189-JavaOne-2016-Introduction-to-Java-ME-development-for-the-Raspberry-Pi-3-320.jpg)
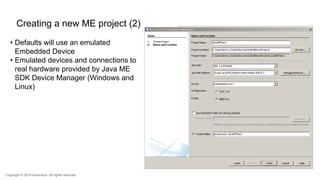


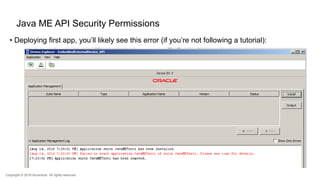

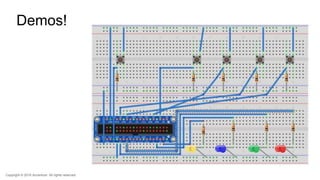


The document presents a tutorial on using Java ME for Raspberry Pi, covering the setup, development tools, and GPIO pin management. It outlines how to create a simple project to interact with hardware components like LEDs and buttons. Additionally, it provides links to demos, resources, and troubleshooting advice for deploying Java ME applications on Raspberry Pi.


![Getting Started with Apache Spark: Big Data Made Simple [Free Meetup]](https://cdn.slidesharecdn.com/ss_thumbnails/apachesparkgettingstarted-260203175547-8361bcc3-thumbnail.jpg?width=640&height=640&fit=bounds)


