SlideShare a Scribd company logo
Computer Security
What is operating system?
An operating system or OS is a software program that enables the computer hardware to communicate and
operate with the computer software.
Without a computer operating system, a computer and software programs would be useless. The picture is an
example of Microsoft Windows 7 a popular operating system.
Examples of computer operating systems:
Microsoft Windows 10 - PC and IBM compatible operating system. Microsoft Windows is the most common and
used operating system.
Apple mac OS - Apple Mac operating system. Today, the only Apple computer operating system is macOS.
Ubuntu Linux - A popular variant of Linux used with PC and IBM compatible computers.
Google Android - Operating system used with Android compatible phones and tablets.
iOS - Operating system used with the Apple iPhone and iPads.
John "Captain Crunch" Draper
John Draper was hacking computers long before computers were even common place. Draper's hacking heyday
was back in the early 1970's, when the largest computer network to which the general public had any access was
the telephone system.
At the time, telephones were managed by an automated system using specific analogue frequencies which could
be exploited to make free long distance or even international calls.
It was called "Phreaking (the action of hacking into telecommunications systems, especially to obtain free calls,"
and one of the most well-known Phreaking tools was a toy whistle that came in a box of Cap'n Crunch cereal.
With this whistle, Draper created another popular Phreaking tool known as the Blue Box, a device that could
produce many other tones used by the phone companies.
Some Top Hackers in the World
1. Kevin Mitnick
Kevin, who is now a security consultant, was convicted of hacking Nokia, Motorola and Pentagon.
Kevin David Mitnick. Once upon a time, the most wanted cyber-criminal of US, now is an affluent entrepreneur.
He pleaded guilty to seven counts of fraud that included wire fraud, computer fraud and of illegally interception a
wire communication.
After five years of incarceration that included eight months of solitary confinement, Mitnick now has started
afresh. However, his knack with the computers is still reminisced and was even depicted on celluloid in the
films Takedown and Freedom Downtown.
2. Gary McKinnon
Gary McKinnon must’ve been a curious, restless child, for to gain information on UFOs, he thought it better to get
a direct access into the channels of NASA.
He infiltrated 97 US military and NASA computers, by installing virus and deleting a few files. All the efforts to
satisfy his curiosity, but, alas, curiosity killed the cat.
It was soon found that McKinnon was guilty of having hacked the military and NASA websites from his girlfriend’s
aunt’s house in London.
While entering and deleting the files from these websites wasn’t enough, McKinnon thought of shaming the
security forces by putting out a notice on the website that said, “Your security is crap.”
3. Adrian Lamo
Adrian Lamo decided to switch careers when he realized the potentials of his skills.
He became a news when he hacked into Yahoo!, Microsoft, Google, and The New York Times.
This, although culminated into his arrest, it later helped him gain the batch of an American Threat Analyst. A guy
who would hack into top-notch accounts sitting in the spacious and comforting cafeterias, libraries, internet cafes,
soon turned WikiLeaks suspect Bradley Manning over to FBI. While Manning was arrested for leaking several
hundred sensitive US government documents, Lamo went hiding or should we presume, undercover?
4. Mathew Bevan and Richard Pryce
Targeting the over-sensitive nerves, what Mathew Bevan along with his alleged partner Richard Pryce did, could
have triggered great many issues between USA and North Korea.
The duo hacked the US military computers and used it as a means to infiltrate the foreign systems.
The crucial contents of Korean Atomic Research Institute were dumped into USAF system.
However, the contents were majorly relevant to South Korea and hence, less volatile. But this, nonetheless, could
have led to a huge international issue
5. Jonathan James
The first juvenile to be imprisoned for a cyber-crime at the age of 16, Jonathan James or better known as c0mrade,
hacked into Defense Threat Reduction Agency of US department.
Further, he installed a sniffer that scrutinized the messages passed on between the DTRA employees.
Not only did he keep a check on the messages being passed around, in the process, he collected the passwords and
usernames and other such vital details of the employees, and further even stole essential software.
All this cost NASA to shut down its system and to pay from its pocket $41,000. c0mrade, however, had a bitter
ending as James committed suicide in 2008.
6. Kevin Poulsen
How far would you go to win your dream car or a dream house? How far will you go to win an online contest or a
radio show contest? Perhaps, you shall keep trying your luck, unless you are Kevin Poulsen! Poulsen infiltrated a
radio shows call-in contest just so he could win a Porsche.
Dark Dante, as he was better known, went underground after FBI started pursuing him. He, later, was found guilty
of seven counts of mail, wire and
computer fraud, money laundering and the likes. What turned out to be rewarding in Dark Dante’s case is – his
past crafted his future. Poulsen now serves as a Senior Editor at Wired.
7. LulzSec
LulzSec or Lulz Security, a high profile, Black Hat hacker group, gained credentials for hacking into Sony, News
International, CIA, FBI, Scotland Yard, and several noteworthy accounts.
So notorious was the group that when it hacked into News Corporations account, they put across a false report of
Rupert Murdoch having passed away.
While the group claims to have retired from their vile duties, the motto of the group, “Laughing at your security
since 2011!” stays alive.
There are assertions of the group having hacked into the websites of the newspapers like The Times and The
Sun to post its retirement news. Many, however, claim that this group had taken it upon itself to create awareness
about the absence of efficient security against hackers.
8. Anonymous
The concept of being a “digital Robin Hood” was far from being conceived, but in the computer age, it is very likely
that someone somewhere has bagged this title.
. A “hacktivist group” called Anonymous are known with the penname of being the “digital Robin Hood” amongst
its supporters.
Identified in public by wearing a Guy Fawkes Masks, Anons, as they are widely known, have publicized themselves
by attacking the government, religious and corporate websites.
The Vatican, the FBI, the CIA, PayPal, Sony, MasterCard, Visa, Chinese, Israeli, Tunisian, and Ugandan governments
have been amongst their targets
9. Astra
Astra, a Sanskrit word for weapon was the pet name of a hacker who dealt in the weapon stealing and selling.
Authorities did not identify the hacker by name, 58-year-old Greek Mathematician hacked into the systems of
France’s Dassault Group, stole vulnerable weapons technology data and sold it to different countries for five long
years.
While the real identity of the ASTRA remains untraced, officials have said that he had been wanted since 2002.
Astra sold the data to approximately 250 people from around the globe, which cost Dassault $360 millions of
damage.
10. Albert Gonzalez
How safe is internet banking? When we browse through the profile of this mastermind, we are certain that one
ought to use the World Wide Web with immense care
For two long years, Albert Gonzalez, stole from credit cards of the netizens. This was recorded to be the biggest
credit card theft in the history of mankind.
He resold approximately 170 million credit cards and ATM numbers. He did so by installing a sniffer and sniffing
out the computer data from internal corporate networks. When arrested, Gonzalez was sentenced to 20 years in
Federal prison.
Introduction:
Computer security, also known as cyber security or IT security, is the protection of computer systems from the
theft and damage to their hardware, software or information, as well as from disruption or misdirection of the
services they provide.
The protection of data, networks and computing power. The protection of data (information security) is the most
important. The protection of networks is the network from being used for illegal purposes.
Computer security can be defined as controls that are put in place to provide confidentiality, integrity, and
availability for all components of computer systems. These components include data, software, hardware, and
firmware.
White Hat – Also known as ethical hackers, White Hat hackers are the good guys of the hacker world. They’ll help
you remove a virus or Pen Test a company. Most White Hat hackers hold a college degree in IT security or
computer science and must be certified to pursue a career in hacking.
Black Hat – Also known as crackers, these are the men and women you hear about in the news. They find banks or
other companies with weak security and steal money or credit card information. The surprising truth about their
methods of attack is that they often use common hacking practices they learned early on.
Gray Hat – Nothing is ever just black or white; the same is true in the world of hacking. Gray Hat hackers don’t
steal money or information (although, sometimes they deface a website or two), yet they don’t help people for
good (but, they could if they wanted to).
Script Kiddie – Script Kiddies normally don’t care about hacking. They copy code and use it for a virus or a SQLi or
something else.
Suicide Hacker - Suicide hackers are those who hack for some purpose and even don’t bother to suffer long term
jail due to their activities. Suicide hacker can be bad as well as good. Suicide Hacker will stop at nothing and will
ignore consequences.
Hacktivist - A hacktivist is kind of hacker who thinks hacking can bring out some social changes and hacks
government and organizations to show his discomfort over some trivial issues. Hacktivism is the subversive use of
computers and computer networks to promote a packing-training political agenda. With roots in hacker culture
and hacker ethics, its ends are often related to the free speech, human rights, or freedom of information
movements.
Common keywords
Security bug: A security bug or security defect is a software bug that can be exploited to gain unauthorized access
or privileges on a computer system.
Vulnerabilities: A vulnerability is a security weakness in a software program that puts the program or computer at
risk of malicious programs and users. For example, an Internet browser could have a vulnerability that crashes the
browser or allow someone to read or copy files on your computer when you visit a web page with malicious code.
Exploit: An exploit is a piece of software a chunk of data, or a sequence of commands that takes advantage of
a bug or vulnerability to cause unintended or unanticipated behavior to occur on computer software, hardware, or
something electronic.
Threat: In computer security a threat is a possible danger that might exploit a vulnerability to breach security and
therefore cause possible harm.
Privilege: In computing, privilege is defined as the delegation of authority over a computer system. A privilege
allows a user to perform an action.
Authentication: Authentication is the process of verifying who you are. When you log on to a PC with a user name
and password you are authenticating.
Authorization: Authorization is the process of verifying that you have access to something. Gaining access to a
resource (e.g. directory on a hard disk) because the permissions configured on it allow you access is authorization.
Command: A command is a specific instruction given to a computer application to perform some kind of task or
function.
Query: A query is a request for information from a database. for example, each time you search for something
using a search engine, you perform a search query. When you press Enter, the keywords are sent to the search
engine and are processed using an algorithm that retrieves related results from the search index. Another common
type of query is a database query
Gui: A graphical user interface (GUI) is a human-computer interface (i.e., a way for humans to interact with
computers) that uses windows, icons and menus and which can be manipulated by a mouse (and often to a limited
extent by a keyboard as well).
Cli: A CLI (command line interface) is a user interface to a computer's operating system or an application in which
the user responds to a visual prompt by typing in a command on a specified line, receives a response back from the
system, and then enters another command, and so forth.
System files: A system file in computers is a critical computer file without which a computer system may not
operate correctly. These files may come as part of the operating system, a third-party device driver or other
sources
Bug bounty: A bug bounty program is a deal offered by many websites and software developers by which
individuals can receive recognition and compensation for reporting bugs, especially those pertaining
to exploits and vulnerabilities. We can find of the programs in the following websites: www.hackerone.com
www.bugcrowd.com
www.vulnerability-lab.com
www.cobalt.io
File attributes
File attribute are settings associated with computer files that grant or deny certain rights to how a user or the
operating system can access that file. For example, IBM compatible computers running MS-DOS or Microsoft
Windows have capabilities of having read, archive, system, and hidden attributes.
Read-only - Allows a file to be read, but nothing can be written to the file or changed.
Archive - Tells Windows Backup to back up the file.
System - System file.
Hidden - File will not be shown when doing a regular dir. from DOS
File Hiding Techniques in Windows Operating system:
Step 1: Go into the folder properties by right clicking on it.
Step 2: Click on hidden checkbox, click on apply and ok
Step 3: Your folder is hidden now
Step 4: Click on view hidden item and uncheck it to see the hidden folder you want to view
To hide a specific file with the help of cmd:
Step 1: Create a file which we want to hide:
Step 2: Click on start and search for command prompt or else press start + r and type cmd press enter
Step 3: Type attrib +h +s (filename) in cmd
Similarly, to unhide the file using Attrib command; type: Attrib: -h -s secret.txt
Free Anvi File Locker Tool
Anvi Folder Locker is a free security tool that has been developed to help you manage and protect your important
files. With Anvi Folder Locker, you can lock your personal files to protect your privacy, set passwords to files so
other users will have no access to them.
Installation and use:
Step 1: Download the tool from - https://filehippo.com/download_anvi_folder_locker_free/ and double click on
setup file
Step 2: Click on next to continue
Step 3: In the Final Step uncheck the change log checkbox and click on finish
Step no 4: At the first time it will ask you to set the master password and email if you forget the password
Step no 5: Click on add button to add the folder
Step no 6: Browse and select the particular folder from the file explorer
Step no 7: Check the box from which on left side of the path to perform the action.
Step no 8: Select the options to perform on the particular folder
Installing in VMware
Step 1 – Download Kali Linux ISO image
To install the Kali Linux, we will have to first get the installer ISO image file. We can get newer version of it by
visiting the official download page. Please download the 64 bit or 32-bit image depending on the system you have.
Don’t get confused by the many options available such as Kali Linux 64-bit Mate or Kali Linux 64 bit Xfce. They are
all the same except for the desktop environment.
Step 2 – Locate the downloaded file
We can find the downloaded image file in the downloads folder, if we have not changed the default settings. The
filename would be something like kali-linux-2016.2-amd64.iso. If we have downloaded through torrent, the ISO file
will be downloaded in a folder, folder name would be something like kali-linux-2016.2-amd64.
Step 3 – Open VMware Workstation 12
Let’s start the installation process. Open VMware Workstation
Step 4 – Launch VMware Workstation New Virtual Machine installation wizard. We can launch this by clicking
Create New Virtual Machine button on the home screen or go to menu File -> New Virtual Machine. The keyboard
shortcut is Ctrl + N on Windows.
VMware workstation supports tab view, which is, all the virtual machines running or stopped will show up in its
own tab until we close them by clicking X on the tab itself. It’s the same as we see in the browsers where
webpages open in separate tabs rather than separate windows. In software development terms, this is commonly
referred to as the tabbed interface.
Step 5- Welcome to the new Virtual Machine Wizard dialog box appears. This is where we get a chance to select
the way virtual machine will be created. Typical is predefined or mostly the defaults. Custom is where you get to
set advanced options such as compatibility with older Virtual Machines, SCSI controller type, etc. We will go with
the default options. Select Typical and click next.
Step 6- Select installation media or source
In this dialog box we will have to browse to the downloaded ISO file and click next. Generally, VMware
Workstation detects the OS automatically and initiates what they call as the Easy Install. But in the case of Kali
Linux this is not the case and we will see a warning (yellow triangle). Please ignore that and click next to continue.
Step 7- Select Guest Operating System
In this dialog box, we will be asked to select the Guest Operating System. Select Guest operating system as Linux
and Version as Delian 7.x 64-bit or 32 bit depending on your system. Please do not select Debian 8. In Debian 8.
Step 8- Select Guest Operating System
In this dialog box, we will be asked to provide the name of the virtual machine. We can provide any name you like.
We can also change the location of the virtual machine. By default, is place in the Documents/Virtual Machine
folder. Leaving it as the default is also fine.
Step 9- Specify disk capacity
This is the default option. Say if you specify 60 GB, all of 60 GB will not be utilized or say 60 GB will not be blocked
at once. These Virtual Disks expand according to the usage with a Maximum size you specified as the disk capacity.
On a fresh install normally it takes 10 GB of space which will grow according to the software’s we install in the VM.
Step 10- Ready to create Virtual Machine Dialog Box
This is the final dialog box and what we can see is all the options you have selected in previous dialog boxes. We
will also see Memory, Network Adapter and Other Devices. They are the defaults. If we wish to change them, click
on Customize Hardware. We can leave them as defaults for now, they can be changed later on also once the
Virtual Machine is created.
Step 11 – Power on Virtual Machine
Step 12 – Select Graphical Install from Boot Menu
Here we can see many options. Select Graphical Install using the down arrow key and click continue.
Step 13 – Select a Language
In this dialog box you will be asked to select a language. Please select a language and continue. This option sets our
language in the Kali Linux Operating system. Default is English.
Step 14 – Configure the Keyboard
In this dialog box we will be asked to select the keyboard layout. Please select a Keyboard layout using the arrow
keys and click continue. This option sets your Keyboard in the Kali Linux Operating system. By default, it is set to
American English.
Step 15 – Configure the Network – Enter hostname
In this dialog box you will be asked to enter the hostname for our system. This being a home network, we can set
anything. Enter any anything and click continue.
Step 16 – Configure the Network – Enter domain name
In this dialog box we will be asked to enter the domain name for your system. This being a home network, we can
set anything like example.com
Step 17 – Set password for User root
In this dialog box we will be asked to enter the password for the root user account. Please enter a password of
your choice and click continue.
Step 18 – Enter Username for your account
In this dialog box we will be asked to enter the username for the account. Please enter a username of your choice
and click continue.
Step 19 – Enter Password for our user account
In this dialog box we will be asked to enter the password for the user account you created in the last step. Please
enter a password of our choice and click continue.
Step 20 – Configure Clock
In this dialog box we will be asked to time zone based on the location you selected earlier. Please enter a time
zone of your choice and click continue.
Step 21 – Partition Disk
In this dialog box we kali Linux asked how we would like to partition our disk. Select Guided – Use entire disk and
click continue. This is the default option.
Step 22 – Partition Disk
In this dialog box we kali Linux asked how we would like to partition our disk. Select Guided – Use entire disk and
click continue. This is the default option.
Step 22 –
Select disk to partition
In this dialog box we will be asked to select a disk to partition. Select sda, VMware Virtual disk. There should be
only one option. Click Continue.
Step 23 – Select partition scheme
In this dialog box you are asked to select a scheme for disk partition. Select the default, all files in one partition and
click Continue.
Step 24 Disk partition Overview
In this dialog box we can see the summary of your disk partition. Select the Finish Partitioning and Write changes
to disk which should be selected by default. All we have to do is to click continue.
Step 25 – Disk partition Confirmation
In this dialog we will be asked to confirm Write changes to disk. Select yes and click continue.
Step 26 – Installation starts
Now the actual installation starts. Wait for Configure the Package Manager Dialog box to appear.
Step 27 – Configure the package manager
In this dialog box we will have been asking if we wish to configure network mirror for Package manager. Choose
yes and continue. You can skip this by selecting NO. But the default option yes is better.
Step 28 – Configure the package manager – HTTP Proxy
In this dialog box we will be asking if we wish to HTTP proxy. Leave it blank and click continue.
In this dialog box we will be asked if we would like to install the GRUB boot loader. Select yes and click Continue.
Step 30 – Select device for GRUB boot loader Installation
In this dialog box we will be asked to select boot loader device for GRUB installation. Select /dev/sda and click
Continue.
Step 31 – Select device for GRUB boot loader Installation
In this dialog box we will be asked to select boot loader device for GRUB installation. Select /dev/sda and click
Continue.
Step 32 – Installation Complete
Now we can see Installation complete dialog box. Click continue to finalize the installation and wait for the VM to
reboot. After reboot we will see the login screen. Login with our username or root user and provide our password.
We will then see the Kali Linux desktop.
Step 33 – Switching to Full screen mode
After login, if we want to switch to full screen mode, we won’t be able to. What we can see is the resolution of
800×600 which is the default resolution. This is because, VMware tools are not installed. Please follow the below
steps to install VMware tools. After the installation and reboot, we will be able to see the desktop with resolution
same as your computer.
Step 34 – Install VMware Tools
To install the VMware tools, follow the below steps.
If you don’t have internet connection, you can install VMware tools directly from the VM. If you have internet
connection, follow the next instruction which is easier.
Go to VM-> Install VMware Tools
2. You will see VMware tools Icon on the desktop. If you don’t, then Places->VMware Tools. Double click to open.
3. Copy the file with the file name something like this VMware-tools….tar.gz to the desktop.
4. Right click on this file on the desktop and click Extract here. You will see that the file is extracted to the folder
VMware-tools-distrib.
5. Open terminal by going to System Tools -> terminal
6. Go to the folder VMware-tools-distrib on desktop by entering the command cd /Desktop/VMware-tools-distrib
7. Now run this command:
Sudo ./vmware-install.pl -d
8. Enter your password and press Enter. You will be asked if you want to proceed with the legacy installer. Enter Y
and press Enter.
9. Now you will be asked series of questions, just accept the default by pressing Enter for all and wait for the
installation to complete.
10. Wait for the installation to complete. You will see more prompts, except the defaults by clicking enter. Once
completed, restart your VM by going to VM->Power->Restart Guest
11. Once the system restarts, you will be prompted to login. Once your login, you can see the desktop in full screen
mode which stretches up to the complete screen.
If you have internet connection, try this
1. Open Terminal
2. Execute the command
Sudo apt-get install open-vm-tools-desktop fuse
3. Enter your password
4. Wait for the process to complete and restart. You are done. Login and now you will see the desktop in full
screen mode
You can check the version of installed VMware Tools. In terminal, execute the command
VMware-toolbox-cmd -v
. This will show you the version number.
Process Complete
Dual boot
A dual boot system is a computer system in which two operating systems are installed on the same hard drive,
allowing either operating system to be loaded and given control.
When you turn the computer on, a boot manager program displays a menu, allowing you to choose the operating
system you wish to use.
Before starting this tutorial first checkout materials required:
8GB Pen drive (Minimum)
At least Dual-Core (either intel or AMD) with minimum 1GB of RAM
Windows 10 or any other version of Windows (Already Installed)
Kali Linux iso
Rufus
Step 1:
First download Kali Linux latest version ISO file from the above provided link. Download either 32 bit or 64 bit,
that’s your choice.
Step 2
: After downloading Kali Linux the next step is the creation of a bootable USB. For that we need Rufus – a utility
that helps format and create bootable USB flash drives. So download it from above link and install.
Step 3:
Let’s start making a bootable USB.
First connect your USB drive. As already said we need minimum 8GB memory pen drive.
Run Rufus and follow steps to create a bootable USB.
Step 4:
Now you get a screen like below image.
Step 5:
First check your USB drive is selected. Then click small CD drive icon below (2) and locate Kali Linux iso file that you
downloaded from Kali official website. And finally click “Start” and wait for process to complete.
• Step 6:
After process completion you can see a close button to exit from the rufu window, click on it and yes, here is your
Kali Linux bootable USB drive.
Other than installing Kali Linux with Windows, you can also use this USB to live boot Kali – means run Kali without
installing it (but limited some functions).
Step 7:
Next we are going to create a separate partition for Kali Linux installation. So open your Disk Management settings
in Windows or Run” diskmgmt.msc” command.
Create a new partition of size about 15 – 20GB minimum by shrinking any existing volume. Here we created a new
partition of size 17GB.
Step 8:
Initial process all done. Downloaded Kali Linux ISO, created bootable USB drive and created a separate partition for
Kali Linux installation.
Before going on keep in mind always Disable Secure Boot and Fast Boot option in BIOS.
Now Restart your PC/Laptop and go to boot manger and select the option boot as USB. [Options will be different
for different brands]. Just boot it as USB.Now you will see the installation window of Kali Linux.
There are different options to install Kali Linux. Here choose” Graphical Install” and follow all the above steps till
Partition disk
Choose partitioning method in the next page as” Manual” and hit” Continue “.
Step 9:
Initial process all done. Downloaded Kali Linux ISO, created bootable USB drive and created a separate partition for
Kali Linux installation.
Before going on keep in mind always Disable Secure Boot and Fast Boot option in BIOS.
Now Restart your PC/Laptop and go to boot manger and select the option boot as USB. [Options will be different
for different brands]. Just boot it as USB.Now you will see the installation window of Kali Linux.
There are different options to install Kali Linux. Here choose” Graphical Install” and follow all the above steps till
Partition disk
Choose partitioning method in the next page as” Manual” and hit” Continue “.
Step -10
This step has to be done carefully. Only select the partition that we created for Kali installation and press”
Continue “.
Step -11
Now you can see that space we allocated for Kali installation is now named as” FREE SPACE “. Choose it and”
Continue “.
Step -12
In this step it will ask us where to do the partition. Choose the option” Automatically partition the free space” and”
Continue” the process.
Step -13
In this step you will be asked the partition scheme just select All files in one partition and click “continue”
Step -14
Finally select the option” Finish Partitioning and Write Changes to Disk” and” Continue “.
Step -15
In this step it will ask permission to write changes in disk. Choose” Yes” and” Continue “.
Kali is installing and this might take from 10 to 15 minutes to complete.
Step-16
In the middle of installation, it will ask for network mirroring, choose” Yes” or” No “. We recommended you to
choose “No”.
Step -17
Next in this page you have to select where to install boot loader. Choose your hard disk which is the second option.
Select 2nd option which says /dev/sda
Step -18
After successful completion of installation process, a page similar to the one seen below appears. Click” continue
Step -19
You have completed all the necessary steps. Now just Restart your PC/Laptop and remove the USB drive. During
Startup you can see the GRUB Loader of Kali Linux v2.0.
Here choose” Kali GNU/Linux” to boot your PC/Laptop with the new Kali Linux or else choose” Windows Recovery
Environment” to start as Windows 10.
Live:
For Using Kali Linux Live, Choose live option from the menu:
Computer Security,Types of Hackers,Installation of Kali Linux, Common Keywords

More Related Content

What's hot

Sit presentation
Sit presentationSit presentation
Sit presentation
cchoi02
 
Sit presentation - Hacking
Sit presentation - HackingSit presentation - Hacking
Sit presentation - Hacking
msolis0710
 
Hacker organizations
Hacker organizationsHacker organizations
Hacker organizations
MarioEliseo3
 
Power Point Hacker
Power Point HackerPower Point Hacker
Power Point Hacker
yanizaki
 
L Scope
L ScopeL Scope
L Scope
CTIN
 
Insider Attacks: Theft of Intellectual and Proprietary Data
Insider Attacks: Theft of Intellectual and Proprietary DataInsider Attacks: Theft of Intellectual and Proprietary Data
Insider Attacks: Theft of Intellectual and Proprietary Data
Lindsey Landolfi
 
โครงงานการพัฒนาเว็บไซต์เรื่อง Hacking ชลธิชา.อรวดี.อรอุมา1
โครงงานการพัฒนาเว็บไซต์เรื่อง Hacking ชลธิชา.อรวดี.อรอุมา1โครงงานการพัฒนาเว็บไซต์เรื่อง Hacking ชลธิชา.อรวดี.อรอุมา1
โครงงานการพัฒนาเว็บไซต์เรื่อง Hacking ชลธิชา.อรวดี.อรอุมา1
Onwadee18
 

What's hot (20)

The house believes that internet acces is a human right
The house believes that internet acces is a human rightThe house believes that internet acces is a human right
The house believes that internet acces is a human right
 
Hacking for Dummies 2
Hacking for Dummies 2Hacking for Dummies 2
Hacking for Dummies 2
 
Sit presentation
Sit presentationSit presentation
Sit presentation
 
Application of computer to legal practice (hacking)
Application of computer to legal practice (hacking)Application of computer to legal practice (hacking)
Application of computer to legal practice (hacking)
 
Warrantless governmental surveillance through the use of emerging technology ...
Warrantless governmental surveillance through the use of emerging technology ...Warrantless governmental surveillance through the use of emerging technology ...
Warrantless governmental surveillance through the use of emerging technology ...
 
The Secret Of Hacking Trial Pages
The Secret Of Hacking   Trial PagesThe Secret Of Hacking   Trial Pages
The Secret Of Hacking Trial Pages
 
Sit presentation - Hacking
Sit presentation - HackingSit presentation - Hacking
Sit presentation - Hacking
 
Attack on Sony
Attack on SonyAttack on Sony
Attack on Sony
 
Hacker organizations
Hacker organizationsHacker organizations
Hacker organizations
 
Criminal hero
Criminal heroCriminal hero
Criminal hero
 
Power Point Hacker
Power Point HackerPower Point Hacker
Power Point Hacker
 
presentation on hacking
presentation on hackingpresentation on hacking
presentation on hacking
 
How private is your privacy?
How private is your privacy?How private is your privacy?
How private is your privacy?
 
Cybercrime
CybercrimeCybercrime
Cybercrime
 
L Scope
L ScopeL Scope
L Scope
 
Insider Attacks: Theft of Intellectual and Proprietary Data
Insider Attacks: Theft of Intellectual and Proprietary DataInsider Attacks: Theft of Intellectual and Proprietary Data
Insider Attacks: Theft of Intellectual and Proprietary Data
 
Hackers are innocent
Hackers are innocentHackers are innocent
Hackers are innocent
 
All about Hacking
All about HackingAll about Hacking
All about Hacking
 
โครงงานการพัฒนาเว็บไซต์เรื่อง Hacking ชลธิชา.อรวดี.อรอุมา1
โครงงานการพัฒนาเว็บไซต์เรื่อง Hacking ชลธิชา.อรวดี.อรอุมา1โครงงานการพัฒนาเว็บไซต์เรื่อง Hacking ชลธิชา.อรวดี.อรอุมา1
โครงงานการพัฒนาเว็บไซต์เรื่อง Hacking ชลธิชา.อรวดี.อรอุมา1
 
FBI's New Data Warehouse A Powerhouse
FBI's New Data Warehouse A PowerhouseFBI's New Data Warehouse A Powerhouse
FBI's New Data Warehouse A Powerhouse
 

Similar to Computer Security,Types of Hackers,Installation of Kali Linux, Common Keywords

Computer Hacking by Rudy
Computer Hacking by RudyComputer Hacking by Rudy
Computer Hacking by Rudy
Udieh Moody
 
Hackers Izyani
Hackers IzyaniHackers Izyani
Hackers Izyani
yanizaki
 

Similar to Computer Security,Types of Hackers,Installation of Kali Linux, Common Keywords (20)

Computer Hacking by Rudy
Computer Hacking by RudyComputer Hacking by Rudy
Computer Hacking by Rudy
 
Hacking And Its Prevention
Hacking And Its PreventionHacking And Its Prevention
Hacking And Its Prevention
 
Report on Hacking
Report on HackingReport on Hacking
Report on Hacking
 
Hacking (cs192 report )
Hacking (cs192 report )Hacking (cs192 report )
Hacking (cs192 report )
 
Famous hackers
Famous hackersFamous hackers
Famous hackers
 
Hacking.pptx
Hacking.pptxHacking.pptx
Hacking.pptx
 
Course on Ehtical Hacking - Introduction
Course on Ehtical Hacking - IntroductionCourse on Ehtical Hacking - Introduction
Course on Ehtical Hacking - Introduction
 
5 of the world’s most famous hackers
5 of the world’s most famous hackers5 of the world’s most famous hackers
5 of the world’s most famous hackers
 
Hackers and cyber crimes
Hackers and cyber crimesHackers and cyber crimes
Hackers and cyber crimes
 
Unit ii-hackers and cyber crimes
Unit ii-hackers and cyber crimesUnit ii-hackers and cyber crimes
Unit ii-hackers and cyber crimes
 
Top 10 Cyber Crimes in the World till now
Top 10 Cyber Crimes in the World till nowTop 10 Cyber Crimes in the World till now
Top 10 Cyber Crimes in the World till now
 
Hackers Izyani
Hackers IzyaniHackers Izyani
Hackers Izyani
 
Jason Samide - State of Security & 2016 Predictions
Jason Samide - State of Security & 2016 PredictionsJason Samide - State of Security & 2016 Predictions
Jason Samide - State of Security & 2016 Predictions
 
article cybersecurity must B2B metaverse
article cybersecurity must B2B metaversearticle cybersecurity must B2B metaverse
article cybersecurity must B2B metaverse
 
Hacking
HackingHacking
Hacking
 
How hackers embarrassed technology
How hackers embarrassed technologyHow hackers embarrassed technology
How hackers embarrassed technology
 
Is hacking good or bad
Is hacking good or badIs hacking good or bad
Is hacking good or bad
 
Social Engineering
Social EngineeringSocial Engineering
Social Engineering
 
International-Dimensions-of-Cybercrime (1).pptx
International-Dimensions-of-Cybercrime (1).pptxInternational-Dimensions-of-Cybercrime (1).pptx
International-Dimensions-of-Cybercrime (1).pptx
 
Ethical hacking
Ethical hackingEthical hacking
Ethical hacking
 

Recently uploaded

Future Visions: Predictions to Guide and Time Tech Innovation, Peter Udo Diehl
Future Visions: Predictions to Guide and Time Tech Innovation, Peter Udo DiehlFuture Visions: Predictions to Guide and Time Tech Innovation, Peter Udo Diehl
Future Visions: Predictions to Guide and Time Tech Innovation, Peter Udo Diehl
Peter Udo Diehl
 
Search and Society: Reimagining Information Access for Radical Futures
Search and Society: Reimagining Information Access for Radical FuturesSearch and Society: Reimagining Information Access for Radical Futures
Search and Society: Reimagining Information Access for Radical Futures
Bhaskar Mitra
 

Recently uploaded (20)

In-Depth Performance Testing Guide for IT Professionals
In-Depth Performance Testing Guide for IT ProfessionalsIn-Depth Performance Testing Guide for IT Professionals
In-Depth Performance Testing Guide for IT Professionals
 
WSO2CONMay2024OpenSourceConferenceDebrief.pptx
WSO2CONMay2024OpenSourceConferenceDebrief.pptxWSO2CONMay2024OpenSourceConferenceDebrief.pptx
WSO2CONMay2024OpenSourceConferenceDebrief.pptx
 
Exploring UiPath Orchestrator API: updates and limits in 2024 🚀
Exploring UiPath Orchestrator API: updates and limits in 2024 🚀Exploring UiPath Orchestrator API: updates and limits in 2024 🚀
Exploring UiPath Orchestrator API: updates and limits in 2024 🚀
 
10 Differences between Sales Cloud and CPQ, Blanka Doktorová
10 Differences between Sales Cloud and CPQ, Blanka Doktorová10 Differences between Sales Cloud and CPQ, Blanka Doktorová
10 Differences between Sales Cloud and CPQ, Blanka Doktorová
 
PLAI - Acceleration Program for Generative A.I. Startups
PLAI - Acceleration Program for Generative A.I. StartupsPLAI - Acceleration Program for Generative A.I. Startups
PLAI - Acceleration Program for Generative A.I. Startups
 
Future Visions: Predictions to Guide and Time Tech Innovation, Peter Udo Diehl
Future Visions: Predictions to Guide and Time Tech Innovation, Peter Udo DiehlFuture Visions: Predictions to Guide and Time Tech Innovation, Peter Udo Diehl
Future Visions: Predictions to Guide and Time Tech Innovation, Peter Udo Diehl
 
Search and Society: Reimagining Information Access for Radical Futures
Search and Society: Reimagining Information Access for Radical FuturesSearch and Society: Reimagining Information Access for Radical Futures
Search and Society: Reimagining Information Access for Radical Futures
 
Bits & Pixels using AI for Good.........
Bits & Pixels using AI for Good.........Bits & Pixels using AI for Good.........
Bits & Pixels using AI for Good.........
 
Unpacking Value Delivery - Agile Oxford Meetup - May 2024.pptx
Unpacking Value Delivery - Agile Oxford Meetup - May 2024.pptxUnpacking Value Delivery - Agile Oxford Meetup - May 2024.pptx
Unpacking Value Delivery - Agile Oxford Meetup - May 2024.pptx
 
Optimizing NoSQL Performance Through Observability
Optimizing NoSQL Performance Through ObservabilityOptimizing NoSQL Performance Through Observability
Optimizing NoSQL Performance Through Observability
 
Kubernetes & AI - Beauty and the Beast !?! @KCD Istanbul 2024
Kubernetes & AI - Beauty and the Beast !?! @KCD Istanbul 2024Kubernetes & AI - Beauty and the Beast !?! @KCD Istanbul 2024
Kubernetes & AI - Beauty and the Beast !?! @KCD Istanbul 2024
 
JMeter webinar - integration with InfluxDB and Grafana
JMeter webinar - integration with InfluxDB and GrafanaJMeter webinar - integration with InfluxDB and Grafana
JMeter webinar - integration with InfluxDB and Grafana
 
Knowledge engineering: from people to machines and back
Knowledge engineering: from people to machines and backKnowledge engineering: from people to machines and back
Knowledge engineering: from people to machines and back
 
Unsubscribed: Combat Subscription Fatigue With a Membership Mentality by Head...
Unsubscribed: Combat Subscription Fatigue With a Membership Mentality by Head...Unsubscribed: Combat Subscription Fatigue With a Membership Mentality by Head...
Unsubscribed: Combat Subscription Fatigue With a Membership Mentality by Head...
 
To Graph or Not to Graph Knowledge Graph Architectures and LLMs
To Graph or Not to Graph Knowledge Graph Architectures and LLMsTo Graph or Not to Graph Knowledge Graph Architectures and LLMs
To Graph or Not to Graph Knowledge Graph Architectures and LLMs
 
Empowering NextGen Mobility via Large Action Model Infrastructure (LAMI): pav...
Empowering NextGen Mobility via Large Action Model Infrastructure (LAMI): pav...Empowering NextGen Mobility via Large Action Model Infrastructure (LAMI): pav...
Empowering NextGen Mobility via Large Action Model Infrastructure (LAMI): pav...
 
Powerful Start- the Key to Project Success, Barbara Laskowska
Powerful Start- the Key to Project Success, Barbara LaskowskaPowerful Start- the Key to Project Success, Barbara Laskowska
Powerful Start- the Key to Project Success, Barbara Laskowska
 
Free and Effective: Making Flows Publicly Accessible, Yumi Ibrahimzade
Free and Effective: Making Flows Publicly Accessible, Yumi IbrahimzadeFree and Effective: Making Flows Publicly Accessible, Yumi Ibrahimzade
Free and Effective: Making Flows Publicly Accessible, Yumi Ibrahimzade
 
How world-class product teams are winning in the AI era by CEO and Founder, P...
How world-class product teams are winning in the AI era by CEO and Founder, P...How world-class product teams are winning in the AI era by CEO and Founder, P...
How world-class product teams are winning in the AI era by CEO and Founder, P...
 
Designing Great Products: The Power of Design and Leadership by Chief Designe...
Designing Great Products: The Power of Design and Leadership by Chief Designe...Designing Great Products: The Power of Design and Leadership by Chief Designe...
Designing Great Products: The Power of Design and Leadership by Chief Designe...
 

Computer Security,Types of Hackers,Installation of Kali Linux, Common Keywords

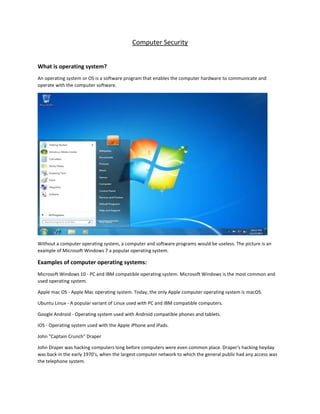
  • 1. Computer Security What is operating system? An operating system or OS is a software program that enables the computer hardware to communicate and operate with the computer software. Without a computer operating system, a computer and software programs would be useless. The picture is an example of Microsoft Windows 7 a popular operating system. Examples of computer operating systems: Microsoft Windows 10 - PC and IBM compatible operating system. Microsoft Windows is the most common and used operating system. Apple mac OS - Apple Mac operating system. Today, the only Apple computer operating system is macOS. Ubuntu Linux - A popular variant of Linux used with PC and IBM compatible computers. Google Android - Operating system used with Android compatible phones and tablets. iOS - Operating system used with the Apple iPhone and iPads. John "Captain Crunch" Draper John Draper was hacking computers long before computers were even common place. Draper's hacking heyday was back in the early 1970's, when the largest computer network to which the general public had any access was the telephone system.
  • 2. At the time, telephones were managed by an automated system using specific analogue frequencies which could be exploited to make free long distance or even international calls. It was called "Phreaking (the action of hacking into telecommunications systems, especially to obtain free calls," and one of the most well-known Phreaking tools was a toy whistle that came in a box of Cap'n Crunch cereal. With this whistle, Draper created another popular Phreaking tool known as the Blue Box, a device that could produce many other tones used by the phone companies. Some Top Hackers in the World 1. Kevin Mitnick Kevin, who is now a security consultant, was convicted of hacking Nokia, Motorola and Pentagon. Kevin David Mitnick. Once upon a time, the most wanted cyber-criminal of US, now is an affluent entrepreneur. He pleaded guilty to seven counts of fraud that included wire fraud, computer fraud and of illegally interception a wire communication. After five years of incarceration that included eight months of solitary confinement, Mitnick now has started afresh. However, his knack with the computers is still reminisced and was even depicted on celluloid in the films Takedown and Freedom Downtown.
  • 3. 2. Gary McKinnon Gary McKinnon must’ve been a curious, restless child, for to gain information on UFOs, he thought it better to get a direct access into the channels of NASA. He infiltrated 97 US military and NASA computers, by installing virus and deleting a few files. All the efforts to satisfy his curiosity, but, alas, curiosity killed the cat. It was soon found that McKinnon was guilty of having hacked the military and NASA websites from his girlfriend’s aunt’s house in London. While entering and deleting the files from these websites wasn’t enough, McKinnon thought of shaming the security forces by putting out a notice on the website that said, “Your security is crap.”
  • 4. 3. Adrian Lamo Adrian Lamo decided to switch careers when he realized the potentials of his skills. He became a news when he hacked into Yahoo!, Microsoft, Google, and The New York Times. This, although culminated into his arrest, it later helped him gain the batch of an American Threat Analyst. A guy who would hack into top-notch accounts sitting in the spacious and comforting cafeterias, libraries, internet cafes, soon turned WikiLeaks suspect Bradley Manning over to FBI. While Manning was arrested for leaking several hundred sensitive US government documents, Lamo went hiding or should we presume, undercover? 4. Mathew Bevan and Richard Pryce
  • 5. Targeting the over-sensitive nerves, what Mathew Bevan along with his alleged partner Richard Pryce did, could have triggered great many issues between USA and North Korea. The duo hacked the US military computers and used it as a means to infiltrate the foreign systems. The crucial contents of Korean Atomic Research Institute were dumped into USAF system. However, the contents were majorly relevant to South Korea and hence, less volatile. But this, nonetheless, could have led to a huge international issue 5. Jonathan James The first juvenile to be imprisoned for a cyber-crime at the age of 16, Jonathan James or better known as c0mrade, hacked into Defense Threat Reduction Agency of US department. Further, he installed a sniffer that scrutinized the messages passed on between the DTRA employees. Not only did he keep a check on the messages being passed around, in the process, he collected the passwords and usernames and other such vital details of the employees, and further even stole essential software. All this cost NASA to shut down its system and to pay from its pocket $41,000. c0mrade, however, had a bitter ending as James committed suicide in 2008.
  • 6. 6. Kevin Poulsen How far would you go to win your dream car or a dream house? How far will you go to win an online contest or a radio show contest? Perhaps, you shall keep trying your luck, unless you are Kevin Poulsen! Poulsen infiltrated a radio shows call-in contest just so he could win a Porsche. Dark Dante, as he was better known, went underground after FBI started pursuing him. He, later, was found guilty of seven counts of mail, wire and computer fraud, money laundering and the likes. What turned out to be rewarding in Dark Dante’s case is – his past crafted his future. Poulsen now serves as a Senior Editor at Wired.
  • 7. 7. LulzSec LulzSec or Lulz Security, a high profile, Black Hat hacker group, gained credentials for hacking into Sony, News International, CIA, FBI, Scotland Yard, and several noteworthy accounts. So notorious was the group that when it hacked into News Corporations account, they put across a false report of Rupert Murdoch having passed away. While the group claims to have retired from their vile duties, the motto of the group, “Laughing at your security since 2011!” stays alive. There are assertions of the group having hacked into the websites of the newspapers like The Times and The Sun to post its retirement news. Many, however, claim that this group had taken it upon itself to create awareness about the absence of efficient security against hackers.
  • 8. 8. Anonymous The concept of being a “digital Robin Hood” was far from being conceived, but in the computer age, it is very likely that someone somewhere has bagged this title. . A “hacktivist group” called Anonymous are known with the penname of being the “digital Robin Hood” amongst its supporters. Identified in public by wearing a Guy Fawkes Masks, Anons, as they are widely known, have publicized themselves by attacking the government, religious and corporate websites. The Vatican, the FBI, the CIA, PayPal, Sony, MasterCard, Visa, Chinese, Israeli, Tunisian, and Ugandan governments have been amongst their targets 9. Astra Astra, a Sanskrit word for weapon was the pet name of a hacker who dealt in the weapon stealing and selling. Authorities did not identify the hacker by name, 58-year-old Greek Mathematician hacked into the systems of France’s Dassault Group, stole vulnerable weapons technology data and sold it to different countries for five long years. While the real identity of the ASTRA remains untraced, officials have said that he had been wanted since 2002. Astra sold the data to approximately 250 people from around the globe, which cost Dassault $360 millions of damage.
  • 9. 10. Albert Gonzalez How safe is internet banking? When we browse through the profile of this mastermind, we are certain that one ought to use the World Wide Web with immense care For two long years, Albert Gonzalez, stole from credit cards of the netizens. This was recorded to be the biggest credit card theft in the history of mankind. He resold approximately 170 million credit cards and ATM numbers. He did so by installing a sniffer and sniffing out the computer data from internal corporate networks. When arrested, Gonzalez was sentenced to 20 years in Federal prison. Introduction:
  • 10. Computer security, also known as cyber security or IT security, is the protection of computer systems from the theft and damage to their hardware, software or information, as well as from disruption or misdirection of the services they provide. The protection of data, networks and computing power. The protection of data (information security) is the most important. The protection of networks is the network from being used for illegal purposes. Computer security can be defined as controls that are put in place to provide confidentiality, integrity, and availability for all components of computer systems. These components include data, software, hardware, and firmware. White Hat – Also known as ethical hackers, White Hat hackers are the good guys of the hacker world. They’ll help you remove a virus or Pen Test a company. Most White Hat hackers hold a college degree in IT security or computer science and must be certified to pursue a career in hacking. Black Hat – Also known as crackers, these are the men and women you hear about in the news. They find banks or other companies with weak security and steal money or credit card information. The surprising truth about their methods of attack is that they often use common hacking practices they learned early on. Gray Hat – Nothing is ever just black or white; the same is true in the world of hacking. Gray Hat hackers don’t steal money or information (although, sometimes they deface a website or two), yet they don’t help people for good (but, they could if they wanted to). Script Kiddie – Script Kiddies normally don’t care about hacking. They copy code and use it for a virus or a SQLi or something else. Suicide Hacker - Suicide hackers are those who hack for some purpose and even don’t bother to suffer long term jail due to their activities. Suicide hacker can be bad as well as good. Suicide Hacker will stop at nothing and will ignore consequences. Hacktivist - A hacktivist is kind of hacker who thinks hacking can bring out some social changes and hacks government and organizations to show his discomfort over some trivial issues. Hacktivism is the subversive use of computers and computer networks to promote a packing-training political agenda. With roots in hacker culture and hacker ethics, its ends are often related to the free speech, human rights, or freedom of information movements. Common keywords Security bug: A security bug or security defect is a software bug that can be exploited to gain unauthorized access or privileges on a computer system. Vulnerabilities: A vulnerability is a security weakness in a software program that puts the program or computer at risk of malicious programs and users. For example, an Internet browser could have a vulnerability that crashes the browser or allow someone to read or copy files on your computer when you visit a web page with malicious code. Exploit: An exploit is a piece of software a chunk of data, or a sequence of commands that takes advantage of a bug or vulnerability to cause unintended or unanticipated behavior to occur on computer software, hardware, or something electronic. Threat: In computer security a threat is a possible danger that might exploit a vulnerability to breach security and therefore cause possible harm. Privilege: In computing, privilege is defined as the delegation of authority over a computer system. A privilege allows a user to perform an action.
  • 11. Authentication: Authentication is the process of verifying who you are. When you log on to a PC with a user name and password you are authenticating. Authorization: Authorization is the process of verifying that you have access to something. Gaining access to a resource (e.g. directory on a hard disk) because the permissions configured on it allow you access is authorization. Command: A command is a specific instruction given to a computer application to perform some kind of task or function. Query: A query is a request for information from a database. for example, each time you search for something using a search engine, you perform a search query. When you press Enter, the keywords are sent to the search engine and are processed using an algorithm that retrieves related results from the search index. Another common type of query is a database query Gui: A graphical user interface (GUI) is a human-computer interface (i.e., a way for humans to interact with computers) that uses windows, icons and menus and which can be manipulated by a mouse (and often to a limited extent by a keyboard as well). Cli: A CLI (command line interface) is a user interface to a computer's operating system or an application in which the user responds to a visual prompt by typing in a command on a specified line, receives a response back from the system, and then enters another command, and so forth. System files: A system file in computers is a critical computer file without which a computer system may not operate correctly. These files may come as part of the operating system, a third-party device driver or other sources Bug bounty: A bug bounty program is a deal offered by many websites and software developers by which individuals can receive recognition and compensation for reporting bugs, especially those pertaining to exploits and vulnerabilities. We can find of the programs in the following websites: www.hackerone.com www.bugcrowd.com www.vulnerability-lab.com www.cobalt.io File attributes File attribute are settings associated with computer files that grant or deny certain rights to how a user or the operating system can access that file. For example, IBM compatible computers running MS-DOS or Microsoft Windows have capabilities of having read, archive, system, and hidden attributes. Read-only - Allows a file to be read, but nothing can be written to the file or changed. Archive - Tells Windows Backup to back up the file. System - System file. Hidden - File will not be shown when doing a regular dir. from DOS File Hiding Techniques in Windows Operating system: Step 1: Go into the folder properties by right clicking on it.
  • 12. Step 2: Click on hidden checkbox, click on apply and ok Step 3: Your folder is hidden now
  • 13. Step 4: Click on view hidden item and uncheck it to see the hidden folder you want to view To hide a specific file with the help of cmd: Step 1: Create a file which we want to hide:
  • 14. Step 2: Click on start and search for command prompt or else press start + r and type cmd press enter Step 3: Type attrib +h +s (filename) in cmd
  • 15. Similarly, to unhide the file using Attrib command; type: Attrib: -h -s secret.txt Free Anvi File Locker Tool Anvi Folder Locker is a free security tool that has been developed to help you manage and protect your important files. With Anvi Folder Locker, you can lock your personal files to protect your privacy, set passwords to files so other users will have no access to them. Installation and use: Step 1: Download the tool from - https://filehippo.com/download_anvi_folder_locker_free/ and double click on setup file
  • 16. Step 2: Click on next to continue
  • 17. Step 3: In the Final Step uncheck the change log checkbox and click on finish Step no 4: At the first time it will ask you to set the master password and email if you forget the password
  • 18. Step no 5: Click on add button to add the folder
  • 19. Step no 6: Browse and select the particular folder from the file explorer Step no 7: Check the box from which on left side of the path to perform the action. Step no 8: Select the options to perform on the particular folder
  • 20. Installing in VMware Step 1 – Download Kali Linux ISO image To install the Kali Linux, we will have to first get the installer ISO image file. We can get newer version of it by visiting the official download page. Please download the 64 bit or 32-bit image depending on the system you have. Don’t get confused by the many options available such as Kali Linux 64-bit Mate or Kali Linux 64 bit Xfce. They are all the same except for the desktop environment.
  • 21. Step 2 – Locate the downloaded file We can find the downloaded image file in the downloads folder, if we have not changed the default settings. The filename would be something like kali-linux-2016.2-amd64.iso. If we have downloaded through torrent, the ISO file will be downloaded in a folder, folder name would be something like kali-linux-2016.2-amd64. Step 3 – Open VMware Workstation 12 Let’s start the installation process. Open VMware Workstation Step 4 – Launch VMware Workstation New Virtual Machine installation wizard. We can launch this by clicking Create New Virtual Machine button on the home screen or go to menu File -> New Virtual Machine. The keyboard shortcut is Ctrl + N on Windows. VMware workstation supports tab view, which is, all the virtual machines running or stopped will show up in its own tab until we close them by clicking X on the tab itself. It’s the same as we see in the browsers where webpages open in separate tabs rather than separate windows. In software development terms, this is commonly referred to as the tabbed interface.
  • 22. Step 5- Welcome to the new Virtual Machine Wizard dialog box appears. This is where we get a chance to select the way virtual machine will be created. Typical is predefined or mostly the defaults. Custom is where you get to set advanced options such as compatibility with older Virtual Machines, SCSI controller type, etc. We will go with the default options. Select Typical and click next. Step 6- Select installation media or source In this dialog box we will have to browse to the downloaded ISO file and click next. Generally, VMware Workstation detects the OS automatically and initiates what they call as the Easy Install. But in the case of Kali Linux this is not the case and we will see a warning (yellow triangle). Please ignore that and click next to continue.
  • 23. Step 7- Select Guest Operating System In this dialog box, we will be asked to select the Guest Operating System. Select Guest operating system as Linux and Version as Delian 7.x 64-bit or 32 bit depending on your system. Please do not select Debian 8. In Debian 8. Step 8- Select Guest Operating System In this dialog box, we will be asked to provide the name of the virtual machine. We can provide any name you like. We can also change the location of the virtual machine. By default, is place in the Documents/Virtual Machine folder. Leaving it as the default is also fine.
  • 24. Step 9- Specify disk capacity This is the default option. Say if you specify 60 GB, all of 60 GB will not be utilized or say 60 GB will not be blocked at once. These Virtual Disks expand according to the usage with a Maximum size you specified as the disk capacity. On a fresh install normally it takes 10 GB of space which will grow according to the software’s we install in the VM. Step 10- Ready to create Virtual Machine Dialog Box This is the final dialog box and what we can see is all the options you have selected in previous dialog boxes. We will also see Memory, Network Adapter and Other Devices. They are the defaults. If we wish to change them, click on Customize Hardware. We can leave them as defaults for now, they can be changed later on also once the Virtual Machine is created.
  • 25. Step 11 – Power on Virtual Machine Step 12 – Select Graphical Install from Boot Menu Here we can see many options. Select Graphical Install using the down arrow key and click continue.
  • 26. Step 13 – Select a Language In this dialog box you will be asked to select a language. Please select a language and continue. This option sets our language in the Kali Linux Operating system. Default is English.
  • 27. Step 14 – Configure the Keyboard In this dialog box we will be asked to select the keyboard layout. Please select a Keyboard layout using the arrow keys and click continue. This option sets your Keyboard in the Kali Linux Operating system. By default, it is set to American English.
  • 28. Step 15 – Configure the Network – Enter hostname In this dialog box you will be asked to enter the hostname for our system. This being a home network, we can set anything. Enter any anything and click continue.
  • 29. Step 16 – Configure the Network – Enter domain name In this dialog box we will be asked to enter the domain name for your system. This being a home network, we can set anything like example.com
  • 30. Step 17 – Set password for User root In this dialog box we will be asked to enter the password for the root user account. Please enter a password of your choice and click continue.
  • 31. Step 18 – Enter Username for your account In this dialog box we will be asked to enter the username for the account. Please enter a username of your choice and click continue.
  • 32. Step 19 – Enter Password for our user account In this dialog box we will be asked to enter the password for the user account you created in the last step. Please enter a password of our choice and click continue.
  • 33. Step 20 – Configure Clock In this dialog box we will be asked to time zone based on the location you selected earlier. Please enter a time zone of your choice and click continue.
  • 34. Step 21 – Partition Disk In this dialog box we kali Linux asked how we would like to partition our disk. Select Guided – Use entire disk and click continue. This is the default option.
  • 35. Step 22 – Partition Disk In this dialog box we kali Linux asked how we would like to partition our disk. Select Guided – Use entire disk and click continue. This is the default option.
  • 36. Step 22 – Select disk to partition In this dialog box we will be asked to select a disk to partition. Select sda, VMware Virtual disk. There should be only one option. Click Continue.
  • 37. Step 23 – Select partition scheme In this dialog box you are asked to select a scheme for disk partition. Select the default, all files in one partition and click Continue.
  • 38. Step 24 Disk partition Overview In this dialog box we can see the summary of your disk partition. Select the Finish Partitioning and Write changes to disk which should be selected by default. All we have to do is to click continue.
  • 39. Step 25 – Disk partition Confirmation In this dialog we will be asked to confirm Write changes to disk. Select yes and click continue.
  • 40. Step 26 – Installation starts Now the actual installation starts. Wait for Configure the Package Manager Dialog box to appear. Step 27 – Configure the package manager In this dialog box we will have been asking if we wish to configure network mirror for Package manager. Choose yes and continue. You can skip this by selecting NO. But the default option yes is better.
  • 41. Step 28 – Configure the package manager – HTTP Proxy In this dialog box we will be asking if we wish to HTTP proxy. Leave it blank and click continue.
  • 42. In this dialog box we will be asked if we would like to install the GRUB boot loader. Select yes and click Continue.
  • 43. Step 30 – Select device for GRUB boot loader Installation In this dialog box we will be asked to select boot loader device for GRUB installation. Select /dev/sda and click Continue.
  • 44. Step 31 – Select device for GRUB boot loader Installation In this dialog box we will be asked to select boot loader device for GRUB installation. Select /dev/sda and click Continue.
  • 45. Step 32 – Installation Complete Now we can see Installation complete dialog box. Click continue to finalize the installation and wait for the VM to reboot. After reboot we will see the login screen. Login with our username or root user and provide our password. We will then see the Kali Linux desktop.
  • 46.
  • 47. Step 33 – Switching to Full screen mode After login, if we want to switch to full screen mode, we won’t be able to. What we can see is the resolution of 800×600 which is the default resolution. This is because, VMware tools are not installed. Please follow the below steps to install VMware tools. After the installation and reboot, we will be able to see the desktop with resolution same as your computer.
  • 48. Step 34 – Install VMware Tools To install the VMware tools, follow the below steps. If you don’t have internet connection, you can install VMware tools directly from the VM. If you have internet connection, follow the next instruction which is easier. Go to VM-> Install VMware Tools 2. You will see VMware tools Icon on the desktop. If you don’t, then Places->VMware Tools. Double click to open. 3. Copy the file with the file name something like this VMware-tools….tar.gz to the desktop. 4. Right click on this file on the desktop and click Extract here. You will see that the file is extracted to the folder VMware-tools-distrib. 5. Open terminal by going to System Tools -> terminal 6. Go to the folder VMware-tools-distrib on desktop by entering the command cd /Desktop/VMware-tools-distrib 7. Now run this command: Sudo ./vmware-install.pl -d 8. Enter your password and press Enter. You will be asked if you want to proceed with the legacy installer. Enter Y and press Enter.
  • 49. 9. Now you will be asked series of questions, just accept the default by pressing Enter for all and wait for the installation to complete. 10. Wait for the installation to complete. You will see more prompts, except the defaults by clicking enter. Once completed, restart your VM by going to VM->Power->Restart Guest 11. Once the system restarts, you will be prompted to login. Once your login, you can see the desktop in full screen mode which stretches up to the complete screen. If you have internet connection, try this 1. Open Terminal 2. Execute the command Sudo apt-get install open-vm-tools-desktop fuse 3. Enter your password 4. Wait for the process to complete and restart. You are done. Login and now you will see the desktop in full screen mode You can check the version of installed VMware Tools. In terminal, execute the command VMware-toolbox-cmd -v . This will show you the version number. Process Complete Dual boot A dual boot system is a computer system in which two operating systems are installed on the same hard drive, allowing either operating system to be loaded and given control.
  • 50. When you turn the computer on, a boot manager program displays a menu, allowing you to choose the operating system you wish to use. Before starting this tutorial first checkout materials required: 8GB Pen drive (Minimum) At least Dual-Core (either intel or AMD) with minimum 1GB of RAM Windows 10 or any other version of Windows (Already Installed) Kali Linux iso Rufus Step 1: First download Kali Linux latest version ISO file from the above provided link. Download either 32 bit or 64 bit, that’s your choice. Step 2 : After downloading Kali Linux the next step is the creation of a bootable USB. For that we need Rufus – a utility that helps format and create bootable USB flash drives. So download it from above link and install. Step 3: Let’s start making a bootable USB. First connect your USB drive. As already said we need minimum 8GB memory pen drive. Run Rufus and follow steps to create a bootable USB. Step 4: Now you get a screen like below image.
  • 51. Step 5: First check your USB drive is selected. Then click small CD drive icon below (2) and locate Kali Linux iso file that you downloaded from Kali official website. And finally click “Start” and wait for process to complete. • Step 6: After process completion you can see a close button to exit from the rufu window, click on it and yes, here is your Kali Linux bootable USB drive. Other than installing Kali Linux with Windows, you can also use this USB to live boot Kali – means run Kali without installing it (but limited some functions). Step 7: Next we are going to create a separate partition for Kali Linux installation. So open your Disk Management settings in Windows or Run” diskmgmt.msc” command.
  • 52. Create a new partition of size about 15 – 20GB minimum by shrinking any existing volume. Here we created a new partition of size 17GB. Step 8: Initial process all done. Downloaded Kali Linux ISO, created bootable USB drive and created a separate partition for Kali Linux installation. Before going on keep in mind always Disable Secure Boot and Fast Boot option in BIOS. Now Restart your PC/Laptop and go to boot manger and select the option boot as USB. [Options will be different for different brands]. Just boot it as USB.Now you will see the installation window of Kali Linux. There are different options to install Kali Linux. Here choose” Graphical Install” and follow all the above steps till Partition disk Choose partitioning method in the next page as” Manual” and hit” Continue “. Step 9: Initial process all done. Downloaded Kali Linux ISO, created bootable USB drive and created a separate partition for Kali Linux installation. Before going on keep in mind always Disable Secure Boot and Fast Boot option in BIOS. Now Restart your PC/Laptop and go to boot manger and select the option boot as USB. [Options will be different for different brands]. Just boot it as USB.Now you will see the installation window of Kali Linux. There are different options to install Kali Linux. Here choose” Graphical Install” and follow all the above steps till Partition disk
  • 53. Choose partitioning method in the next page as” Manual” and hit” Continue “. Step -10 This step has to be done carefully. Only select the partition that we created for Kali installation and press” Continue “. Step -11 Now you can see that space we allocated for Kali installation is now named as” FREE SPACE “. Choose it and” Continue “.
  • 54. Step -12 In this step it will ask us where to do the partition. Choose the option” Automatically partition the free space” and” Continue” the process. Step -13 In this step you will be asked the partition scheme just select All files in one partition and click “continue”
  • 55. Step -14 Finally select the option” Finish Partitioning and Write Changes to Disk” and” Continue “. Step -15 In this step it will ask permission to write changes in disk. Choose” Yes” and” Continue “. Kali is installing and this might take from 10 to 15 minutes to complete.
  • 56. Step-16 In the middle of installation, it will ask for network mirroring, choose” Yes” or” No “. We recommended you to choose “No”.
  • 57. Step -17 Next in this page you have to select where to install boot loader. Choose your hard disk which is the second option.
  • 58. Select 2nd option which says /dev/sda
  • 59. Step -18 After successful completion of installation process, a page similar to the one seen below appears. Click” continue
  • 60. Step -19 You have completed all the necessary steps. Now just Restart your PC/Laptop and remove the USB drive. During Startup you can see the GRUB Loader of Kali Linux v2.0. Here choose” Kali GNU/Linux” to boot your PC/Laptop with the new Kali Linux or else choose” Windows Recovery Environment” to start as Windows 10.
  • 61. Live: For Using Kali Linux Live, Choose live option from the menu: