More Related Content
Similar to Cloud Computing With Amazon Web Services, Part 3: Servers on Demand With EC2
Similar to Cloud Computing With Amazon Web Services, Part 3: Servers on Demand With EC2 (20)
More from white paper (20)
Cloud Computing With Amazon Web Services, Part 3: Servers on Demand With EC2
- 1. Cloud computing with Amazon Web Services, Part
3: Servers on demand with EC2
Skill Level: Introductory
Prabhakar Chaganti (prabhakar@ylastic.com)
CTO
Ylastic, LLC.
14 Oct 2008
In this series, learn about cloud computing using Amazon Web Services. Explore
how the services provide a compelling alternative for architecting and building
scalable, reliable applications. This article introduces you to the virtual servers
provided by Amazon Elastic Compute Cloud (EC2). Learn how EC2 can help you
configure your applications' computing requirements on the fly and adust capacity
based on demand.
Amazon EC2
Amazon Elastic Compute Cloud (EC2) is the base platform for the cloud computing
environment provided by Amazon. EC2 makes it simple to create, launch, and
provision virtual instances—at any time—for your personal or business needs. You
pay for these instances based upon the type of instance and your actual hourly
usage. The virtual servers run inside the secure environment of Amazon’s own data
centers.
EC2 can give your Web-scale applications the ability to:
• Configure their computing requirements on the fly.
• Adjust capacity based upon demand.
What an invaluable proposition in today’s Web-driven world, where traffic can spike
to tsunami levels if your site is mentioned on the Yahoo front page—and an hour
later drop off the cliff. You can now ramp your capacity up and down in an elastic
fashion. Some of the most valuable features provided by this new model of elastic
Servers on demand with EC2
© Copyright IBM Corporation 1994, 2008. All rights reserved. Page 1 of 22
- 2. developerWorks® ibm.com/developerWorks
computing are:
Reliability
EC2 is designed to easily provision instances and then destroy them when
they're no longer needed.
Simplicity
Built on simple concepts, EC2 provides great flexibility for you to architect your
systems. Amazon provides all the building blocks you need; you can combine
them in different ways that match your application use cases.
Security
EC2 is designed to provide a high level of security. The instances all run inside
Amazon’s secure data centers, with the ability to configure firewall rules to
restrict all access to groups trusted by you.
Resilience
You can build resilience into your applications by placing your instances in
different geographical locations, and by using persistent storage volumes
whose life cycle is independent from a more ephemeral instance.
Low cost
EC2 service is charged at rates that make it a very economical and compelling
alternative for all your server needs.
The framework
This section explores the concepts that underpin the EC2 framework.
Amazon Machine Images
Amazon Machine Images (AMIs) are packaged server environments, based on
Linux®, that can run any software or application that you want. They are the heart of
the elastic computing environment provided by EC2. The current release of EC2
supports AMIs that are based on Linux, though there is also some initial support for
using OpenSolaris as the operating system in the EC2 environment.
There are three different kinds of machine images:
Private
Public
Paid
Amazon provides several command line tools that make it easy to create and
Servers on demand with EC2
Page 2 of 22 © Copyright IBM Corporation 1994, 2008. All rights reserved.
- 3. ibm.com/developerWorks developerWorks®
manage machine images. The images themselves are stored on Amazon Simple
Storage Service (S3). Upon registering the image with EC2, a unique ID is assigned
to the image, which can be used for identifying it and launching an instance from it.
There are several different ways for you to create your own image. You can use an
existing public image as the basis for your own images, and use the following
workflow to create a new AMI:
1. Launch an instance from the existing AMI with your secure socket shell
(SSH) keypair.
2. SSH into the instance.
3. Customize the instance as you like.
4. Rebundle the running instance into a new AMI by using Amazon’s tools.
5. Upload the bundle to S3 for storage using Amazon’s tools.
6. Register this new image with EC2 using Amazon’s tools.
7. Launch a new instance from this new image, and repeat the
customization and rebundling until you are satisfied.
Another option is to create a new AMI using one of the publicly available scripts from
the EC2 community. The scripts let you create an AMI from scratch. Some of the
most popular scripts are:
• Ubuntu and Debian based AMI creation scripts provided by Eric
Hammond.
You can either use the prebuilt images from his site, or create one from
scratch with the scripts.
• If you're looking for images that can serve as the base for Ruby on Rails
applications, Paul Dowman provides a script that can create an Ubuntu
based image for running rails applications on EC2.
• RightScale provides both Ubuntu and CentOS based scripts for creating
your images from scratch.
Instances
Instances are the running virtual instances that use an AMI as a template. You can
launch an instance, view details about the instance, and terminate it using the tools
provided by Amazon. You can also use a variety of third-party libraries in different
languages to control the life cycle of the instances.
Servers on demand with EC2
© Copyright IBM Corporation 1994, 2008. All rights reserved. Page 3 of 22
- 4. developerWorks® ibm.com/developerWorks
The instances can be based on either 32-bit or 64-bit platforms and can be one of
the following types. Amazon also rates each instance type in terms of EC2 compute
units. Each EC2 compute unit (ECU) provides the equivalent processor capacity of a
1.0-1.2 GHz 2007 Opteron or 2007 Intel® Xeon™ processor. Pricing has details for
each instance type.
Small instance (m1.small)
1.7GB memory, 1 EC2 compute unit (1 virtual core with 1 EC2 compute unit),
160GB instance storage, 32-bit platform, moderate I/O performance
Large instance (m1.large)
7.5GB memory, 4 EC2 compute units (2 virtual cores, each with 2 EC2
compute units), 850GB instance storage, 64-bit platform, high I/O performance
Extra large instance (m1.xlarge)
15GB memory, 8 EC2 compute units (4 virtual cores, each with 2 EC2 compute
units), 1690GB instance storage, 64-bit platform, high I/O performance
Medium instance (c1.medium)
1.7GB memory, 5 EC2 compute units (2 virtual cores with 2.5 EC2 compute
units), 350GB instance storage, 32-bit platform, moderate I/O performance
Extra large instance (c1.xlarge)
7GB memory, 20 EC2 compute units (8 virtual cores, each with 2.5 EC2
compute units), 1690GB instance storage, 64-bit platform, high I/O
performance
Because the instances are charged based on the actual time they're used, you can
easily ramp your computation needs up or down based on the current load for your
application. You don't need to reserve a lot of compute capacity in advance.
Security groups
Any and all instances launched within the EC2 environment run inside a security
group. Each security group defines the firewall rules that specify the access
restrictions for instances that run within that group. You can grant or restrict access
by IP address or classless interdomain routing (CIDR) rules, which let you specify a
port range and transport protocol. You can also control access to specified security
groups, so any instances that are running within those security access groups will
automatically be granted or denied access to your instance.
Security keypairs
Security keypairs are public/private SSH keypairs that are specified when launching
an instance. They are needed to actually log in to the console of one of your
launched instances. EC2 will add the public part of the keypair to the launched
instance, and you can then use the private key to ssh into it.
Servers on demand with EC2
Page 4 of 22 © Copyright IBM Corporation 1994, 2008. All rights reserved.
- 5. ibm.com/developerWorks developerWorks®
Security keypairs are different from your Amazon Web Services access key ID and
security key (available from your account information page), which are used for
uniquely identifying you as the user making the requests to Amazon Web Services
using the API. The security keypairs are mainly for enabling users to securely log in
to instances without requiring the use of passwords.
Availability zones
EC2 is made up of multiple data centers in separate geographical locations to
provide failure resiliency. You can place the instances that you launch in different
locations. The locations are geographical regions with availability zones within them.
The current release of EC2 provides access to a single region in the eastern United
States with three different availability zones within it. Each availability zone within a
region is engineered by Amazon to be insulated from failures in other availability
zones.
You can protect your applications from the failure of a single location by launching
instances in separate availability zones. If you do not specify an availability zone
when launching an instance, Amazon will automatically choose one for you based
on the current system health and capacity.
Elastic IP addresses
Each instance is automatically assigned a private and a public IP address on launch
by EC2. The public IP address can, of course, be used to access the instance over
the Internet. Each time you launch an instance, though, this address will change. If
you are using any kind of dynamic DNS mapping for connecting a DNS name to the
IP address, it can take as long as 24 hours before the change is propagated across
the Internet. EC2 introduced the concept of an elastic IP address to alleviate this
problem. Each elastic IP address is a static IP address that is associated with your
EC2 account, not to a specific instance, and is permanently associated with your
account unless you explicitly release it back to EC2.
You can also remap an elastic IP address among instances, and thus quickly
respond to any instance failures by just starting another instance and remapping it
(or using an existing instance). At any given time, you can only have a single
instance mapped to an elastic IP address.
Elastic Block Store (EBS)
EBS is a new form of persistent storage created by Amazon that lets you create
volumes that can be attached as block-level devices to a running instance. You can
also create snapshots from these volumes, and later recreate a volume from the
snapshot. Each snapshot represents the state of a volume at a specific point in time.
You can thus easily store files and data that need to persist beyond the lifetime of an
instance on an EBS volume, and then easily attach and reattach that volume to any
Servers on demand with EC2
© Copyright IBM Corporation 1994, 2008. All rights reserved. Page 5 of 22
- 6. developerWorks® ibm.com/developerWorks
instance you want.
The one caveat is that each EBS volume can only be attached to one instance at a
time. However, you can attach as many different volumes to a single instance as you
want. Each EBS volume is associated and located in an availability zone. The
instance to which the volume is being attached must be in the same availability
zone. There is an account limit of 20 EBS volumes, but you can request that
Amazon Web Services increase the limit if you need to use more volumes.
Pricing
The charges for EC2 are calculated based on four criteria:
• The type of instance used. There are two standard types of instances,
each with a varying number of cores, memory, storage, and architecture.
Standard
Normal instances that can be used for most applications.
High-CPU
Instances that are more suitable for applications that require a lot of processor
power and are computation intensive.
Table 1 shows example pricing for small to large instance types.
Table 1. Pricing for instance type
Type Details Cost
Standard small 1.7GB of memory, $0.10 per
1 EC2 compute instance-hour
unit, 160GB of
storage, 32-bit
platform
Standard large 7.5GB of memory, $0.40 per
4 EC2 compute instance-hour
units, 850GB of
storage, 64-bit
platform
Standard extra 15GB of memory, 8 $0.80 per
large EC2 compute units, instance-hour
1690GB of storage,
64-bit platform
High-CPU medium 1.7GB of memory, $0.20 per
5 EC2 compute instance-hour
units, 35GB of
storage, 32-bit
platform
Servers on demand with EC2
Page 6 of 22 © Copyright IBM Corporation 1994, 2008. All rights reserved.
- 7. ibm.com/developerWorks developerWorks®
High-CPU extra 7GB of memory, 20 $0.80 per
large EC2 compute units, instance-hour
1690GB of storage,
32-bit platform
• The amount of data or bandwidth transferred to and from EC2. There is
no charge for data transferred between EC2, SimpleDB, and S3 buckets
located in the United States. Data transferred between EC2 and
European S3 buckets is charged at the standard data transfer rates.
Table 2. Pricing for data transfer
Type of transfer Cost
Internet data transfer $0.100 per GB - all data transfer in
$0.170 per GB - first 10TB / month
data transfer out
$0.130 per GB - next 40TB / month
data transfer out
$0.110 per GB - next 100TB / month
data transfer out
$0.100 per GB - data transfer out /
month over 150TB
Availability data zone transfer $0.00 per GB - all data transfer
between instances in the same data
zone
$0.01 per GB - all data transfer
between instances in different data
zones in the same region
Public and elastic IP data transfer $0.01 per GB - all data transfer
in/out
Private IP data transfer $0.00 per GB - all data transfer
in/out
• The storage used by the EBS volumes and snapshots.
Table 3. Pricing for EBS
Type Cost
EBS volumes $0.10 per GB-month
$0.10 per 1 million I/O requests
EBS snapshots $0.15 per GB-month
$0.01 per 1,000 PUT requests to
save snapshots
$0.01 per 10,000 GET requests to
load snapshots
Servers on demand with EC2
© Copyright IBM Corporation 1994, 2008. All rights reserved. Page 7 of 22
- 8. developerWorks® ibm.com/developerWorks
• The number of elastic IP addresses allocated to you that are unused.
Table 4. Pricing for elastic IP addresses
Type Cost
Elastic IP No cost for elastic IP addresses
while in use
$0.01 per nonattached elastic IP
address per complete hour
$0.00 per elastic IP address remap -
first 100 remaps / month
$0.10 per elastic IP address remap -
additional remap / month over 100
Check Amazon EC2 for the latest price information. You can also use the Amazon
Web Services Simple Monthly Calculator tool for calculating your monthly usage
costs for EC2 and the other Amazon Web Services.
Getting started with EC2
To start exploring EC2, you first need to create an Amazon Web Services account.
Part 2 of this series has detailed instructions for creating an Amazon Web Services
account. Once you have an account, you must enable Amazon EC2 service for your
account using the following steps.
1. Log in to your Amazon Web Services account.
2. Navigate to EC2.
3. Select Sign Up For This Web Service on the right side of the page.
4. Provide the requested information and complete the sign-up process.
All communication with any of the Amazon Web Services is through either the SOAP
interface or the query/REST interface. In this article you'll use the query/REST
interface to communicate with EC2. You will need to obtain your access keys, which
you can access from your Web Services Account information page by selecting
View Access Key Identifiers.
You are now set up to use Amazon Web Services and have enabled EC2 service for
your account.
Interacting with EC2
Servers on demand with EC2
Page 8 of 22 © Copyright IBM Corporation 1994, 2008. All rights reserved.
- 9. ibm.com/developerWorks developerWorks®
For this example, you will use both the command line tools provided by Amazon and
an open source third-party Ruby library named right_aws to interact with EC2.
Throughout this article you will:
• Set up a local EC2 development environment.
• Launch an existing AMI.
• Customize the AMI to install the right_aws library and other required
software.
• Rebundle the AMI, upload AMI to S3, and then register it.
• Launch the new customized AMI.
• Get familiar with the right_aws API by running small snippets of code in
a Ruby shell.
Set up a local EC2 development environment
The Amazon EC2 tools require that you have Java™, so be sure it is installed.
1. Download both the AMI management tools and the EC2 command line
tools.
2. Unzip the tools archives to the directory of your choice.
3. You need to set up some environment variables, and add the tools
directory to the shell path so you can actually find them when executing
from the command line. Listing 1 shows an example.
The commands below are specified for Linux. If you're using Microsoft®
Windows®, you can substitute the equivalent commands. You can
download the EC2 X.509 certificate and your EC2 private key file from
your account information page.
Listing 1. Set up the EC2 development environment
$ export EC2_HOME=path_to_the_directory_with_the_tools
$ export JAVA_HOME=path_to_the_directory_with_your_java_sdk
# Add the directory to your PATH
$ export PATH=$PATH:$EC2_HOME/bin
# Export variables with the paths to your private key file and X.509 certificate
$ export EC2_PRIVATE_KEY=path_to_your_private_key
$ export EC2_CERT=path_to_your_x509_certificate
4. Check to make sure everything is set up correctly by running the
Servers on demand with EC2
© Copyright IBM Corporation 1994, 2008. All rights reserved. Page 9 of 22
- 10. developerWorks® ibm.com/developerWorks
command shown below to list the version of your EC2 command line
tools.
Listing 2. Check the setup
$ ec2-ami-tools-version
1.3-20041 20071010
5. You need to create an SSH keypair to use for launching an instance and
then connecting to it at the command line shell. The following command in
Listing 3 creates a new keypair and subsequently prints the name of the
keypair, its fingerprint, and the private key data to the screen.
Listing 3. Create a new SSH keypair
$ ec2-add-keypair devworks
KEYPAIR devworks 29:d1:90:7b:3d:a4:99:52:41:e0:1f:21:d5:20:97:d3:f0:33:fd:76
-----BEGIN RSA PRIVATE KEY-----
MIIEowIBAAKCAQEAyxaeXt6nb+qzboVW/3ax7An8CUJjDqwNi/PZm4lGOAzOHGnuPlDXeh1GpJ9f
hky7Bg6VEY2VfS5G6UtmIzsGf/JlquzVl/x3uyriOzeCIw+m07aSgUOBn3qW/74IZxYYkxCYdBci
eZeKpr8Mpvuz2sfurRzQOkUeHyuEaiD1RRS7DGxxUXfpVYhGjPltfNW2xRSMLTaOZzRwRdS0cHUU
hC+GOKFDkp8nqQpd8iGUtp2G2DI1pxRN4MbeFZHWMh5tcIo1NTc7pkFPGEwrq6pO6gIsEOLqGpTL
+2AxJY5WToZQoTWieOVwLpjJU9fnufRs0Mt/M/TP6SGK/YkrQOprOwIDAQABAoIBAFj1UGvX9dnl
IbHAwInoUSlGelsH9GIB5XEvYFtr9xEoMsRpdk1flfNMjZwgn3Qxeh6+Fnf438lUkwUv3M6D1WYI
JJaJZUpM8ZlPwIcV2nBHM9k6+NOcYVQdG7VsZTvahusscssvMw+13KsLtpwSVwb3WsoDfAZ6LiaT
Jk5in20hTiipC0pz0K9DgQ//76r20ysUFpCymj4EvQrRkk5kBtsiMixsJzimpUOrSmrRHcORKEin
FKM6y/DFE33zhP8BNDQRaDLGni0Ip+/jP3EHmia41SSbnwzRcbXMfH5fL3KAyRsCE0ocHY+cjUng
HPYxl1ffdLZuEW3wJDQFuTS/v4ECgYEA9r7HVVnrS2303zclzCTGen/W/SVbpflSKEYJOZpa8RtQ
uFMOewfkTbBzfavLMVBYB8uAmcWIz5JAFSzlBaKDRCnouUeeDiDJVJd8Asbn1gCE8UVETUOthy50
R90RTtPNMmyP7AnoSMTuzsbwVORus7IJvceWHQBB4KCh652UansCgYEA0rSmvdquidkXf5iFpebc
6Wh/qy+L1dkgz7+HTZIMW7kxA4EfJFnqaQRPqJ5XYcLvk2IzxNQKJlZvtBhCfVYhPJ2uB2Yqxv0p
0LXGC01fZSyhbYGfaxVymA3HMc2ULBbaFMyhO7l7zkz+G+qkylych59zJBSoUxSFStpgNL7NhkEC
gYAPJIorLMeJ64eZo1LIgoFDx1C0XHSRbQmjuxiZ1mU6YsjDZyV+W2+hbPDJh5+CuUGNyOlthnfs
9TbFlenAPMb9iezkYgbLKyvv6xQLP5W+xm1iOTQF4d9mam1sc566TblMHOmAPONqg9t8CS16qEI6
+PQsF3GY+gkQ9gq54QPYvQKBgDgwjsrQd30xVI/lV7a/Uyg3gtxe6JaVuadNN0LbcMpBH64EkA58
oANzb97SoxDiEEuog4+40CAbKtzHH2wXPPPSROeaOkwolS8gWnkHICp19XKjf6Tp6k5cVkOUxC/h
xDSJwXGQ7FA+vgEp2NpSSjfssKLtk1ncfhNRGxjVzS9BAoGBALbBLS4Nbjs2Fco+okNQPNfJNSvW
yWV7a6ngfRzW8B+BO6V1QRIR44bwv/Z74oQ7ttt8KoZENB5yzZwaVWpFlOjSO/4Nx++Ef4pY5aPS
zNpXcXCZgUdA67qmOILvrG7bnDR60dcBZVBl7CjnpTlccg7MD4CBsFJx+hGRPD2yIV94
-----END RSA PRIVATE KEY-----
6. Save the part of the output beginning with -----BEGIN RSA PRIVATE
KEY----- to a local file. This will be the private key that you're going to
use for launching instances and for accessing them with SSH. Be sure
that you keep the file private and secure. If you launch an instance with
this key and then lose the key later, you will not be able to connect to your
instance using the shell anymore.
Name the key file pk-devworks and modify the permissions on the file
to make it more secure.
Listing 4. Change permissions for the private key
$ chmod 600 pk-devworks
Servers on demand with EC2
Page 10 of 22 © Copyright IBM Corporation 1994, 2008. All rights reserved.
- 11. ibm.com/developerWorks developerWorks®
You now have the development environment set up.
Launch the first instance
You're going to launch the first instance from one of the public images provided by
RightScale, which is based on CentOS. The AMI ID for this image is
ami-d8a347b1.
Listing 5. Launch an instance
$ ec2-run-instances –k devworks -n 1 ami-d8a347b1
RESERVATION r-2691404f 710193521658 default
INSTANCE i-7f923516 ami-d8a347b1 pending
devworks 0 m1.small 2008-09-07T18:05:34+0000
us-east-1c aki-9b00e5f2
A freshly launched instance is always in the pending state. This instance cannot
yet be addressed in any way, as it is still starting up. In this state you can view the
following details about this instance:
• Time launched: The time when this instance was launched, displayed in
UTC.
• Instance type: You did not specify the type of instance on launch, so EC2
automatically chose the default m1.small instance for us.
• Availability zone: You did not specify an availability zone on launch, so
EC2 selected one based on the current system health and availability.
• Kernel: The Linux kernel used by this instance is also displayed. You can
either specify this on launch, or the AMI can be preconfigured with one as
the default.
• Security group: The instance was placed in the default security group.
You can create your security groups, grant access permissions for them,
and then place the instance in those groups. You must specify the
security group on launch. You cannot change the group name once the
instance is launched, but you can change the grants for the group.
You can now list the instances that are running, and check their current state.
Listing 6. List instances
$ ec2-describe-instances
RESERVATION r-2691404f 710193521658 default
INSTANCE i-7f923516 ami-d8a347b1
ec2-67-202-28-68.compute-1.amazonaws.com
domU-12-31-38-00-34-C8.compute-1.internal running devworks 0
m1.small 2008-09-07T18:05:34+0000 us-east-1c aki-9b00e5f
Servers on demand with EC2
© Copyright IBM Corporation 1994, 2008. All rights reserved. Page 11 of 22
- 12. developerWorks® ibm.com/developerWorks
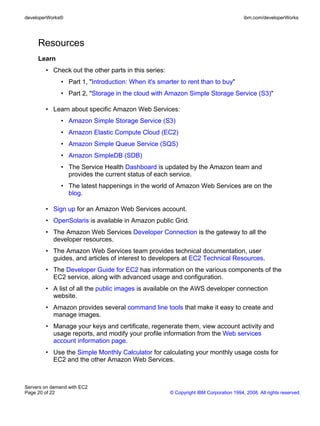
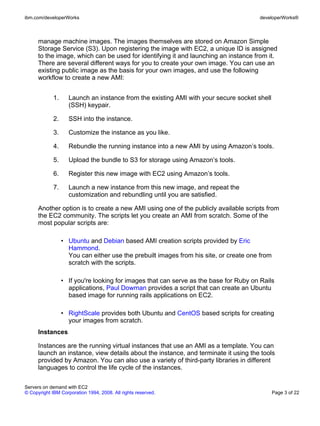
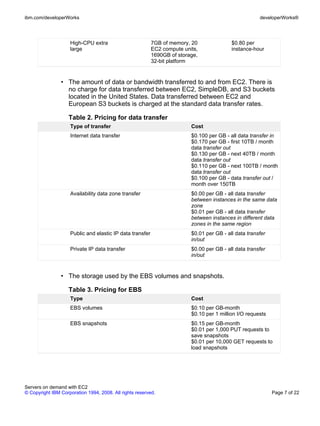
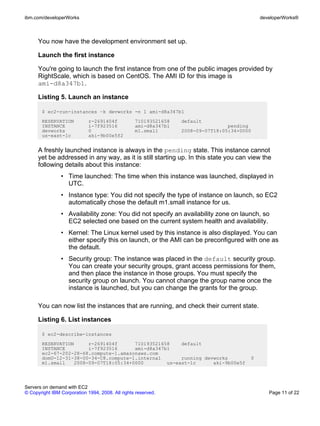
You can see that the instance is running, and more details about this instance, such
as:
• Public DNS Name: The DNS name that can be used to connect to this
instance across the Internet.
• Private DNS Name: The DNS name that is used to resolve this instance
within EC2’s local network within Amazon’s data center environment.
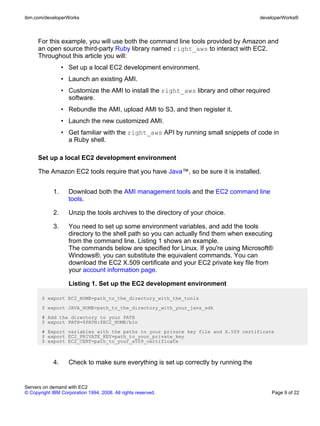
Connect to your first instance using SSH
You can now SSH into the instance using our private key and the public DNS name
for the instance.
Listing 7. SSH to the instance
$ ssh -i pk-devworks root@ec2-67-202-28-68.compute-1.amazonaws.com
The authenticity of host 'ec2-67-202-28-68.compute-1.amazonaws.com (10.252.59.54)'
can't be established.
RSA key fingerprint is ae:e5:00:54:75:65:1c:c5:44:53:72:b9:e0:b5:26:a9.
Are you sure you want to continue connecting (yes/no)? yes
Warning: Permanently added 'ec2-67-202-28-68.compute-1.amazonaws.com,10.252.59.54'
(RSA) to the
list of known hosts.
[root@domU-12-31-38-00-34-C8:~]
You might see an error message after you log in above, but you can safely ignore it.
The AMI runs some custom RightScale scripts after startup, which are missing.
Customize and rebundle the instance
The RightScale AMI is very comprehensive, and contains everything you need to
start using it as your base image. It already contains the EC2 command line tools
installed in the directory/home/ec2.
1. Add the security certificates. These are the same files used earlier in
Listing 1.
Listing 8. Copy your certificates to the instance
$ scp -i pk-devworks path_to_your_private_key_cert
root@ec2-67-202-28-68.compute-1.amazonaws.com:/home/ec2/
$ scp -i pk-devworks path_to_your_x509_cert
root@ec2-67-202-28-68.compute-1.amazonaws.com:/home/ec2/
Servers on demand with EC2
Page 12 of 22 © Copyright IBM Corporation 1994, 2008. All rights reserved.
- 13. ibm.com/developerWorks developerWorks®
2. Set up the environment variables so you can use this as your own private
EC2 image. Edit the file /etc/profile.d/env.sh and set up each of the
variables. The account number and access keys are available from Web
services account information, while the cert and private key are the files
that you copied to the instance in the step above.
Listing 9. Customize the instance environment
$ vim /etc/profile.d/env.sh
export EC2_HOME=/home/ec2
export EC2_CERT=
export EC2_PRIVATE_KEY=
export AWS_ACCOUNT_NUMBER=
export AWS_ACCESS_KEY_ID=
export AWS_SECRET_ACCESS_KEY=
export PATH=$PATH:/home/ec2/bin/
# Turn off the rightscripts so you don’t get the error on login.
$ chkconfig --level 4 rightscale off
# Change the login message
$ echo “Welcome to my devworks test EC2 image” > /etc/motd
3. This image already has Ruby installed, but you need to install the Ruby
libraries that will be used later in this article to interact with EC2. First
you'll update the installed gems, and then install right_aws gems and
any needed dependencies.
Listing 10. Install Ruby gems
$ gem update
$ gem install right_aws
4. You're ready to rebundle this instance, upload it to S3, and register it with
EC2. First, rebundle it under the name devworks-ec2, and ignore the
/mnt and /tmp folders. You must also specify the EC2 private key, EC2
security certificate, and the Amazon Web Services account number.
Listing 11. Rebundle the instance
$ ec2-bundle-vol -d /mnt -c /home/ec2/your_ec2_x509_cert
-k /home/ec2/your_ec2_private_key -u your_aws_account_number
-e /mnt,/tmp -s 10240 -r i386 -p devworks-ec2
5. The rebundling process will create a bunch of files in the /mnt directory,
once complete. You'll upload these files, which comprise the newly
created AMI, to S3. The image will be placed in the bucket that you
specify.
Servers on demand with EC2
© Copyright IBM Corporation 1994, 2008. All rights reserved. Page 13 of 22
- 14. developerWorks® ibm.com/developerWorks
Replace the –b parameter in the command below with the name of the
bucket where you want your image files stored in S3.
Listing 12. Upload image to S3
$ ec2-upload-bundle -b your_s3_bucket -m
/mnt/devworks-ec2.manifest.xml
-a your_aws_access_key -s your_aws_secret_key
6. Your AMI is now safely stored on S3. All that's left to do is to register it
with EC2 so you can get an ID for the AMI, which can be used to launch
this image later.
Listing 13. Register the image with EC2
$ ec2-register -K /home/ec2/your_ec2_private_key
-C /home/ec2/your_ec2_x509_cert
your_s3_bucket/devworks-ec2.manifest.xml
IMAGE ami-58c42031
7. Exit from the SSH session, and terminate the running instance.
Listing 14. Terminate our instance
$ ec2-terminate-instances i-7f923516
INSTANCE i-7f923516 running shutting-down
You'll launch a new instance from the freshly created AMI in the next section, and
use it in the rest of this article for exploring EC2 using the right_aws library.
Exploring EC2 with Ruby
RightScale provides a Ruby library, right_aws, which provides access to Amazon’s
EC2 service from Ruby. This battle-tested library is used by their own products, and
covers every facet of EC2, including the recently introduced EBS. The library is
packaged as a rubygem, along with the HTTP library right_http_connection, which
has robust retries and error handling. This article covers only some of the EC2
functions provided by this library. It is highly recommended that you review the
documentation provided with the library to get a comprehensive feel for the API.
Review the various configuration options for both the right_aws library and the
supporting right_http_connection library.
You'll use the Rightscale::Ec2 class, which provides the main interface for our
interaction with EC2. The medium of usage of this Ruby library will be the irb
Servers on demand with EC2
Page 14 of 22 © Copyright IBM Corporation 1994, 2008. All rights reserved.
- 15. ibm.com/developerWorks developerWorks®
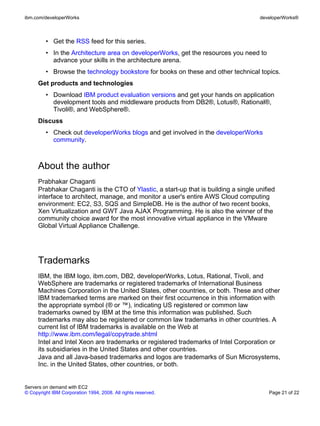
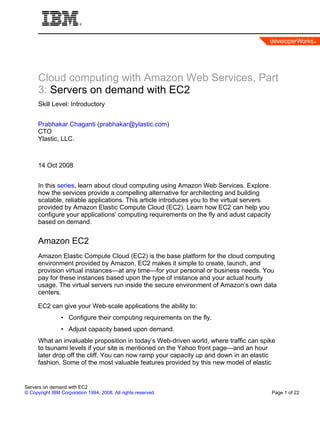
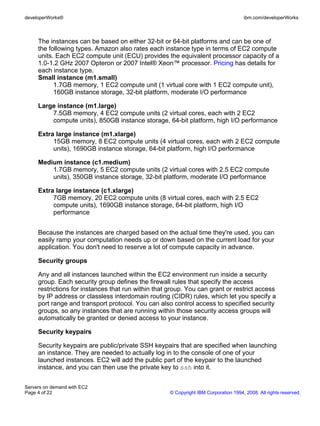
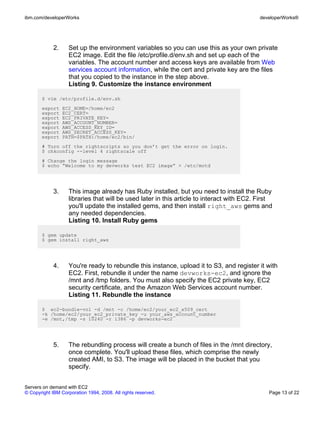
console. You will send messages to the Rightscale::Ec2 object, and examine
the responses returned by EC2 to the messages. This will help you become familiar
with the API while exploring the EC2 concepts.
1. Launch an instance from the new AMI.
Once the instance is in a running state, SSH into the instance. Then you'll
start using the irb console inside the instance.
Listing 15. Launch new instance and SSH into it
$ ec2-run-instances -k devworks -n 1 ami-58c42031
RESERVATION r-5795443e 710193521658 default
INSTANCE i-1a9e3973 ami-58c42031 pending devworks
0
m1.small 2008-09-07T21:06:37+0000 us-east-1c aki-9b00e5f2
$ ec2-describe-instances
RESERVATION r-949544fd 710193521658 default
INSTANCE i-5a9d3a33 ami-58c42031
ec2-75-101-208-95.compute-1.amazonaws.com
domU-12-31-38-00-78-04.compute-1.internal
running devworks 0 m1.small
2008-09-07T21:14:27+0000 us-east-1c aki-9b00e5f2
$ ssh -i pk-devworks root@ec2-75-101-208-95.compute-1.amazonaws.com
2. Start up the Ruby shell and create a Rightscale::Ec2 object.
Listing 16. Ruby shell and new Rightscale::Ec2 object
$ irb
irb(main):001:0> require 'rubygems'
=> true
irb(main):002:0> require 'right_aws'
=> true
irb(main):003:0> @ec2 = Rightscale::Ec2.new(
ENV['AWS_ACCESS_KEY_ID'], ENV['AWS_SECRET_ACCESS_KEY'])
You use this newly created variable @ec2 from this point on for exploring EC2. The
example is using the default configuration for this library. See the documentation for
the list of available configuration options.
1. Retrieving a list of your instances returns an array of hashes, with each
hash providing all of the relevant details for each instance. This is a
common pattern for the response format followed by almost all of the API
calls for this library. Listing 17 shows an example.
Listing 17. Describe your instances
Servers on demand with EC2
© Copyright IBM Corporation 1994, 2008. All rights reserved. Page 15 of 22
- 16. developerWorks® ibm.com/developerWorks
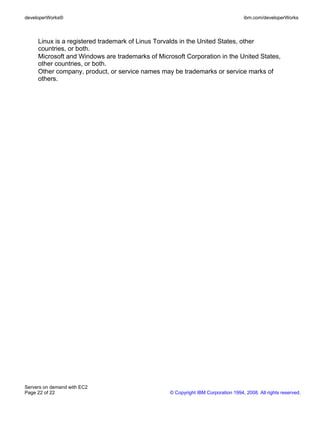
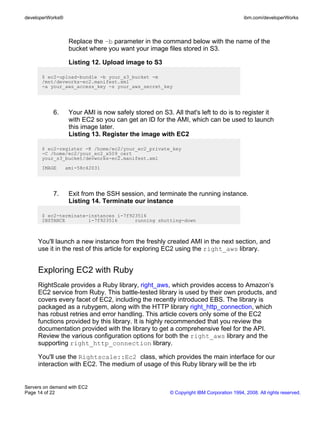
irb(main):004:0> @ec2.describe_instances()
=> [{:aws_launch_time=>"2008-09-07T21:14:27.000Z", :aws_kernel_id=>"aki-9b00e5f2",
:ssh_key_name=>"devworks", :aws_reservation_id=>"r-949544fd",
:aws_availability_zone=>"us-east-1c",
:aws_state=>"running", :aws_instance_id=>"i-5a9d3a33", :aws_groups=>["default"],
:aws_image_id=>"ami-58c42031",
:aws_product_codes=>[], :dns_name=>"ec2-75-101-208-95.compute-1.amazonaws.com",
:aws_state_code=>"16",
:private_dns_name=>"domU-12-31-38-00-78-04.compute-1.internal",
:aws_instance_type=>"m1.small",
:aws_reason=>"", :ami_launch_index=>"0"}]
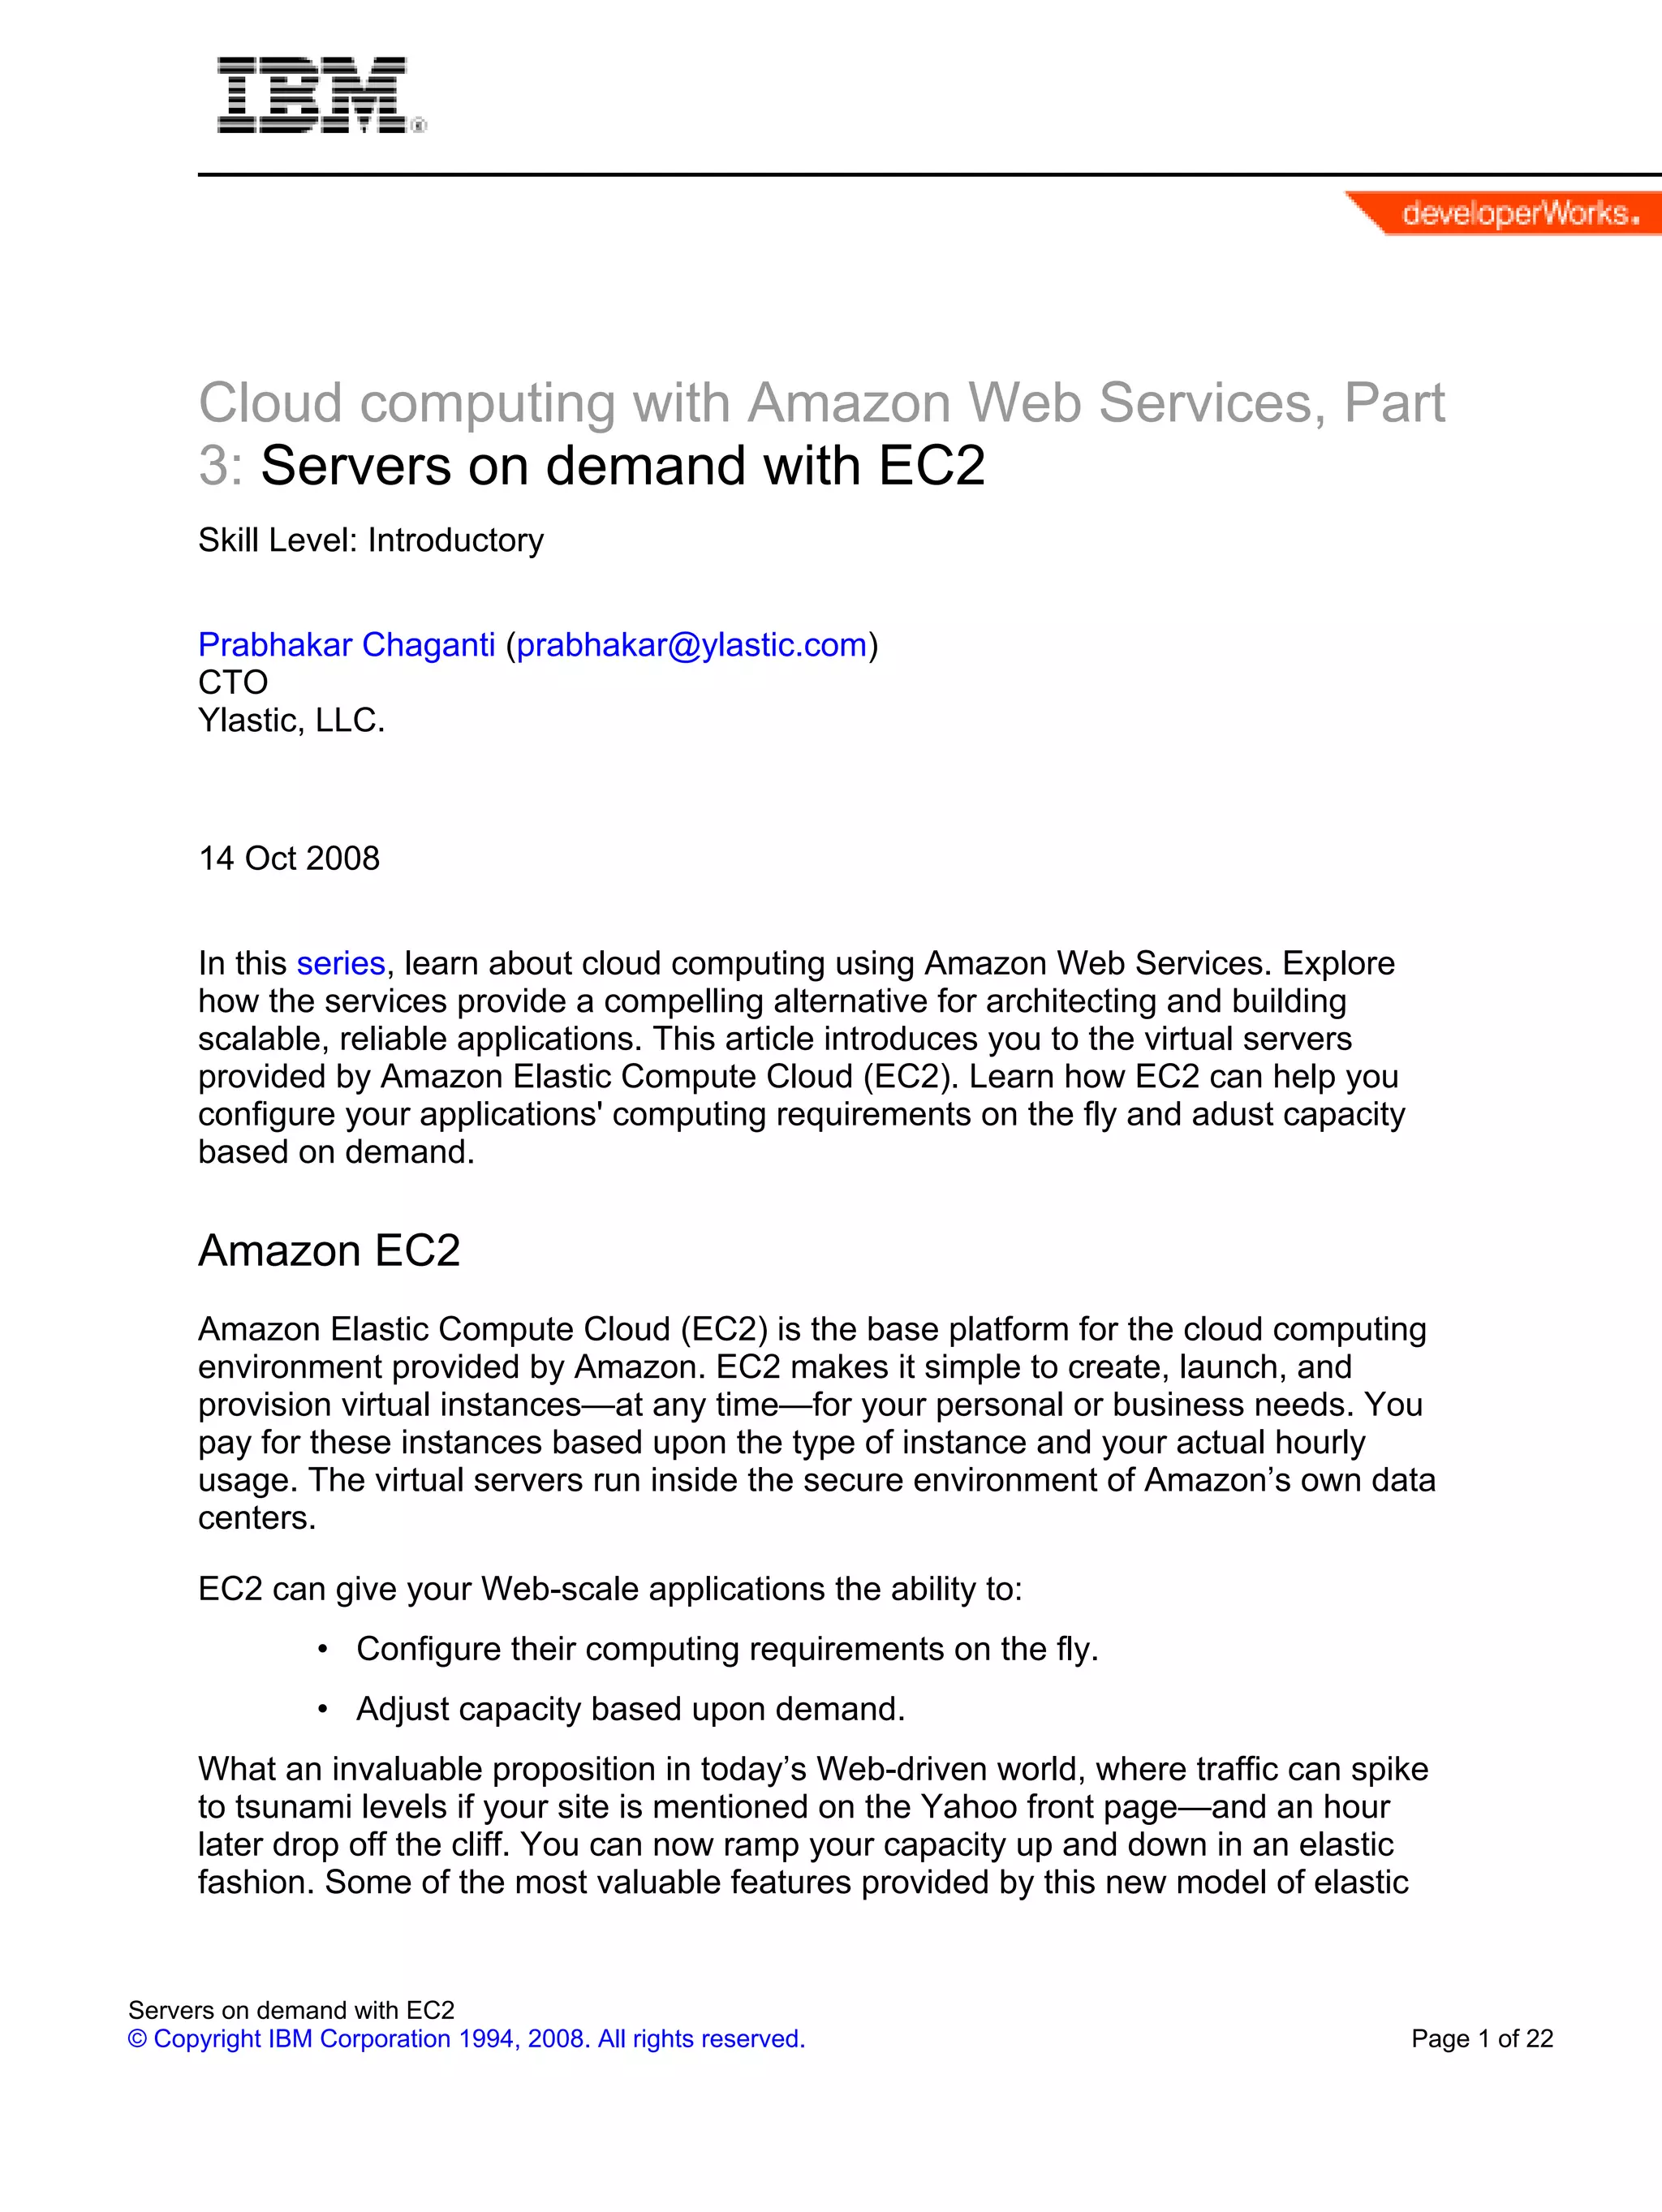
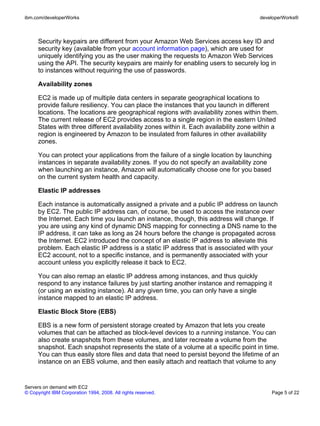
2. Retrieve a list of your images.
Listing 18. Describe your images
irb(main):005:0> @ec2.describe_images_by_owner([ENV['AWS_ACCOUNT_NUMBER']])
=> [{:aws_location=>"ylastic_images/devworks-ec2.manifest.xml",
:aws_kernel_id=>"aki-9b00e5f2", :aws_state=>"available", :aws_is_public=>false,
:aws_architecture=>"i386", :aws_id=>"ami-58c42031", :aws_image_type=>"machine"}]
3. Create a new security group that can be used for placing your instances,
and for restricting or granting access to it.
Listing 19. Create a new security group and list groups
irb(main):006:0> @ec2.create_security_group("devworks",
"Devworks Article Security Group")
=> true
irb(main):008:0> @ec2.describe_security_groups()
=> [{:aws_group_name=>"devworks", :aws_description=>"Devworks Article Security
Group",
:aws_perms=>[]}]
4. Create a new security keypair and list all the keypairs in your account.
Listing 20. Create a new security keypair and list keypairs
irb(main):018:0> @ec2.create_key_pair('mykeypair')
=> {:aws_key_name=>"mykeypair",
:aws_fingerprint=>"c6:62:22:9e:99:05:6a:17:13:06:e0:86:f9:55:2a:78:ff:99:6b:fa",
:aws_material=>"-----BEGIN RSA PRIVATE KEY-----
nMIIEpAIBAAKCAQEAyRdAvihBXDu30o2uvQ1h8xdIRLHs0RjQWK4Yw5Y5DkaS41EEjnDwjO6sEY5ln
IXSuzVj1nkZ1VMPuVR3hIXHCMJLaAO77TaXZVC9yymIUAyTcQ1+hoVLlrCuVI3dEY21WQNTEbtkInlI
xMW+UhkiaKrGHmt2yYLjr754KGt7pNCpRwxPXB7brlpQ3qpapkr7XrKZppvWoG8MCmPIFx8P0Kno8Cd
mnF9lEdns6uaJZmfs4Ls9HZHpsmn0r42GbOAkJEkj7nE5zc3rXYpmCBZhjyHus0iXjS/n9oLnHWhV0a
wagjvmsQgJPYqEsBeO5pDb2IOZq5okQie1YJTd1m8k8k7m9wIDAQABAoIBAQCK0lWssOemnP8fAQHVg
J+v1wJ3wZpBhLWsvvUh1RbCvzUK8UQL/PrKh6Ga7W/0u4nmGY6J0mJmJYhWXhyATUZBInrih3uoOccC
Eff/4T/y9nmDvC+zL+xtatTA0SRdTdeu6vpPLSv1uwCUbxrbXGSnszVAbNm9dXGvsqnMK7GCYQEB4p4
Servers on demand with EC2
Page 16 of 22 © Copyright IBM Corporation 1994, 2008. All rights reserved.
- 17. ibm.com/developerWorks developerWorks®
FtJolDqGZdWAj1u5/AGjbCI+PbkbCAro55Sqnl95WAlogdQFmgxljWl9TEIsbrHfnYZHtKHlm1lvyeB
QdVmwLT9S7ufI1J/GAevRxrG2iEkx/IJWYGnQE0P2bXa6Ry90UyvWRPS6Zi/MDnfWoFAxnB6Ryssr+S
IAfpG6SGuM55AoGBAOr7yPcvg/66f/Xd3CbpmI8lIfsXBb9xki3pIEfYAWD/n2ToxpRYPTgrwwB1ufo
NPr7U1QfzJvAvlTXWkfp4oUnssi5sXw1okZmm01hT0j0FNvsgMG6zD8Z/9nmgrVrH+tBxVoYqrPM/WB
dnYhQXEGQq+UF2uPqoKDbsl3DkftXTBrAoGBANsTdLfHmRidkLCRKfSjnUrbJOSsU6RWGFuoqgD+DZL
ngKBTaBTd6TVONSR2JvpVJo5hyiAXQ/jQ1XtsPAuJR6fiiRvDfgF7jn1lp1tsFpNYx2R4+eqoLrHgIC
Ak1Ke8tWyoD3NgQ4FO9TDfW+QHn0dpLeWdNMUd2a1GVKp4hIoJalnAoGBAITqMryO5eyZ9XNPMQ3Zp+
+gI15xoVCunu7VJOs+ZVlGnsrp9eVKdux9TU3YiDsiQdMP8ulXn+sQHyg63It+3EyCVC8qIYHmGiV9V
aJql0rovjbB+GNFabDwBKLbkMhRt/MnBJ75SQaOmvSkImomhn7up9q9mtg9cbHPlcHHnW65VNAoGAKi
+Y7jrVVFQjJJ0PgzhgGSqug4lHSQnFJ9p/T7uxjcmIblt9nXa2Dbm9qgPGhbYX8psKHRvdzvAH6/hvp
5kL31xUIrCGdyqf9AvZf9uaXlTDBnvpiw0sbQC+62b9anD1HrNOJl2HIkNeG8cnHsYI+etbFzgqjTqu
TBua+iiy/RHLECgYALIDqaAcd7o4V+ws+WG1G9vTlcnJ6/sBpu3JyKMSdJYlbgIbvHgrfbKhEYuNh/H
XNdrI6oeW9eAruqHlH+OlUx0tCg4VIeQsz/b7kPSnY14OMAswuHHyqlZIqK4Xy/R6SQmsc/CUXWPk5I
UesJk5f1V1NXIqqwv6+nlEucdjgYUd5w==n-----END RSA PRIVATE KEY-----"}
irb(main):020:0> @ec2.describe_key_pairs()
=> [{:aws_key_name=>"mykeypair",
:aws_fingerprint=>"c6:62:22:9e:99:05:6a:17:13:06:e0:86:f9:55:2a:78:ff:99:6b:fa"}]
5. Create a new EBS volume. Specify the availability zone for this volume as
us-east-1c. This volume, once created and available, can only be
attached to an instance that is running in the same availability zone. The
volume will initially be in the "creating" state. Once the process is
complete, the volume will be "available."
Listing 21. Create a new EBS volume and list volumes
irb(main):024:0> @ec2.create_volume('', 1, 'us-east-1c')
=> {:aws_status=>"creating", :aws_created_at=>Mon Sep 08 00:29:35 UTC 2008,
:zone=>"us-east-1c", :aws_size=>1, :snapshot_id=>nil, :aws_id=>"vol-2f34d146"}
irb(main):026:0> @ec2.describe_volumes()
=> {:aws_status=>"available", :aws_created_at=>Mon Sep 08 00:29:35 UTC 2008,
:zone=>"us-east-1c", :aws_size=>1, :snapshot_id=>nil, :aws_id=>"vol-2f34d146"}
6. Attach this volume to the current instance as block device /dev/sdj, and
format it with the ext3 file system so it can actually be used.
Listing 22. Attach the new EBS volume and make file system
irb(main):031:0> @ec2.attach_volume('vol-2f34d146', 'i-5a9d3a33', '/dev/sdj')
=> {:aws_instance_id=>"i-5a9d3a33", :aws_device=>"/dev/sdj",
:aws_attachment_status=>"attaching", :aws_id=>"vol-2f34d146",
:aws_attached_at=>Mon Sep 08 00:34:03 UTC 2008}
$ mkfs.ext3 /dev/sdj
mke2fs 1.39 (29-May-2006)
/dev/sdj is entire device, not just one partition!
Proceed anyway? (y,n) y
Filesystem label=
OS type: Linux
Block size=4096 (log=2)
Servers on demand with EC2
© Copyright IBM Corporation 1994, 2008. All rights reserved. Page 17 of 22
- 18. developerWorks® ibm.com/developerWorks
Fragment size=4096 (log=2)
131072 inodes, 262144 blocks
13107 blocks (5.00%) reserved for the super user
First data block=0
Maximum filesystem blocks=268435456
8 block groups
32768 blocks per group, 32768 fragments per group
16384 inodes per group
Superblock backups stored on blocks:
32768, 98304, 163840, 229376
Writing inode tables: done
Creating journal (8192 blocks): done
Writing superblocks and filesystem accounting information: done
This filesystem will be automatically checked every 39 mounts or
180 days, whichever comes first. Use tune2fs -c or -i to override.
7. Mount the newly formatted block device on a file system folder.
Listing 23. Mount the volume to a local directory and use it
$ mount /dev/sdj /mnt/my-vol
$ echo “Hello Devworks” > /mnt/my-vol/test.txt
# cat /mnt/my-vol/test.txt
Hello Devworks
Now you can use this EBS volume just like any other block device on your system.
You can read and write to and from the volume. When you're finished using the
volume, you can detach the volume from the running instance and then reattach to
another instance, or the same instance, whenever you want. This is persistent
storage that really takes EC2 to another level of usefulness. There are many ways to
leverage this asset, from using it for storing your valuable database data to Web
server logs, which need to exist beyond the life of an instance.
You can create a snapshot of an EBS volume that will hold the contents of the
volume at that point in time. The snapshots are themselves stored automatically on
S3, and are created by EC2 in a cumulative fashion. The first snapshot of a volume
will be a complete copy, but the ones after that will only store the change sets. There
is currently a limit of 500 snapshots allowed per Amazon Web Services account. If
you need to keep more than 500 snapshots, you can request an increase in your
account limit.
Listing 24. Creating a snapshot from an EBS volume
irb(main):007:0> @ec2.create_snapshot('vol-2f34d146')
=> {:aws_status=>"pending", :aws_volume_id=>"vol-2f34d146",
:aws_started_at=>Mon Sep 08 00:49:15 UTC 2008, :aws_progress=>"",
:aws_id=>"snap-13db3c7a"}
Servers on demand with EC2
Page 18 of 22 © Copyright IBM Corporation 1994, 2008. All rights reserved.
- 19. ibm.com/developerWorks developerWorks®
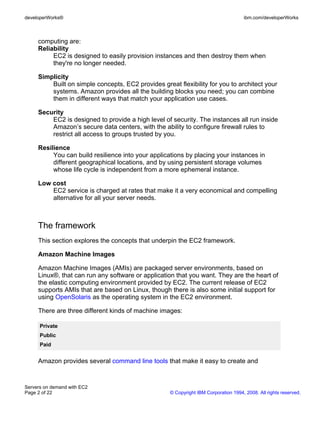
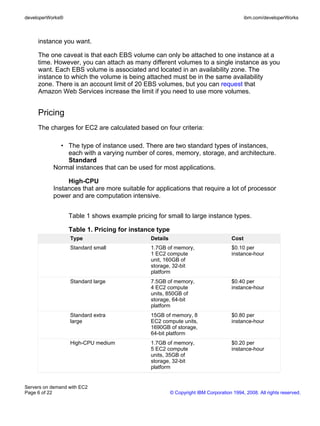
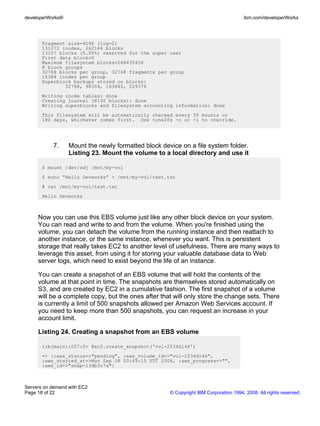
The snapshot is created by EC2 in the background. You can list all your snapshots
periodically to ensure that the creation has completed successfully.
Listing 25. Listing your EBS snapshots
irb(main):008:0> @ec2.describe_snapshots()
=> [{:aws_status=>"completed", :aws_volume_id=>"vol-2f34d146",
:aws_started_at=>Mon Sep 08 00:49:15 UTC 2008,
:aws_progress=>"100%",
:aws_id=>"snap-13db3c7a"}]
Finally, you can detach a volume from your instance. You can reattach the volume to
the same instance or to another instance at a later point.
Listing 26. Detaching an EBS volume
irb(main):006:0> @ec2.detach_volume('vol-2f34d146')
=> {:aws_instance_id=>"i-5a9d3a33", :aws_device=>"/dev/sdj",
:aws_attachment_status=>"detaching", :aws_id=>"vol-2f34d146",
:aws_attached_at=>Mon Sep 08 00:34:03 UTC 2008}
Conclusion
This article introduced you to Amazon’s EC2 service, and covered the basic
concepts. You learned about some of the functions provided by right_aws, an
open source Ruby library for interacting with EC2. We covered a lot of ground, but
EC2 is a very large and complex topic. It is highly recommended that you read the
Amazon EC2 Developer Guide for more information.
Stay tuned for Part 4, which will examine Amazon Simple Queue Service (SQS) for
reliable messaging in the cloud.
Servers on demand with EC2
© Copyright IBM Corporation 1994, 2008. All rights reserved. Page 19 of 22
- 20. developerWorks® ibm.com/developerWorks
Resources
Learn
• Check out the other parts in this series:
• Part 1, "Introduction: When it's smarter to rent than to buy"
• Part 2, "Storage in the cloud with Amazon Simple Storage Service (S3)"
• Learn about specific Amazon Web Services:
• Amazon Simple Storage Service (S3)
• Amazon Elastic Compute Cloud (EC2)
• Amazon Simple Queue Service (SQS)
• Amazon SimpleDB (SDB)
• The Service Health Dashboard is updated by the Amazon team and
provides the current status of each service.
• The latest happenings in the world of Amazon Web Services are on the
blog.
• Sign up for an Amazon Web Services account.
• OpenSolaris is available in Amazon public Grid.
• The Amazon Web Services Developer Connection is the gateway to all the
developer resources.
• The Amazon Web Services team provides technical documentation, user
guides, and articles of interest to developers at EC2 Technical Resources.
• The Developer Guide for EC2 has information on the various components of the
EC2 service, along with advanced usage and configuration.
• A list of all the public images is available on the AWS developer connection
website.
• Amazon provides several command line tools that make it easy to create and
manage images.
• Manage your keys and certificate, regenerate them, view account activity and
usage reports, and modify your profile information from the Web services
account information page.
• Use the Simple Monthly Calculator for calculating your monthly usage costs for
EC2 and the other Amazon Web Services.
Servers on demand with EC2
Page 20 of 22 © Copyright IBM Corporation 1994, 2008. All rights reserved.
- 21. ibm.com/developerWorks developerWorks®
• Get the RSS feed for this series.
• In the Architecture area on developerWorks, get the resources you need to
advance your skills in the architecture arena.
• Browse the technology bookstore for books on these and other technical topics.
Get products and technologies
• Download IBM product evaluation versions and get your hands on application
development tools and middleware products from DB2®, Lotus®, Rational®,
Tivoli®, and WebSphere®.
Discuss
• Check out developerWorks blogs and get involved in the developerWorks
community.
About the author
Prabhakar Chaganti
Prabhakar Chaganti is the CTO of Ylastic, a start-up that is building a single unified
interface to architect, manage, and monitor a user's entire AWS Cloud computing
environment: EC2, S3, SQS and SimpleDB. He is the author of two recent books,
Xen Virtualization and GWT Java AJAX Programming. He is also the winner of the
community choice award for the most innovative virtual appliance in the VMware
Global Virtual Appliance Challenge.
Trademarks
IBM, the IBM logo, ibm.com, DB2, developerWorks, Lotus, Rational, Tivoli, and
WebSphere are trademarks or registered trademarks of International Business
Machines Corporation in the United States, other countries, or both. These and other
IBM trademarked terms are marked on their first occurrence in this information with
the appropriate symbol (® or ™), indicating US registered or common law
trademarks owned by IBM at the time this information was published. Such
trademarks may also be registered or common law trademarks in other countries. A
current list of IBM trademarks is available on the Web at
http://www.ibm.com/legal/copytrade.shtml
Intel and Intel Xeon are trademarks or registered trademarks of Intel Corporation or
its subsidiaries in the United States and other countries.
Java and all Java-based trademarks and logos are trademarks of Sun Microsystems,
Inc. in the United States, other countries, or both.
Servers on demand with EC2
© Copyright IBM Corporation 1994, 2008. All rights reserved. Page 21 of 22
- 22. developerWorks® ibm.com/developerWorks
Linux is a registered trademark of Linus Torvalds in the United States, other
countries, or both.
Microsoft and Windows are trademarks of Microsoft Corporation in the United States,
other countries, or both.
Other company, product, or service names may be trademarks or service marks of
others.
Servers on demand with EC2
Page 22 of 22 © Copyright IBM Corporation 1994, 2008. All rights reserved.