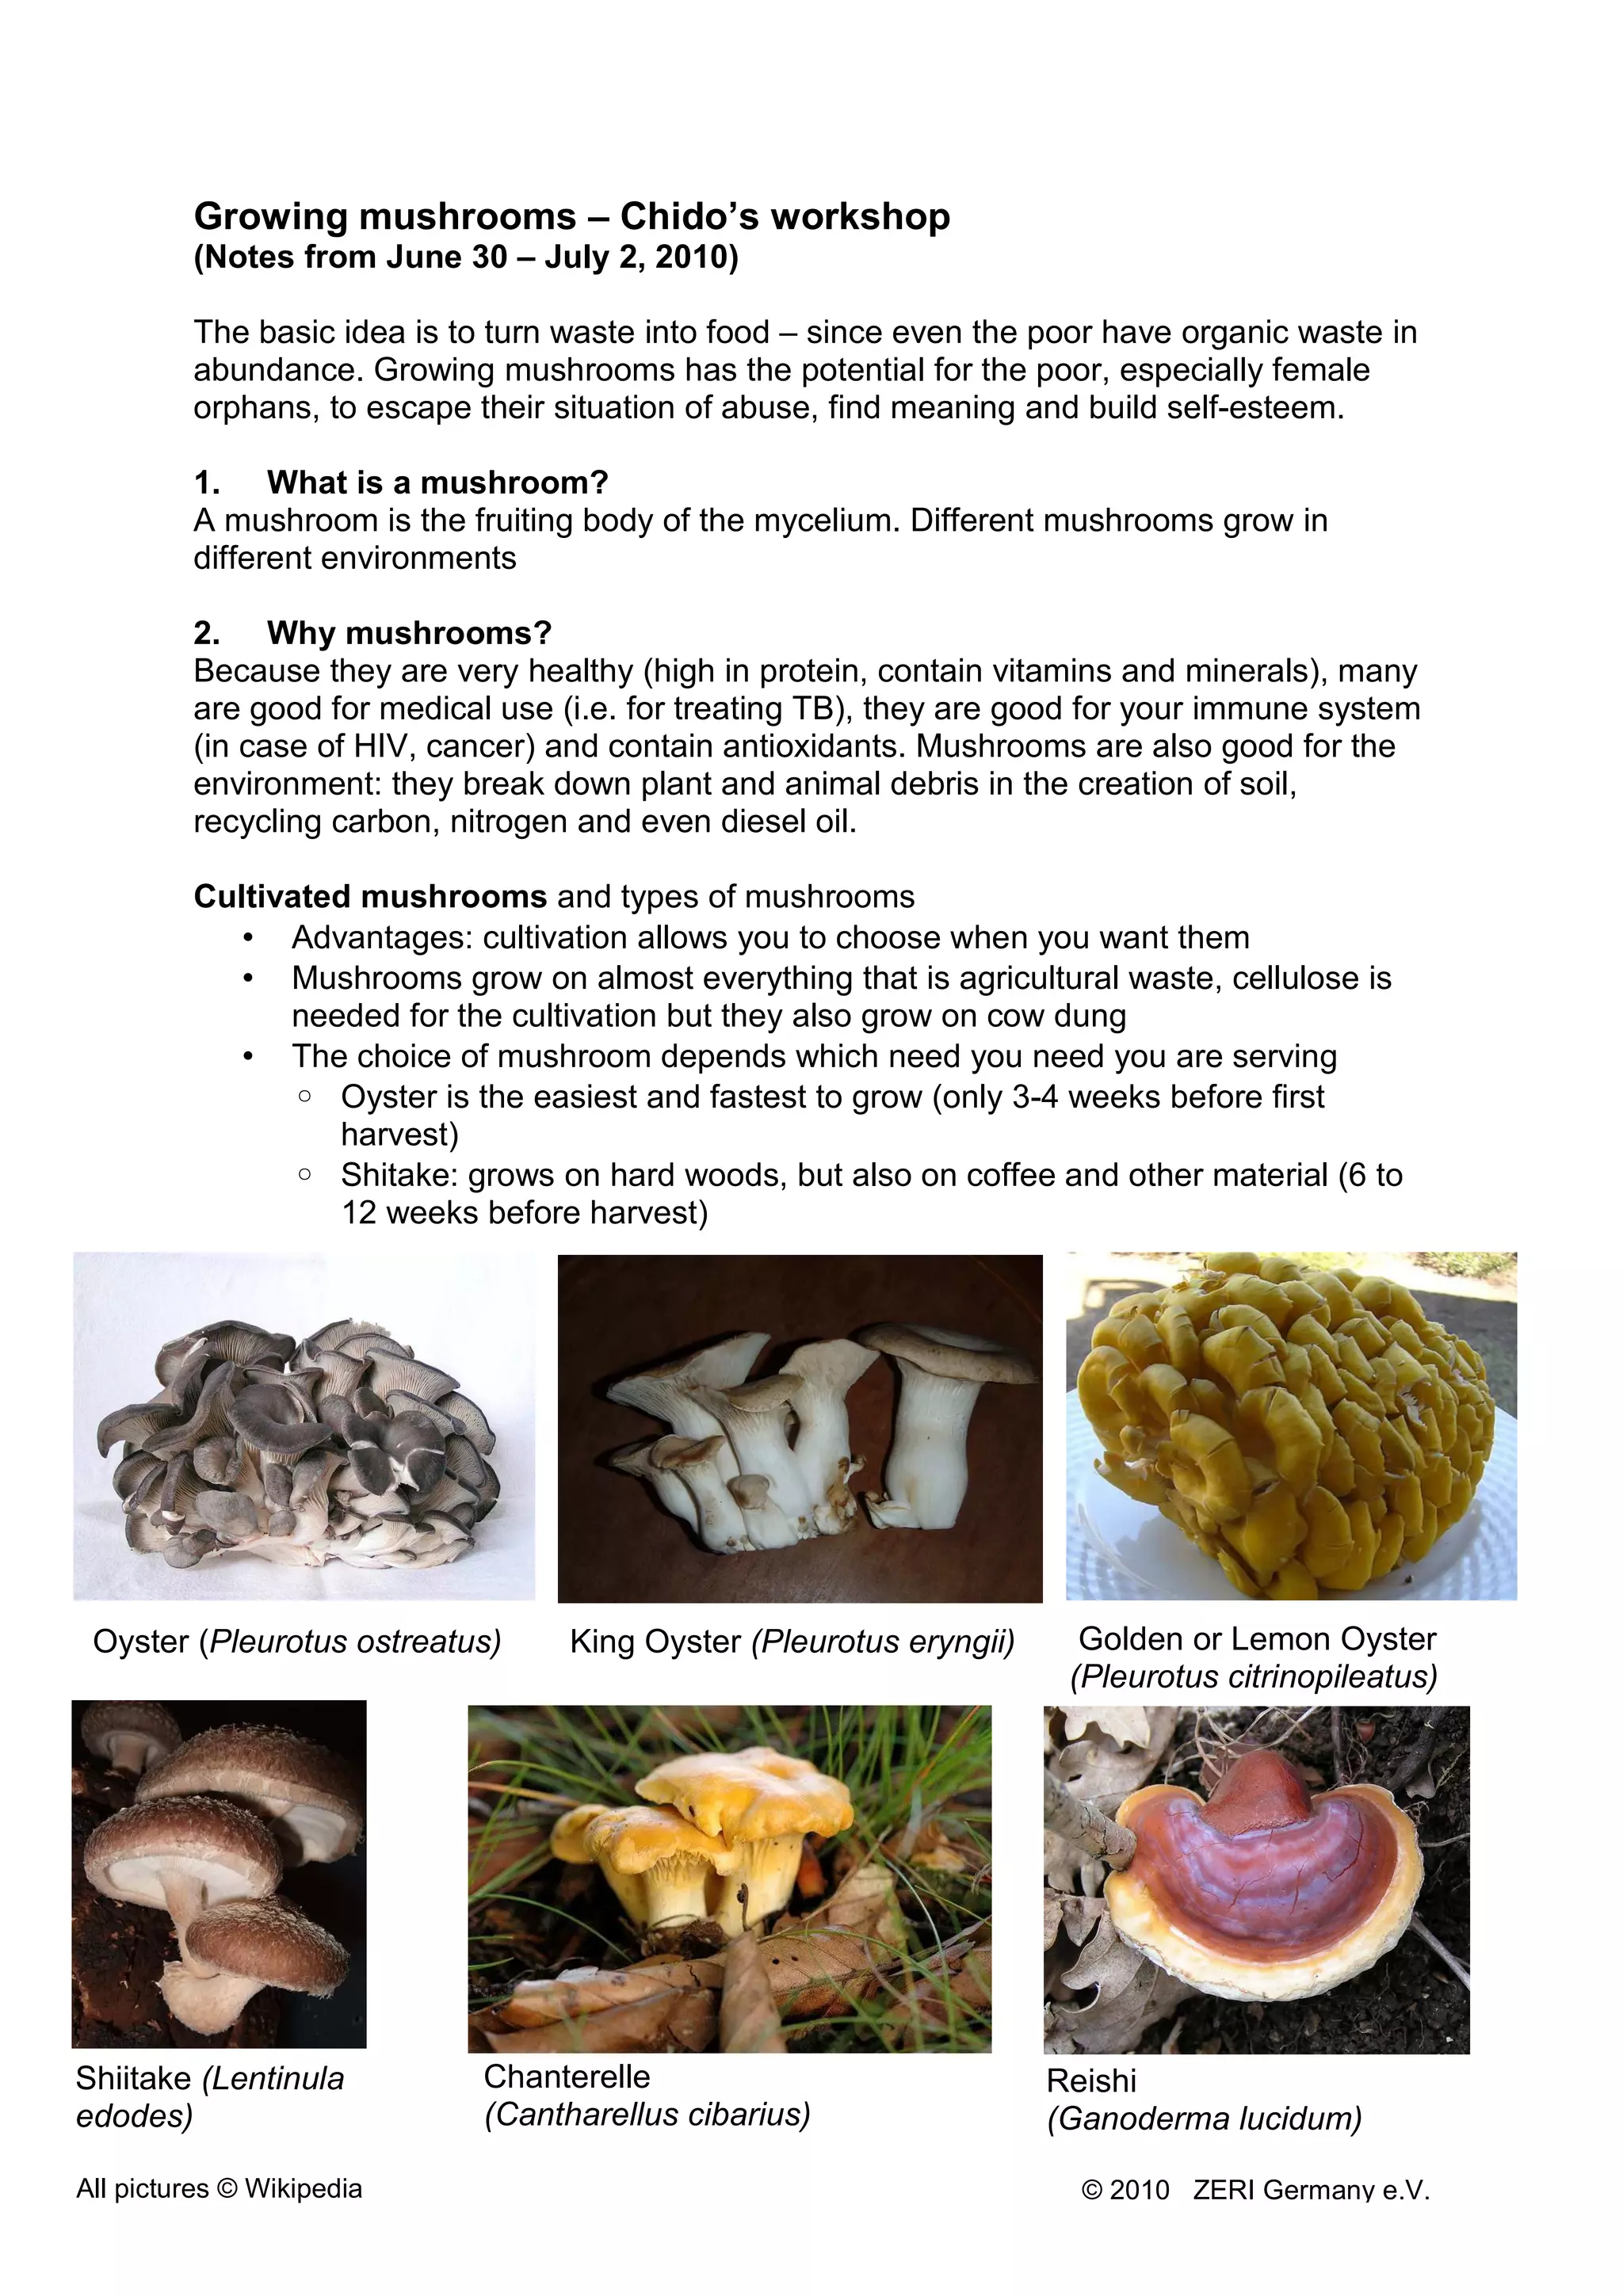
Growing mushrooms – Chido’s workshop
         (Notes from June 30 – July 2, 2010)

         The basic idea is to turn waste into food – since even the poor have organic waste in
         abundance. Growing mushrooms has the potential for the poor, especially female
         orphans, to escape their situation of abuse, find meaning and build self-esteem.

         1. What is a mushroom?
         A mushroom is the fruiting body of the mycelium. Different mushrooms grow in
         different environments

         2. Why mushrooms?
         Because they are very healthy (high in protein, contain vitamins and minerals), many
         are good for medical use (i.e. for treating TB), they are good for your immune system
         (in case of HIV, cancer) and contain antioxidants. Mushrooms are also good for the
         environment: they break down plant and animal debris in the creation of soil,
         recycling carbon, nitrogen and even diesel oil.

         Cultivated mushrooms and types of mushrooms
            • Advantages: cultivation allows you to choose when you want them
            • Mushrooms grow on almost everything that is agricultural waste, cellulose is
               needed for the cultivation but they also grow on cow dung
            • The choice of mushroom depends which need you need you are serving
               ◦ Oyster is the easiest and fastest to grow (only 3-4 weeks before first
                  harvest)
               ◦ Shitake: grows on hard woods, but also on coffee and other material (6 to
                  12 weeks before harvest)


 Oyster (Pleurotus ostreatus)      King Oyster (Pleurotus eryngii)     Golden or Lemon Oyster
                                                                      (Pleurotus citrinopileatus)


Shiitake (Lentinula          Chanterelle                             Reishi
edodes)                      (Cantharellus cibarius)                 (Ganoderma lucidum)

All pictures © Wikipedia                                               © 2010 ZERI Germany e.V.
3.     Producing Seeds

In most settings, buying seeds from a professional producer is the fastest method.
But if seed production is wanted or necessary, there are two different techniques:

1) Spore culture
2) Tissue culture

Both require an absolutely sterile environment (usually a laboratory)!


Spore culture: collecting the “dust”
Look for mature (3-5 days old) mushrooms that have begun opening at the top. Cut
off the top and set it on a piece of paper. The spores then fall onto the paper (called a
“print”) and canbe collected.


Tissue culture
These seeds are made from a young (2-3 days), fresh mushroom with the stem
being the best part. In order to get the speciment, open the stem in the middle and
cut a small piece from there. It has to be from the inner part of the mushroom
because the outer part was exposed to the environment and thus contamination.

Each piece (or a few of the collected spores) is then placed in a petridish with PDA
(potatoe dextrose agar). Within 3-4 days the mycelium should begin growing: after
approximately 2 weeks, the entire petridish should be white. This is called the
“mother culture”. At this point, the mother culture can be dried or put in the fridge for
later use.

In the next step, grain is introduced. The grain (wheat, barley, sorghum, spelt, rice or
millet) is watered over night and then decontaminated in an autoclave. This is filled
into sterilized 1 liter bottles with a little piece of the mother culture (ca. 20 per
petridish). The bottles are not closed entirely because oxygen is vital in the process.

This subculture one is finished when the mycelium has colonized the grain and the
entire bottle is white. This subculture can again be multiplied at one spoon per bottle
(subculture 2), and once more to receive subculture 3.

Do not create more than subculture 3 if you intend to sell the seeds, because they
this would mean a loss of quality for the seeds; anything beyond subculture 3 can
only be used for fruitification.


When producing seeds for yourself (not for selling), a simpler method is possible:

Put any kind of organic material (cardboard, cotton shirt, coffee waste…) in a small (1
liter) bag (either paper or plastic). Add bits of mushroom tissue throughout and then
close the bag. The seeds that you will get will not be entirely sterile, but stronger than
the ones created under sterile conditions!


                                                                 © 2010 ZERI Germany e.V.
4.        Conditions in the Mushroom House

Conditions for cultivation of mushrooms are simple:
             No direct sunlight
             No blowing wind but fresh air circulation; a place where you would feel
             comfortable yourself
             Dark; very dark during the incubation; in the fruitification phase there
             should be a bit more light so that you can read a newspaper
             Humidity

Needed: 3 rooms (should have concrete floor and be very clean)

incubation room:                18-28° C (10-31° possible, but no t ideal)
fruitification/ growing room    10-27° C
working room (where the substrate is prepared and the bags are packed)

When buying the seeds: ask the providers at what temperature the seeds were made
and what temperature they would recommend for incubation and fruitification.


5.        Substrate preparation

Mushrooms are a mould; they have to be introduced immediately to the substrate
The size of the substrate is decisive: the smaller the better, all pieces should be 4cm
and below; thus coffee grounds are very suitable.

The smaller the substrate, the fewer empty spaces/air. With too many empty spaces,
the mushrooms cannot grow properly in the bag, it is also easier to absorb more
water when there are less spaces.
The quality of the substrate is very important. In order to remove contamination from
the substrate, there are 2 techniques:

1) boiling (less preferred by Chido) or
2) soaking in water overnight and steaming the next day

Steaming and boiling also makes the “food” for the seeds in the substrate more
accessible (breaks open the molecules).

Coffee grounds as a substrate are already clean as boiling water passed through in
the coffee shop. Only import is to check the humidity – ideal are approx. 50-60%.
Test: if you squeeze the coffee in your hand, no drops should come out.
Use the coffee grounds straight away! You can also keep it in a cool place for up to 2
days, otherwise it might be contaminated (then it has to be steamed to clean it).

For steaming, put some bricks in a large pot or oil drum, add a few centimeters of
water and then put a bag or large linen on top. Add the substrate and then boil the
water for about 2 hours (lid closed at all times). Wait for the substrate to cool before
inoculation!

If only a little dirt is to be washed out of the substrate, cold water can be used as well
(not as effective).

                                                                 © 2010 ZERI Germany e.V.
6.     Inoculation

Substrate and seed are mixed into small bags (best is thin, transparent plastic) at
approximately one quantity of seed to 20 quantities of substrate. Both layering as
well as mixing through and through are possible.

The bags should be filled in portions, pressed down to squeeze out any air, until they
are very full. Ideally, substrate makes up the top layer to protect the seed from
contamination.

Knotting the top of the bag should leave a little hole are the top for air to circulate.

Experts can prepare around 100 bags per day.


7.     Incubation

Incubation is when the mycelium is colonising the substrate; this process is complete
when the whole bag is white. For oyster mushrooms, this takes about 3-4 weeks,
shiitake may take 6-12 weeks to colonize the substrate.

During this time, the bags are left to sit in the room. Check every day for signs of
contamination (e.g. green or orange moulds) – separate contaminated bags from the
healthy ones and keep them under observation.

Causes of contamination:
  – seed (low quality)
  – conditions of the incubation room
  – method of preparing the substrate

If you see a need for adding extra nutrients: mix brown sugar with flour and inject it
into the bag.

Once the mushrooms begin growing, you have to water every day. Thus, if planning
to leave for a weekend, possibly open the bag and add some new substrate in the
center, giving the mycelium “more to do”. Alternatively, if you need to slow down the
growing process, wait until the incubation stage is finished, then put the bags into a
fridge (5-7 degrees).

Once the mycelium has grown throughout the substrate and the bag is all white,
fruitification will start.


8.     Fruitification

Once the bags have grown entirely white, fruitification begins.

Mycelium needs to be “shocked” to begin producing mushrooms. In the case of
oysters, normal watering is usually enough. Shiitake have to be soaked in water for
several hours to begin this phase. Both causes a change in temperature, boosting


                                                                  © 2010 ZERI Germany e.V.
growth (imagine a forest after it rained and the sun comes out again: they grow a lot
then).

The bags are carried into the growing room, the top is opened and water is sprayed
on with a hose. (Never add any water during the incubation.) From now on, water the
bags every day!

If the bags are too dry, put them into water for a few hours and they will take as much
water as they need! The top part of the bag should never go dry.

A few days later mushrooms start popping out. Sometimes this happens naturally,
without human intervention – in this case, one needs to begin watering immediately
because otherwise the bag will dehydrate.

Important: No direct sunlight!

If the mushrooms develop brown spots, this is a sign of either too much wind or too
much light.


9.    Harvest

The best time for harvesting is in the morning. Water the bags AFTER the harvest, as
the mushrooms would soak up too mush water, losing quality.

Keep the floor clean at any time! Make sure that after watering, all surplus water is
swept away to avoid slimy moulds from growing all over the floor.

When harvesting, take EVERYTHING of the mushroom out. In other words, do not
cut the mushroom stem, leaving a piece behind (it will begin fouling after a few days)
– but also do not take out chunks of substrate (creating holes that will fill with water
and then also begin fouling).

When harvesting, always start with the good bags and then do the bad bags.

Mushrooms keep for 1-2 weeks in the fridge. If you have excess production and want
to dry the mushrooms, do it in the shade. No additional heat is needed, just free air
circulation.


10.    Links and literature

Our seeds were bought via the internet on www.shii-take.de

Chido recommends the author Paul Stamets (e.g. Growing Gourmet and Medicinal
Mushrooms; Mushroom Cultivator: A Practical Guide to Growing Mushrooms at
Home; Mycelium Running) – available on Amazon.

Feel free to share your experiences and interact with all participants through the
mushroom-growing forum on www.community.blueeconomy.de.


                                                               © 2010 ZERI Germany e.V.

Chidos open source workshop notes

  • 1.
    Growing mushrooms –Chido’s workshop (Notes from June 30 – July 2, 2010) The basic idea is to turn waste into food – since even the poor have organic waste in abundance. Growing mushrooms has the potential for the poor, especially female orphans, to escape their situation of abuse, find meaning and build self-esteem. 1. What is a mushroom? A mushroom is the fruiting body of the mycelium. Different mushrooms grow in different environments 2. Why mushrooms? Because they are very healthy (high in protein, contain vitamins and minerals), many are good for medical use (i.e. for treating TB), they are good for your immune system (in case of HIV, cancer) and contain antioxidants. Mushrooms are also good for the environment: they break down plant and animal debris in the creation of soil, recycling carbon, nitrogen and even diesel oil. Cultivated mushrooms and types of mushrooms • Advantages: cultivation allows you to choose when you want them • Mushrooms grow on almost everything that is agricultural waste, cellulose is needed for the cultivation but they also grow on cow dung • The choice of mushroom depends which need you need you are serving ◦ Oyster is the easiest and fastest to grow (only 3-4 weeks before first harvest) ◦ Shitake: grows on hard woods, but also on coffee and other material (6 to 12 weeks before harvest) Oyster (Pleurotus ostreatus) King Oyster (Pleurotus eryngii) Golden or Lemon Oyster (Pleurotus citrinopileatus) Shiitake (Lentinula Chanterelle Reishi edodes) (Cantharellus cibarius) (Ganoderma lucidum) All pictures © Wikipedia © 2010 ZERI Germany e.V.
  • 2.
    3. Producing Seeds In most settings, buying seeds from a professional producer is the fastest method. But if seed production is wanted or necessary, there are two different techniques: 1) Spore culture 2) Tissue culture Both require an absolutely sterile environment (usually a laboratory)! Spore culture: collecting the “dust” Look for mature (3-5 days old) mushrooms that have begun opening at the top. Cut off the top and set it on a piece of paper. The spores then fall onto the paper (called a “print”) and canbe collected. Tissue culture These seeds are made from a young (2-3 days), fresh mushroom with the stem being the best part. In order to get the speciment, open the stem in the middle and cut a small piece from there. It has to be from the inner part of the mushroom because the outer part was exposed to the environment and thus contamination. Each piece (or a few of the collected spores) is then placed in a petridish with PDA (potatoe dextrose agar). Within 3-4 days the mycelium should begin growing: after approximately 2 weeks, the entire petridish should be white. This is called the “mother culture”. At this point, the mother culture can be dried or put in the fridge for later use. In the next step, grain is introduced. The grain (wheat, barley, sorghum, spelt, rice or millet) is watered over night and then decontaminated in an autoclave. This is filled into sterilized 1 liter bottles with a little piece of the mother culture (ca. 20 per petridish). The bottles are not closed entirely because oxygen is vital in the process. This subculture one is finished when the mycelium has colonized the grain and the entire bottle is white. This subculture can again be multiplied at one spoon per bottle (subculture 2), and once more to receive subculture 3. Do not create more than subculture 3 if you intend to sell the seeds, because they this would mean a loss of quality for the seeds; anything beyond subculture 3 can only be used for fruitification. When producing seeds for yourself (not for selling), a simpler method is possible: Put any kind of organic material (cardboard, cotton shirt, coffee waste…) in a small (1 liter) bag (either paper or plastic). Add bits of mushroom tissue throughout and then close the bag. The seeds that you will get will not be entirely sterile, but stronger than the ones created under sterile conditions! © 2010 ZERI Germany e.V.
  • 3.
    4. Conditions in the Mushroom House Conditions for cultivation of mushrooms are simple: No direct sunlight No blowing wind but fresh air circulation; a place where you would feel comfortable yourself Dark; very dark during the incubation; in the fruitification phase there should be a bit more light so that you can read a newspaper Humidity Needed: 3 rooms (should have concrete floor and be very clean) incubation room: 18-28° C (10-31° possible, but no t ideal) fruitification/ growing room 10-27° C working room (where the substrate is prepared and the bags are packed) When buying the seeds: ask the providers at what temperature the seeds were made and what temperature they would recommend for incubation and fruitification. 5. Substrate preparation Mushrooms are a mould; they have to be introduced immediately to the substrate The size of the substrate is decisive: the smaller the better, all pieces should be 4cm and below; thus coffee grounds are very suitable. The smaller the substrate, the fewer empty spaces/air. With too many empty spaces, the mushrooms cannot grow properly in the bag, it is also easier to absorb more water when there are less spaces. The quality of the substrate is very important. In order to remove contamination from the substrate, there are 2 techniques: 1) boiling (less preferred by Chido) or 2) soaking in water overnight and steaming the next day Steaming and boiling also makes the “food” for the seeds in the substrate more accessible (breaks open the molecules). Coffee grounds as a substrate are already clean as boiling water passed through in the coffee shop. Only import is to check the humidity – ideal are approx. 50-60%. Test: if you squeeze the coffee in your hand, no drops should come out. Use the coffee grounds straight away! You can also keep it in a cool place for up to 2 days, otherwise it might be contaminated (then it has to be steamed to clean it). For steaming, put some bricks in a large pot or oil drum, add a few centimeters of water and then put a bag or large linen on top. Add the substrate and then boil the water for about 2 hours (lid closed at all times). Wait for the substrate to cool before inoculation! If only a little dirt is to be washed out of the substrate, cold water can be used as well (not as effective). © 2010 ZERI Germany e.V.
  • 4.
    6. Inoculation Substrate and seed are mixed into small bags (best is thin, transparent plastic) at approximately one quantity of seed to 20 quantities of substrate. Both layering as well as mixing through and through are possible. The bags should be filled in portions, pressed down to squeeze out any air, until they are very full. Ideally, substrate makes up the top layer to protect the seed from contamination. Knotting the top of the bag should leave a little hole are the top for air to circulate. Experts can prepare around 100 bags per day. 7. Incubation Incubation is when the mycelium is colonising the substrate; this process is complete when the whole bag is white. For oyster mushrooms, this takes about 3-4 weeks, shiitake may take 6-12 weeks to colonize the substrate. During this time, the bags are left to sit in the room. Check every day for signs of contamination (e.g. green or orange moulds) – separate contaminated bags from the healthy ones and keep them under observation. Causes of contamination: – seed (low quality) – conditions of the incubation room – method of preparing the substrate If you see a need for adding extra nutrients: mix brown sugar with flour and inject it into the bag. Once the mushrooms begin growing, you have to water every day. Thus, if planning to leave for a weekend, possibly open the bag and add some new substrate in the center, giving the mycelium “more to do”. Alternatively, if you need to slow down the growing process, wait until the incubation stage is finished, then put the bags into a fridge (5-7 degrees). Once the mycelium has grown throughout the substrate and the bag is all white, fruitification will start. 8. Fruitification Once the bags have grown entirely white, fruitification begins. Mycelium needs to be “shocked” to begin producing mushrooms. In the case of oysters, normal watering is usually enough. Shiitake have to be soaked in water for several hours to begin this phase. Both causes a change in temperature, boosting © 2010 ZERI Germany e.V.
  • 5.
    growth (imagine aforest after it rained and the sun comes out again: they grow a lot then). The bags are carried into the growing room, the top is opened and water is sprayed on with a hose. (Never add any water during the incubation.) From now on, water the bags every day! If the bags are too dry, put them into water for a few hours and they will take as much water as they need! The top part of the bag should never go dry. A few days later mushrooms start popping out. Sometimes this happens naturally, without human intervention – in this case, one needs to begin watering immediately because otherwise the bag will dehydrate. Important: No direct sunlight! If the mushrooms develop brown spots, this is a sign of either too much wind or too much light. 9. Harvest The best time for harvesting is in the morning. Water the bags AFTER the harvest, as the mushrooms would soak up too mush water, losing quality. Keep the floor clean at any time! Make sure that after watering, all surplus water is swept away to avoid slimy moulds from growing all over the floor. When harvesting, take EVERYTHING of the mushroom out. In other words, do not cut the mushroom stem, leaving a piece behind (it will begin fouling after a few days) – but also do not take out chunks of substrate (creating holes that will fill with water and then also begin fouling). When harvesting, always start with the good bags and then do the bad bags. Mushrooms keep for 1-2 weeks in the fridge. If you have excess production and want to dry the mushrooms, do it in the shade. No additional heat is needed, just free air circulation. 10. Links and literature Our seeds were bought via the internet on www.shii-take.de Chido recommends the author Paul Stamets (e.g. Growing Gourmet and Medicinal Mushrooms; Mushroom Cultivator: A Practical Guide to Growing Mushrooms at Home; Mycelium Running) – available on Amazon. Feel free to share your experiences and interact with all participants through the mushroom-growing forum on www.community.blueeconomy.de. © 2010 ZERI Germany e.V.