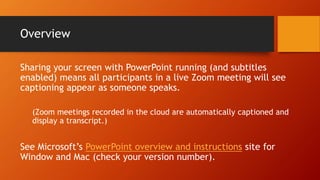
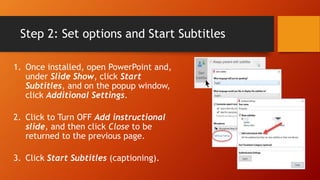
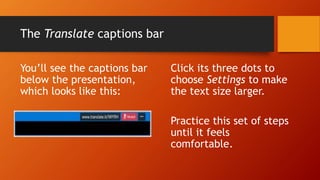
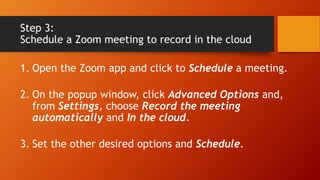
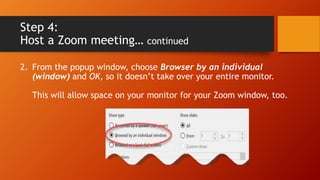
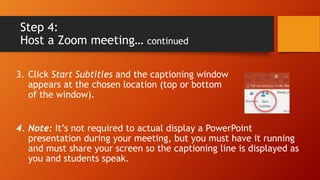
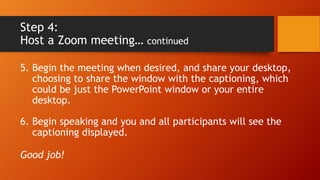
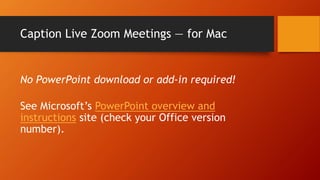
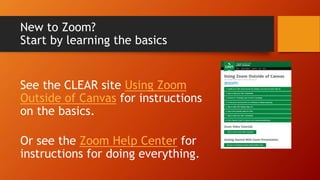
How to Caption Live Zoom Meetings
Using the PowerPoint subtitle feature
Alese Smith, online instructional engineer
alese.smith@unt.edu
Overview
Sharing your screen with PowerPoint running (and subtitles
enabled) means all participants in a live Zoom meeting will see
captioning appear as someone speaks.
(Zoom meetings recorded in the cloud are automatically captioned and
display a transcript.)
See Microsoft’s PowerPoint overview and instructions site for
Window and Mac (check your version number).
Step 1:
Download and Run the PowerPoint Translator add-in
Download the free add-in from the Microsoft page About
Presentation Translator.
Scroll down that page to How Presentation Translator works and
watch the Get Started with Presentation Translator video (3:14
min) to learn how it works.
(Most of you can skip the part at the end about presenting to students
requiring a language other than English.)
Step 2: Install Translator
Translator’s first-time use can take five or more minutes
to install.
Find something else to do while it works.
Step 2: Set options and Start Subtitles
1. Once installed, open PowerPoint and,
under Slide Show, click Start
Subtitles, and on the popup window,
click Additional Settings.
2. Click to Turn OFF Add instructional
slide, and then click Close to be
returned to the previous page.
3. Click Start Subtitles (captioning).
The Translate captions bar
You’ll see the captions bar
below the presentation,
which looks like this:
Click its three dots to
choose Settings to make
the text size larger.
Practice this set of steps
until it feels
comfortable.
Step 3:
Schedule a Zoom meeting to record in the cloud
1. Open the Zoom app and click to Schedule a meeting.
2. On the popup window, click Advanced Options and,
from Settings, choose Record the meeting
automatically and In the cloud.
3. Set the other desired options and Schedule.
Step 4:
Host a Zoom meeting
1. Before staring the meeting, open a PowerPoint file.
For single-monitor users, click Slide Show from the menu, and,
from the new set of options that appear, choose Set Up Slide Show.
Step 4:
Host a Zoom meeting… continued
2. From the popup window, choose Browser by an individual
(window) and OK, so it doesn’t take over your entire monitor.
This will allow space on your monitor for your Zoom window, too.
Step 4:
Host a Zoom meeting… continued
3. Click Start Subtitles and the captioning window
appears at the chosen location (top or bottom
of the window).
4. Note: It’s not required to actual display a PowerPoint
presentation during your meeting, but you must have it running
and must share your screen so the captioning line is displayed as
you and students speak.
Step 4:
Host a Zoom meeting… continued
5. Begin the meeting when desired, and share your desktop,
choosing to share the window with the captioning, which
could be just the PowerPoint window or your entire
desktop.
6. Begin speaking and you and all participants will see the
captioning displayed.
Good job!
Caption Live Zoom Meetings — for Mac
No PowerPoint download or add-in required!
See Microsoft’s PowerPoint overview and
instructions site (check your Office version
number).
New to Zoom?
Start by learning the basics
See the CLEAR site Using Zoom
Outside of Canvas for instructions
on the basics.
Or see the Zoom Help Center for
instructions for doing everything.
For more information…
Alese Smith
alese.smith@unt.edu
512-626-2098

Captioning Zoom meetings using the PowerPoint subtitles feature for Windows and Mac

  • 1.
    How to CaptionLive Zoom Meetings Using the PowerPoint subtitle feature Alese Smith, online instructional engineer alese.smith@unt.edu
  • 2.
    Overview Sharing your screenwith PowerPoint running (and subtitles enabled) means all participants in a live Zoom meeting will see captioning appear as someone speaks. (Zoom meetings recorded in the cloud are automatically captioned and display a transcript.) See Microsoft’s PowerPoint overview and instructions site for Window and Mac (check your version number).
  • 3.
    Step 1: Download andRun the PowerPoint Translator add-in Download the free add-in from the Microsoft page About Presentation Translator. Scroll down that page to How Presentation Translator works and watch the Get Started with Presentation Translator video (3:14 min) to learn how it works. (Most of you can skip the part at the end about presenting to students requiring a language other than English.)
  • 4.
    Step 2: InstallTranslator Translator’s first-time use can take five or more minutes to install. Find something else to do while it works.
  • 5.
    Step 2: Setoptions and Start Subtitles 1. Once installed, open PowerPoint and, under Slide Show, click Start Subtitles, and on the popup window, click Additional Settings. 2. Click to Turn OFF Add instructional slide, and then click Close to be returned to the previous page. 3. Click Start Subtitles (captioning).
  • 6.
    The Translate captionsbar You’ll see the captions bar below the presentation, which looks like this: Click its three dots to choose Settings to make the text size larger. Practice this set of steps until it feels comfortable.
  • 7.
    Step 3: Schedule aZoom meeting to record in the cloud 1. Open the Zoom app and click to Schedule a meeting. 2. On the popup window, click Advanced Options and, from Settings, choose Record the meeting automatically and In the cloud. 3. Set the other desired options and Schedule.
  • 8.
    Step 4: Host aZoom meeting 1. Before staring the meeting, open a PowerPoint file. For single-monitor users, click Slide Show from the menu, and, from the new set of options that appear, choose Set Up Slide Show.
  • 9.
    Step 4: Host aZoom meeting… continued 2. From the popup window, choose Browser by an individual (window) and OK, so it doesn’t take over your entire monitor. This will allow space on your monitor for your Zoom window, too.
  • 10.
    Step 4: Host aZoom meeting… continued 3. Click Start Subtitles and the captioning window appears at the chosen location (top or bottom of the window). 4. Note: It’s not required to actual display a PowerPoint presentation during your meeting, but you must have it running and must share your screen so the captioning line is displayed as you and students speak.
  • 11.
    Step 4: Host aZoom meeting… continued 5. Begin the meeting when desired, and share your desktop, choosing to share the window with the captioning, which could be just the PowerPoint window or your entire desktop. 6. Begin speaking and you and all participants will see the captioning displayed. Good job!
  • 12.
    Caption Live ZoomMeetings — for Mac No PowerPoint download or add-in required! See Microsoft’s PowerPoint overview and instructions site (check your Office version number).
  • 13.
    New to Zoom? Startby learning the basics See the CLEAR site Using Zoom Outside of Canvas for instructions on the basics. Or see the Zoom Help Center for instructions for doing everything.
  • 14.
    For more information… AleseSmith alese.smith@unt.edu 512-626-2098