Download as PDF, PPTX


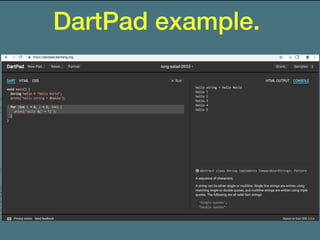


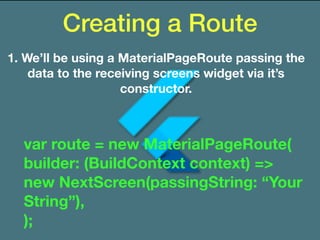
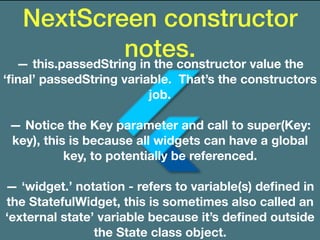


![HTTP POSTing fields for
Multipart/Form-Data.
There were many examples for sending a file, but not
for just sending parameters via a POST.
var uri = Uri.parse("https://www.yoursite.com/api/
v1/youendpoint/");
var request = new http.MultipartRequest("POST",
uri);
request.headers['content-type'] = "multipart/form-
data; charset=utf-8";
request.fields['yourfield'] = '$yourfieldvalue';](https://image.slidesharecdn.com/bronxstudyjam2-181103164326/85/Bronx-study-jam-2-42-320.jpg)
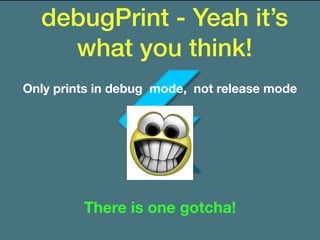
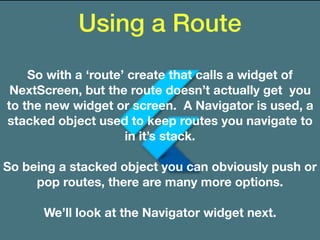
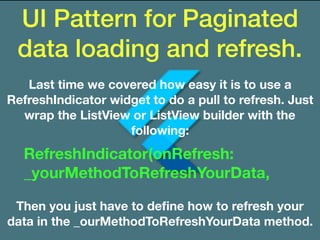
![HTTP PUTting fields for
Multipart/Form-Data.
It shows how to retrieve the http response
immediately from the Future. It uses
the .then callback for a Future, as follows:
var uri = Uri.parse("https://www.yourwebsite.com/api/v1/
yourendpoint/");
var request = new http.MultipartRequest("PUT", uri);
request.headers['content-type'] = "multipart/form-data;
charset=utf-8";
request.fields['field1'] = field1;
request.fields['field2'] = field2;
await request.send().then((response) {
if(response.statusCode == nnn) {
//Do something
}
});](https://image.slidesharecdn.com/bronxstudyjam2-181103164326/85/Bronx-study-jam-2-43-320.jpg)


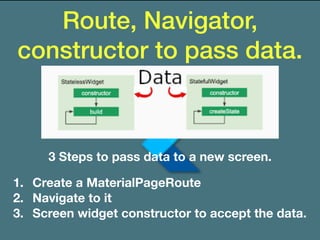
The document presents an overview of a Flutter Study Jam led by Peter Birdsall, focusing on enhancing skills with the Flutter framework using tools like DartPad. Key topics include string interpolation, debug printing, managing state with hot reload, handling timestamps, passing data between screens, and practices for data loading and HTTP requests. It also includes additional resources for learning Flutter and Dart, as well as troubleshooting tips for common issues.