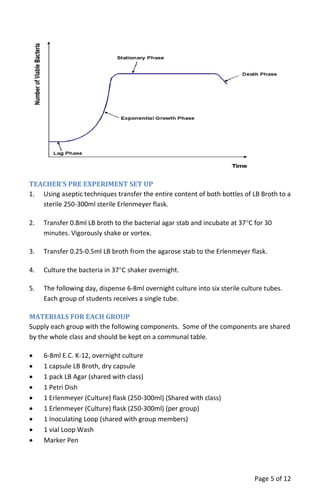
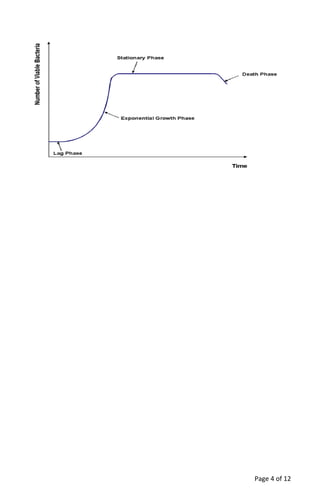
G-Biosciences ♦ 1-800-628-7730 ♦ 1-314-991-6034 ♦ technical@GBiosciences.com
A Geno Technology, Inc. (USA) brand name
think proteins! think G-Biosciences www.GBiosciences.com
PR019
Bacterial Culture & Growth
Teacher’s Guidebook
(Cat. # BE‐201)
Page 2 of 12
MATERIALS INCLUDED....................................................................................................... 3
SPECIAL HANDLING INSTRUCTIONS................................................................................... 3
ADDITIONAL EQUIPMENT REQUIRED ................................................................................ 3
TIME REQUIRED................................................................................................................. 3
OBJECTIVES........................................................................................................................ 4
BACKGROUND ................................................................................................................... 4
TEACHER’S PRE EXPERIMENT SET UP ................................................................................ 5
MATERIALS FOR EACH GROUP .......................................................................................... 5
PROCEDURE....................................................................................................................... 6
I. MEDIA PREPARATION................................................................................................. 6
II. LIQUID CULTURE: INOCULATION AND BACTERIAL CULTURE..................................... 6
III. SOLID CULTURE: INOCULATION AND DILUTION ON SOLID CULTURE....................... 7
RESULTS, ANALYSIS & ASSESSMENT.................................................................................. 9
MATERIALS INCLUDED
This kit has enough materials and reagents for 24 students (six groups of four students).
• 1 vial Bac: E.C. K‐12 Agar Stab
• 1 vial LB Broth
• 2 bottles LB Broth
• 1 bag 6 LB Broth capsules
• 1 pack LB Agar
• 6 Petri Dishes
• 6 Inoculating Loops
• 6 vials Loop Wash
SPECIAL HANDLING INSTRUCTIONS
• Store Bac: E.C. K‐12 Agar Stab at 4°C.
• All other reagents can be stored at room temperature.
The majority of reagents and components supplied in the BioScience Excellence™
kits are
non toxic and are safe to handle, however good laboratory procedures should be used
at all times. This includes wearing lab coats, gloves and safety goggles.
For further details on reagents please review the Material Safety Data Sheets (MSDS).
The following items need to be used with particular caution.
Part # Name Hazard
L041 Loop Wash Flammable
ADDITIONAL EQUIPMENT REQUIRED
• 250‐300ml Erlenmeyer (Culture) flasks
• Autoclave*
• Shaking Incubator
• Incubator
• 10ml Sterile Culture Tubes
• Spectrophotometer and cuvettes
* 100ml premade bottles of LB broth (Cat. # L021‐C) and LB agar (L011), which is melted
in a boiling waterbath, can be used if an autoclave is not available. You will require 6 x
LB Broth and 2 x LB Agar bottles.
TIME REQUIRED
• Day 1: 1‐2 hours
• Day 2: One day (9 x 20 minutes)
• Day 3: 20 minutes
Page 3 of 12
OBJECTIVES
• Learn aseptic techniques
• Learn manipulation of bacteria
• Study bacterial growth in liquid culture
• Cultivation of bacteria on solid agar, streaking and dilution
• Isolation a single bacterial colony
BACKGROUND
This kit teaches aseptic handling techniques, cultivation of bacteria in liquid broth and
on solid culture media. This kit designed to educate students in the lag, log, stationary
and decline phases of the bacterial growth cycle and how to monitor the various stages.
In addition, the kit teaches the importance of bacterial liquid culture in biotechnology
and its applications in industrial biotechnology. This laboratory activity involves
preparation of culture medium, inoculation, and monitoring of the liquid culture
through the four growth stages. The laboratory activity also teaches cultivation of
bacteria on agar, streaking, serial dilution and isolating a single bacterial colony.
This laboratory activity uses the most widely used medium for common bacterial
culture. LB (Luria and Bertani) broth consists of 1% tryptone, 0.5% yeast extract and
0.5% sodium chloride. The solid media, LB agar, consists of 1% tryptone, 0.5% yeast
extract, 0.5% sodium chloride and 1.5% agar. Both LB broth and LB Agar are rich in
nitrogen, carbon and salts to meet the requirement of bacterial growth. Both media do
not require the adjustment of pH. For convenience both LB media are supplied as
premixed preparations, LB Broth as capsules. Fresh medium is prepared by adding water
followed by sterilization.
In the case of bacteria or other unicellular organisms cell growth refers to cell division
rather than to the size of the individual cell. The rate at which bacterial cells divide in
culture is influenced by several factors, including the level of available nutrients, the
temperature, pH and the degree of agitation. There are four different phases in a typical
bacterial growth curve, the lag, log or exponential, stationary and the decline or death
phase.
• LAG PHASE: Growth is slow at first, while the bacteria acclimatize to the nutrients
and conditions in the growth media.
• LOG PHASE: Once acclimatized, the bacteria begin to rapidly divide at an
exponential rate, doubling every 10‐20 minutes.
• STATIONARY PHASE: The increasing numbers of bacteria begin to compete for the
dwindling nutrients and their exponential growth is inhibited. The number of
bacteria stabilizes.
• DEATH PHASE: The decreasing amount of nutrients and increasing levels of toxic
byproducts results in harmful conditions for the bacteria and they begin to die.
Page 4 of 12
TEACHER’S PRE EXPERIMENT SET UP
1. Using aseptic techniques transfer the entire content of both bottles of LB Broth to a
sterile 250‐300ml sterile Erlenmeyer flask.
2. Transfer 0.8ml LB broth to the bacterial agar stab and incubate at 37°C for 30
minutes. Vigorously shake or vortex.
3. Transfer 0.25‐0.5ml LB broth from the agarose stab to the Erlenmeyer flask.
4. Culture the bacteria in 37°C shaker overnight.
5. The following day, dispense 6‐8ml overnight culture into six sterile culture tubes.
Each group of students receives a single tube.
MATERIALS FOR EACH GROUP
Supply each group with the following components. Some of the components are shared
by the whole class and should be kept on a communal table.
• 6‐8ml E.C. K‐12, overnight culture
• 1 capsule LB Broth, dry capsule
• 1 pack LB Agar (shared with class)
• 1 Petri Dish
• 1 Erlenmeyer (Culture) flask (250‐300ml) (Shared with class)
• 1 Erlenmeyer (Culture) flask (250‐300ml) (per group)
• 1 Inoculating Loop (shared with group members)
• 1 vial Loop Wash
• Marker Pen
Page 5 of 12
PROCEDURE
I. Media Preparation
Wear heat protective gloves throughout the autoclaving and the agar pouring
procedure.
Agar plates can be made up to a week in advance, stored in an airtight container at 4°C.
1. The media preparation is performed as a class or the media may be prepared in
advance by your teacher.
2. LB Broth Preparation: Each group places one capsule of LB Broth in to a 250‐300ml
flask. Add 50ml distilled water and tightly cover the flask mouth with aluminum
foil, similar plug or lose cap.
3. LB Agar Preparation: As a class, transfer the LB Agar to a 250‐300ml flask. Add
150ml distilled water and tightly cover the flask mouth with aluminum foil, similar
plug or lose cap.
4. Autoclave the LB Broth and LB Agar for 15min at 121°C. Turn the autoclave off.
Wait for the autoclave to cool and the pressure to become zero.
Instruct students not to open the autoclave until it has cooled and the pressure
becomes zero.
5. Remove the media from the autoclave and leave to cool at room temperature.
Once the LB Agar has cooled to hand hot temperature (about 45°C), pour a
~0.5cm/ ¼” layer of agar into six Petri dishes. This is approximately 20‐25ml
volume of agar.
6. Leave the Petri dish on a flat surface for 30‐40 minutes until completely set.
II. Liquid Culture: Inoculation and bacterial culture
1. Transfer 1ml LB broth to a 1.5ml tube to be used as a blank later.
2. Inoculate the remaining LB broth with 5ml overnight culture that will be supplied
by your teacher. Gently swirl the flask in a circular motion to thoroughly mix.
3. Transfer 1ml of your culture to a cuvette. Using a spectrophotometer at 600‐
700nm, zero (blank) the colorimetric spectrophotometer with the LB broth from
step 1. Save the blank LB broth. You may need it in next step. Measure the
Page 6 of 12
absorbance of the culture sample. This is your zero time absorbance of culture
density.
Students can only see three phases of bacteria growth (lag, log and
stationary) during one day culture. The bacteria growth will enter decline phase within
24 hours of culture. As the lysis of dead bacteria is slow, the absorbance of the total
bacteria mass won’t decline dramatically in 24‐32 hours.
4. Place the flask in a shaking 37°C incubator to start the bacterial growth. Transfer
1ml samples to a cuvette every hour (up to 8 hours) and measure the absorbance
at 600‐700nm.
III. Solid Culture: Inoculation and dilution on solid culture
1. Write your group name on the bottom of the agar plate.
2. The first student in the group, opens the inoculating loop at the opposite end to
the loop. Remove the loop from the package and dip the inoculating loop in to the
remaining overnight culture. With the loop in one hand, lift the lid of the Petri dish
slightly with the other side kept over the Petri dish. Do NOT put the lid down.
Quickly and gently steak four parallel lines across the agar, as shown in figure 1.
Replace the lid.
Do not to dig the loop into the agar, which will damage the surface of the agar.
Figure 1
3. The second student, dips the loop into the Loop Wash. Remove and gentle shake
to remove excess wash solution, WAIT 20 seconds to allow the wash solution to
evaporate whilst gently shaking in the air.
4. Dilute the bacteria on the plate, in order to isolate single colonies. From one end
of the parallel streaks, streak four more parallel lines 90° to the original set. See
figure 2. Replace the lid.
Page 7 of 12
Figure 2
5. The third student repeats the wash step as in step 3 and streaks four parallel lines
90° to the previous set, starting at the end of the previous streaks. See figure 3.
Figure 3
6. The final student repeats the wash as in step 3 and streaks a final set of parallel
lines 90° to the previous set, as shown in figure 4. Be careful and ensure that you
do NOT streak through the first set.
Figure 4
7. Replace the lid and turn the Petri dish upside down to prevent moisture running
onto the LB agar.
8. Place the inverted plate in a 37°C incubator overnight.
9. Observe the plate the following day.
Page 8 of 12
Page 9 of 12
RESULTS, ANALYSIS & ASSESSMENT
1. Draw the bacterial growth curve using time as x value and absorbance as y value.
The curve should show three phases of bacterial growth – lag, log and stationary.
2. There are four phases of bacterial growth the lag, log, stationary and decline
(death) phases. Label the curve with the respective growth phase. If there is only
three phases explain why?
The onset of the decline phase occurs after the end of the experiment. The absorbance
value measures the total bacteria mass (live and dead). The dead bacteria will not lyse
so quickly and still contribute to the absorbance value.
3. Draw a rough sketch of the bacteria growth on the agar plate.
4. Did you see a dilution in the number of colonies between each set of four streaks;
explain why this technique is important to microbiologists?
Yes. If there are just bacteria in the first set of streaks then there was still wash solution
on the loop that killed the bacteria.
This technique is important as it allows microbiologists to isolate individual colonies.
Last saved: 9/6/2013 CMH
This page is intentionally left blank
Page 10 of 12
This page is intentionally left blank
Page 11 of 12
www.GBiosciences.com
Page 12 of 12
G-Biosciences ♦ 1-800-628-7730 ♦ 1-314-991-6034 ♦ technical@GBiosciences.com
A Geno Technology, Inc. (USA) brand name
think proteins! think G-Biosciences www.GBiosciences.com
PR020
Bacterial Culture & Growth
Student’s Handbook
(Cat. # BE‐201)
Page 2 of 12
OBJECTIVES........................................................................................................................ 3
BACKGROUND ................................................................................................................... 3
MATERIALS FOR EACH GROUP .......................................................................................... 5
PROCEDURE....................................................................................................................... 6
I. MEDIA PREPARATION................................................................................................. 6
II. LIQUID CULTURE: INOCULATION AND BACTERIAL CULTURE..................................... 6
III. SOLID CULTURE: INOCULATION AND DILUTION ON SOLID CULTURE....................... 7
RESULTS, ANALYSIS & ASSESSMENT.................................................................................. 9
OBJECTIVES
• Learn aseptic techniques
• Learn manipulation of bacteria
• Study bacterial growth in liquid culture
• Cultivation of bacteria on solid agar, streaking and dilution
• Isolation a single bacterial colony
BACKGROUND
This kit teaches aseptic handling techniques, cultivation of bacteria in liquid broth and
on solid culture media. This kit designed to educate students in the lag, log, stationary
and decline phases of the bacterial growth cycle and how to monitor the various stages.
In addition, the kit teaches the importance of bacterial liquid culture in biotechnology
and its applications in industrial biotechnology. This laboratory activity involves
preparation of culture medium, inoculation, and monitoring of the liquid culture
through the four growth stages. The laboratory activity also teaches cultivation of
bacteria on agar, streaking, serial dilution and isolating a single bacterial colony.
This laboratory activity uses the most widely used medium for common bacterial
culture. LB (Luria and Bertani) broth consists of 1% tryptone, 0.5% yeast extract and
0.5% sodium chloride. The solid media, LB agar, consists of 1% tryptone, 0.5% yeast
extract, 0.5% sodium chloride and 1.5% agar. Both LB broth and LB Agar are rich in
nitrogen, carbon and salts to meet the requirement of bacterial growth. Both media do
not require the adjustment of pH. For convenience both LB media are supplied as
premixed preparations, LB Broth as capsules. Fresh medium is prepared by adding water
followed by sterilization.
In the case of bacteria or other unicellular organisms cell growth refers to cell division
rather than to the size of the individual cell. The rate at which bacterial cells divide in
culture is influenced by several factors, including the level of available nutrients, the
temperature, pH and the degree of agitation. There are four different phases in a typical
bacterial growth curve, the lag, log or exponential, stationary and the decline or death
phase.
• LAG PHASE: Growth is slow at first, while the bacteria acclimatize to the nutrients
and conditions in the growth media.
• LOG PHASE: Once acclimatized, the bacteria begin to rapidly divide at an
exponential rate, doubling every 10‐20 minutes.
• STATIONARY PHASE: The increasing numbers of bacteria begin to compete for the
dwindling nutrients and their exponential growth is inhibited. The number of
bacteria stabilizes.
• DEATH PHASE: The decreasing amount of nutrients and increasing levels of toxic
byproducts results in harmful conditions for the bacteria and they begin to die.
Page 3 of 12
Page 4 of 12
MATERIALS FOR EACH GROUP
Supply each group with the following components. Some of the components are shared
by the whole class and should be kept on a communal table.
• 6‐8ml E.C. K‐12, overnight culture
• 1 capsule LB Broth, dry capsule
• 1 pack LB Agar (shared with class)
• 1 Petri Dish
• 1 Erlenmeyer (Culture) flask (250‐300ml) (Shared with class)
• 1 Erlenmeyer (Culture) flask (250‐300ml) (per group)
• 1 Inoculating Loop (shared with group members)
• 1 vial Loop Wash
• Marker Pen
Page 5 of 12
PROCEDURE
I. Media Preparation
Wear heat protective gloves throughout the autoclaving and the agar pouring
procedure.
Agar plates can be made up to a week in advance, stored in an airtight container at 4°C.
1. The media preparation is performed as a class or the media may be prepared in
advance by your teacher.
2. LB Broth Preparation: Each group places one capsule of LB Broth in to a 250‐300ml
flask. Add 50ml distilled water and tightly cover the flask mouth with aluminum
foil, similar plug or lose cap.
3. LB Agar Preparation: As a class, transfer the LB Agar to a 250‐300ml flask. Add
150ml distilled water and tightly cover the flask mouth with aluminum foil, similar
plug or lose cap.
4. Autoclave the LB Broth and LB Agar for 15min at 121°C. Turn the autoclave off.
Wait for the autoclave to cool and the pressure to become zero.
Instruct students not to open the autoclave until it has cooled and the pressure
becomes zero.
5. Remove the media from the autoclave and leave to cool at room temperature.
Once the LB Agar has cooled to hand hot temperature (about 45°C), pour a
~0.5cm/ ¼” layer of agar into six Petri dishes. This is approximately 20‐25ml
volume of agar.
6. Leave the Petri dish on a flat surface for 30‐40 minutes until completely set.
II. Liquid Culture: Inoculation and bacterial culture
1. Transfer 1ml LB broth to a 1.5ml tube to be used as a blank later.
2. Inoculate the remaining LB broth with 5ml overnight culture that will be supplied
by your teacher. Gently swirl the flask in a circular motion to thoroughly mix.
3. Transfer 1ml of your culture to a cuvette. Using a spectrophotometer at 600‐
700nm, zero (blank) the colorimetric spectrophotometer with the LB broth from
step 1. Save the blank LB broth. You may need it in next step. Measure the
Page 6 of 12
absorbance of the culture sample. This is your zero time absorbance of culture
density.
Students can only see three phases of bacteria growth (lag, log and
stationary) during one day culture. The bacteria growth will enter decline phase within
24 hours of culture. As the lysis of dead bacteria is slow, the absorbance of the total
bacteria mass won’t decline dramatically in 24‐32 hours.
4. Place the flask in a shaking 37°C incubator to start the bacterial growth. Transfer
1ml samples to a cuvette every hour (up to 8 hours) and measure the absorbance
at 600‐700nm.
III. Solid Culture: Inoculation and dilution on solid culture
1. Write your group name on the bottom of the agar plate.
2. The first student in the group, opens the inoculating loop at the opposite end to
the loop. Remove the loop from the package and dip the inoculating loop in to the
remaining overnight culture. With the loop in one hand, lift the lid of the Petri dish
slightly with the other side kept over the Petri dish. Do NOT put the lid down.
Quickly and gently steak four parallel lines across the agar, as shown in figure 1.
Replace the lid.
Do not to dig the loop into the agar, which will damage the surface of the agar.
Figure 1
3. The second student, dips the loop into the Loop Wash. Remove and gentle shake
to remove excess wash solution, WAIT 20 seconds to allow the wash solution to
evaporate whilst gently shaking in the air.
4. Dilute the bacteria on the plate, in order to isolate single colonies. From one end
of the parallel streaks, streak four more parallel lines 90° to the original set. See
figure 2. Replace the lid.
Page 7 of 12
Figure 2
5. The third student repeats the wash step as in step 3 and streaks four parallel lines
90° to the previous set, starting at the end of the previous streaks. See figure 3.
Figure 3
6. The final student repeats the wash as in step 3 and streaks a final set of parallel
lines 90° to the previous set, as shown in figure 4. Be careful and ensure that you
do NOT streak through the first set.
Figure 4
7. Replace the lid and turn the Petri dish upside down to prevent moisture running
onto the LB agar.
8. Place the inverted plate in a 37°C incubator overnight.
9. Observe the plate the following day.
Page 8 of 12
Page 9 of 12
RESULTS, ANALYSIS & ASSESSMENT
1. Draw the bacterial growth curve using time as x value and absorbance as y value.
________________________________________________________________________
________________________________________________________________________
________________________________________________________________________
________________________________________________________________________
2. There are four phases of bacterial growth the lag, log, stationary and decline
(death) phases. Label the curve with the respective growth phase. If there is only
three phases explain why?
________________________________________________________________________
________________________________________________________________________
________________________________________________________________________
3. Draw a rough sketch of the bacteria growth on the agar plate.
4. Did you see a dilution in the number of colonies between each set of four streaks;
explain why this technique is important to microbiologists?
________________________________________________________________________
________________________________________________________________________
________________________________________________________________________
________________________________________________________________________
Last saved: 9/6/2013 CMH
This page is intentionally left blank
Page 10 of 12
This page is intentionally left blank
Page 11 of 12
www.GBiosciences.com
Page 12 of 12

BE-201_protocol lab test and media nutrition.pdf

  • 1.
    G-Biosciences ♦ 1-800-628-7730♦ 1-314-991-6034 ♦ technical@GBiosciences.com A Geno Technology, Inc. (USA) brand name think proteins! think G-Biosciences www.GBiosciences.com PR019 Bacterial Culture & Growth Teacher’s Guidebook (Cat. # BE‐201)
  • 2.
    Page 2 of12 MATERIALS INCLUDED....................................................................................................... 3 SPECIAL HANDLING INSTRUCTIONS................................................................................... 3 ADDITIONAL EQUIPMENT REQUIRED ................................................................................ 3 TIME REQUIRED................................................................................................................. 3 OBJECTIVES........................................................................................................................ 4 BACKGROUND ................................................................................................................... 4 TEACHER’S PRE EXPERIMENT SET UP ................................................................................ 5 MATERIALS FOR EACH GROUP .......................................................................................... 5 PROCEDURE....................................................................................................................... 6 I. MEDIA PREPARATION................................................................................................. 6 II. LIQUID CULTURE: INOCULATION AND BACTERIAL CULTURE..................................... 6 III. SOLID CULTURE: INOCULATION AND DILUTION ON SOLID CULTURE....................... 7 RESULTS, ANALYSIS & ASSESSMENT.................................................................................. 9
  • 3.
    MATERIALS INCLUDED This kithas enough materials and reagents for 24 students (six groups of four students). • 1 vial Bac: E.C. K‐12 Agar Stab • 1 vial LB Broth • 2 bottles LB Broth • 1 bag 6 LB Broth capsules • 1 pack LB Agar • 6 Petri Dishes • 6 Inoculating Loops • 6 vials Loop Wash SPECIAL HANDLING INSTRUCTIONS • Store Bac: E.C. K‐12 Agar Stab at 4°C. • All other reagents can be stored at room temperature. The majority of reagents and components supplied in the BioScience Excellence™ kits are non toxic and are safe to handle, however good laboratory procedures should be used at all times. This includes wearing lab coats, gloves and safety goggles. For further details on reagents please review the Material Safety Data Sheets (MSDS). The following items need to be used with particular caution. Part # Name Hazard L041 Loop Wash Flammable ADDITIONAL EQUIPMENT REQUIRED • 250‐300ml Erlenmeyer (Culture) flasks • Autoclave* • Shaking Incubator • Incubator • 10ml Sterile Culture Tubes • Spectrophotometer and cuvettes * 100ml premade bottles of LB broth (Cat. # L021‐C) and LB agar (L011), which is melted in a boiling waterbath, can be used if an autoclave is not available. You will require 6 x LB Broth and 2 x LB Agar bottles. TIME REQUIRED • Day 1: 1‐2 hours • Day 2: One day (9 x 20 minutes) • Day 3: 20 minutes Page 3 of 12
  • 4.
    OBJECTIVES • Learn aseptictechniques • Learn manipulation of bacteria • Study bacterial growth in liquid culture • Cultivation of bacteria on solid agar, streaking and dilution • Isolation a single bacterial colony BACKGROUND This kit teaches aseptic handling techniques, cultivation of bacteria in liquid broth and on solid culture media. This kit designed to educate students in the lag, log, stationary and decline phases of the bacterial growth cycle and how to monitor the various stages. In addition, the kit teaches the importance of bacterial liquid culture in biotechnology and its applications in industrial biotechnology. This laboratory activity involves preparation of culture medium, inoculation, and monitoring of the liquid culture through the four growth stages. The laboratory activity also teaches cultivation of bacteria on agar, streaking, serial dilution and isolating a single bacterial colony. This laboratory activity uses the most widely used medium for common bacterial culture. LB (Luria and Bertani) broth consists of 1% tryptone, 0.5% yeast extract and 0.5% sodium chloride. The solid media, LB agar, consists of 1% tryptone, 0.5% yeast extract, 0.5% sodium chloride and 1.5% agar. Both LB broth and LB Agar are rich in nitrogen, carbon and salts to meet the requirement of bacterial growth. Both media do not require the adjustment of pH. For convenience both LB media are supplied as premixed preparations, LB Broth as capsules. Fresh medium is prepared by adding water followed by sterilization. In the case of bacteria or other unicellular organisms cell growth refers to cell division rather than to the size of the individual cell. The rate at which bacterial cells divide in culture is influenced by several factors, including the level of available nutrients, the temperature, pH and the degree of agitation. There are four different phases in a typical bacterial growth curve, the lag, log or exponential, stationary and the decline or death phase. • LAG PHASE: Growth is slow at first, while the bacteria acclimatize to the nutrients and conditions in the growth media. • LOG PHASE: Once acclimatized, the bacteria begin to rapidly divide at an exponential rate, doubling every 10‐20 minutes. • STATIONARY PHASE: The increasing numbers of bacteria begin to compete for the dwindling nutrients and their exponential growth is inhibited. The number of bacteria stabilizes. • DEATH PHASE: The decreasing amount of nutrients and increasing levels of toxic byproducts results in harmful conditions for the bacteria and they begin to die. Page 4 of 12
  • 5.
    TEACHER’S PRE EXPERIMENTSET UP 1. Using aseptic techniques transfer the entire content of both bottles of LB Broth to a sterile 250‐300ml sterile Erlenmeyer flask. 2. Transfer 0.8ml LB broth to the bacterial agar stab and incubate at 37°C for 30 minutes. Vigorously shake or vortex. 3. Transfer 0.25‐0.5ml LB broth from the agarose stab to the Erlenmeyer flask. 4. Culture the bacteria in 37°C shaker overnight. 5. The following day, dispense 6‐8ml overnight culture into six sterile culture tubes. Each group of students receives a single tube. MATERIALS FOR EACH GROUP Supply each group with the following components. Some of the components are shared by the whole class and should be kept on a communal table. • 6‐8ml E.C. K‐12, overnight culture • 1 capsule LB Broth, dry capsule • 1 pack LB Agar (shared with class) • 1 Petri Dish • 1 Erlenmeyer (Culture) flask (250‐300ml) (Shared with class) • 1 Erlenmeyer (Culture) flask (250‐300ml) (per group) • 1 Inoculating Loop (shared with group members) • 1 vial Loop Wash • Marker Pen Page 5 of 12
  • 6.
    PROCEDURE I. Media Preparation Wearheat protective gloves throughout the autoclaving and the agar pouring procedure. Agar plates can be made up to a week in advance, stored in an airtight container at 4°C. 1. The media preparation is performed as a class or the media may be prepared in advance by your teacher. 2. LB Broth Preparation: Each group places one capsule of LB Broth in to a 250‐300ml flask. Add 50ml distilled water and tightly cover the flask mouth with aluminum foil, similar plug or lose cap. 3. LB Agar Preparation: As a class, transfer the LB Agar to a 250‐300ml flask. Add 150ml distilled water and tightly cover the flask mouth with aluminum foil, similar plug or lose cap. 4. Autoclave the LB Broth and LB Agar for 15min at 121°C. Turn the autoclave off. Wait for the autoclave to cool and the pressure to become zero. Instruct students not to open the autoclave until it has cooled and the pressure becomes zero. 5. Remove the media from the autoclave and leave to cool at room temperature. Once the LB Agar has cooled to hand hot temperature (about 45°C), pour a ~0.5cm/ ¼” layer of agar into six Petri dishes. This is approximately 20‐25ml volume of agar. 6. Leave the Petri dish on a flat surface for 30‐40 minutes until completely set. II. Liquid Culture: Inoculation and bacterial culture 1. Transfer 1ml LB broth to a 1.5ml tube to be used as a blank later. 2. Inoculate the remaining LB broth with 5ml overnight culture that will be supplied by your teacher. Gently swirl the flask in a circular motion to thoroughly mix. 3. Transfer 1ml of your culture to a cuvette. Using a spectrophotometer at 600‐ 700nm, zero (blank) the colorimetric spectrophotometer with the LB broth from step 1. Save the blank LB broth. You may need it in next step. Measure the Page 6 of 12
  • 7.
    absorbance of theculture sample. This is your zero time absorbance of culture density. Students can only see three phases of bacteria growth (lag, log and stationary) during one day culture. The bacteria growth will enter decline phase within 24 hours of culture. As the lysis of dead bacteria is slow, the absorbance of the total bacteria mass won’t decline dramatically in 24‐32 hours. 4. Place the flask in a shaking 37°C incubator to start the bacterial growth. Transfer 1ml samples to a cuvette every hour (up to 8 hours) and measure the absorbance at 600‐700nm. III. Solid Culture: Inoculation and dilution on solid culture 1. Write your group name on the bottom of the agar plate. 2. The first student in the group, opens the inoculating loop at the opposite end to the loop. Remove the loop from the package and dip the inoculating loop in to the remaining overnight culture. With the loop in one hand, lift the lid of the Petri dish slightly with the other side kept over the Petri dish. Do NOT put the lid down. Quickly and gently steak four parallel lines across the agar, as shown in figure 1. Replace the lid. Do not to dig the loop into the agar, which will damage the surface of the agar. Figure 1 3. The second student, dips the loop into the Loop Wash. Remove and gentle shake to remove excess wash solution, WAIT 20 seconds to allow the wash solution to evaporate whilst gently shaking in the air. 4. Dilute the bacteria on the plate, in order to isolate single colonies. From one end of the parallel streaks, streak four more parallel lines 90° to the original set. See figure 2. Replace the lid. Page 7 of 12
  • 8.
    Figure 2 5. Thethird student repeats the wash step as in step 3 and streaks four parallel lines 90° to the previous set, starting at the end of the previous streaks. See figure 3. Figure 3 6. The final student repeats the wash as in step 3 and streaks a final set of parallel lines 90° to the previous set, as shown in figure 4. Be careful and ensure that you do NOT streak through the first set. Figure 4 7. Replace the lid and turn the Petri dish upside down to prevent moisture running onto the LB agar. 8. Place the inverted plate in a 37°C incubator overnight. 9. Observe the plate the following day. Page 8 of 12
  • 9.
    Page 9 of12 RESULTS, ANALYSIS & ASSESSMENT 1. Draw the bacterial growth curve using time as x value and absorbance as y value. The curve should show three phases of bacterial growth – lag, log and stationary. 2. There are four phases of bacterial growth the lag, log, stationary and decline (death) phases. Label the curve with the respective growth phase. If there is only three phases explain why? The onset of the decline phase occurs after the end of the experiment. The absorbance value measures the total bacteria mass (live and dead). The dead bacteria will not lyse so quickly and still contribute to the absorbance value. 3. Draw a rough sketch of the bacteria growth on the agar plate. 4. Did you see a dilution in the number of colonies between each set of four streaks; explain why this technique is important to microbiologists? Yes. If there are just bacteria in the first set of streaks then there was still wash solution on the loop that killed the bacteria. This technique is important as it allows microbiologists to isolate individual colonies. Last saved: 9/6/2013 CMH
  • 10.
    This page isintentionally left blank Page 10 of 12
  • 11.
    This page isintentionally left blank Page 11 of 12
  • 12.
  • 13.
    G-Biosciences ♦ 1-800-628-7730♦ 1-314-991-6034 ♦ technical@GBiosciences.com A Geno Technology, Inc. (USA) brand name think proteins! think G-Biosciences www.GBiosciences.com PR020 Bacterial Culture & Growth Student’s Handbook (Cat. # BE‐201)
  • 14.
    Page 2 of12 OBJECTIVES........................................................................................................................ 3 BACKGROUND ................................................................................................................... 3 MATERIALS FOR EACH GROUP .......................................................................................... 5 PROCEDURE....................................................................................................................... 6 I. MEDIA PREPARATION................................................................................................. 6 II. LIQUID CULTURE: INOCULATION AND BACTERIAL CULTURE..................................... 6 III. SOLID CULTURE: INOCULATION AND DILUTION ON SOLID CULTURE....................... 7 RESULTS, ANALYSIS & ASSESSMENT.................................................................................. 9
  • 15.
    OBJECTIVES • Learn aseptictechniques • Learn manipulation of bacteria • Study bacterial growth in liquid culture • Cultivation of bacteria on solid agar, streaking and dilution • Isolation a single bacterial colony BACKGROUND This kit teaches aseptic handling techniques, cultivation of bacteria in liquid broth and on solid culture media. This kit designed to educate students in the lag, log, stationary and decline phases of the bacterial growth cycle and how to monitor the various stages. In addition, the kit teaches the importance of bacterial liquid culture in biotechnology and its applications in industrial biotechnology. This laboratory activity involves preparation of culture medium, inoculation, and monitoring of the liquid culture through the four growth stages. The laboratory activity also teaches cultivation of bacteria on agar, streaking, serial dilution and isolating a single bacterial colony. This laboratory activity uses the most widely used medium for common bacterial culture. LB (Luria and Bertani) broth consists of 1% tryptone, 0.5% yeast extract and 0.5% sodium chloride. The solid media, LB agar, consists of 1% tryptone, 0.5% yeast extract, 0.5% sodium chloride and 1.5% agar. Both LB broth and LB Agar are rich in nitrogen, carbon and salts to meet the requirement of bacterial growth. Both media do not require the adjustment of pH. For convenience both LB media are supplied as premixed preparations, LB Broth as capsules. Fresh medium is prepared by adding water followed by sterilization. In the case of bacteria or other unicellular organisms cell growth refers to cell division rather than to the size of the individual cell. The rate at which bacterial cells divide in culture is influenced by several factors, including the level of available nutrients, the temperature, pH and the degree of agitation. There are four different phases in a typical bacterial growth curve, the lag, log or exponential, stationary and the decline or death phase. • LAG PHASE: Growth is slow at first, while the bacteria acclimatize to the nutrients and conditions in the growth media. • LOG PHASE: Once acclimatized, the bacteria begin to rapidly divide at an exponential rate, doubling every 10‐20 minutes. • STATIONARY PHASE: The increasing numbers of bacteria begin to compete for the dwindling nutrients and their exponential growth is inhibited. The number of bacteria stabilizes. • DEATH PHASE: The decreasing amount of nutrients and increasing levels of toxic byproducts results in harmful conditions for the bacteria and they begin to die. Page 3 of 12
  • 16.
  • 17.
    MATERIALS FOR EACHGROUP Supply each group with the following components. Some of the components are shared by the whole class and should be kept on a communal table. • 6‐8ml E.C. K‐12, overnight culture • 1 capsule LB Broth, dry capsule • 1 pack LB Agar (shared with class) • 1 Petri Dish • 1 Erlenmeyer (Culture) flask (250‐300ml) (Shared with class) • 1 Erlenmeyer (Culture) flask (250‐300ml) (per group) • 1 Inoculating Loop (shared with group members) • 1 vial Loop Wash • Marker Pen Page 5 of 12
  • 18.
    PROCEDURE I. Media Preparation Wearheat protective gloves throughout the autoclaving and the agar pouring procedure. Agar plates can be made up to a week in advance, stored in an airtight container at 4°C. 1. The media preparation is performed as a class or the media may be prepared in advance by your teacher. 2. LB Broth Preparation: Each group places one capsule of LB Broth in to a 250‐300ml flask. Add 50ml distilled water and tightly cover the flask mouth with aluminum foil, similar plug or lose cap. 3. LB Agar Preparation: As a class, transfer the LB Agar to a 250‐300ml flask. Add 150ml distilled water and tightly cover the flask mouth with aluminum foil, similar plug or lose cap. 4. Autoclave the LB Broth and LB Agar for 15min at 121°C. Turn the autoclave off. Wait for the autoclave to cool and the pressure to become zero. Instruct students not to open the autoclave until it has cooled and the pressure becomes zero. 5. Remove the media from the autoclave and leave to cool at room temperature. Once the LB Agar has cooled to hand hot temperature (about 45°C), pour a ~0.5cm/ ¼” layer of agar into six Petri dishes. This is approximately 20‐25ml volume of agar. 6. Leave the Petri dish on a flat surface for 30‐40 minutes until completely set. II. Liquid Culture: Inoculation and bacterial culture 1. Transfer 1ml LB broth to a 1.5ml tube to be used as a blank later. 2. Inoculate the remaining LB broth with 5ml overnight culture that will be supplied by your teacher. Gently swirl the flask in a circular motion to thoroughly mix. 3. Transfer 1ml of your culture to a cuvette. Using a spectrophotometer at 600‐ 700nm, zero (blank) the colorimetric spectrophotometer with the LB broth from step 1. Save the blank LB broth. You may need it in next step. Measure the Page 6 of 12
  • 19.
    absorbance of theculture sample. This is your zero time absorbance of culture density. Students can only see three phases of bacteria growth (lag, log and stationary) during one day culture. The bacteria growth will enter decline phase within 24 hours of culture. As the lysis of dead bacteria is slow, the absorbance of the total bacteria mass won’t decline dramatically in 24‐32 hours. 4. Place the flask in a shaking 37°C incubator to start the bacterial growth. Transfer 1ml samples to a cuvette every hour (up to 8 hours) and measure the absorbance at 600‐700nm. III. Solid Culture: Inoculation and dilution on solid culture 1. Write your group name on the bottom of the agar plate. 2. The first student in the group, opens the inoculating loop at the opposite end to the loop. Remove the loop from the package and dip the inoculating loop in to the remaining overnight culture. With the loop in one hand, lift the lid of the Petri dish slightly with the other side kept over the Petri dish. Do NOT put the lid down. Quickly and gently steak four parallel lines across the agar, as shown in figure 1. Replace the lid. Do not to dig the loop into the agar, which will damage the surface of the agar. Figure 1 3. The second student, dips the loop into the Loop Wash. Remove and gentle shake to remove excess wash solution, WAIT 20 seconds to allow the wash solution to evaporate whilst gently shaking in the air. 4. Dilute the bacteria on the plate, in order to isolate single colonies. From one end of the parallel streaks, streak four more parallel lines 90° to the original set. See figure 2. Replace the lid. Page 7 of 12
  • 20.
    Figure 2 5. Thethird student repeats the wash step as in step 3 and streaks four parallel lines 90° to the previous set, starting at the end of the previous streaks. See figure 3. Figure 3 6. The final student repeats the wash as in step 3 and streaks a final set of parallel lines 90° to the previous set, as shown in figure 4. Be careful and ensure that you do NOT streak through the first set. Figure 4 7. Replace the lid and turn the Petri dish upside down to prevent moisture running onto the LB agar. 8. Place the inverted plate in a 37°C incubator overnight. 9. Observe the plate the following day. Page 8 of 12
  • 21.
    Page 9 of12 RESULTS, ANALYSIS & ASSESSMENT 1. Draw the bacterial growth curve using time as x value and absorbance as y value. ________________________________________________________________________ ________________________________________________________________________ ________________________________________________________________________ ________________________________________________________________________ 2. There are four phases of bacterial growth the lag, log, stationary and decline (death) phases. Label the curve with the respective growth phase. If there is only three phases explain why? ________________________________________________________________________ ________________________________________________________________________ ________________________________________________________________________ 3. Draw a rough sketch of the bacteria growth on the agar plate. 4. Did you see a dilution in the number of colonies between each set of four streaks; explain why this technique is important to microbiologists? ________________________________________________________________________ ________________________________________________________________________ ________________________________________________________________________ ________________________________________________________________________ Last saved: 9/6/2013 CMH
  • 22.
    This page isintentionally left blank Page 10 of 12
  • 23.
    This page isintentionally left blank Page 11 of 12
  • 24.