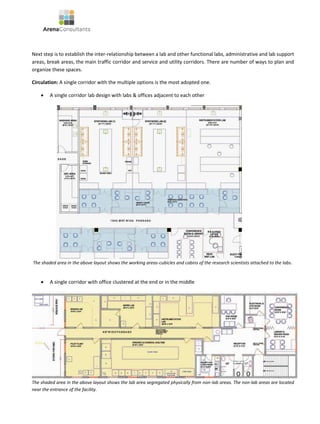
Basic Architectural Design Considerations for a Laboratory
Published in: Pharma Ally, Feb 16-28, 2010
The Ministry of Health & Family Welfare, under the Drugs & Cosmetics Act, has laid down “Good Laboratory Practices”
requirements and made the compliance of GLP mandatory from 1st November 2010, for all pharma companies. Close
to the requirement of Indian Law; WHO has also come out with a draft guidance document of GLP for all establishments
engaged in testing of pharmaceutical products. Further for last few years it is also noticed that laboratory’s functioning,
its design, layout, aesthetic appearance and adequacy of work area have been one of the major areas where various
regulatory officials have been spending time and making observations for compliance. Shortcomings in design, layout,
aesthetic appearance and adequacy of work area found its mention in inspection report either because of improper
understanding and far-sight (by project persons, technical persons or management personnel) of these aspects while
setting up laboratories or poor execution work for time constrain / money constrain. The above two publications has
raised a furor in the industry to retrofit the existing facilities as well those upcoming ones are now focusing on to make
their upcoming set-up’s GLP/GMP compliant.
Lab Classification: Broadly speaking laboratories can be classified as wet or dry labs. Wet labs use chemicals for
reactions versus dry labs where instrumentation and very small amounts of chemicals are used in testing.
Wet labs require chemical resistant work surfaces and cabinets that are liquid tight to contain spillage. Chemical and
glassware storage and fume hoods are significant factors in space planning and furniture selection.
Dry analytical labs typically require a lot of large shelving to support instrumentation. Height-adjustable work surfaces
may be required to allow large counter-mounted equipment to be placed at a comfortable operating height or be
completely removed to provide instant space for the addition of floor mounted equipment.
The wet and dry categories are not without crossover. Wet labs will always have some instrumentation and dry labs
usually will have limited chemicals on hand. Some laboratories may contain both wet and dry areas.
Lab Planning Concepts: The laboratory module is the key unit in any lab facility. A well thought of and well-designed
module will primarily have flexibility and expansion as its two most important benefits. The other criterions are
functionality, safety, interaction, aesthetics and cost effectiveness.
However, first and foremost it is absolutely
critical to identify the lab and non-lab areas at the
initial planning stage. Zoning the premises or the
building between lab and non-lab spaces reduces
the project capital and operational costs. Labs
require 100% outside air while non-lab spaces
function moreover on the principal of re-
circulated air similar to commercial buildings.
The adjoining table describes the ‘zoning of lab and
non-lab areas’.
Next step is to establish the inter-relationship between a lab and other functional labs, administrative and lab support
areas, break areas, the main traffic corridor and service and utility corridors. There are number of ways to plan and
organize these spaces.
Circulation: A single corridor with the multiple options is the most adopted one.
 A single corridor lab design with labs & offices adjacent to each other
The shaded area in the above layout shows the working areas-cubicles and cabins of the research scientists attached to the labs.
 A single corridor with office clustered at the end or in the middle
The shaded area in the above layout shows the lab area segregated physically from non-lab areas. The non-lab areas are located
near the entrance of the facility.
 A single corridor with office clusters directly accessing the main labs
The shaded area in the adjoining layout shows the placement of scientist’s work tables next to the individual lab.
For a medium size lab, option 2 with office clusters at the end or in the middle works the best. This layout segregates
lab and non-lab spaces thereby differentiating between the mechanical requirements and resulting to cost effective lab
operating solution.
The other way to go about for lab designing is by deciding whether to have a single main corridor with a view from labs
to the exterior or to have labs located in the interior and use the wall length for main traffic and utility corridors. Both the
options have pros and cons. Labs planned along the external wall allow natural light to flow in and easy extraction of
toxic air. Certain special instruments and equipments such as nuclear magnetic resonance apparatus (NMR), electron
microscopes and lasers have to be placed in low light areas or area with no natural light and hence have to be located
in the interior of the building.
The above layout shows the HPTLC room surrounded by labs and office areas.
Lab exposed to building exterior’s through windows
Research scientists many times prefer detaching the ‘hot zone’ from the main lab area. This is the space where
equipment’s emit hot air (ovens) or fume hoods etc and large amount of toxic air is exhausted. This area doesn’t need
to be air conditioned and it reduces considerable load from HVAC system. A proper exhaust layout supported by forced
draft fresh air ventilation is sufficient. This area is moreover like a dead space where the research scientists set up the
assembly and visit the zone only for the purpose of monitoring. The other point of view here is, since this area is not
so habitable, the finishing elements like false ceiling or epoxy flooring can be avoided further cutting the costs. Looking
at the above advantages it is advisable to adopt this practice for a medium size lab.
Segregation of the ‘hot zone’ from the main facility.
Open labs: In open labs, researchers share not only the space itself but also equipment, bench space, and support
staff. The open lab format facilitates communication between scientists and makes the lab more easily adaptable for
future needs.
The above process is followed by deciding a grid of lab operations which is normally in two directions. The horizontal
plane caters the human movement and the physical expansion of lab while the vertical plane caters to the drop down
points for mechanical, electrical, plumbing and utility systems. This pattern gives the flexibility by avoiding the cross-
over between the human and mechanical interface.
Lab Layout: The layout of a lab can have any shape or form. It can be linear, square, rectangular or curvilinear. Typically
a lab has a width varying from 10’-0” to 20’-0” and depth which may vary from 20’-0” to 30’-0”. The depth depends
upon the individual requirement of a laboratory.
Non lab areas
Area where Fume hoods are placed ’Hot zone’ is
segregated from other areas
The width criteria is based on two rows of equipment and lab tables of 2’-6” depth along each wall and a 5’-0” aisle in
the centre for movement. If it’s a 20’-0” wide lab, then it has 2 aisles running parallel to the longitudinal walls with a
5’-0” wide island table in the centre thereby providing for maximum worktops and assemblies to take place. In either
case it is mandatory to have at least 5’-0” aisle for safe and easy movement and operations.
Lab Aesthetics & Finishes: Once the basic lab boundary is set, planning for lab interiors and finishes has to be taken
up. Flooring, ceiling and walls are the static elements of lab interiors. Laboratories should be free from air pollution,
cross contamination and zero tolerance for insects and rodents. Research activities by nature produce toxic elements
in air. So it is important that all the interior surfaces are smooth, free from cracks and permit easy cleaning and
disinfection. Treating the walls and floor with epoxy coating ensures smooth and homogeneous surface. However it
can prove to be an expensive solution for a medium size lab in which case the floor can be treated with joint free
vitrified tiles which are not only easy to maintain but are cost effective as well.
The walls can be treated with a minimum
thickness of epoxy coating or can be finished with
regular washable luster paint with low voc. The
other option to walls is to have glazed aluminum
anodized partitions interconnecting the labs. This
has an added advantage. It creates open-ness in
the entire facility, establishes visual connection
between the labs and enables the transmission of
light. These partitions also give the flexibility in
terms of reconfiguration and expansion of lab
layout for futuristic needs.
A grid of 2’x2’ modular false ceiling above the
service carriers gives a finished look to the lab.
The biggest advantage of modular ceiling is that it
controls the volume of lab thereby reducing the
HVAC load and cost. In addition, this pattern
provides the flexibility of adding, shifting, and
relocating of supply and exhaust ducts as and
when new equipments or fume hoods are added
or eliminated.
Few points that can be easily taken care of:
 Eliminate cross-contamination between laboratories
 Minimize areas requiring controlled environments
 The laboratory doors should be automatically self-closing. Such self-closing doors are to be able to be opened
with a minimum of effort as to allow access and outlet for everyone
 Consider cascading supply air from non-laboratory spaces to laboratory spaces for exhaust
 Spaces between benches, cabinets, and equipment must be accessible for cleaning and allow for servicing of
equipment.
 Each laboratory must contain a sink. Laboratory sinks should have lips that protect sink drains from spills.
Waste water lines should be separate from domestic sewage
 Chemical storage shelves should not be placed above laboratory sinks. Separate ventilated chemical storage
cabinets should be utilized supported by a proper exhaust system
 Space allocation for gas cylinders at the same level but segregated from lab areas and supported by gas
detection system. This will reduce the piping length.
 Auxiliary valves for gas and vacuum lines should be located outside the lab.
 Flexible connections should be used for connecting gas and other plumbed utilities. A shutoff valve should be
located within sight of the connection and clearly marked
 The entire facility should have fire safety provisions with a consideration of integrating the same with HVAC
system
 Non-lab area should have a provision for changing room at the entrance so that the chemists enter the lab
only after wearing the overcoat and eye protection spectacles
 The ancillary areas such as stability rooms with incubators or sample receiving areas or lab specific
requirements in case of microbiology labs should be planned for in advance
 Place fume hoods at “dead-end” locations away from entryways and circulation routes
Mistakes that can be avoided
Several mistakes that are common in laboratory planning occur from a lack of knowledge, insufficient planning or down
grading in the wrong areas to reduce costs.
Most common ones are:
 No allowances made in the structure for adding new drains or fume hood exhausts in the future
 Lab modules are too shallow; not enough space
 No way to expand the facility in the future
 Improperly fastened wall cabinets come loose from the wall
 Fixed cabinets prohibit reconfiguration of the lab area
 Critical systems and equipment are not connected to a continual power source or an emergency power system
 Inadequate distribution system for data cables; no cable trays
 HVAC is not sufficient to maintain adequate temperature levels or supply makeup air for fume hoods
 Electrical system lacks sufficient power, appropriate distribution or enough outlets
 Too little space provided for using and servicing equipment
 Location of fume hoods is too close to primary exits
 Not all lab areas have adequate access to primary exits
Apart from the civil interior, the laboratories should be provided with adequate lighting and ventilation. The air
ventilation system should provide dust free environment. Temperature should be between 23 to 27 degree C and
humidity should be not more than 65%.
Building Costs at a glance
Typically, more than 50% of the construction cost of a laboratory building is attributed to engineering systems.
Adequate provision has to be made not only for space and equipment for carrying out necessary test but also for
utilities like water and gas. Lab planning guidelines can be used effectively to control the project & operational costs.
In a typical biochemistry lab building, the cost for
architecture is about equal to the cost for HVAC,
plumbing, and electrical infrastructure combined.
Finally, lab buildings start getting modified almost from the day they are occupied. Thus an early on design process has
to be adopted. The purpose of the laboratory for which it is being built has to be clearly defined and there should be
maximum if not equal amount of interaction and involvement between the stakeholders, the design team and the end
user’s. It has to be understood that the designing of a layout is a very user & requirement specific and should
incorporate the current as well as the futuristic needs of the lab. Careful assessment of user’s needs and equipment
requirements should be noted down. A good design will result into a synergism of greater productivity & better
performance, informal interaction, team work, innovation and good working environment.
References:
http://www.wbdg.org/
http://www.labdesignnews.com/
http://indiaglp.gov.in/

Basic architectural design considerations for a laboratory

  • 1.
    Basic Architectural DesignConsiderations for a Laboratory Published in: Pharma Ally, Feb 16-28, 2010 The Ministry of Health & Family Welfare, under the Drugs & Cosmetics Act, has laid down “Good Laboratory Practices” requirements and made the compliance of GLP mandatory from 1st November 2010, for all pharma companies. Close to the requirement of Indian Law; WHO has also come out with a draft guidance document of GLP for all establishments engaged in testing of pharmaceutical products. Further for last few years it is also noticed that laboratory’s functioning, its design, layout, aesthetic appearance and adequacy of work area have been one of the major areas where various regulatory officials have been spending time and making observations for compliance. Shortcomings in design, layout, aesthetic appearance and adequacy of work area found its mention in inspection report either because of improper understanding and far-sight (by project persons, technical persons or management personnel) of these aspects while setting up laboratories or poor execution work for time constrain / money constrain. The above two publications has raised a furor in the industry to retrofit the existing facilities as well those upcoming ones are now focusing on to make their upcoming set-up’s GLP/GMP compliant. Lab Classification: Broadly speaking laboratories can be classified as wet or dry labs. Wet labs use chemicals for reactions versus dry labs where instrumentation and very small amounts of chemicals are used in testing. Wet labs require chemical resistant work surfaces and cabinets that are liquid tight to contain spillage. Chemical and glassware storage and fume hoods are significant factors in space planning and furniture selection. Dry analytical labs typically require a lot of large shelving to support instrumentation. Height-adjustable work surfaces may be required to allow large counter-mounted equipment to be placed at a comfortable operating height or be completely removed to provide instant space for the addition of floor mounted equipment. The wet and dry categories are not without crossover. Wet labs will always have some instrumentation and dry labs usually will have limited chemicals on hand. Some laboratories may contain both wet and dry areas. Lab Planning Concepts: The laboratory module is the key unit in any lab facility. A well thought of and well-designed module will primarily have flexibility and expansion as its two most important benefits. The other criterions are functionality, safety, interaction, aesthetics and cost effectiveness. However, first and foremost it is absolutely critical to identify the lab and non-lab areas at the initial planning stage. Zoning the premises or the building between lab and non-lab spaces reduces the project capital and operational costs. Labs require 100% outside air while non-lab spaces function moreover on the principal of re- circulated air similar to commercial buildings. The adjoining table describes the ‘zoning of lab and non-lab areas’.
  • 2.
    Next step isto establish the inter-relationship between a lab and other functional labs, administrative and lab support areas, break areas, the main traffic corridor and service and utility corridors. There are number of ways to plan and organize these spaces. Circulation: A single corridor with the multiple options is the most adopted one.  A single corridor lab design with labs & offices adjacent to each other The shaded area in the above layout shows the working areas-cubicles and cabins of the research scientists attached to the labs.  A single corridor with office clustered at the end or in the middle The shaded area in the above layout shows the lab area segregated physically from non-lab areas. The non-lab areas are located near the entrance of the facility.
  • 3.
     A singlecorridor with office clusters directly accessing the main labs The shaded area in the adjoining layout shows the placement of scientist’s work tables next to the individual lab. For a medium size lab, option 2 with office clusters at the end or in the middle works the best. This layout segregates lab and non-lab spaces thereby differentiating between the mechanical requirements and resulting to cost effective lab operating solution. The other way to go about for lab designing is by deciding whether to have a single main corridor with a view from labs to the exterior or to have labs located in the interior and use the wall length for main traffic and utility corridors. Both the options have pros and cons. Labs planned along the external wall allow natural light to flow in and easy extraction of toxic air. Certain special instruments and equipments such as nuclear magnetic resonance apparatus (NMR), electron microscopes and lasers have to be placed in low light areas or area with no natural light and hence have to be located in the interior of the building. The above layout shows the HPTLC room surrounded by labs and office areas. Lab exposed to building exterior’s through windows
  • 4.
    Research scientists manytimes prefer detaching the ‘hot zone’ from the main lab area. This is the space where equipment’s emit hot air (ovens) or fume hoods etc and large amount of toxic air is exhausted. This area doesn’t need to be air conditioned and it reduces considerable load from HVAC system. A proper exhaust layout supported by forced draft fresh air ventilation is sufficient. This area is moreover like a dead space where the research scientists set up the assembly and visit the zone only for the purpose of monitoring. The other point of view here is, since this area is not so habitable, the finishing elements like false ceiling or epoxy flooring can be avoided further cutting the costs. Looking at the above advantages it is advisable to adopt this practice for a medium size lab. Segregation of the ‘hot zone’ from the main facility. Open labs: In open labs, researchers share not only the space itself but also equipment, bench space, and support staff. The open lab format facilitates communication between scientists and makes the lab more easily adaptable for future needs. The above process is followed by deciding a grid of lab operations which is normally in two directions. The horizontal plane caters the human movement and the physical expansion of lab while the vertical plane caters to the drop down points for mechanical, electrical, plumbing and utility systems. This pattern gives the flexibility by avoiding the cross- over between the human and mechanical interface. Lab Layout: The layout of a lab can have any shape or form. It can be linear, square, rectangular or curvilinear. Typically a lab has a width varying from 10’-0” to 20’-0” and depth which may vary from 20’-0” to 30’-0”. The depth depends upon the individual requirement of a laboratory. Non lab areas Area where Fume hoods are placed ’Hot zone’ is segregated from other areas
  • 5.
    The width criteriais based on two rows of equipment and lab tables of 2’-6” depth along each wall and a 5’-0” aisle in the centre for movement. If it’s a 20’-0” wide lab, then it has 2 aisles running parallel to the longitudinal walls with a 5’-0” wide island table in the centre thereby providing for maximum worktops and assemblies to take place. In either case it is mandatory to have at least 5’-0” aisle for safe and easy movement and operations. Lab Aesthetics & Finishes: Once the basic lab boundary is set, planning for lab interiors and finishes has to be taken up. Flooring, ceiling and walls are the static elements of lab interiors. Laboratories should be free from air pollution, cross contamination and zero tolerance for insects and rodents. Research activities by nature produce toxic elements in air. So it is important that all the interior surfaces are smooth, free from cracks and permit easy cleaning and disinfection. Treating the walls and floor with epoxy coating ensures smooth and homogeneous surface. However it can prove to be an expensive solution for a medium size lab in which case the floor can be treated with joint free vitrified tiles which are not only easy to maintain but are cost effective as well. The walls can be treated with a minimum thickness of epoxy coating or can be finished with regular washable luster paint with low voc. The other option to walls is to have glazed aluminum anodized partitions interconnecting the labs. This has an added advantage. It creates open-ness in the entire facility, establishes visual connection between the labs and enables the transmission of light. These partitions also give the flexibility in terms of reconfiguration and expansion of lab layout for futuristic needs. A grid of 2’x2’ modular false ceiling above the service carriers gives a finished look to the lab. The biggest advantage of modular ceiling is that it controls the volume of lab thereby reducing the HVAC load and cost. In addition, this pattern provides the flexibility of adding, shifting, and relocating of supply and exhaust ducts as and when new equipments or fume hoods are added or eliminated.
  • 6.
    Few points thatcan be easily taken care of:  Eliminate cross-contamination between laboratories  Minimize areas requiring controlled environments  The laboratory doors should be automatically self-closing. Such self-closing doors are to be able to be opened with a minimum of effort as to allow access and outlet for everyone  Consider cascading supply air from non-laboratory spaces to laboratory spaces for exhaust  Spaces between benches, cabinets, and equipment must be accessible for cleaning and allow for servicing of equipment.  Each laboratory must contain a sink. Laboratory sinks should have lips that protect sink drains from spills. Waste water lines should be separate from domestic sewage  Chemical storage shelves should not be placed above laboratory sinks. Separate ventilated chemical storage cabinets should be utilized supported by a proper exhaust system  Space allocation for gas cylinders at the same level but segregated from lab areas and supported by gas detection system. This will reduce the piping length.  Auxiliary valves for gas and vacuum lines should be located outside the lab.  Flexible connections should be used for connecting gas and other plumbed utilities. A shutoff valve should be located within sight of the connection and clearly marked  The entire facility should have fire safety provisions with a consideration of integrating the same with HVAC system  Non-lab area should have a provision for changing room at the entrance so that the chemists enter the lab only after wearing the overcoat and eye protection spectacles  The ancillary areas such as stability rooms with incubators or sample receiving areas or lab specific requirements in case of microbiology labs should be planned for in advance  Place fume hoods at “dead-end” locations away from entryways and circulation routes Mistakes that can be avoided Several mistakes that are common in laboratory planning occur from a lack of knowledge, insufficient planning or down grading in the wrong areas to reduce costs. Most common ones are:  No allowances made in the structure for adding new drains or fume hood exhausts in the future  Lab modules are too shallow; not enough space  No way to expand the facility in the future  Improperly fastened wall cabinets come loose from the wall  Fixed cabinets prohibit reconfiguration of the lab area  Critical systems and equipment are not connected to a continual power source or an emergency power system  Inadequate distribution system for data cables; no cable trays  HVAC is not sufficient to maintain adequate temperature levels or supply makeup air for fume hoods  Electrical system lacks sufficient power, appropriate distribution or enough outlets  Too little space provided for using and servicing equipment  Location of fume hoods is too close to primary exits  Not all lab areas have adequate access to primary exits
  • 7.
    Apart from thecivil interior, the laboratories should be provided with adequate lighting and ventilation. The air ventilation system should provide dust free environment. Temperature should be between 23 to 27 degree C and humidity should be not more than 65%. Building Costs at a glance Typically, more than 50% of the construction cost of a laboratory building is attributed to engineering systems. Adequate provision has to be made not only for space and equipment for carrying out necessary test but also for utilities like water and gas. Lab planning guidelines can be used effectively to control the project & operational costs. In a typical biochemistry lab building, the cost for architecture is about equal to the cost for HVAC, plumbing, and electrical infrastructure combined. Finally, lab buildings start getting modified almost from the day they are occupied. Thus an early on design process has to be adopted. The purpose of the laboratory for which it is being built has to be clearly defined and there should be maximum if not equal amount of interaction and involvement between the stakeholders, the design team and the end user’s. It has to be understood that the designing of a layout is a very user & requirement specific and should incorporate the current as well as the futuristic needs of the lab. Careful assessment of user’s needs and equipment requirements should be noted down. A good design will result into a synergism of greater productivity & better performance, informal interaction, team work, innovation and good working environment. References: http://www.wbdg.org/ http://www.labdesignnews.com/ http://indiaglp.gov.in/