SlideShare a Scribd company logo
1 of 24
Download to read offline
User Manual
Rev. 1
!
Warnings
•For safety operation of the weighing indicator, please follow the following warning/
safety instructions:
•Calibration inspection and maintenance of the indicator are prohibited by non-
professional staff
•Please ensure that the indicator has good ground
•The indicator is a static and sensitive equipment; Please cut off power during
electrical connections; Touching the internal components by hand is prohibited;
Please take anti-static prevention measures
!
!
.....................................................................................Getting Started	

 4
................................................................................................................................Overview	

 4
...........................................................................................................Technical Parameters	

 4
................................................................................................................Indicator Drawing	

 5
....................................................................................................................................Battery	

 6
..............................................................................................................................Installation	

 6
...............................................................................Calibration and Parameter Settings	

 10
...................................................................................Using Indicator	

 16
....................................................................................................................Basic Weighing	

 16
.....................................................................................................................Power On/Off	

 17
......................................................................................................................................Zero	

 17
.......................................................................................................................................Tare	

 18
...................................................................................................................Changing Units	

 18
......................................................................................................................................Hold	

 18
.......................................................................................................................................Print	

 18
.............................................................................................................Counting Function	

 19
.....................................................................................................Accumulation Function	

 19
......................................................................................................RS232 Output Format	

 20
.............................................................................................More Info	

 23
.................................................................................................................Troubleshooting	

 23
...............................................................................................................Technical Support	

 24
	

 User Manual / Table of Contents
	

 3/24
Getting Started
Overview
Thank you for using AWI's LP7510 series indicator for your important application.
The L7510 series weighing indicator can be used for many type of scales such as
bench and floor scales. The basic functions are as follows:
•Hold function
•Print
•kg/lb unit conversion
•Count/Total
•Gross/Tare/Zero
•Overload reminder
Options can also be requested to include the following:
•RS232/RS485 serial interface or second display
•I/O
•4-20mA outputs
Technical Parameters
• Accuracy class: 6000 e
• Resolution:
• Display: 30,000
• ADC: 2,000,000
• Zero stability error:TK0 < 0.1μV//K
• Span stability error:TKspn < ± 6 ppm//K
• Sensitivity (internal): 0. 3 μV /d
• Input voltage: -30 to +30mV DC
• Excitation circuit: 5VDC, 4 wire connection, 6 load cell of 350ohm maximum
• AC power:AC 100-250V (use only the 9V adapter supplied with the indicator)
• Operation temperature: -10 °C ~ +40 °C
• Operation humidity: ≤90%RH
• Storage temperature: -40 °C ~ +70 °C
	

 User Manual / Getting Started
	

 4/24
Indicator Drawing
	

 User Manual / Getting Started
	

 5/24
!
!
!
Battery
•Charge the internal battery (option) fully before first time use
•When “battery” light is on, it means the battery is low and needs recharging
•During charging, the battery light turns yellow
•When the battery light turns green, its means the battery is fully charged
•Remove the battery when not in use for a long period of time
•To keep the battery in best condition, fully discharge battery every month by
leaving the indicator on until indicator powers off
Installation
•The indicator can connect with 6 load cell of 350ohm maximum with 4 wire or 6
wire load cell. There are two connection methods between the load cell and the
indicator:
•Quick disconnect
•Terminal trip connection (inner connection)
•The excitation voltage for the load cell is 5VDC; largest output current =
120mA; maximum connect 6 350ohm load cell
•Load cell (or the signal cable for the junction box) is connected with 5 pin
terminal block (J5) on the circuit board of the weighing indicator
•Open the back cover of the weighing indicator, and insert signal cable to the
terminal block (J5); Make sure the screw is fixed tightly
	

 User Manual / Getting Started
	

 6/24
!
+EXC = Positive excitation voltage to load cell


 +IN = Positive output signal from load cell


 HD = Shielded wire


 -IN = Negative output signal from load cell


 -EXC = Negative excitation voltage to load cell
•RS232: DB9 Pin or 3 Pin
DB9 joint Definition Function
2 TXD Sending data
3 RXD Receiving data
5 GND Ground interface
Note: if RS485,The connection pin is 2 and 5 pin.
3 Pin definition
	

 User Manual / Getting Started
	

 7/24
•4-20mA output
•Resolution: 1/1000
•Outside Load: 100-350ohms
•Inside connection: load input port connect with “1” of J2, ground port connect
with “GND” of J2
•Outside connection: load input port connect with pin 1 of DB9, ground port
connect with pin 6 of DB9
•To test the connection, connect a 250ohm load; Adjust the multimeter to the
current stalls; To test the output current, connect the loading port to the red
lead of the multimeter and the GND to the black lead of the multimeter
•Calibration:
•Press PRINT andTOTAL to go into configuration mode
•Go to C32 and change out to out-20
•Relay output signal function
•The indicator can output 4 signals, which when connected to outside
equipment, can perform automatic control function and upper/lower limit alarm
function. Goto setting C33 as follows:
Output port Port definition Function
C33=0
Out1 Close output function No output signal
C33=0
Out2 Close output function No output signal
C33=0
Out3 Close output function No output signal
C33=0
Out4 Close output function No output signal
C33=1
Out1 Open overload control function Output overload control
signal
C33=1
Out2 Open compliance control function Output compliance
control signal
C33=1
Out3 Open under-load control function Output under-load control
signal
C33=1
Out4 Open stable control function Output stable control
signal
C33=2
Out1 Weight>=C13 instant connection Feeding control signal
C33=2
Out2 Weight<=C14 instant connection Feeding control signal
C33=2
Out3 OUT1、OUT2 close Output alarm signal,
connect with buzzer
C33=2
Out4 Weight<=C14 constant connection
Weight>=C13 disconnect
Feeding start and stop
C33=3 Preserved, no function.Preserved, no function.Preserved, no function.
	

 User Manual / Getting Started
	

 8/24
•Examples:
•Check weigh application:
•Connect indicator with yellow, green and red lights.
•Yellow light on when overload
•Green light on when ok
•Red light on when under-load
•Connect with buzzer
•Feeding control application
•For hopper scales
•Target between 50 to 500kg
•I/O card can perform open and close feeding valve
•Setting C13=500kg, C14=50kg
•C13=upper limit -> close feeding valve
•C14=lower limit -> open feeding valve
•Indicator output signal will control the ON/OFF switch of the external
equipment or machine
•OUT2 ON, OUT1 OFF, OUT3 connect to buzzer, alarm reminder when
start and stop
•When weight over 500kg, OUT1 and OUT3 give instant connection and
break off; OUT4 breaks off; when weight is under 50kg, OUT2 and OUT3
provide instant connection and break off; OUT4 constantly connected.
DB9 pin definition port
1 pin 1st output signal pin Out1
2 pin 1st output signal pin Out1
3 pin 2nd output signal pin Out2
4 pin 2nd output signal pin Out2
5 pin 3rd output signal pin Out3
6 pin 3rd output signal pin Out3
7 pin 4th output signal pin Out4
8 pin 4th output signal pin Out4
	

 User Manual / Getting Started
	

 9/24
Step
Method of
operation
Display Remark
1 [C01 ] After you enter calibration mode,
it display [C01 ]
2 press [C01 1] Weight unit
option:1=kg
2=lb
3 press
press
press or
[C02 ]
[C02 0]
[C02 2]
Set decimal digits
option:0/1/2/3/4
Select decimal digit
example:two decimal point:
[C02 2]
4 press
press
press or
[C03 ]
[C03 1]
[C03 5]
Set graduation
option:1/2/5/10/20/50
Select required graduation
example:graduation 5:[C03 5]
5 press
press
press or /
[C04 ]
[0100.00]
[0100.00]
Max capacity
example:max weighing 100kg:
[0100.00]
6
press
press
press
press
[C05 ]
[C05 0]
[C05 1]
[CAL 9]
。。。。。
。
[0000.00]
Zero calibration
Option
0=no need zero calibration
1=need zero calibration
calibration zero please choose 1 and
ensure scale is empty and “stable” light
is on
Ensure zero calibration, countdown. Till
show[0.00](example for two decimal
point)。
	

 User Manual / Getting Started
	

 10/24
Calibration and Parameter Settings
•To enter calibration/parameter settings
•Press and hold the HOLD and PRINT key at the same time (OP-900)
•For OP-901, press ON/OFF and SET at the same time
•Navigate through the settings as shown in the following tables by using the
arrow and return keys (labeled below the indicator keys)
•Press theTOTAL key (OP-900) to save and exit settings at any time
•Press ON/OFF key (do not hold) for OP-901
The following table shows the steps to properly calibrate the indicator in the
calibration menu:
7 press
press
press or
press
press or
press
[C06 ]
[C06 0]
[C06 1]
[SPAN ]
[0100.00]
[0080.00]
[CAL 9]
……
[0080.00]
[CAL End]
calibration
option:
0=No need calibration
1= need calibration
Load weights on scales according
to max. capacity. Suggest close to
the max capacity, at least 10% of
max. capacity.
For example: the weights is 80kg
As bellows:
Input the 0080.00, count down ,
then indicator shows 0080.00 ,
calibration is over.
If you want to set application
function parameter. Press
“PRINT” if you want to exit press
“TOTAL”
8
press
press
press or
[C07 ]
[07 0]
[07 1]
Default parameters setting
option:0=non-restore default
parameters
1=restore default parameters
Note: after the above parameters
setting finish, please do not set
default parameters to avoid the
original setting parameters is lost.
	

 User Manual / Getting Started
	

 11/24
The following table shows the other parameter settings in the same calibration menu
as above:
Function Setting Item parameters setting and instruction
warning tone
C08
warning tone
Options: 0 = close warning tone
1 = open warning tone
Automatic
power off
C09
Automatic
power off
option:0=close auto power off
10= power off automatically if no change
within 10 minute.
30= power off automatically if no change
within 30 minute.
60= power off automatically if no
change within 60 minute.
Power saving
setting
C10
Power saving
setting
LED Version:
option:0= close power saving setting
3= close display if no change within 3min.
5= close display if no change within 5 min.
LCD Version:
0=Close he backlight
1= backlight when the weight change or press
the keyboard
2=constant backlight
Hold function
C11
Hold mode
option:0=close hold function
1=Peak hold /2=Data Hold
Instruction:
Peak-hold: it shows the max. data,
mainly application for materials testing,
such as tension and pulling force.
Date-hold: it shows current weight value.
Mainly application for animal weighing.
Kg/lb
conversion
C12
Kg/lb
conversion
C12=0 stop kg/lb conversion
C12=1 kg/lb conversion is ok
Upper/lower
limit alarm
C13
Upper limit
alarm value
You can set it within the max. capacity limitUpper/lower
limit alarm
C14
Lower limit
alarm value
You can set it within the max. capacity limit
Inner Code
display
C15
Check inner
code
Enter C15 to check the inner code
	

 User Manual / Getting Started
	

 12/24
Date and time
C16
Date
Enter C16, you can set the date, from
left to right: year/month/day
Date and time
C17
Time
Enter C17, you can set the time from
left to right: hour/min./sec.
Communication
setting
C18
Serial interface data
output method
option:0= Close serial interface data
output
1=Continuous sending, connect big
display
2=Print method, connect printer.
3=Command request method ,
connect computer.
4=PC continues sending format,
connect computer.
5=PC/ big display continuous sending
format.
Communication
setting
C19
Baud rate
option:
0=1200/1=2400/2=4800/3=9600
Zero range
C20
Manually zero range
Option:
0= close manually zero setting
1=±1% max capacity
2=±2% max capacity
4=±4% max capacity
10=±10% max capacity
20=±20% max capacity
100=±100% max capacityZero range
C21
Initial zero range
option:0= no initial zero setting
1=±1% max capacity
2=±1% max capacity
5=±1% max capacity
10=±1% max capacity
20=±1% max capacity
Zero tracking
C22
Automatically zero
tracking range
Options:
0= close zero tracking
0.5=±0.5d
1.0=±1.0d
2.0=±2.0d
3.0=±3.0d
4.0=±4.0d
5.0=±5.0d
Note: 1. d = division
2. the zero tracking range can not
bigger than manual zero range.
Zero tracking
C23
Automatically zero
tracking time
Options:
0= close zero tracking time
1= 1 second
2= 2 seconds
3= 3 seconds
	

 User Manual / Getting Started
	

 13/24
Overload range C24
Overload range
option:00= close overload range
01d~99d
remark:d =division
Negative display C25
Negative display
range
Option:0=-9d
10=10% max. capacity
20=20% max. capacity
50=50% max. capacity
100=100% max. capacity
Standstill time C26
Standstill time
Option:
0= quick 1= medium 2= slow
Standstill time
C27
Standstill range
Option:
1= 1d 2=2d 5=5d 10=10d
D= division
Digital filter C28
Dynamic filter
Instruction:Dynamic
filter is collecting the
data filter before
loaded weight stable.
When loaded weight
easily shaking (for
example animal) ,
you can set this filter
to make weight
display more stable
option:0= close dynamic filter
1=1 digital filter strength
2=2 digital filter strength
3=3 digital filter strength
4=4 digital filter strength
5=5 digital filter strength
6=6 digital filter strength
Note:Pls setting dynamic filter
strength carefully, the No. is
bigger, more stable. if the loaded
weight shake not too much. The
setting is less than 3
C29
Noise filter
option:0=close noise filter
1=1 digital filter strength
2=2 digital filter strength
3=3 digital filter strength
C30
Print time and date
C30=0 yy.mm.dd
C30=1 mm.dd.yy
C30=2 dd.mm.yy
C30=3 yy.mm.dd
Analog output
setting
C31 output type C31=0 0~5Vouput
C31=1 4~20mA output
	

 User Manual / Getting Started
	

 14/24
4~20mA current
calibrate
C32 calibrate current Refer to 2.5
Relay output
setting
C33 Relay output C33=0 close relay output
C33=1 Open relay output function 1
C3=2 Open relay output function2
C33=3 Preserved menu
Muti
communication
add.
C34 Communication
add.
C34= 0~99 Add. Code
Wireless
communication
C35 C35=0~99 signal
Gravity of
calibration location
C36 C36=9.7000~9.9999
Gravity of
destination
C37 C37=9.7000~9.9999
Version No. C38
Preserved menu C39
	

 User Manual / Getting Started
	

 15/24
Using Indicator
Basic Weighing
After the scale has been properly calibrated, the scale is now ready for use. Here
are the available keys as shown in the following overlays:
LED instruction
Weighing data
kg kg
lb lb
Hold Data hold
Gross Gross weight
Net Net weight
Tare tare
The weighing data is stable
Weight is zero
Hi Overload
OK ok
Lo Underload
. Decimal
PCS Show the counting status.
TOTAL Go to accumulation mode
	

 User Manual / Using Scale
1
	

 16/24
keys Key name Key function
Print
1.work with “ZERO” TARE” “ON/OFF” key to
perform many functions. 2.Print
Zero
Zero the weight within tolerance
Tare
At G.W mode, get the tare weight. At N.W
mode, clear the tare, get the G.W
Gross weight
At N.W mode, check the G.W, after 3 seconds
back to N.W automatically
Counting
Counting operation
Kg/lb convert Covert between kg and lb
Accumulation
1. Accumulation
2. work together with “ Print” to perform
The accumulation function and check the
accumulation result
Power on/off Press 2 seconds to power on or power off
Power On/Off
•Press the ON/OFF key for about 2 seconds to power on/off the indicator. After
self inspection, the indicator will go into weighing mode.
Zero
•When the indicator is powered on, if the weight on the scale is within the initial
zero tolerance, indicator will show zero automatically. This tolerance can be set in
configuration C20 and C21.
•You can manually zero the indicator by pressing the Zero key.
	

 User Manual / Using Scale
1
	

 17/24
Tare
•When the indicator is in gross mode (Gross status light on), pressing theTare key
will tare the current weight. The indicator will then go into Net weight mode (Net
status light on).
•When the indicator is already in net mode (Net status light on), pressing theTare
key will clear the tare weight and go back to gross mode (Gross status light on).
Changing Units
•Press the kg/lb key to change between the following units:
•kg (Status light kg on)
•lb (Status light lb on)
Hold
•Set configuration setting C11 to configure different hold functions
Print
•Press the Print key to print to printer connected to RS232. Please remember to
configure parameter settings C18 and C30.
	

 User Manual / Using Scale
1
	

 18/24
Counting Function
To perform counting function , follow the procedure below:
1. At weighing mode, load the weight to count and press the Count key. Indicator
will show “PCS 0”. Use the up and down arrow key to change the quantity that
represents the load weight. Press the return (Print) key to confirm.
2. Press Count key to return to weighing mode.
3. Repeat the above steps for counting of different goods.
Accumulation Function
1. After the weight is at zero mode (zero light on), load weight and wait for the
stable light to turn on.
2. PressTotal key and theTotal light should turn on.
3. The indicator will display “n 001” and then the loaded weight.
4. Unload the weight, and load the 2nd weight until stable light on.
5. Press theTotal key and the indicator will display “n 002” and then the loaded
weight.
6. Repeat steps 4 and 5 to continue to accumulate (max 999 times).
7. After accumulation is finished, press theTotal and ON/OFF key at the same time.
The display will show the number of accumulation (“n ***”) (first 4 digits) and
then the total weight (last 4 digits).
8. After the indicator shows all 8 digits, press and holdTotal key and the indicator
will show “clr n”.
9. Press the up or down key to change from “clr n” (don’t clear total) and “clr
y” (clear total). Press the Print key to accept and exit accumulation mode.
	

 User Manual / Using Scale
1
	

 19/24
RS232 Output Format
Big Display Continuous Output Format (C18 = 1)
Output continuous formatOutput continuous formatOutput continuous formatOutput continuous formatOutput continuous formatOutput continuous formatOutput continuous formatOutput continuous formatOutput continuous formatOutput continuous formatOutput continuous formatOutput continuous formatOutput continuous formatOutput continuous formatOutput continuous formatOutput continuous formatOutput continuous formatOutput continuous format
S
T
X
S
W
A
S
W
B
S
W
C
X X X X X X X X X X X X
C
R
C
K
S
1 222 333333 444444 5 6
State AState AState AState AState A
Bits0,1,2Bits0,1,2Bits0,1,2Bits0,1,2Bits0,1,2
0 11 2 Decimal point position
1 00 0 XXXXXX0
0 11 0 XXXXXXX
1 11 0 XXXXX.X
0 00 1 XXXX.XX
1 00 1 XXX.XXX
Bits3,4Bits3,4Bits3,4Bits3,4 Division
00 11 X1
11 00 X2
State BState B
BitsS function
Bits0 gross=0, net=1
Bits1 Symbol: positive =0,negative =1
Bits2 Overload(or under zero)=1
Bits3 dynamic=1
Bits4 unit:lb=0, kg=1
Bits5 Constant 1
Bits6 Constant 0
State CState CState CState C
Bit2 Bit1 Bit0 unit
0 0 0 Kg or lb
0 0 1 g
0 1 0 t
Bit 3Bit 3Bit 3 printing=1
Bit 4Bit 4Bit 4
Extend
display=1
Bit 5Bit 5Bit 5 Constant 1
Bit 6Bit 6Bit 6 Constant 0
	

 User Manual / Using Scale
	

 20/24
Computer Continuous Output Format (C18 = 2)
, , CR LF
S 1 S 2 S 3 Data S 4
S1: weight status, ST= standstill, US= not standstill, OL= overload
S2: weight mode, GS=gross mode, NT=net mode
S3: weight of positive and negative, “+” or ” –“
S4: “kg” or “lb”
Data: weight value, including decimal point
CR: carriage return
LF: line feed
Serial Interface Command Mode (C18 = 3)
•In this mode, indicator can receive ASCII commands listed below:
Command NAME Function
T TARE Save and clear tare
Z ZERO Zero gross weight
P PRINT Print the weight
R G.W/N.W Read gross weight or net weight
C Kg/lb Kg/lb conversion
G G.W Check gross weight at net weight mode
•The R command will trigger the indicator to output the following data format:
	

 User Manual / Using Scale
	

 21/24
Print Format (C18 = 4)
ID.NO. 004 (Serial No.)
Date: XX.XX. XX (yy.mm.dd)
Time: XX.XX.XX (hh.mm.ss)
GROSS 8.88kg (gross weight)
TARE 2.88kg (tare)
NET 6.00kg (net weight)
PC or Big Display Continuous Sending Format (C18 = 5)
	

 User Manual / Using Scale
	

 22/24
More Info
Troubleshooting
Q:What are the different error codes?
A:The following table shows the error codes and explanations:
ERROR REASON SOLUTION
UUUUUU
1. Overload
2. wrong connection
with load cell
3. load cell has quality
problem.
1. reduce the weight
2. check load cell connection
3. inspection load cell. Check the
input and output
nnnnnnn
1. calibration is no good
2. wrong connection
3. load cell has quality
problem
1. check scale is resisted or not,
foot is kept level or not.
2. check load cell connection.
3. checking load cell:check
input and output resistance to
judge it is good or not.
ERR1
During calibration, not
input the weights or the
weight is overload
Input the correct weights
ERR2
During calibration , the
weights is below than
Min. required weights
The calibration weights Minimum
is 10% of Max. cap. Recommend
60%-80% of Max. Cap.
ERR3
During calibration, the
input signal is negative
1. check the connection is
correct
2. check load cell is no problem
3. recalibration if still wrong
change the PCB
ERR4
During calibration, the
signal is unstable
After the platform is stable, start
calibration
ERR5 Change PCB
	

 User Manual / More Info
	

 23/24
Q:The scale does not turn on.
A: Make sure the power cord is plugged in, and that there is power. One easy way
to test this is by connecting another appliance to the same outlet and see if it’s
operational.
Q:The reading goes negative when a load is applied.
A:Try interchanging the Sig+ and Sig- wiring connected to the load cell or junction
box (if one is used).
	

 User Manual / More Info
	

 24/24

More Related Content

Similar to Awi lp7510 manual

PLC INPUT&OUTPUT DEVICES.pptx
PLC INPUT&OUTPUT DEVICES.pptxPLC INPUT&OUTPUT DEVICES.pptx
PLC INPUT&OUTPUT DEVICES.pptxJannaRicaBeason
 
Catalog FR-A700 Instruction manual (applied)-Beeteco.com
Catalog FR-A700 Instruction manual (applied)-Beeteco.comCatalog FR-A700 Instruction manual (applied)-Beeteco.com
Catalog FR-A700 Instruction manual (applied)-Beeteco.comBeeteco
 
internship report and presentation for electronics students
internship report and presentation for electronics studentsinternship report and presentation for electronics students
internship report and presentation for electronics studentsjaisivajaisiva0492
 
Vacuum loader user manual
Vacuum loader user manualVacuum loader user manual
Vacuum loader user manualssuser660147
 
Mitsubishi inverter fr-a700-instruction-manualbasic-160425031653
Mitsubishi inverter fr-a700-instruction-manualbasic-160425031653Mitsubishi inverter fr-a700-instruction-manualbasic-160425031653
Mitsubishi inverter fr-a700-instruction-manualbasic-160425031653Dien Ha The
 
Mitsubishi inverter fr-a700-instruction-manualbasic dienhathe.vn
Mitsubishi inverter fr-a700-instruction-manualbasic dienhathe.vnMitsubishi inverter fr-a700-instruction-manualbasic dienhathe.vn
Mitsubishi inverter fr-a700-instruction-manualbasic dienhathe.vnDien Ha The
 
Mitsubishi inverter fr-a700-instruction-manualbasic-160425031653
Mitsubishi inverter fr-a700-instruction-manualbasic-160425031653Mitsubishi inverter fr-a700-instruction-manualbasic-160425031653
Mitsubishi inverter fr-a700-instruction-manualbasic-160425031653Dien Ha The
 
5876558 powerpoint how to use cable tracer .pptx
5876558 powerpoint how to use cable tracer .pptx5876558 powerpoint how to use cable tracer .pptx
5876558 powerpoint how to use cable tracer .pptxTrainer011
 
Susol ACB Cyber Training.ppt
Susol ACB  Cyber Training.pptSusol ACB  Cyber Training.ppt
Susol ACB Cyber Training.pptssuserd83aa9
 
Fx3 g,fx3u,fx3uc series users manual positioning control edition
Fx3 g,fx3u,fx3uc series users manual   positioning control editionFx3 g,fx3u,fx3uc series users manual   positioning control edition
Fx3 g,fx3u,fx3uc series users manual positioning control editionphong279
 
Fr a700 instruction manual
Fr a700 instruction manualFr a700 instruction manual
Fr a700 instruction manualToàn Huỳnh
 
0.5m inspection conveyor user manual
0.5m inspection conveyor user manual0.5m inspection conveyor user manual
0.5m inspection conveyor user manualssuser660147
 
329292817-PLC-Training for new person pptx
329292817-PLC-Training for new person pptx329292817-PLC-Training for new person pptx
329292817-PLC-Training for new person pptxviveksingh2418
 
HST New Fire Alarm System
HST New Fire Alarm SystemHST New Fire Alarm System
HST New Fire Alarm Systemssuser7165ec
 
Safe Isolation Procedure
Safe Isolation ProcedureSafe Isolation Procedure
Safe Isolation Proceduretotalpeople
 
Catalog FR-A700 Instruction manual (basic)-Beeteco.com
Catalog FR-A700 Instruction manual (basic)-Beeteco.comCatalog FR-A700 Instruction manual (basic)-Beeteco.com
Catalog FR-A700 Instruction manual (basic)-Beeteco.comBeeteco
 

Similar to Awi lp7510 manual (20)

PLC INPUT&OUTPUT DEVICES.pptx
PLC INPUT&OUTPUT DEVICES.pptxPLC INPUT&OUTPUT DEVICES.pptx
PLC INPUT&OUTPUT DEVICES.pptx
 
Catalog FR-A700 Instruction manual (applied)-Beeteco.com
Catalog FR-A700 Instruction manual (applied)-Beeteco.comCatalog FR-A700 Instruction manual (applied)-Beeteco.com
Catalog FR-A700 Instruction manual (applied)-Beeteco.com
 
Programmable logic controllers
Programmable logic controllersProgrammable logic controllers
Programmable logic controllers
 
internship report and presentation for electronics students
internship report and presentation for electronics studentsinternship report and presentation for electronics students
internship report and presentation for electronics students
 
Vacuum loader user manual
Vacuum loader user manualVacuum loader user manual
Vacuum loader user manual
 
Mitsubishi inverter fr-a700-instruction-manualbasic-160425031653
Mitsubishi inverter fr-a700-instruction-manualbasic-160425031653Mitsubishi inverter fr-a700-instruction-manualbasic-160425031653
Mitsubishi inverter fr-a700-instruction-manualbasic-160425031653
 
Mitsubishi inverter fr-a700-instruction-manualbasic dienhathe.vn
Mitsubishi inverter fr-a700-instruction-manualbasic dienhathe.vnMitsubishi inverter fr-a700-instruction-manualbasic dienhathe.vn
Mitsubishi inverter fr-a700-instruction-manualbasic dienhathe.vn
 
Mitsubishi inverter fr-a700-instruction-manualbasic-160425031653
Mitsubishi inverter fr-a700-instruction-manualbasic-160425031653Mitsubishi inverter fr-a700-instruction-manualbasic-160425031653
Mitsubishi inverter fr-a700-instruction-manualbasic-160425031653
 
5876558 powerpoint how to use cable tracer .pptx
5876558 powerpoint how to use cable tracer .pptx5876558 powerpoint how to use cable tracer .pptx
5876558 powerpoint how to use cable tracer .pptx
 
Susol ACB Cyber Training.ppt
Susol ACB  Cyber Training.pptSusol ACB  Cyber Training.ppt
Susol ACB Cyber Training.ppt
 
Fx3 g,fx3u,fx3uc series users manual positioning control edition
Fx3 g,fx3u,fx3uc series users manual   positioning control editionFx3 g,fx3u,fx3uc series users manual   positioning control edition
Fx3 g,fx3u,fx3uc series users manual positioning control edition
 
Fr a700 instruction manual
Fr a700 instruction manualFr a700 instruction manual
Fr a700 instruction manual
 
0.5m inspection conveyor user manual
0.5m inspection conveyor user manual0.5m inspection conveyor user manual
0.5m inspection conveyor user manual
 
329292817-PLC-Training for new person pptx
329292817-PLC-Training for new person pptx329292817-PLC-Training for new person pptx
329292817-PLC-Training for new person pptx
 
HST New Fire Alarm System
HST New Fire Alarm SystemHST New Fire Alarm System
HST New Fire Alarm System
 
Safe Isolation Procedure
Safe Isolation ProcedureSafe Isolation Procedure
Safe Isolation Procedure
 
Elearningtemplateppt
ElearningtemplatepptElearningtemplateppt
Elearningtemplateppt
 
Direct operation of a motor using or logic
Direct operation of a motor using or logicDirect operation of a motor using or logic
Direct operation of a motor using or logic
 
Fe 712 instruction_sheet_1
Fe 712 instruction_sheet_1Fe 712 instruction_sheet_1
Fe 712 instruction_sheet_1
 
Catalog FR-A700 Instruction manual (basic)-Beeteco.com
Catalog FR-A700 Instruction manual (basic)-Beeteco.comCatalog FR-A700 Instruction manual (basic)-Beeteco.com
Catalog FR-A700 Instruction manual (basic)-Beeteco.com
 

Recently uploaded

Java Programming :Event Handling(Types of Events)
Java Programming :Event Handling(Types of Events)Java Programming :Event Handling(Types of Events)
Java Programming :Event Handling(Types of Events)simmis5
 
Call for Papers - Educational Administration: Theory and Practice, E-ISSN: 21...
Call for Papers - Educational Administration: Theory and Practice, E-ISSN: 21...Call for Papers - Educational Administration: Theory and Practice, E-ISSN: 21...
Call for Papers - Educational Administration: Theory and Practice, E-ISSN: 21...Christo Ananth
 
VIP Model Call Girls Kothrud ( Pune ) Call ON 8005736733 Starting From 5K to ...
VIP Model Call Girls Kothrud ( Pune ) Call ON 8005736733 Starting From 5K to ...VIP Model Call Girls Kothrud ( Pune ) Call ON 8005736733 Starting From 5K to ...
VIP Model Call Girls Kothrud ( Pune ) Call ON 8005736733 Starting From 5K to ...SUHANI PANDEY
 
The Most Attractive Pune Call Girls Budhwar Peth 8250192130 Will You Miss Thi...
The Most Attractive Pune Call Girls Budhwar Peth 8250192130 Will You Miss Thi...The Most Attractive Pune Call Girls Budhwar Peth 8250192130 Will You Miss Thi...
The Most Attractive Pune Call Girls Budhwar Peth 8250192130 Will You Miss Thi...ranjana rawat
 
Thermal Engineering -unit - III & IV.ppt
Thermal Engineering -unit - III & IV.pptThermal Engineering -unit - III & IV.ppt
Thermal Engineering -unit - III & IV.pptDineshKumar4165
 
Unit 1 - Soil Classification and Compaction.pdf
Unit 1 - Soil Classification and Compaction.pdfUnit 1 - Soil Classification and Compaction.pdf
Unit 1 - Soil Classification and Compaction.pdfRagavanV2
 
Extrusion Processes and Their Limitations
Extrusion Processes and Their LimitationsExtrusion Processes and Their Limitations
Extrusion Processes and Their Limitations120cr0395
 
Online banking management system project.pdf
Online banking management system project.pdfOnline banking management system project.pdf
Online banking management system project.pdfKamal Acharya
 
FULL ENJOY Call Girls In Mahipalpur Delhi Contact Us 8377877756
FULL ENJOY Call Girls In Mahipalpur Delhi Contact Us 8377877756FULL ENJOY Call Girls In Mahipalpur Delhi Contact Us 8377877756
FULL ENJOY Call Girls In Mahipalpur Delhi Contact Us 8377877756dollysharma2066
 
The Most Attractive Pune Call Girls Manchar 8250192130 Will You Miss This Cha...
The Most Attractive Pune Call Girls Manchar 8250192130 Will You Miss This Cha...The Most Attractive Pune Call Girls Manchar 8250192130 Will You Miss This Cha...
The Most Attractive Pune Call Girls Manchar 8250192130 Will You Miss This Cha...ranjana rawat
 
Generative AI or GenAI technology based PPT
Generative AI or GenAI technology based PPTGenerative AI or GenAI technology based PPT
Generative AI or GenAI technology based PPTbhaskargani46
 
data_management_and _data_science_cheat_sheet.pdf
data_management_and _data_science_cheat_sheet.pdfdata_management_and _data_science_cheat_sheet.pdf
data_management_and _data_science_cheat_sheet.pdfJiananWang21
 
Thermal Engineering-R & A / C - unit - V
Thermal Engineering-R & A / C - unit - VThermal Engineering-R & A / C - unit - V
Thermal Engineering-R & A / C - unit - VDineshKumar4165
 
Call Girls Pimpri Chinchwad Call Me 7737669865 Budget Friendly No Advance Boo...
Call Girls Pimpri Chinchwad Call Me 7737669865 Budget Friendly No Advance Boo...Call Girls Pimpri Chinchwad Call Me 7737669865 Budget Friendly No Advance Boo...
Call Girls Pimpri Chinchwad Call Me 7737669865 Budget Friendly No Advance Boo...roncy bisnoi
 
PVC VS. FIBERGLASS (FRP) GRAVITY SEWER - UNI BELL
PVC VS. FIBERGLASS (FRP) GRAVITY SEWER - UNI BELLPVC VS. FIBERGLASS (FRP) GRAVITY SEWER - UNI BELL
PVC VS. FIBERGLASS (FRP) GRAVITY SEWER - UNI BELLManishPatel169454
 
Top Rated Pune Call Girls Budhwar Peth ⟟ 6297143586 ⟟ Call Me For Genuine Se...
Top Rated  Pune Call Girls Budhwar Peth ⟟ 6297143586 ⟟ Call Me For Genuine Se...Top Rated  Pune Call Girls Budhwar Peth ⟟ 6297143586 ⟟ Call Me For Genuine Se...
Top Rated Pune Call Girls Budhwar Peth ⟟ 6297143586 ⟟ Call Me For Genuine Se...Call Girls in Nagpur High Profile
 
Vivazz, Mieres Social Housing Design Spain
Vivazz, Mieres Social Housing Design SpainVivazz, Mieres Social Housing Design Spain
Vivazz, Mieres Social Housing Design Spaintimesproduction05
 
BSides Seattle 2024 - Stopping Ethan Hunt From Taking Your Data.pptx
BSides Seattle 2024 - Stopping Ethan Hunt From Taking Your Data.pptxBSides Seattle 2024 - Stopping Ethan Hunt From Taking Your Data.pptx
BSides Seattle 2024 - Stopping Ethan Hunt From Taking Your Data.pptxfenichawla
 
Coefficient of Thermal Expansion and their Importance.pptx
Coefficient of Thermal Expansion and their Importance.pptxCoefficient of Thermal Expansion and their Importance.pptx
Coefficient of Thermal Expansion and their Importance.pptxAsutosh Ranjan
 

Recently uploaded (20)

Java Programming :Event Handling(Types of Events)
Java Programming :Event Handling(Types of Events)Java Programming :Event Handling(Types of Events)
Java Programming :Event Handling(Types of Events)
 
Call for Papers - Educational Administration: Theory and Practice, E-ISSN: 21...
Call for Papers - Educational Administration: Theory and Practice, E-ISSN: 21...Call for Papers - Educational Administration: Theory and Practice, E-ISSN: 21...
Call for Papers - Educational Administration: Theory and Practice, E-ISSN: 21...
 
VIP Model Call Girls Kothrud ( Pune ) Call ON 8005736733 Starting From 5K to ...
VIP Model Call Girls Kothrud ( Pune ) Call ON 8005736733 Starting From 5K to ...VIP Model Call Girls Kothrud ( Pune ) Call ON 8005736733 Starting From 5K to ...
VIP Model Call Girls Kothrud ( Pune ) Call ON 8005736733 Starting From 5K to ...
 
The Most Attractive Pune Call Girls Budhwar Peth 8250192130 Will You Miss Thi...
The Most Attractive Pune Call Girls Budhwar Peth 8250192130 Will You Miss Thi...The Most Attractive Pune Call Girls Budhwar Peth 8250192130 Will You Miss Thi...
The Most Attractive Pune Call Girls Budhwar Peth 8250192130 Will You Miss Thi...
 
Thermal Engineering -unit - III & IV.ppt
Thermal Engineering -unit - III & IV.pptThermal Engineering -unit - III & IV.ppt
Thermal Engineering -unit - III & IV.ppt
 
Call Girls in Ramesh Nagar Delhi 💯 Call Us 🔝9953056974 🔝 Escort Service
Call Girls in Ramesh Nagar Delhi 💯 Call Us 🔝9953056974 🔝 Escort ServiceCall Girls in Ramesh Nagar Delhi 💯 Call Us 🔝9953056974 🔝 Escort Service
Call Girls in Ramesh Nagar Delhi 💯 Call Us 🔝9953056974 🔝 Escort Service
 
Unit 1 - Soil Classification and Compaction.pdf
Unit 1 - Soil Classification and Compaction.pdfUnit 1 - Soil Classification and Compaction.pdf
Unit 1 - Soil Classification and Compaction.pdf
 
Extrusion Processes and Their Limitations
Extrusion Processes and Their LimitationsExtrusion Processes and Their Limitations
Extrusion Processes and Their Limitations
 
Online banking management system project.pdf
Online banking management system project.pdfOnline banking management system project.pdf
Online banking management system project.pdf
 
FULL ENJOY Call Girls In Mahipalpur Delhi Contact Us 8377877756
FULL ENJOY Call Girls In Mahipalpur Delhi Contact Us 8377877756FULL ENJOY Call Girls In Mahipalpur Delhi Contact Us 8377877756
FULL ENJOY Call Girls In Mahipalpur Delhi Contact Us 8377877756
 
The Most Attractive Pune Call Girls Manchar 8250192130 Will You Miss This Cha...
The Most Attractive Pune Call Girls Manchar 8250192130 Will You Miss This Cha...The Most Attractive Pune Call Girls Manchar 8250192130 Will You Miss This Cha...
The Most Attractive Pune Call Girls Manchar 8250192130 Will You Miss This Cha...
 
Generative AI or GenAI technology based PPT
Generative AI or GenAI technology based PPTGenerative AI or GenAI technology based PPT
Generative AI or GenAI technology based PPT
 
data_management_and _data_science_cheat_sheet.pdf
data_management_and _data_science_cheat_sheet.pdfdata_management_and _data_science_cheat_sheet.pdf
data_management_and _data_science_cheat_sheet.pdf
 
Thermal Engineering-R & A / C - unit - V
Thermal Engineering-R & A / C - unit - VThermal Engineering-R & A / C - unit - V
Thermal Engineering-R & A / C - unit - V
 
Call Girls Pimpri Chinchwad Call Me 7737669865 Budget Friendly No Advance Boo...
Call Girls Pimpri Chinchwad Call Me 7737669865 Budget Friendly No Advance Boo...Call Girls Pimpri Chinchwad Call Me 7737669865 Budget Friendly No Advance Boo...
Call Girls Pimpri Chinchwad Call Me 7737669865 Budget Friendly No Advance Boo...
 
PVC VS. FIBERGLASS (FRP) GRAVITY SEWER - UNI BELL
PVC VS. FIBERGLASS (FRP) GRAVITY SEWER - UNI BELLPVC VS. FIBERGLASS (FRP) GRAVITY SEWER - UNI BELL
PVC VS. FIBERGLASS (FRP) GRAVITY SEWER - UNI BELL
 
Top Rated Pune Call Girls Budhwar Peth ⟟ 6297143586 ⟟ Call Me For Genuine Se...
Top Rated  Pune Call Girls Budhwar Peth ⟟ 6297143586 ⟟ Call Me For Genuine Se...Top Rated  Pune Call Girls Budhwar Peth ⟟ 6297143586 ⟟ Call Me For Genuine Se...
Top Rated Pune Call Girls Budhwar Peth ⟟ 6297143586 ⟟ Call Me For Genuine Se...
 
Vivazz, Mieres Social Housing Design Spain
Vivazz, Mieres Social Housing Design SpainVivazz, Mieres Social Housing Design Spain
Vivazz, Mieres Social Housing Design Spain
 
BSides Seattle 2024 - Stopping Ethan Hunt From Taking Your Data.pptx
BSides Seattle 2024 - Stopping Ethan Hunt From Taking Your Data.pptxBSides Seattle 2024 - Stopping Ethan Hunt From Taking Your Data.pptx
BSides Seattle 2024 - Stopping Ethan Hunt From Taking Your Data.pptx
 
Coefficient of Thermal Expansion and their Importance.pptx
Coefficient of Thermal Expansion and their Importance.pptxCoefficient of Thermal Expansion and their Importance.pptx
Coefficient of Thermal Expansion and their Importance.pptx
 

Awi lp7510 manual

  • 2. Warnings •For safety operation of the weighing indicator, please follow the following warning/ safety instructions: •Calibration inspection and maintenance of the indicator are prohibited by non- professional staff •Please ensure that the indicator has good ground •The indicator is a static and sensitive equipment; Please cut off power during electrical connections; Touching the internal components by hand is prohibited; Please take anti-static prevention measures ! !
  • 3. .....................................................................................Getting Started 4 ................................................................................................................................Overview 4 ...........................................................................................................Technical Parameters 4 ................................................................................................................Indicator Drawing 5 ....................................................................................................................................Battery 6 ..............................................................................................................................Installation 6 ...............................................................................Calibration and Parameter Settings 10 ...................................................................................Using Indicator 16 ....................................................................................................................Basic Weighing 16 .....................................................................................................................Power On/Off 17 ......................................................................................................................................Zero 17 .......................................................................................................................................Tare 18 ...................................................................................................................Changing Units 18 ......................................................................................................................................Hold 18 .......................................................................................................................................Print 18 .............................................................................................................Counting Function 19 .....................................................................................................Accumulation Function 19 ......................................................................................................RS232 Output Format 20 .............................................................................................More Info 23 .................................................................................................................Troubleshooting 23 ...............................................................................................................Technical Support 24 User Manual / Table of Contents 3/24
  • 4. Getting Started Overview Thank you for using AWI's LP7510 series indicator for your important application. The L7510 series weighing indicator can be used for many type of scales such as bench and floor scales. The basic functions are as follows: •Hold function •Print •kg/lb unit conversion •Count/Total •Gross/Tare/Zero •Overload reminder Options can also be requested to include the following: •RS232/RS485 serial interface or second display •I/O •4-20mA outputs Technical Parameters • Accuracy class: 6000 e • Resolution: • Display: 30,000 • ADC: 2,000,000 • Zero stability error:TK0 < 0.1μV//K • Span stability error:TKspn < ± 6 ppm//K • Sensitivity (internal): 0. 3 μV /d • Input voltage: -30 to +30mV DC • Excitation circuit: 5VDC, 4 wire connection, 6 load cell of 350ohm maximum • AC power:AC 100-250V (use only the 9V adapter supplied with the indicator) • Operation temperature: -10 °C ~ +40 °C • Operation humidity: ≤90%RH • Storage temperature: -40 °C ~ +70 °C User Manual / Getting Started 4/24
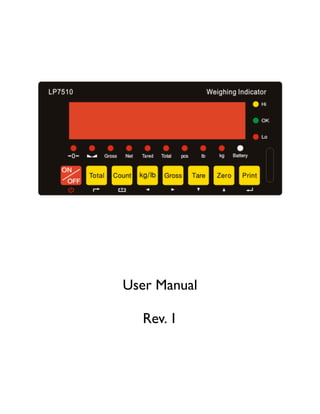
  • 5. Indicator Drawing User Manual / Getting Started 5/24 ! ! !
  • 6. Battery •Charge the internal battery (option) fully before first time use •When “battery” light is on, it means the battery is low and needs recharging •During charging, the battery light turns yellow •When the battery light turns green, its means the battery is fully charged •Remove the battery when not in use for a long period of time •To keep the battery in best condition, fully discharge battery every month by leaving the indicator on until indicator powers off Installation •The indicator can connect with 6 load cell of 350ohm maximum with 4 wire or 6 wire load cell. There are two connection methods between the load cell and the indicator: •Quick disconnect •Terminal trip connection (inner connection) •The excitation voltage for the load cell is 5VDC; largest output current = 120mA; maximum connect 6 350ohm load cell •Load cell (or the signal cable for the junction box) is connected with 5 pin terminal block (J5) on the circuit board of the weighing indicator •Open the back cover of the weighing indicator, and insert signal cable to the terminal block (J5); Make sure the screw is fixed tightly User Manual / Getting Started 6/24 !
  • 7. +EXC = Positive excitation voltage to load cell +IN = Positive output signal from load cell HD = Shielded wire -IN = Negative output signal from load cell -EXC = Negative excitation voltage to load cell •RS232: DB9 Pin or 3 Pin DB9 joint Definition Function 2 TXD Sending data 3 RXD Receiving data 5 GND Ground interface Note: if RS485,The connection pin is 2 and 5 pin. 3 Pin definition User Manual / Getting Started 7/24
  • 8. •4-20mA output •Resolution: 1/1000 •Outside Load: 100-350ohms •Inside connection: load input port connect with “1” of J2, ground port connect with “GND” of J2 •Outside connection: load input port connect with pin 1 of DB9, ground port connect with pin 6 of DB9 •To test the connection, connect a 250ohm load; Adjust the multimeter to the current stalls; To test the output current, connect the loading port to the red lead of the multimeter and the GND to the black lead of the multimeter •Calibration: •Press PRINT andTOTAL to go into configuration mode •Go to C32 and change out to out-20 •Relay output signal function •The indicator can output 4 signals, which when connected to outside equipment, can perform automatic control function and upper/lower limit alarm function. Goto setting C33 as follows: Output port Port definition Function C33=0 Out1 Close output function No output signal C33=0 Out2 Close output function No output signal C33=0 Out3 Close output function No output signal C33=0 Out4 Close output function No output signal C33=1 Out1 Open overload control function Output overload control signal C33=1 Out2 Open compliance control function Output compliance control signal C33=1 Out3 Open under-load control function Output under-load control signal C33=1 Out4 Open stable control function Output stable control signal C33=2 Out1 Weight>=C13 instant connection Feeding control signal C33=2 Out2 Weight<=C14 instant connection Feeding control signal C33=2 Out3 OUT1、OUT2 close Output alarm signal, connect with buzzer C33=2 Out4 Weight<=C14 constant connection Weight>=C13 disconnect Feeding start and stop C33=3 Preserved, no function.Preserved, no function.Preserved, no function. User Manual / Getting Started 8/24
  • 9. •Examples: •Check weigh application: •Connect indicator with yellow, green and red lights. •Yellow light on when overload •Green light on when ok •Red light on when under-load •Connect with buzzer •Feeding control application •For hopper scales •Target between 50 to 500kg •I/O card can perform open and close feeding valve •Setting C13=500kg, C14=50kg •C13=upper limit -> close feeding valve •C14=lower limit -> open feeding valve •Indicator output signal will control the ON/OFF switch of the external equipment or machine •OUT2 ON, OUT1 OFF, OUT3 connect to buzzer, alarm reminder when start and stop •When weight over 500kg, OUT1 and OUT3 give instant connection and break off; OUT4 breaks off; when weight is under 50kg, OUT2 and OUT3 provide instant connection and break off; OUT4 constantly connected. DB9 pin definition port 1 pin 1st output signal pin Out1 2 pin 1st output signal pin Out1 3 pin 2nd output signal pin Out2 4 pin 2nd output signal pin Out2 5 pin 3rd output signal pin Out3 6 pin 3rd output signal pin Out3 7 pin 4th output signal pin Out4 8 pin 4th output signal pin Out4 User Manual / Getting Started 9/24
  • 10. Step Method of operation Display Remark 1 [C01 ] After you enter calibration mode, it display [C01 ] 2 press [C01 1] Weight unit option:1=kg 2=lb 3 press press press or [C02 ] [C02 0] [C02 2] Set decimal digits option:0/1/2/3/4 Select decimal digit example:two decimal point: [C02 2] 4 press press press or [C03 ] [C03 1] [C03 5] Set graduation option:1/2/5/10/20/50 Select required graduation example:graduation 5:[C03 5] 5 press press press or / [C04 ] [0100.00] [0100.00] Max capacity example:max weighing 100kg: [0100.00] 6 press press press press [C05 ] [C05 0] [C05 1] [CAL 9] 。。。。。 。 [0000.00] Zero calibration Option 0=no need zero calibration 1=need zero calibration calibration zero please choose 1 and ensure scale is empty and “stable” light is on Ensure zero calibration, countdown. Till show[0.00](example for two decimal point)。 User Manual / Getting Started 10/24 Calibration and Parameter Settings •To enter calibration/parameter settings •Press and hold the HOLD and PRINT key at the same time (OP-900) •For OP-901, press ON/OFF and SET at the same time •Navigate through the settings as shown in the following tables by using the arrow and return keys (labeled below the indicator keys) •Press theTOTAL key (OP-900) to save and exit settings at any time •Press ON/OFF key (do not hold) for OP-901 The following table shows the steps to properly calibrate the indicator in the calibration menu:
  • 11. 7 press press press or press press or press [C06 ] [C06 0] [C06 1] [SPAN ] [0100.00] [0080.00] [CAL 9] …… [0080.00] [CAL End] calibration option: 0=No need calibration 1= need calibration Load weights on scales according to max. capacity. Suggest close to the max capacity, at least 10% of max. capacity. For example: the weights is 80kg As bellows: Input the 0080.00, count down , then indicator shows 0080.00 , calibration is over. If you want to set application function parameter. Press “PRINT” if you want to exit press “TOTAL” 8 press press press or [C07 ] [07 0] [07 1] Default parameters setting option:0=non-restore default parameters 1=restore default parameters Note: after the above parameters setting finish, please do not set default parameters to avoid the original setting parameters is lost. User Manual / Getting Started 11/24
  • 12. The following table shows the other parameter settings in the same calibration menu as above: Function Setting Item parameters setting and instruction warning tone C08 warning tone Options: 0 = close warning tone 1 = open warning tone Automatic power off C09 Automatic power off option:0=close auto power off 10= power off automatically if no change within 10 minute. 30= power off automatically if no change within 30 minute. 60= power off automatically if no change within 60 minute. Power saving setting C10 Power saving setting LED Version: option:0= close power saving setting 3= close display if no change within 3min. 5= close display if no change within 5 min. LCD Version: 0=Close he backlight 1= backlight when the weight change or press the keyboard 2=constant backlight Hold function C11 Hold mode option:0=close hold function 1=Peak hold /2=Data Hold Instruction: Peak-hold: it shows the max. data, mainly application for materials testing, such as tension and pulling force. Date-hold: it shows current weight value. Mainly application for animal weighing. Kg/lb conversion C12 Kg/lb conversion C12=0 stop kg/lb conversion C12=1 kg/lb conversion is ok Upper/lower limit alarm C13 Upper limit alarm value You can set it within the max. capacity limitUpper/lower limit alarm C14 Lower limit alarm value You can set it within the max. capacity limit Inner Code display C15 Check inner code Enter C15 to check the inner code User Manual / Getting Started 12/24
  • 13. Date and time C16 Date Enter C16, you can set the date, from left to right: year/month/day Date and time C17 Time Enter C17, you can set the time from left to right: hour/min./sec. Communication setting C18 Serial interface data output method option:0= Close serial interface data output 1=Continuous sending, connect big display 2=Print method, connect printer. 3=Command request method , connect computer. 4=PC continues sending format, connect computer. 5=PC/ big display continuous sending format. Communication setting C19 Baud rate option: 0=1200/1=2400/2=4800/3=9600 Zero range C20 Manually zero range Option: 0= close manually zero setting 1=±1% max capacity 2=±2% max capacity 4=±4% max capacity 10=±10% max capacity 20=±20% max capacity 100=±100% max capacityZero range C21 Initial zero range option:0= no initial zero setting 1=±1% max capacity 2=±1% max capacity 5=±1% max capacity 10=±1% max capacity 20=±1% max capacity Zero tracking C22 Automatically zero tracking range Options: 0= close zero tracking 0.5=±0.5d 1.0=±1.0d 2.0=±2.0d 3.0=±3.0d 4.0=±4.0d 5.0=±5.0d Note: 1. d = division 2. the zero tracking range can not bigger than manual zero range. Zero tracking C23 Automatically zero tracking time Options: 0= close zero tracking time 1= 1 second 2= 2 seconds 3= 3 seconds User Manual / Getting Started 13/24
  • 14. Overload range C24 Overload range option:00= close overload range 01d~99d remark:d =division Negative display C25 Negative display range Option:0=-9d 10=10% max. capacity 20=20% max. capacity 50=50% max. capacity 100=100% max. capacity Standstill time C26 Standstill time Option: 0= quick 1= medium 2= slow Standstill time C27 Standstill range Option: 1= 1d 2=2d 5=5d 10=10d D= division Digital filter C28 Dynamic filter Instruction:Dynamic filter is collecting the data filter before loaded weight stable. When loaded weight easily shaking (for example animal) , you can set this filter to make weight display more stable option:0= close dynamic filter 1=1 digital filter strength 2=2 digital filter strength 3=3 digital filter strength 4=4 digital filter strength 5=5 digital filter strength 6=6 digital filter strength Note:Pls setting dynamic filter strength carefully, the No. is bigger, more stable. if the loaded weight shake not too much. The setting is less than 3 C29 Noise filter option:0=close noise filter 1=1 digital filter strength 2=2 digital filter strength 3=3 digital filter strength C30 Print time and date C30=0 yy.mm.dd C30=1 mm.dd.yy C30=2 dd.mm.yy C30=3 yy.mm.dd Analog output setting C31 output type C31=0 0~5Vouput C31=1 4~20mA output User Manual / Getting Started 14/24
  • 15. 4~20mA current calibrate C32 calibrate current Refer to 2.5 Relay output setting C33 Relay output C33=0 close relay output C33=1 Open relay output function 1 C3=2 Open relay output function2 C33=3 Preserved menu Muti communication add. C34 Communication add. C34= 0~99 Add. Code Wireless communication C35 C35=0~99 signal Gravity of calibration location C36 C36=9.7000~9.9999 Gravity of destination C37 C37=9.7000~9.9999 Version No. C38 Preserved menu C39 User Manual / Getting Started 15/24
  • 16. Using Indicator Basic Weighing After the scale has been properly calibrated, the scale is now ready for use. Here are the available keys as shown in the following overlays: LED instruction Weighing data kg kg lb lb Hold Data hold Gross Gross weight Net Net weight Tare tare The weighing data is stable Weight is zero Hi Overload OK ok Lo Underload . Decimal PCS Show the counting status. TOTAL Go to accumulation mode User Manual / Using Scale 1 16/24
  • 17. keys Key name Key function Print 1.work with “ZERO” TARE” “ON/OFF” key to perform many functions. 2.Print Zero Zero the weight within tolerance Tare At G.W mode, get the tare weight. At N.W mode, clear the tare, get the G.W Gross weight At N.W mode, check the G.W, after 3 seconds back to N.W automatically Counting Counting operation Kg/lb convert Covert between kg and lb Accumulation 1. Accumulation 2. work together with “ Print” to perform The accumulation function and check the accumulation result Power on/off Press 2 seconds to power on or power off Power On/Off •Press the ON/OFF key for about 2 seconds to power on/off the indicator. After self inspection, the indicator will go into weighing mode. Zero •When the indicator is powered on, if the weight on the scale is within the initial zero tolerance, indicator will show zero automatically. This tolerance can be set in configuration C20 and C21. •You can manually zero the indicator by pressing the Zero key. User Manual / Using Scale 1 17/24
  • 18. Tare •When the indicator is in gross mode (Gross status light on), pressing theTare key will tare the current weight. The indicator will then go into Net weight mode (Net status light on). •When the indicator is already in net mode (Net status light on), pressing theTare key will clear the tare weight and go back to gross mode (Gross status light on). Changing Units •Press the kg/lb key to change between the following units: •kg (Status light kg on) •lb (Status light lb on) Hold •Set configuration setting C11 to configure different hold functions Print •Press the Print key to print to printer connected to RS232. Please remember to configure parameter settings C18 and C30. User Manual / Using Scale 1 18/24
  • 19. Counting Function To perform counting function , follow the procedure below: 1. At weighing mode, load the weight to count and press the Count key. Indicator will show “PCS 0”. Use the up and down arrow key to change the quantity that represents the load weight. Press the return (Print) key to confirm. 2. Press Count key to return to weighing mode. 3. Repeat the above steps for counting of different goods. Accumulation Function 1. After the weight is at zero mode (zero light on), load weight and wait for the stable light to turn on. 2. PressTotal key and theTotal light should turn on. 3. The indicator will display “n 001” and then the loaded weight. 4. Unload the weight, and load the 2nd weight until stable light on. 5. Press theTotal key and the indicator will display “n 002” and then the loaded weight. 6. Repeat steps 4 and 5 to continue to accumulate (max 999 times). 7. After accumulation is finished, press theTotal and ON/OFF key at the same time. The display will show the number of accumulation (“n ***”) (first 4 digits) and then the total weight (last 4 digits). 8. After the indicator shows all 8 digits, press and holdTotal key and the indicator will show “clr n”. 9. Press the up or down key to change from “clr n” (don’t clear total) and “clr y” (clear total). Press the Print key to accept and exit accumulation mode. User Manual / Using Scale 1 19/24
  • 20. RS232 Output Format Big Display Continuous Output Format (C18 = 1) Output continuous formatOutput continuous formatOutput continuous formatOutput continuous formatOutput continuous formatOutput continuous formatOutput continuous formatOutput continuous formatOutput continuous formatOutput continuous formatOutput continuous formatOutput continuous formatOutput continuous formatOutput continuous formatOutput continuous formatOutput continuous formatOutput continuous formatOutput continuous format S T X S W A S W B S W C X X X X X X X X X X X X C R C K S 1 222 333333 444444 5 6 State AState AState AState AState A Bits0,1,2Bits0,1,2Bits0,1,2Bits0,1,2Bits0,1,2 0 11 2 Decimal point position 1 00 0 XXXXXX0 0 11 0 XXXXXXX 1 11 0 XXXXX.X 0 00 1 XXXX.XX 1 00 1 XXX.XXX Bits3,4Bits3,4Bits3,4Bits3,4 Division 00 11 X1 11 00 X2 State BState B BitsS function Bits0 gross=0, net=1 Bits1 Symbol: positive =0,negative =1 Bits2 Overload(or under zero)=1 Bits3 dynamic=1 Bits4 unit:lb=0, kg=1 Bits5 Constant 1 Bits6 Constant 0 State CState CState CState C Bit2 Bit1 Bit0 unit 0 0 0 Kg or lb 0 0 1 g 0 1 0 t Bit 3Bit 3Bit 3 printing=1 Bit 4Bit 4Bit 4 Extend display=1 Bit 5Bit 5Bit 5 Constant 1 Bit 6Bit 6Bit 6 Constant 0 User Manual / Using Scale 20/24
  • 21. Computer Continuous Output Format (C18 = 2) , , CR LF S 1 S 2 S 3 Data S 4 S1: weight status, ST= standstill, US= not standstill, OL= overload S2: weight mode, GS=gross mode, NT=net mode S3: weight of positive and negative, “+” or ” –“ S4: “kg” or “lb” Data: weight value, including decimal point CR: carriage return LF: line feed Serial Interface Command Mode (C18 = 3) •In this mode, indicator can receive ASCII commands listed below: Command NAME Function T TARE Save and clear tare Z ZERO Zero gross weight P PRINT Print the weight R G.W/N.W Read gross weight or net weight C Kg/lb Kg/lb conversion G G.W Check gross weight at net weight mode •The R command will trigger the indicator to output the following data format: User Manual / Using Scale 21/24
  • 22. Print Format (C18 = 4) ID.NO. 004 (Serial No.) Date: XX.XX. XX (yy.mm.dd) Time: XX.XX.XX (hh.mm.ss) GROSS 8.88kg (gross weight) TARE 2.88kg (tare) NET 6.00kg (net weight) PC or Big Display Continuous Sending Format (C18 = 5) User Manual / Using Scale 22/24
  • 23. More Info Troubleshooting Q:What are the different error codes? A:The following table shows the error codes and explanations: ERROR REASON SOLUTION UUUUUU 1. Overload 2. wrong connection with load cell 3. load cell has quality problem. 1. reduce the weight 2. check load cell connection 3. inspection load cell. Check the input and output nnnnnnn 1. calibration is no good 2. wrong connection 3. load cell has quality problem 1. check scale is resisted or not, foot is kept level or not. 2. check load cell connection. 3. checking load cell:check input and output resistance to judge it is good or not. ERR1 During calibration, not input the weights or the weight is overload Input the correct weights ERR2 During calibration , the weights is below than Min. required weights The calibration weights Minimum is 10% of Max. cap. Recommend 60%-80% of Max. Cap. ERR3 During calibration, the input signal is negative 1. check the connection is correct 2. check load cell is no problem 3. recalibration if still wrong change the PCB ERR4 During calibration, the signal is unstable After the platform is stable, start calibration ERR5 Change PCB User Manual / More Info 23/24
  • 24. Q:The scale does not turn on. A: Make sure the power cord is plugged in, and that there is power. One easy way to test this is by connecting another appliance to the same outlet and see if it’s operational. Q:The reading goes negative when a load is applied. A:Try interchanging the Sig+ and Sig- wiring connected to the load cell or junction box (if one is used). User Manual / More Info 24/24