Downloaded 126 times


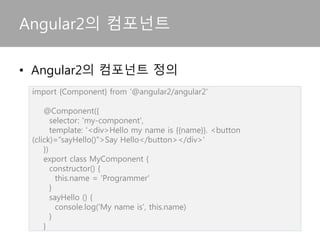
![• 컴포넌트는 함수를 통해 View를 바인딩 컨트롤
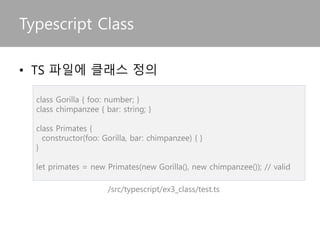
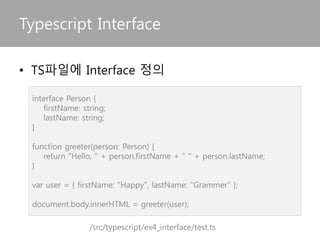
2. Component
import {Component} from 'angular2/core';
@Component({
selector: 'my-app',
template: ‘...’
})
export class AppComponent {
name ='';
district = ['namgu', 'bukgu', 'seogu', 'suseonggu'];
constructor() {
this.name = 'daegu'
}
sayCityName() {
alert('Our city name is '+this.name);
}
}
Module
=AppComponent
Metadata
To the Class](https://image.slidesharecdn.com/angular2-160514101442/85/Angular2-16-320.jpg)
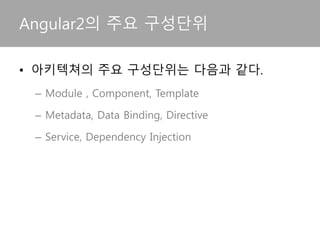
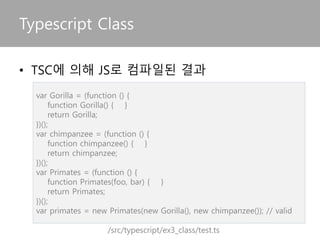
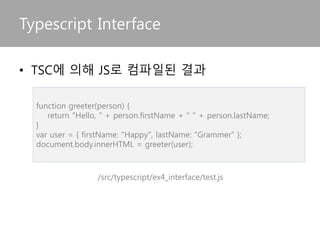
![• Component가 Render하여 생성된다.
3. Template
<h2>Hero List</h2>
<p><i>Pick a hero from the list</i></p>
<div *ngFor="let hero of heroes" (click)="selectHero(hero)">
{{hero.name}}
</div>
<hero-detail *ngIf="selectedHero" [hero]="selectedHero"></hero-detail>](https://image.slidesharecdn.com/angular2-160514101442/85/Angular2-17-320.jpg)
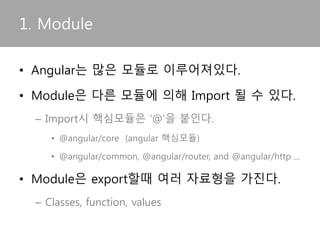
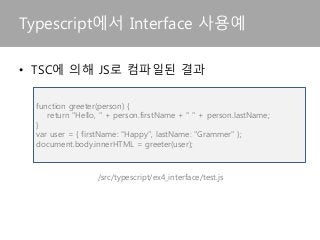
![• Angular가 Class를 어떻게 처리해야 할지를 정의
4. Metadata
@Component({
selector: 'hero-list',
templateUrl: 'app/hero-list.component.html',
directives: [HeroDetailComponent],
providers: [HeroService]
})
export class HeroesComponent { ... }](https://image.slidesharecdn.com/angular2-160514101442/85/Angular2-18-320.jpg)
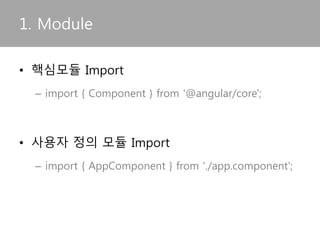
![5. Data Binding
• Component의 탬플릿은 모듈내 function에 의해
제어되고, Two Way Binding된 변수(model)를 통
해 rendering 된다.
<div>{{hero.name}}</div>
<hero-detail [hero]="selectedHero"></hero-detail>
<div (click)="selectHero(hero)"></div>](https://image.slidesharecdn.com/angular2-160514101442/85/Angular2-19-320.jpg)
![5. Data Binding
• Two way binding
– ngModel directive를 이용하여 모델은 Element에 연
결되고, 모듈이 이를 제어한다.
<input [(ngModel)]="hero.name">](https://image.slidesharecdn.com/angular2-160514101442/85/Angular2-20-320.jpg)
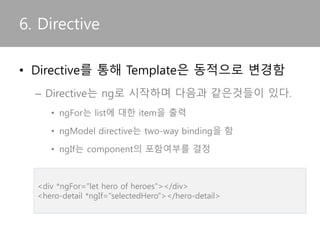
![6. Directive
• 컴포넌트에서 사용자 Directive를 Import가능
import { Directive, ElementRef, Input } from '@angular/core';
@Directive({ selector: '[myHighlight]' })
export class HighlightDirective {
constructor(el: ElementRef) {
el.nativeElement.style.backgroundColor = 'yellow';
}
}
import { Component } from '@angular/core';
import { HighlightDirective } from './highlight.directive';
@Component({
selector: 'my-app',
templateUrl: 'app/app.component.html',
directives: [HighlightDirective]
})
export class AppComponent { }
directive definition
Using directive](https://image.slidesharecdn.com/angular2-160514101442/85/Angular2-22-320.jpg)
![• Template에서 attribute directive는 [Directive
명]=“string literals” 형태로 사용
6. Directive
<p [myHighlight]="color" [defaultColor]="'violet'">
Highlight me too!
</p>](https://image.slidesharecdn.com/angular2-160514101442/85/Angular2-23-320.jpg)
![import { Injectable } from '@angular/core';
import { HEROES } from './mock-heroes';
@Injectable() //서비스 클래스에 추가해야
하는 Injectable Decorator
export class HeroService {
getHeroes() {
return HEROES;
}
}
7. Service
• 재사용이 빈번한 기능을 서비스로 정의함
import { Hero } from './hero';
export var HEROES: Hero[] = [
{"id": 11, "name": "Mr. Nice"},
{"id": 12, "name": "Narco"},
{"id": 13, "name": "Bombasto"},
{"id": 14, "name": "Celeritas"},
{"id": 15, "name": "Magneta"},
{"id": 16, "name": "RubberMan"},
{"id": 17, "name": "Dynama"},
{"id": 18, "name": "Dr IQ"},
{"id": 19, "name": "Magma"},
{"id": 20, "name": "Tornado"}
];
Heroservice.ts
Return the mock hero
mock-heroes.ts](https://image.slidesharecdn.com/angular2-160514101442/85/Angular2-24-320.jpg)
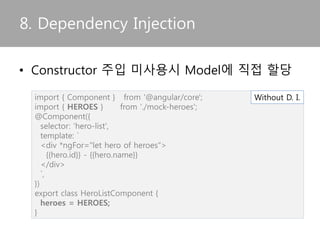
![• Construct의 parameter를 통한 서비스 주입
8. Dependency Injection
import { Component } from '@angular/core';
import { Hero } from './hero';
import { HeroService } from './hero.service';
@Component({
selector: 'hero-list',
template: `<div *ngFor="let hero of heroes">{{hero.id}} - {{hero.name}}
</div>`,
})
export class HeroListComponent {
heroes: Hero[];
constructor(heroService: HeroService) {
this.heroes = heroService.getHeroes();
} }
With D.I](https://image.slidesharecdn.com/angular2-160514101442/85/Angular2-26-320.jpg)


Angular2는 컴포넌트 중심의 개발 접근 방식에 대한 내용을 가집니다. 따라서 본 슬라이드도 컴포넌트 중심의 개발 접근 방식으로 Angular2를 바라보았습니다. 대략적인 내용은 다음과 같습니다. - Angular2 History - Angular2 핵심구성요소 - 컴포넌트 중심의 개발 - Angular2 주요개념 - Type Script에대한 설명 - 기타 필요하신 분에게 도움이 되었으면 좋겠습니다. 관련 코드는 다음 주소에 공유하였습니다. https://github.com/DaeguDevGroup/angular2-bootstrap - 내용이 업데이트되거나, 추가되면 설명에 이력을 남기겠습니다. - 본 슬라이드에 오류가 있다면 코멘트 바랍니다. *Change Log* - 2016-05-14 : 슬라이드 첫 버전을 업로드


![Angular Seminar [한빛미디어 리얼타임 세미나]](https://cdn.slidesharecdn.com/ss_thumbnails/angularseminarhanbitpublic-170725053734-thumbnail.jpg?width=640&height=640&fit=bounds)


![[XECon+PHPFest 2014] jQuery 개발자에서 AngularJS 개발자 되기](https://cdn.slidesharecdn.com/ss_thumbnails/xeconphpfest2014-angularjs-141110181025-conversion-gate01-thumbnail.jpg?width=640&height=640&fit=bounds)
![[DevOn 2013] Backbone.js로 능동적 M-V 디자인 구현하기](https://cdn.slidesharecdn.com/ss_thumbnails/backbone-131027105006-phpapp01-thumbnail.jpg?width=640&height=640&fit=bounds)


![[114]angularvs react 김훈민손찬욱](https://cdn.slidesharecdn.com/ss_thumbnails/114angularvsreact-161023163723-thumbnail.jpg?width=640&height=640&fit=bounds)


![[152] 웹브라우저 감옥에서 살아남기](https://cdn.slidesharecdn.com/ss_thumbnails/152-150914023446-lva1-app6892-thumbnail.jpg?width=640&height=640&fit=bounds)


![[Td 2015]java script에게 형(type)이 생겼어요. typescript(박용준)](https://cdn.slidesharecdn.com/ss_thumbnails/td2015javascripttype-151104051048-lva1-app6892-thumbnail.jpg?width=640&height=640&fit=bounds)


![[하코사세미나]미리보는 대규모 자바스크립트 어플리케이션 개발](https://cdn.slidesharecdn.com/ss_thumbnails/hacosakimsuho-151208014839-lva1-app6891-thumbnail.jpg?width=640&height=640&fit=bounds)