Full-ajax 유지관리의 고충
•Ajax 도배질 & GET/POST 의존
한 파일 내에서도 곳곳에 산재하는 ajax 코드들의 관리 이슈.
그리고 GET/POST 만 활용하기에 call path의 parameter들은
수도없이 늘어난다.
→ 결국 call path는 사람이 이해할 수 없는 지경이 되며
Back-end API 또한 Parameter별 조건처리로 복잡해진
다.
4.
Full-ajax 유지관리의 고충
•Event처리의 파편화
“이상하다! 이 이벤트를 다른 어딘가에서도 핸들링 하고있어!”
오픈 당시에는 아름다웠어도,
코드 유지보수가 계속되면서 Event 핸들링에 대한 구조화가 점
점 어려워지며 소스 이곳저곳에 파편화됨.
5.
Full-ajax 유지관리의 고충
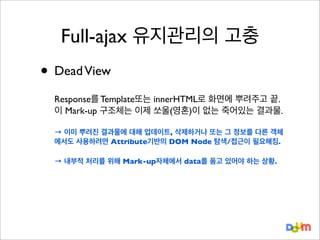
•Dead View
Response를 Template또는 innerHTML로 화면에 뿌려주고 끝.
이 Mark-up 구조체는 이제 쏘울(영혼)이 없는 죽어있는 결과물.
→ 이미 뿌려진 결과물에 대해 업데이트, 삭제하거나 또는 그 정보를 다른 객체
에서도 사용하려면 Attribute기반의 DOM Node 탐색/접근이 필요해짐.
→ 내부적 처리를 위해 Mark-up자체에서 data를 품고 있어야 하는 상황.
6.
Full-ajax 유지관리의 고충
•Dead View
Response를 Template또는 innerHTML로 화면에 뿌려주고 끝.
이 Mark-up 구조체는 이제 쏘울(영혼)이 없는 죽어있는 결과물.
→ 이미 뿌려진 결과물에 대해 업데이트, 삭제하거나 또는 그 정보를 다른 객체
에서도 사용하려면 Attribute기반의 DOM Node 탐색/접근이 필요해짐.
→ 내부적 처리를 위해 Mark-up자체에서 data를 품고 있어야 하는 상황.
Features
•
•
•
•
Jeremy Ashkenas (CoffeeScript, Underscore.js)
•
•
•
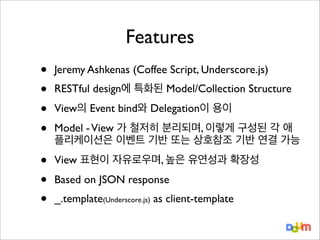
View 표현이 자유로우며, 높은 유연성과 확장성
RESTful design에 특화된 Model/Collection Structure
View의 Event bind와 Delegation이 용이
Model - View 가 철저히 분리되며, 이렇게 구성된 각 애
플리케이션은 이벤트 기반 또는 상호참조 기반 연결 가능
Based on JSON response
_.template(Underscore.js) as client-template
10.
Underscore.js
•
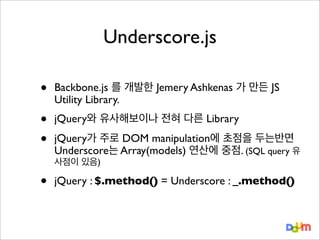
Backbone.js 를 개발한Jemery Ashkenas 가 만든 JS
Utility Library.
•
•
jQuery와 유사해보이나 전혀 다른 Library
jQuery가 주로 DOM manipulation에 초점을 두는반면
Underscore는 Array(models) 연산에 중점. (SQL query 유
사점이 있음)
•
jQuery : $.method() = Underscore : _.method()
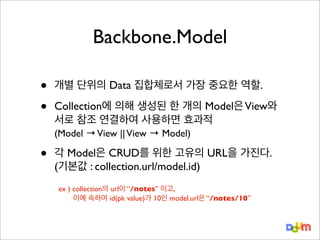
Backbone.Model
•
•
개별 단위의 Data집합체로서 가장 중요한 역할.
Collection에 의해 생성된 한 개의 Model은 View와
서로 참조 연결하여 사용하면 효과적
(Model → View || View → Model)
•
각 Model은 CRUD를 위한 고유의 URL을 가진다.
(기본값 : collection.url/model.id)
ex ) collection의 url이 “/notes” 이고,
이에 속하며 id(pk value)가 10인 model.url은 “/notes/10”
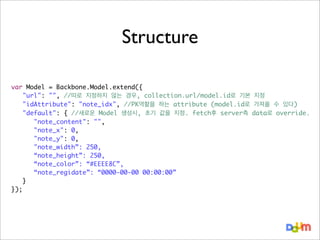
Structure
var Model =Backbone.Model.extend({
"url": "", //따로 지정하지 않는 경우, collection.url/model.id로 기본 지정
"idAttribute": "note_idx", //PK역할을 하는 attribute (model.id로 가져올 수 있다)
"default": { //새로운 Model 생성시, 초기 값을 지정. fetch후 server측 data로 override.
"note_content": "",
"note_x": 0,
"note_y": 0,
"note_width”: 250,
“note_height”: 250,
“note_color”: “#EEEE8C”,
“note_regidate”: “0000-00-00 00:00:00”
}
});
17.
Methods of Backbone.Model
•
model.fetch() [GET]
- 개별
model의 url을 호출하며, response를 attribute에 저장.
- “Change” event를 발생시킴
•
model.save(attr) [POST / UPDATE or PATCH]
- 전달된 Attributes들을 JSON형태로 model.url에 Request
- “Change” event를 발생시킴
이미 create된 model을 save로 수정하면, 기본적으로 모든 Attribute를 정리해서 UPDATE request
하지만 options에 patch: true를 주게되면 새로 지정된 값만 정리해서 PATCH method로 보냄
•
model.destroy( ) [DELETE]
- 스스로를 삭제하며 model.url로 delete method 전달
- “destroy” event를 발생시킴
18.
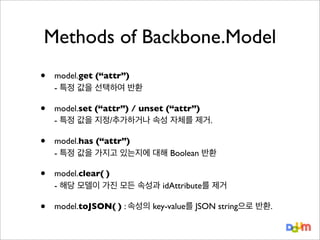
Methods of Backbone.Model
•
model.get(“attr”)
- 특정 값을 선택하여 반환
•
model.set (“attr”) / unset (“attr”)
- 특정 값을 지정/추가하거나 속성 자체를 제거.
•
model.has (“attr”)
- 특정 값을 가지고 있는지에 대해 Boolean 반환
•
model.clear( )
- 해당 모델이 가진 모든 속성과 idAttribute를 제거
•
model.toJSON( ) : 속성의 key-value를 JSON string으로 반환.
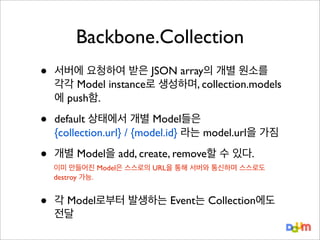
Backbone.Collection
•
서버에 요청하여 받은JSON array의 개별 원소를
각각 Model instance로 생성하며, collection.models
에 push함.
•
default 상태에서 개별 Model들은
{collection.url} / {model.id} 라는 model.url을 가짐
•
개별 Model을 add, create, remove할 수 있다.
•
이미 만들어진 Model은 스스로의 URL을 통해 서버와 통신하며 스스로도
destroy 가능.
각 Model로부터 발생하는 Event는 Collection에도
전달
Structure
var Collection =Backbone.Collection.extend({
"url": "/notes",
"model": Model, //앞서 지정한 “Model” 구조를 개별 Model의 기본으로 가짐
"initialize": function(){}
});
23.
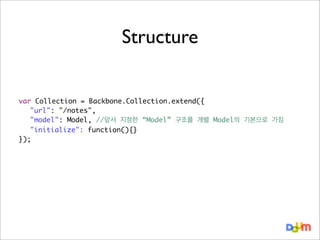
Methods of Backbone.Collection
•collection.fetch( )
[GET]
url을 호출하며, response를 각각 새로운 Model
instance로 변환하여 collection.models 에 push.
- 자신의
- reset:true 옵션을 주면 “reset” event를 발생시킴
•
collection.add(attr) / create(attr)
[POST]
- 전달된 argument로 구성된 새로운 Model 생성
- “add” / “request”, “sync” event 발생
add : 새로운 Model을 Collection에 추가만 함.
create : 추가함과 동시, backbone.sync를 통해 POST Request
•
collection.remove(model) [DELETE]
- 하나 또는 array 단위의 Model을 Collection에서 삭제
- “remove” event를 발생시킴
24.
Methods of Backbone.Collection
•
collection.push/ pop / unshift / shift (model)
- 전달된 Model에 대해 Collection에 추가
•
collection.sort( )
- collection.comparator로 지정된 Attribute의 Value 순서로 Sorting
•
collection.where / findWhere (option)
- 특정 값을 가진 Model들만 골라서 반환 (findWhere는 limit 1역할)
•
collection.clone( )
- 해당 collection를 새로운 instance로 반환
•
collection.parse(response) : API로부터 받은 Raw response에
대해 어떤 부분을 가져올지 지정하여 반환
기존의 REST API가 이미 있으나, Response를 변경하기 어려운 상황에서 유용
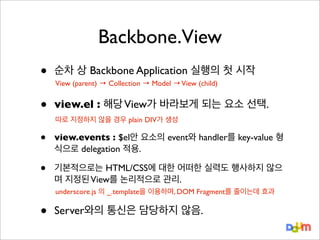
Backbone.View
•
순차 상 BackboneApplication 실행의 첫 시작
•
view.el : 해당 View가 바라보게 되는 요소 선택.
•
view.events : $el안 요소의 event와 handler를 key-value 형
식으로 delegation 적용.
•
기본적으로는 HTML/CSS에 대한 어떠한 실력도 행사하지 않으
며 지정된 View를 논리적으로 관리.
View (parent) → Collection → Model → View (child)
따로 지정하지 않을 경우 plain DIV가 생성
underscore.js 의 _.template을 이용하며, DOM Fragment를 줄이는데 효과
•
Server와의 통신은 담당하지 않음.
27.
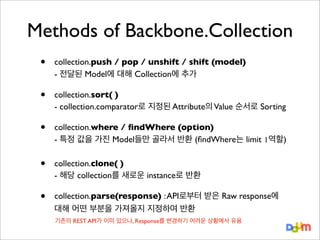
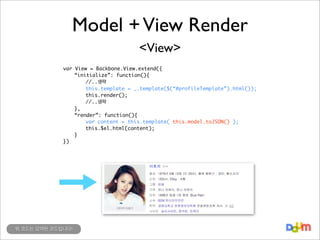
Model + ViewRender
<Model>
{
}
"name": "이효리",
"birth_date": "1979년 5월 10일 (만 33세)",
"birth_place": "충북 청원군",
"group": "핑클",
"family": "언니 이애리, 언니 이유리",
"debut": "1998년 핑클 1집 앨범 'Blur Rain'",
"img_url": "http://i2.daumcdn.net/thumb/S160x160/2224.jpg",
"school": [
"경희대학교 언론정보대학원",
"국민대학교 연극영화학",
"서문여자고등학교",
"서문여자중학교",
"동작초등학교"
]
...
Model + ViewRender
<View>
var View = Backbone.View.extend({
“initialize”: function(){
//..생략
this.template = _.template($(“#profileTemplate”).html());
this.render();
//..생략
},
“render”: function(){
var content = this.template( this.model.toJSON() );
this.$el.html(content);
}
})
위 코드는 요약된 코드입니다!
30.
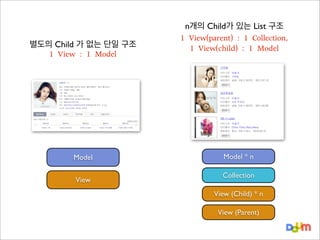
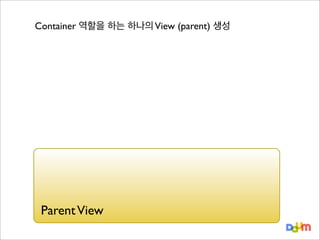
별도의 Child 가없는 단일 구조
1 View : 1 Model
Model
View
n개의 Child가 있는 List 구조
1 View(parent) : 1 Collection,
1 View(child) : 1 Model
Model * n
Collection
View (Child) * n
View (Parent)
31.
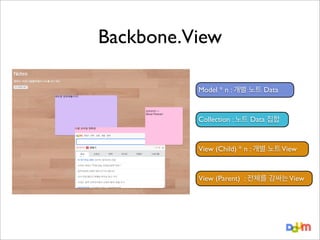
Backbone.View
Model * n: 개별 노트 Data
Collection : 노트 Data 집합
View (Child) * n : 개별 노트 View
View (Parent) : 전체를 감싸는 View
32.
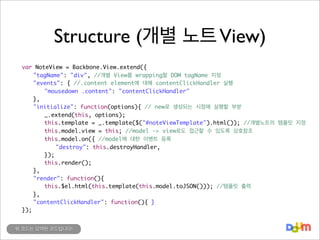
Structure (개별 노트View)
var NoteView = Backbone.View.extend({
"tagName": "div", //개별 View를 wrapping할 DOM tagName 지정
"events": { //.content element에 대해 contentClickHandler 실행
"mousedown .content": "contentClickHandler"
},
"initialize": function(options){ // new로 생성되는 시점에 실행할 부분
_.extend(this, options);
this.template = _.template($("#noteViewTemplate").html()); //개별노트의 템플릿 지정
this.model.view = this; //model -> view로도 접근할 수 있도록 상호참조
this.model.on({ //model에 대한 이벤트 등록
"destroy": this.destroyHandler,
});
this.render();
},
"render": function(){
this.$el.html(this.template(this.model.toJSON())); //템플릿 출력
},
"contentClickHandler": function(){ }
});
위 코드는 요약된 코드입니다!
33.
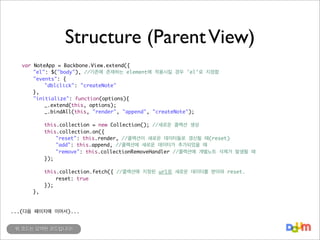
Structure (Parent View)
var
NoteApp= Backbone.View.extend({
"el": $("body"), //기존에 존재하는 element에 적용시킬 경우 'el'로 지정함
"events": {
"dblclick": "createNote"
},
"initialize": function(options){
_.extend(this, options);
_.bindAll(this, "render", "append", "createNote");
this.collection = new Collection(); //새로운 콜렉션 생성
this.collection.on({
"reset": this.render, //콜렉션이 새로운 데이터들로 갱신될 때(reset)
"add": this.append, //콜렉션에 새로운 데이터가 추가되었을 때
"remove": this.collectionRemoveHandler //콜렉션에 개별노트 삭제가 발생될 때
});
},
this.collection.fetch({ //콜렉션에 지정된 url로 새로운 데이터를 받아와 reset.
reset: true
});
...(다음 페이지에 이어서)...
위 코드는 요약된 코드입니다!
34.
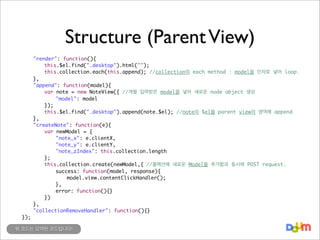
Structure (Parent View)
});
"render":function(){
this.$el.find(".desktop").html("");
this.collection.each(this.append); //collection의 each method : model을 인자로 넣어 loop.
},
"append": function(model){
var note = new NoteView({ //개별 입력받은 model을 넣어 새로운 node object 생성
"model": model
});
this.$el.find(".desktop").append(note.$el); //note의 $el을 parent view의 영역에 append
},
"createNote": function(e){
var newModel = {
"note_x": e.clientX,
"note_y": e.clientY,
"note_zIndex": this.collection.length
};
this.collection.create(newModel,{ //콜렉션에 새로운 Model을 추가함과 동시에 POST request.
success: function(model, response){
model.view.contentClickHandler();
},
error: function(){}
})
},
"collectionRemoveHandler": function(){}
위 코드는 요약된 코드입니다!
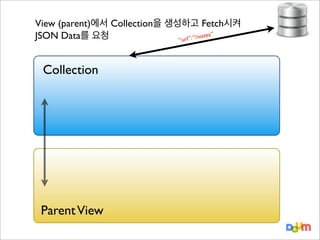
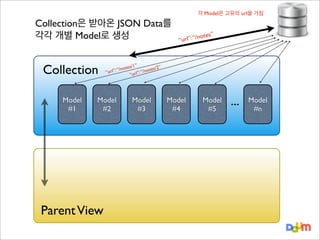
각 Model은 고유의url을 가짐
Collection은 받아온 JSON Data를
각각 개별 Model로 생성
Collection
Model
#1
/1”
2”
/notes
otes/
l”: “
“/n
“ur
“url”:
Model
#2
Parent View
tes”
rl”: “/no
“u
Model
#3
Model
#4
Model
#5
...
Model
#n
39.
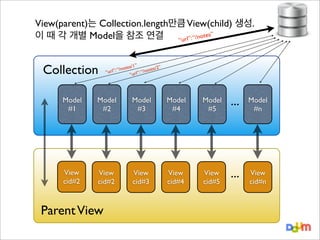
View(parent)는 Collection.length만큼 View(child)생성.
tes”
이 때 각 개별 Model을 참조 연결
rl”: “/no
“u
Collection
/1”
2”
/notes
otes/
l”: “
“/n
“ur
“url”:
Model
#1
Model
#2
Model
#3
Model
#4
Model
#5
...
Model
#n
View
cid#2
View
cid#2
View
cid#3
View
cid#4
View
cid#5
...
View
cid#n
Parent View
40.
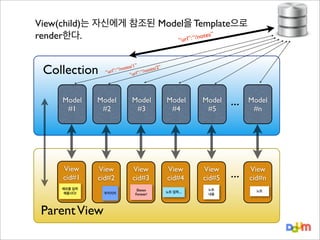
View(child)는 자신에게 참조된Model을 Template으로
tes”
render한다.
rl”: “/no
“u
Collection
/1”
2”
/notes
otes/
l”: “
“/n
“ur
“url”:
Model
#1
Model
#2
Model
#3
Model
#4
Model
#5
View
cid#1
View
cid#2
View
cid#3
View
cid#4
View
cid#5
메모를 입력
해봅시다!
Parent View
우키키키
Devon
Forever!
노트 입력....
노트
내용
...
Model
#n
...
View
cid#n
노트
41.
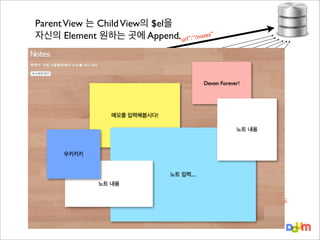
Parent View 는Child View의 $el을
자신의 Element 원하는 곳에 Append. url”: “/notes”
“
Collection
/1”
2”
/notes
otes/
l”: “
“/n
“ur
“url”:
Model
#1
Model
#2
Model
#3
Model
#4
Model
#5
...
Model
#n
View
cid#2
View
cid#2
View
cid#3
View
cid#4
View
cid#5
...
View
cid#n
View
메모를 입력
해봅시다!
우키키키
Devon
Forever!
노트 입력....
노트
내용
노트
Append 됐다고 해도
여전히 개별
Child View와 연결
42.
Parent View 는Child View의 $el을
자신의 Element 원하는 곳에 Append. url”: “/notes”
“
Collection
/1”
2”
/notes
otes/
l”: “
“/n
“ur
“url”:
Devon Forever!
Model
#1
Model
#2
Model
#3
메모를 입력해봅시다!
Model
#4
Model
#5
...
Model
#n
노트 내용
우키키키
View
cid#2
View
View
cid#2
노트 내용
메모를 입력
해봅시다!
우키키키
View
cid#3
View
노트 입력.... View
cid#4
cid#5
Devon
Forever!
노트
내용
노트 입력....
노트
...
View
cid#n
Append 됐다고 해도
여전히 개별
Child View와 연결
43.
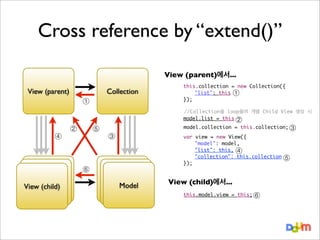
Cross reference by“extend()”
View (parent)에서...
View (parent)
Collection
④
//Collection을 loop돌며 개별 Child View 생성 시
model.list = this
②
②
⑤
③
⑥
View (child)
View (child)
View (child)
①
this.collection = new Collection({
"list": this ①
});
Model
Model
Model
model.collection = this.collection; ③
var
});
view = new View({
"model": model,
"list": this, ④
"collection": this.collection
View (child)에서...
this.model.view = this; ⑥
⑤
“backbone.js에서 API 호출주체는 collection과 model”
collection자체가 storage 역할을 하기 때문에
Client에서는 response를 기다릴 필요없이 바로 반응
Back-end API
collection.create실행 시 option으로 “wait”: true를 주면
response를 받은 후 add 됨.
[POST]
/note/
{ “note_content” : “노트내용~” .... }
{
“note_idx”: 4
}
{ “note_content” : “노트내용~” .... }
noteApp.collection
.create(model)
noteApp.collection에
“add” event 발생
collection.on(“add”, addHandler);
noteApp.collection
(local)
47.
Request URI &HTTP Methods
noteApp.collection
remove
fetch
create
/notes
NOTE
REQUEST METHOD
case “GET”:
case “POST”:
case “DELETE”:
(isNew) save
note.model
fetch,
save ,
destroy
case “UPDATE”:
“PATCH”:
/notes/${note_idx}
48.
Collection, Model의 Built-inEvents
•
•
•
•
•
•
“add” : collection.add(model) or collection.create(model) [POST]
“remove” : collection.remove(model) [DELETE]
“reset” : collection.fetch(model, {reset: true}) or model.fetch(model, {reset: true}) [GET]
“change” : collection에 모든 종류의 CRUD 발생 시 / model에 attribute변경 시
[UPDATE/PATCH]
“change:[attribute]” : model의 특정 attribute 변경 시
“destroy” : model.destroy()
[DELETE]
49.
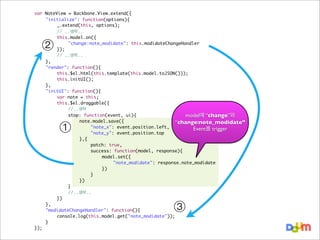
Backbone.Event Callback 처리
Devon
Forever!
메모를입력해봅시다!
노트 내용
우키키키
노트 내용
Case )
노트 입력....
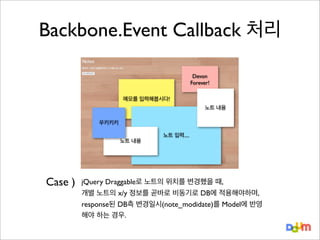
jQuery Draggable로 노트의 위치를 변경했을 때,
개별 노트의 x/y 정보를 곧바로 비동기로 DB에 적용해야하며,
response된 DB측 변경일시(note_modidate)를 Model에 반영
해야 하는 경우.
키오
피노
번
35
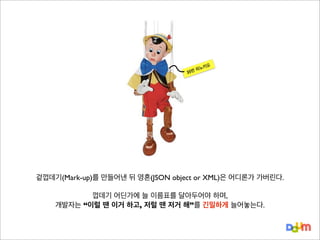
겉껍데기(Mark-up)를 만들어낸 뒤영혼(JSON object or XML)은 어디론가 가버린다.
껍데기 어딘가에 늘 이름표를 달아두어야 하며,
개발자는 “이럴 땐 이거 하고, 저럴 땐 저거 해”를 긴밀하게 늘어놓는다.
54.
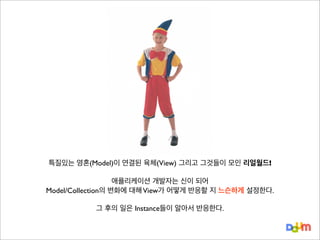
특질있는 영혼(Model)이 연결된육체(View) 그리고 그것들이 모인 리얼월드!
애플리케이션 개발자는 신이 되어
Model/Collection의 변화에 대해 View가 어떻게 반응할 지 느슨하게 설정한다.
그 후의 일은 Instance들이 알아서 반응한다.
55.
•
Javascript OOP
•
Model-View 비간섭
•
엄청난개발 Performance
•
아름다운 Source code
Backbone.js는 사용자가 Javascript OOP를 완전히 이해하고 있다는 것을 전제로 구현되었음. 그래서 매뉴얼도 매우
불친절하고 부실하다. (Jeremy Ashkenas는 심지어 method별 options을 만들어놓고도 이를 매뉴얼에 적지 않은게
꽤 됨) 따라서 이를 이해하고 학습하는 과정 자체가 JS OOP를 이해하는 과정이 된다.
Model과 View가 서로 참조하며 Event에 따라 각자의 Handler가 실행될 뿐 완벽히 구분지어지며, Memory Address
에 의한 Reference 참조일 뿐이므로 Performance 관리에 효과적이다. 또한 Backbone.js는 여타 JS MVC
Framework 와 달리 View단을 간섭하지 않는다.
Model과 Collection,View가 유기체처럼 행동하며 개발자는 이 행동을 제어만 하면 됨. 그리고 Application 사전설
계 단계에서 각 소속 Object들의 추상화와 Module화를 적당히 신경써서 구현할 경우, 개별 객체는 서로간 느슨하
게 연결되고 자신만의 기능에만 초점을 둔다. 따라서 유지관리 시 어마어마한 편의성과 그에 따른 개발
Performance 향상이라는 장점이 있다. 애자일 환경에서 매우 큰 효과를 얻을 수 있다.
Backbone.js를 의도와 목적에 맞게 잘 작성한다면, Source Code는 그 자체로서 매우 아름다운 개발 문서가 된다.
•
Backbone.js의 기능을 몇퍼센트나 사용할 것인가?
•
자유롭다, 하지만 손이 많이 갈 것이다.
•
Server측 API가 RESTful 한가?
•
Logical Flow 정리
•
Template 보안 이슈
project 전체에 사용할 필요는 없지만 사용하고자 하는 부분에 data를 fetch해와서 template만 뿌려주는 식으로
Backbone.js기능의 반만 사용할 것이면, 장점은 장점대로 사라지고 Code가 혼잡해 질 것이다.
View단을 자유롭게 꾸밀 수 있는 큰 장점이 있지만, 이는 결국 프로젝트 팀 내에 CSS/Markup 전문가가 필요하다는
이야기가 된다. (모두 다 작업가능한 사람이라면? 천국에 온 기분일 것)
default상태에서, Backbone.js의 자동화된 비동기 호출은 Addressable URI를 기반으로 Request method를 GET/
POST/DELETE/UPDATE/PATCH/PUT 등 달리하여 실행된다. GET/POST만 사용하는 환경에서는 효율적 사용이
어렵다.
각 기능별 단위 내에서 Backbone.js 코드는 그 자체로 아름다운 문서이지만, 이러한 Objects 또는 File 간의 관계를
따로 정리해 놓지 않으면 차후 유지보수가 어려울 수 있다. (뭐, 어느 개발이던 마찬가지겠지요!)
JS Template은 기본적으로 화면에 template을 뿌려놓은 상태에서 시작한다. 때문에 template내에서는 가급적 연산
을 지양하며, 노출되기 민감한 부분은 비동기 호출하거나 애초에 서버에서 parse시킨 후 include하는 방식으로 우회.


![Methods of Backbone.Model
•
model.fetch( ) [GET]
- 개별
model의 url을 호출하며, response를 attribute에 저장.
- “Change” event를 발생시킴
•
model.save(attr) [POST / UPDATE or PATCH]
- 전달된 Attributes들을 JSON형태로 model.url에 Request
- “Change” event를 발생시킴
이미 create된 model을 save로 수정하면, 기본적으로 모든 Attribute를 정리해서 UPDATE request
하지만 options에 patch: true를 주게되면 새로 지정된 값만 정리해서 PATCH method로 보냄
•
model.destroy( ) [DELETE]
- 스스로를 삭제하며 model.url로 delete method 전달
- “destroy” event를 발생시킴](https://image.slidesharecdn.com/backbone-131027105006-phpapp01/85/DevOn-2013-Backbone-js-M-V-17-320.jpg)

![Backbone.Collection
•
개별 노트들의 집합
[
]
{
},{
},{
}
note_idx: 1,
note_content: "메모를 입력해봅시다!",
...
note_idx: 2,
note_content: "다음 모바일 첫화면",
...
note_idx: 3,
note_content: "키키키키~ Devon Forever!",
...](https://image.slidesharecdn.com/backbone-131027105006-phpapp01/85/DevOn-2013-Backbone-js-M-V-21-320.jpg)
![Methods of Backbone.Collection
• collection.fetch( )
[GET]
url을 호출하며, response를 각각 새로운 Model
instance로 변환하여 collection.models 에 push.
- 자신의
- reset:true 옵션을 주면 “reset” event를 발생시킴
•
collection.add(attr) / create(attr)
[POST]
- 전달된 argument로 구성된 새로운 Model 생성
- “add” / “request”, “sync” event 발생
add : 새로운 Model을 Collection에 추가만 함.
create : 추가함과 동시, backbone.sync를 통해 POST Request
•
collection.remove(model) [DELETE]
- 하나 또는 array 단위의 Model을 Collection에서 삭제
- “remove” event를 발생시킴](https://image.slidesharecdn.com/backbone-131027105006-phpapp01/85/DevOn-2013-Backbone-js-M-V-23-320.jpg)

![Model + View Render
<Model>
{
}
"name": "이효리",
"birth_date": "1979년 5월 10일 (만 33세)",
"birth_place": "충북 청원군",
"group": "핑클",
"family": "언니 이애리, 언니 이유리",
"debut": "1998년 핑클 1집 앨범 'Blur Rain'",
"img_url": "http://i2.daumcdn.net/thumb/S160x160/2224.jpg",
"school": [
"경희대학교 언론정보대학원",
"국민대학교 연극영화학",
"서문여자고등학교",
"서문여자중학교",
"동작초등학교"
]
...](https://image.slidesharecdn.com/backbone-131027105006-phpapp01/85/DevOn-2013-Backbone-js-M-V-27-320.jpg)
![Model + View Render
<Template>
<script type=”text/template” id=”profileTemplate”>
<div class="profile_img">
<img src="<%= img_url %>" alt="<%= name %>">
</div>
<div class="profile_desc">
<a href="<%= music_link %>"><%= name %></a> <%= category %>
<dl>
<dt>출생</dt>
<dd><%= birth_date %>, <%= birth_place %></dd>
<% if(group !== undefined){ %>
<dt>그룹</dt>
<dd><%= group %></dd>
<% } %>
<dt>학력</dt>
<dd>
<% for(var i,len=school.length; i<len; i++){ %>
<%= school[i] %>
<% } %>
</dd>
...
</dl>
</div>
</script>](https://image.slidesharecdn.com/backbone-131027105006-phpapp01/85/DevOn-2013-Backbone-js-M-V-28-320.jpg)
![“backbone.js에서 API 호출 주체는 collection과 model”
collection자체가 storage 역할을 하기 때문에
Client에서는 response를 기다릴 필요없이 바로 반응
Back-end API
collection.create실행 시 option으로 “wait”: true를 주면
response를 받은 후 add 됨.
[POST]
/note/
{ “note_content” : “노트내용~” .... }
{
“note_idx”: 4
}
{ “note_content” : “노트내용~” .... }
noteApp.collection
.create(model)
noteApp.collection에
“add” event 발생
collection.on(“add”, addHandler);
noteApp.collection
(local)](https://image.slidesharecdn.com/backbone-131027105006-phpapp01/85/DevOn-2013-Backbone-js-M-V-46-320.jpg)

![Collection, Model의 Built-in Events
•
•
•
•
•
•
“add” : collection.add(model) or collection.create(model) [POST]
“remove” : collection.remove(model) [DELETE]
“reset” : collection.fetch(model, {reset: true}) or model.fetch(model, {reset: true}) [GET]
“change” : collection에 모든 종류의 CRUD 발생 시 / model에 attribute변경 시
[UPDATE/PATCH]
“change:[attribute]” : model의 특정 attribute 변경 시
“destroy” : model.destroy()
[DELETE]](https://image.slidesharecdn.com/backbone-131027105006-phpapp01/85/DevOn-2013-Backbone-js-M-V-48-320.jpg)


![[XECon+PHPFest 2014] jQuery 개발자에서 AngularJS 개발자 되기](https://cdn.slidesharecdn.com/ss_thumbnails/xeconphpfest2014-angularjs-141110181025-conversion-gate01-thumbnail.jpg?width=640&height=640&fit=bounds)


![[115] clean fe development_윤지수](https://cdn.slidesharecdn.com/ss_thumbnails/115cleanfedevelopment-161023163916-thumbnail.jpg?width=640&height=640&fit=bounds)


![XECon2015 :: [2-2] 박상현 - React로 개발하는 SPA 실무 이야기](https://cdn.slidesharecdn.com/ss_thumbnails/react1-160404022032-thumbnail.jpg?width=640&height=640&fit=bounds)


![[하코사세미나] 한 시간 만에 배우는 Jquery](https://cdn.slidesharecdn.com/ss_thumbnails/jquery-151208015421-lva1-app6891-thumbnail.jpg?width=640&height=640&fit=bounds)


![[TECHCON 2019: MOBILE - Android]2.예제에서는 알려주지 않는 Model 이야기](https://cdn.slidesharecdn.com/ss_thumbnails/navertechconcertkimbeomjunpdf-190711081557-thumbnail.jpg?width=640&height=640&fit=bounds)
