54
Visual Studio TeamServices のソースコードを Visual Studio Mobile Center でビルドして成果物をダウンロードします。
1. ブラウザーで Visual Studio Mobile Center の画面に移動します。[Build] をクリックします。
2. 連携するコースコード管理サービスを選択します。[Visual Studio Team Services] をクリックします。
Visual Studio Mobile Center でビルド (1)
2
1
55.
55
Visual Studio MobileCenter から Visual Studio Team Services へのアクセス承認画面が表示されます。
1. [承認] をクリックします。
Visual Studio Mobile Center でビルド (2)
1
74
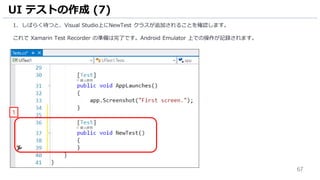
作成した UI テストをVisual Studio Mobile Center 上で実行します。
1. 26行目のコメントアウトします。
2. [すべて保存] アイコンをクリックして、ソースコードを保存します。
Visual Studio Mobile Center での UI テストの実行 (1)
2
1
75.
75
作成した UI テストをVisual Studio Mobile Center 上で実行できるようにパッケージをアップグレードします。
1. Visual Studio のメニュー [ツール] – [NuGet パッケージマネージャ] – [ソリューションの NuGet パッケージの管理]
の順にクリックします。
Visual Studio Mobile Center での UI テストの実行 (2)
1
77
1. Visual Studioのメニュー [ビルド] – [ソリューションのビルド] の順にクリックして、ビルドを実行します。
Visual Studio Mobile Center 上で UI テスト実行設定を行います。
2. ブラウザーで Visual Studio Mobile Center にアクセスし、[Test アイコン] をクリックします。
3. [Start testing your app] をクリックして、UI テストを有効化します。
Visual Studio Mobile Center での UI テストの実行 (4)
1
2
3
79
1. Android 6.0.1OS のデバイスを 3 つ選択します。リストの上から 3 つ選択するとテスト実行時間の待ち時間が増える
場合があります。
2. [Select 3 devices] をクリックします。
Visual Studio Mobile Center での UI テストの実行 (6)
1
2
80.
80
1. [System launguage]は [Japanese (Japan)] を選択します。
2. [Test framework] は、[Xamarin.UITest] をチェックします。
3. [Next] をクリックします。
Visual Studio Mobile Center での UI テストの実行 (7)
1
2
3
81.
81
Visual Studio MobileCenter での UI テストの実行手順の記載があることを確認します。
1. [Running tests] の [copy to clipcoard] をクリックしてコピーして、メモ帳などに貼り付けします。
2. [Done] をクリックします。
Visual Studio Mobile Center での UI テストの実行 (8)
1
2
82.
82
1. Node.js をインストールします。https://nodejs.org/ja/download/ にアクセスして [Windows Installer] をクリッ
クし、Node.js インストーラーをダウンロードします。
Visual Studio Mobile Center での UI テストの実行 (9)
1
83.
83
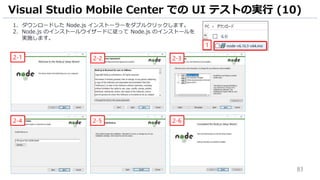
1. ダウンロードした Node.jsインストーラーをダブルクリックします。
2. Node.js のインストールウイザードに従って Node.js のインストールを
実施します。
Visual Studio Mobile Center での UI テストの実行 (10)
1
2-1 2-2 2-3
2-4 2-5 2-6
84.
84
1. Mobile CenterCLI をインストールします。Windows の検索ボックスで [cmd] と入力します。
2. 検索結果から [コマンドプロンプト] をクリックします。
3. コマンドプロンプト上で [npm install -g mobile-center-cli] と入力してから [Enter キー] を押して、Mobile
Center CLI をインストールします。
Visual Studio Mobile Center での UI テストの実行 (11)
2
1
85.
85
Mobile Center CLIから ログインコマンドを実行します。
1. コマンドプロンプト上で [mobile-center login] と入力してから [Enter キー] を押します。
2. ブラウザーが開いてアクセスコードが表示されます。[コピーアイコン] をクリックしてアクセスコードをコピーします。
3. コマンドプロンプト上でアクセスコード貼り付けしてから [Enter キー] を押します。
4. [Loogin in as [ユーザー名]] と表示されていることを確認します。
Visual Studio Mobile Center での UI テストの実行 (12)
1
3
2
4
86.
86
Mobile Center CLIから UI テストを実行します。
1. コマンドプロンプト上で [cd SourceRepos] と入力してから [Enter キー] を押し、プロジェクトフォルダーに移動
します。
2. 先ほどコピーした mobile-center コマンドを実行します。
• [pathToFile.apk] は、[C:Users(ユーザー名)DesktopApp1.App1.apk] と置き換えます。
• [pathToUITestBuildDir] は、[UITest1UITest1binDebug] と置き換えます。
3. 10 分程度待つとテストが終了します。今回は失敗していることを確認します。
Visual Studio Mobile Center での UI テストの実行 (13)
1
2
3
実行に 約 10 分かかります。
先にスライド 92 以降を進めてください。
87.
87
1. UI テスト結果を確認します。ブラウザーでVisual Studio Mobile Center にアクセスし、[Test] をクリックします。
2. 先ほどコマンドラインで実行した UI テストの結果が表示されています。クリックします。
Visual Studio Mobile Center での UI テストの実行 (14)
1
2
92
Visual Studio MobileCenter では、成果物をユーザーに配布することも行えます。
1. ブラウザーで Visual Studio Mobile Center にアクセスし、[Distribute アイコン] をクリックします。
2. [Distribute new release] をクリックします。
ユーザーへの配布 (1)
1
2


![5
1. ブラウザーで https://mobile.azure.com にアクセスし、[Connect with Microsoft] をクリックします。
Visual Studio Mobile Center のアカウント作成 (1)
1](https://image.slidesharecdn.com/mobileappdevhol20171103-171104004551/85/Android-Xamarin-5-320.jpg)
![6
1. マイクロソフトアカウントを入力します。
2. [次へ] をクリックします。
3. パスワードを入力します。
4. [サインイン] をクリックします。
Visual Studio Mobile Center のアカウント作成 (2)
1
3
4
2](https://image.slidesharecdn.com/mobileappdevhol20171103-171104004551/85/Android-Xamarin-6-320.jpg)
![7
Visual Studio Mobile Center にログインしました。今回のハンズオン用のアプリケーションの設定を行います。
1. 表示されている [username] の値を記録します。
2. [Choose username] をクリックします。
3. [Add new app] をクリックします。
Visual Studio Mobile Center のアカウント作成 (3)
32
1](https://image.slidesharecdn.com/mobileappdevhol20171103-171104004551/85/Android-Xamarin-7-320.jpg)
![8
1. [Name] には、[AndroidDemo] と入力します。
2. [OS] には、[Android] を選択します。
3. [Platform] には、[Xamarin] を選択します。
4. [Add new app] をクリックします。
Visual Studio Mobile Center のアカウント作成 (4)
1
2
3
4](https://image.slidesharecdn.com/mobileappdevhol20171103-171104004551/85/Android-Xamarin-8-320.jpg)
![10
今回のハンズオンで使用する Android Emulator を準備します。
1. Visual Studio を起動し、メニュー [ツール] をクリックします。
2. [Android] – [Android エミュレーター マネージャー] の順にクリックします。
Android Emulator の準備 (1)
2
1](https://image.slidesharecdn.com/mobileappdevhol20171103-171104004551/85/Android-Xamarin-10-320.jpg)
![11
Android エミュレーター マネージャーが起動します。
1. [Device Definition] をクリックします。
2. [Nexus 5 by Google] をクリックします。
3. [Create AVD...] をクリックします。
Android Emulator の準備 (2)
2
1
3](https://image.slidesharecdn.com/mobileappdevhol20171103-171104004551/85/Android-Xamarin-11-320.jpg)
![12
1. [Target] は、[Android 6.0 – API Level 23] を選択します。
2. [CPU/ABI] は、[Google APIs Intel Atom (x86)] を選択します。
3. [Skin] は、[No skin] を選択します。
4. [Memory Options] の [RAM] は、[1024] に変更します。
5. [OK] をクリックして、AVDを作成します。
6. 作成結果が表示されます。[OK] をクリックしてウインドウを閉じます。
Android Emulator の準備 (3)
2
1
3
4
5
6](https://image.slidesharecdn.com/mobileappdevhol20171103-171104004551/85/Android-Xamarin-12-320.jpg)
![13
Android Emulator を起動します。
1. 先ほど作成した AVD をクリックして選択します。
2. [Start] をクリックします。
3. [Launch] をクリックして、Android Emulator を起動します。
Android Emulator の準備 (4)
21
3](https://image.slidesharecdn.com/mobileappdevhol20171103-171104004551/85/Android-Xamarin-13-320.jpg)
![14
1. Android Emulator が起動し、Android の Welcome メッセージが表示されます。[GOT IT] をクリックします。
2. Android の画面が表示されていることを確認します。
Android Emulator の準備 (5)
2
1
Android Emulator は閉じないこと!](https://image.slidesharecdn.com/mobileappdevhol20171103-171104004551/85/Android-Xamarin-14-320.jpg)
![15
1. ブラウザーで https://www.visualstudio.com/ja-jp にアクセスし、[Sign in] をクリックします。
Visual Studio Team Services のアカウント作成 (1)
1](https://image.slidesharecdn.com/mobileappdevhol20171103-171104004551/85/Android-Xamarin-15-320.jpg)
![16
Visual Studio Team Services のサインイン画面が表示されます。
1. Microsoft アカウントを入力します。
2. [次へ] をクリックします。
3. Microsoftアカウントのパスワードを入力します。
4. [サインイン]をクリックします。
Visual Studio Team Services のアカウント作成 (2)
3
4
1
2](https://image.slidesharecdn.com/mobileappdevhol20171103-171104004551/85/Android-Xamarin-16-320.jpg)
![17
1. 詳細情報に関する画面が表示されます。[発信元] に [Japan] を選択します。
2. [続行]をクリックします。
Visual Studio Team Services のアカウント作成 (3)
1
2](https://image.slidesharecdn.com/mobileappdevhol20171103-171104004551/85/Android-Xamarin-17-320.jpg)
![18
1. [新しいアカウントの作成] をクリックします。
Visual Studio Team Services のアカウント作成 (4)
1](https://image.slidesharecdn.com/mobileappdevhol20171103-171104004551/85/Android-Xamarin-18-320.jpg)
![19
Visual Studio Team Services のアカウント作成画面が表示されます。
1. 任意のURLを入力します。
2. [Git] を選択します。
3. [詳細の変更]をクリックします。
Visual Studio Team Services のアカウント作成 (5)
2
3
1](https://image.slidesharecdn.com/mobileappdevhol20171103-171104004551/85/Android-Xamarin-19-320.jpg)
![20
1. プロジェクト名が [MyFirstProject] 、 プロセステンプレート [Agile] となっている事を確認します。
2. [続行]をクリックして、Visual Studio Team Services のアカウントを作成します。
Visual Studio Team Services のアカウント作成 (6)
2
1
プロジェクト名は変更可能ですが、
本手順書では、デフォルトのままにします。](https://image.slidesharecdn.com/mobileappdevhol20171103-171104004551/85/Android-Xamarin-20-320.jpg)

![23
1. [コピー] アイコンをクリックして、 Git の URL をコピーします。
2. Visual Studio を起動し、メニュー [表示] – [チーム エクスプローラー] の順にクリックします。
3. [チームエクスプローラー] の [接続] アイコンをクリックします。
4. [ローカル Git リポジトリ] の [複製] をクリックします。
Visual Studio と Git の接続 (1)
1
4
2
3](https://image.slidesharecdn.com/mobileappdevhol20171103-171104004551/85/Android-Xamarin-23-320.jpg)
![24
Visual Studio 上に作成した Git リポジトリを複製します。
1. 先ほどコピーした URL を貼り付けします。
2. [複製] をクリックします。
3. [マイクロソフトアカウント] を入力します。
4. 続いて、[次へ] をクリックします。
Visual Studio と Git の接続 (2)
2
1
4
3](https://image.slidesharecdn.com/mobileappdevhol20171103-171104004551/85/Android-Xamarin-24-320.jpg)
![25
1. [マイクロソフトアカウントのパスワード] を入力します。
2. 続いて、[サインイン] をクリックします。
3. Visual Studio のメニュー [表示] – [チーム エクスプローラー] の順にクリックします。
4. Visual Studio のチームエクスプローラーの [新しいプロジェクトまたはソリューションを作成] をクリックします。
Visual Studio と Git の接続 (3)
2
1
4
3](https://image.slidesharecdn.com/mobileappdevhol20171103-171104004551/85/Android-Xamarin-25-320.jpg)
![26
1. 新しいプロジェクトの作成画面が開きます。[Visual C#] の [Android] を選択します。
2. [空のアプリ]を選択します。
3. [ソリューションのディレクトリを作成]と[新しいGit リポジトリの作成] にチェックがはいっていることを確認します。
4. [OK] をクリックします。
Xamarin.Android アプリ作成 (1)
3
2
1
4](https://image.slidesharecdn.com/mobileappdevhol20171103-171104004551/85/Android-Xamarin-26-320.jpg)
![27
Xamarin.Android プロジェクトが作成されます。まずはビューデザイナーを起動します。
1. [ソリューション エクスプローラー] をクリックします。
2. [ソリューション エクスプローラー] にある[Resources] フォルダー – [layout] フォルダーを順にクリックします。
3. [Main.axml] をダブルクリックしてビューデザイナーを起動します。
Xamarin.Android アプリ作成 (2)
3
1
2](https://image.slidesharecdn.com/mobileappdevhol20171103-171104004551/85/Android-Xamarin-27-320.jpg)
![28
まずは、Text コントロールを配置します。
1. Visual Studio の [ツールボックス] をクリックします。
2. [ツールボックス] の [Text(Large)] をクリックします。
3. [Text(Large)] をドラッグ & ドロップしてビューデザイナー上に配置します。
Xamarin.Android アプリ作成 (3)
31
2](https://image.slidesharecdn.com/mobileappdevhol20171103-171104004551/85/Android-Xamarin-28-320.jpg)
![29
Text コントロールのプロパティ値を設定します。
1. Visual Studio のメニュー [表示] – [プロパティウインドウ] の順にクリックします。
2. [プロパティウインドウ] の [Main] にある [text] を [パスワードを入力] と変更します。
3. ビューデザイナー上にある[Large Text] の文字列が [パスワードを入力] に変更されていることを確認します。
Xamarin.Android アプリ作成 (4)
3
1
2](https://image.slidesharecdn.com/mobileappdevhol20171103-171104004551/85/Android-Xamarin-29-320.jpg)
![30
続いては、Plain Text コントロールを配置します。
1. Visual Studio の [ツールボックス] をクリックします。
2. [ツールボックス] の [Plain Text] をクリックします。
3. [Plain Text] をドラッグ & ドロップしてビューデザイナー上に配置します。
Xamarin.Android アプリ作成 (5)
3
1
2](https://image.slidesharecdn.com/mobileappdevhol20171103-171104004551/85/Android-Xamarin-30-320.jpg)
![31
Plain Text コントロールのプロパティ値を設定します。
1. Visual Studio のメニュー [表示] – [プロパティウインドウ] の順にクリックします。
2. [プロパティウインドウ] の [Main] にある [id] を [@+id/PhoneNumberText] と変更します。
3. 同じく、[プロパティウインドウ] の [Main] にある [text] を [1-855-XAMARIN] と変更します。
4. ビューデザイナー上にある文字列が [1-855-XAMARIN] に変更されていることを確認します。
Xamarin.Android アプリ作成 (6)
4
1
2
3](https://image.slidesharecdn.com/mobileappdevhol20171103-171104004551/85/Android-Xamarin-31-320.jpg)
![32
続いては、Button コントロールを配置します。
1. Visual Studio の [ツールボックス] をクリックします。
2. [ツールボックス] の [Button] をクリックします。
3. [Button] をドラッグ & ドロップしてビューデザイナー上に配置します。
Xamarin.Android アプリ作成 (7)
3
1
2](https://image.slidesharecdn.com/mobileappdevhol20171103-171104004551/85/Android-Xamarin-32-320.jpg)
![33
Button コントロールのプロパティ値を設定します。
1. Visual Studio のメニュー [表示] – [プロパティウインドウ] の順にクリックします。
2. [プロパティウインドウ] の [Main] にある [id] を [@+id/TranslateButton] と変更します。
3. 同じく、[プロパティウインドウ] の [Main] にある [text] を [変換] と変更します。
4. ビューデザイナー上にあるボタンの文字が [変換] に変更されていることを確認します。
Xamarin.Android アプリ作成 (8)
4
1
2
3](https://image.slidesharecdn.com/mobileappdevhol20171103-171104004551/85/Android-Xamarin-33-320.jpg)
![34
最後に、Button コントロールをもう一つ配置します。
1. Visual Studio の [ツールボックス] をクリックします。
2. [ツールボックス] の [Button] をクリックします。
3. [Button] をドラッグ & ドロップしてビューデザイナー上に配置します。
Xamarin.Android アプリ作成 (9)
3
1
2](https://image.slidesharecdn.com/mobileappdevhol20171103-171104004551/85/Android-Xamarin-34-320.jpg)
![35
Button コントロールのプロパティ値を設定します。
1. Visual Studio のメニュー [表示] – [プロパティウインドウ] の順にクリックします。
2. [プロパティウインドウ] の [Main] にある [id] を [@+id/CallButton] と変更します。
3. 同じく、[プロパティウインドウ] の [Main] にある [text] を [Call] と変更します。
4. ビューデザイナー上にあるボタンの文字が [Call] に変更されていることを確認します。
Xamarin.Android アプリ作成 (10)
4
1
2
3](https://image.slidesharecdn.com/mobileappdevhol20171103-171104004551/85/Android-Xamarin-35-320.jpg)
![36
ビューデザイナーで配置したコントロールの挙動の実装を行います。
1. Visual Studio の [ソリューション エクスプローラー] の プロジェクト [App1] を右クリックします。
2. [追加] – [新しい項目] の順にクリックします。
Xamarin.Android アプリ作成 (11)
1
2](https://image.slidesharecdn.com/mobileappdevhol20171103-171104004551/85/Android-Xamarin-36-320.jpg)
![37
1. 新しい項目の追加画面が開きます。[Visual C#] の [コード] を選択します。
2. [コードファイル] をクリックして選択します。
3. [名前] を [PhoneTranslator.cs] に変更します。
4. [追加] をクリックします。
Xamarin.Android アプリ作成 (12)
1
2
3
4](https://image.slidesharecdn.com/mobileappdevhol20171103-171104004551/85/Android-Xamarin-37-320.jpg)
![38
1. [PhoneTranslator.cs] のソースコードは、
https://1drv.ms/t/s!AA8nkeSt8_2qnCQ にあります。
アクセスしてソースコードをコピーして、Visual Studio の [PhoneTranslator.cs] に貼り付けします。
2. [すべて保存] アイコンをクリックして、ソースコードを保存します。
Xamarin.Android アプリ作成 (13)
1
2](https://image.slidesharecdn.com/mobileappdevhol20171103-171104004551/85/Android-Xamarin-38-320.jpg)
![39
1. 続いて、[MainActivity.cs] を編集します。ソースコードは、
https://1drv.ms/t/s!AA8nkeSt8_2qnCUにあります。
アクセスしてソースコードをコピーして、Visual Studio の [MainActivity.cs] を上書きする形で貼り付けします。
2. [すべて保存] アイコンをクリックして、ソースコードを保存します。
Xamarin.Android アプリ作成 (14)
1
2](https://image.slidesharecdn.com/mobileappdevhol20171103-171104004551/85/Android-Xamarin-39-320.jpg)
![40
最後に、プロジェクトの設定を編集します。
1. Visual Studio の [ソリューション エクスプローラー] の [App1] の [Properties] をダブルクリックします。
2. [アプリケーション] の [Android バージョンを使用したコンパイル] を [Android 6.0] にします。
Xamarin.Android アプリ作成 (15)
1
2](https://image.slidesharecdn.com/mobileappdevhol20171103-171104004551/85/Android-Xamarin-40-320.jpg)
![41
1. [Android マニフェスト] をクリックして選択します。
2. [必要なアクセス許可] の [CALL_PHONE] にチェックいれ、このアプリから電話発信を許可します。
3. 続いて、[必要なアクセス許可] の [INTERNET] にチェックいれ、このアプリからインターネットアクセスを許可します。
Xamarin.Android アプリ作成 (16)
1
2
3](https://image.slidesharecdn.com/mobileappdevhol20171103-171104004551/85/Android-Xamarin-41-320.jpg)
![42
1. [すべて保存] アイコンをクリックして、ソースコードを保存します。
2. [AVD_for_Nexus_5_by_Google (Android 6.0 – API 23)] をクリックして、先ほど起動した Android Emulator へ
のデバッグ実行をします。
3. Android Emulator 上にアプリが実行されています。[1-855-Xamarin] を [Azure-Daisuki] に変更します。
4. [変換] ボタンをクリックします。
5. [CALL] ボタンが、[CALL 29873-3247854] に変更されていることを確認します。
Xamarin.Android アプリ作成 (17)
1 2
3
4
5](https://image.slidesharecdn.com/mobileappdevhol20171103-171104004551/85/Android-Xamarin-42-320.jpg)
![43
続いて、このアプリで電話発信が許可されていることを確認します。
1. [CALL 29873-3247854] ボタンをクリックします。
2. [Call …?] というポップアップウインドウが表示されていることを確認します。今回は[CANCEL] をクリックします。
3. Visual Studio で[デバッグの停止] アイコンをクリックして、デバッグ実行を終了します。
Xamarin.Android アプリ作成 (18)
3
2
1](https://image.slidesharecdn.com/mobileappdevhol20171103-171104004551/85/Android-Xamarin-43-320.jpg)
![44
Xamarin Profiler を使用すると、Xamarinで作成したモバイルアプリケーションのプロファイリングが可能になります。
1. Visual Studio の [ツール] をクリックします。
2. [Xamarin Profiler] をクリックします。Xamarin Profiler が起動します。
3. [割り当て] をクリックして選択します。
4. [プロファイリングの開始] をクリックします。
プロファイリングの実行 (1)
2
1
3
4](https://image.slidesharecdn.com/mobileappdevhol20171103-171104004551/85/Android-Xamarin-44-320.jpg)
![45
Xamarin Profiler が起動します。
1. [Allocations] をクリックします。
2. 詳細情報が表示されていることを確認します。
3. [X] をクリックして、 Xamarin Profiler を終了します。
プロファイリングの実行 (2)
1
2
3](https://image.slidesharecdn.com/mobileappdevhol20171103-171104004551/85/Android-Xamarin-45-320.jpg)
![46
Xamarin Profiler を使用すると、Xamarinで作成したモバイルアプリケーションのプロファイリングが可能になります。
1. Visual Studio の [ツール] をクリックします。
2. [Xamarin Profiler] をクリックします。Xamarin Profiler が起動します。
3. [時間プロファイラー] をクリックして選択します。
4. [プロファイリングの開始] をクリックします。
プロファイリングの実行 (3)
2
1
3
4](https://image.slidesharecdn.com/mobileappdevhol20171103-171104004551/85/Android-Xamarin-46-320.jpg)
![47
1. [時間プロファイラー] のCPU 時間が変化している前後をドラッグ&ドロップします。
2. 詳細情報が表示されていることを確認します。
プロファイリングの実行 (4)
1
2](https://image.slidesharecdn.com/mobileappdevhol20171103-171104004551/85/Android-Xamarin-47-320.jpg)
![48
1. Android Emulator で [変換] ボタンをクリックします。
2. Xamarin Profiler の時間プロファイラーの CPU 時間が変化していることを確認します。
3. [X] をクリックして Xamarin Profiler を終了します。
プロファイリングの実行 (5)
1
2
3](https://image.slidesharecdn.com/mobileappdevhol20171103-171104004551/85/Android-Xamarin-48-320.jpg)
![49
1. リリース用の設定をします。Visual Studio プロジェクトのプロパティ画面で [Android オプション] をクリックします。
2. [構成] は [Release] を選択します。
3. [詳細設定] をクリックします。
4. [サポートされているアーキテクチャ] をクリックして、 [x86] と[x86_64] を追加します。
5. [閉じる] をクリックします。
6. [すべて保存] アイコンをクリックして、ソースコードを保存します。
ソースコードのコミット (1)
5
1
3
2
4
6](https://image.slidesharecdn.com/mobileappdevhol20171103-171104004551/85/Android-Xamarin-49-320.jpg)
![50
ソースコードのコミット (2)
1. メニュー [表示] – [チーム エクスプローラー] の順にクリックします。
2. [チームエクスプローラー] の [設定] をクリックします。
1
2](https://image.slidesharecdn.com/mobileappdevhol20171103-171104004551/85/Android-Xamarin-50-320.jpg)
![51
ソースコードのコミット (3)
1. [グローバル設定] をクリックします。
2. [ユーザー名] を入力します。
3. [電子メールアドレス] には、今回使用しているMSアカウントを入力します。
4. [更新] をクリックします。
1
4
2
3
既に入力されている場合は、
次に進んでください。](https://image.slidesharecdn.com/mobileappdevhol20171103-171104004551/85/Android-Xamarin-51-320.jpg)
![52
ソースコードのコミット (4)
1. [ホームアイコン] をクリックします。
2. [変更] をクリックします。
3. [コメント] には、[Xamarin.Android] と入力します。
4. [すべてをコミット] をクリックします。
5. コミットがローカルで作成されました。[同期] をクリックします。
6. 今回は [プッシュ] をクリックして、Visual Studio Team Services のリポジトリに Push します。
ここまで操作が完了したら、Visual Studio を終了してください!
1
4
2
3
5
6](https://image.slidesharecdn.com/mobileappdevhol20171103-171104004551/85/Android-Xamarin-52-320.jpg)

![54
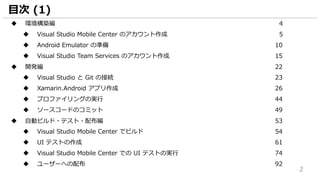
Visual Studio Team Services のソースコードを Visual Studio Mobile Center でビルドして成果物をダウンロードします。
1. ブラウザーで Visual Studio Mobile Center の画面に移動します。[Build] をクリックします。
2. 連携するコースコード管理サービスを選択します。[Visual Studio Team Services] をクリックします。
Visual Studio Mobile Center でビルド (1)
2
1](https://image.slidesharecdn.com/mobileappdevhol20171103-171104004551/85/Android-Xamarin-54-320.jpg)
![55
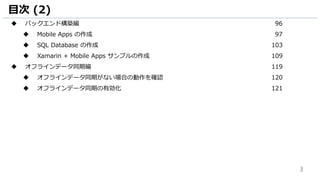
Visual Studio Mobile Center から Visual Studio Team Services へのアクセス承認画面が表示されます。
1. [承認] をクリックします。
Visual Studio Mobile Center でビルド (2)
1](https://image.slidesharecdn.com/mobileappdevhol20171103-171104004551/85/Android-Xamarin-55-320.jpg)
![56
1. チームプロジェクトを選択します。 [MyFirstProject] をクリックします。
2. 連携する Git リポジトリのリストが表示されます。[MyFirstProject] をクリックします。
Visual Studio Mobile Center でビルド (3)
1
2](https://image.slidesharecdn.com/mobileappdevhol20171103-171104004551/85/Android-Xamarin-56-320.jpg)
![57
1. ビルドするブランチを指定します。[master] をクリックします。
2. master ブランチでのビルド設定をします。[Configure build] をクリックします。
Visual Studio Mobile Center でビルド (4)
1
2](https://image.slidesharecdn.com/mobileappdevhol20171103-171104004551/85/Android-Xamarin-57-320.jpg)
![58
1. [Project] には、[App1.csproj] が選択されていることを確認します。
2. [Configuration] には、[Release] が選択されていることを確認します。
3. [Save & Build] をクリックします。
Visual Studio Mobile Center でビルド (5)
3
1
2](https://image.slidesharecdn.com/mobileappdevhol20171103-171104004551/85/Android-Xamarin-58-320.jpg)
![59
1. ビルドが自動的に開始されます。ビルドが成功したことを確認してクリックします。
2. ビルドが成功している場合は成果物をダウンロードできます。[Download] – [Download build] の順にクリックします。
Visual Studio Mobile Center でビルド (6)
1
2](https://image.slidesharecdn.com/mobileappdevhol20171103-171104004551/85/Android-Xamarin-59-320.jpg)
![60
1. ダウンロード フォルダーにある [build.zip] を展開して、作成された [build] フォルダーの中にある
[buildApp1.App1.apk] を [デスクトップフォルダー] にコピーします。
2. [デスクトップフォルダー] フォルダーの中に、[App1.App1.apk] があることを確認します。
Visual Studio Mobile Center でビルド (7)
1 2](https://image.slidesharecdn.com/mobileappdevhol20171103-171104004551/85/Android-Xamarin-60-320.jpg)
![61
Visual Studio Mobile Center でのビルド成果物として APK ファイルが生成されました。
続いては、この APK ファイルを使ってUIテストを作成します。今回は Xamarin Test Recorder を使用します。
1. ブラウザーの検索画面で、[Xamarin test recorder marketplace] と入力して検索ボタンをクリックします。
2. 検索結果の [Xamarin Test Recorder – Visual Studio Marketplace] をクリックします。
3. https://marketplace.visualstudio.com/items?itemName=XamarinInc.XamarinTestRecorder2015 に移動します。
[Download] ボタンをクリックしてダウンロードします。
UI テストの作成 (1)
2
3
1](https://image.slidesharecdn.com/mobileappdevhol20171103-171104004551/85/Android-Xamarin-61-320.jpg)
![62
Xamarin Test Recorder をインストールします。
1. ダウンロードフォルダーにある [Xamarin.TestRecorder.VSIX...vsix] をダブルクリックします。
2. [インストール] をクリックして、Xamarin Test Recorderインストールします。
3. Xamarin Test Recorder のインストールが完了したことを確認して、[閉じる] をクリックします。
UI テストの作成 (2)
2
3
1](https://image.slidesharecdn.com/mobileappdevhol20171103-171104004551/85/Android-Xamarin-62-320.jpg)
![63
1. Visual Studio を起動し、メニュー [ファイル] - [新規作成] – [プロジェクト] の順にクリックします。
UI テストの作成 (3)
1](https://image.slidesharecdn.com/mobileappdevhol20171103-171104004551/85/Android-Xamarin-63-320.jpg)
![64
1. 新しいプロジェクトの作成画面が開きます。[Visual C#] の [Android] を選択します。
2. [UIテストアプリ (Xamarin.UITest | Android)]を選択します。
3. [OK] をクリックします。
UI テストの作成 (4)
2
1
3](https://image.slidesharecdn.com/mobileappdevhol20171103-171104004551/85/Android-Xamarin-64-320.jpg)
![65
1. Xamarin Test Recorderによる操作記録を開始します。[ソリューション エクスプローラー] をクリックします。
2. [Test.cs] をダブルクリックします。
3. [Xamarin Test Recorder] アイコンをクリックします。
UI テストの作成 (5)
3
2
1](https://image.slidesharecdn.com/mobileappdevhol20171103-171104004551/85/Android-Xamarin-65-320.jpg)
![66
1. [Record New Test] – [Select APK] の順にクリックします。
2. Visual Studio Mobile Center でのビルド成果物 [App1.App1.apk] を選択します。
3. [開く] をクリックします。Android Emulator にアプリがアップロードされます。
UI テストの作成 (6)
1
2
3](https://image.slidesharecdn.com/mobileappdevhol20171103-171104004551/85/Android-Xamarin-66-320.jpg)
![68
Android Emulator 上での操作記録を実施します。
間違った操作をした場合は操作記録完了後にソースコードを削除してください。
1. Android Emulator 上で [1-855-XAMARIN] の文字をクリックします。
そして、文字列を削除し、[XamarinTest] と入力します。
2. Visual Studioで Xamarin Test Recorder のアイコンをクリックして、[Take Screenshot] をクリックします。
UI テストの作成 (8)
1
2](https://image.slidesharecdn.com/mobileappdevhol20171103-171104004551/85/Android-Xamarin-68-320.jpg)
![69
続けて、Android Emulator 上での操作記録を実施します。
間違った操作をした場合は操作記録完了後にソースコードを削除してください。
1. Android Emulator 上で [変換] ボタンをクリックします。
2. Visual Studioで Xamarin Test Recorder のアイコンをクリックして、[Take Screenshot] をクリックします。
UI テストの作成 (9)
1
2](https://image.slidesharecdn.com/mobileappdevhol20171103-171104004551/85/Android-Xamarin-69-320.jpg)
![70
続けて、Android Emulator 上での操作記録を実施します。
間違った操作をした場合は操作記録完了後にソースコードを削除してください。
1. Android Emulator 上で [CALL 92627468378] ボタンをクリックします。
2. Visual Studioで Xamarin Test Recorder のアイコンをクリックして、[Take Screenshot] をクリックします。
UI テストの作成 (10)
1
2](https://image.slidesharecdn.com/mobileappdevhol20171103-171104004551/85/Android-Xamarin-70-320.jpg)
![71
1. Visual Studioで Xamarin Test Recorder のアイコンをクリックして、[Stop recording] をクリックします。
[NewTest] が下記の手順になっていることを確認します。
間違った操作をした場合はここで不要なソースコードを削除してください。
UI テストの作成 (11)
2
1](https://image.slidesharecdn.com/mobileappdevhol20171103-171104004551/85/Android-Xamarin-71-320.jpg)
![72
1. コードの修正を行います。[AppLaunches] は不要なのでコメントアウトします。
2. 評価式を追加します。47行目に下記のコードを追加します。
Call ボタンの文字列の評価式ですが、今回はテストを意図的に失敗するように “Test” という文字列を期待値として
もたせています。
UI テストの作成 (12)
2
1](https://image.slidesharecdn.com/mobileappdevhol20171103-171104004551/85/Android-Xamarin-72-320.jpg)
![73
1. Android Emulator 上で UI テストを実行します。26行目のコメントアウトを解除して、デスクトップにある APK
ファイルへのフルパスを記載します。.Apkfile (”C:/Users/(ユーザー名)/Desktop/App1.App1.apk”) のよう
に、”” ではなく “/” で記載してください。
2. [すべて保存] アイコンをクリックして、ソースコードを保存します。
3. メニュー [テスト] - [実行] - [すべてのテスト] の順にクリックして、UI テストを実行します。
4. Android Emulator 上で自動で操作されていることを確認します。
5. テスト結果は失敗となります。[NewTest] をダブルクリックして、追加した評価式が機能していることを確認します。
UI テストの作成 (13)
2
1
5
4](https://image.slidesharecdn.com/mobileappdevhol20171103-171104004551/85/Android-Xamarin-73-320.jpg)
![74
作成した UI テストを Visual Studio Mobile Center 上で実行します。
1. 26行目のコメントアウトします。
2. [すべて保存] アイコンをクリックして、ソースコードを保存します。
Visual Studio Mobile Center での UI テストの実行 (1)
2
1](https://image.slidesharecdn.com/mobileappdevhol20171103-171104004551/85/Android-Xamarin-74-320.jpg)
![75
作成した UI テストを Visual Studio Mobile Center 上で実行できるようにパッケージをアップグレードします。
1. Visual Studio のメニュー [ツール] – [NuGet パッケージマネージャ] – [ソリューションの NuGet パッケージの管理]
の順にクリックします。
Visual Studio Mobile Center での UI テストの実行 (2)
1](https://image.slidesharecdn.com/mobileappdevhol20171103-171104004551/85/Android-Xamarin-75-320.jpg)
![76
1. [Xamarin.UITest] をクリックして選択します。
2. [UITest1] プロジェクトにチェックをいれます。
3. [Xamarin.UITest] の [2.1.4] を選択します。⇒忘れずに!
4. [インストール] をクリックして Xamarin.UITest パッケージをインストールします。
5. インストールが完了すると、[出力] ウインドウに [パッケージが正常にインストールされました。] と表示されることを
確認します。
Visual Studio Mobile Center での UI テストの実行 (3)
1
2
4
4
3](https://image.slidesharecdn.com/mobileappdevhol20171103-171104004551/85/Android-Xamarin-76-320.jpg)
![77
1. Visual Studio のメニュー [ビルド] – [ソリューションのビルド] の順にクリックして、ビルドを実行します。
Visual Studio Mobile Center 上で UI テスト実行設定を行います。
2. ブラウザーで Visual Studio Mobile Center にアクセスし、[Test アイコン] をクリックします。
3. [Start testing your app] をクリックして、UI テストを有効化します。
Visual Studio Mobile Center での UI テストの実行 (4)
1
2
3](https://image.slidesharecdn.com/mobileappdevhol20171103-171104004551/85/Android-Xamarin-77-320.jpg)
![78
1. デバイスの選択画面が表示されます。[フィルター] アイコンをクリックします。
2. [OS Versions] をクリックします。
3. [Android 6.0.1] にチェックをいれます。
4. [X] をクリックしてフィルターを閉じます。
Visual Studio Mobile Center での UI テストの実行 (5)
1
2
3
4](https://image.slidesharecdn.com/mobileappdevhol20171103-171104004551/85/Android-Xamarin-78-320.jpg)
![79
1. Android 6.0.1 OS のデバイスを 3 つ選択します。リストの上から 3 つ選択するとテスト実行時間の待ち時間が増える
場合があります。
2. [Select 3 devices] をクリックします。
Visual Studio Mobile Center での UI テストの実行 (6)
1
2](https://image.slidesharecdn.com/mobileappdevhol20171103-171104004551/85/Android-Xamarin-79-320.jpg)
![80
1. [System launguage] は [Japanese (Japan)] を選択します。
2. [Test framework] は、[Xamarin.UITest] をチェックします。
3. [Next] をクリックします。
Visual Studio Mobile Center での UI テストの実行 (7)
1
2
3](https://image.slidesharecdn.com/mobileappdevhol20171103-171104004551/85/Android-Xamarin-80-320.jpg)
![81
Visual Studio Mobile Center での UI テストの実行手順の記載があることを確認します。
1. [Running tests] の [copy to clipcoard] をクリックしてコピーして、メモ帳などに貼り付けします。
2. [Done] をクリックします。
Visual Studio Mobile Center での UI テストの実行 (8)
1
2](https://image.slidesharecdn.com/mobileappdevhol20171103-171104004551/85/Android-Xamarin-81-320.jpg)
![82
1. Node.js をインストールします。 https://nodejs.org/ja/download/ にアクセスして [Windows Installer] をクリッ
クし、Node.js インストーラーをダウンロードします。
Visual Studio Mobile Center での UI テストの実行 (9)
1](https://image.slidesharecdn.com/mobileappdevhol20171103-171104004551/85/Android-Xamarin-82-320.jpg)
![84
1. Mobile Center CLI をインストールします。Windows の検索ボックスで [cmd] と入力します。
2. 検索結果から [コマンドプロンプト] をクリックします。
3. コマンドプロンプト上で [npm install -g mobile-center-cli] と入力してから [Enter キー] を押して、Mobile
Center CLI をインストールします。
Visual Studio Mobile Center での UI テストの実行 (11)
2
1](https://image.slidesharecdn.com/mobileappdevhol20171103-171104004551/85/Android-Xamarin-84-320.jpg)
![85
Mobile Center CLI から ログインコマンドを実行します。
1. コマンドプロンプト上で [mobile-center login] と入力してから [Enter キー] を押します。
2. ブラウザーが開いてアクセスコードが表示されます。[コピーアイコン] をクリックしてアクセスコードをコピーします。
3. コマンドプロンプト上でアクセスコード貼り付けしてから [Enter キー] を押します。
4. [Loogin in as [ユーザー名]] と表示されていることを確認します。
Visual Studio Mobile Center での UI テストの実行 (12)
1
3
2
4](https://image.slidesharecdn.com/mobileappdevhol20171103-171104004551/85/Android-Xamarin-85-320.jpg)
![86
Mobile Center CLI から UI テストを実行します。
1. コマンドプロンプト上で [cd SourceRepos] と入力してから [Enter キー] を押し、プロジェクトフォルダーに移動
します。
2. 先ほどコピーした mobile-center コマンドを実行します。
• [pathToFile.apk] は、[C:Users(ユーザー名)DesktopApp1.App1.apk] と置き換えます。
• [pathToUITestBuildDir] は、[UITest1UITest1binDebug] と置き換えます。
3. 10 分程度待つとテストが終了します。今回は失敗していることを確認します。
Visual Studio Mobile Center での UI テストの実行 (13)
1
2
3
実行に 約 10 分かかります。
先にスライド 92 以降を進めてください。](https://image.slidesharecdn.com/mobileappdevhol20171103-171104004551/85/Android-Xamarin-86-320.jpg)
![87
1. UI テスト結果を確認します。ブラウザーで Visual Studio Mobile Center にアクセスし、[Test] をクリックします。
2. 先ほどコマンドラインで実行した UI テストの結果が表示されています。クリックします。
Visual Studio Mobile Center での UI テストの実行 (14)
1
2](https://image.slidesharecdn.com/mobileappdevhol20171103-171104004551/85/Android-Xamarin-87-320.jpg)
![88
1. UI テストのテスト結果の履歴が確認できます。 今回のテスト結果を確認します。[New Test] をクリックします。
Visual Studio Mobile Center での UI テストの実行 (15)
1](https://image.slidesharecdn.com/mobileappdevhol20171103-171104004551/85/Android-Xamarin-88-320.jpg)
![89
1. 今回のテスト結果の詳細が表示されます。[New Test] の一番下のステップをクリックします。
2. [左上のデバイス] をクリックして、失敗したテストのデバイスログを確認します。
Visual Studio Mobile Center での UI テストの実行 (16)
1
2](https://image.slidesharecdn.com/mobileappdevhol20171103-171104004551/85/Android-Xamarin-89-320.jpg)
![90
今回のテストでのデバイスの状態が確認できます。
1. CPU メモリの利用状況の推移を確認できます。
2. テストにかかった時間を確認できます。
3. [Logs] をクリックします。
Visual Studio Mobile Center での UI テストの実行 (17)
1
2
3](https://image.slidesharecdn.com/mobileappdevhol20171103-171104004551/85/Android-Xamarin-90-320.jpg)
![91
デバイスログが確認できます。
1. [TEST FAILUTURES] をクリックします。
2. テスト失敗のログが表示されていることを確認します。
Visual Studio Mobile Center での UI テストの実行 (18)
1
2](https://image.slidesharecdn.com/mobileappdevhol20171103-171104004551/85/Android-Xamarin-91-320.jpg)
![92
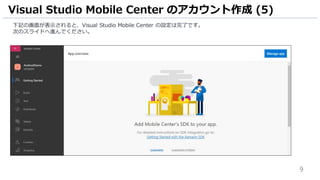
Visual Studio Mobile Center では、成果物をユーザーに配布することも行えます。
1. ブラウザーで Visual Studio Mobile Center にアクセスし、[Distribute アイコン] をクリックします。
2. [Distribute new release] をクリックします。
ユーザーへの配布 (1)
1
2](https://image.slidesharecdn.com/mobileappdevhol20171103-171104004551/85/Android-Xamarin-92-320.jpg)
![93
1. パッケージを選択します。デスクトップの [App1.App1.apk] を選択します。少し待ってアップロード完了を確認します。
2. [Next] をクリックします。
3. [Release notes] には、[デモです。] と入力します。
4. [Next] をクリックします。
ユーザーへの配布 (2)
1
2
3
4](https://image.slidesharecdn.com/mobileappdevhol20171103-171104004551/85/Android-Xamarin-93-320.jpg)
![94
1. 配布先のグループはデフォルトの [Collaborators] をクリックして選択します。
2. [Next] をクリックします。
3. [Distribute] をクリックして指定したグループにアプリケーションを配布をします。
ユーザーへの配布 (3)
2 3
1](https://image.slidesharecdn.com/mobileappdevhol20171103-171104004551/85/Android-Xamarin-94-320.jpg)
![95
今回は、マイクロソフトアカウントに紐づいたメールボックスにメールが届いています。
1. 届いたメールの [Install] をクリックします。
2. PC からアクセスすると、[Android デバイスからアクセスしないとインストールできない] 旨のメッセージが表示されて
いることを確認します。実際には、Android 端末からアクセスするとアプリがインストールできます。
ユーザーへの配布 (4)
1
2](https://image.slidesharecdn.com/mobileappdevhol20171103-171104004551/85/Android-Xamarin-95-320.jpg)

![97
1. ブラウザーで https://portal.azure.com にアクセスし、Azure ログイン可能なアカウントを入力します。
2. [次へ] をクリックします。
3. 入力したアカウントの種類によりリダイレクト先がかわります。リダイレクト先で、パスワードを入力します。
4. [サインイン] をクリックします。
Mobile Apps の作成 (1)
1
2
3
4](https://image.slidesharecdn.com/mobileappdevhol20171103-171104004551/85/Android-Xamarin-97-320.jpg)
![98
Azure Portal のダッシュボードが表示されます。
1. Dev Test Lab を作成します。[+新規] をクリックします。
Mobile Apps の作成 (2)
1](https://image.slidesharecdn.com/mobileappdevhol20171103-171104004551/85/Android-Xamarin-98-320.jpg)
![99
1. [Web + モバイル] をクリックします。
2. [モバイルアプリ] をクリックします。
Mobile Apps の作成 (3)
1
2](https://image.slidesharecdn.com/mobileappdevhol20171103-171104004551/85/Android-Xamarin-99-320.jpg)
![100
1. [アプリ名] には、任意の文字列でユニークな名前を入力します。
2. [リソースグループ] には、[新規作成] をクリックし、[MobileApp] と入力します。
3. [App Service プラン/場所] をクリックします。
4. [+新規作成] をクリックします。
Mobile Apps の作成 (4)
1
2
3
4](https://image.slidesharecdn.com/mobileappdevhol20171103-171104004551/85/Android-Xamarin-100-320.jpg)
![101
1. [App Service プラン] には、[MobileApps] と入力します。
2. [場所] は、[Japan East (東日本)] を選択します。
3. [価格レベル] をクリックします。
4. [F1 Free] をクリックします。
5. [選択] をクリックします。
6. [OK] をクリックします。
Mobile Apps の作成 (5)
1
4
2
3
56](https://image.slidesharecdn.com/mobileappdevhol20171103-171104004551/85/Android-Xamarin-101-320.jpg)
![102
1. [作成] をクリックして Mobile Apps を作成します。
Mobile Apps の作成 (6)
1](https://image.slidesharecdn.com/mobileappdevhol20171103-171104004551/85/Android-Xamarin-102-320.jpg)
![103
続いて、SQL Database を作成します。[+新規] をクリックします。
SQL Database の作成 (1)
1](https://image.slidesharecdn.com/mobileappdevhol20171103-171104004551/85/Android-Xamarin-103-320.jpg)
![104
1. [Databases] をクリックします。
2. [SQL Database] をクリックします。
SQL Database の作成 (2)
1
2](https://image.slidesharecdn.com/mobileappdevhol20171103-171104004551/85/Android-Xamarin-104-320.jpg)
![105
1. [データベース名] には、[Backend] と入力します。
2. [リソースグループ] には、[既存のものを使用] をクリックし、[MobileApp] を選択します。
3. [サーバー] をクリックします。
4. [+新規作成] をクリックします。
SQL Database の作成 (3)
1
2
3
4](https://image.slidesharecdn.com/mobileappdevhol20171103-171104004551/85/Android-Xamarin-105-320.jpg)
![106
1. [サーバー名] には、任意の文字列でユニークな名前を入力します。
2. [サーバー管理者ログオン] は、[azuredaisuki] と入力します。
3. [パスワード], [パスワードの確認] は、[Welcome00] と入力します。
4. [場所] は、[東日本] を選択します。
5. [選択] をクリックします。
SQL Database の作成 (4)
1
2
3
5
4](https://image.slidesharecdn.com/mobileappdevhol20171103-171104004551/85/Android-Xamarin-106-320.jpg)
![107
1. [価格レベル] をクリックします。
2. [価格レベル] は、[Basic] を選択します。
3. [選択] をクリックします。
4. [作成] をクリックして、SQL Database を作成します。
SQL Database の作成 (5)
1
4
3
2](https://image.slidesharecdn.com/mobileappdevhol20171103-171104004551/85/Android-Xamarin-107-320.jpg)
![108
SQL Database の作成には数分かかります。
1. SQL Database の作成完了を確認します。[通知アイコン] をクリックします。
2. [展開が成功しました] と表示されていることを確認します。
SQL Database の作成 (6)
1
2](https://image.slidesharecdn.com/mobileappdevhol20171103-171104004551/85/Android-Xamarin-108-320.jpg)
![109
1. [すべてのリソース] をクリックします。
2. [App Service アイコン] の [Mobile Apps] をクリックします。
Xamarin + Mobile Apps サンプルの作成 (1)
1
2](https://image.slidesharecdn.com/mobileappdevhol20171103-171104004551/85/Android-Xamarin-109-320.jpg)
![110
1. [アプリスロット] の [1/0] をクリックします。
2. [先ほど作成した Mobile Apps の名前] をクリックします。
Xamarin + Mobile Apps サンプルの作成 (2)
1
2](https://image.slidesharecdn.com/mobileappdevhol20171103-171104004551/85/Android-Xamarin-110-320.jpg)
![111
1. [クイックスタート] をクリックします。
2. [Xamarin.Android] をクリックします。
Xamarin + Mobile Apps サンプルの作成 (3)
1
2](https://image.slidesharecdn.com/mobileappdevhol20171103-171104004551/85/Android-Xamarin-111-320.jpg)
![112
1. [データベースの接続] の赤枠の個所をクリックします。
2. [+追加] をクリックします。
3. [SQL Database] をクリックします。
4. [Backend] をクリックして選択します。
Xamarin + Mobile Apps サンプルの作成 (4)
1
2
3
4](https://image.slidesharecdn.com/mobileappdevhol20171103-171104004551/85/Android-Xamarin-112-320.jpg)
![113
1. [接続文字列] をクリックします。
2. [SQL 管理ユーザー名] は、[azuredaisuki] と入力します。
3. [SQL 管理管理パスワード] は、[Welcome00] と入力します。
4. [OK] をクリックします。
5. [OK] をクリックします。
Xamarin + Mobile Apps サンプルの作成 (5)
1
2
3
45](https://image.slidesharecdn.com/mobileappdevhol20171103-171104004551/85/Android-Xamarin-113-320.jpg)
![114
1. [MS_TableConnectionString] が追加されていることを確認します。
2. [X] をクリックしてブレードを閉じます。
3. [データベース接続が既に存在します] と表示されていることを確認します。
Xamarin + Mobile Apps サンプルの作成 (6)
1
2
3](https://image.slidesharecdn.com/mobileappdevhol20171103-171104004551/85/Android-Xamarin-114-320.jpg)
![115
接続したデータベースにサンプル用のテーブルを作成します。
1. [バックエンド言語] は、[Node.js] を選択します。
2. [これにより、すべてのサイトコンテンツが…] にチェックをいれます。
3. [TodoItem テーブルの作成] をクリックして、テーブルを作成します。
4. [TodoItem テーブルが既に存在します] と表示されていることを確認します。
Xamarin + Mobile Apps サンプルの作成 (7)
1
2
3
4](https://image.slidesharecdn.com/mobileappdevhol20171103-171104004551/85/Android-Xamarin-115-320.jpg)
![116
最後にモバイルアプリのサンプルプロジェクトをダウンロードします。
1. [新しいアプリの作成] をクリックします。
2. [ダウンロード] をクリックします。
3. [ダウンロード] フォルダにある [zip 形式のファイル] を右クリックします。
4. [すべて展開...] をクリックします。
Xamarin.Forms + Mobile Apps サンプルの作成 (8)
1
4
2
3](https://image.slidesharecdn.com/mobileappdevhol20171103-171104004551/85/Android-Xamarin-116-320.jpg)
![117
1. [展開] をクリックします。
2. 展開されたフォルダが新しいウインドウで開きます。[(作成した MobileApps の名前).sln] をダブルクリックします。
3. Visual Studio が起動します。セキュリティ警告ウインドウが表示されますが、[OK] をクリックします。
Xamarin+ Mobile Apps サンプルの作成 (9)
1
2
3](https://image.slidesharecdn.com/mobileappdevhol20171103-171104004551/85/Android-Xamarin-117-320.jpg)
![118
Xamarin + Mobile Apps サンプルの作成 (10)
1. Visual Studio の [ソリューション エクスプローラー] の [Properties] をダブルクリックします。
2. [アプリケーション] の [Android バージョンを使用したコンパイル] を [Android 6.0] にします。
3. [AVD_for_Nexus_5…] をクリックして、モバイルアプリをデバッグ実行します。
4. エミュレータ上でアプリが起動したことを確認します。
1
2
3
4](https://image.slidesharecdn.com/mobileappdevhol20171103-171104004551/85/Android-Xamarin-118-320.jpg)

![120
オフラインデータ同期がない場合の動作を確認 (1)
先ほどダウンロードしたサンプルアプリには、オフラインデータ同期のコードも組み込まれています。
1. お手元のマシンの Wifi をオフにします。Android エミュレータ上で実行しているアプリで [test] と入力します。
2. [Add] ボタンをクリックします。
3. [Error ウインドウ] が表示されることを確認します。お手元のマシンの Wifi をオンにします。
1
3
2](https://image.slidesharecdn.com/mobileappdevhol20171103-171104004551/85/Android-Xamarin-120-320.jpg)
![121
オフラインデータ同期の有効化 (1)
1. Visual Studio で [デバック実行の停止ボタン] をクリックします。
2. [ソリューション エクスプローラー] で [ToDoActivity.cs] をダブルクリックしてファイルを開きます。
3. 8行目のコメントを解除します。
1
3
2](https://image.slidesharecdn.com/mobileappdevhol20171103-171104004551/85/Android-Xamarin-121-320.jpg)
![122
オフラインデータ同期の有効化 (2)
1. Visual Studio のメニュー [ビルド] – [ソリューションのクリーン]の順にクリックします。
2. [AVD_for_Nexus_5…] をクリックして、モバイルアプリをデバッグ実行します。
1
2](https://image.slidesharecdn.com/mobileappdevhol20171103-171104004551/85/Android-Xamarin-122-320.jpg)
![123
オフラインデータ同期の有効化 (3)
1. お手元のマシンの Wifi をオフにします。Android エミュレータ上で実行しているアプリで [Offline] と入力します。
2. [Add] ボタンをクリックします。
3. しばらくすると[Error ウインドウ] が表示されます。メッセージが先ほどと異なっていることを確認します。
4. ローカルのデータベース (SQLite) に [Offiline] の文字がストアされていることを確認します。
2
1
4
3](https://image.slidesharecdn.com/mobileappdevhol20171103-171104004551/85/Android-Xamarin-123-320.jpg)
![124
オフラインデータ同期の有効化 (4)
1. お手元のマシンの Wifi をオンにします。Azure Portal に戻り、[クイックスタート] をクリックします。
2. [Easy Tables] をクリックします。
3. [TodoItem] をクリックします。
4. 先ほどローカルのデータベース (SQLite) に保存されたデータが SQL Database 上に保存されていることを確認します。
5. Visual Studio で [デバック実行の停止ボタン] をクリックします。
2
1
3
4
5](https://image.slidesharecdn.com/mobileappdevhol20171103-171104004551/85/Android-Xamarin-124-320.jpg)


![Visual Studio Online BUILD を本気で使いこなして品質&効率を劇的に上げる! [ Comm Tech Festival ] C-4](https://cdn.slidesharecdn.com/ss_thumbnails/commtechfestivalvso2015build-150926103603-lva1-app6892-thumbnail.jpg?width=640&height=640&fit=bounds)


