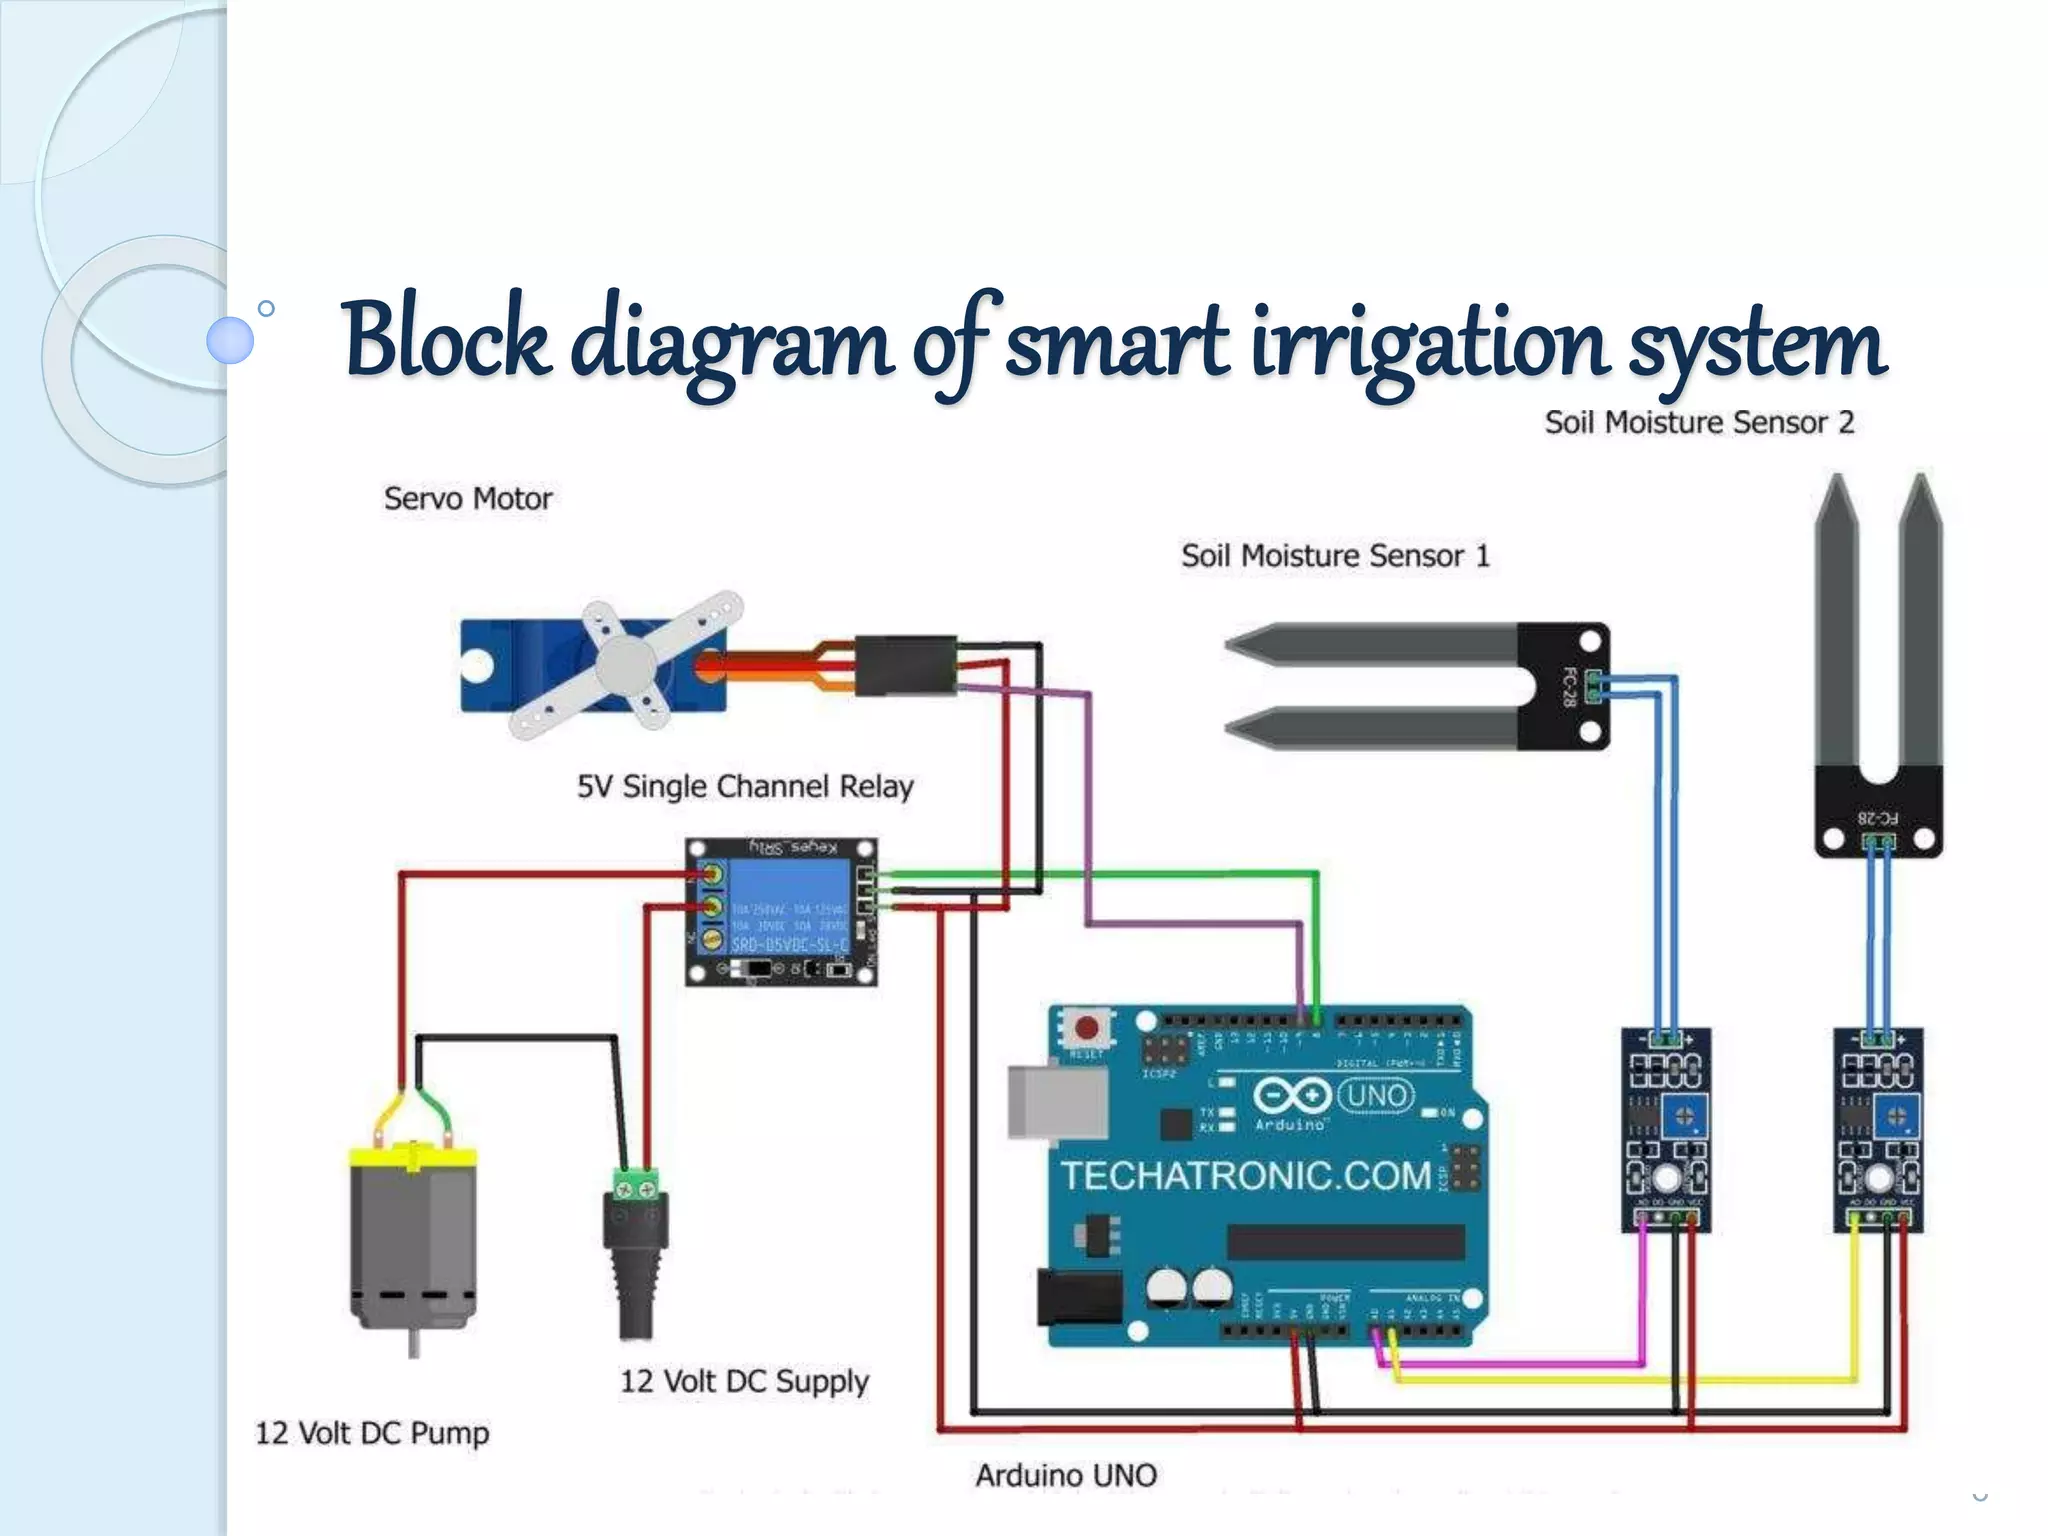
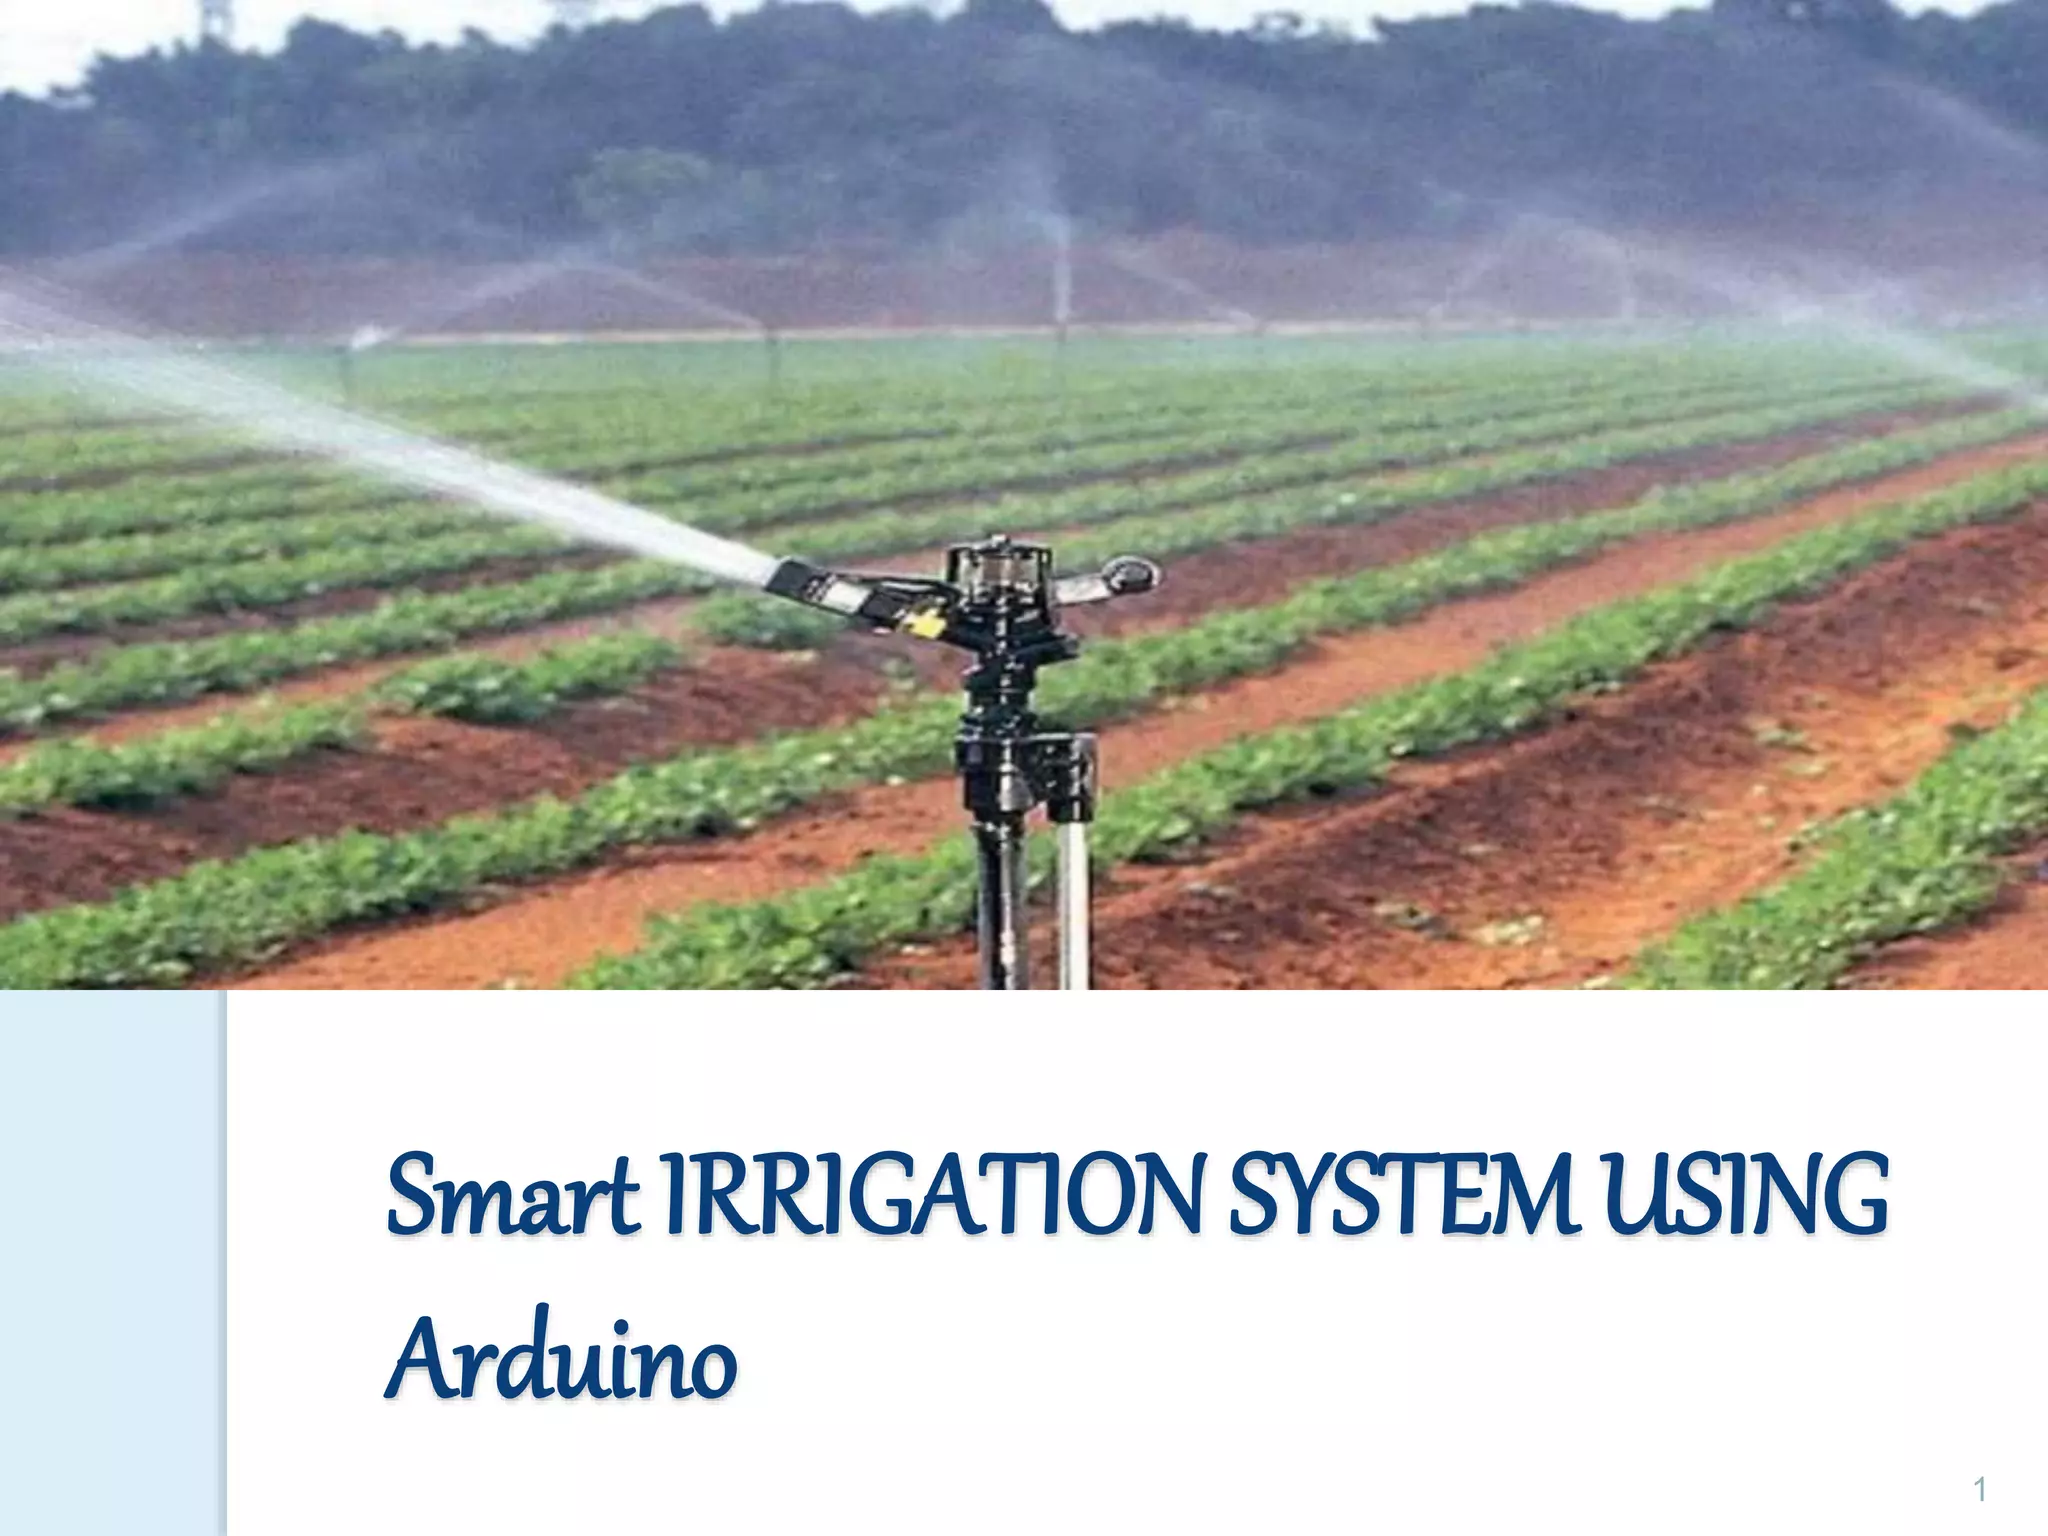
1
Smart IRRIGATION SYSTEM USING
Arduino
Our project (real picture)
2
Submitted By-
Ankur Kumar Shakya [2008400000022]
Anuj Chauhan [2008400000023]
Himanshu Singh [2008400000035]
Rohit Sharma [2008400000048]
Shivam Yadav [2008400000053]
Vineet Jaiswal [2008400000061]
Yogesh Sehgal [2008400000063]
Under the Guidance of
Mr. Surendra Pratap Singh
3
INTRODUCTION
• Irrigation is the artificial application of water to the land
or soil to assist in the growing of agricultural crops.
• Air moisture, air humidity, temperature and water level in
the soil are wirelessly transmitted using wireless
technology for better production.
• To make the farming work easily, the automatic irrigation
system is created .
4
objectives
• Reduce the manpower & conserve the water
• Real time sensing and control
• To get the output of soil water sensor and provide
water to crop
• To observe other parameters for better yield
5
Block diagramof smart irrigation system
6
resources and its working
•Arduino Uno
•Servo motor
•Soil moisture sensor
•Mini water pump
•Jumper wires.
•Relay module
•Breadboard
7
Arduino UNO
8
• The Arduino UNO is the brain of this whole
project.
• This project uses Arduino Uno to controls the
motor.
• The Arduino Board is programmed using the
Arduino IDE software.
servo motOr
•A Servo Motor is a small device that has an output shaft.
•This shaft can be positioned to specific angular positions
by sending the servo a coded signal.
•As long as the coded signal exists on the input line, the
servo will maintain the angular position of the shaft
9
Soil moisture sensor
10
•The humidity sensor is used to measure the water
content (moisture) of the soil.
• This sensor reminds the user to irrigate their plants
and also controls the moisture content of the soil.
11
Mini water pump
•For this study a water pump is required, which must
be DC, 12V. The DC motor is the commonly used
motor and has DC power distribution systems
Relay module
12
• A relay is an electrical main voltage switch. This means
that it can be turned on or off, letting the current flow or
not. Controlling a relay with Arduino is as simple as
controlling an output like a motor .
Jumper wire
• A jump cable is used to connect the test plate, the prototype
or the internal circuit with other non-joined instruments.
BREADBOARD
13
•Breadboard is used to
connect the components
AND plan complete the
circuit .
WORKING
 This project uses Arduino Uno to controls
the motor. The Arduino Board is
programmed using the Arduino IDE
software.
 The moisture sensor measures the level
of moisture in the soil and sends the
signal to the Arduino if watering is
required.
 The motor/water pump supplies water to
the plants until the desired moisture level
is reached.
14
Arduino IDE Software
The Arduino Integrated Development
Environment (IDE) is a cross-platform application
(for Windows, MacOS, Linux) written in the Java
programming language. It is used to write in the
java programming language. It is used to write
and load programs on the Arduino board. The
source code for the IDE is published under the
GNU General Public License, version 2.
15
Arduino Code
#include <Servo.h> // servo library
Servo myservo;
int m=0;
int n=0;
int pos = 0;
void setup()
{
pinMode(A0, INPUT_PULLUP); // Soil Moisture Sensor 1 PIN A0
pinMode(A1, INPUT_PULLUP); // Soil Moisture Sensor 1 PIN A1
pinMode(8,OUTPUT); // Relay Module PIN D8
Serial.begin(9600); // Sensor Buart Rate
myservo.attach(9); // Servo PIN D9
digitalWrite(8, HIGH); // Relay Normally Hight for OFF condition
}
void loop()
{
int m= analogRead(A0); // Soil Moisture Sensor 1 PIN A0
int n= analogRead(A1); // Soil Moisture Sensor 1 PIN A1
Serial.println(m);
delay(10);
Serial.println(n);
delay(200);
if (m>=980) 16
17
{
myservo.write(90); // tell servo to go to position in variable 'pos'
digitalWrite(8, LOW); // Relay ON
delay(1000);
}
else if(m<=970)
{
digitalWrite(8, HIGH); // Relay ON
}
if (n>=980)
{
myservo.write(0); // tell servo to go to position in variable 'pos'
digitalWrite(8, LOW); // Relay ON
delay(1000);
}
else if(n<=970)
{
digitalWrite(8, HIGH); // Relay OFF
}
else
{
digitalWrite(8, HIGH); // Relay OFF
}
}
Advantages
18
• Increase in productivity
• Reduced water consumption
• Safe
• No manpower required
• Reduce soil erosion and nutrient leaching
• Require smaller water sources
CONCLUSION
• The smart irrigation system is feasible and cost effective
for optimizing water resources for agricultural
production.
• This irrigation system allows cultivation in places with
water scarcity thereby improving sustainability.
• It proves that the use of water can be diminished.
• The use of solar power in this system is significantly
important for organic crops
19
20

Advanced irrigation system using Arduino

  • 1.
  • 2.
  • 3.
    Submitted By- Ankur KumarShakya [2008400000022] Anuj Chauhan [2008400000023] Himanshu Singh [2008400000035] Rohit Sharma [2008400000048] Shivam Yadav [2008400000053] Vineet Jaiswal [2008400000061] Yogesh Sehgal [2008400000063] Under the Guidance of Mr. Surendra Pratap Singh 3
  • 4.
    INTRODUCTION • Irrigation isthe artificial application of water to the land or soil to assist in the growing of agricultural crops. • Air moisture, air humidity, temperature and water level in the soil are wirelessly transmitted using wireless technology for better production. • To make the farming work easily, the automatic irrigation system is created . 4
  • 5.
    objectives • Reduce themanpower & conserve the water • Real time sensing and control • To get the output of soil water sensor and provide water to crop • To observe other parameters for better yield 5
  • 6.
    Block diagramof smartirrigation system 6
  • 7.
    resources and itsworking •Arduino Uno •Servo motor •Soil moisture sensor •Mini water pump •Jumper wires. •Relay module •Breadboard 7
  • 8.
    Arduino UNO 8 • TheArduino UNO is the brain of this whole project. • This project uses Arduino Uno to controls the motor. • The Arduino Board is programmed using the Arduino IDE software.
  • 9.
    servo motOr •A ServoMotor is a small device that has an output shaft. •This shaft can be positioned to specific angular positions by sending the servo a coded signal. •As long as the coded signal exists on the input line, the servo will maintain the angular position of the shaft 9
  • 10.
    Soil moisture sensor 10 •Thehumidity sensor is used to measure the water content (moisture) of the soil. • This sensor reminds the user to irrigate their plants and also controls the moisture content of the soil.
  • 11.
    11 Mini water pump •Forthis study a water pump is required, which must be DC, 12V. The DC motor is the commonly used motor and has DC power distribution systems
  • 12.
    Relay module 12 • Arelay is an electrical main voltage switch. This means that it can be turned on or off, letting the current flow or not. Controlling a relay with Arduino is as simple as controlling an output like a motor .
  • 13.
    Jumper wire • Ajump cable is used to connect the test plate, the prototype or the internal circuit with other non-joined instruments. BREADBOARD 13 •Breadboard is used to connect the components AND plan complete the circuit .
  • 14.
    WORKING  This projectuses Arduino Uno to controls the motor. The Arduino Board is programmed using the Arduino IDE software.  The moisture sensor measures the level of moisture in the soil and sends the signal to the Arduino if watering is required.  The motor/water pump supplies water to the plants until the desired moisture level is reached. 14
  • 15.
    Arduino IDE Software TheArduino Integrated Development Environment (IDE) is a cross-platform application (for Windows, MacOS, Linux) written in the Java programming language. It is used to write in the java programming language. It is used to write and load programs on the Arduino board. The source code for the IDE is published under the GNU General Public License, version 2. 15
  • 16.
    Arduino Code #include <Servo.h>// servo library Servo myservo; int m=0; int n=0; int pos = 0; void setup() { pinMode(A0, INPUT_PULLUP); // Soil Moisture Sensor 1 PIN A0 pinMode(A1, INPUT_PULLUP); // Soil Moisture Sensor 1 PIN A1 pinMode(8,OUTPUT); // Relay Module PIN D8 Serial.begin(9600); // Sensor Buart Rate myservo.attach(9); // Servo PIN D9 digitalWrite(8, HIGH); // Relay Normally Hight for OFF condition } void loop() { int m= analogRead(A0); // Soil Moisture Sensor 1 PIN A0 int n= analogRead(A1); // Soil Moisture Sensor 1 PIN A1 Serial.println(m); delay(10); Serial.println(n); delay(200); if (m>=980) 16
  • 17.
    17 { myservo.write(90); // tellservo to go to position in variable 'pos' digitalWrite(8, LOW); // Relay ON delay(1000); } else if(m<=970) { digitalWrite(8, HIGH); // Relay ON } if (n>=980) { myservo.write(0); // tell servo to go to position in variable 'pos' digitalWrite(8, LOW); // Relay ON delay(1000); } else if(n<=970) { digitalWrite(8, HIGH); // Relay OFF } else { digitalWrite(8, HIGH); // Relay OFF } }
  • 18.
    Advantages 18 • Increase inproductivity • Reduced water consumption • Safe • No manpower required • Reduce soil erosion and nutrient leaching • Require smaller water sources
  • 19.
    CONCLUSION • The smartirrigation system is feasible and cost effective for optimizing water resources for agricultural production. • This irrigation system allows cultivation in places with water scarcity thereby improving sustainability. • It proves that the use of water can be diminished. • The use of solar power in this system is significantly important for organic crops 19
  • 20.