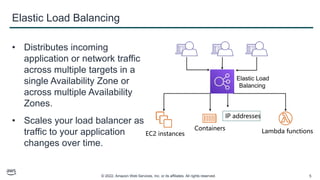
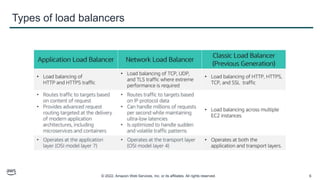
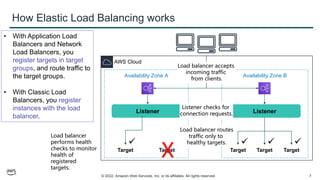
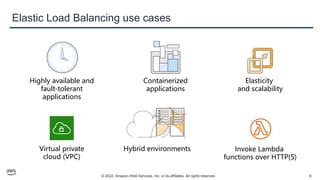
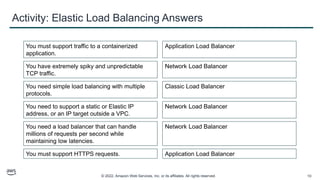
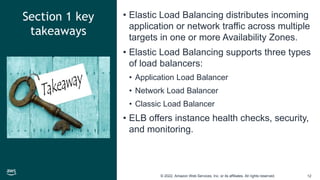
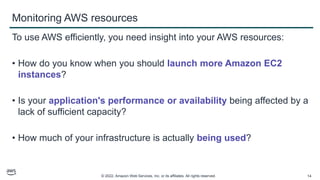
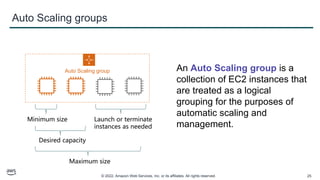
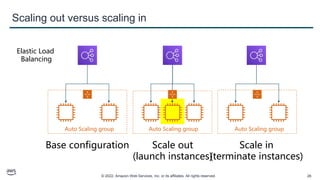
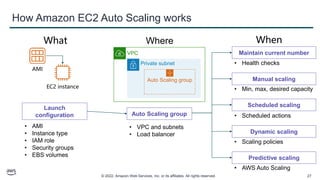
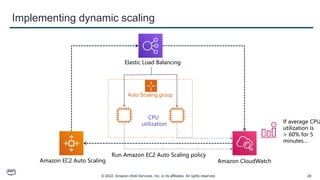
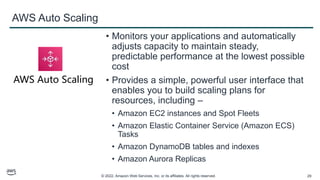
Welcome to Module 10: Automatic Scaling and Monitoring
This module will address the following topics:
Elastic Load Balancing
Amazon CloudWatch
Amazon EC2 Auto Scaling
The module also includes two activities. One activity will challenge you to indicate Elastic Load Balancing use cases. The other activity will challenge you to identify Amazon CloudWatch examples.
The module also includes a hands-on lab where you will use Amazon EC2 Auto Scaling, Elastic Load Balancing, and Amazon CloudWatch together to create a dynamically scalable architecture.
Finally, you will be asked to complete a knowledge check that will test your understanding of key concepts that are covered in this module.
After completing this module, you should be able to:
Indicate how to distribute traffic across Amazon Elastic Compute Cloud (Amazon EC2) instances by using Elastic Load Balancing
Identify how Amazon CloudWatch enables you to monitor AWS resources and applications in real time
Explain how Amazon EC2 Auto Scaling launches and releases servers in response to workload changes
Perform scaling and load balancing tasks to improve an architecture
Section 1: Elastic Load Balancing
Modern high-traffic websites must serve hundreds of thousands—if not millions—of concurrent requests from users or clients, and then return the correct text, images, video, or application data in a fast and reliable manner. Additional servers are generally required to meet these high volumes.
Elastic Load Balancing is an AWS service that distributes incoming application or network traffic across multiple targets—such as Amazon Elastic Compute Cloud (Amazon EC2) instances, containers, internet protocol (IP) addresses, and Lambda functions—in a single Availability Zone or across multiple Availability Zones. Elastic Load Balancing scales your load balancer as traffic to your application changes over time. It can automatically scale to most workloads.
Elastic Load Balancing is available in three types:
An Application Load Balancer operates at the application level (Open Systems Interconnection, or OSI, model layer 7). It routes traffic to targets—Amazon Elastic Compute Cloud (Amazon EC2) instances, containers, Internet Protocol (IP) addresses, and Lambda functions—based on the content of the request. It is ideal for advanced load balancing of Hypertext Transfer Protocol (HTTP) and Secure HTTP (HTTPS) traffic. An Application Load Balancer provides advanced request routing that is targeted at delivery of modern application architectures, including microservices and container-based applications. An Application Load Balancer simplifies and improves the security of your application by ensuring that the latest Secure Sockets Layer/Transport Layer Security (SSL/TLS) ciphers and protocols are used at all times.
A Network Load Balancer operates at the network transport level (OSI model layer 4), routing connections to targets—EC2 instances, microservices, and containers—based on IP protocol data. It works well for load balancing both Transmission Control Protocol (TCP) and User Datagram Protocol (UDP) traffic. A Network Load Balancer is capable of handling millions of requests per second while maintaining ultra-low latencies. A Network Load Balancer is optimized to handle sudden and volatile network traffic patterns.
A Classic Load Balancer provides basic load balancing across multiple EC2 instances, and it operates at both the application level and network transport level. A Classic Load Balancer supports the load balancing of applications that use HTTP, HTTPS, TCP, and SSL. The Classic Load Balancer is an older implementation. When possible, AWS recommends that you use a dedicated Application Load Balancer or Network Load Balancer.
To learn more about the differences between the three types of load balancers, see Product comparisons on the Elastic Load Balancing Features Page https://aws.amazon.com/elasticloadbalancing/features/?nc=sn&loc=2.
A load balancer accepts incoming traffic from clients and routes requests to its registered targets (such as EC2 instances) in one or more Availability Zones.
You configure your load balancer to accept incoming traffic by specifying one or more listeners. A listener is a process that checks for connection requests. It is configured with a protocol and port number for connections from clients to the load balancer. Similarly, it is configured with a protocol and port number for connections from the load balancer to the targets.
You can also configure your load balancer to perform health checks, which are used to monitor the health of the registered targets so that the load balancer only sends requests to the healthy instances. When the load balancer detects an unhealthy target, it stops routing traffic to that target. It then resumes routing traffic to that target when it detects that the target is healthy again.
There is a key difference in how the load balancer types are configured. With Application Load Balancers and Network Load Balancers, you register targets in target groups, and route traffic to the target groups. With Classic Load Balancers, you register instances with the load balancer.
There are many reasons to use a load balancer:
Achieve high availability and better fault tolerance for your applications – Elastic Load Balancing balances traffic across healthy targets in multiple Availability Zones. If one or more of your targets in a single Availability Zone are unhealthy, Elastic Load Balancing will route traffic to healthy targets in other Availability Zones. After the targets return to a healthy state, load balancing will automatically resume traffic to them.
Automatically load balance your containerized applications – With enhanced container support for Elastic Load Balancing, you can now load balance across multiple ports on the same EC2 instance. You can also take advantage of deep integration with Amazon Elastic Container Service (Amazon ECS), which provides a fully-managed container offering. You only need to register a service with a load balancer, and Amazon ECS transparently manages the registration and de-registration of Docker containers. The load balancer automatically detects the port and dynamically reconfigures itself.
Automatically scale your applications – Elastic Load Balancing works with Amazon CloudWatch and Amazon EC2 Auto Scaling to help you scale your applications to the demands of your customers. Amazon CloudWatch alarms can trigger auto scaling for your EC2 instance fleet when the latency of any one of your EC2 instances exceeds a preconfigured threshold. Amazon EC2 Auto Scaling then provisions new instances and your applications will be ready to serve the next customer request. The load balancer will register the EC2 instance and direct traffic to it as needed.
Use Elastic Load Balancing in your virtual private cloud (VPC) – You can use Elastic Load Balancing to create a public entry point into your VPC, or to route request traffic between tiers of your application within your VPC. You can assign security groups to your load balancer to control which ports are open to a list of allowed sources. Because Elastic Load Balancing works with your VPC, all your existing network access control lists (network ACLs) and routing tables continue to provide additional network controls. When you create a load balancer in your VPC, you can specify whether the load balancer is public (default) or internal. If you select internal, you do not need to have an internet gateway to reach the load balancer, and the private IP addresses of the load balancer will be used in the load balancer’s Domain Name System (DNS) record.
Enable hybrid load balancing – Elastic Load Balancing enables you to load balance across AWS and on-premises resources by using the same load balancer. For example, if you must distribute application traffic across both AWS and on-premises resources, you can register all the resources to the same target group and associate the target group with a load balancer. Alternatively, you can use DNS-based weighted load balancing across AWS and on-premises resources by using two load balancers, with one load balancer for AWS and other load balancer for on-premises resources. You can also use hybrid load balancing to benefit separate applications where one application is in a VPC and the other application is in an on-premises location. Put the VPC targets in one target group and the on-premises targets in another target group, and then use content-based routing to route traffic to each target group.
Invoking Lambda functions over HTTP(S) – Elastic Load Balancing supports invoking Lambda functions to serve HTTP(S) requests. This enables users to access serverless applications from any HTTP client, including web browsers. You can register Lambda functions as targets and use the support for content-based routing rules in Application Load Balancers to route requests to different Lambda functions. You can use an Application Load Balancer as a common HTTP endpoint for applications that use servers and serverless computing. You can build an entire website by using Lambda functions, or combine EC2 instances, containers, on-premises servers, and Lambda functions to build applications.
For this activity, name the load balancer you would use for the given scenario.
The answers are revealed.
You can use the following features to monitor your load balancers, analyze traffic patterns, and troubleshoot issues with your load balancers and targets:
Amazon CloudWatch metrics – Elastic Load Balancing publishes data points to Amazon CloudWatch for your load balancers and your targets. CloudWatch enables you to retrieve statistics about those data points as an ordered set of time series data, known as metrics. You can use metrics to verify that your system is performing as expected. For example, you can create a CloudWatch alarm to monitor a specified metric and initiate an action (such as sending a notification to an email address) if the metric goes outside what you consider an acceptable range.
Access logs – You can use access logs to capture detailed information about the requests that were made to your load balancer and store them as log files in Amazon Simple Storage Service (Amazon S3). You can use these access logs to analyze traffic patterns and to troubleshoot issues with your targets or backend applications.
AWS CloudTrail logs – You can use AWS CloudTrail to capture detailed information about the calls that were made to the Elastic Load Balancing application programming interface (API) and store them as log files in Amazon S3. You can use these CloudTrail logs to determine who made the call, what calls were made, when the call was made, the source IP address of where the call came from, and so on.
Some key takeaways from this section of the module include:
Elastic Load Balancing distributes incoming application or network traffic across multiple targets (such as Amazon EC2 instances, containers, IP addresses, and Lambda functions) in one or more Availability Zones.
Elastic Load Balancing supports three types of load balancers:
Application Load Balancer
Network Load Balancer
Classic Load Balancer
Elastic Load Balancing offers several monitoring tools for continuous monitoring and logging for auditing and analytics.
Section 2: Amazon CloudWatch
To use AWS efficiently, you need insight into your AWS resources.
For example, you might want to know:
When you should launch more Amazon EC2 instances?
If your application’s performance or availability is being affected by a lack of sufficient capacity?
How much of your infrastructure is actually being used?
How do you capture this information?
You can capture this information with Amazon CloudWatch.
Amazon CloudWatch is a monitoring and observability service that is built for DevOps engineers, developers, site reliability engineers (SRE), and IT managers. CloudWatch monitors your AWS resources (and the applications that you run on AWS) in real time. You can use CloudWatch to collect and track metrics, which are variables that you can measure for your resources and applications.
You can create an alarm to monitor any Amazon CloudWatch metric in your account and use the alarm to automatically send a notification to an Amazon Simple Notification Service (Amazon SNS) topic or perform an Amazon EC2 Auto Scaling or Amazon EC2 action. For example, you can create alarms on the CPU utilization of an EC2 instance, Elastic Load Balancing request latency, Amazon DynamoDB table throughput, Amazon Simple Queue Service (Amazon SQS) queue length, or even the charges on your AWS bill. You can also create an alarm on custom metrics that are specific to your custom applications or infrastructure.
You can also use Amazon CloudWatch Events to define rules that match incoming events (or changes in your AWS environment) and route them to targets for processing. Targets can include Amazon EC2 instances, AWS Lambda functions, Kinesis streams, Amazon ECS tasks, Step Functions state machines, Amazon SNS topics, Amazon SQS queues, and built-in targets. CloudWatch Events becomes aware of operational changes as they occur. CloudWatch Events responds to these operational changes and takes corrective action as necessary, by sending messages to respond to the environment, activating functions, making changes, and capturing state information.
With CloudWatch, you gain system-wide visibility into resource utilization, application performance, and operational health. There is no upfront commitment or minimum fee; you simply pay for what you use. You are charged at the end of the month for what you use.
You can create a CloudWatch alarm that watches a single CloudWatch metric or the result of a math expression based on CloudWatch metrics. You can create a CloudWatch alarm based on a static threshold, anomaly detection, or a metric math expression.
When you create an alarm based on a static threshold, you choose a CloudWatch metric for the alarm to watch and the threshold for that metric. The alarm goes to ALARM state when the metric breaches the threshold for a specified number of evaluation periods.
For an alarm based on a static threshold, you must specify the:
Namespace – A namespace contains the CloudWatch metric that you want, for example, AWS/EC2.
Metric – A metric is the variable you want to measure, for example, CPU Utilization.
Statistic – A statistic can be an average, sum, minimum, maximum, sample count, a predefined percentile, or a custom percentile.
Period – A period is the evaluation period for the alarm. When the alarm is evaluated, each period is aggregated into one data point.
Conditions – When you specify the conditions for a static threshold, you specify whenever the metric is Greater, Greater or Equal, Lower or Equal, or Lower than the threshold value, and you also specify the threshold value.
Additional configuration information – This includes the number of data points within the evaluation period that must be breached to trigger the alarm, and how CloudWatch should treat missing data when it evaluates the alarm.
Actions – You can choose to send a notification to an Amazon SNS topic, or to perform an Amazon EC2 Auto Scaling action or Amazon EC2 action.
For more information on creating CloudWatch alarms, see the topics under Using Alarms in the AWS Documentation at https://docs.aws.amazon.com/AmazonCloudWatch/latest/monitoring/AlarmThatSendsEmail.html.
For this activity, see if you can identify which are correct CloudWatch alarms. For the ones that are incorrect, see if you can identify the error.
The answers are revealed.
Some key takeaways from this section of the module include:
Amazon CloudWatch helps you monitor your AWS resources—and the applications that you run on AWS—in real time.
CloudWatch enables you to –
Collect and track standard and custom metrics.
Set alarms to automatically send notifications to SNS topics or perform Amazon EC2 Auto Scaling or Amazon EC2 actions based on the value of the metric or expression relative to a threshold over a number of time periods.
Define rules that match changes in your AWS environment and route these events to targets for processing.
Section 3: Amazon EC2 Auto Scaling
When you run your applications on AWS, you want to ensure that your architecture can scale to handle changes in demand. In this section, you will learn how to automatically scale your EC2 instances with Amazon EC2 Auto Scaling.
Scaling is the ability to increase or decrease the compute capacity of your application. To understand why scaling is important, consider this example of a workload that has varying resource requirements. In this example, the most resource capacity is required on Wednesday, and the least resource capacity is required on Sunday.
One option is to allocate more than enough capacity so you can always meet your highest demand—in this case, Wednesday. However, this situation means that you are running resources that will be underutilized most days of the week. With this option, your costs are not optimized.
Another option is to allocate less capacity to reduce costs. This situation means that you are under capacity on certain days. If you don't solve your capacity problem, your application could underperform or potentially even become unavailable for users.
In the cloud, because computing power is a programmatic resource, you can take a flexible approach to scaling. Amazon EC2 Auto Scaling is an AWS service that helps you maintain application availability and enables you to automatically add or remove EC2 instances according to conditions you define. You can use the fleet management features of EC2 Auto Scaling to maintain the health and availability of your fleet.
Amazon EC2 Auto Scaling provides several ways to adjust scaling to best meet the needs of your applications. You can add or remove EC2 instances manually, on a schedule, in response to changing demand, or in combination with AWS Auto Scaling for predictive scaling. Dynamic scaling and predictive scaling can be used together to scale faster.
To learn more about Amazon EC2 Auto Scaling, see the Amazon EC2 Auto Scaling product page at https://aws.amazon.com/ec2/autoscaling .
Automatic scaling is useful for predictable workloads—for example, the weekly traffic at the retail company Amazon.com.
Automatic scaling is also useful for dynamic on-demand scaling. Amazon.com experiences a seasonal peak in traffic in November (on Black Friday and Cyber Monday, which are days at the end of November when US retailers hold major sales). If Amazon provisions a fixed capacity to accommodate the highest use, 76 percent of the resources are idle for most of the year. Capacity scaling is necessary to support the fluctuating demands for service. Without scaling, the servers could crash due to saturation, and the business would lose customer confidence.
An Auto Scaling group is a collection of Amazon EC2 instances that are treated as a logical grouping for the purposes of automatic scaling and management. The size of an Auto Scaling group depends on the number of instances you set as the desired capacity. You can adjust its size to meet demand, either manually or by using automatic scaling. See more about Auto Scaling Groups at https://docs.aws.amazon.com/autoscaling/ec2/userguide/auto-scaling-groups.html.
You can specify the minimum number of instances in each Auto Scaling group, and Amazon EC2 Auto Scaling is designed to prevent your group from going below this size. You can specify the maximum number of instances in each Auto Scaling group, and Amazon EC2 Auto Scaling is designed to prevent your group from going above this size. If you specify the desired capacity, either when you create the group or at any time afterwards, Amazon EC2 Auto Scaling is designed to adjust the size of your group so it has the specified number of instances. If you specify scaling policies, then Amazon EC2 Auto Scaling can launch or terminate instances as demand on your application increases or decreases.
For example, this Auto Scaling group has a minimum size of one instance, a desired capacity of two instances, and a maximum size of four instances. The scaling policies that you define adjust the number of instances within your minimum and maximum number of instances, based on the criteria that you specify.
With Amazon EC2 Auto Scaling, launching instances is referred to as scaling out, and terminating instances is referred to as scaling in.
To launch EC2 instances, an Auto Scaling group uses a launch configuration, which is an instance configuration template. You can think of a launch configuration as what you are scaling. When you create a launch configuration, you specify information for the instances. The information you specify includes the ID of the Amazon Machine Image (AMI), the instance type, AWS Identity and Access Management (IAM) role, additional storage, one or more security groups, and any Amazon Elastic Block Store (Amazon EBS) volumes. See more information on the launch configuration at https://docs.aws.amazon.com/autoscaling/ec2/userguide/launch-configurations.html.
You define the minimum and maximum number of instances and desired capacity of your Auto Scaling group. Then, you launch it into a subnet within a VPC (you can think of this as where you are scaling). Amazon EC2 Auto Scaling integrates with Elastic Load Balancing to enable you to attach one or more load balancers to an existing Auto Scaling group. After you attach the load balancer, it automatically registers the instances in the group and distributes incoming traffic across the instances.
Finally, you specify when you want the scaling event to occur. You have many scaling options:
Maintain current instance levels at all times – You can configure your Auto Scaling group to maintain a specified number of running instances at all times. To maintain the current instance levels, Amazon EC2 Auto Scaling performs a periodic health check on running instances in an Auto Scaling group. When Amazon EC2 Auto Scaling finds an unhealthy instance, it terminates that instance and launches a new one.
Manual scaling – With manual scaling, you specify only the change in the maximum, minimum, or desired capacity of your Auto Scaling group. See more on manual scaling at https://docs.aws.amazon.com/autoscaling/ec2/userguide/as-manual-scaling.html.
Scheduled scaling– With scheduled scaling, scaling actions are performed automatically as a function of date and time. This is useful for predictable workloads when you know exactly when to increase or decrease the number of instances in your group. For example, say that every week, the traffic to your web application starts to increase on Wednesday, remains high on Thursday, and starts to decrease on Friday. See more on scheduled scaling at https://docs.aws.amazon.com/autoscaling/ec2/userguide/ec2-auto-scaling-scheduled-scaling.html. You can plan your scaling actions based on the predictable traffic patterns of your web application. To implement scheduled scaling, you create a scheduled action.
– A more advanced way to scale your resources enables you to define parameters that control the scaling process. For example, you have a web application that currently runs on two instances and you want the CPU utilization of the Auto Scaling group to stay close to 50 percent when the load on the application changes. This option is useful for scaling in response to changing conditions, when you don't know when those conditions will change. Dynamic scaling gives you extra capacity to handle traffic spikes without maintaining an excessive amount of idle resources. You can configure your Auto Scaling group to scale automatically to meet this need. More on dynamic scaling at https://docs.aws.amazon.com/autoscaling/ec2/userguide/as-scale-based-on-demand.html. The scaling policy type determines how the scaling action is performed. You can use Amazon EC2 Auto Scaling with Amazon CloudWatch to trigger the scaling policy in response to an alarm. See policy types at https://docs.aws.amazon.com/autoscaling/ec2/userguide/as-scale-based-on-demand.html#as-scaling-types.
Predictive scaling – You can use Amazon EC2 Auto Scaling with AWS Auto Scaling to implement predictive scaling, where your capacity scales based on predicted demand. Predictive scaling uses data that is collected from your actual EC2 usage, and the data is further informed by billions of data points that are drawn from our own observations. AWS then uses well-trained machine learning models to predict your expected traffic (and EC2 usage), including daily and weekly patterns. The model needs at least 1 day of historical data to start making predictions. It is re-evaluated every 24 hours to create a forecast for the next 48 hours. The prediction process produces a scaling plan that can drive one or more groups of automatically scaled EC2 instances. See more on predictive scaling at https://aws.amazon.com/blogs/aws/new-predictive-scaling-for-ec2-powered-by-machine-learning/.
To learn more about these options, see Scaling the Size of Your Auto Scaling Group in the AWS Documentation at https://docs.aws.amazon.com/autoscaling/ec2/userguide/scale-your-group.html.
One common configuration for implementing dynamic scaling is to create a CloudWatch alarm that is based on performance information from your EC2 instances or load balancer. When a performance threshold is breached, a CloudWatch alarm triggers an automatic scaling event that either scales out or scales in EC2 instances in the Auto Scaling group.
To understand how it works, consider this example:
You create an Amazon CloudWatch alarm to monitor CPU utilization across your fleet of EC2 instances and run automatic scaling policies if the average CPU utilization across the fleet goes above 60 percent for 5 minutes.
Amazon EC2 Auto Scaling instantiates a new EC2 instance into your Auto Scaling group based on the launch configuration that you create.
After the new instance is added, Amazon EC2 Auto Scaling makes a call to Elastic Load Balancing to register the new EC2 instance in that Auto Scaling group.
Elastic Load Balancing then performs the required health checks and starts distributing traffic to that instance. Elastic Load Balancing routes traffic between EC2 instances and feeds metrics to Amazon CloudWatch.
Amazon CloudWatch, Amazon EC2 Auto Scaling, and Elastic Load Balancing work well individually. Together, however, they become more powerful and increase the control and flexibility over how your application handles customer demand.
So far, you learned about scaling EC2 instances with Amazon EC2 Auto Scaling. You also learned that you can use Amazon EC2 Auto Scaling with AWS Auto Scaling to perform predictive scaling.
AWS Auto Scaling is a separate service that monitors your applications. It automatically adjusts capacity to maintain steady, predictable performance at the lowest possible cost. The service provides a simple, powerful user interface that enables you to build scaling plans for resources, including:
Amazon EC2 instances and Spot Fleets
Amazon Elastic Container Service (Amazon ECS) tasks
Amazon DynamoDB tables and indexes
Amazon Aurora Replicas
If you are already using Amazon EC2 Auto Scaling to dynamically scale your EC2 instances, you can now use it with AWS Auto Scaling to scale additional resources for other AWS services.
To learn more information about AWS Auto Scaling, see AWS Auto Scaling at https://aws.amazon.com/autoscaling/.
Some key takeaways from this section of the module include:
Scaling enables you to respond quickly to changes in resource needs.
Amazon EC2 Auto Scaling helps you maintain application availability, and enables you to automatically add or remove EC2 instances according to your workloads.
An Auto Scaling group is a collection of EC2 instances.
A launch configuration is an instance configuration template.
You can implement dynamic scaling with Amazon EC2 Auto Scaling, Amazon CloudWatch, and Elastic Load Balancing.
AWS Auto Scaling is a separate service that monitors your applications, and it automatically adjusts capacity for the following resources:
Amazon EC2 instances and Spot Fleets
Amazon ECS tasks
Amazon DynamoDB tables and indexes
Amazon Aurora Replicas
You will now complete Lab 6: Scale and Load Balance Your Architecture.
In this lab, you will use Elastic Load Balancing and Amazon EC2 Auto Scaling to load balance and scale your infrastructure. You will start with the given infrastructure.
In this lab, you will complete the following tasks:
Create an Amazon Machine Image (AMI) from a running instance.
Create an Application Load Balancer.
Create a launch configuration and an Auto Scaling group.
Automatically scale new instances within a private subnet.
Create Amazon CloudWatch alarms and monitor performance of your infrastructure.
The diagram summarizes what you will have built after you complete the lab.
It is now time to start the lab. It should take you approximately 30 minutes to complete the lab.
In this lab, you:
Created an Amazon Machine Image (AMI) from a running instance.
Created a load balancer.
Created a launch configuration and an Auto Scaling group.
Automatically scaled new instances within a private subnet.
Created Amazon CloudWatch alarms and monitored performance of your infrastructure.
It’s now time to review the module, and wrap up with a knowledge check and discussion of a practice certification exam question.
In summary, in this module you learned how to:
Indicate how to distribute traffic across Amazon Elastic Compute Cloud (Amazon EC2) instances using Elastic Load Balancing.
Identify how Amazon CloudWatch enables you to monitor AWS resources and applications in real time
Explain how Amazon EC2 Auto Scaling launches and releases servers in response to workload changes.
Perform scaling and load balancing tasks to improve an architecture.
Complete the knowledge check for this module.
Look at the answer choices and rule them out based on the keywords.
The following are the keywords to recognize: “send alerts” and “Amazon CloudWatch alarms”.
The correct answer is A.