
Recommended
More Related Content
Viewers also liked
Viewers also liked (17)
Similar to Abc of airbrushing
Similar to Abc of airbrushing (20)
Recently uploaded
Recently uploaded (14)
Abc of airbrushing
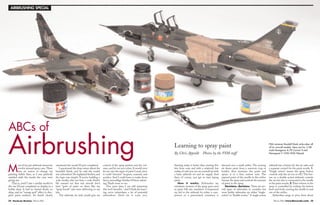
- 1. March 2002 www.finescale.com 25 Starting today is better than starting five kits from now, and with a relatively low outlay of cash you can set yourself up with a basic airbrush set and air supply. And then, of course, you get to start laying paint. How it works. Airbrushes are miniature versions of the spray guns used to paint full-size machines. Compressed air, fed to the airbrush by either a com- pressor or a pressurized container, is directed over a small orifice. The moving air draws paint from a reservoir (cup or bottle), then atomizes the paint and sprays it in a fine, narrow mist. The tapered point of the needle in the orifice focuses the spray and controls the amount of paint in the spray. Decisions, decisions. There are sev- eral types of airbrushes to consider, but most hobby airbrushes are either “single- action” or “double-action.” A single-action airbrush has a button for the air valve and a separate control for the paint nozzle, 1. “Single action” means the spray button controls only the air (on or off).The but- ton on a double-action airbrush controls the air, but also is connected to the needle in the paint nozzle, 2. Paint volume in the spray is controlled by rocking the button back and forth, moving the needle in and out of the orifice. Airbrushes range in price from about 24 FineScale Modeler March 2002 M ost of my pre-airbrush memories revolve around spray cans.There was no reason to change my painting habits then, as I was perfectly satisfied with the results the cans were giving me. That is, until I saw a similar model to the one I’d just completed on display in a hobby shop. It had no buried detail, no drips, and no “orange peel” effect (a dim- pled paint surface). Its finish clearly outclassed the model I’d just completed. I questioned the shop owner about the beautiful finish, and he said the model was airbrushed. He explained further, and the logic was simple: If you’re building a scale model, why not have a scale finish? He assured me that real aircraft don’t have “gobs of paint on them like my “spray bomb” cans were delivering to my kits. The airbrush, he said, would give me control of the spray pattern and the vol- ume, and let me mix colors. It would even let me vary the types of paint I used, since it could “atomize” lacquers, enamels, and acrylics. And I could learn to make those fancy camouflage finishes I’d been admir- ing. Made sense to me. Five years later, I am still mastering this tool’s benefits – and I think the learn- ing curve intimidates a lot of potential airbrushers. Don’t let it scare you. ABCs of Airbrushing Learning to spray paint By Chris Appoldt Photos by the FSM staff FSM reviewer Randall Dieck airbrushes all of his aircraft models. Here are his 1/48 scale Hasegawa A-7D Corsair II and Monogram F-105G Wild Weasel. AIRBRUSHING SPECIAL AirbrushABCs 2/18/02 1:17 PM Page 24
- 2. March 2002 www.finescale.com 27 with the liquid part of the paint. Modeling paints are made for brush painting and must be thinned to get them to spray properly. Don’t add thinner to the original paint container, but obtain empty mixing bottles or use 35mm film containers for mixing paint. Start by adding one part of thinner to two parts of stirred paint. I try to thin the paint to the consistency of milk, and sometimes I need more thinner. I always stir the paint and thinner thoroughly. Gloss enamels usually need more thin- ning than flats, but acrylics (water-based) vary from brand to brand. Check the paint label for the thinner-to-paint ratio and the type of thinner that the manufac- turer recommends. Surface preparation. The airbrush can produce a beautiful, thin, smooth layer of paint, so make sure the model is clean and smooth, too. Airbrushed paint won’t hide blemishes – it will only make them look worse. I wash my ready-to-finish model in warm soapy dishwater first, shake off the excess water, and leave it overnight on a lint-free dishtowel in a cabinet to dry. An alternative to dish soap is Polly S Plastic Prep; this alcohol-based surface-preparer lifts greasy fingerprints and grime and evaporates quickly. Spray away. Always test your air- brush’s paint flow away from your model. Even the most experienced modelers I know will test-shoot their newly loaded airbrush off to the side to be certain the paint is flowing well. I test-spray at the lowest effective pressure, about 10 p.s.i., and sometimes use the regulator to crank up the pressure to 20 p.s.i. My test surface is a huge styrene sheet I found at a model contest for about $1.50. An old model makes a great “test dummy,” too, but don’t use paper or cardboard; they absorb paint and won’t provide a good simulation of how the paint is going to cover your model. Don’t aim your airbrush at the model and then press the air button. Paint buildup on the tip of the nozzle will lift off with the first blast of air and land as a spatter. Instead, aim off the model, then move onto the area to be painted. The same goes for stopping the spray; stop off the model. I spray a few patterns on the test sur- face first, getting the “feel” of my loaded airbrush; this way I retrain my senses on what to expect, and discover how the air- brush is handling with the selected paint. What’s the right distance between the airbrush and the model? I start about 2" to 3" from the surface. By adjusting the air pressure, paint-to-thinner ratio, and paint volume, I can move in to where the tip of the airbrush is less than 1" away from the model, ideal for applying fine lines and camouflage. Stay inside the lines. If you’re just getting started, it might be best to finish your first airbrushed model in a single color. Start by lightly misting the paint on with the airbrush 4"-5" from the surface. Don’t start any farther away; the paint 26 FineScale Modeler March 2002 $20 up to several hundred dollars. Design, features, and quality all deter- mine the price. Inexpensive single-action airbrushes such as Badger’s 250 or Testor’s A2203 are adequate for applying single overall colors and would serve as good “basic trainer” airbrushes. The next step up is a high-quality single-action airbrush such as the Paasche H or Badger 350. Badger’s 200, 3, and Paasche’s SA2000 are interesting hybrids. They are single-action airbrushes (button controls air only), but they have a longitu- dinal needle usually found in double-action airbrushes (where the button rocks to control paint volume). Double-action airbrushes, such as Badger’s 150, Anthem, and Crescendo; Paasche’s V and Millennium; Testor’s Aztek; Iwata’s HP-C; and Tamiya’s HG offer better control and finer spray pat- terns. However, they are more difficult to master and more complex to disassemble and clean. Powering up. No matter which air- brush you choose, you’re going to need a source of compressed air to make it work. Air sources also range in price and com- plexity (for a good overview, check out the March 2002 Scale Auto, or the January 2001 FSM). At the bottom end is the propellant can. It can supply enough “air” to spray, perhaps, one model, so if you sel- dom airbrush, this is the least expensive option. If you plan a lot of airbrushing, con- sider buying a good compressor made for airbrushes. They range from $100 to about $400 depending on features. Compressors can be noisy, but some aren’t. The more expensive “silent” types use refrigerator-style compressors that charge small storage tanks. It’s a good idea to add a moisture trap along the air- brush hose to catch moisture “squeezed” out of the air by the compressor. Another alternative is a compressed gas cylinder. You can get small cylinders (five-pound) all the way up to industrial- size cylinders. Usually airbrushers opt for 10- or 20-pound cylinders of carbon dioxide or nitrogen. Gas cylinders require a flow regulator. Cylinder/regulator setups can be purchased for around $200, or leased from industrial gas suppliers or services that supply carbon dioxide cylin- ders for beverage fountains. Cylinders are absolutely silent and don’t require elec- tricity, but when they are empty, you have to tote them to a filling service. Ready, aim, paint! Now you’ve got an airbrush, an air source, and a model to paint. What’s next? Ah, paint! There are lots of modeling paints, but you can’t sim- ply load them into the airbrush and spray away. Your airbrush is an engineering marvel, and a delicate instrument; so with the exception of some buffable metallics, modeling paints must be thinned before airbrushing. Stir the paint in the original container; paint pigments are heavy and settle to the bottom, and paint must be thoroughly mixed before use. Keep stirring until the heavy clump at the bottom is mixed in A Paasche H is a fine single-action airbrush. Paint flows up the siphon from the color cup (or bottle) into the angled paint noz- zle. The knurled nozzle adjusts paint volume. The top-mounted button turns on the air flow. Badger’s model 200 is a hybrid design. It has the longitudinal nee- dle found on double-action airbrushes, but the paint volume is controlled by turning the knurled knob at the end of the needle. For multicolored paint schemes, apply the lightest color over the entire model. This will serve as a primer and help avoid unpaint- ed spots. This is an Iwata Eclipse series double-action airbrush. Pressing down on the top button turns on the air flow; rocking the button back and forth controls the paint volume. This model has a grav- ity feed paint cup. Airbrush the next darker color onto the first, only after you have given the first color at least 48 hours to cure. Here’s a tip: Lightly draw the camouflage pattern onto the first color with a pencil. Airbrush at an angle to get the sharpest line. Move the model so you can outline each colored area with the fine spray. Open the nozzle a little and fill in the center of the color area. 1 2 3 4 5 7 8 6 Knurled nozzle Air button Knurled knob AirbrushABCs 2/18/02 1:17 PM Page 26
- 3. March 2002 www.finescale.com 2928 FineScale Modeler March 2002 may dry before it gets to the model, cre- ating a gritty, rough surface. The misted coat serves as a “tooth” for heavier color coats to come. For the next coat, move the airbrush a little closer to your model and lay an even coat by sweeping the brush slowly over it. Remember to begin and end the spray off of your model to prevent paint build-up or spatter. I’ve learned the hard way that thinned paint from an airbrush dries quickly.That can fool you into thinking that the shiny wet paint that just landed on the model is not covering well – especially when you’re using acrylics. The paint you’ve just sprayed looks different in color and sheen than the paint that is nearby. Let the entire area you’ve just sprayed dry before you go over it with a second pass. Build up paint in light, even coats. If you put it on too heavily or quickly, you could form a drip as the paint piles up. When you’re finished with your ses- sion, you should have a thin, light, even coat covering the surface. Set the project aside overnight, and retouch any missed spots with the airbrush the next day. A few light coats are all you’ll need! Multicolor schemes. As you gain confidence, you’ll want to try airbrushing camouflage patterns, as this is where air- brushes really show their stuff. Before starting, think ahead. For multicolored schemes, paint the lightest color first, and apply that color to the entire model, 4. This ensures the model is covered with at least one color, and that color can serve as a primer. Primers aren’t absolutely neces- sary, but they help you spot blemishes. It’s easier to sand and repaint now than after all the colors have been painted. After the first (lightest) color is cured (48 hours is safe), draw the camouflage scheme lightly with an ordinary pencil, 5 – don’t bear down, or you’ll engrave the paint and it will show after the camou- flage is applied. Label each color area with a code you’ll remember: LG for light green,T for tan, and so forth. Hey, you’ve got a “paint by letter” model! Paint the next darker color over all the indicated areas, slightly overlapping the penciled borders, 6. To get a tighter pat- tern, close down the nozzle and get in close. This will take practice. Adjust the paint volume, air pressure (if you can), and paint/thinner ratio so you can spray fine lines. Another way to spray a tight edge on each camouflage area is to aim the air- brush 45 degrees to the surface, 7. This will create a harder edge closest to the air- brush, with a softer edge on the far side of the spray.Turn the model so you can paint from the edge of each area inward. Paint all the edges first, then go back and fill the middles, 8. Open the nozzle a bit so it doesn’t take as long to fill the areas and you’ll avoid that “scribbled in” appearance. If you make a mistake, don’t try to wipe the color off; the soft paint will only smear and ruin your paint job. You can always go back and paint over your mis- takes. For best results, wait a couple of days between colors to give the underly- ing paint time to cure. After a while, you’ll be hooked and find yourself using the airbrush on every modeling project. And you’ll probably wonder why you didn’t pick up an air- brush sooner. FSM By Paul Boyer Even after years of experience, you’re going to encounter problems when air- brushing. Here’s a peek at some of the problems I’ve run into. Clouds of paint swirling in your spray area. Whoa! Back off the air pressure and the paint volume. Any clouds of overspray constitute wasted paint. The airbrush can deliver fine smooth paint jobs, so take your time and apply the paint in thin layers. Whether you have clouds of paint or not, paint and thinner fumes can be toxic. Make sure you have sufficient ventilation in your work area. A spray booth is best – it can remove all the fumes. A ventilator mask is a good idea, too. Overspray. Watch where you’re aiming your airbrush. While you are concentrat- ing on spraying a certain spot, parts of the model that lie behind your target may accidentally receive overspray as you paint. Make sure you mask these areas before airbrushing. If you forget, you may have to repaint the affected areas. Spidery splashes. Those spots of paint with little rivulets running out all over. They have several causes, some- times more than one at the same time. Usually it means you’re too close to the surface with too much paint coming out of the airbrush. Also, the paint could be too thin. First, close the nozzle to limit the amount of paint coming out, then test spray on your test model to get a feel for the proper distance. If you’re still getting spiders, add more paint into the mixture. Gritty finish. The paint is covering, but it is covering with small grits and lumps. There are four possible causes: the paint is not thinned enough; the air- brush is too far away and the paint is drying on the way to the model; clumps of pigment are not dissolving in the thinner; there is too much air pressure. You don’t need to blast paint on with an airbrush – a gentle whisper from the air- brush should be enough to deliver a smooth finish. Adjust the air pressure (if you can) to between 10 and 20 p.s.i., and make sure the paint is well mixed. Drips and runs. Too much paint in one spot will form a puddle, and gravity will make it run. Keep the airbrush mov- ing so you don’t pile up too much paint on one area. Spatters. Little spatters around fine lines are usually caused by a damaged needle or nozzle. Paint blows off the distorted tip and lands outside of the intended area. Sometimes, low air pres- sure also can cause this. Examine the needle and nozzle with a magnifying glass. If the nozzle is cracked or splayed open, replace it. If the tip of the needle is bent, you can careful- ly straighten it out. Single-action needles are relatively sturdy and you can persuade the bent tip by pressing it against a hard surface. Go easy: press, check, press some more, check again, and so forth. The fine needle of a double-action (or a hybrid) airbrush is more delicate. You may not be able to see the bent tip, but you’ll be able to feel it. Remove the needle from the airbrush, and drag it lightly over your fingertip. Roll the needle as you drag, and you’ll feel the hooked side catch as it goes along your finger. Make note of the direction of the hook, then drag the affected side of the needle on fine-grit sandpaper or a sand- ing stick. Check it again on your finger and repeat if necessary. Bleed under masking tape. This is usually caused by too heavy an applica- tion of paint. The wet paint over- whelms the masking tape and creeps under, resulting in a ragged line. Airbrush several light coats instead of trying to cover with a heavy coat. Also, spray at an angle over the tape so the air pressure isn’t forcing the paint under the mask. No paint coming out. Shame, shame, you haven’t been cleaning the airbrush properly. Most likely there’s a small par- ticle of dried paint clogging the nozzle. Check the sidebar on cleaning the air- brush (page 30), and be sure to clean it after every painting session. This single-action nozzle (left) and needle are beyond repair. Replacements can be ordered where you purchase airbrushes. Whoops! Using too much paint, too thin paint, or moving too close to the surface will produce this spidery creature. The finely feathered demarcation lines between colors is an air- brush hallmark. Sharp lines, such as the canopy framing and the orange area on the nose of Randall’s 1/48 scale Monogram F-100D Super Sabre, are masked, then airbrushed. Randall beautifully recreated the characteristic unpainted rear fuselage of the F-100 with various shades of metallics and clear coats. This hot-metal effect would be nearly impossible to create without an airbrush. Airbrush Troubleshooting REFERENCES How to use an Airbrush Robert Downie, Kalmbach Publishing Co., Waukesha, Wisconsin, 2001 8 ways to power your airbrush Paul Boyer, FineScale Modeler, January 2001 Airbrushing basics Matt Usher, FineScale Modeler, February 1999 Airbrushing tricks and techniques Paul Boyer, FineScale Modeler, March 1999 Powering your airbrush Matt Usher, Scale Auto, March 2002 SOURCES Badger Air-Brush Co. 9128 W. Belmont Ave., Franklin Park, IL 60131, 800-247- 2787, www.badgerairbrush.com Binks Manufacturing 9201 W. Belmont Ave., Franklin Park, IL 60131, 847-671- 3000 Iwata Medea P.O. Box 14397, Portland, OR 97293, 503-253-7308, www.iwata- airbrush.com Paasche Airbrush Co. 7440 W. Lawrence Ave., Harwood Heights, IL 60656-3497, 708-867-9191, www.paascheairbrush.com Tamiya America 2 Orion, Aliso Viejo, CA 92656-4200, 800-826-4922, www.tamiyausa.com Testor Corp./Aztek 620 Buckbee St., Rockford, IL 61104-4891, 815-962-7401, www.testors.com AirbrushABCs 2/18/02 1:17 PM Page 28
- 4. 30 FineScale Modeler March 2002 Here is the Paasche H broken down for cleaning. This is a disassembled Iwata Eclipse. The airbrush should be cleaned after every painting session. Paint thinners and cleaners can be applied with cotton swabs and pipe cleaners. Cleaning your airbrush Paper towel rolled into a point helps clean the airbrush nozzle. By Terry Thompson Without a doubt, the most important aspect of airbrushing is cleaning the equip- ment. Neglecting to clean a brush properly is also the absolute best, or at least the simplest, way of assuring yourself of never-ending frustration while painting. However, cleaning your airbrush doesn’t have to be a chore. I can clean my double-action airbrush completely in less than 10 minutes and clean it well enough to change colors in fewer than five. While I learned most of these techniques the hard way, reading this article means you won’t have to. Single- and double-action airbrushes require different procedures; clean hybrid airbrushes as you would a double-action brush. I’ve organized the information below into three categories, one for rinsing the equipment and two for cleaning the air- brush itself. Choose the two that apply to your situation. If you’re only changing col- ors, you can normally skip the disassembly and just rinse, unless you’re going from a dark color to a light one, or from a metallic to a non-metallic. Then you’ll still have to clean the brush completely. RINSING THE EQUIPMENT What you’ll do A) Rinse the paint out of the brush using the appropriate solvent and cleaner (see above). B) Remove the feed jar or cup (if possible). C) Disassemble the nozzle assembly carefully. Wipe each piece clean with a swab dampened with the appropriate cleaner solution. For stub- born acrylics that don’t wipe off using Windex, use paint remover. D) Clean the inside of the paint tip (where the feed tube attaches) with a dampened swab or pipe cleaner. E) Twist a corner of a paper towel into a point, dampen it, and clean the inside of the nozzle. Never force anything, including a pipe cleaner, through the nozzle. If the nozzle won’t come clean, soak it in lacquer thinner or paint remover, depending on what type of paint is on it. Then clean it using a piece of dampened toweling. F) Reassemble the brush, then go to step 6 above. What you’ll do A) Rinse the paint out of the brush using the appropriate solvent and cleaner (see above). B) Remove the feed jar or cup (if possible). Working carefully according to the manufacturer’s instructions, remove the needle. (Exception: On Aztek double-action brushes, the needle/tip assembly is a unit. Testor does not recommend disassembling it, so just flush or soak it until clean). C) Disassemble the nozzle assembly carefully. Wipe each piece clean with a swab dampened with the appropriate cleaner solution. For stub- born acrylics that don’t wipe off using Windex, use the Testor paint remover. D) Clean the inside of the paint tip (where the feed tube attaches) with a cleaner-dampened swab or pipe cleaner. If your brush has a non- removable color cup, clean it with a swab. Clean an Aztek brush using its special cleaning tool/wrench. E) Twist a corner of a paper towel into a point, dampen it with cleaner, and clean the inside of the nozzle. Never force anything, including pipe cleaners, through the nozzle. The tip on a double-action or hybrid brush is extremely fragile. If the nozzle and tip won’t come clean, soak them in lacquer thinner or paint remover (depending on what type of paint is on it) until that paint softens or loosens. Then clean the nozzle using a piece of dampened toweling. Do not remove the tip from the nozzle. F) Clean the needle by pulling it across a soft cloth dampened with the appropriate thinner/cleaner. Do not push it forward, and be careful – needles are sharp! G) Reassemble the brush, then go to step 6 above. What you’ll need cotton swabs, pipe cleaners, paper towels, cleaner, paint remover What you’ll need cotton swabs, pipe cleaners, soft cloth, paper towels, cleaner, paint remover What you’ll need Mineral spirits and lacquer thin- ner (for enamels) or distilled water and Windex (for acrylics), Testor acrylic paint remover or other hobby paint remover, paper towels, cleaning station. The instructions refer to both “solvent” and “cleaner.” For enamels, use mineral spirits as the solvent and lacquer thinner as the cleaner; for acrylics, water is the solvent and Windex is the cleaner. What you’ll do 1) Immediately upon completing your painting session, remove the feed jar or color cup. Pour the thinned paint into your waste paint container (never save it), and flush the cup or jar with solvent. If your brush has a non-removable cup, pour the paint out, then flush the cup with sol- vent until most of the paint is out. 2) Still working quickly, pour that dirty solvent into your waste paint container and refill the cup or jar with cleaner. 3) Spray nearly a full jar or cup of cleaner through the brush into your cleaning station or other container. Let the brush sit with cleaner in it. 4) Remove and clean the feed jar and tube using cleaner-dampened swabs, pipe cleaners (for the tube only), and paper towels. If your brush uses a non-removable color cup, clean it using dampened swabs and paper towels. 5) Spray the remaining cleaner through the brush, then clean the brush (see below). 6) Reassemble the brush, then spray clean solvent through the brush and onto a white paper towel. If it comes out clean, go to step 7. If not, repeat steps 4 and 5 as needed, using paint remover as needed. 7) Spray the remaining solvent through the brush and into your cleaning station or container. If you’re using a double-action or hybrid brush, remove and oil the needle, then replace it. Don’t leave cleaner, solvent, or paint remover in the airbrush during storage. SINGLE-ACTION AIRBRUSHES DOUBLE-ACTION AND HYBRID AIRBRUSHES March 2002 www.finescale.com 31 I Never shake paint – always stir. Shaking leaves paint around the top of the jar, where it dries into clumps. Those clumps can easily clog an airbrush. A screen on your pickup tube can help, as can straining your paint. I If you use a single-action brush, close it (run the needle forward or twist the tip closed) if it will sit for more than 20 seconds. Thinned paint dries on and in an open tip quickly. I Drain your water trap each time you spray. It can’t work if it’s full. I Make sure your thinner is clean. Dirt or lint (been doing the old tip-the-can-onto-the-towel trick?) can and will clog your brush, or at least appear in your paint. I Lubricate your airbrush according to the instructions, and don’t abuse it by overtightening the threads. I Some parts, including washers, gaskets, and even needles and tips, will wear out. Paint is abrasive, and solvents are harsh chemicals. Keep spares on hand so you can keep painting. I If you think you might have bent your airbrush needle, check it visually or by pulling it across a towel while rotat- ing the needle. Do not check it by running it back into the brush – that just ensures that you’ll ruin your tip also. I If you own needles and nozzles/tips in multiple sizes, keep the sets together. Though they may look similar, they’re not interchangeable. I If you can afford to, it’s a good idea to have separate air- brushes for solvent-based paints and acrylics. The two don’t mix well, and paint left in a brush can form clots when exposed to the wrong solvent. I When you reassemble a double-action brush, the action should be crisp. If the needle sticks in the nozzle, or if the action seems mushy, there’s still paint in the nozzle. Clean it again. I If you get bubbles in your color cup or feed jar, you have an air leak in your brush, probably where the tip joins the nozzle. Check your brush’s instructions to see whether it can be repaired by the user. Tips for keeping your brush clean and healthy By Terry Thompson Needle Needle lock nut Connector for air hose Paint cup Nozzle Air cap Air and paint volume control Paint cup and cap Needle lock nut Needle guard Connector for air hoseNeedle Nozzle Air cap Air button AirbrushABCs 2/18/02 1:17 PM Page 30