This document provides the license terms for an official Microsoft learning product titled "Implementing a Microsoft SQL Server 2008 Database". Key details include:
- The product includes trainer content, student content, software, classroom setup guides, and other materials for teaching a SQL Server 2008 database course.
- The content is licensed per copy per authorized learning center location, and can only be used for authorized training sessions at those locations.
- Trainers can use the content to teach authorized sessions, and are allowed one copy for personal training. Students can only use the content during sessions.
- The document outlines installation, use rights, additional licensing requirements, and restrictions around the included virtual machines and software.


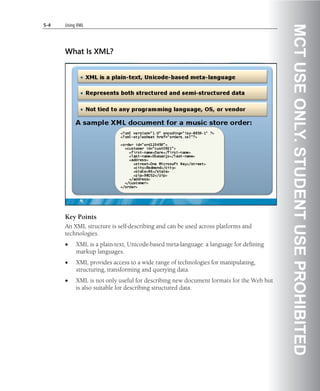


![Implementing a Microsoft SQL Server 2008 Database 5-55
MCT USE ONLY. STUDENT USE PROHIBITED
You must also write Transact-SQL code for a delivery scheduling application that
retrieves information from the XML data and modifies the information by using
xml methods.
You need to use XQuery expressions to retrieve and modify delivery schedule data.
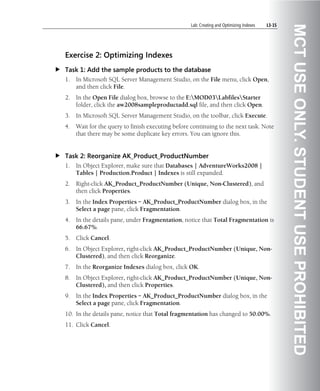
Task 1: Retrieve the resume elements
• Create a new query.
• File name: xmlMethods.sql
• Enter the following code to retrieve the resume elements:
USE AdventureWorks2008
GO
WITH XMLNAMESPACES(
'http://schemas.microsoft.com/sqlserver/2004/07/adventure-
works/Resume' AS "RES")
SELECT NationalIDNumber, Resume.query('
/RES:Resume/RES:Name
') as Result
FROM HumanResources.JobCandidateHistory
GO
• Execute the code and verify that the desired results are returned.
Task 2: Retrieve the address for a specified candidate
• Below the SELECT statement, type the following Transact-SQL:
USE AdventureWorks2008
GO
WITH XMLNAMESPACES(
'http://schemas.microsoft.com/sqlserver/2004/07/adventure-
works/Resume' AS "RES")
SELECT Resume.value(
'(/RES:Resume/RES:Address/RES:Addr.Street)[1]',
'nvarchar(100)')
As ResumeAddress
FROM HumanResources.JobCandidateHistory
WHERE JobCandidateID = 2
GO
• Execute the statements, and then verify that the desired results are returned.](https://image.slidesharecdn.com/6232a-implementingamicrosoftsqlserver2008database-100427074951-phpapp02/85/6232-a-implementing-a-microsoft-sql-server-2008-database-209-320.jpg)
![5-56 Using XML
MCT USE ONLY. STUDENT USE PROHIBITED
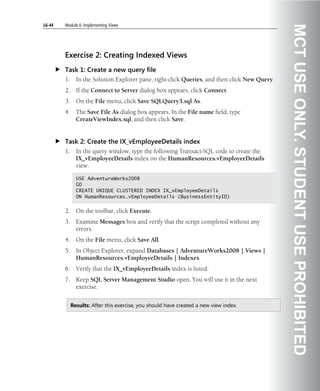
Task 3: Update a candidate's address
• Below the previous SELECT statement, type the following Transact-SQL:
USE AdventureWorks2008
GO
WITH XMLNAMESPACES(
'http://schemas.microsoft.com/sqlserver/2004/07/adventure-
works/Resume' AS "RES")
UPDATE HumanResources.JobCandidateHistory
SET Resume.modify('replace value of
(/RES:Resume/RES:Address/RES:Addr.Street)[1]
with "7194 Fourth St. Rockhampton"')
WHERE JobCandidateID = 2
GO
• Execute the statements, and then verify that the desired results are returned.
Task 4: Verify the updated candidate's address
• Select the statements from Task 2.
• Execute the statements, and then verify that the desired results are returned as
7194 Fourth St. Rockhampton.
Results: After this exercise, you should have you have used XQuery with XML methods
to view the selected contents of an XML schema and modified an XML object.](https://image.slidesharecdn.com/6232a-implementingamicrosoftsqlserver2008database-100427074951-phpapp02/85/6232-a-implementing-a-microsoft-sql-server-2008-database-210-320.jpg)


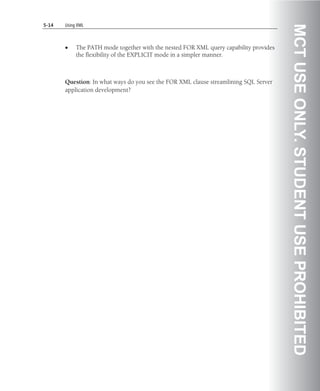
![Implementing a Microsoft SQL Server 2008 Database 6-29
MCT USE ONLY. STUDENT USE PROHIBITED
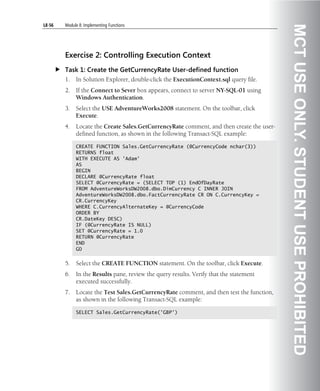
Exercise 3: Creating Partitioned Views
Scenario
After testing the HumanResources.vEmployeeDetails view, the senior database
developer has asked you to perform the following task:
• Create a distributed partitioned view named Person.vContact on the
AW_Contacts database. The view should union the sets of data contained in
the following source servers and tables:
• [NY-SQL-01].AW_Contacts.Person.Contact
• [NY-SQL-01 SQLINSTANCE2].AW_Contacts.Person.Contact
• [NY-SQL-01 SQLINSTANCE3].AW_Contacts.Person.Contact
In this exercise, you need to configure the SQL Server databases and create a new
partitioned view.
The main tasks for this exercise are as follows:
1. Prepare the SQL Server instances.
2. Create a new query file.
3. Create the Person.vContact distributed partitioned view.
Task 1: Prepare the SQL Server instances
• Execute the following code:
• E:Mod06LabfilesStarter LabSetup.cmd
Task 2: Create a new query file
• Create a new query file.
• File name: CreatePartitionedView.sql](https://image.slidesharecdn.com/6232a-implementingamicrosoftsqlserver2008database-100427074951-phpapp02/85/6232-a-implementing-a-microsoft-sql-server-2008-database-245-320.jpg)
![6-30 Implementing Views
MCT USE ONLY. STUDENT USE PROHIBITED
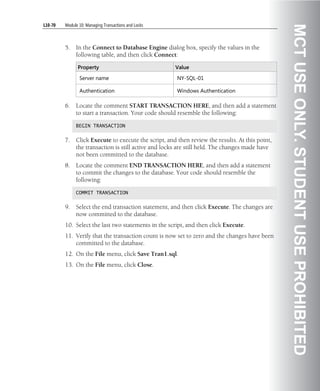
Task 3: Create the Person.vContact distributed partitioned view
1. In the query window, type the following code to create the distributed
partitioned view named Person.vContact on the AW_Contacts database:
USE AW_Contacts
GO
CREATE VIEW Person.vContact
AS
SELECT * FROM [NY-SQL-01].AW_Contacts.Person.Contact
UNION ALL
SELECT * FROM [NY-SQL-01SQLINSTANCE2].AW_Contacts.Person.Contact
UNION ALL
SELECT * FROM [NY-SQL-01SQLINSTANCE3].AW_Contacts.Person.Contact
2. Examine this code.
3. Execute the code. Examine the Messages box and verify that the script
completed without any errors.
4. Verify that the Person.vContact view is listed in the Object Explorer.
5. Verify that the correct columns are listed in the view.
6. Create a new query file.
• File name: ViewPersonContact.sql
7. In the query window, type the following code to select the contents of the
Person.vContact view:
USE AW_Contacts
GO
SELECT * FROM Person.vContact
8. Examine this code.
9. Execute the code. Examine Messages box and verify that the script completed
without any errors.
10. Verify that the result set of the Person.vContact view contains the data from
the Person.Contact tables on all three SQL Server instances.
Results: After this exercise, you should have configured and tested a new partitioned
view for the SQL Server.](https://image.slidesharecdn.com/6232a-implementingamicrosoftsqlserver2008database-100427074951-phpapp02/85/6232-a-implementing-a-microsoft-sql-server-2008-database-246-320.jpg)


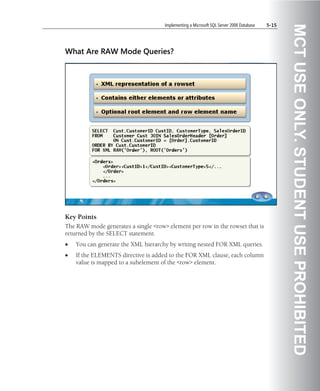
![Implementing a Microsoft SQL Server 2008 Database 8-25
MCT USE ONLY. STUDENT USE PROHIBITED
4. Execute the CREATE USER statement as shown in the example below:
IF NOT EXISTS (SELECT * FROM sys.database_principals WHERE name =
'Adam' AND type = 'U')
CREATE USER Adam FOR LOGIN [NY-SQL-01Adam]
GO
5. Locate the Grant Authenticate permission on the database comment.
6. Execute the Transact-SQL code required to grant the mapped user
AUTHENTICATE permission in the AdventureWorksDW2008 database as
show in the example below:
GRANT AUTHENTICATE TO Adam
GO
7. Locate the Grant SELECT permission to Adam comment.
8. Execute the GRANT statement as show in the example below:
GRANT SELECT TO Adam
GO
9. Locate the Set the TRUSTWORTHY database option on the
AdventureWorks2008 database comment.
10. Execute the ALTER DATABASE statement as show in the example below:
ALTER DATABASE AdventureWorks2008 SET TRUSTWORTHY ON
GO
11. Verify that the statement executes successfully.
12. Save the TrustRelationship.sql query file.
Task 3: Create and test the GetCurrencyDiscountedProducts user-
defined function
1. In Solution Explorer open the ExecutionContext.sql query file.
2. Select and execute the USE AdventureWorks2008 statement.
3. Locate the Test Sales.GetCurrencyDiscountedProducts comment.](https://image.slidesharecdn.com/6232a-implementingamicrosoftsqlserver2008database-100427074951-phpapp02/85/6232-a-implementing-a-microsoft-sql-server-2008-database-309-320.jpg)


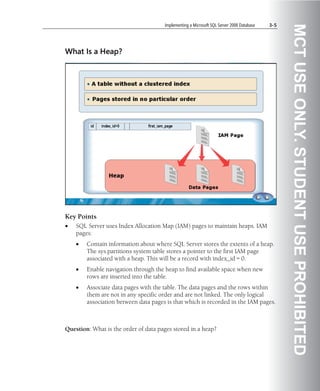
![Implementing a Microsoft SQL Server 2008 Database 10-45
MCT USE ONLY. STUDENT USE PROHIBITED
Lock Timeout
If a transaction becomes locked while waiting for a resource and a deadlock
results, SQL Server will terminate one of the participating transactions with no
timeout.
If no deadlock occurs, SQL Server blocks the transaction requesting the lock until
the other transaction releases the lock. By default, there is no mandatory timeout
period that SQL Server observes. The only way to test whether a resource that you
want to lock is already locked is to attempt to access the data, which could result in
getting locked indefinitely.
The LOCK_TIMEOUT setting allows an application to set a maximum time that a
statement waits on a blocked resource before the blocked statement is
automatically cancelled. The cancellation does not roll back or cancel the
transaction. The application must trap the error to handle the timeout situation
and take remedial action, such as resubmitting the transaction or rolling it back.
The following example shows how to set the lock timeout. The timeout_period is
the number of milliseconds that SQL Server will wait before returning a locking
error.
SET LOCK_TIMEOUT timeout_period
The KILL command terminates a user process based on the server process ID
(spid).
KILL {spid | UOW} [WITH STATUSONLY]
Question: Have you experienced deadlocking problems in your current
environment? If so, how did you determine that deadlocks were a problem, and
how was it resolved?](https://image.slidesharecdn.com/6232a-implementingamicrosoftsqlserver2008database-100427074951-phpapp02/85/6232-a-implementing-a-microsoft-sql-server-2008-database-385-320.jpg)


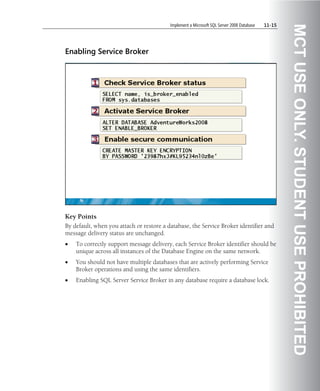


![11-28 Using Service Broker
MCT USE ONLY. STUDENT USE PROHIBITED
When your work is complete, the senior database developer will modify the
customer registration process to use the services you create. The senior database
developer has provided the following specifications for the solution:
• The EmailService service must be configured to send e-mail messages by using
Database Mail. The database administrator has provided a batch file named
LabSetup.cmd to configure Database Mail on your development computer.
• You must enable Service Broker in the AdventureWorks database by using the
ALTER DATABASE statement. To enable secure communication between
services, you must also create a master key with a secure password in the
AdventureWorks database.
• You must create schemas named EmailSvc and CustomerSvc in the
AdventureWorks database, and then create a table named EmailLog in the
EmailSvc schema. The EmailLog table should have the following definition.
CREATE TABLE EMailSvc.EmailLog
(
Date datetime NOT NULL,
[Event] nvarchar(50) NOT NULL,
CustomerData xml
)
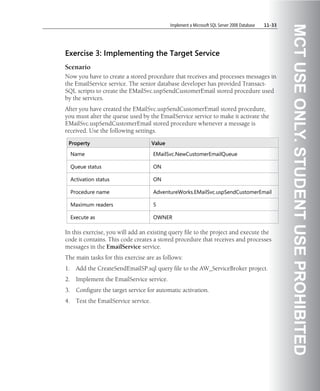
• Use the following details to create a message type that will be used to pass
customer data to the EmailService service.
Property Value
Name //AW/EMail/CustomerDetails
Validation WELL_FORMED_XML
• Use the following details to create a contract that will be supported by the
EmailService service.
Property Value
Name //AW/EMail/SendCustomerDetails
Message type //AW/EMail/CustomerDetails
Message Direction SENT BY INITIATOR](https://image.slidesharecdn.com/6232a-implementingamicrosoftsqlserver2008database-100427074951-phpapp02/85/6232-a-implementing-a-microsoft-sql-server-2008-database-422-320.jpg)


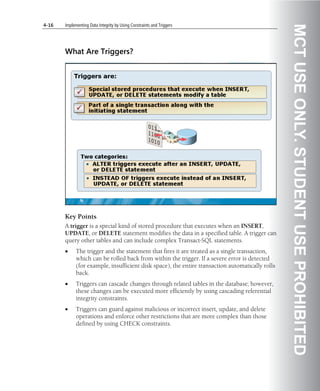
![L4-18 Module 4: Implementing Data Integrity by Using Constraints
MCT USE ONLY. STUDENT USE PROHIBITED
Task 3: Create the JobCandidateHistory table and constraints
1. On the Project menu, click New Query.
2. In Solution Explorer, right-click SQLQuery1.sql, click Rename, type
TableAndContraints.sql, and then press ENTER.
3. In the query window, type the following Transact-SQL code to create the
JobCandidateHistory table:
USE [AdventureWorks2008]
GO
CREATE TABLE [HumanResources].[JobCandidateHistory](
[JobCandidateID] [int] NOT NULL UNIQUE,
[Rating] [int] NOT NULL CONSTRAINT
[DF_JobCandidateHistory_Rating]
Default (5),
[RejectedDate] [datetime] NOT NULL,
[BusinessEntityID] [int] NULL,
CONSTRAINT
[FK_JobCandidateHistory_BusinessEntity_BusinessEntityID]
FOREIGN KEY (BusinessEntityID) REFERENCES
[Person].[BusinessEntity] (BusinessEntityID),
CONSTRAINT [CK_JobCandidateHistory_Rating]
CHECK ([Rating]>=0 AND [Rating]<=10)
) ON [PRIMARY]
4. On the toolbar, click Execute.
5. On the File menu, click Save All.
6. If Object Explorer is not visible, on the View menu, click Object Explorer.
7. In Object Explorer, expand Databases, expand AdventureWorks2008,
expand Tables, and then verify that the
HumanResources.JobCandidateHistory table is listed. You may need to right-
click Tables, and then click Refresh to see the new table.
8. In Object Explorer, expand the HumanResources.JobCandidateHistory table.
9. In the HumanResources.JobCandidateHistory table, expand the Columns,
Keys, Indexes, and Constraints folders, and then verify that the necessary
constraints have been implemented.](https://image.slidesharecdn.com/6232a-implementingamicrosoftsqlserver2008database-100427074951-phpapp02/85/6232-a-implementing-a-microsoft-sql-server-2008-database-448-320.jpg)

![L4-20 Module 4: Implementing Data Integrity by Using Constraints
MCT USE ONLY. STUDENT USE PROHIBITED
3. In the query window, type the following Transact-SQL code:
USE [AdventureWorks2008]
GO
ALTER TABLE HumanResources.JobCandidateHistory
NOCHECK CONSTRAINT [CK_JobCandidateHistory_Rating]
GO
4. On the toolbar, click Execute.
5. Verify that the commands completed successfully.
6. On the File menu, click Save All.
7. Switch to the InsertTestData.sql query window.
8. On the toolbar, click Execute.
9. Click the Client Statistics tab, and then compare the Time Statistics with the
previous trial. Notice that Trial 2 executes more quickly.
Task 3: Enable constraints on the JobCandidateHistory table
1. Switch to the Constraints.sql query window.
2. In the query window, type the following Transact-SQL code below the existing
statements:
ALTER TABLE HumanResources.JobCandidateHistory
CHECK CONSTRAINT [CK_JobCandidateHistory_Rating]
GO
3. Select the new statements, and then on the toolbar, click Execute.
4. Verify that the commands completed successfully.
5. On the File menu, click Save All.
6. Keep SQL Server Management Studio open for the next exercise.
Results: After this exercise, you should have successfully compared performance results
with constraints enabled and disabled.](https://image.slidesharecdn.com/6232a-implementingamicrosoftsqlserver2008database-100427074951-phpapp02/85/6232-a-implementing-a-microsoft-sql-server-2008-database-450-320.jpg)
![Lab: Implementing Data Integrity by Using Constraints L4-21
MCT USE ONLY. STUDENT USE PROHIBITED
Exercise 3: Creating Triggers
Task 1: Create the dJobCandidate trigger
1. In SQL Server Management Studio, on the Project menu, click New Query.
2. In Solution Explorer, right-click SQLQuery1.sql, click Rename, type
Trigger.sql, and then press ENTER.
3. In the query window, type the following Transact-SQL code to create the
dJobCandidate trigger on the HumanResources.JobCandidate table:
USE AdventureWorks2008
GO
CREATE TRIGGER [dJobCandidate] ON [HumanResources].[JobCandidate]
AFTER DELETE AS
BEGIN
SET NOCOUNT ON;
INSERT INTO
[HumanResources].[JobCandidateHistory] (JobCandidateID,
RejectedDate)
SELECT
JobCandidateID, getdate()
FROM
deleted
END;
4. On the toolbar, click Execute.
5. On the File menu, click Save All.
6. In Object Explorer, expand Databases, expand AdventureWorks2008, and
then expand Tables. Right-click Tables, and then click Refresh.
7. Expand the HumanResources.JobCandidate table, expand Triggers, and
then verify that the dJobCandidate trigger is listed.](https://image.slidesharecdn.com/6232a-implementingamicrosoftsqlserver2008database-100427074951-phpapp02/85/6232-a-implementing-a-microsoft-sql-server-2008-database-451-320.jpg)


![L5-38 Module 5: Using XML
MCT USE ONLY. STUDENT USE PROHIBITED
Task 2: Retrieve the address for a specified candidate
1. Below the SELECT statement, type the following Transact-SQL code:
USE AdventureWorks2008
GO
WITH XMLNAMESPACES(
'http://schemas.microsoft.com/sqlserver/2004/07/adventure-
works/Resume' AS "RES")
SELECT Resume.value(
'(/RES:Resume/RES:Address/RES:Addr.Street)[1]',
'nvarchar(100)')
As ResumeAddress
FROM HumanResources.JobCandidateHistory
WHERE JobCandidateID = 2
GO
This retrieves a single resume address with a JobCandidateID of 2.
2. Select the statements you just added, and then on the toolbar, click Execute.
3. Verify that the desired results are returned.
Task 3: Update a candidate's address
1. Below the previous SELECT statement, type the following Transact-SQL code:
USE AdventureWorks2008
GO
WITH XMLNAMESPACES(
'http://schemas.microsoft.com/sqlserver/2004/07/adventure-
works/Resume' AS "RES")
UPDATE HumanResources.JobCandidateHistory
SET Resume.modify('replace value of
(/RES:Resume/RES:Address/RES:Addr.Street)[1]
with "7194 Fourth St. Rockhampton"')
WHERE JobCandidateID = 2
GO
2. This updates the HumanResources.JobCandidateHistory table, setting the
Address element value in the document for the record with a JobCandidateID
of 2 to 7194 Fourth St. Rockhampton.](https://image.slidesharecdn.com/6232a-implementingamicrosoftsqlserver2008database-100427074951-phpapp02/85/6232-a-implementing-a-microsoft-sql-server-2008-database-468-320.jpg)


![Lab: Implementing Views L6-45
MCT USE ONLY. STUDENT USE PROHIBITED
Exercise 3: Creating Partitioned Views
Task 1: Prepare the SQL Server instances
1. Click Start, and then click Computer.
2. In Microsoft® Windows® Explorer, navigate to the
E:Mod06LabfilesStarter folder.
3. Double-click LabSetup.cmd to run the script that configures the servers for
the partitioned view.
4. When the script completes, close Windows Explorer.
Task 2: Create a new query file
1. In the Solution Explorer pane, right-click Queries, and then click New Query.
2. If the Connect to Server dialog box appears, click Connect.
3. On the File menu, click Save SQLQuery4.sql As.
4. The Save File As dialog box appears. In the File name field, type
CreatePartitionedView.sql, and then click Save.
Task 3: Create the Person.vContact distributed partitioned view
1. In the query window, type the following code to create the distributed
partitioned view named Person.vContact on the AW_Contacts database:
USE AW_Contacts
GO
CREATE VIEW Person.vContact
AS
SELECT * FROM [NY-SQL-01].AW_Contacts.Person.Contact
UNION ALL
SELECT * FROM [NY-SQL-01SQLINSTANCE2].AW_Contacts.Person.Contact
UNION ALL
SELECT * FROM [NY-SQL-01SQLINSTANCE3].AW_Contacts.Person.Contact
2. On the toolbar, click Execute.
3. On the File menu, click Save All.
4. In Object Explorer, right-click Databases, and then click Refresh.](https://image.slidesharecdn.com/6232a-implementingamicrosoftsqlserver2008database-100427074951-phpapp02/85/6232-a-implementing-a-microsoft-sql-server-2008-database-475-320.jpg)


![Lab: Implementing Functions L8-57
MCT USE ONLY. STUDENT USE PROHIBITED
8. Select the SELECT statement. On the toolbar, click Execute.
Note: At this stage you have not established a trust relationship between the
databases, so you should expect to receive the following error message:
The server principal "NY-SQL-01Adam" is not able to access the database
"AdventureWorksDW" under the current security context.
9. On the File menu, click Save ExecutionContext.sql.
Task 2: Establish a database trust relationship
1. In Solution Explorer, double-click the TrustRelationship.sql query file.
2. If the Connect to Sever box appears, connect to server NY-SQL-01 using
Windows Authentication.
3. Select the USE AdventureWorksDW2008 statement. Click Execute.
4. Locate the Create the user for the NY-SQL-01Adam login comment, and
then create a user called Adam in the AdventureWorksDW2008 database for
the NY-SQL-01Adam login, as shown in the following Transact-SQL example:
IF NOT EXISTS (SELECT * FROM sys.database_principals WHERE name =
'Adam' AND type = 'U')
CREATE USER Adam FOR LOGIN [NY-SQL-01Adam]
GO
5. Select the IF and CREATE statements. On the toolbar, click Execute.
6. Verify that the statements executed successfully.
7. Locate the Grant AUTHENTICATE permission on the database comment.
8. Implement the Transact-SQL code required to grant the mapped user
AUTHENTICATE permission in the AdventureWorksDW2008 database, as
shown in the following Transact-SQL example:
GRANT AUTHENTICATE TO Adam
GO](https://image.slidesharecdn.com/6232a-implementingamicrosoftsqlserver2008database-100427074951-phpapp02/85/6232-a-implementing-a-microsoft-sql-server-2008-database-487-320.jpg)


![L11-78 Module 11: Using Service Broker
MCT USE ONLY. STUDENT USE PROHIBITED
6. Add the following Transact-SQL code to the PrepareDatabase.sql query:
USE master
GO
-- Enable Service Broker in the AdventureWorks2008 database
ALTER DATABASE AdventureWorks2008 SET SINGLE_USER
WITH ROLLBACK IMMEDIATE
GO
ALTER DATABASE AdventureWorks2008 SET ENABLE_BROKER
GO
-- Configure the AdventureWorks2008 database
USE AdventureWorks2008
GO
IF NOT EXISTS
(SELECT * FROM sys.symmetric_keys
WHERE name = '##MS_DatabaseMasterKey##')
CREATE MASTER KEY ENCRYPTION BY PASSWORD = '23987hxJ#KL95234nl0zBe'
GO
CREATE SCHEMA EMailSvc
GO
CREATE SCHEMA CustomerSvc
GO
-- Create a table to log details of the customer e-mails sent
CREATE TABLE EMailSvc.EmailLog
(
Date datetime NOT NULL,
[Event] nvarchar(50) NOT NULL,
CustomerData xml
)
GO
ALTER DATABASE AdventureWorks2008 SET MULTI_USER
GO
7. On the toolbar, click Execute to execute the query.
8. On the File menu, click Save All.](https://image.slidesharecdn.com/6232a-implementingamicrosoftsqlserver2008database-100427074951-phpapp02/85/6232-a-implementing-a-microsoft-sql-server-2008-database-508-320.jpg)
![Lab: Using Service Broker L11-79
MCT USE ONLY. STUDENT USE PROHIBITED
Task 4: Create the Service Broker objects required for the customer e-
mail solution
1. On the Project menu, click New Query.
2. In Solution Explorer, right-click SQLQuery1.sql, click Rename, type
CreateServiceBrokerObjects.sql, and then press ENTER.
3. In the CreateServiceBrokerObjects.sql query window, type the following
Transact-SQL code to create the message type, contract, queues, and services:
USE AdventureWorks2008
GO
-- Create message types
CREATE MESSAGE TYPE [//AW/EMail/CustomerDetails]
VALIDATION = WELL_FORMED_XML
GO
-- Create contracts
CREATE CONTRACT [//AW/EMail/SendCustomerDetails]
(
[//AW/EMail/CustomerDetails]
SENT BY INITIATOR
)
GO
-- Create queues
CREATE QUEUE CustomerSvc.NewCustomerQueue
WITH STATUS = ON
CREATE QUEUE EMailSvc.NewCustomerEmailQueue
WITH STATUS = OFF
GO
-- Create services
CREATE SERVICE [//AW/Sales/CustomerService]
ON QUEUE CustomerSvc.NewCustomerQueue
CREATE SERVICE [//AW/EMail/EmailService]
ON QUEUE EMailSvc.NewCustomerEmailQueue
([//AW/EMail/SendCustomerDetails])](https://image.slidesharecdn.com/6232a-implementingamicrosoftsqlserver2008database-100427074951-phpapp02/85/6232-a-implementing-a-microsoft-sql-server-2008-database-509-320.jpg)


