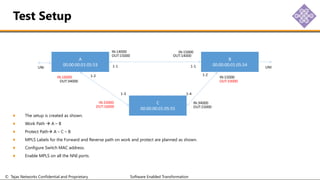
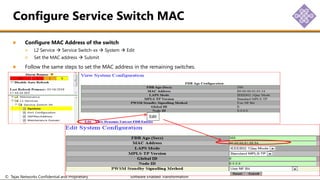
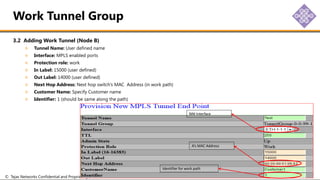
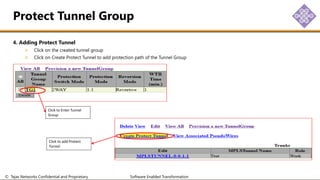
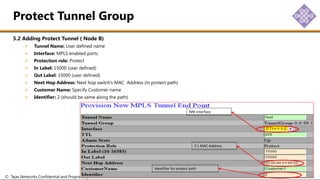
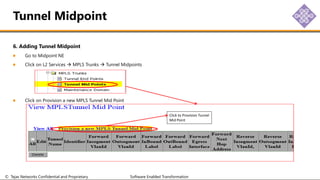
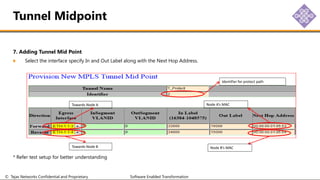
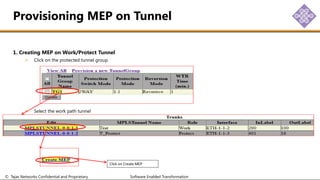
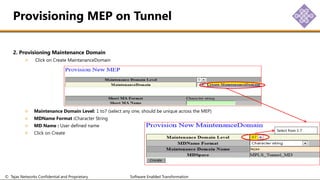
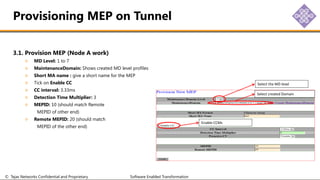
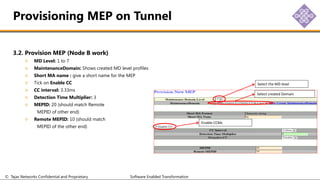
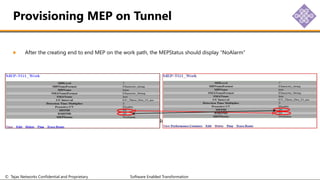
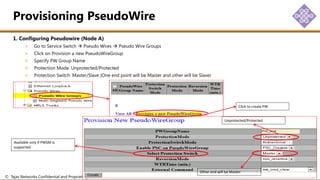
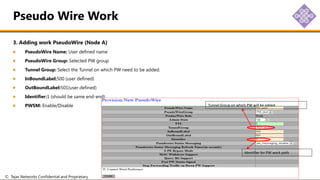
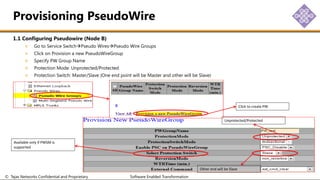
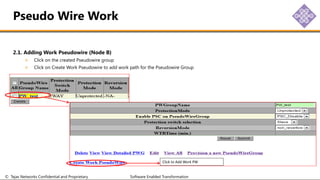
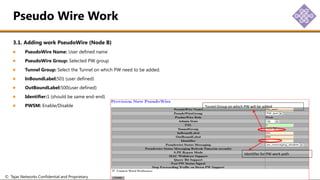
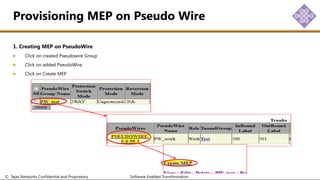
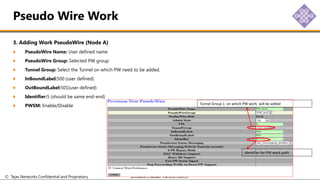
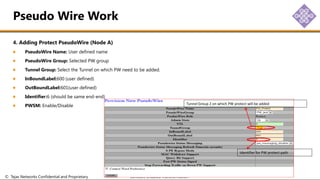
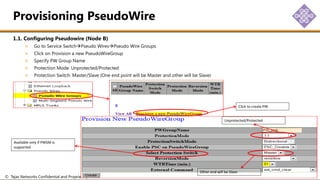
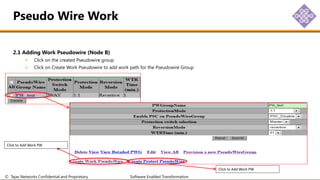
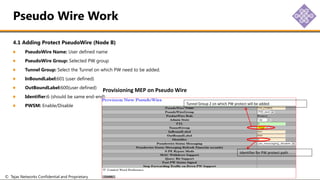
© Tejas Networks Confidential and Proprietary Software Enabled Transformation www.tejasnetworks.com
MPLS-TP Provisioning
© Tejas Networks Confidential and Proprietary Software Enabled Transformation
Test Setup
Configure Service Switch MAC
Enable MPLS
Provisioning Tunnel
Adding Work Tunnel
Adding Protect Tunnel
Adding Tunnel Mid point
Provisioning MEP on Tunnel
Provisioning Pseudo Wire
Adding Work Pseudo Wire
Provisioning MEP on Pseudo Wire
Provisioning Service
Protected Pseudo Wire Group
Provisioning Pseudo Wire
Adding Work Pseudo Wire
Adding Protect Pseudo Wire
Content
© Tejas Networks Confidential and Proprietary Software Enabled Transformation
The setup is created as shown.
Work Path  A – B
Protect Path A – C – B
MPLS Labels for the Forward and Reverse path on work and protect are planned as shown.
Configure Switch MAC address.
Enable MPLS on all the NNI ports.
Test Setup
A
00:00:00:01:05:53
IN:14000 IN:15000
OUT:15000 OUT:14000
IN:16000
OUT:34000
IN:33000
OUT:16000
IN:34000
OUT:15000
IN:15000
OUT:33000
UNI UNI
B
00:00:00:01:05:54
C
00:00:00:01:05:55
1-1 1-1
1-2
1-2
1-3 1-4
© Tejas Networks Confidential and Proprietary Software Enabled Transformation
Configure MAC Address of the switch
L2 Service  Service Switch-xx  System  Edit
Set the MAC address  Submit
Follow the same steps to set the MAC address in the remaining switches.
Configure Service Switch MAC
Edit
© Tejas Networks Confidential and Proprietary Software Enabled Transformation
Enable MPLS on ports
Go to Port Configuration
Select the NNI ports Switching Configuration.
Enable MPLS.
Enable MPLS
Enable
© Tejas Networks Confidential and Proprietary Software Enabled Transformation
1. Configuring Tunnel
Go to L2 Service Switches MPLS TrunksTunnel End Points
Click on Provision a new TunnelGroup
Tunnel Group Name
Protection Mode: Unprotected/Protected
Provisioning Tunnel
Click to Provision
Unprotected/Protected
Revertive/Non-Revertive
© Tejas Networks Confidential and Proprietary Software Enabled Transformation
2. Adding Work Tunnel
Click on the created tunnel group
Click on Create Work Tunnel to add Working path of the Tunnel Group
Work Tunnel Group
Click to Enter Tunnel
Group
Click to add work Tunnel
© Tejas Networks Confidential and Proprietary Software Enabled Transformation
3.1 Adding Work Tunnel (Node A)
Tunnel Name: User defined name
Interface: MPLS enabled ports
Protection role: work
In Label: 14000 (user defined)
Out Label: 15000 (user defined)
Next Hop Address: Next hop switch’s MAC Address (in work path)
Customer Name: Specify Customer name
Identifier: 1 (should be same along the path)
Work Tunnel Group
NNI Interface
B’s MAC Address
Identifier for work path
© Tejas Networks Confidential and Proprietary Software Enabled Transformation
3.2 Adding Work Tunnel (Node B)
Tunnel Name: User defined name
Interface: MPLS enabled ports
Protection role: work
In Label: 15000 (user defined)
Out Label: 14000 (user defined)
Next Hop Address: Next hop switch’s MAC Address (in work path)
Customer Name: Specify Customer name
Identifier: 1 (should be same along the path)
Work Tunnel Group
NNI Interface
A’s MAC Address
Identifier for work path
© Tejas Networks Confidential and Proprietary Software Enabled Transformation
4. Adding Protect Tunnel
Click on the created tunnel group
Click on Create Protect Tunnel to add protection path of the Tunnel Group
Protect Tunnel Group
Click to Enter Tunnel
Group
Click to add Protect
Tunnel
© Tejas Networks Confidential and Proprietary Software Enabled Transformation
5.1 Adding Protect Tunnel (Node A)
Tunnel Name: User defined name
Interface: MPLS enabled ports
Protection role: Protect
In Label: 16000 (user defined)
Out Label: 34000 (user defined)
Next Hop Address: Next hop switch’s MAC Address (in protect path)
Customer Name: Specify Customer name
Identifier: 2 (should be same along the path)
Protect Tunnel Group
NNI Interface
C’s MAC Address
Identifier for protect path
© Tejas Networks Confidential and Proprietary Software Enabled Transformation
5.2 Adding Protect Tunnel ( Node B)
Tunnel Name: User defined name
Interface: MPLS enabled ports
Protection role: Protect
In Label: 15000 (user defined)
Out Label: 33000 (user defined)
Next Hop Address: Next hop switch’s MAC Address (in protect path)
Customer Name: Specify Customer name
Identifier: 2 (should be same along the path)
Protect Tunnel Group
NNI Interface
C’s MAC Address
Identifier for protect path
© Tejas Networks Confidential and Proprietary Software Enabled Transformation
6. Adding Tunnel Midpoint
Go to Midpoint NE
Click on L2 Services  MPLS Trunks  Tunnel Midpoints
Click on Provision a new MPLS Tunnel Mid Point
Tunnel Midpoint
Click to Provision Tunnel
Mid Point
© Tejas Networks Confidential and Proprietary Software Enabled Transformation
7. Adding Tunnel Mid Point
Select the interface specify In and Out Label along with the Next Hop Address.
* Refer test setup for better understanding
Tunnel Midpoint
Identifier for protect path
Towards Node A
Towards Node B
Node A’s MAC
Node B’s MAC
© Tejas Networks Confidential and Proprietary Software Enabled Transformation
1. Creating MEP on Work/Protect Tunnel
Click on the protected tunnel group
Select the work path tunnel
Provisioning MEP on Tunnel
Click on Create MEP
© Tejas Networks Confidential and Proprietary Software Enabled Transformation
2. Provisioning Maintenance Domain
Click on Create MaintananceDomain
Maintenance Domain Level: 1 to7 (select any one, should be unique across the MEP)
MDName Format :Character String
MD Name : User defined name
Click on Create
Provisioning MEP on Tunnel
Select from 1-7
© Tejas Networks Confidential and Proprietary Software Enabled Transformation
3.1. Provision MEP (Node A work)
MD Level: 1 to 7
MaintenanceDomain: Shows created MD level profiles
Short MA name : give a short name for the MEP
Tick on Enable CC
CC interval: 3.33ms
Detection Time Multiplier: 3
MEPID: 10 (should match Remote
MEPID of other end)
Remote MEPID: 20 (should match
MEPID of the other end)
Provisioning MEP on Tunnel
Select the MD level
Select created Domain
Enable CCMs
© Tejas Networks Confidential and Proprietary Software Enabled Transformation
3.2. Provision MEP (Node B work)
MD Level: 1 to 7
MaintenanceDomain: Shows created MD level profiles
Short MA name : give a short name for the MEP
Tick on Enable CC
CC interval: 3.33ms
Detection Time Multiplier: 3
MEPID: 20 (should match Remote
MEPID of other end)
Remote MEPID: 10 (should match
MEPID of the other end)
Provisioning MEP on Tunnel
Select the MD level
Select created Domain
Enable CCMs
© Tejas Networks Confidential and Proprietary Software Enabled Transformation
After the creating end to end MEP on the work path, the MEPStatus should display “NoAlarm”
Similarly, create MEP on the Protect path in Node A and Node B
Provisioning MEP on Tunnel
© Tejas Networks Confidential and Proprietary Software Enabled Transformation
1. Configuring Pseudowire (Node A)
Go to Service Switch  Pseudo Wires  Pseudo Wire Groups
Click on Provision a new PseudoWireGroup
Specify PW Group Name
Protection Mode: Unprotected/Protected
Protection Switch: Master/Slave (One end point will be Master and other will be Slave)
Provisioning PseudoWire
Click to create PW
Unprotected/Protected
Other end will be Master
Available only if PWSM is
supported
© Tejas Networks Confidential and Proprietary Software Enabled Transformation
2. Adding Work Pseudowire (Node A)
Click on the created Pseudowire group
Click on Create Work Pseudowire to add work path for the Pseudowire Group
Pseudo Wire Work
Click to Add Work PW
© Tejas Networks Confidential and Proprietary Software Enabled Transformation
3. Adding work PseudoWire (Node A)
PseudoWire Name: User defined name
PseudoWire Group: Selected PW group
Tunnel Group: Select the Tunnel on which PW need to be added.
InBoundLabel:500 (user defined)
OutBoundLabel:501(user defined)
Identifier:1 (should be same end-end)
PWSM: Enable/Disable
Pseudo Wire Work
Tunnel Group on which PW will be added
Identifier for PW work path
© Tejas Networks Confidential and Proprietary Software Enabled Transformation
1.1 Configuring Pseudowire (Node B)
Go to Service SwitchPseudo WiresPseudo Wire Groups
Click on Provision a new PseudoWireGroup
Specify PW Group Name
Protection Mode: Unprotected/Protected
Protection Switch: Master/Slave (One end point will be Master and other will be Slave)
Provisioning PseudoWire
Click to create PW
Unprotected/Protected
Other end will be Slave
Available only if PWSM is
supported
© Tejas Networks Confidential and Proprietary Software Enabled Transformation
2.1. Adding Work Pseudowire (Node B)
Click on the created Pseudowire group
Click on Create Work Pseudowire to add work path for the Pseudowire Group
Pseudo Wire Work
Click to Add Work PW
© Tejas Networks Confidential and Proprietary Software Enabled Transformation
3.1. Adding work PseudoWire (Node B)
PseudoWire Name: User defined name
PseudoWire Group: Selected PW group
Tunnel Group: Select the Tunnel on which PW need to be added.
InBoundLabel:501 (user defined)
OutBoundLabel:500(user defined)
Identifier:1 (should be same end-end)
PWSM: Enable/Disable
Pseudo Wire Work
Tunnel Group on which PW will be added
Identifier for PW work path
© Tejas Networks Confidential and Proprietary Software Enabled Transformation
1. Creating MEP on PseudoWire
Click on created Pseudowire Group
Click on added PseudoWire.
Click on Create MEP
Provisioning MEP on Pseudo Wire
© Tejas Networks Confidential and Proprietary Software Enabled Transformation
2. Provisioning Maintenance Domain
Click on Create MaintananceDomain
Maintenance Domain Level: 1 to7 (select any one, should be unique across the MEP)
MDName Format :Character String
MD Name : User defined name
Click on Create
Provisioning MEP on Pseudo Wire
Select from 1-7
© Tejas Networks Confidential and Proprietary Software Enabled Transformation
Follow the same steps of ‘Provisioning MEP on Tunnel’ to create MEP on PW.
After the creating end to end MEP on the work path of the PW, the MEPStatus should display “NoAlarm”
Provisioning MEP on Pseudo Wire
© Tejas Networks Confidential and Proprietary Software Enabled Transformation
Creating Service
Go to L2 Service switch Service Provisioning  Eline Service
Service Provisioning
Service Name
UNI Port PW Group
VLAN on the ingress of UNI
© Tejas Networks Confidential and Proprietary Software Enabled Transformation
Tunnel Group (TG1) : A – B Work Path (TG1-Work)
A – C – B Protect Path (TG1-Protect)
Tunnel Group (TG2) : A – B Work Path (TG2-Work)
A – D – B Protect Path (TG2-Protect)
Protected Pseudo Wire Service
A
C
D
B
UNI UNI
TG1-Work
TG2-Work
© Tejas Networks Confidential and Proprietary Software Enabled Transformation
Protected Tunnel Groups
Work Path
Work Path
Protect Path
Protect Path
© Tejas Networks Confidential and Proprietary Software Enabled Transformation
1. Configuring Pseudowire (Node A)
Go to Service Switch  Pseudo Wires  Pseudo Wire Groups
Click on Provision a new PseudoWireGroup
Specify PW Group Name
Protection Mode: Unprotected/Protected
Protection Switch: Master/Slave (One end point will be Master and other will be Slave)
Provisioning PseudoWire
Click to create PW
Unprotected/Protected
Other end will be Master
Available only if PWSM is
supported
© Tejas Networks Confidential and Proprietary Software Enabled Transformation
2. Adding Work Pseudowire (Node A)
Click on the created Pseudowire group
Click on Create Work Pseudowire to add work path for the Pseudowire Group
Pseudo Wire Work
Click to Add Work PW
© Tejas Networks Confidential and Proprietary Software Enabled Transformation
3. Adding Work PseudoWire (Node A)
PseudoWire Name: User defined name
PseudoWire Group: Selected PW group
Tunnel Group: Select the Tunnel on which PW need to be added.
InBoundLabel:500 (user defined)
OutBoundLabel:501(user defined)
Identifier:5 (should be same end-end)
PWSM: Enable/Disable
Pseudo Wire Work
Tunnel Group 1 on which PW work will be added
Identifier for PW work path
© Tejas Networks Confidential and Proprietary Software Enabled Transformation
4. Adding Protect PseudoWire (Node A)
PseudoWire Name: User defined name
PseudoWire Group: Selected PW group
Tunnel Group: Select the Tunnel on which PW need to be added.
InBoundLabel:600 (user defined)
OutBoundLabel:601(user defined)
Identifier:6 (should be same end-end)
PWSM: Enable/Disable
Pseudo Wire Work
Tunnel Group 2 on which PW protect will be added
Identifier for PW protect path
© Tejas Networks Confidential and Proprietary Software Enabled Transformation
Follow the previous slides to provision MEP on Pseudo Wire
“Provisioning MEP on Pseudo Wire”
Provisioning MEP on Pseudo Wire
© Tejas Networks Confidential and Proprietary Software Enabled Transformation
1.1. Configuring Pseudowire (Node B)
Go to Service SwitchPseudo WiresPseudo Wire Groups
Click on Provision a new PseudoWireGroup
Specify PW Group Name
Protection Mode: Unprotected/Protected
Protection Switch: Master/Slave (One end point will be Master and other will be Slave)
Provisioning PseudoWire
Click to create PW
Unprotected/Protected
Other end will be Slave
Available only if PWSM is
supported
© Tejas Networks Confidential and Proprietary Software Enabled Transformation
2.1 Adding Work Pseudowire (Node B)
Click on the created Pseudowire group
Click on Create Work Pseudowire to add work path for the Pseudowire Group
Pseudo Wire Work
Click to Add Work PW
© Tejas Networks Confidential and Proprietary Software Enabled Transformation
3.1 Adding Work PseudoWire (Node B)
PseudoWire Name: User defined name
PseudoWire Group: Selected PW group
Tunnel Group: Select the Tunnel on which PW need to be added.
InBoundLabel:501 (user defined)
OutBoundLabel:500(user defined)
Identifier:5 (should be same end-end)
PWSM: Enable/Disable
Pseudo Wire Work
Tunnel Group 1 on which PW work will be added
Identifier for PW work path
© Tejas Networks Confidential and Proprietary Software Enabled Transformation
4.1 Adding Protect PseudoWire (Node B)
PseudoWire Name: User defined name
PseudoWire Group: Selected PW group
Tunnel Group: Select the Tunnel on which PW need to be added.
InBoundLabel:601 (user defined)
OutBoundLabel:600(user defined)
Identifier:6 (should be same end-end)
PWSM: Enable/Disable
Pseudo Wire Work
Tunnel Group 2 on which PW protect will be added
Identifier for PW protect path
Provisioning MEP on Pseudo Wire
© Tejas Networks Confidential and Proprietary Software Enabled Transformation
Follow the previous slides to provision MEP on Pseudo Wire
“Provisioning MEP on Pseudo Wire”
Provisioning MEP on Pseudo Wire
© Tejas Networks Confidential and Proprietary Software Enabled Transformation
Creating Service
Go to L2 Service switch Service Provisioning  Eline Service
Service Provisioning
Service Name
UNI Port Protected PW Group
VLAN on the ingress of UNI
© Tejas Networks Confidential and Proprietary Software Enabled Transformation
Thank You

580497890-MPLS-TP-Configuration for .pdf

  • 1.
    © Tejas NetworksConfidential and Proprietary Software Enabled Transformation www.tejasnetworks.com MPLS-TP Provisioning
  • 2.
    © Tejas NetworksConfidential and Proprietary Software Enabled Transformation Test Setup Configure Service Switch MAC Enable MPLS Provisioning Tunnel Adding Work Tunnel Adding Protect Tunnel Adding Tunnel Mid point Provisioning MEP on Tunnel Provisioning Pseudo Wire Adding Work Pseudo Wire Provisioning MEP on Pseudo Wire Provisioning Service Protected Pseudo Wire Group Provisioning Pseudo Wire Adding Work Pseudo Wire Adding Protect Pseudo Wire Content
  • 3.
    © Tejas NetworksConfidential and Proprietary Software Enabled Transformation The setup is created as shown. Work Path  A – B Protect Path A – C – B MPLS Labels for the Forward and Reverse path on work and protect are planned as shown. Configure Switch MAC address. Enable MPLS on all the NNI ports. Test Setup A 00:00:00:01:05:53 IN:14000 IN:15000 OUT:15000 OUT:14000 IN:16000 OUT:34000 IN:33000 OUT:16000 IN:34000 OUT:15000 IN:15000 OUT:33000 UNI UNI B 00:00:00:01:05:54 C 00:00:00:01:05:55 1-1 1-1 1-2 1-2 1-3 1-4
  • 4.
    © Tejas NetworksConfidential and Proprietary Software Enabled Transformation Configure MAC Address of the switch L2 Service  Service Switch-xx  System  Edit Set the MAC address  Submit Follow the same steps to set the MAC address in the remaining switches. Configure Service Switch MAC Edit
  • 5.
    © Tejas NetworksConfidential and Proprietary Software Enabled Transformation Enable MPLS on ports Go to Port Configuration Select the NNI ports Switching Configuration. Enable MPLS. Enable MPLS Enable
  • 6.
    © Tejas NetworksConfidential and Proprietary Software Enabled Transformation 1. Configuring Tunnel Go to L2 Service Switches MPLS TrunksTunnel End Points Click on Provision a new TunnelGroup Tunnel Group Name Protection Mode: Unprotected/Protected Provisioning Tunnel Click to Provision Unprotected/Protected Revertive/Non-Revertive
  • 7.
    © Tejas NetworksConfidential and Proprietary Software Enabled Transformation 2. Adding Work Tunnel Click on the created tunnel group Click on Create Work Tunnel to add Working path of the Tunnel Group Work Tunnel Group Click to Enter Tunnel Group Click to add work Tunnel
  • 8.
    © Tejas NetworksConfidential and Proprietary Software Enabled Transformation 3.1 Adding Work Tunnel (Node A) Tunnel Name: User defined name Interface: MPLS enabled ports Protection role: work In Label: 14000 (user defined) Out Label: 15000 (user defined) Next Hop Address: Next hop switch’s MAC Address (in work path) Customer Name: Specify Customer name Identifier: 1 (should be same along the path) Work Tunnel Group NNI Interface B’s MAC Address Identifier for work path
  • 9.
    © Tejas NetworksConfidential and Proprietary Software Enabled Transformation 3.2 Adding Work Tunnel (Node B) Tunnel Name: User defined name Interface: MPLS enabled ports Protection role: work In Label: 15000 (user defined) Out Label: 14000 (user defined) Next Hop Address: Next hop switch’s MAC Address (in work path) Customer Name: Specify Customer name Identifier: 1 (should be same along the path) Work Tunnel Group NNI Interface A’s MAC Address Identifier for work path
  • 10.
    © Tejas NetworksConfidential and Proprietary Software Enabled Transformation 4. Adding Protect Tunnel Click on the created tunnel group Click on Create Protect Tunnel to add protection path of the Tunnel Group Protect Tunnel Group Click to Enter Tunnel Group Click to add Protect Tunnel
  • 11.
    © Tejas NetworksConfidential and Proprietary Software Enabled Transformation 5.1 Adding Protect Tunnel (Node A) Tunnel Name: User defined name Interface: MPLS enabled ports Protection role: Protect In Label: 16000 (user defined) Out Label: 34000 (user defined) Next Hop Address: Next hop switch’s MAC Address (in protect path) Customer Name: Specify Customer name Identifier: 2 (should be same along the path) Protect Tunnel Group NNI Interface C’s MAC Address Identifier for protect path
  • 12.
    © Tejas NetworksConfidential and Proprietary Software Enabled Transformation 5.2 Adding Protect Tunnel ( Node B) Tunnel Name: User defined name Interface: MPLS enabled ports Protection role: Protect In Label: 15000 (user defined) Out Label: 33000 (user defined) Next Hop Address: Next hop switch’s MAC Address (in protect path) Customer Name: Specify Customer name Identifier: 2 (should be same along the path) Protect Tunnel Group NNI Interface C’s MAC Address Identifier for protect path
  • 13.
    © Tejas NetworksConfidential and Proprietary Software Enabled Transformation 6. Adding Tunnel Midpoint Go to Midpoint NE Click on L2 Services  MPLS Trunks  Tunnel Midpoints Click on Provision a new MPLS Tunnel Mid Point Tunnel Midpoint Click to Provision Tunnel Mid Point
  • 14.
    © Tejas NetworksConfidential and Proprietary Software Enabled Transformation 7. Adding Tunnel Mid Point Select the interface specify In and Out Label along with the Next Hop Address. * Refer test setup for better understanding Tunnel Midpoint Identifier for protect path Towards Node A Towards Node B Node A’s MAC Node B’s MAC
  • 15.
    © Tejas NetworksConfidential and Proprietary Software Enabled Transformation 1. Creating MEP on Work/Protect Tunnel Click on the protected tunnel group Select the work path tunnel Provisioning MEP on Tunnel Click on Create MEP
  • 16.
    © Tejas NetworksConfidential and Proprietary Software Enabled Transformation 2. Provisioning Maintenance Domain Click on Create MaintananceDomain Maintenance Domain Level: 1 to7 (select any one, should be unique across the MEP) MDName Format :Character String MD Name : User defined name Click on Create Provisioning MEP on Tunnel Select from 1-7
  • 17.
    © Tejas NetworksConfidential and Proprietary Software Enabled Transformation 3.1. Provision MEP (Node A work) MD Level: 1 to 7 MaintenanceDomain: Shows created MD level profiles Short MA name : give a short name for the MEP Tick on Enable CC CC interval: 3.33ms Detection Time Multiplier: 3 MEPID: 10 (should match Remote MEPID of other end) Remote MEPID: 20 (should match MEPID of the other end) Provisioning MEP on Tunnel Select the MD level Select created Domain Enable CCMs
  • 18.
    © Tejas NetworksConfidential and Proprietary Software Enabled Transformation 3.2. Provision MEP (Node B work) MD Level: 1 to 7 MaintenanceDomain: Shows created MD level profiles Short MA name : give a short name for the MEP Tick on Enable CC CC interval: 3.33ms Detection Time Multiplier: 3 MEPID: 20 (should match Remote MEPID of other end) Remote MEPID: 10 (should match MEPID of the other end) Provisioning MEP on Tunnel Select the MD level Select created Domain Enable CCMs
  • 19.
    © Tejas NetworksConfidential and Proprietary Software Enabled Transformation After the creating end to end MEP on the work path, the MEPStatus should display “NoAlarm” Similarly, create MEP on the Protect path in Node A and Node B Provisioning MEP on Tunnel
  • 20.
    © Tejas NetworksConfidential and Proprietary Software Enabled Transformation 1. Configuring Pseudowire (Node A) Go to Service Switch  Pseudo Wires  Pseudo Wire Groups Click on Provision a new PseudoWireGroup Specify PW Group Name Protection Mode: Unprotected/Protected Protection Switch: Master/Slave (One end point will be Master and other will be Slave) Provisioning PseudoWire Click to create PW Unprotected/Protected Other end will be Master Available only if PWSM is supported
  • 21.
    © Tejas NetworksConfidential and Proprietary Software Enabled Transformation 2. Adding Work Pseudowire (Node A) Click on the created Pseudowire group Click on Create Work Pseudowire to add work path for the Pseudowire Group Pseudo Wire Work Click to Add Work PW
  • 22.
    © Tejas NetworksConfidential and Proprietary Software Enabled Transformation 3. Adding work PseudoWire (Node A) PseudoWire Name: User defined name PseudoWire Group: Selected PW group Tunnel Group: Select the Tunnel on which PW need to be added. InBoundLabel:500 (user defined) OutBoundLabel:501(user defined) Identifier:1 (should be same end-end) PWSM: Enable/Disable Pseudo Wire Work Tunnel Group on which PW will be added Identifier for PW work path
  • 23.
    © Tejas NetworksConfidential and Proprietary Software Enabled Transformation 1.1 Configuring Pseudowire (Node B) Go to Service SwitchPseudo WiresPseudo Wire Groups Click on Provision a new PseudoWireGroup Specify PW Group Name Protection Mode: Unprotected/Protected Protection Switch: Master/Slave (One end point will be Master and other will be Slave) Provisioning PseudoWire Click to create PW Unprotected/Protected Other end will be Slave Available only if PWSM is supported
  • 24.
    © Tejas NetworksConfidential and Proprietary Software Enabled Transformation 2.1. Adding Work Pseudowire (Node B) Click on the created Pseudowire group Click on Create Work Pseudowire to add work path for the Pseudowire Group Pseudo Wire Work Click to Add Work PW
  • 25.
    © Tejas NetworksConfidential and Proprietary Software Enabled Transformation 3.1. Adding work PseudoWire (Node B) PseudoWire Name: User defined name PseudoWire Group: Selected PW group Tunnel Group: Select the Tunnel on which PW need to be added. InBoundLabel:501 (user defined) OutBoundLabel:500(user defined) Identifier:1 (should be same end-end) PWSM: Enable/Disable Pseudo Wire Work Tunnel Group on which PW will be added Identifier for PW work path
  • 26.
    © Tejas NetworksConfidential and Proprietary Software Enabled Transformation 1. Creating MEP on PseudoWire Click on created Pseudowire Group Click on added PseudoWire. Click on Create MEP Provisioning MEP on Pseudo Wire
  • 27.
    © Tejas NetworksConfidential and Proprietary Software Enabled Transformation 2. Provisioning Maintenance Domain Click on Create MaintananceDomain Maintenance Domain Level: 1 to7 (select any one, should be unique across the MEP) MDName Format :Character String MD Name : User defined name Click on Create Provisioning MEP on Pseudo Wire Select from 1-7
  • 28.
    © Tejas NetworksConfidential and Proprietary Software Enabled Transformation Follow the same steps of ‘Provisioning MEP on Tunnel’ to create MEP on PW. After the creating end to end MEP on the work path of the PW, the MEPStatus should display “NoAlarm” Provisioning MEP on Pseudo Wire
  • 29.
    © Tejas NetworksConfidential and Proprietary Software Enabled Transformation Creating Service Go to L2 Service switch Service Provisioning  Eline Service Service Provisioning Service Name UNI Port PW Group VLAN on the ingress of UNI
  • 30.
    © Tejas NetworksConfidential and Proprietary Software Enabled Transformation Tunnel Group (TG1) : A – B Work Path (TG1-Work) A – C – B Protect Path (TG1-Protect) Tunnel Group (TG2) : A – B Work Path (TG2-Work) A – D – B Protect Path (TG2-Protect) Protected Pseudo Wire Service A C D B UNI UNI TG1-Work TG2-Work
  • 31.
    © Tejas NetworksConfidential and Proprietary Software Enabled Transformation Protected Tunnel Groups Work Path Work Path Protect Path Protect Path
  • 32.
    © Tejas NetworksConfidential and Proprietary Software Enabled Transformation 1. Configuring Pseudowire (Node A) Go to Service Switch  Pseudo Wires  Pseudo Wire Groups Click on Provision a new PseudoWireGroup Specify PW Group Name Protection Mode: Unprotected/Protected Protection Switch: Master/Slave (One end point will be Master and other will be Slave) Provisioning PseudoWire Click to create PW Unprotected/Protected Other end will be Master Available only if PWSM is supported
  • 33.
    © Tejas NetworksConfidential and Proprietary Software Enabled Transformation 2. Adding Work Pseudowire (Node A) Click on the created Pseudowire group Click on Create Work Pseudowire to add work path for the Pseudowire Group Pseudo Wire Work Click to Add Work PW Click to Add Work PW
  • 34.
    © Tejas NetworksConfidential and Proprietary Software Enabled Transformation 3. Adding Work PseudoWire (Node A) PseudoWire Name: User defined name PseudoWire Group: Selected PW group Tunnel Group: Select the Tunnel on which PW need to be added. InBoundLabel:500 (user defined) OutBoundLabel:501(user defined) Identifier:5 (should be same end-end) PWSM: Enable/Disable Pseudo Wire Work Tunnel Group 1 on which PW work will be added Identifier for PW work path
  • 35.
    © Tejas NetworksConfidential and Proprietary Software Enabled Transformation 4. Adding Protect PseudoWire (Node A) PseudoWire Name: User defined name PseudoWire Group: Selected PW group Tunnel Group: Select the Tunnel on which PW need to be added. InBoundLabel:600 (user defined) OutBoundLabel:601(user defined) Identifier:6 (should be same end-end) PWSM: Enable/Disable Pseudo Wire Work Tunnel Group 2 on which PW protect will be added Identifier for PW protect path
  • 36.
    © Tejas NetworksConfidential and Proprietary Software Enabled Transformation Follow the previous slides to provision MEP on Pseudo Wire “Provisioning MEP on Pseudo Wire” Provisioning MEP on Pseudo Wire
  • 37.
    © Tejas NetworksConfidential and Proprietary Software Enabled Transformation 1.1. Configuring Pseudowire (Node B) Go to Service SwitchPseudo WiresPseudo Wire Groups Click on Provision a new PseudoWireGroup Specify PW Group Name Protection Mode: Unprotected/Protected Protection Switch: Master/Slave (One end point will be Master and other will be Slave) Provisioning PseudoWire Click to create PW Unprotected/Protected Other end will be Slave Available only if PWSM is supported
  • 38.
    © Tejas NetworksConfidential and Proprietary Software Enabled Transformation 2.1 Adding Work Pseudowire (Node B) Click on the created Pseudowire group Click on Create Work Pseudowire to add work path for the Pseudowire Group Pseudo Wire Work Click to Add Work PW Click to Add Work PW
  • 39.
    © Tejas NetworksConfidential and Proprietary Software Enabled Transformation 3.1 Adding Work PseudoWire (Node B) PseudoWire Name: User defined name PseudoWire Group: Selected PW group Tunnel Group: Select the Tunnel on which PW need to be added. InBoundLabel:501 (user defined) OutBoundLabel:500(user defined) Identifier:5 (should be same end-end) PWSM: Enable/Disable Pseudo Wire Work Tunnel Group 1 on which PW work will be added Identifier for PW work path
  • 40.
    © Tejas NetworksConfidential and Proprietary Software Enabled Transformation 4.1 Adding Protect PseudoWire (Node B) PseudoWire Name: User defined name PseudoWire Group: Selected PW group Tunnel Group: Select the Tunnel on which PW need to be added. InBoundLabel:601 (user defined) OutBoundLabel:600(user defined) Identifier:6 (should be same end-end) PWSM: Enable/Disable Pseudo Wire Work Tunnel Group 2 on which PW protect will be added Identifier for PW protect path Provisioning MEP on Pseudo Wire
  • 41.
    © Tejas NetworksConfidential and Proprietary Software Enabled Transformation Follow the previous slides to provision MEP on Pseudo Wire “Provisioning MEP on Pseudo Wire” Provisioning MEP on Pseudo Wire
  • 42.
    © Tejas NetworksConfidential and Proprietary Software Enabled Transformation Creating Service Go to L2 Service switch Service Provisioning  Eline Service Service Provisioning Service Name UNI Port Protected PW Group VLAN on the ingress of UNI
  • 43.
    © Tejas NetworksConfidential and Proprietary Software Enabled Transformation Thank You