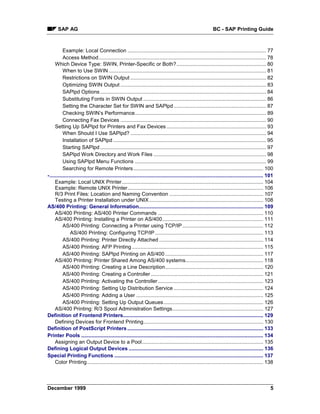
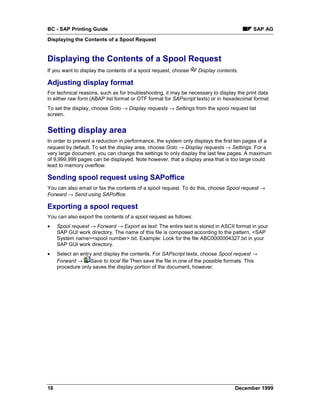
The document describes the SAP printing guide. It outlines the process of printing from a print file to final printout. This involves two parts - first, a device-independent spool request is created containing print data. Second, an output request is created by converting the spool request into a device-specific format like PostScript for the target printer. The guide provides information on managing spool and output requests, frontend printing, problem analysis for missing or incorrect printouts, and configuring printers for use with SAP.

![SAP AG BC - SAP Printing Guide
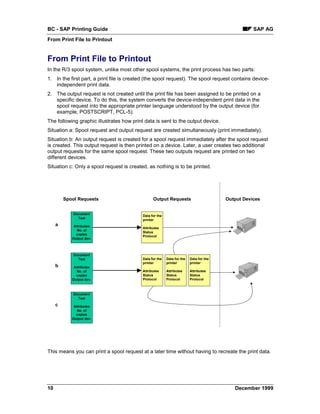
From Print File to Printout
Administer spool requests and output requests using the Output Controller [Page 12] (transaction
SP01).
December 1999 11](https://image.slidesharecdn.com/46bprinting-130417085750-phpapp01/85/46-b-printing-11-320.jpg)
![SAP AG BC - SAP Printing Guide
Selecting Spool and Output Requests
Selecting Spool and Output Requests
To select spool and output requests, use the selection screen of the output controller (Tools →
CCMS → Spool → Output controller). You can switch between the selection screens Spool
requests and Output requests.
You can specify which selection fields you want to display. To select fields, choose Further
selection criteria... Choose from Minimum, Standard, Extended or All or select specific fields to
add to your selection screen.
Users with administration authorizations are offered more selection fields than users who are
only authorized to change their own requests.
Select requests by entering any combination of criteria (for example, a user, a spool request
number, an output device, the date of the requests and so on). If you leave a field blank, the
system displays all possible values.
For more information, such as how to enter value ranges or exclude specific values from the
selection, see Entering Selection Criteria [Ext.].
You want to display all spool requests created between 01.01.1999 and
01.02.1999 for the output device PRINTER1. On the Spool request selection
screen, enter the date range in the Date created field and the name of the output
device in the Output device field. Then choose Execute.
Result
The List of Spool Requests [Page 14] includes the spool requests that match your selection
criteria.
December 1999 13](https://image.slidesharecdn.com/46bprinting-130417085750-phpapp01/85/46-b-printing-13-320.jpg)
![BC - SAP Printing Guide SAP AG
List of Spool Requests
List of Spool Requests
Definition
This displays a list of requests matching the criteria you specified (see Selecting Spool and
Output Requests [Page 13]). This includes details of the individual requests, such as date and
time created, user who created the request, Processing Status [Page 15], number of pages, and
so on.
You can tailor how this list is displayed according to your needs. You can hide or display
columns, sort columns, and create variants. For more information, see ABAP List Viewer [Ext.].
Use
The following functions are available to edit the displayed spool requests:
• Print request [Page 19]
• Display and Change Spool Request Information [Page 17] (for example, number of pages,
or output device)
• Delete request
• Display Contents of Request [Page 16]
• Display Output Requests for a Spool Request [Page 21]
• Forward Contents of Request [Page 16] (send using SAPoffice or export as text)
14 December 1999](https://image.slidesharecdn.com/46bprinting-130417085750-phpapp01/85/46-b-printing-14-320.jpg)
![SAP AG BC - SAP Printing Guide
Displaying and Changing Spool Request Information
Displaying and Changing Spool Request Information
To display the header information for a spool request, select the spool request from the List of
Spool Requests [Page 14] and choose . You can select multiple requests.
You can change the following attributes, among others:
• Output device: If possible, only divert the output to an output device that uses the same
device type as the output device where the request was originally sent. Usually, SAPscript
texts cannot be sent to a printer that has a different device type. For ABAP lists, make sure
the selected format is included in the device type of the output device to which you want to
divert the output of the request.
• Delete date: After the spool request has passed the expiration date, it is marked for deletion.
The request is deleted the next time the spool database is reorganized. For more
information, see Deleting Multiple Spool Requests Simultaneously [Page 27].
To retain a spool request in the database, change the date specified in the Delete date
field. You can also do this past the expiration date as long as the database has not yet
been reorganized.
• Completed, no longer possible to add to: If this field is blank, the spool system
automatically adds additional spool requests that have the same attributes (user, title, output
device, client from which the request was issued, number of copies, priority, cover page
setting, archiving mode, and SAP GUI session number).
For example, if a user repeatedly uses a transaction that generates a spool request, the
spool system combines the requests into a single spool request. This request can then
be handled as a single job for purposes of printing and spool administration.
A request is "completed" and cannot have additional jobs added to it when it has been
sent to the host spooler for printing. No other spool requests can be added to a spool
request you generated with the Print immediately option set or that you sent to the printer
from the output controller.
You can also close a spool request before it is printed by marking this field. The system
creates a separate spool request for subsequent requests that would have been added
to this request.
If you are combining requests, note the following two rules:
• If the expiration dates of combined spool requests are not the same, the spool system uses
the latest date for the entire spool request.
• To print out a "combined" spool request, set the Print immediately option on the last of the
spool requests that is to be added. The spool system adds the last spool request and then
sends the entire "combined" spool request to the output device.
• Delete after printing if no errors: If this field is selected, the spool request, output request,
and print data are deleted automatically after the request has been successfully printed.
The spool system retains spool requests that contain errors. You must manually delete
such requests or allow them to expire and be deleted when the spool database is
reorganized.
The delete option is set in a user's master record and can be changed:
• When a user submits a spool request
December 1999 17](https://image.slidesharecdn.com/46bprinting-130417085750-phpapp01/85/46-b-printing-17-320.jpg)

![BC - SAP Printing Guide SAP AG
List of Output Requests
List of Output Requests
Definition
There are two ways of displaying a list of output requests:
• From the Selection Screen of the Output Controller [Page 13]
• From the list of spool requests: Select the spool requests whose output requests you want to
display and choose Output requests.
Working with the list
You can tailor how the list is displayed according to your needs. You can hide or display
columns, sort columns, and create variants. For more information, see ABAP List Viewer [Ext.].
20 December 1999](https://image.slidesharecdn.com/46bprinting-130417085750-phpapp01/85/46-b-printing-20-320.jpg)
![SAP AG BC - SAP Printing Guide
Status of Output Requests
Status of Output Requests
You can display:
• Output requests for an individual spool request. Choose a request from the display and then
choose Output requests.
• Using the device definition of an output device (in Spool Administration), you can display all
output requests for a particular output device (Choose Output requests).
These displays provide more details about the status of output requests than are available in the
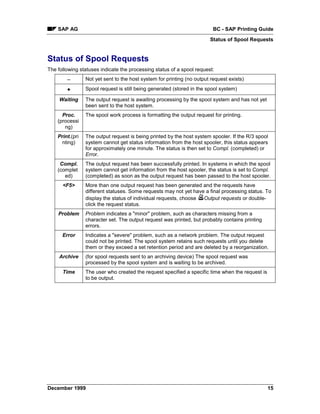
spool request display. The system displays one of the following statuses for requests for which
this information is available:
Waiting The output request is waiting for or is being processed by a spool work process or
spooler.
If this status is displayed for a request for an extended period of time (more than
one minute), then the spool work process that is responsible for the request may
have terminated, or there may be a problem establishing a connection to a
remote output device.
The spool work process automatically reprints the output request affected by the
problem.
Proc. Print data is being processed by the R/3 spool work process or by the host
(processing) spooler.
Print. The request has been passed to the host spooler or to an output device and a
(printing) final status has not yet been returned to the spool system.
Compl. In host systems which the R/3 spool system can query, this means that the
(completed) request has been successfully printed, as reported to the R/3 spool system by the
host system or by the output device.
If the spool system cannot obtain status information from the host system, then
the status of a output request is set to Compl. as soon as the request has been
passed to the host spooler.
Problem A minor error occurred while printing the request.
Error A severe error occurred. The output request could not be printed.
Use the error log to determine the cause of the error. For more information, see
Reading an Error Log [Page 23] .
Scheduled The user who created the request has set a start time for printing the request
(+ Start
time)
If you want to view a log of the events of an output request, double-click the status of
a request.
December 1999 21](https://image.slidesharecdn.com/46bprinting-130417085750-phpapp01/85/46-b-printing-21-320.jpg)

![SAP AG BC - SAP Printing Guide
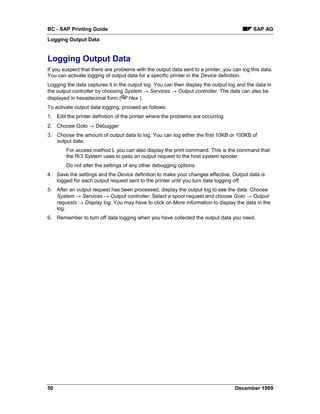
Reading Error Logs
Reading Error Logs
Any errors that occur during the processing of an output request are reported in an error log.
In the output request overview, the icon displays which requests have a log. To call the log,
choose .
The log reports messages from the R/3 spool work process or formatting process and messages
returned from the host spooler, if any. A log also summarizes the attributes of the output request.
The first screen of an error log presents summary information. You can also display more
detailed log information by choosing All info.
That a log exists, does not necessarily mean an error occurred. When defining a
printer, you can specify whether print data should always be logged (for test
purposes, for example). For more information, see Logging Output Data [Page 50].
December 1999 23](https://image.slidesharecdn.com/46bprinting-130417085750-phpapp01/85/46-b-printing-23-320.jpg)
![BC - SAP Printing Guide SAP AG
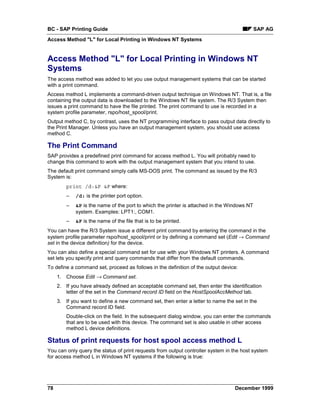
Frontend Printing on Local Printers
Frontend Printing on Local Printers
You want to print from your R/3 System to the same printer you print to from your Windows PC,
Apple Macintosh, or UNIX workstation. You can print to these printers using frontend printing,
even if the printers themselves are not defined in the R/3 spool system.
Before you can use frontend printing in your R/3 System, you must create "generic“ frontend
output devices for the various operating system platforms. For more information, see Definition of
Frontend Printers [Page 129].
Frontend printing only works as long as there is an active connection to the frontend.
This means that frontend printing cannot be used in background processing.
Frontend printing should not be used for production or high-volume printing. For
more information, see Planning Procedure [Page 54].
Setting Up Frontend Printing in the SAP System
Frontend print requests are processed, as for other output methods, by the spool work process.
This may cause conflicts between regular print requests and frontend print requests in your R/3
spool system. Even if you have classified spool servers and output devices according to the type
of output (for example, production printing or mass printing), as we recommend, frontend printing
may still cause server load problems.
The following describes how to configure your system to avoid these problems.
• Set up a spool service on every application server, if possible. Add the profile parameter
rsdisp/wp_no_spo to the instance profile of each server.
• Set the maximum number of spool work processes to be used for frontend printing. The
default setting is a maximum of one spool work process for frontend printing for each server.
If you need to use more work processes for frontend printing, add the profile parameter
rsdisp/wp_no_Fro_max to the instance profile and increase the value for work processes.
• To ensure that your R/3 spool system can process requests as effectively as before, you
should increase the number of spool work processes by at least one, as one of the spool
work processes is always used for frontend printing in the standard system.
Example: In the instance profile of the application server mn1234_YXZ_99, the number
of spool work processes is set to 1 using the profile parameter rsdisp/wp_no_spo.
Increase this number to 2.
• Specify a spool server to be used for all frontend print requests in your R/3 System. To do
this, use the profile parameter rspo/local_print/server. In spool administration (transaction
SPAD), specify an alternate server for this server to ensure printing can continue if the first
server is down.
For information about how to execute frontend printing, click Here [Page 25].
24 December 1999](https://image.slidesharecdn.com/46bprinting-130417085750-phpapp01/85/46-b-printing-24-320.jpg)
![SAP AG BC - SAP Printing Guide
Executing Frontend Printing
Executing Frontend Printing
Use
Using frontend printing, you can print to your local printer from the SAP System, even if this
printer is not directly defined in your SAP System. This is particularly useful for employees that
often log on to the SAP System at several workstations, or those often on the road.
Prerequisites
A frontend output device must be defined as a “representative” for every operating system
platform. For more information, see Defining Frontend Printers [Page 129].
Procedure
1. When you choose Print anywhere in the system, the print parameters screen appears.
− For a Windows PC, in the Output device field, enter the name of the printer your system
administrator defined for frontend printing under Windows. After you confirm your entry,
you can select one of the Windows printers defined on your frontend. Then choose
Print.
− For a Macintosh, in the Output device field, enter the name of the printer your system
administrator defined for frontend printing on Macintosh computers. Then choose
Print.
− For a UNIX workstation, you must know the printer type of the printer you want to use
(whether it is a POSTSCRIPT or a PCL printer). Then choose the printer your system
administrator defined for the corresponding printer type. Then choose Print.
2. On a Windows PC the R/3 System starts the SAPlpd transfer program, if it is not already
running. Your document is sent through SAPlpd to the Windows printer.
On a UNIX workstation or Macintosh, the system outputs the document on the lpd printer.
This printer must already be defined on your UNIX workstation, or in the lpd program on your
Macintosh.
The lp/lpd program must already be running on UNIX and Macintosh systems when you
start frontend printing.
Note the following:
• For frontend printing, a spool request (and possibly an output request) is created as for other
types of R/3 System printing. This means that you can view this frontend spool request,
create additional printouts, and so on, in the output controller (transaction SP01).
• The status of a frontend output request is set to Compl., as soon as the output request is
transferred to the target workstation or PC. The system is therefore only able to log problems
with communication with the PC or workstation in the output request log. Other error
messages are lost.
December 1999 25](https://image.slidesharecdn.com/46bprinting-130417085750-phpapp01/85/46-b-printing-25-320.jpg)
![SAP AG BC - SAP Printing Guide
Deleting Multiple Spool Requests Simultaneously
Deleting Multiple Spool Requests Simultaneously
You can delete several spool requests at once by selecting them in the Output controller.
However, if you want to delete a large number of spool requests, choose Spool → Spool
administration → Administration → Delete old spool requests.
You can delete:
• All spool requests whose expiration date has been reached
• All spool requests older than a certain date
• All requests successfully printed
• All spool requests
When you delete a spool request you delete:
• The spool request itself (the record of the spool request in the spool database)
• The print file
The data in a print file is stored separately from the spool request, in the temporary
sequential object database (TemSe).
• All output requests generated for the spool request.
• Any error logs
Error logs are stored separately from the spool request, in the temporary sequential
object database (TemSe).
Background Deletion
You want to delete old spool requests from the database at regular intervals. Choose Tools →
CCMS → Spool → Spool administration. On the tab page Administr. (administration), choose
Settings. On the tab page Administr., choose Automatically delete old spool requests and specify
an interval at which the old requests are to be deleted.
To change deletion criteria, you can also run report RSPO1041 in the background. This report
also maintains the TemSe database and deletes any spool data that has errors or is superfluous.
For more information about the TemSe database, see Administering the TemSe Database [Page
29].
If you:
• Send faxes and/or telexes using the SAPoffice functions; and
• Use the SAP communication server to send these faxes and telexes,
schedule a second reorganization report to run after RSPO0041. This report is RSKREORG. It
removes orphaned fax and telex messages; messages canceled by the user in the output
controller before they were sent.
December 1999 27](https://image.slidesharecdn.com/46bprinting-130417085750-phpapp01/85/46-b-printing-27-320.jpg)
![SAP AG BC - SAP Printing Guide
Administering the TemSe Database
Administering the TemSe Database
The spool system uses the TemSe (temporary sequential objects) database to store output data.
The TemSe database is also used for storing background processing job logs and other
sequential objects that are temporary in nature (such as application data from FI and HR).
You can display and administer the database objects using the functions provided in Spool →
TemSe contents and Spool → TemSe administration. The TemSe administration function also
lets you administer the character set buffer used by the spool system (though not the buffer used
by SAPscript).
Retaining too many spool requests in the TemSe database may lead to capacity problems in the
database in the SAP System. The best way to avoid space problems is to run the spool system
reorganization report RSPO0041 daily as a background processing job. RSPO0041 deletes old
spool requests according to the criteria that you specify. By deleting such requests, the report
also deletes the corresponding print data in the TemSe database.
You should also ensure, to the maximum extent possible, that users have the Delete after output
option set in their user master records. This is especially important for users who have
authorizations to execute background processing jobs and batch input sessions.
The TemSe functions in Spool → TemSe contents and Spool →=TemSe
administration are intended only for "emergency" use, for example for analyzing print
problems by displaying output data.
Do not delete objects using these functions if you can avoid doing so. Remove old
job logs and spool request output data using the delete functions provided in the
spool and background processing systems. Deleting objects using the TemSe
functions can result in error messages in the system log from the affected
components. For example, the background processing system registers missing job
logs in the system log.
For more information about spool delete functions, see Deleting Multiple Spool Requests
Simultaneously [Page 27].
December 1999 29](https://image.slidesharecdn.com/46bprinting-130417085750-phpapp01/85/46-b-printing-29-320.jpg)
![BC - SAP Printing Guide SAP AG
Problem Analysis: Print-Out Missing or Incorrect
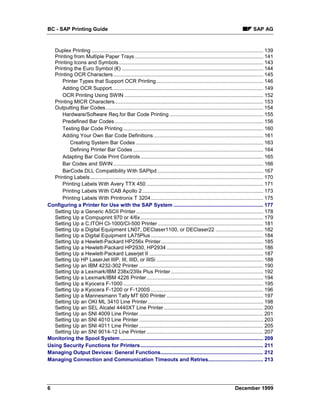
Problem Analysis: Print-Out Missing or Incorrect
The following describes the procedure that we recommend for analyzing printing problems. This
includes:
• The decisions that you must make at each step in the procedure
• The actions that you should take to correct a problem.
Identifying the problem and finding the correct analysis procedure
Question 1:
Was the output request printed?
Yes No
Question 2: Question 3:
Printed with slight errors Was a spool request actually
(e.g. missing characters) or is the generated?
output a mess (severe errors)?
Minor Severe Yes No
Goto: Goto: Goto: Goto:
Correcting Correcting Why has Analyze
minor output severe output request not Spool Dump
problems problems been in ABAP
processed?
Problem Analysis 1: Output Request Printed? [Page 32]
Problem Analysis 2: Minor or Severe Printing Errors? [Page 33]
Problem Analysis 3: Spool Request Generated? [Page 37]
30 December 1999](https://image.slidesharecdn.com/46bprinting-130417085750-phpapp01/85/46-b-printing-30-320.jpg)

![BC - SAP Printing Guide SAP AG
Problem Analysis 1: Output Request Printed?
Problem Analysis 1: Output Request Printed?
Question 1: Has the output request been printed?
In addition to physically checking whether output has appeared, you can use the spool output
controller to check on the status of a job.
Do the following:
1. Choose Tools → CCMS → Spool → Output controller.
2. Enter all available information that you have on the spool request in the selection screen.
3. If the spool request has the status:
-- (no status), then the spool request has not yet been sent to the printer. Print it to see if
it is output normally.
Process, then the job is still being formatted and/or transmitted to the host system
spooler. You can wait to see if processing finishes normally. Or you can go to analysis
procedure Determining Why Output Request Was Not Processed [Page 38] to check
whether processing is proceeding normally.
Waiting or Compl. and still has not appeared at the printer, you can go directly to the
analysis procedure Determining Why Output Request Was Not Processed [Page 38].
If the status is Compl., also check the request information. Select the spool request and
choose on the Output information tab page. This screen shows the status of
completed output requests. If Processed but not printed is marked, then this confirms
that the output request has not been printed. Go to the error analysis procedure shown
above.
32 December 1999](https://image.slidesharecdn.com/46bprinting-130417085750-phpapp01/85/46-b-printing-32-320.jpg)
![SAP AG BC - SAP Printing Guide
Problem Analysis 2: Minor/Severe Output Problems?
Problem Analysis 2: Minor/Severe Output Problems?
Question 2: The output request has been printed, but it contains errors. Are these minor
or severe printing problems?
It is important to distinguish between minor and major problems with the appearance of output
that has actually been printed.
A minor problem has occurred when the print out is legible and generally correct. However,
there are problems with individual characters, with alignment of text and graphic elements, and
the like. Go to the analysis procedure Correcting Minor Output Problems [Page 34].
A severe problem has occurred when a print request has been printed but is not readable.
Examples: the output is in the incorrect character set (for example, Dingbats) and is not readable;
line breaks and formatting are incorrect. See Correcting Severe Output Problems [Page 35]
December 1999 33](https://image.slidesharecdn.com/46bprinting-130417085750-phpapp01/85/46-b-printing-33-320.jpg)
![SAP AG BC - SAP Printing Guide
Correcting Severe Output Problems
Correcting Severe Output Problems
A severe output problem means your output device printed something, but the result is illegible.
The wrong character set may have been used (for example, Dingbats was printed instead of
alphanumeric characters). Line breaks, page breaks, or the text layout may be incorrect.
Uninterpreted printer command language statements may have been printed. Or the printer may
print blank pages.
If a severe problem occurs, check for the following settings:
• Was the correct device type specified in the output device definition?
Choose Tools → CCMS → Spool → Spool administration. On the Devices / servers tab
page, enter the name of the output device in the Output devices field.
The device definition for a Kyocera printer incorrectly specifies device type HPLJIIID
(which is for a Hewlett-Packard LaserJet printer).
• Does the emulation specified at the printer match the emulation specified in the device
definition?
Many printers support multiple emulations; these printers are able to understand multiple
printer languages. Emulations are switched either by an incoming print job or by way of
the printer control panel. Example: a correctly-configured Hewlett-Packard LaserJet 4M
printer can be switched between PostScript and PCL-5 emulations.
Do the following:
1. Check the emulation at the printer as well as in the R/3 System. You may be able to use the
printer control panel to determine the emulation that is active at the printer. Or you may need
to print a test sheet to see what the emulation setting is.
2. Once you have determined which emulation is active at the printer, check whether the
emulation in the defined device type is the same.
Choose Tools → CCMS → Spool → Spool administration. On the Devices / servers
tab page, enter the name of the output device in the Output devices field. Then
choose Device types.
3. If the emulations do not match, try to determine why. Is the default emulation at the printer
set incorrectly? Can the printer default be changed without causing problems for other output
requests? Did output requests from other users change the emulation at the printer?
If the printer default cannot be changed, can you change the R/3 output device
definition to match the printer default?
You can specify that the R/3 System sets the printer to the correct emulation at the
start of each output request. To do this, copy the R/3 device type. Then, in the INIT
(printer initialization) action, enter the required print command to switch the
emulation. Look in your printer manual for the command to enter. The R/3 System
automatically restores the default emulation at the end of a print request.
For more information, see Editing Device Type Formats [Page 264].
December 1999 35](https://image.slidesharecdn.com/46bprinting-130417085750-phpapp01/85/46-b-printing-35-320.jpg)
![BC - SAP Printing Guide SAP AG
Correcting Severe Output Problems
You specify that your Hewlett-Packard printer starts in PCL-4 emulation mode
(Hewlett-Packard LaserJet printer command language). However, the printer
definition in the R/3 System specifies the device type POSTSCPT for the printer.
This results in the following: The R/3 System sends PostScript code to a printer that
is expecting commands in the PCL-4 language.
You can solve the problem in any of the following ways:
• Change the default emulation setting at the printer so that it starts in the correct emulation
mode.
• Specify a compatible device type in the R/3 device definition.
• Edit the R/3 device type format so that the printer automatically switches to the correct
emulation at the start of an R/3 print request.
• Is the correct character set specified in the WIN.INI file (WinCharSet parameter) for the
Windows printer with device type SWIN (SAPWIN)?
Using the WinCharSet parameter, you can specify the character set and font to be used
with SWIN (device type) printers. Generally, the WinCharSet parameter should not be
included in the WIN.INI file or, if included, it should be set to 0.
If all SWIN output requests are printed using the wrong character set (Dingbats, for
example), check the WIN.INI file. If the parameter WinCharSet is included, remove it
from the file.
For more information, see Setting the Character Set for SWIN and SAPlpd [Page 87].
36 December 1999](https://image.slidesharecdn.com/46bprinting-130417085750-phpapp01/85/46-b-printing-36-320.jpg)
![SAP AG BC - SAP Printing Guide
Problem Analysis 3: Spool Request Generated?
Problem Analysis 3: Spool Request Generated?
Question 3:
If your output request has not yet been printed, then you must first find out whether a spool
request was generated.
Do the following:
1. Choose Tools → CCMS → Spool → Output controller.
2. Enter all available information that you have on the spool request in the selection screen.
Especially useful: enter the name of the user who generated the spool request and R/3
printer name (Output device).
3. If you find the spool request, then go to the analysis procedure Determining Why an Output
Request Has Not Been Processed [Page 38].
4. If you do not find a spool request, then go to the analysis procedure No Spool Request
Generated: Analyzing a Spool Dump [Page 39].
The spool request you are looking for may also have been deleted if it was
processed to completion by the spool system and the user had the Delete after
printing option set.
If you do not find an ABAP dump from the spool system, then this situation has
probably occurred. You should then have the user print again with the Delete after
printing option not set.
December 1999 37](https://image.slidesharecdn.com/46bprinting-130417085750-phpapp01/85/46-b-printing-37-320.jpg)
![BC - SAP Printing Guide SAP AG
Determining Why Output Request Was Not Processed
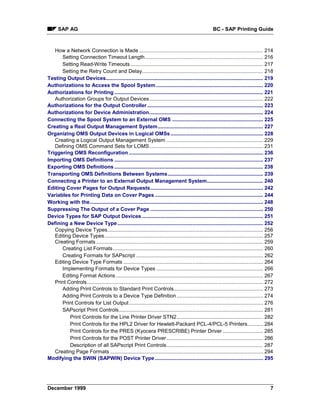
Determining Why Output Request Was Not Processed
Troubleshooting when no output appears at the printer
Question 4:
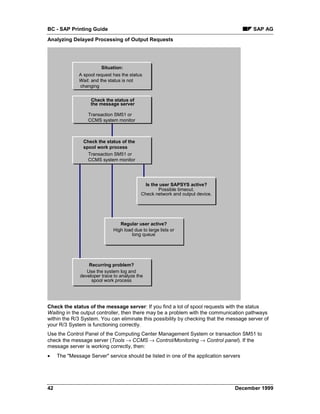
What is the status of the spool request
In the SAP spool Output controller?
Wait No Status Error/Compl.
See: See: See:
Analyzing Status -- No
delayed Spool request not output --
processing sent to output trouble-
device shooting
Problem Analysis 4: Status of a Spool Request? [Page 40]
Analyzing Delayed Processing of Output Requests [Page 41]
Analyzing "Missing-Output" Problems [Page 46]
38 December 1999](https://image.slidesharecdn.com/46bprinting-130417085750-phpapp01/85/46-b-printing-38-320.jpg)
![SAP AG BC - SAP Printing Guide
No Spool Request Generated: Analyzing a Spool Dump
No Spool Request Generated: Analyzing a Spool Dump
If the spool system is unable to generate a spool request when a user selects Print, then the
spool program logic terminates the program. All the details about the abnormal termination are
recorded in an ABAP short dump.
To analyze the abnormal termination or to prepare information for the R/3 hotline, choose Tools
→ ABAP Workbench → Test → Dump analysis [Ext.]. The short dump includes the name of the
affected user, the time and date, and a description of the error.
December 1999 39](https://image.slidesharecdn.com/46bprinting-130417085750-phpapp01/85/46-b-printing-39-320.jpg)
![BC - SAP Printing Guide SAP AG
Problem Analysis 4: Status of a Spool Request?
Problem Analysis 4: Status of a Spool Request?
The first step in finding out what has happened to a spool request that was not printed out is to
check on the status of the spool request and any print requests associated with it.
To check the status of the spool request, choose Tools → CCMS → Spool → Output controller.
Enter as much information about the spool request as you have and display the request.
You will see one of the following statuses for the spool request:
• (no status): The spool request has not yet been sent to a printer. Use the Print function to
print out the spool request.
A spool request is sent to a printer automatically only if a user has the Print immediately
option marked when he or she requests a print. Otherwise, the spool request waits in the
spool until it is explicitly sent to the printer or deleted.
• Wait: The spool request has been sent to a printer, but it has not yet been processed.
Generally, an output request should be processed and sent on by the spool system within at
most a couple of seconds.
When a spool request is sent to a printer, then the spool system formats the output data
for the printer. It then passes the resulting output request to a host spool system or print
manager for output.
In this case, the output request is still waiting in the R/3 spool system and has not yet
been passed on to a host spool system and output device.
See Analyzing Delayed Processing of Output Requests [Page 41].
• Complete or Problem: The spool request has been sent to a printer and has been
processed by the R/3 spool system.
If no output appears at the printer, then see Analyzing "Missing-Output" Problems [Page
46].
• <F5>: The spool request has been sent to a printer more than once. The resulting output
requests have different statuses.
• Time: The owner of the request set a specific time for printing the document.
Press the F5 key or Output requests to display the statuses of the output requests. Use
the statuses of the requests to decide how to analyze the error. Example: If you see the
statuses Waiting and Problem, you should go to Analyzing "Missing-Output" Problems
[Page 46] to determine what happened to the output request.
40 December 1999](https://image.slidesharecdn.com/46bprinting-130417085750-phpapp01/85/46-b-printing-40-320.jpg)
![SAP AG BC - SAP Printing Guide
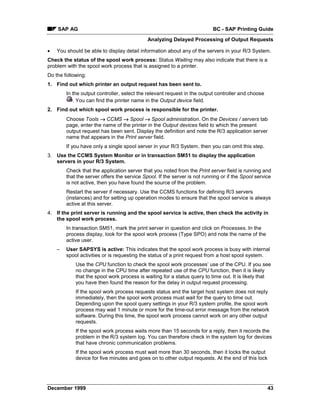
Analyzing Delayed Processing of Output Requests
You may also sometimes notice that the spool work process is working on the
RSPOWP00 program. This indicates that the work process is busy with internal
spool processing. You should not interrupt processing of this program.
5. If you are having frequent problems with delayed processing of spool requests and/or
spool work processes waiting for communications time-outs, then you may want to run your
spool work processes with the R/3 developer trace switched on.
You can switch on the developer trace by adding the TRACE option to the command line
with which an R/3 application server is started. These command lines are held in R/3
start-up profiles. You can also start the developer trace by setting the rdisp/TRACE
option in the system profile. For more information, see "Using Developer Traces" in the
System Services [Ext.] guide and the profile maintenance sections in the Computing
Center Management Guide.
The information in the developer traces is highly technical. However, the trace
information should let you or a consultant at least identify the host system and printer
that are causing problems.
December 1999 45](https://image.slidesharecdn.com/46bprinting-130417085750-phpapp01/85/46-b-printing-45-320.jpg)
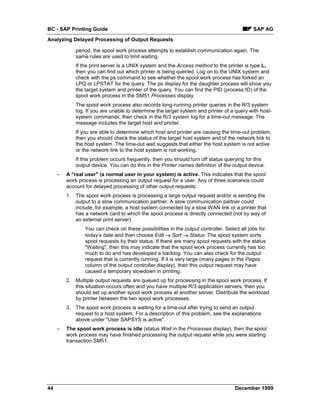
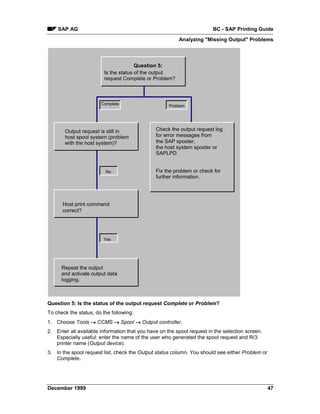
![BC - SAP Printing Guide SAP AG
Analyzing "Missing Output" Problems
Analyzing "Missing Output" Problems
If the status of a spool request has been set to Compl. or Problem but no output is printed, then:
• The R/3 spool system finished processing the spool request and is working normally
• A problem with the data in the spool request, with the printer definition in the R/3 System, or
with the host system spooler or printer prevented any output from appearing. You can log
output data to help you analyze the problem. For information about activating this logging,
see Logging Print Output Data [Page 50].
The following graphic provides an overview of the problem analysis procedure.
Analyzing "missing-output" problems
46 December 1999](https://image.slidesharecdn.com/46bprinting-130417085750-phpapp01/85/46-b-printing-46-320.jpg)
![BC - SAP Printing Guide SAP AG
Analyzing "Missing Output" Problems
If you see <F5>, then there are multiple output requests with varying statuses. Press
Output requests to display the status information.
Output request status Complete:
If the output request has the status Problem, then you can do the following to analyze the
problem:
1. Check to see if the output request is in your host system spooler or print manager. If
the output request is there, then it is likely that the printing problem is somewhere in the host
system. Check the status of the print request in the host spooler for possible information. You
should also check the printer and the local or remote connection from the host to the printer.
After you have found and corrected the problem, print the spool request again.
2. If you did not find the output request in the host system spooler, then check that the
print command you are using is correct.
In UNIX systems, you can find this command in the system profile of an application
server. Choose Tools → CCMS → Configuration → Profile maintenance. Find the profile
used by the application server from which the unprinted output request was sent. Then
use Extended maintenance to check the value of the rspo/host_spool/print parameter.
You may find this parameter set globally for your R/3 System in the DEFAULT.PFL
default profile.
For help in interpreting the variables in the parameter value, see Setting Spool System
Parameters [Page 327].
Once you have found the command, try it out directly at the host system command line. If
you are not able to print successfully using the command, check your host system
documentation to find out what is incorrect in the command. When you have corrected
the command in the R/3 system profile and have restarted the system, you should be
able to print output requests successfully.
If you can, try to use the command to print the host system file generated by the R/3
spool system. The R/3 spool system passes this file to the host spool system or print
manager for printing. For help in finding print files in UNIX systems, see Spool Data
Storage Location [Page 330]. For help in finding print files in Windows and Windows for
Workgroups systems, see Setting Up SAPlpd for Printers and Fax Machines [Page 93].
No print file is created on Windows NT systems where you have specified Access
method C for the connection between the R/3 spool work process and the NT print
manager.
3. If the host print command is correct, then you should collect additional information
about the output request that could not be printed. You can use this information to
identify problems with the output data itself. For information about activating this logging, see
Logging Print Output Data [Page 50].
If you are using the SAPlpd transfer program on a Windows or Windows NT PC, then
you should also try stopping and restarting the program. For information about analyzing
problems in SAPlpd, see Setting Up SAPlpd for Printers and Fax Devices [Page 93].
Possible problems in the output data can include:
– Problems in the printer command language in the output data. If you have
modified the device type formatting, make sure any printer commands you
have added or altered are correct.
48 December 1999](https://image.slidesharecdn.com/46bprinting-130417085750-phpapp01/85/46-b-printing-48-320.jpg)
![SAP AG BC - SAP Printing Guide
Analyzing "Missing Output" Problems
– Incorrect emulation activated at the printer. Example: The output request is
formatted for PostScript, but the printer is set to LaserJet emulation.
Output request status is Problem:
If the output request has the status Problem, then you can do the following to analyze the
problem:
1. Start the Output controller and display the spool request that has an error.
Choose the Output requests function to display the output requests generated from the
spool request. Mark the most recent "problem" output request and choose the error log
function.
The log may contain errors issued from the following sources:
– The spool work process. If you see messages about severe errors, then the data in the
spool request may be corrupt or incorrect. Corrupt or incorrect data can be caused by a
problem in your host system or database system or by an incorrectly programmed ABAP
report.
– The SAPlpd transfer program. If the printer is attached to a Windows, Windows for
Workgroups, or Windows NT PC and you are using the SAPlpd program to pass data to
the Windows Print Manager, you may find error messages from SAPlpd in the log.
– The host spool system or print manager. If querying of the host spool system or print
manager is activated, then you may see error messages from the host spooler. If you are
using SAPlpd on a Windows PC, SAPlpd passes error messages from the Windows print
manager back to the R/3 spool system for inclusion in the output request log.
If you find error messages and can correct the problems, you should then be able to print
successfully.
2. If you cannot isolate and resolve the printing problem on the basis of the output request log,
repeat the print request with logging of output data switched on. For information about
activating this logging, see Logging Output Data [Page 50].
You can also use the ABAP debugging and trace functions to analyze how the output
request was processed.
December 1999 49](https://image.slidesharecdn.com/46bprinting-130417085750-phpapp01/85/46-b-printing-49-320.jpg)
![SAP AG BC - SAP Printing Guide
Output Devices in the SAP Spool System
Output Devices in the SAP Spool System
Definition
The SAP System manages its own output devices. This includes mostly printers, but also fax and
archiving devices. In order for you to use output devices defined in your operating system from
the SAP System, you must define these devices in the SAP spool system.
Use
Before you start defining your output devices, you should plan the architecture of your SAP spool
system. See Planning Your SAP Printing Architecture [Page 52] and other sections for
information about:
• Which strategy we recommend to optimize your printing architecture
• Which methods the SAP spool system offers for setting up your printers and fax machines
Defining output devices
After you have planned your SAP spool system, go to the following sections to learn how to:
• Connect Output Devices to a Windows System [Page 69]
• Connect UNIX Printers to the R/3 System [Page 101]
• Connecting AS/400 Printers [Page 109]
• Defining Devices for Frontend Printing [Page 129]
• Use Special Printing Functions [Page 137] (for example, barcode and OCR printing).
December 1999 51](https://image.slidesharecdn.com/46bprinting-130417085750-phpapp01/85/46-b-printing-51-320.jpg)
![BC - SAP Printing Guide SAP AG
Planning Your SAP Printing Architecture
Planning Your SAP Printing Architecture
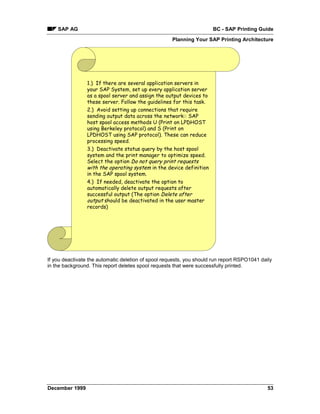
This section explains the guidelines that you should follow as you plan and implement the print
output configuration of your SAP System.
Plan your printing architecture very carefully, particularly if the following printing tasks will be
required in your R/3 System:
• Printing of time-critical documents, such as shipping documents. The shipping documents
must always be available on time to the employees in your shipping department when
needed.
• High-volume printing. Your enterprise prints a large number of print requests, such as long
lists and/or the total number of print requests is very high.
General Guidelines: Optimizing Printing
The following general guidelines will help you to optimize printing in your R/3 System. Planning
[Page 54] includes a description of how you determine your printing requirements and plan the
correct printing architecture.
52 December 1999](https://image.slidesharecdn.com/46bprinting-130417085750-phpapp01/85/46-b-printing-52-320.jpg)
![BC - SAP Printing Guide SAP AG
Planning the SAP Printing Architecture
Planning the SAP Printing Architecture
1. Identify critical printing requirements:
• Determine which users in your R/3 System have time-critical printing requirements, such as
shipping departments
• Identify users who regularly need to print long documents, such as long lists from ABAP
reports (for cost center reports, for example).
• Estimate the total volume of output requests your R/3 System will generate.
2. Based on your printing requirements, identify the critical printers in your company.
Critical printers can be printers that are used for time-critical printing, for example.
Evaluate whether your existing printers can meet your estimated printing requirements
and/or plan the acquisition of new equipment.
Consider whether a faster line printer might be able to speed up printing of long lists yet
provide the print quality you require. Think about whether a central printing shop might
be more cost-effective than small line printers in each department.
Your hardware supplier, SAP consultant, and/or the SAP Competence Centers can help
you select the printers that best meet your requirements.
3. Assign your printers to one of the following three groups:
• Time-critical printers, such as those that print shipping labels.
• High-volume printers that must print large documents, such as long lists.
• Non-critical printers, those that do not have to meet any special printing requirements, such
as small laser printers for light-duty printing in individual departments.
4. If you have defined three or more Spool servers [Page 316] in your R/3 System, then assign
each group of printers to one or more of your spool servers.
No spool server should serve more than one group of printers. Example: A spool server
for printers in the time-critical group should serve only printers from this group.
You can assign a printer to a particular spool server in the Output device definition in the
R/3 spool system (Tools → Administration → Spool → Spool administration).
Assign printer groups to spool servers according to these guidelines:
• Time-critical printers should generally be set up for R/3 "local printing". That is, the printers
should be defined in the R/3 spool system with access method E (OMS printing), access
method C (direct operating system call – Windows NT systems) or access method L (print
locally via LP/LPR – Windows NT and UNIX systems).
This means that you should only print to time–critical printers from host systems
(UNIX or Windows NT computers) that also have R/3 spool servers.
Avoid connecting time–critical printers with the "remote printing" access methods.
These are access methods U (Print on LPDHOST via Berkeley protocol) and S (Print
on LPDHOST via R/3 protocol). These "remote printing" access methods are
generally slower than R/3 "local" printing. The only exception to this guideline is
when the host system meets the high reliability and high throughput requirements
described in Implementing R/3 “Remote Printing“ [Page 64]. A UNIX workstation
within a reliable LAN network generally meets these requirements. Printers accessed
54 December 1999](https://image.slidesharecdn.com/46bprinting-130417085750-phpapp01/85/46-b-printing-54-320.jpg)
![SAP AG BC - SAP Printing Guide
Planning the SAP Printing Architecture
from this workstation would be defined with access method U in the R/3 spool
system.
Note: Problems with a printer defined with access method U or S tend to reduce
performance for other printers serviced by the same spool server. Example: Assume
a U or S printer cannot be accessed because its host system is not running or the
network link to the host is down. When the spool server attempts to send an output
request to the printer, it must wait for network time-outs to cancel the communication
attempt before it can process other output requests.
With Release 4.0, you can reduce this problem by defining multiple spool work
processes on your servers.
• High–volume printers can use any of the R/3 access methods. A high-volume printer can
be accessed by the designated R/3 spool server "locally", "remotely", or as a PC printer.
High-volume printers should be serviced by their own spool server so that processing
of long lists does not affect other output requests.
• Non-critical printers can use any of the R/3 access methods. A non-critical printer can be
accessed by the designated R/3 spool server "locally", "remotely", or as a PC printer.
Non-critical printers should be serviced by their own spool server so that they do not
affect and are not affected by other print requests. If non-critical and high-volume
printers are serviced by the same spool server, then large output requests may
cause delays in processing smaller requests for office users printing on non-critical
printers.
Non-critical printers should never be serviced by a spool server that services time-
critical printers. Non-critical output requests may block the processing of time-critical
output requests. If a non-critical printer that uses access method U or S cannot be
accessed, time-critical printing may be seriously delayed.
5. When you have completed your print configuration planning, you can set up the printers in
your R/3 spool system.
The following topics provide explanations and examples of each of the printer access
methods the R/3 spool system supports:
• Implementing R/3 Local Printing [Page 61]
• Implementing R/3 Remote Printing [Page 64]
• Implementing R/3 “PC Printing” [Page 57]
For details about setting up printers, see:
• Connecting Output Devices to a Windows System [Page 69]
• Connecting UNIX Printers to the R/3 System [Page 101]
• AS/400 Printing: Installing a Printer on AS/400 [Page 111]
• Defining Devices for Frontend Printing [Page 129]
• Managing Output Devices: General Functions [Page 212]
December 1999 55](https://image.slidesharecdn.com/46bprinting-130417085750-phpapp01/85/46-b-printing-55-320.jpg)

![SAP AG BC - SAP Printing Guide
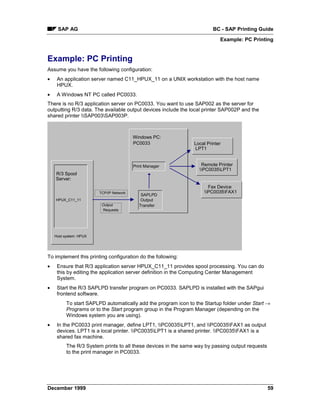
Implementing PC Printing in the R/3 System
Implementing PC Printing in the R/3 System
Local printing as described in Implementing R/3 Local Printing [Page 61] is not possible with
most printers connected to Windows and IBM OS/2 PC’s and Apple Macintosh computers.
Only Windows NT, of available Windows systems, can support the R/3 application server with
spool work process required for local printing. R/3 application servers also cannot run on IBM
OS/2 PCs and Apple Macintosh computers.
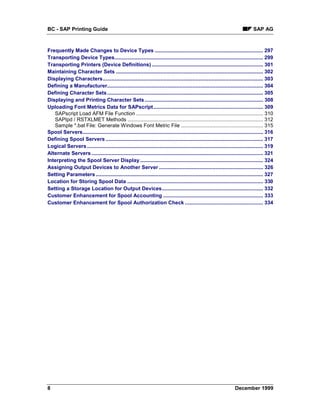
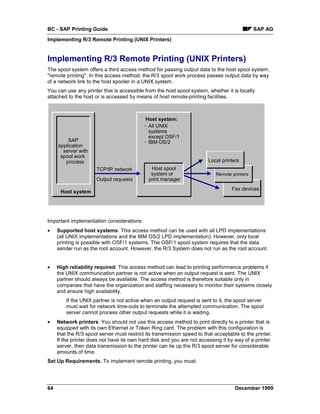
SAP therefore provides its own remote-printing solution for printing from Windows PCs. This
solution uses the R/3 SAPlpd program to transfer output requests from the R/3 spool server to
the Windows print manager. SAPlpd can run on all systems.
Windows PC
Local printers
Print manager Remote
printers
SAP
application Fax devices
server with
spool work TCP/IP network SAPLPD
process output
Output transfer
requests
Host system
Prerequisites: To implement remote printing on Windows PCs, do the following:
• Install and start the SAPlpd program on a Windows PC. SAPlpd is installed with the SAP GUI
frontend software.
• In the Windows print manager, define the printers and fax devices you want to use. You can
use both local as well as shared devices.
• In each printer definition in the R/3 spool system, specify the host system on which the spool
server is running as the Spool server for the output device.
For Access method, select S (Print on LPDHOST via R/3 protocol) or U (Print on
LPDHOST via Berkeley protocol).
For an example, see Example: PC Printing [Page 59]
For more information:
• Setting up a printer under Windows: Connecting Output Devices to a Windows System [Page
69]
• Setting up fax devices under Windows: Connecting Fax Devices [Page 90]
December 1999 57](https://image.slidesharecdn.com/46bprinting-130417085750-phpapp01/85/46-b-printing-57-320.jpg)
![BC - SAP Printing Guide SAP AG
Implementing PC Printing in the R/3 System
• Setting Up SAPlpd for Printers and Fax Devices [Page 93]
• Managing Output Devices: General Functions [Page 212]
58 December 1999](https://image.slidesharecdn.com/46bprinting-130417085750-phpapp01/85/46-b-printing-58-320.jpg)
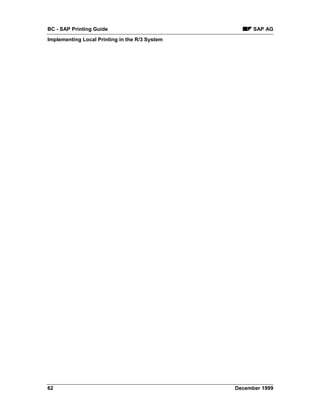
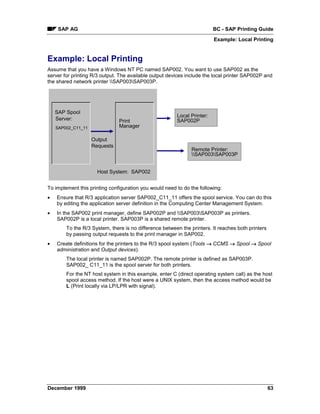
![SAP AG BC - SAP Printing Guide
Implementing Local Printing in the R/3 System
Implementing Local Printing in the R/3 System
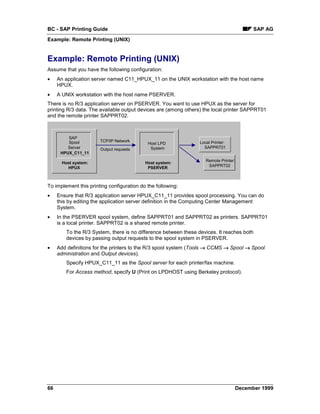
The most reliable and often the fastest method to transfer data from the R/3 spool system to the
host spool system is "local printing". In this connection type, the R/3 spool server passes output
requests to the host spool system in the same host. The spool server can then print on any local
or remote printer defined in the host spool system.
SAP Host Spool
Application System Local Devices
Server with
Spool Work
Process Output
Requests
Remote Devices
Host System
Set Up Requirements: To implement local printing, you must do the following:
• Run an R/3 spool server [Ext.] on a host system from which you can conveniently drive your
printers. You can set up as many spool servers (application servers that offer the spool
service) in your R/3 System as you want.
Define connections in the spool system or print manager of the host to each of the
printers that the R/3 spool server is to use.
• In each printer definition in the R/3 spool system, fill in the Spool server field with the name of
the host system where the spool server is running.
For Access method, specify L for a UNIX host, C for a Microsoft Windows NT host.
For an example, see Example: Local Printing [Page 63].
For more information, see:
• Setting up a printer under Windows: Connecting a Printer or Fax to a Microsoft Windows
System [Page 69]
• Setting up a fax machine under Windows: Connecting Fax Devices [Page 90]
• Connecting UNIX Printers to the R/3 System [Page 101]
• AS/400 Printing: Installing a Printer on AS/400 [Page 111]
• Managing Output Devices: General Functions [Page 212].
December 1999 61](https://image.slidesharecdn.com/46bprinting-130417085750-phpapp01/85/46-b-printing-61-320.jpg)
![SAP AG BC - SAP Printing Guide
Implementing R/3 Remote Printing (UNIX Printers)
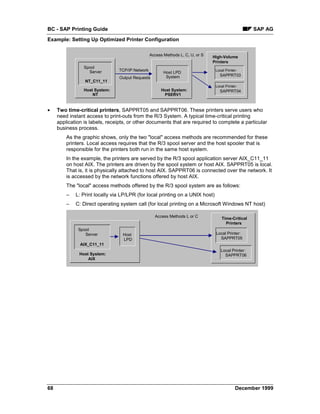
• Set up the printers on host systems meeting the high reliability requirements of this access
method. (See the preceding notes.)
• Run an R/3 application server with the spool service on a host system of your choice. You
can set up as many spool servers (application servers that offer the spool service) in your
R/3 System as you want.
• In each printer definition in the R/3 spool system, specify the host system in which the spool
server is running as the Spool server of the printer.
For the Access method, specify U (Print on LPDHOST via Berkeley protocol).
For an example, see Example: Remote Printing (UNIX) [Page 66]
More information:
• Connecting UNIX Printers [Page 101]
• Managing Output Devices: General Functions [Page 212]
December 1999 65](https://image.slidesharecdn.com/46bprinting-130417085750-phpapp01/85/46-b-printing-65-320.jpg)

![SAP AG BC - SAP Printing Guide
Example: Setting Up Optimized Printer Configuration
Connecting Output Devices to a Windows System
Which Type of Connection?
You can connect an output device (PC printer or fax machine) locally or remotely to the R/3
System. Answer the questions below to decide which procedure to use.
• Local connection: Is the printer accessible from a Windows NT Server on which an R/3
spool application server is running?
In this case, you can create a local connection to the printer. In each case, the Windows
NT Print Manager will take care of R/3 print requests.
Usually, you want to make a local connection to the printer. This is the fastest and most
reliable type of connection.
Creating a Local Connection to a Windows NT Printer [Page 74]
• Remote or PC connection: Is the printer to be run by the Print Manager at a normal
workplace PC or at a printer server PC (no R/3 application server is running on the PC)?
In this case, you can make a remote or "PC" connection to the printer.
Remote or "PC" Connections to a Windows Printer [Page 70]
For help with planning your print and fax output system, also see Planning and Implementing
Your R/3 Printing Architecture [Page 52].
December 1999 69](https://image.slidesharecdn.com/46bprinting-130417085750-phpapp01/85/46-b-printing-69-320.jpg)
![BC - SAP Printing Guide SAP AG
PC Connections to a Windows Printer
PC Connections to a Windows Printer
The standard connection to a PC printer is a remote or "PC" connection. This connection is for
PCs that do not have an R/3 spool application server running on them.
In a PC connection, the R/3 System passes print data to the transfer program running on the PC.
This program, SAPlpd, passes the data on to the Windows Print Manager for printing.
For information about how to set up a PC connection to a Windows printer, click here [Page 71].
See also:
Deciding Whether to Use SWIN, the Printer-Specific Device Type, or Both [Page 80]
Checking SWIN's Performance [Page 89]
Setting Up the SAPlpd Transfer Program for Printers and Fax Machines [Page 93]
For additional background information, see Implementing R/3 PC Printing [Page 57].
70 December 1999](https://image.slidesharecdn.com/46bprinting-130417085750-phpapp01/85/46-b-printing-70-320.jpg)
![SAP AG BC - SAP Printing Guide
Connecting a PC to a Windows Printer
Connecting a PC to a Windows Printer
Prerequisites
1. Can you already print on the printer from your PC? If not, install the printer on your
Windows PC. You can find details about this in your Windows documentation.
You must be able to print on the printer from your PC before you can use it from the R/3
System.
2. Is the SAPlpd transfer program running on your Windows PC? This program
transfers print output from the R/3 System to the Windows output controller.
For more information about SAPlpd and its options, see Setting Up SAPlpd for Printers
and Fax Devices [Page 93].
Procedure
1. Define the printer in the R/3 System.
Choose Tools → CCMS → Spool → Spool administration and then choose Output
devices on the Devices / servers tab. Choose Change and then Create to create a
new device definition. If you want to copy the definition of an output device, select an
output device from the list of output devices and choose Create with reference.
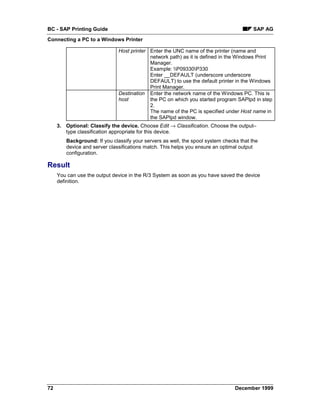
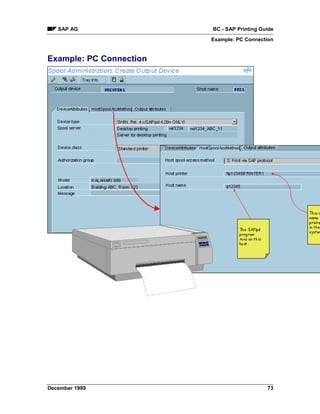
2. Fill out the device definition screen.
The graphic [Page 73] shows an example of a remote PC connection. The following table
will help you fill out the individual fields correctly.
Field Value
DeviceAttributes Device Enter the device type defined in the R/3 System for
tab type your printer model.
For printing under Windows, use the generic SWIN
Device Type [Page 80]. This lets you use any device
supported by Windows, even if the device type is not
defined in R/3.
For a list of the device types delivered with R/3, see
SAPNet Note 8928.
Spool Select the name of the R/3 spool server [Page 316]
server to use for processing output for this device..
Authorizati To assign the output device to an authorization
on group group, enter the name here. For more information,
see Authorization Groups for Output Devices [Page
222].
HostSpoolAccMeth Access Enter S for printing under Windows using the
od tab method generic SWIN device type
Even though access method U is also supported for
PC printing, access method S provides more
possibilities (such as reporting of error messages).
December 1999 71](https://image.slidesharecdn.com/46bprinting-130417085750-phpapp01/85/46-b-printing-71-320.jpg)
![BC - SAP Printing Guide SAP AG
Local Connection to a Windows NT Printer
Local Connection to a Windows NT Printer
A printer is local when the R/3 spool server can pass output requests to the Windows spool
system directly without having to send the data across a network. That is, the R/3 spool server is
running on the Windows PC to which the printer is attached.
Prerequisite: An R/3 application server that offers the spool service must be running on the
Windows NT system.
If you want to set up a local printer in a Windows NT system, see Creating Local Connections to
a Windows NT Printer [Page 75].
Local printing is the fastest and most reliable way to output R/3 documents. You can also set up
the NT printers using the SAPlpd transfer program and PC Connections to a Windows Printer
[Page 70]. You can do this even if the spool server for the printer is running on the NT system.
See also:
Access Method “L” for Local Printing on Windows-NT-System [Page 78]
For additional background information, see Implementing R/3 Local Printing [Page 61].
74 December 1999](https://image.slidesharecdn.com/46bprinting-130417085750-phpapp01/85/46-b-printing-74-320.jpg)
![SAP AG BC - SAP Printing Guide
Creating Local Connections to Windows NT Printers
Creating Local Connections to Windows NT Printers
Prerequisites
1. Can you already print on the printer from your PC? If not, then you must install the printer
on your Windows NT PC. You can find information about this in your Windows NT
documentation.
You must be able to print on the printer from your PC before you can print to it from the
R/3 System.
2. Make sure that the prerequisites are satisfied. To set up a local printer for a Windows NT
PC, you will need to do the following:
• Ensure that an R/3 spool server is running on the NT PC.
A local connection to a Windows printer is possible only using Windows NT.
A spool server is an R/3 server that has a spool work process and therefore offers
the spool service. The list of SAP Servers [Ext.] shows you which servers in your
system are spool servers.
Note that shared (network) printers that you access from the Windows NT PC are
considered local for purposes of R/3 printing. Example: An R/3 spool server is running on
an NT PC. You can define any printer the NT PC accesses as a local printer, regardless
of whether the printer is directly attached to the PC or not.
Procedure
1. Define the printer in the R/3 System. Choose Tools → CCMS → Spool → Spool
administration and then choose Output devices on the Devices / servers tab. Then
choose Create to create a new device definition. If you want to copy the definition of
an output device, select it in the list of output devices and choose Create with
reference.
2. Fill out the definition screen.
The graphic [Page 77] displays an example of a local Windows NT connection. The
following table helps you to fill out the individual fields correctly.
Field Value
DeviceAttributes Device type Enter the device type defined in the R/3 System for
tab your printer model.
For printer under Windows, you can also use the
generic SWIN Device Type [Page 80]. Use this type to
print to any device supported by windows, even the
device type itself is not defined in the R/3 System.
For a list of device types delivered, see SAPNet Note
8928.
December 1999 75](https://image.slidesharecdn.com/46bprinting-130417085750-phpapp01/85/46-b-printing-75-320.jpg)
![BC - SAP Printing Guide SAP AG
Creating Local Connections to Windows NT Printers
Spool server Enter the name of the R/3 spool server running on the
Windows NT system. For a local connection, the R/3
spool server and the Windows NT Print Manager must
be running on the same system.
For more information, see Spool Server [Page 316]
Authorization- To assign the output device to an authorization group,
group enter the name here. For more information, see
Authorization Groups for Output Devices [Page 222].
Host spool Enter C, for local printing by way of the Windows NT
access method print application interface. This is the recommended
access method.
Or, enter L for LPD-style local printing. For additional
information, see Access Method "L" for Local Printing
at Windows NT [Page 78].
Host printer Enter the UNC name of the printer (name and network
path) as defined in the Windows Print Manager.
Example: P09330P330
3. Optional: Classify the device.
Choose Edit → Classification. Choose the output type classification appropriate for this
device.
Background: If you classify your servers as well, the spool system checks that the
device and server classifications match. This helps you enforce an optimal output
configuration.
Result
You can use the printer in the R/3 System as soon as you save your new device
definitions.
Status information about output requests is not available from Windows NT systems
if you use access method C.
76 December 1999](https://image.slidesharecdn.com/46bprinting-130417085750-phpapp01/85/46-b-printing-76-320.jpg)

![BC - SAP Printing Guide SAP AG
Which Device Type: SWIN, Printer-Specific or Both?
Which Device Type: SWIN, Printer-Specific or Both?
When you add a Windows printer, you can specify either a printer-specific device type (example:
HPLJIIID, KYOF1212) or the generic Windows device type, SWIN.
You can specify SWIN as the device type for all printers for which a driver is installed in the
Windows system).
With SWIN, you can also use Windows printer support to access an output device even if the
device type is not supported by the R/3 System (that is, no print controls, formats or device-type
formats have been specified for the device type).
Your R/3 System does not contain the definition for your Kalahari 1202 laser printer.
However, you have installed the printer under Windows and you have no problems printing to it.
This means you will not have to create a full printer definition in the R/3 spool system for the
Kalahari 1202. Instead, you only have to define the printer as a SWIN device in the Output device
definition. After creating the definition, you can print from the R/3 System to the Kalahari 1202
without any other preparations.
SWIN also offers some functions (such as color printer support) that are not available for all
printer-specific device types.
You may want to define two definitions for a printer, one with SWIN as the device type, the other
with the printer-specific device type. In that way, you can take advantage of the features of both
device types. You can then select the device type according to the printing features you require.
When to Use SWIN [Page 81]
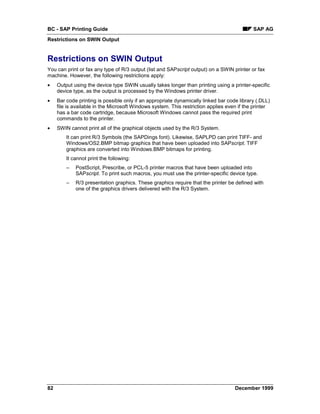
Restrictions on SWIN Output [Page 82]
See also:
Modifying the SWIN (SAPWIN) Device Type [Page 295]
80 December 1999](https://image.slidesharecdn.com/46bprinting-130417085750-phpapp01/85/46-b-printing-80-320.jpg)
![SAP AG BC - SAP Printing Guide
When to Use SWIN
When to Use SWIN
You should use SWIN as the type for a fax or printer at a Windows system if any of the following
are true:
• The SWIN restrictions (see Restrictions on SWIN Output [Page 82]) are acceptable and you
want to take advantage of the special features and simplified printer set-up and maintenance
that SWIN offers.
You can use SWIN to print on a printer whose device type was not defined in the R/3
Spool System, but for which you have Windows drivers.
• You want to print R/3 list output on a color printer. SWIN replicates the predefined R/3 list
color schemes on any color printer supported by Windows.
From Release 4.5A, color printing is supported by SWIN as well as by device types
HPLJ4000, KYOFS170 and POST2. Other device types cannot send color output to
printers.
• You want to print R/3 list output in halftone (gray scale, with gray background shading).
From Release 4.5A, SWIN and device types HPLJ4000, KYOFS170 and POST2 offer
halftone conversion of R/3 list colors. Other device types cannot convert list colors to
halftone.
• You are having trouble getting a Windows printer to work correctly with its printer-specific R/3
device type (such as HPLJIIID).
If the printer is a shared network printer and if you encounter network or other problems
using the printer with the printer-specific R/3 device type, then using SWIN is likely to
resolve the problem. SWIN uses the Windows API for printing. Using the Windows API
leaves the work of communicating with the printer to Windows.
Printing with a printer-specific device type makes use of the network functions
OpenSpool, WriteSpool, and CloseSpool. Not all network packages offer correctly
functioning support for these functions.
• You want to send faxes from the R/3 System using a Windows fax program and a fax
machine that is attached to a Windows system.
You must use SWIN as the device type for faxing with WinFax PRO from Delrina or other
supported products.
December 1999 81](https://image.slidesharecdn.com/46bprinting-130417085750-phpapp01/85/46-b-printing-81-320.jpg)
![SAP AG BC - SAP Printing Guide
Optimizing SWIN Output
Optimizing SWIN Output
SWIN and the SAPlpd program offer Options [Page 84] with which you can optimize printing
speed and quality:
• To improve print quality, you can activate:
• Color or halftone printing
• Printing of lines and boxes as graphics in R/3 output
• Background shading in list output
You should activate all of these options for normal SWIN printing.
• To speed up printing from your SWIN printer, you can do the following:
• Deactivate color and halftone printing
• Print lines and boxes as replacement characters or do not print them at all
• Deactivate background shading
• Force portrait-mode printing
Downloading of graphics is another important factor in SAPlpd and PC print
performance. In SAPscript, you can incorporate bitmap graphics and printer macros
in forms (for form printing). Downloading and processing these graphics takes extra
time. If you set all SAPlpd options for speed and still have performance problems,
check for graphics in your SAPscript print requests. You may need to eliminate these
as well, or substitute smaller graphics for company logos and so on.
For information about optimizing SWIN output for speed or print quality, see SAPlpd Options
[Page 84].
December 1999 83](https://image.slidesharecdn.com/46bprinting-130417085750-phpapp01/85/46-b-printing-83-320.jpg)
![SAP AG BC - SAP Printing Guide
Checking SWIN’s Performance
Checking SWIN’s Performance
SWIN is the generic R/3 device type for Windows printers. SWIN print requests may print more
slowly on a PC than print requests that use another R/3 device type, such as POSTSCPT or
HPLJ4.
Windows takes over the print formatting when you use SWIN. With printer-specific device types,
the R/3 System does the formatting. Further, the S access method, which you should choose
when using SWIN, transmits output data in blocks. In slow WAN connections and overburdened
networks, this block transmission can be slower than file transmission with access method U
Usually, the difference in performance is slight. If, however, you find that printing is too slow, then
you can switch to one of the printer-specific output device types, such as POSTSCPT, for
PostScript printers.
For more information, see Device type in Making a Remote or PC Connection to a Windows
Printer [Page 70].
Procedure
1. Find the SAPlpd window on the PC in question.
2. Choose Test helps → Settings in the SAPlpd menu. Set the value in the SAPlpd box to 1.
This switches on the first level of tracing in SAPlpd.
3. Send some test print requests to the PC printer that is printing too slowly.
4. As the jobs arrive and are processed, look for the following message at the end of each
request:
Elapsed time <seconds> sec. (<seconds> sec. used by Windows)
The first figure is the total processing time for the print request.
The second figure is the amount of time that Windows spent formatting the print request.
Usually, this value is very small. However, in a few combinations of Windows driver and
printer, the processing time can be many seconds for a typical small print request.
If the Windows processing time is too long, then you should try switching to the printer-
specific R/3 device type for this printer. Change the device type in the R/3 definition of
the printer: Making a Remote or "PC" Connection to a Windows Printer [Page 70].
5. Remember to reset the Test helps →= Settings value for SAPlpd back to 0. This turns tracing
back off again.
December 1999 89](https://image.slidesharecdn.com/46bprinting-130417085750-phpapp01/85/46-b-printing-89-320.jpg)
![BC - SAP Printing Guide SAP AG
Connecting Fax Devices
Connecting Fax Devices
This topic explains how to set up and use a fax device connected to a Windows or Windows NT
PC.
Fax Software Compatibility
Currently, Delrina WinFax PRO versions 3.0, 4.0, and 7.0 are known to be compatible with
SAPlpd. WinFax PRO supports automatic transfer of the destination phone number. That is, a
destination fax number entered in the R/3 System is automatically passed to the WinFax PRO
software.
All other fax software packages that run as drivers under Windows should be able to send faxes
from the R/3 System. WinFax is the only product that currently supports automatic transfer of the
destination fax number. If you use another fax software package, you have to test the fax
software to be sure that it prompts for a fax number at the Windows PC when a R/3 fax is sent.
You must also establish a procedure for entering the required fax number at the Windows PC.
If you want to enter the fax number manually at the PC, add the following to the SAPlpd section
of the win.ini file on the Windows PC:
AbortOnManualDial=0
This parameter is set to 1 by default. This setting causes any fax request to be canceled if the
destination fax number cannot be transmitted automatically to the fax software by way of
SAPFAX.DLL.
SAPNet Note 44062 provides information about how to use Windows fax packages
other than WinFax PRO.
Set-Up Procedure
To set up a fax device, do the following:
1. Can you already fax from your Windows PC? If not, then you must first install the fax device
and fax software on the Windows, Windows for Workgroups, or Windows NT PC. You must
be able to fax successfully from Windows before you can send faxes from the R/3 System.
2. Set up SAPlpd on the Windows PC where the fax device is attached.
For more information about this step, see Setting Up the SAPlpd Transfer Program for
Printers and Fax Devices [Page 93].
In addition to the SAPlpd executable you also need the SAPFAX.DLL that creates the
interface between the SAPlpd transfer program and the Windows fax software. SAPFAX
is installed with your SAP GUI frontend software, just as SAPlpd is. SAPFAX.DLL should
be in the same directory as SAPlpd.EXE and must remain there.
3. Define the fax device in the R/3 spool system. Defining the fax in the R/3 spool system
makes it available for faxing from within the R/3 System.
90 December 1999](https://image.slidesharecdn.com/46bprinting-130417085750-phpapp01/85/46-b-printing-90-320.jpg)
![SAP AG BC - SAP Printing Guide
Connecting Fax Devices
Choose Tools → CCMS → Spool → Spool administration and then choose Output
devices on the Devices / servers tab page.. Then choose Create to create a new device
definition.
4. Specify the following in the Output device definition:
Field What to enter
DeviceAttributes tab page Output device Enter a name for the fax device. R/3
users use this name to access the
device.
The name can have up to 30 characters
and is case-sensitive.
Device type Choose SWIN. SWIN is required for fax
devices connected to Windows PCs.
Spool server Enter the name of the spool server. This
is the spool server that formats the
output for the device.
Authorization group If you want to assign the fax device to
an authorization group, enter the name
of the group here. For more information
see Authorization Groups for Output
Devices [Page 222]
HostSpoolAccMethod tab Host spool access Enter S (for SWIN). The SWIN protocol
page method is required to send data to Windows fax
devices.
Host printer Enter the name of the fax device in the
Windows system.
Example: If the name is pn122fax1,
enter fax1 in the R/3 Output device
definition.
Destination host Enter the network name of the Windows
PC. This is the PC where the SAPlpd
transfer program is started from.
The name of the PC is displayed in the
SAPlpd window under Server name.
5. Start the fax software and SAPlpd on the Windows PC. You should now be able to send
faxes from the R/3 System using the fax device.
Be sure to start the fax software before starting SAPlpd or the R/3 SAP GUI frontend
software. In some cases, the fax software may not respond correctly if SAPlpd or SAP
GUI are started first.
The R/3 communications server offers a second way to use fax devices as well as
other communication media, such as x.400 communications, from your R/3 System.
December 1999 91](https://image.slidesharecdn.com/46bprinting-130417085750-phpapp01/85/46-b-printing-91-320.jpg)

![SAP AG BC - SAP Printing Guide
Setting Up SAPlpd for Printers and Fax Devices
Setting Up SAPlpd for Printers and Fax Devices
To reach the spool system and printers on a remote Windows system, the R/3 spool system must
work with a process that runs externally to the R/3 System. This process is the R/3 transfer (or
SAPlpd) program.
This section explains how to set up the SAPlpd program on a Windows PC. For an explanation of
how SAPlpd works on your network, see Implementing R/3 PC Printing [Page 57] .
SAPlpd.EXE and associated files may be updated between R/3 Releases. You can
obtain the newest version from the SAPNet servers (SAPSERV4 for the USA, for
example) by FTP from directory /general/frontend/saplpd. You can find out about the
newest features of SAPlpd by choosing Help → Display README-file in SAPlpd.
You can also use the TCP/IP print server under Windows NT instead of SAPlpd, but
only for access method U and not for device type SWIN.
December 1999 93](https://image.slidesharecdn.com/46bprinting-130417085750-phpapp01/85/46-b-printing-93-320.jpg)
![BC - SAP Printing Guide SAP AG
When Should I Use SAPlpd?
When Should I Use SAPlpd?
SAPlpd is required for printing in the following cases:
• When you want to use printers or fax machines from the Print Manager at any Windows PC
• When you want to use printers or fax machines from the Print Manager at a Windows NT PC
and no R/3 application server is running on the NT PC.
If an application server is running on the NT PC, then you can set up a spool work
process at the server. You can then pass print requests directly to the PC from the
application server. The SAPlpd transfer process is not needed unless you have defined
the printers/fax machines with device type SWIN. For more information, see Deciding
Whether to Use SWIN, the Printer-Specific Device Type, or Both [Page 80].
94 December 1999](https://image.slidesharecdn.com/46bprinting-130417085750-phpapp01/85/46-b-printing-94-320.jpg)

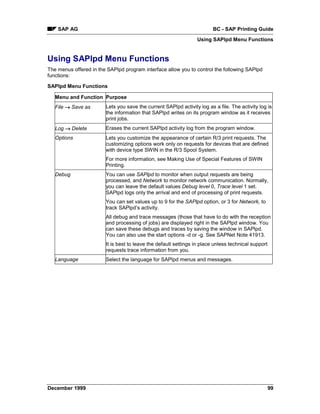
![SAP AG BC - SAP Printing Guide
Connecting UNIX Printers to the R/3 System
To use a UNIX output device from the R/3 System, you must first inform the R/3 System of its
name and type. To do this, choose Tools → CCMS →=Spool → Spool administration. Then select
Output devices on the Devices / servers tab page. Choose Create to create a new device
definition. If you want to copy the configuration of an existing output device, choose Create with
reference.
Procedure
1. Fill out the definition screen. The graphic [Page 104] shows a completed definition.
The following table will help you fill out the individual fields correctly.
Field Value
DeviceAttribute Device type Enter the device type defined in the R/3 System for
s tab page your printer model.
Examples: HPLJ4 for Hewlett-Packard LaserJet 4
printers, POSTSCPT for any PostScript printer.
You cannot specify the generic SWIN device type.
Spool server Select the R/3 application server [Page 316] to use as
the spool server. The spool work process responsible
for the output device runs on the spool server.
If possible, you should choose a spool server running
on the host system the output device is attached to
(Access method L). This means the R/3 spool server
can pass output requests directly to the host spooler in
the same system. This configuration is the most reliable
way of connecting a UNIX output device.
If the target host system has a compatible LPD
configuration, the spool work process can also send
output data through a network connection (access
method U). (This pertains to all UNIX systems except
OSF/1. OSF/1 requires that spool requests come from
the “root” user, but the R/3 System does not run as the
“root”).
Authorization To assign the output device to an authorization group,
group enter the name here. For more information, see
Authorization Groups for Output Devices [Page 222].
December 1999 101](https://image.slidesharecdn.com/46bprinting-130417085750-phpapp01/85/46-b-printing-101-320.jpg)
![BC - SAP Printing Guide SAP AG
Connecting UNIX Printers to the R/3 System
HostSpoolAcc Access Specify how the spool work process or formatting
Method tab method program is to pass data to the host spooler.
page "Local" output device: If you are using a spool work
process and the printer is local – served by the spooler
of the host that you entered in Host name – choose
access method L.
The output device can be physically or remotely
attached to the host. Regardless of where it is located,
the output device is "local" with respect to the R/3
System if it is served by the spool system of the host
you specified under Host name.
“Remote” Output Device [Page 106]: If the output
device is attached to a different host system than you
entered in Host name, then enter access method U.
If you enter access method U, the system displays an
additional host system field. Enter the name of the host
system to which the output data is to be sent. This is
the name of the host system to which the printer is
attached (locally or remotely).
Output requests can only be sent to a
remote output device using access method
U if the remote host system is either a
Hewlett-Packard HP-UX or an IBM AIX
system.
Host printer Enter the name of the output device as it is specified in
the UNIX system. Pay attention to capitalization.
2. Optional: Classify the device.
Choose Edit → Classification. Choose the output-type classification appropriate for this
device.
Background: If you classify your servers as well, the spool system checks that the
device and server classifications match. This helps to ensure an optimal output
configuration.
3. Optional: Define or select a command set for this device (local printers, access
method L only).
If this device requires print and query commands that differ from the default commands,
you can specify a command set for use with this device.
To do so, do the following:
Choose Edit → Command set.
If you have already defined an acceptable command set, then enter the identification
letter of the set in the Command record ID field.
If you want to define a new command set, then enter a letter to name the set in the
Command record ID field.
Double-click the field. In the next dialog box, enter the commands that are to be used
with this device. The command set can also be used in other access method L device
definitions.
102 December 1999](https://image.slidesharecdn.com/46bprinting-130417085750-phpapp01/85/46-b-printing-102-320.jpg)
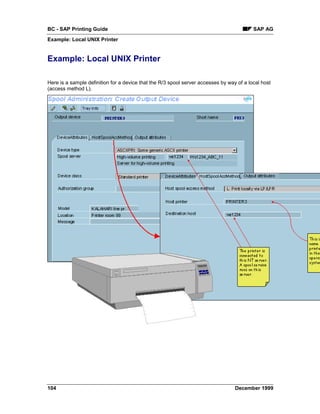

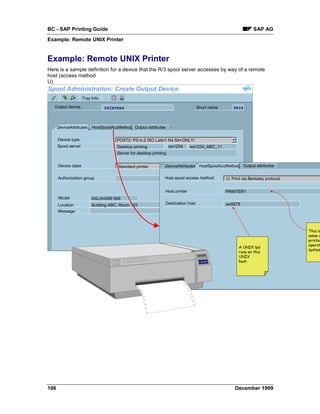
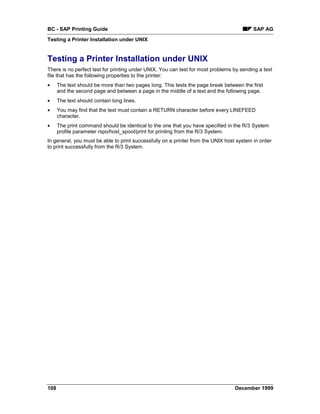
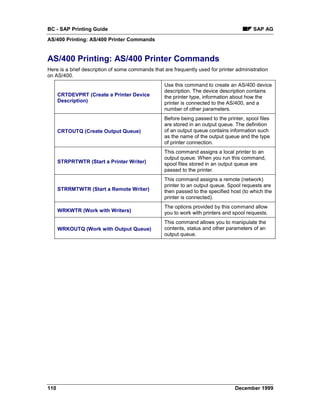
![SAP AG BC - SAP Printing Guide
AS/400 Printing: Installing a Printer on AS/400
AS/400 Printing: Installing a Printer on AS/400
Process Flow
Spool requests are passed to an output queue, which passes the data on to the connected
printer.
This method utilizes the spool request administration functions provided by the AS/400.
For more information about what you have to enter in the R/3 spool administration function, see
AS/400 Printing: R/3 Spool Administration Settings [Page 127]
December 1999 111](https://image.slidesharecdn.com/46bprinting-130417085750-phpapp01/85/46-b-printing-111-320.jpg)
![BC - SAP Printing Guide SAP AG
AS/400 Printing: Connecting a Printer using TCP/IP
AS/400 Printing: Connecting a Printer using TCP/IP
If your printer is connected to the AS/400 across a network using TCP/IP, the formatted print
requests are passed from the R/3 System to an AS/400 output queue. Subsequently, they are
passed from the output queue to the connected printer. Before you can print using a network
printer, you must have created an output queue and started the printer.
Procedure
1. Enter the TCP/IP address for the printer in the host table using the functions provided by the
CFGTCP menu. For details of the procedure, see AS/400 Printing: Configuring TCP/IP [Page
113].
2. To create the output queue, use AS/400 command CRTOUTQ
CRTOUTQ OUTQ(QGPL/PRT1) RMTSYS('P100') RMTPRTQ('P100')
CNNTYPE(*IP) DESTTYPE(*OTHER) MFRTYPMDL(*HP4)
In this example, output queue PRT1 is created in the library QGPL. PRT1 passes the
spool requests to the printer P100. The printer, in this case, is a printer of type HP4.
3. To start the printer, enter the command STRRMTWTR (Start Remote Writer), specifying the
name of the output queue as a parameter:
STRRMTWTR OUTQ(<output_queue_name>)
112 December 1999](https://image.slidesharecdn.com/46bprinting-130417085750-phpapp01/85/46-b-printing-112-320.jpg)
![BC - SAP Printing Guide SAP AG
AS/400 Printing: Printer Directly Attached
AS/400 Printing: Printer Directly Attached
The connection procedure is similar to that for a network printer (see AS/400 Printing:
Connecting a Printer via TCP/IP [Page 112]). However, since this time the connection between
the printer and the AS/400 is of type *SNA, instead of type *IP, you do not need to make an
entry in the TCP/IP table.
1. To create the output queue, use AS/400 command CRTOUTQ.
CRTOUTQ OUTQ(QGPL/IBM3916) RMTSYS(*NONE)
Create a DEVD using CRTDEVPRT; this creates an output queue with the same name as well.
2. To start the printer, enter AS/400 command STRPRTWTR
STRPRTWTR DEV(PRT03) OUTQ(QGPL/IBM3916) WTR(IBM3916)
114 December 1999](https://image.slidesharecdn.com/46bprinting-130417085750-phpapp01/85/46-b-printing-114-320.jpg)

![BC - SAP Printing Guide SAP AG
AS/400 Printing: Printer Shared Among AS/400 systems
AS/400 Printing: Printer Shared Among AS/400 systems
If you are working on an AS/400 application server and want to use a printer connected to a
different AS/400, you have to begin by setting up a network or APPC connection between the two
AS/400 systems.
The process of setting up an Advanced Program-to-Program Communication (APPC) connection
is explained here with the help of a simple example. For technical details and a precise
explanation of the various parameters involved, see the IBM documentation OS/400 Printer
Device Programming (document number SC41-4713).
For the purposes of the example, let us assume that there is an R/3 System running on an
AS/400 "AS1". Print requests are to be passed from this system to another AS/400 "AS2", which
is connected to a printer. Before this can be done, an APPC connection must be established
between the two AS/400 machines.
Printer
A S /4 0 0 A S /4 0 0
AP P C
AS 1 AS2
The APPCConnection
Process Flow
1. Create a Line Description [Page 120]
2. Generate a Controller [Page 121]
3. Activate the Controller [Page 123]
4. Set Up the Distribution Service [Page 124]
5. Add Users [Page 125]
6. Set Up Output Queues [Page 126]
118 December 1999](https://image.slidesharecdn.com/46bprinting-130417085750-phpapp01/85/46-b-printing-118-320.jpg)
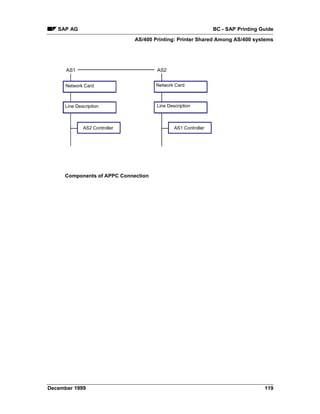
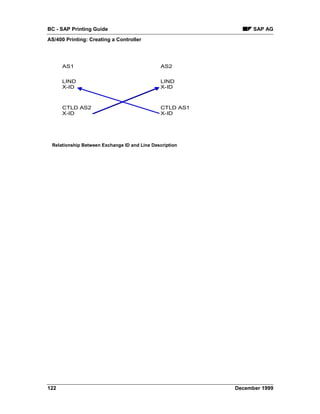
![BC - SAP Printing Guide SAP AG
AS/400 Printing: Setting Up Output Queues
AS/400 Printing: Setting Up Output Queues
Prerequisites
Once the printer and output queue have been configured on one AS/400 (in our example, AS2),
the necessary settings have to be made on the other AS/400 (AS1).
Procedure
1. Set up an output queue on the first AS/400 (in our example, AS1) For the procedure, see
AS/400 Printing: Printer Directly Attached [Page 114]
The parameter CNNTYPE from the CRTOUTQ command must be set to the value
*SNA.
2. To start the printer, enter the command STRRMTWTR
126 December 1999](https://image.slidesharecdn.com/46bprinting-130417085750-phpapp01/85/46-b-printing-126-320.jpg)
![BC - SAP Printing Guide SAP AG
AS/400 Printing: R/3 Spool Administration Settings
AFP Printer
Device type IBMEFP (or IBMEFP3)
Spool server <host_name>_<SID>_<SAP_instance>
for example, as0001_C11_00
Destination host <host_name>
Host printer Name of the output queue (*OUTQ)
Device class
Access method Z
LPQ format B
See also AS/400 Printing: AFP Printing [Page 115]
Access Method "L"
Device type
Spool server <host_name>_<SID>_<SAP_instance>
for example, as0001_C11_00
Destination host <host_name>
Host printer Name of the output queue (*OUTQ)
Device class
Access method L
LPQ format B
For access method "Z" you also have to specify a suitable command for parameter
rspo/host_spool/print in the instance profile.
128 December 1999](https://image.slidesharecdn.com/46bprinting-130417085750-phpapp01/85/46-b-printing-128-320.jpg)
![SAP AG BC - SAP Printing Guide
Definition of Frontend Printers
Definition of Frontend Printers
Frontend (or local) printing lets your users print on their local printers. These local printers do not
have to be defined individually in the R/3 System. You have to create a “representative” output
device for each operating system platform. For more information about frontend printing, see
Help → Application help or Frontend Printing on Undefined Printers [Page 24].
How Frontend Printing Works
Frontend printing works on Microsoft Windows PCs, Apple Macintosh computers, and on UNIX
workstations. Frontend printing is intended for a limited number of users in an R/3 System who
want to print out their screen display quickly.
If a user requests immediate printing, then the output data is downloaded directly to SAPLPD on
a Windows PC or to the lpd/lpr on a UNIX workstation.
Under Windows, the output is sent to the default printer.
Under UNIX and Macintosh, there is no default printer. The output is therefore sent to the printer
whose name corresponds to the host printer you specify in the frontend printing device definition.
For more information, see Defining Devices for Frontend Printing [Page 130].
In order for users to print to their local printers, you must enter the device name of the
frontend printer and %LOC in the authorization object S_SPO_DEV.
December 1999 129](https://image.slidesharecdn.com/46bprinting-130417085750-phpapp01/85/46-b-printing-129-320.jpg)
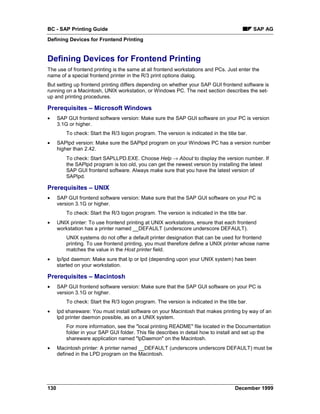
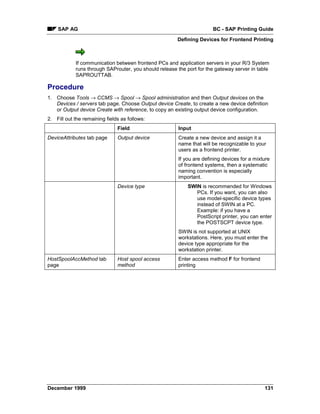
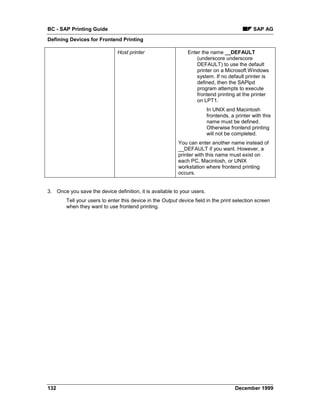
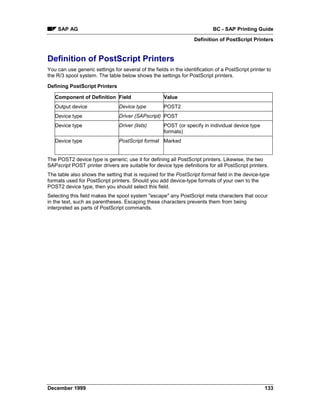
![BC - SAP Printing Guide SAP AG
Printer Pools
Printer Pools
Printer pools allow you to group multiple printers for the following purposes:
• Print on more than one device at a time.
You can have an output request printed on all of the printers in a pool.
Example: Assume that a type of output document is routinely needed at more than one
location in your company. You can set up a printer pool that includes the printers at each
of the locations where the document is needed.
When this type of document is to be printed, your users can specify the printer pool at
the destination printer. The document is printed out on each printer in the pool.
• Alternate printing between the printers in a pool.
You can distribute output requests to the different devices in a pool.
Example: For a critical printing application, you have set up two printers, side-by-side. By
setting up a pool for the printers, you can have the spool system issue print requests to
the pooled printers.
Assigning a printer to a pool does not prevent you from addressing the printer individually as well.
To print on a pool printer without addressing the other printers, just specify the printer’s name
instead of the pool name when you print.
For information about assigning output devices to a pool, see here [Page 135].
Using Device Pools as Logical Devices
In some situations, it is useful to use device pools as "logical devices." That is, you define a pool
and assign a single printer to it. You then use the pool name -- which never changes -- to identify
the printer for such special purposes as customizing. If you need to, you can then substitute a
different printer simply by entering a new printer name in the pool definition. The logical name
remains the same and does not have to be changed.
For some functions in the R/3 Customizing System, you must identify a particular
printer for certain kinds of output. In the Inventory Management System, for example,
you must specify the printer for system output by plant or location.
If you use pools to define logical printer names, you can enter these names
permanently in the Customizing system. If output needs to be diverted to another
printer (due to a hardware problem, for example), you only need to change the pool
definition. You do not need to change any of the system Customizing.
134 December 1999](https://image.slidesharecdn.com/46bprinting-130417085750-phpapp01/85/46-b-printing-134-320.jpg)

![SAP AG BC - SAP Printing Guide
Special Printing Functions
Special Printing Functions
Use
You can use the following special printing functions with the R/3 spool system:
• Color Printing [Page 138]: Color printing of SAPscript texts and ABAP lists on color printers
• Duplex Printing [Page 139]: DUPLEX and TUMBLE printing on printers that support these
functions
• Paper Tray Selection [Page 141]
• Printing Icons [Page 143]
• Printing the Euro Symbol € [Page 144]
• OCR Printing [Page 145]: Printing Optical Character Recognition (OCR) characters
• Outputting Bar Codes [Page 154] in SAPscript texts
• Printing Labels [Page 170]: Printing labels on special printers using utility programs
Prerequisites
Go to the documents named in the links above for information about the prerequisites for using
the individual functions.
December 1999 137](https://image.slidesharecdn.com/46bprinting-130417085750-phpapp01/85/46-b-printing-137-320.jpg)
![SAP AG BC - SAP Printing Guide
Duplex Printing
Duplex Printing
Duplex printing of SAPscript texts
Information about whether output is on one page, duplex, or tumble, is specified in the SAPscript
text form. For more information see the section Print Mode in Pages in SAPscript Forms [Ext.] as
well as the SAPNet note 96102.
The following print controls are used to control duplex printing:
SPMBS Selects reverse side of page for duplex printing (DUPLEX/TUMBLE DUPLEX)
SPMBU Begin DUPLEX mode (that is, print on both sides of the page starting with this page)
SPMSI Begin SIMPLEX mode (that is, print on only one side of the page starting with this
page)
SPMTU Start TUMBLE DUPLEX mode (that is, print on both sides inverted)
Device definition for duplex printing of SAPscript texts
If the SAP device definition for your printer does not contain the print controls described above,
do the following:
1. Copy [Page 256] the device type
2. Add the required Print Controls [Page 274] and the printer-specific escape sequences Look
in your printer manual for information about what to enter.
3. Create an Output Device [Page 51] with the new device type
To test duplex printing, use the standard text SAPSCRIPT-PRINTMODETEST. To
do this, choose Utilities → For device types → Test data(SAPscript).
Duplex printing of ABAP lists
You can print ABAP lists in duplex, if your printer supports duplex printing and uses one of the
following device types:
• HPLJ4000 Device type for PCL-5 printers
• KYOFS170 Device type for PRESCRIBE II printers
• POST2 Device type for PostScript Level 2 printers
Device definition for duplex list printing
To be able to use both the simplex and duplex mode of your printer, you should create two
different device definitions. For information about the procedure for doing this, see Creating
Output Devices [Page 51].
On the Output attributes tab page for the device definition, specify the desired Print mode.
December 1999 139](https://image.slidesharecdn.com/46bprinting-130417085750-phpapp01/85/46-b-printing-139-320.jpg)

![SAP AG BC - SAP Printing Guide
Printing from Multiple Paper Trays
Printing from Multiple Paper Trays
Use
If your printer has multiple paper trays, you can control which one is used from the SAP System.
Tray selection for SAPscript texts
Information about which paper tray to use is specified in the SAPscript form for SAPscript texts.
For more information, see the section Print Mode in Pages in SAPscript Forms [Ext.].
The following Print Controls [Page 274] are used to control tray selection:
TRY01 Paper tray 1
TRY02 Paper tray 2
TRY03 Paper tray 3
TRYEN Paper tray for envelopes
TRYME Manual envelope feed
TRYMN Manual paper feed
Device Definition
If the SAP device definition for your printer does not contain the print controls described above,
do the following:
4. Copy [Page 256] the device type.
5. Add the required Print Controls [Page 274] and the printer-specific escape sequences. Look
in your printer manual for information about what to enter.
6. For list printing: Create a format type and add this to the device type definition. For the
initialization action, enter the command for selection of the desired tray. For information
about the procedure, see Defining a New Device Type [Page 252].
7. Create an Output Device [Page 51] with the new device type
8. Choose Tray info in the device definition and enter the available paper formats
Background: The R/3 spool system cannot use this information to switch paper trays
according to the output. But it does use this information to detect potential
incompatibilities between the output format and the available paper types. It then
chooses the best available format for printing at this device.
To test tray selection, use the standard text SAPSCRIPT-TRAYTEST. To do this,
choose Utilities → For device types → Test data(SAPscript).
Device definition (with list printer drivers)
If your output device uses one of the following device types:
• HPLJ4000 Device type for PCL-5 printers
• KYOFS170 Device type for PRESCRIBE II printers
December 1999 141](https://image.slidesharecdn.com/46bprinting-130417085750-phpapp01/85/46-b-printing-141-320.jpg)
![BC - SAP Printing Guide SAP AG
Printing from Multiple Paper Trays
• POST2 Device type for PostScript Level 2 printers
go to the Output attribute tab page in the device definition. Under Paper tray, specify the default
tray to use for printing lists. For Tray info, enter the page formats available at the printer. If Tray
info is not available, the system prints using an intersection of the DINA4 and LETTER page
formats.
If you want to use several of your printer’s trays, you must create an output device for each paper
tray, for example, P99_TRAY1, P99_TRAY2, and so on.
If your printer does not use any of the specified device types, you must add a command to
activate a particular paper tray to a format. For more information, see Creating Formats [Page
259]
142 December 1999](https://image.slidesharecdn.com/46bprinting-130417085750-phpapp01/85/46-b-printing-142-320.jpg)
![SAP AG BC - SAP Printing Guide
Printing OCR Characters
Printing OCR Characters
Optical character recognition (OCR) fonts are machine-readable character sets widely used in
financial documents. The OCR-A character set, for example, is used for printing routing
information about checks.
See the following links, for information about:
• Which types of printers SAP has defined to support OCR Printing [Page 146]
• The procedure for Setting Up OCR Printing [Page 149] for other printer types.
Hardware/Software Requirements
To print OCR fonts, a printer requires either special built-in character sets or additional hardware
or software. Some printers cannot print OCR characters at all. Be sure to check that this feature
is available before you purchase a printer.
Testing OCR Printing
You can test OCR printing using the test procedure described in Testing Output Device [Page
219].
December 1999 145](https://image.slidesharecdn.com/46bprinting-130417085750-phpapp01/85/46-b-printing-145-320.jpg)

![SAP AG BC - SAP Printing Guide
Adding OCR Support
Adding OCR Support
If you want to enable OCR printing:
• On a new type of printer
• For a printer which SAP did not predefine with OCR support
You must add OCR support to the printer definition in the R/3 spool system and SAPscript. Do
the following:
• Check whether the character set specified for the printer contains the correct hexadecimal
codes for OCR special characters. This step is only required for OCR-A printing as only the
OCR-A character set contains special characters.
• Define the print controls that switch OCR printing on and off at the printer.
To add OCR printing support, do the following:
1. Copy the device type definition of the printer [Page 256] with which you are working. You can
skip this step if you are adding a new type of printer to the R/3 System.
Use the new device type in all the printer definitions you set up for OCR printing.
2. Copy the R/3 character set used by the printer. You can skip this step if you are defining a
new character set for the printer.
To determine which character set a printer uses, check the device type definition.
Choose Tools → Spool → Spool administration and then Full administration and then
Device types. Double-click a device type. The first character set in the definition is the
standard character set.
To copy the character set, start by selecting Tools → CCMS → Spool → Spool
administration, Full administration and then Character sets on the Char. sets tab.
Find the R/3 character set identified in the device type definition with which you are
working. Mark the character set with the cursor, choose Change and then Create with
reference.
On the following screen, enter a new ID number for the new character set. The number
must begin with the number 9. This naming convention protects your character set from
conflicting with the standard R/3 character set. You can leave the other specifications on
the screen unchanged.
3. Check whether your new character set uses the correct hexadecimal values for OCR-A
printing on your printer. In particular, check the hexadecimal values for the following OCR-A
separation characters (for information about how to do this, see Defining Character Sets
[Page 305])
Hook R/3 character ID 7.
Fork R/3 character ID 8.
Chair R/3 character ID 9.
December 1999 149](https://image.slidesharecdn.com/46bprinting-130417085750-phpapp01/85/46-b-printing-149-320.jpg)

![BC - SAP Printing Guide SAP AG
OCR Printing Using SWIN
OCR Printing Using SWIN
The SWIN device type uses Windows formatting and Windows fonts for printing. To print OCR
characters with SWIN, you therefore need to install an OCR-A font in Windows.
The R/3 System provides an internal OCR font definition. To have this font printed out in the
Windows font, you will need to set up a Font Substitution [Page 86] in the SAPlpd program. The
substitution should convert the R/3 OCR font to the name of the Windows OCR font.
With device types other than OCR, you will probably need a font cartridge of soft fonts to print
OCR characters.
For additional information, see Printing OCR Characters [Page 145].
152 December 1999](https://image.slidesharecdn.com/46bprinting-130417085750-phpapp01/85/46-b-printing-152-320.jpg)
![BC - SAP Printing Guide SAP AG
Outputting Bar Codes
Outputting Bar Codes
With SAPscript, you can format data to print out as bar codes. Bar codes are often printed on
labels to allow machine-reading of data for such purposes as inventory of stock, transport,
purchase, and so on.
Bar codes code data as a series of lines of varying thickness and/or distance from one another.
Sometimes they include a check number, which can be used for detecting and analyzing errors.
Sometimes the bar code data is also repeated in human-readable numeric form.
Choose the following links for information about:
• The Bar Codes [Page 156] that have been predefined by SAP and which are ready for use
• The procedures for Adding New Bar Codes [Page 161] add enabling bar code printing on
printers not predefined for bar code printing
• How to use the transfer program SAPLPD on Windows Printers [Page 166]
See also these useful SAPNet notes on bar code printing:
SAPNet Note Number Topic
45643 Bar code control sequences for the Hewlett-Packard LaserJet 4
JetCAPS Intelligent Bar code SIMM
35386 Printing bar codes under Windows NT
14561 BARCODE.DLL for SAPLPD bar code printing not found
5196 Printing bar codes with SAPscript (contents included in this
documentation)
154 December 1999](https://image.slidesharecdn.com/46bprinting-130417085750-phpapp01/85/46-b-printing-154-320.jpg)
![SAP AG BC - SAP Printing Guide
Hardware/Software Req.for Bar Code Printing
Hardware/Software Req.for Bar Code Printing
Generally, printers need extra hardware or software to print bar codes. Many printers cannot print
bar codes at all. Be sure to check that this feature is available before you acquire a printer.
Some printers are able to generate check numbers from the bar code data. For other models,
you must provide the check numbers in the data that you send to the printer. If your printer
cannot generate check numbers, then check the documentation of your R/3 applications to
determine how to send the check number as part of the bar code data.
For information about the barcode.DLL for use in Microsoft Windows PCs, see Bar
Codes and SAPWIN [Page 166] .
December 1999 155](https://image.slidesharecdn.com/46bprinting-130417085750-phpapp01/85/46-b-printing-155-320.jpg)
![SAP AG BC - SAP Printing Guide
Predefined Bar Codes
RSNUM (reservation number) Kyocera device types Code 128
KYOF1000, KYOF1200,
KYOFS150; the Hewlett-
Packard LaserJet 4 device
type HPLJ4
RSNUM (reservation item) Kyocera device types Code 128
KYOF1000, KYOF1200,
KYOFS150; the Hewlett-
Packard LaserJet 4 device
type HPLJ4
RSNUM (confirmation Kyocera device types Code 128
number) KYOF1000, KYOF1200,
KYOFS150; the Hewlett-
Packard LaserJet 4 device
type HPLJ4
If you want to print with these bar codes on another type of printer or if you want to define
another bar code, then you must add your own bar code definitions. See Adding Your Own Bar
Code Definitions [Page 161] for additional information.
For current information about predefined bar codes and supported printers, see
SAPNet Note 5196.
For bar code printing on device type HPLJ4 (Hewlett-Packard LaserJet 4 (PCL-4/5
printer language), you must have the JetCAPS Intelligent Bar code SIMM board for
your printer. You can obtain this SIMM card from Hewlett-Packard. R/3 supports only
this bar code SIMM module for HPLJ4 printers. See also SAPNet Note 5196 for
supplier information. Note that the HPL2 printer driver automatically restores the font
in use before the bar code printing occurred. To do this, the driver issues the
appropriate SF<nnn> print control.
December 1999 159](https://image.slidesharecdn.com/46bprinting-130417085750-phpapp01/85/46-b-printing-159-320.jpg)
![BC - SAP Printing Guide SAP AG
Testing Bar Code Printing
Testing Bar Code Printing
To test bar code printing, do the following:
1. On the Spool Administration: Initial Screen choose Utilities → For device types → Test data
(SAPscript)..
2. Print the predefined document SAPSCRIPT-BARCODETEST, specifying ST as the
document ID and D or E as the language.
If you want to test rotated bar code printing, choose SAPSCRIPT-BARCODETEST2.
The document prints the most important bar codes predefined by SAP (see Predefined
Bar Codes [Page 156] for additional information). The document is usually available only
in client 000.
160 December 1999](https://image.slidesharecdn.com/46bprinting-130417085750-phpapp01/85/46-b-printing-160-320.jpg)
![SAP AG BC - SAP Printing Guide
Adding Your Own Bar Code Definitions
Adding Your Own Bar Code Definitions
If you want to:
• Add a new bar code
• Use a predefined bar code on a printer other than those listed in Predefined Bar Codes
[Page 156]
you must define the bar code in the R/3 spool system and in SAPscript. Specifically, you must
define the following:
• The bar code in SAPscript, if it is not one of the standard, predefined R/3 bar codes. This is
the system bar code definition.
• The names of the print controls for turning bar code printing on and off. This is the printer bar
code definition.
• The printer escape sequences with which bar codes are turned on and off. These are the
values for the print controls for turning a bar code on and off.
To define a bar code and activate bar code printing, do the following:
1. Define the Bar Codes in SAPscript [Page 163], if not already defined.
2. Copy the device type definition of the printer [Page 256] with which you are working. You can
skip this step if you are adding a new type of printer to the R/3 System.
Use the new device type in all of the printer definitions that you set up for printing with
bar codes.
You want to print bar codes on a Hewlett-Packard LaserJet 4 printer. This printer is
predefined by SAP with device type HPLJ4. However, the standard printer definition
does not include support for printing bar codes.
You need to create a copy of the device type, such as ZHPLJ4.
You need to add the print controls for turning off bar code printing to printer type
ZHPLJ4, not to the standard HPLJ4 definition. You also need to use ZHPLJ4 as the
device type in all of the Hewlett-Packard LaserJet 4 printers you define for printing
bar codes in the R/3 System.
3. Define the printer bar codes [Page 164] for the system bar codes you intend to use.
4. Enter the escape sequences (printer commands) for bar code printing in the print controls
you have defined.
Choose Tools → CCMS → Spool → Spool administration and then Full administration.
Choose the DeviceTypes tab page, enter the name of the device type and confirm your
entry.
Choose Print controls and enter the required printer commands to start and stop bar
code printing. For information about which commands to enter, see the documentation
provided with your bar code printing system.
Using the manual provided with your bar code equipment, enter the printer commands
required for starting and stopping bar code printing.
December 1999 161](https://image.slidesharecdn.com/46bprinting-130417085750-phpapp01/85/46-b-printing-161-320.jpg)
![BC - SAP Printing Guide SAP AG
Adding Your Own Bar Code Definitions
Example: For SBP25 (from step 2), you would enter the escape sequence that switches
the printer into bar code mode. For SBS25, you would enter the sequence that switches
off bar code mode.
See Adapting Bar Code Print Controls [Page 165] before you define your bar code
print controls. The R/3 printer drivers handle the marking of bar code data differently,
and this affects the escape sequences you must enter in your print controls.
162 December 1999](https://image.slidesharecdn.com/46bprinting-130417085750-phpapp01/85/46-b-printing-162-320.jpg)
![SAP AG BC - SAP Printing Guide
Creating System Bar Codes
Creating System Bar Codes
To add a bar code in SAPscript, do the following.
Procedure
1. Choose Utilities → SAPscript → Administration →=Font.
2. Select System bar codes and then Change.
3. Choose Create to define a new bar code. Note the following information:
- Bar code: Enter the name of your new bar code. The name must begin with a Z to avoid
conflicts between your bar codes and the R/3 System bar codes.
- Bar code type: Choose one of the bar code types listed. This is currently for information
purposes only.
- Rotation at output: Enter how many degrees your bar code should be rotated at output.
Result
Once you have created a system bar code, continue with step 2, Copying Device Types [Page
256] .
December 1999 163](https://image.slidesharecdn.com/46bprinting-130417085750-phpapp01/85/46-b-printing-163-320.jpg)
![BC - SAP Printing Guide SAP AG
Defining Printer Bar Codes
Defining Printer Bar Codes
Use
A Printer bar code specifies the name of the print controls that are used to turn bar code printing
on and off. You must define bar code print controls for each printer type that you want to use for
bar code printing.
Prerequisites
Ensure that the system bar code for your printer bar code already exists, or create a new system
bar code, see Creating System Bar Codes [Page 163] . Define the new printer bar code only for
the copy of an original device type.
Procedure
1. Choose Tools → SAPscript → Administration → Font.
2. Flag Printer bar codes and choose Change.
3. Choose your new device type.
4. Choose Create to define a new printer bar code.
Enter the following information:
- Bar code: The name of the system bar code that you want to print.
- Prefix: The name of a print control in the form SBP<nn>. <nn> is an ID
number.
You can select any identification number you want. The print control name must be
unique among the print controls that have been defined for the device type.
Example: SBP25
- Suffix: The name of a print control in the form SBP<nn>. <nn> is an ID
number.
You can select any identification number you want. The print control name must be
unique among the print controls that have been defined for the device type. You
should use the same identification number for both Prefix and Suffix.
Example: SBS25
Result
Once you have created a printer bar code, you can continue with step 4, Specifying printer
commands in the print controls [Page 161] .
164 December 1999](https://image.slidesharecdn.com/46bprinting-130417085750-phpapp01/85/46-b-printing-164-320.jpg)
![BC - SAP Printing Guide SAP AG
Bar Codes and SWIN
Bar Codes and SWIN
You can print bar codes on any Windows printer if you do the following:
1. Define the printer in the R/3 spool system with device type SWIN
2. Specify Access method S in the printer definition in the spool system
3. Install a .DLL file on your Windows PC.
SAP does not market a bar code.DLL. You must obtain the.DLL from another vendor.
Typically, such .DLLs convert bar codes to graphics. Any printer that can print graphics
can therefore print the bar codes, and no font cartridge is required.
The bar code.DLL must meet the following requirements:
• It must be compatible with your Windows printers and with the R/3 SAPLPD transfer program
that is running on the Windows PC.
To be compatible with SAPLPD, the bar code.DLL must offer a programming interface
that meets SAPLPD’s requirements. These interface requirements and known
compatible products are documented in Note 25344 in the SAP online information
system. You can view the interface requirements as of the time of this writing in Bar
Code.DLL Compatibility With SAPLPD [Page 167].
• The.DLL must be named BARCODE.DLL.
• The.DLL must be located in one of these directories:
– The winnt directory
– The directory in which SAPLPD.EXE resides.
SAPLPD does not use the PATH variable to find the BARCODE.DLL.
166 December 1999](https://image.slidesharecdn.com/46bprinting-130417085750-phpapp01/85/46-b-printing-166-320.jpg)
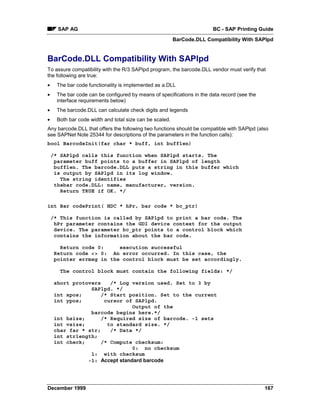
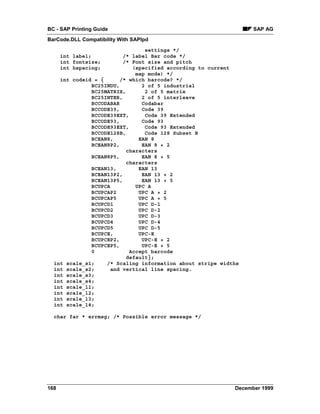

![BC - SAP Printing Guide SAP AG
Printing Labels
Printing Labels
Use
You want to print labels (for example, shipping labels or barcode labels) on a special printer.
Release 4.6A allows you to create labels using an external design program and to print them
from within a SAPscript form.
Prerequisites
Nearly all special label printers on the market use individual control languages, for which no
printer drivers exist in the SAP Standard. To be able to address these label printers from within
the R/3 system nevertheless, you use an external program to define the entire layout.
Activities
1. Create the label using a design program: Define the entire layout of the label, including the
fields you later want to fill from within the R/3 system.
2. Download the print file: Export the data using the printer commands of the design program.
The printer commands must be in ASCII format, that is, you can use only printable characters
plus carriage return, line feed, and, maybe, form feed. In addition, the file must not comprise
more than 80 characters per line; otherwise unwanted line feeds may occur during upload.
There must be no binary control characters (for example, escape).
3. Upload the print file into the SAPscript form: Upload the print file into a SAPscript
standard text. However, you use this standard text as "intermediate storage" only. Then copy
the text into a SAPscript form. In the form, enter variables of the print program (program
symbols) in those places where you want variable data to appear in the label. At runtime, the
system fills these variables with the current field values from the application program.
4. Adapt the form: For most label printers you must adapt the form; for example, you must
enlarge the MAIN window to maximum page size and delete all other windows. In addition,
the MAIN window should contain only one single text element: the imported print file.
5. Create an output device: Define an output device for label printing. As device type use
either ASCIIPRI or one of the special device types for label printers.
The subsequent topics tell you how to create labels for the individual printer
types and how to print them from within SAPscript.
• Printing Labels With Avery TTX 450 [Page 171]
• Printing Labels With CAB Apollo 2 [Page 173]
• Printing Labels With Intermec Easycoder 501 XP [Ext.]
• Printing Labels With Printronix T 3204 [Page 175]
170 December 1999](https://image.slidesharecdn.com/46bprinting-130417085750-phpapp01/85/46-b-printing-170-320.jpg)
![SAP AG BC - SAP Printing Guide
Printing Labels With Avery TTX 450
Printing Labels With Avery TTX 450
Use
This topic tells you how to use the method described under Printing Labels [Page 170] to create
and print labels with the TTX 450 of Avery-Dennison.
Procedure
1. Create the label: Use the design program Jetmark 32 of Avery Dennison to create the label
layout. This program runs under Windows 95/98 and under Windows NT. As printer select
the Avery printer TTX 450 12 dpmm in Jetmark 32.
2. Define the R/3 form fields: In Jetmark 32, define all those fields as "normal" input fields with
constant text (not as database variables) that will later be filled with variable data from the
R/3 system. Into each field enter the field name that will later be used in R/3 (for example,
VBAK-KUNNR) as plein text; this allows you to easily find the field in the print file created by
the download. To "simulate" the size the field will have later, you can extend the field name to
the desired size by adding any characters (for example, VBAK-KUNNRXXXXX).
In some barcode fields, you cannot enter field names but only characters corresponding
to the barcode type (for example, only digits). In this case, use a text constant that
corresponds to the input data (for example, 01234567 for an 8-digit numeric barcode
field).
3. Select fonts for text fields: For text fields with variable contents you can use only printer-
internal fonts. For text fields with constant contents you can use either printer-internal fonts or
TrueType fonts. During download, constant texts with TrueType fonts are transformed into bit
patterns and stored in the print file, which enlarges them.
4. Insert bitmap graphics: You can include bitmap graphics (for example, company logos) into
the label definition; during download, they are inserted into the print file. However, transform
any colored bitmaps into black-and-white bitmaps before importing them into Jetmark 32.
5. Download the label definition into the print file: In Jetmark 32 choose File → Print to
transfer the printer commands into a print file. Select the field Print in file and enter path and
file names for the file to be created. You can use Settings to set options such as "cutting the
label at the end of the job" or "Blank label and cutting at the end of the job".
6. Upload the print file into SAPscript and insert the variables: Start the SAPscript standard
text editor (Utilities → SAPscript → Standard text). Create a new standard text. Upload the
label file using function Text → Upload. As format choose ASCII. Save the file.
In the text, search for the variable fields you defined under 2.). Replace the constant text
you entered there (for example, VBAK-KUNNR) with the name of the actual variable as it
is used by the print program of the application (for example, &VBAK-KUNNR&). In the
editor choose Edit → Command → Insert command to insert SAPscript variables
(program symbols).
7. Adapt the SAPscript form: To print the label, adapt the SAPscript form you want to use.
Choose Utilities → SAPscript → Form:
• Copy the standard text that contains the print file into a text element of the MAIN
window. The name of this text element depends on the R/3 application program you
use.
December 1999 171](https://image.slidesharecdn.com/46bprinting-130417085750-phpapp01/85/46-b-printing-171-320.jpg)
![BC - SAP Printing Guide SAP AG
Printing Labels With Avery TTX 450
• The first page of the form should point to itself as next page, since the label file in the
MAIN window may be very large, especially if graphics are included.
Since Avery printers ignore any unknown commands in the print data stream, it
is not necessary to execute the actions described below. However, they make the
form clearer and easier to use:
• Delete all windows except MAIN. If you keep any windows, they must not contain
any data you want to print (you may mark texts as comments).
• The MAIN window should contain only one text element, which contains the label file
you just created.
• If there are any other text elements defined in MAIN that are called from within the
print program, mark their contents as comments.
8. Create an output device: Define the Avery printer as Output Device in the SAP System
[Page 51].
The easiest way is to connect the printer to a Windows PC, install any Windows printer
driver there, and start the output program SAPlpd. Then define the printer in the spool
administration (transaction SPAD) using coupling type "S" or "U".
As device type select LB_AVE.
172 December 1999](https://image.slidesharecdn.com/46bprinting-130417085750-phpapp01/85/46-b-printing-172-320.jpg)
![SAP AG BC - SAP Printing Guide
Printing Labels With CAB Apollo 2
Printing Labels With CAB Apollo 2
This topic tells you how to use the method described under Printing Labels [Page 170] to create
and print labels with the printer Apollo 2 of the manufacturer CAB GmbH. According to CAB, you
can use the same procedure for the printer models Apollo 1, Apollo 3, Apollo 4, and for the fully
automatic labelling system "CAB Hermes 4" as well.
Procedure
1. Create the label: To design the label layout, use the design program Easylabel of the
manufacturer Tharo Systems, Inc. This program runs under Windows 3.1, Windows 95, and
Windows NT. As printer in Easylabel select CAB Apollo 2
For technical reasons, you can use the CAB printer from within SAPscript only if
you previously store the label definition in the printer (on memory card) and then
transfer from within SAPscript only the field contents of the variable label fields. To
be able to use this method, each printer must be equipped with a memory card.
2. Define the R/3 form fields: In Easylabel define all those fields as type FIX (not as database
fields) that will later be filled with variable data from the R/3 system. As field contents select
sample data that allows you to estimate the space needed for the field contents. To load the
label definition onto the memory card of the printer at a later time, each variable field must
have a field name in Easylabel. The field names in Easylabel can be up to 10 characters long
and alphanumeric. Therefore, you cannot use R/3 field names directly. Instead, use neutral
field names such as T1 for the first, T2 for the second text field, B1 for the first barcode field,
and so on.
3. Select fonts for the text fields: For text fields, you can use either printer-internal or
TrueType fonts. Since the label definition is stored together with the fonts on a memory card
in the printer, the font selected does not influence the size of the print file created by R/3.
4. Insert bitmap graphics: Bitmap graphics are also stored on the memory card.
5. Transfer the label definition to the memory card: To transfer the label definition to the
memory card installed in the printer, choose Print a batch of formats, load the stored label,
and execute the function Download format to memory card. Enter the name of the label,
which may be up to eight characters long. This name is used later to identify the label
definition.
Set the parameter Quantity to the value Printer prompts for quantity, otherwise the
printer will always print one label with the current data and, additionally, one original
label.
Besides the label definition downloaded to the printer, Easylabel creates a file of type
"[Dateiname].rpl" on the PC. Usually, you find this file in the installation directory of
Easylabel on the PC. This RPL file is the basis for the print file to be sent from R/3, which
passes values for the variable fields of the label and finally prints the label.
6. Upload the RPL file into SAPscript and insert the variables: Start the SAPscript standard
text editor (Utilities → SAPscript → Standard text). Create a new standard text. Upload the
RPL file using function Text → Upload. As format select ASCII. Save the file.
For each variable field to which you assigned a field name in Easylabel under 2.), the file
contains a line R XX, where XX is the field name (for example, R T1;). After the
December 1999 173](https://image.slidesharecdn.com/46bprinting-130417085750-phpapp01/85/46-b-printing-173-320.jpg)
![BC - SAP Printing Guide SAP AG
Printing Labels With CAB Apollo 2
semicolon enter the program variable from the print program of the application, whose
value you want to print in this field (for example, R T1;&VBAK-KUNNR&). In the editor
choose Edit → Command → Insert command to insert SAPscript variables (program
symbols).
7. Adapt the SAPscript form: To print the label, adapt the SAPscript form you want to use for
printing. Choose Utilities → SAPscript → Form:
− The MAIN window must cover the entire page format (for example, DINA4), which means
that there may not be an upper or left margin between MAIN and the page margin.
− The MAIN window should contain only one text element which contains the newly
created RPL file. The name of the text element depends on the R/3 application program
you use. Insert the RPL file into this text element by copying the entire text from SO10
into the form window.
− If there are any other text elements defined in MAIN that are called from within the print
program, mark their contents as comments.
− Delete all windows except MAIN. If you keep any windows, they must not contain any
data you want to print (you may mark texts as comments).
− The first page of the form should point to itself as next page, since the label file in the
MAIN window may be very large.
8. Create an output device: Define the CAB printer as Output Device in the SAP System
[Page 51].
The easiest way is to connect the printer to a Windows PC, install any Windows printer
driver there, and start the output program SAPlpd. Then define the printer in the spool
administration (transaction SPAD) using coupling type "S" or "U".
As device type select LB_CAB.
174 December 1999](https://image.slidesharecdn.com/46bprinting-130417085750-phpapp01/85/46-b-printing-174-320.jpg)
![SAP AG BC - SAP Printing Guide
Printing Labels With Printronix T 3204
Printing Labels With Printronix T 3204
This section explains the procedure described in Printing Labels [Page 170] to create and print
labels using the printer Printronix T3204.
Procedure
1. Creating the label: Use the design program Codesoft Pro 4.20 by Techniques Avancées to
create the label layout. You can run this program under Windows 3.1, Windows 95, and
Windows NT. As printer choose within Codesoft: Printronix T 3204 (PGL).
Define the printer within Codesoft with output port FILE to be able to load the
print data into a file at a later time.
When defining the output format, deactivate the option Automatically adapt size. To
do this, choose File → Format → Page.
2. Defining the R/3 form fields: Define all fields, which R/3 later fills with variable data, as
fields with constant values, not as database fields. As field contents, use the R/3 field name.
If this is not possible – for example, for certain barcodes – enter a combination of numbers
which you can easily find in the print file.
If the field contents exceeds the printable area of the defined output format, the
printer T 3204 shows an error message and does not print the label. Therefore, make
sure that the contents of a completely filled output field still fits into the defined label. If
necessary, enhance the R/3 field names (for example, VBAK-KUNNR) with additional
characters to ensure output of a variable in its maximum length.
3. Selecting the fonts for text fields: For text fields, use only printer-internal fonts of the
Printronix printer, no TrueType fonts.
4. Inserting bitmap graphics: You cannot include bitmap graphics into the label definition.
During download they are converted into binary data which cannot be interpreted by
SAPscript.
5. Downloading the label definition into the file: To transfer the printer commands to a file,
choose File → Print. Select the printer with output port FILE and choose Print. Enter a name
for the print file.
6. Uploading the label file into SAPscript and inserting the variables: Start the SAPscript
standard text editor (Utilities → SAPscript → Standard text). Create a new standard text.
Choose Text → Upload to upload the print file. As format select ASCII. Save the file.
Search for the variable fields and replace the constant text there (for example, VBAK-
KUNNR) with the variable actually used in the print program (for example, &VBAK-
KUNNR&). To do this, choose Edit → Command → Insert command and specify the
variable in the field Symbols.
7. Adapting the SAPscript form: To print the label, adapt the desired SAPscript form. Choose
Utilities → SAPscript → Form:
• Define the first page of the form as its own next page, since the label file in the MAIN
window may be very large.
December 1999 175](https://image.slidesharecdn.com/46bprinting-130417085750-phpapp01/85/46-b-printing-175-320.jpg)
![BC - SAP Printing Guide SAP AG
Printing Labels With Printronix T 3204
• The MAIN window should contain only one text element which contains the label file.
The name of this text element depends on the R/3 application program used. To
insert the label file into this text element, copy the entire text from the standard text
editor into the form window.
The modifications described below are not mandatory, since the printer language
Printronix PGL ignores any unknown commands and leading blanks or blank lines are no
problem. However, for better readability, you should make the following changes to the
form:
• Delete all windows except MAIN, or make sure that these windows don not contain
any data to be printed (make them comments).
• If the print program calls any other text elements in MAIN, change their contents to
comments.
8. Creating an output device: Define the Printronix printer as Output Device in the SAP
System [Page 51].
The easiest way is to connect the printer to a Windows PC, install any Windows printer
driver there and start the output program SAPlpd. The define the printer in the spool
administration (transaction SPAD) using coupling type "S" or "U".
As device type choose LB_PRI.
176 December 1999](https://image.slidesharecdn.com/46bprinting-130417085750-phpapp01/85/46-b-printing-176-320.jpg)
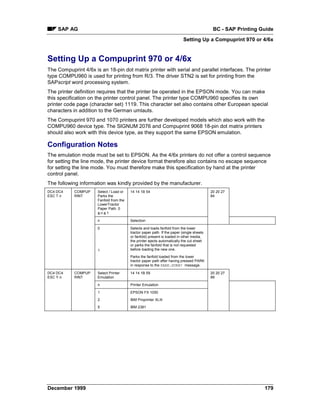
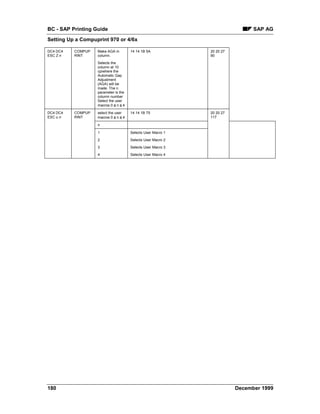
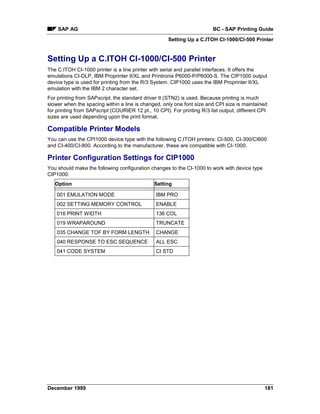
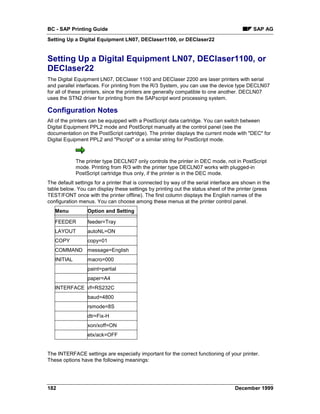

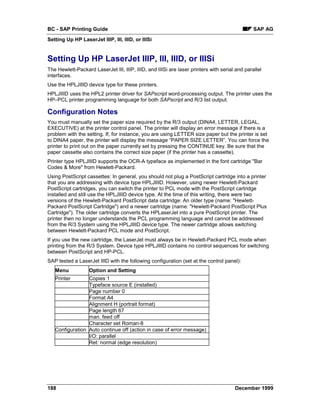

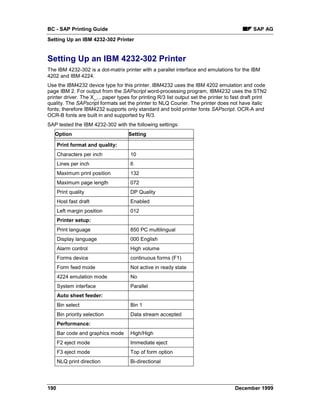
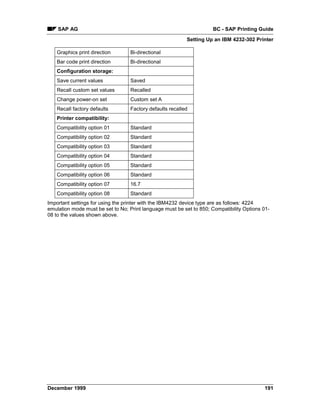
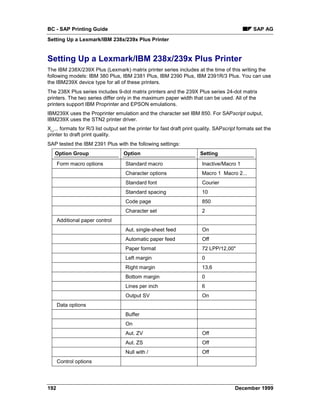
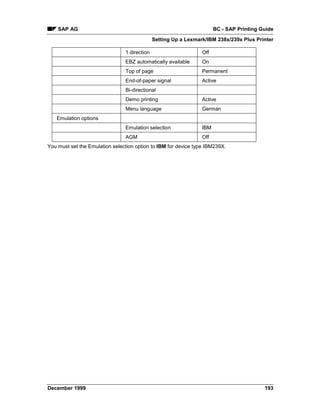

![SAP AG BC - SAP Printing Guide
Setting Up a Kyocera F-1000
Setting Up a Kyocera F-1000
The Kyocera F-1000 is a laser printer that uses the PRESCRIBE printing language and emulates
many other printer types.
Use the KYOF1000 device type for this printer. The printer is often driven using PCL4 emulation,
the most powerful of the emulations other than the native PRESCRIBE. The entire configuration
can be changed using software without having to change the settings manually at the printer
control panel. The F-1000 is largely compatible with the Kyocera F-1200, but with fewer
typefaces, less storage, no display, and so on.
As of 1989, the F-1000 printer was outfitted with extra fonts and other capabilities. If your F-1000
has these features you can use the device type for the Kyocera F-1200 for your F-1000. The F-
1200 device type uses extra fonts and other features (for more information, see Setting Up a
Kyocera F-1200 or F-1200S [Page 196]).
To check the printer status and number of available fonts, run the following short report from the
ABAP programming environment. Substitute the name of your Kyocera F-1000 as defined in the
SAP System for ‘printer name’.
REPORT KYOSTAT;
NEW-PAGE PRINT ON
DESTINATION 'printer_name'
NEW LIST IDENTIFICATION 'X'
IMMEDIATELY 'X'
NO DIALOG.
WRITE '!R! RES; STAT; FLST; RES; EXIT, E;'.
NEW-PAGE PRINT OFF.
The report causes the printer to print a status sheet and a list of the resident fonts. If the printer
has more than 36 fonts you can run the printer as a Kyocera F-1200 for printing from the SAP
System.
Using OCR-A Typeface Cassettes
Kyocera offers no OCR-A typeface cassette for the Kyocera F-1000 laser printer. OCR-A
typeface cassettes for this printer are available from independent software companies in
Germany. SAP tested an F-1000 with an OCR-A cassette from LaserPrint. The R/3 device type
for the F-1000 is designed for this board (that is, the printer character set and the font command
for the selection of the OCR-A typeface are board-specific).
As there is no standard board for OCR-A printing with the F-1000, you will probably need to
create your own device type definition for OCR-A printing if you use a different board than SAP
did. This is because the character set used by an OCR-A board differs even among the boards
offered by LaserPrint. For example, the three boards offered by LaserPrint use character sets
with different hex code assignments for the OCR-A special characters.
December 1999 195](https://image.slidesharecdn.com/46bprinting-130417085750-phpapp01/85/46-b-printing-195-320.jpg)
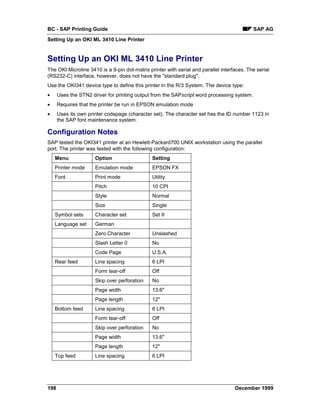
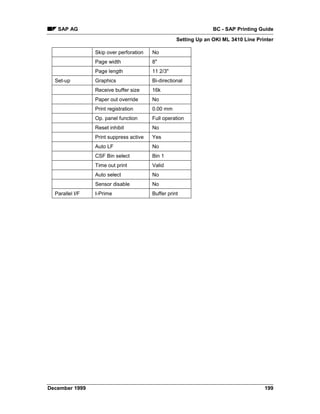
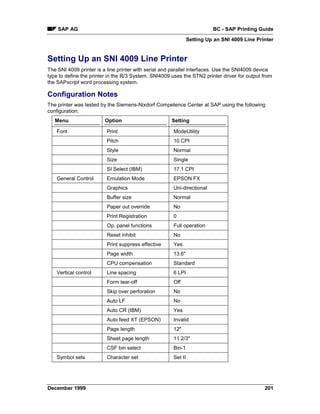
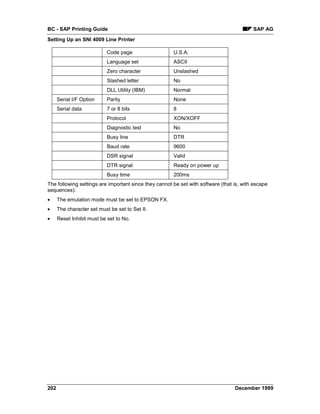
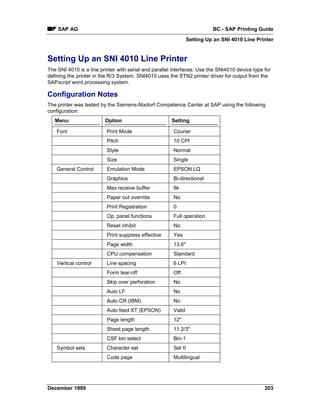
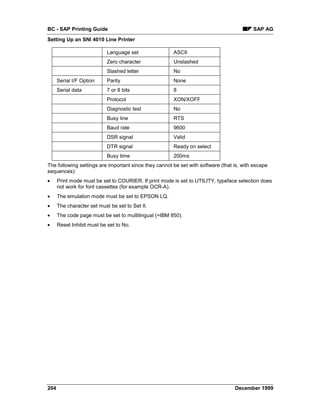
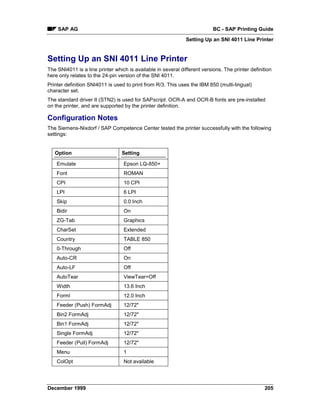
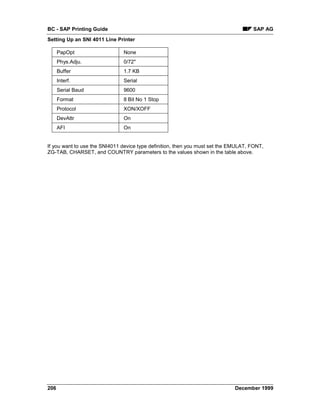
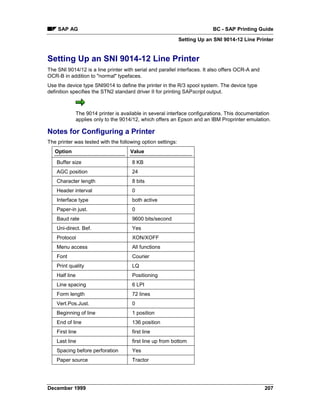
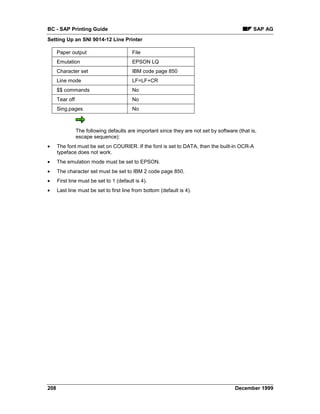
![SAP AG BC - SAP Printing Guide
Monitoring the Spool System
Monitoring the Spool System
Use
Within the R/3 monitoring architecture you can monitor the performance of your R/3 spool
system. The spool monitor is a tool which provides you an overview of the system status allowing
you to react quickly to alert messages.
You can access the spool monitor by choosing Tools → CCMS → Control/Monitoring → Alert
monitor. Open the monitor set SAP CCMS Overview Monitors. Double–click Spool. The system
displays a monitoring tree you can expand to display the information you require.
You can use this monitor template as is, or you can copy it into your own monitor set and modify
it.
Features
The spool monitoring tree is divided into a overview of the system and an overview of the
individual spool servers. The table below the graphic explains the individual components
(Monitoring Tree Elements, MTE) in the system-wide overview. Threshold values are set for the
individual attributes. Each attribute has a color indicating whether the current attribute value falls
below or exceeds the threshold value. The tree can display the attributes from several points of
view. You can select the view level by choosing Extras → Display options and then Dsply tree.
Object Attribute Meaning
SpoolNumbers UsedNumbers Percentage of numbers in a spool number range
occupied by spool requests
SystemWide MaxWaitTime Maximum wait time of the system spool service
Frontend WaitTime Wait time to set up connection to the frontend printers
[Server_name] Status Spool server status
WaitTime Spool server wait time
SAPcomm WaitTime Wait time during transfer of output requests for fax
devices (access method X) to the SAP communication
server
The lower part of the tree contains the spool server nodes. The table below the graphic
explains the individual components (Monitoring Tree Elements, MTE) and their attributes.
Object Attribute Meaning
SpoolService Utilization Spool server load
QueueLength Length of the dispatcher queue
ServiceQueue Length of the spool service queue
ServiceQueuePriv (not in the Length of the spool service queue
overview view) for processing requests sequentially
DeviceCacheUsed (not in overview Size of the used cache area
and analysis views)
DeviceCacheFixed (not in the Size of used fixable cache entries
overview view)
December 1999 209](https://image.slidesharecdn.com/46bprinting-130417085750-phpapp01/85/46-b-printing-209-320.jpg)
![BC - SAP Printing Guide SAP AG
Monitoring the Spool System
HostspoolListUsed (not in the Used host spool list area
overview view)
Devices Job processing as well as host spool
queries from specific devices
When defining an output device, you
can specify that it is to be monitored
(tab).
LPQ_Time Time an output request spends in
the output device queue
Pages/Min. Number of pages the device outputs
per minute
Messages Last message delivered by the LPQ
Activities
The monitoring architecture of the R/3 System provides you with various options for monitoring
your system and analyzing any errors. For a detailed description, see Using the Release 4 Alert
Monitor [Ext.].
210 December 1999](https://image.slidesharecdn.com/46bprinting-130417085750-phpapp01/85/46-b-printing-210-320.jpg)
![BC - SAP Printing Guide SAP AG
Managing Output Devices: General Functions
Managing Output Devices: General Functions
This section provides information about managing output requests
Managing Connection and Communication Timeouts and Retries [Page 213]
Testing Output Devices [Page 219]
212 December 1999](https://image.slidesharecdn.com/46bprinting-130417085750-phpapp01/85/46-b-printing-212-320.jpg)
![SAP AG BC - SAP Printing Guide
Managing Connection and Communication Timeouts and Retries
Managing Connection and Communication Timeouts
and Retries
If an output request is sent to a remote output device, the R/3 System verifies that it can reach
this output device.
If the spool work process waits more than 15 seconds for a reply, then it records the problem
in the R/3 system log. You can therefore check in the system log for devices that have chronic
communication problems.
If the spool work process must wait more than 30 seconds, then it locks the output
device for five minutes and goes on to other output requests. The output request
keeps the status Waiting. At the end of this lock period, the spool work process
attempts to establish communication again.
The output requests are only reactivated once the host spool system is available.
The connection test is repeated three times every five minutes. If the remote host spool service
cannot be reached, the output requests still have the status Waiting.
The connection test is restarted (three times every five minutes) if
• a new output request is generated for the host spool system concerned
• an output device in this host spool system is reactivated
• the R/3 application server is restarted.
The output requests are reactivated once the host spool system can be reached. This operation
can be repeated up to three times. If the output requests could still not be output, they are given
the status Error.
You can set timeouts both centrally in the system profile as well as individually in the
individual output device definitions.
For additional information, see:
Setting Connection Timeout Length [Page 216]
Setting Read-Write Timeouts [Page 217]
Setting the Retry Count and Delay [Page 218]
December 1999 213](https://image.slidesharecdn.com/46bprinting-130417085750-phpapp01/85/46-b-printing-213-320.jpg)
![SAP AG BC - SAP Printing Guide
How a Network Connection is Made
The system profile value for read and write timeouts is valid for all output devices. You can also
specify a read or write timeout for a single output device.
Wide-Area Network (WAN) Connections
If you are using a wide-area network connection to an R/3 transfer process, then timeouts can
pose special problems. If data transmission across the WAN link is too slow, then the read-write
timeout of the R/3 spool system or of your host network software may be triggered while
transmitting data across the connection. The minimum throughput for successful data transfer to
an SAPLPD process is 1 kilobyte/minute.
Should this problem occur, a faster WAN link is the best solution to the problem. If this is not
possible, then one of the following measures should help:
• If the host spooler supports remote printers, use the host’s remote printing facilities to access
the printer. You then no longer need the WAN link to the R/3 SAPLPD transfer process. Data
transmission may be more successful under the host’s remote printing facility than by way of
SAPLPD.
• If the remote SAPLPD is running under Microsoft Windows, you can reset the SAPLPD
packet size to a smaller value, as of SAPLPD version 2.19. The default packet size is 1000
bytes and is set in the WIN.INI file, section SAPLPD, parameter s_packet_size.
For more information, see Setting Read-Write Timeouts [Page 217].
December 1999 215](https://image.slidesharecdn.com/46bprinting-130417085750-phpapp01/85/46-b-printing-215-320.jpg)
![BC - SAP Printing Guide SAP AG
Authorizations to Access the Spool System
Authorizations to Access the Spool System
To access the spool system, there are separate authorizations (R/3 authorizations) for:
• Printing [Page 221]
• The Output Controller [Page 223] (for managing spool requests and output requests)
• The Spool Administration transaction [Page 224] (for defining printers and managing device
definitions.
For details about authorizations, see the authorization object documentation in the
R/3 System. Enter transaction SU21 and choose the BC_A (Basis: Administration)
object class. The names of most spool authorization objects begin with "S_SPO_".
The spool system also uses the S_ADMI_FCD object.
For more information about spool system authorizations, see SAPNet Note
119147.
220 December 1999](https://image.slidesharecdn.com/46bprinting-130417085750-phpapp01/85/46-b-printing-220-320.jpg)
![SAP AG BC - SAP Printing Guide
Authorizations for Printing
Authorizations for Printing
By default, as R/3 is delivered to you, all users may print any amount of output on any R/3 output
device.
The spool system provides authorizations so that you can limit these privileges. You can do the
following:
• Limit printer access: Allow access only to specific printers by name.
Authorization object: S_SPO_DEV (Spooler: Devices)
Use: Limit a user’s access to R/3 output devices by name. Example: An authorization for
FI_PR* with S_SPO_DEV would allow a user to print only on devices whose names
begin with this string.
You can also assign authorizations for authorization groups, instead of for explicitly
specified output devices. To do this, read Authorization Groups for Output Devices [Page
222].
Sample profiles: None.
In order for users to be able to use Frontend Printing [Page 24], they must have the
authorization for the frontend printer as well as the authorization for the output device
%LOC.
• Limit amount printed: Permit users to submit output requests only up to a specified number
of pages.
Authorization object: S_SPO_PAGE
Use: Specify the maximum number of pages permitted in a user’s output requests. To
use this authorization, you must set the rspo/auth/pagelimit parameter in the
system profile to the value 1. All users must have an authorization for S_SPO_PAGE
when the changed profile becomes active; otherwise no user will be able to print.
Sample profiles: None.
December 1999 221](https://image.slidesharecdn.com/46bprinting-130417085750-phpapp01/85/46-b-printing-221-320.jpg)
![BC - SAP Printing Guide SAP AG
Authorization Groups for Output Devices
Authorization Groups for Output Devices
Using the Authorization group configuration field, you can group output devices according to
particular functions, for example. Users may print on all output devices in such a group, provided
that they have authorization to do so.
When defining output devices [Page 51], you can enter an authorization group. The group names
are in the same namespace as the names of the output devices. You can also use the same
names.
Instead of entering an output device explicitly in a user authorization, you can now specify an
authorization group. During the authorization check the system uses authorization object
S_SPO_DEV for the output devices as well as the authorization groups. This checks
authorization for the output device concerned as well as the authorization group.
If you use the name of an existing output device as the group name, usage
authorization for this device can no longer be assigned separately. The authorization
still applies for all devices in this group.
222 December 1999](https://image.slidesharecdn.com/46bprinting-130417085750-phpapp01/85/46-b-printing-222-320.jpg)
![SAP AG BC - SAP Printing Guide
Authorizations for the Output Controller
Authorizations for the Output Controller
There are two classes of users in the Output Controller [Page 12] (transaction SP01, Tools →
CCMS → Spool → Output controller), where users can manage spool requests, generate output
requests, and check output logs. These user classes are as follows:
• End users are allowed unlimited access to their own spool and output requests in the output
controller.
No special authorization is required.
• System administrators are users, that can access spool and output requests from other
users. They may also have access to these requests in the current client as well as other R/3
System clients.
Authorization objects: To access spool requests and output requests other than your
own, you need an authorization for the S_SPO_ACT (Spooler: Actions) authorization
object.
For Output controller functions in clients other than the one you are logged onto, you
need authorization for the S_ADMI_FCD (System Administration Functions)
authorization object.
Sample profiles: S_ADMI_SPO_J
This profile lets a user manage spool and output requests in the output controller in all
clients and for all users. By client, the profile allows the following:
• In the user’s current client: The user must have an additional authorization for S_SPO_ACT
(Spooler: actions).
• In other clients: Full spool request control.
Authorizations to download and send spool requests
As of Release 4.6A, the following authorizations are required in object S_SPO_ACT, in order to
download spool requests as text from the output controller or send spool requests using
SAPoffice:
• To download: authorization value DOWN
• To send: authorization value SEND
Create the corresponding authorizations and add these to the authorization profiles.
December 1999 223](https://image.slidesharecdn.com/46bprinting-130417085750-phpapp01/85/46-b-printing-223-320.jpg)
![SAP AG BC - SAP Printing Guide
Connecting the Spool System to an External OMS
Connecting the Spool System to an External OMS
This procedure shows how to integrate the R/3 spool system with an external output
management system (OMS) using the OMS interface.
Prerequisites
Compatible OMS: You must have an OMS that is compatible with R/3 or you must implement
the OMS interface yourself.
If you already have an OMS installed, then you must upgrade it so that it supports the R/3 OMS
interface.
If you are buying an OMS, it should be one certified for the OMS interface.
Local access: An OMS and all of the devices it serves must be "local" to all R/3 spool servers.
That is, the OMS commands issued by R/3 spool servers must be executable on the host system
on which each corresponding R/3 spool server is running.
An R/3 spool server stores output data for an OMS device in a file on the host where the server is
running. This file is referenced in the OMS Submit command issued by the server, and the file
must be accessible to the OMS.
More information about certified OMS products and implementing and certifying the OMS
interface is available from the SAP Complementary Software Program (CSP). Internet address:
http://www.sap.com/csp (Email: csp-europe@sap-ag.de)
Procedure
Follow this procedure for each OMS you want to integrate into R/3 output:
1. Define the real OMS (ROMS).
See: Defining a Real OMS [Page 227]
2. Optional: Organize your OMS output devices by designing a set of logical OMSs (LOMS).
You can use a single OMS to access all of the devices in the OMS.
See: Organizing OMS Output Devices in Logical OMSs [Page 228]
3. Define one or more logical OMSs (LOMS). Only one is required.
See: Defining a Logical OMS [Page 229]
4. Define one or more sets of operating system specific commands. Only one of these sets is
required.
See: Defining OMS Command Sets for LOMS [Page 231]
5. Make one or more of the OMS output devices available for use in R/3 printing and faxing.
See: Connecting a Printer to an External OMS [Page 240]
6. If you are working in a test system, replicate your OMS definitions in other R/3 Systems.
See: Transporting OMS Definitions Between Systems [Page 239]
7. During production use of your OMS: If you are using RFC callback for reporting of OMS job
and device status, you can force reconfiguration of the callback client.
This is an optional step. Usually the OMS callback client reconfigures itself.
December 1999 225](https://image.slidesharecdn.com/46bprinting-130417085750-phpapp01/85/46-b-printing-225-320.jpg)
![BC - SAP Printing Guide SAP AG
Connecting the Spool System to an External OMS
See: Triggering OMS Reconfiguration [Page 236]
Result
You can now use OMS devices for printing and faxing R/3 documents.
226 December 1999](https://image.slidesharecdn.com/46bprinting-130417085750-phpapp01/85/46-b-printing-226-320.jpg)
![SAP AG BC - SAP Printing Guide
Creating a Real Output Management System
Creating a Real Output Management System
To integrate the spool system into an external OMS, you must first create the OMS as a real
OMS (ROMS) in the spool system. The ROMS specifies the characteristics of the external OMS.
Not every OMS offers all of the operations that the OMS interface allows. Therefore, when you
create the real OMS in the R/3 System, you should specify the options that are supported by the
OMS you are using.
Prerequisites
• Your external OMS system should be installed and ready to run before you define it in R/3.
• OMS manufacturers have the option of delivering a configuration file to you. If such a file is
available, then uploading it into the spool system creates the ROMS and operating system
specific commands for you.
Before proceeding, check to see if such a file is available for your OMS.
Procedure
1. Is an OMS configuration file available? If so, then perform the following procedure to
upload the file: Importing OMS Definitions [Page 237].
2. Start the ROMS maintenance tool. Choose Tools → CCMS → Spool → Spool
administration. Choose Extended admin, and then Real output management systems on the
Output management systems tab .
Choose Change and then Create. You can also copy the settings and configuration of an
existing ROMS. To do this, select it and then choose Create with copy.
3. Use the OMS documentation to fill out or edit the OMS attributes fields.
4. Save the ROMS definition and exit the function.
5. If you are using callback: Define the R/3 user and password for the callback client. The
user name and password are used to log onto the R/3 System if you are using callbacks. To
define user names and passwords, choose Tools → Administration → User maintenance →
Users. Note that the values entered in the OMS are the same. For additional information, see
the User Maintenance Manual [Ext.].
Create the user in the logon client of the callback client. The user needs the following
authorization to log into the CCMS system management XOM API:
• An authorization for S_XMI_PROD (Auth. for external management interfaces (XMI)) with the
value XOM for field Interface ID.
Sample R/3 authorization: S_XMI_ADMIN or S_XMI_XOM_A.
Result
Your ROMS definition for identifying an external OMS is finished. You can now create logical
output management systems [Page 229] and OMS printers [Page 240] that reference the ROMS.
December 1999 227](https://image.slidesharecdn.com/46bprinting-130417085750-phpapp01/85/46-b-printing-227-320.jpg)
![BC - SAP Printing Guide SAP AG
Organizing OMS Output Devices in Logical OMSs
Organizing OMS Output Devices in Logical OMSs
The logical OMS (LOMS) concept lets you group output devices according to how they use the
external output management system. This section explains how this concept can be useful to
you.
You can assign all of your R/3 OMS output devices to a single LOMS. Only a single LOMS is
required.
However, it can be useful to group R/3 OMS devices into separate LOMSs for these reasons:
• Using separate sets of operating system specific commands: If your OMS is running on
several platforms, you can define a different set of OMS commands for each operating
system.
Example: You have special printers that require extra SUBMIT command options. You
can meet this requirement by assigning these printers to their own LOMS. You can then
define a special command set that uses the special options for the LOMS.
If you want to change commands that apply to several LOMSs, you do not have to
change each LOMS individually. You can organize your LOMS into command groups. If
you change the commands for an LOMS in a command group, these changes also apply
to all other LOMSs in the group.
• Using different OMS services: You can use LOMSs to allow different sets of OMS services
to be used, according to the printer.
Example: You want to use RFC callback to track the status of critical printers in the
shipping department. Less important printers should be tracked only by polling. You can
meet this requirement by defining an LOMS for each group. In the critical LOMS,
callback is activated. In the other LOMS, only polling is activated.
• Distributing callback workload: Should you want to distribute the workload of processing
status reports from an OMS callback client, you can do so by defining separate LOMSs. For
each LOMS, you can specify a different R/3 server as the callback target.
If any of these requirements apply to you, then you may want to design a set of LOMS definitions
that meet your requirements before proceeding [Page 229].
228 December 1999](https://image.slidesharecdn.com/46bprinting-130417085750-phpapp01/85/46-b-printing-228-320.jpg)
![SAP AG BC - SAP Printing Guide
Creating a Logical Output Management System
Creating a Logical Output Management System
The second step in integrating the R/3 spool system with an external output management system
(OMS) is to define one or more logical OMS (LOMS) definitions.
A LOMS specifies how a particular group of R/3 OMS output devices is to use the external OMS.
(See Organizing OMS Output Devices in Logical OMSs [Page 228] for additional information
about the LOMS concept and its uses.)
If a configuration file was supplied with your OMS or you have imported your own configuration
file, then at least one LOMS has probably already been defined for you.
Prerequisites
You have defined the real OMS (ROMS) [Page 227] to which your LOMS definitions will refer.
Procedure
1. Start the LOMS maintenance tool. Choose Tools → CCMS → Spool → Spool
administration. Choose Extended admin. and then Logical OMS on the Output management
systems tab.
If the LOMS you want to edit has already been created, select the LOMS name and
choose Change. Otherwise choose Change and then Create. You can also copy the
settings and configuration of an existing LOMS. To do this, mark it and then choose
Create with reference.
2. If you are creating a new LOMS, enter the basic attributes of the LOMS:
• Enter a name and description for the LOMS.
• Choose the ROMS which this LOMS uses.
• Choose an R/3 server as the Tasking target.
3. Choose to copy all the settings of the selected ROMS. You can then edit these settings.
4. Select a command group, if any have been defined. Otherwise, enter a character to define
the command group.
Local commands: If you want to define commands only for this LOMS, then select Local
as the command group. When you define a command group, the commands will be used
only for this LOMS. The command group cannot be selected from other LOMSs.
3. (If you are using RFC callback), Specify other options and parameters on the OMS
configuration tab. If you want to adjust message filtering, choose .
4. Save the LOMS and exit.
Result
Your LOMS definition for specifying how R/3 OMS devices are to access an external OMS is
complete. You can now define additional LOMSs or define the commands [Page 231] that are
required by LOMSs.
December 1999 229](https://image.slidesharecdn.com/46bprinting-130417085750-phpapp01/85/46-b-printing-229-320.jpg)
![SAP AG BC - SAP Printing Guide
Defining OMS Command Sets for LOMS
Defining OMS Command Sets for LOMS
You can define a set of OMS commands to be used by a particular LOMS on a particular
platform. When an output request is sent to this LOMS, the SUBMIT, QUERY, POLLING and
other commands in this set are used to submit the output request to the OMS and query its
status.
You need at least one command set for each operating system on which your R/3 servers are
running. For more information, see Organizing OMS Output Devices in Logical OMSs [Page
228].
Prerequisites
You have created at least one logical OMS [Page 229] (LOMS).
Procedure
1. Start the LOMS maintenance tool, if you are not already in the LOMS definition for which
you want to define a command. Choose Tools → CCMS → Spool → Spool administration.
Choose Extended admin. and then Logical output management systems on the Output
management systems tab.
Select the LOMS for which you want to define commands and choose Change. Then
choose Commands
2. Choose the operating system for this variant of the OMS commands.
If you have a heterogeneous system environment, you will need a variant for each host
operating system on which your R/3 servers are running.
If you have a homogenous operating system environment, define only a single variant,
for your operating system.
Background: If the R/3 System uses a defined OMS command, it chooses the correct
variant according to the local host operating system. Example: If a SUBMIT command is
to be issued by an R/3 spool server running on Windows NT, then the Windows NT
SUBMIT command is used.
Here are the operating system names you can enter:
Value to Enter
Operating System
AIX IBM UNIX
BOS/X Honeywell-Bull UNIX
HP-UX Hewlett-Packard UNIX
OSF/1 Digital Equipment UNIX
OSF1 Digital Equipment UNIX
SINIX Siemens-Nixdorf UNIX
SunOS Sun UNIX
Windows NT Microsoft Windows NT
1. Enter the Command path. This is the full path name for the OMS commands. In this variant,
the path name has a prefix for each of the OMS commands.
December 1999 231](https://image.slidesharecdn.com/46bprinting-130417085750-phpapp01/85/46-b-printing-231-320.jpg)
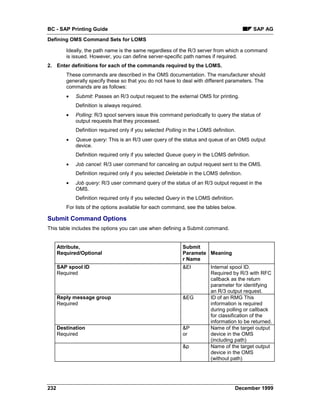
![SAP AG BC - SAP Printing Guide
Defining OMS Command Sets for LOMS
Document &F Name of the file containing
Required the print data (including
path)
&f Name of the target output
device in the OMS
(without path)
Attributes required if RFC callback control is
implemented through the Submit command (see
the OMS documentation to determine if this is
the case)
SAP instance &ES SAP instance name for
callback format
<hostname>_<system
ID>_<system number>
‘-‘ if callback not required.
Interval &ET Maximum interval for
collecting RMG-specific
events before forced
initiation of callback.
Should fewer than
Number of events occur,
the callback client reports
events after this interval
elapses.
Number &EA Number of RMG-specific
events to collect before
initiating callback
Optional attributes
Number of copies &C Number of copies
Department &D Addressee’s department
R3LOMS flags &E1 LOMS option settings for
OMS services.
LOMS flags &E2 OMS flags of the LOMS
This option inserts the
contents of the OMS
Configuration field from
the LOMS definition into
the Submit command.
This field can be used to
insert any desired OMS
options or OMS
arguments into the
command.
See also: Defining a
Logical OMS [Page 229]
December 1999 233](https://image.slidesharecdn.com/46bprinting-130417085750-phpapp01/85/46-b-printing-233-320.jpg)
![BC - SAP Printing Guide SAP AG
Defining OMS Command Sets for LOMS
R3 ROMS flags &E3 ROMS option settings for
OMS services.
Currently, these are:
• Job query supported
• Job callback
supported
• Device callback
supported
• Fax supported
For the field structure, see
table TSPROMS in the
ABAP Dictionary. The
options are inserted in the
Submit command as a 60-
character string.
ROMS flags &E4 OMS flags of the ROMS
This option inserts the
contents of the OMS
Configuration field from
the ROMS definition into
the Submit command.
This field can be used to
insert any desired OMS
options or OMS
arguments into the
command.
See also: Defining a Real
OMS [Page 227]
Fax recipient &EP Name of FAX recipient
(future enhancement)
Cover page &H/x/y/ Cover page wanted
(alternative 2)? X = yes, Y
= no.
Output request name &I Output request name
(name in R/3) without the
R/3 System name
(database ID)
Output request name &J Output request name
(name in R/3) including
the R/3 System name
(database ID)
Layout &L R/3 format of the output
request
R/3 client – spool request owner &M Client of R/3 owner of the
spool request (user who
created the spool request)
R/3 client – output request generator &m Client of the R/3 user who
created the output request
R/3 user – spool request owner &O R/3 user ID of the owner
of the spool request
R/3 user – output request generator &o R/3 user ID of the owner
of the output request
234 December 1999](https://image.slidesharecdn.com/46bprinting-130417085750-phpapp01/85/46-b-printing-234-320.jpg)
![SAP AG BC - SAP Printing Guide
Defining OMS Command Sets for LOMS
R/3 user &R R/3 user ID of the
addressee (intended
recipient) of the output (for
delivery of print output)
R/3 printer &S Name of the printer in the
R/3 spool system
Title &T R/3 title user gave to the
output request (if any)
Fax number &t Telephone number of the
target fax device
Cover page &U Cover page wanted
(alternative 1)? (X = yes,
N = no)
Priority &Y R/3 priority (1-99), where
1 is the highest priority
Result
You have defined commands for use in an LOMS. You can now:
• Define additional commands for other LOMSs
• Connect a Printer to an External OMS [Page 240]
December 1999 235](https://image.slidesharecdn.com/46bprinting-130417085750-phpapp01/85/46-b-printing-235-320.jpg)
![BC - SAP Printing Guide SAP AG
Exporting OMS Definitions
Exporting OMS Definitions
You can use report RSPOXOMS not only to import OMS definitions [Page 237] but also to export
them from your R/3 System.
Exporting from one R/3 System and importing into another is one way to move your R/3 OMS
definitions between R/3 Systems. However, you should use this procedure only in exceptional
circumstances (a quick move between test systems, for example). The reason: it is easier to
keep track of where you copy OMS definitions if you use the recommended "official" transport
mechanism. See Moving OMS Definitions Between Systems [Page 239].
You can also use the export mechanism as a way to save your OMS definitions.
Prerequisites
You would like to move all or some of the objects that make up an R/3 OMS definition between
R/3 Systems.
Procedure
1. Log on to the R/3 System from which the OMS definition is to be exported.
2. Choose Tools → ABAP Workbench → ABAP Editor. Alternative: Enter Transaction SE38.
3. Enter RSPOXOMS in the Program field and choose Execute.
4. In the selection screen, do the following:
• In Export/Import file name, enter the full path name of the configuration file.
• Select Server or Frontend computer depending upon where you want to export the
configuration file.
• Select Export, Execute export, and Generate log.
• Enter a logical OMS and/or a real OMS. You can also export all LOMS definitions to a real
OMS.
5. Run the report.
The report displays a list showing the ROMS and LOMS definitions that have been
exported from the R/3 System in a host-system file.
Result
You have exported all or part of an OMS definition to a file. You can save the file as an informal
means of backing up the OMS definition. Or you can import the file into another system. See
Importing OMS Definitions [Page 237].
238 December 1999](https://image.slidesharecdn.com/46bprinting-130417085750-phpapp01/85/46-b-printing-238-320.jpg)
![SAP AG BC - SAP Printing Guide
Transporting OMS Definitions Between Systems
Transporting OMS Definitions Between Systems
You can transfer your OMS definitions into other R/3 Systems. This means, for example, that you
only need to maintain OMS definitions in a single system. If you need to make changes, you can
then transport the OMS objects from the maintenance system to your other systems.
If you want to use this maintenance model, only use logical spool servers in the definitions of:
• OMS: ROMSs and LOMSs
• Output devices that belong to the OMS
Using logical servers means you will not have to adjust the server names in the OMS definitions
after you have transported them. If you specify real servers in the definitions, you will have to
change the server names to reflect the servers present in the other systems.
Procedure
There are two ways to transport OMS definitions between R/3 Systems. Here, we describe only
the recommended method using the R/3 software logistics (transport) system. An alternate
method is to download and upload definitions: See Importing OMS Definitions [Page 237] and
Exporting OMS Definitions [Page 238].
Transport either a ROMS definition or a ROMS definition with all LOMS definitions that
reference it:
1. Choose Tools → CCMS → Spool → Spool administration. Choose Extended admin. and
then Real output management systems on the Output management systems tab.
2. Switch to Change mode in the ROMS list and choose the ROMS definition you want to
transport.
3. Choose the appropriate transport function:
• To transport only the ROMS definition, choose .
• To transport both the ROMS definition and all LOMS definitions that reference it, choose
All.
In both cases, a transport request is created with which you can transport the OMS
definition objects to other R/3 Systems.
Switch to the Workbench Organizer [Ext.] (Transaction SE09) to transport your OMS definitions.
Result
You have created and transported OMS definitions between R/3 Systems. You can track your
OMS copy activity in the transport requests you created using this procedure.
December 1999 239](https://image.slidesharecdn.com/46bprinting-130417085750-phpapp01/85/46-b-printing-239-320.jpg)
![BC - SAP Printing Guide SAP AG
Connecting a Printer to an External Output Management System
Connecting a Printer to an External Output Management
System
Use this procedure to make a printer that is served by an external output management system
(OMS) accessible for R/3 printing and (optionally) faxing.
Prerequisites
1. You must have already defined the external OMS in the R/3 spool system. Real OMS
(ROMS) and logical OMS (LOMS) definitions must already exist. For more information, see
Connecting the Spool System to an External OMS [Page 225].
2. Can you already print on your OMS printer from your host systems? If not, then you
must first install the printer or fax in the OMS.
Procedure
1. Start the device definition. Choose Tools → CCMS → Spool → Spool
administration → Output devices on the Devices / servers tab page. Choose Change
and then Create to create a new device definition. If you want to copy the definition of
an output device, select this in the list of output devices and choose Create with
reference.
2. Fill in the fields.
For help filling in the fields, see the following table.
Field Input
DeviceAttributes Device type Enter the device type that has been defined in the
tab page R/3 System for the printer model that you have
You can also use the generic Device Type SWIN
[Page 80]
here. This means you can use any device supported
by Windows, even if the device type is not defined in
the R/3 System.
Spool server Enter the name of the R/3 Spool Server [Page 316]
that is to prepare the output for this device.
Authorization To assign the output device to an authorization
group group, enter the name here. For more information,
see Authorization Groups for Output Devices [Page
222].
Host printer Enter the name of the output device in the external
OMS.
Example: OMS_PRINTER_NAME
HostSpoolAccMet Host spool Enter E, for printing by way of an external output
hod tab page access management system.
method
Host printer Enter the name of the output device in the external
OMS
240 December 1999](https://image.slidesharecdn.com/46bprinting-130417085750-phpapp01/85/46-b-printing-240-320.jpg)
![SAP AG BC - SAP Printing Guide
Connecting a Printer to an External Output Management System
Logical OMS Choose the LOMS to which this device should be
assigned. A LOMS specifies how the device is to be
accessed in the external output management system
(OMS).
For more information, see Organizing OMS Output
Devices in Logical OMSs [Page 228].
3. Optional: Classify the device.
Choose Edit → Classification. Choose the output-type classification that is appropriate
for this device.
Background: If you classify your servers as well, the spool system checks that the
device and server classifications match thus ensuring optimal output configuration.
4. Save the device definition and exit.
Result
Your OMS printer or fax machine is immediately available to R/3 users and programs for printing
R/3 lists and SAPscript forms and documents.
December 1999 241](https://image.slidesharecdn.com/46bprinting-130417085750-phpapp01/85/46-b-printing-241-320.jpg)
![SAP AG BC - SAP Printing Guide
Editing Cover Pages for Output Requests
by default the spool system uses the X_PAPER cover page. X_PAPER can not make the
required settings as the subsequent print request may use any one of many formats. If
the cover page followed initialization, its settings might alter settings made during the
initialization. The initialization for the print job therefore comes after the cover page.)
If you are editing a copy of a standard R/3 cover page action, you do not need to change
the initialization commands. If you are creating a new cover page action, then use,
whenever possible, a standard R/3 cover page as a guide to the commands to be issued
to a given type of printer.
For example, you may need to set all of the following printer attributes at the start of a
cover page action:
• The printer font and/or character set
• The printer emulation mode
• The page format (or page length for the SAPscript STND and STN2 line printer
drivers)
• The leading (lines per inch)
• The page orientation (portrait or landscape)
– Then print the cover page: For the cover page text, you can use two types of variables
to add information such as user name, recipient address and so on.
For a list of the variables, see Variables for Printing Data on Cover pages [Page 244].
December 1999 243](https://image.slidesharecdn.com/46bprinting-130417085750-phpapp01/85/46-b-printing-243-320.jpg)
![BC - SAP Printing Guide SAP AG
Variables for Printing Data on Cover Pages
Variables for Printing Data on Cover Pages
There are two types of texts on cover pages:
• Static texts. These are texts that structure the cover page, such as field names like User
name and User address and so on.
R/3 cover page actions use the "TP_" variables of the spool system to print out these
texts. TP_ variables are translatable and are output in the language specified in the
output device definition in the R/3 spool system.
• Dynamic texts. These are texts that output variable information such as the user’s name,
number of pages, and so on.
R/3 cover page actions use three types of variable to output dynamic texts. These are
spool, user address, and profile variables.
"TP_" Translatable Variables for Static Texts
The TP_ variables let you insert static texts, such as field names, in a cover page.
The standard set of TP_ variables with their default English translations is shown in the table
below. However, you can add your own TP_ variables and your own translations of these
variables. For more information, see Working with the “TP_” Cover Page Variables [Page 248].
"TP_" Variables: Static Texts on Cover Pages
Predefined TP_ Variable Name
Default Value
(English)
TP_CLIENT Client
TP_COUNT Number
TP_CREATE Created
TP_DEPART Department
TP_DEVICE Device
TP_DEVTYP Device type
TP_DTABSE Database
TP_FORM Format type
TP_FROM From
TP_HOST Host
TP_OUTREQ Output request
TP_OWNER Owner
Dynamic Variables: Spool, User Address, and Profile Variables
You can use any of the variables shown in the following tables on your cover page.
244 December 1999](https://image.slidesharecdn.com/46bprinting-130417085750-phpapp01/85/46-b-printing-244-320.jpg)
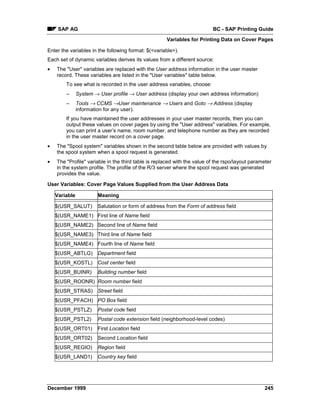
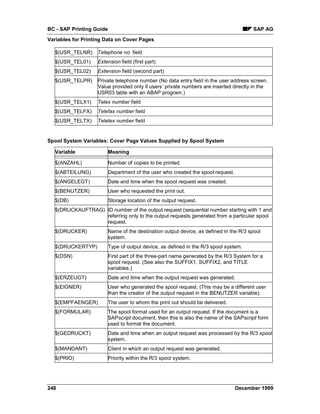
![SAP AG BC - SAP Printing Guide
Device Types for SAP Output Devices
Device Types for SAP Output Devices
The device type information is used to convert a document from an internal format (OTF or text
format) into a device-specific, print-ready data stream. A device type specifies attributes that
apply to all devices of a particular model, and can therefore be used by multiple device
definitions. For example, all Hewlett-Packard LaserJet IIID-compatible devices use the device
type HPLJIIID in the R/3 spool system.
The device type specifies which SAPscript printer driver the system should use for output
formatting for devices of this type, as well as which printer character sets are required.
We deliver a set of pre-defined device types with the standard system. We are continually adding
to this set, so that the newest printers are always included; for more information, see SAPNet
Note 8928). If necessary, you can define your own device types. For more information about this,
see Defining a New Device Type [Page 252].
The standard device types are completely defined and do not need to be changed or added to
before being used in device definitions.
December 1999 251](https://image.slidesharecdn.com/46bprinting-130417085750-phpapp01/85/46-b-printing-251-320.jpg)
![BC - SAP Printing Guide SAP AG
Defining a New Device Type
Defining a New Device Type
A device type is the R/3 spool system’s container for storing information about a particular type of
output device such as a PostScript printer. Basically, the device type stores the same type of
information as a printer driver in a Windows PC: the information needed to generate a device-
specific, output-ready data stream.
You can modify any part of a device type as required. For example, you may want to add support
for a SAPscript printer font that is not part of the R/3 standard font set. This change would require
adding new print controls to the device type to enable it to switch to the font. Only make changes
to an R/3 standard device type using your own copy of the device type. Otherwise your changes
may be overwritten when you upgrade your R/3 System.
In this section, we review how to define a device type from start to finish. If you want to extend an
existing device type, see the relevant step in the procedure for more information.
1. Copy the device type.
If you are modifying an R/3 standard device type, only work on a copy of the device type.
Otherwise, your changes may be lost when you upgrade your system.
If you are creating a new device type, working from a copy of a similar device type is
easier than starting from scratch. The print controls and device type formatting actions
required are, for example, already present.
Procedure: See Copying Device Types [Page 256].
2. Edit the device type.
Use: The device type identifies a particular printer or fax machine model.
When to edit: You are defining a completely new device type.
Where to edit: Using a copy of a R/3 standard device type.
Contents: You can specify:
– The R/3 character set that should be used for formatting device output. The character set
specifies the character codes to send to the device for printing specific characters.
– The driver to use for formatting SAPscript documents
Procedure: Editing Device Types [Page 257]
3. Add a new character set or enhance an existing character set, if required.
Use: An R/3 character set is used to convert output from the internal R/3 representation
into the codes required by the output device to print the output correctly.
When to edit: You are defining a new device type and none of the standard R/3 character
sets are suitable for the device. You can then add a new character set or enhance a
copy of an existing character set by adding characters to it.
Where to edit: Using a copy of a R/3 standard device type. The number for a new
character set must begin with "9"; to places the character set in the customer
namespace.
Contents: A character set contains the set of R/3 characters that can be output at a
device that uses that character set. R/3 characters specify the code to send to a device
in order to produce the corresponding character.
252 December 1999](https://image.slidesharecdn.com/46bprinting-130417085750-phpapp01/85/46-b-printing-252-320.jpg)
![SAP AG BC - SAP Printing Guide
Defining a New Device Type
For more information: Maintaining Character Sets [Page 302]
4. Add page formats.
Use: A page format specifies the physical size and orientation of an output page. From
Release 4.5A, both SAPscript and list printing uses page formats. The physical page
dimensions determine and specify the printable area on a page. This information, in turn,
determines how the page is filled with text.
When to edit: You need to add new page formats for paper sizes or output layouts not
included in the standard system.
Page formats are used together with formats and device formats to determine how text
should be printed on a particular paper size or in a particular layout format. To define a
new paper size, you need to add all three of these objects.
Where to edit: Under Page formats Name must begin with Y or Z. Do not alter existing
page formats as otherwise R/3’s SAPscript forms or ABAP lists may not print correctly.
Contents: Dimensions and orientation of physical paper (SAPscript and lists) or lines and
columns in page layout (lists text).
Procedure: Creating Page Formats [Page 294]
5. Add formats.
Use: Formats specify the paper sizes or output formats that can be used with R/3 device
types. Example: Standard R/3 device types support formats such s DINA4, LETTER, and
X_65_80.
When to edit: You need to add new formats for paper sizes or output layouts not included
in the standard system. Do not alter or delete existing formats as otherwise R/3
documents may not print correctly.
Formats are used together with page formats and device formats to determine how text
should be printed on a particular paper size or in a particular layout format. To define a
new paper size, you need to add all three of these objects.
Where to edit: Under Formats. Name must begin with Y or Z. Do not alter existing
formats, as otherwise R/3’s SAPscript forms may not print correctly.
Contents: Name of corresponding page format (same as format name for SAPscript
formats, page format ANY for list text formats).
Procedure: Creating Formats [Page 259]
6. Define or edit device formats.
Use: A device format specifies a format for a particular device type. That is, it associates
sets of device–specific commands, called actions, with a format. The R/3 spool system
uses device type formatting actions to output printer commands during printing. These
actions specify printer operations. Examples of actions: configure printer for the incoming
output request, or specify line end, page end and printer reset after the output request
has completed. Printer initialization is especially important, as this sets critical format
information, such as lines per page.
The device format for the X_65_80 format (ABAP list and editor output) for the
HPLJ4 device type (Hewlett-Packard LaserJet 4 printer) contains the following
actions: Printer initialization, Reset, End of page, End of line. Each action contains
December 1999 253](https://image.slidesharecdn.com/46bprinting-130417085750-phpapp01/85/46-b-printing-253-320.jpg)
![BC - SAP Printing Guide SAP AG
Defining a New Device Type
the appropriate printer commands for carrying out the indicated operation. Printer
initialization, for example, sets the line spacing to 65 lines specified by the format.
The End of line action issues carriage return and line feed commands to the printer.
Device type formats are device–specific. They are copied with a device type.
When to edit: In the following situations:
– You need to add a device type format for a new format (a new type of paper or layout).
– You need to customize a copy of an R/3 standard device format. Normally, you should
only customize the cover page for output requests in the Title page action. Other
changes may have adverse effects on list and SAPscript printing. For information about
customizing the cover page, see Maintaining Cover Pages for Output Requests [Page
242].
Where to edit: Always using a copy of the R/3 device type.
Contents: Printer/fax commands for the standard R/3 actions -- Printer initialization, Title
page (optional), Reset after exit, device–specific combination of Start of line, Start of
page, End of line, End of page (see similar standard R/3 device type).
Procedure: Editing Device Type Formats [Page 264]
7. Define or edit print controls.
Use: The R/3 System provides a set of standard formatting tags known as "print
controls." Print controls are used in all types of R/3 documents (SAPscript forms, ABAP
list output). Print controls are used mostly for character formatting, but also overlap in
function with device type format actions in some cases (SLAND, SPORT, SLINE, and
SPAGE print controls). Print controls are usually inserted in documents under program
control (by one of the SAPscript printer drivers or by an ABAP program or report), though
users can also enter them in SAPscript documents directly.
When an output request is generated, print controls are converted into printer–specific
escape sequences to control how text output. For example, print controls change fonts,
print bar codes, and perform other character formatting operations.
When to edit: When you are defining a new device type or extending or customizing the
formatting capabilities of an existing device type.
Where to edit: Using a copy of the R/3 device type. Print controls are specific to a device
type and are copied with the device type. You can therefore change standard R/3 print
controls under their original names in a copied device type. New print controls should
have names that start with Y or Z (customer namespace).
Contents: The printer or fax commands required for the operation as specified by the
print control.
Procedure: Editing Print Controls [Page 272]
8. Implement OCR or bar code printing, if required.
If you want to print OCR characters or bar codes with the printer, you must first enable
these printing functions. For more information, see Bar Code Printing [Page 154].
9. Activate your device type changes in the R/3 System.
Component Procedure for activating your changes
254 December 1999](https://image.slidesharecdn.com/46bprinting-130417085750-phpapp01/85/46-b-printing-254-320.jpg)
![SAP AG BC - SAP Printing Guide
Defining a New Device Type
New/copied device Enter as a device type under device definitions in the R/3 spool
type system. Required for changes to formats (page formats, formats,
device formats), character sets, and print controls.
New character set Enter in a copied device type. Automatically takes effect when the
new device type is used.
Must be in accordance with character set specification, if any, in
the Device format Printer initialization (list printing) and with the
character sets that may implicitly be selected at the printer using
SAPscript SF<xxx> font print controls. For help with testing, see
Testing Output Devices [Page 219].
New page format Enter in the SAPscript forms that should use the new format
(SAPscript Form Painter).
New format For SAPscript: Activated with new device type when new page
format is activated.
For list printing: Add to affected reports with NEW-PAGE PRINT
ON LAYOUT/ SUBMIT... TO SAP-SPOOL LAYOUT (print at list
generation). For printing from list display, adjust REPORT width
specification to force selection of the format and move format to
R/3 namespace (name "X....").
New device type Automatically activated when the device type, page format, and
format format are activated.
Print Controls List printing: List print controls edited under their standard R/3
names are automatically activated when the new device type is
activated.
New print control names: Enter in affected reports with PRINT-
CONTROL FUNCTION. Effective only if a list is printed as it is
generated.
SAPscript printing: SF (font) and SBP/SBS (bar code) print controls
require:
• New SAPscript fonts for the fonts/bar codes (SAPscript Font
Maintenance)
• Use of the new fonts in affected SAPscript forms (SAPscript
Form Painter).
To define other print controls, you need to use the SAPscript /:
PRINT-CONTROL statement to add print controls to the affected
SAPscript texts.
December 1999 255](https://image.slidesharecdn.com/46bprinting-130417085750-phpapp01/85/46-b-printing-255-320.jpg)
![SAP AG BC - SAP Printing Guide
Editing Device Types
Editing Device Types
The device type consists of several components, all of which are linked by a header, which is the
device type definition itself. This topic explains what you can specify directly in the device type
definition.
To create or edit a device type, choose Tools → CCMS → Spool → Spool administration and
then Full administration. Then choose Device types to display a list of device types. If you have
already copied the device type (see Copying Device Types [Page 256]), then just double–click
your device type. Otherwise, use Create or Create with reference to set up a new device type.
You can then edit the following fields:
• SAPscript Driver: Enter the name of the SAPscript printer driver to use with this device type.
The drivers convert output from the SAPscript OTF format into Postscript or PRESCRIBE
format, for example.
The following table describes SAPscript drivers in more detail.
SAPscript OTF Drivers
Drivers Printers
POST PostScript printers
PRES Kyocera printers that use the formatting language PRESCRIBE
HPL2 Hewlett-Packard or compatible printers that use the PCL-4 (LaserJet II) or PCL-
5 (LaserJet III, 4, 5, and 6) printing language
STN2 Line printers. This is a generic driver for printers that cannot be driven by one of
the other OTF drivers. Proportional fonts are not supported, but character
attributes such as boldface, italic, and so forth are supported.
Note: The STN2 line printer driver requires that a printer can be driven in true
line-mode. That is, the printer can correctly print a file that contains only
printable characters and NEWLINE, CARRIAGE RETURN, and FORM FEED
commands. A PostScript printer is, for example, not a line printer.
SWIN Windows printers by way of the SAPlpd transfer program. This driver is for use
only with the SAPWIN/SWIN device type. SWIN converts SAPscript OTF format
to an internal R/3 protocol that SAPlpd understands and converts to Windows
GDI commands.
By way of SAPWIN/SWIN, you can use any type of Windows printer, regardless
of whether it has a device type definition in R/3.
TELE Default driver for fax and telex traffic from the SAPcomm communications
server. Used only in the standard device types predefined for SAPcomm
(TOPCALL, for example).
Produces an ASCII-only output stream. The driver ignores font changes,
superscripts and subscripts, underlining and other changes in font attributes.
Other drivers you may notice are either for SAP internal use or are not used.
You can only use the following functions if you are using (or copying) device types
HPLJ4000, KYOFS170, POST2 and SWIN:
• Drivers for list printing: Enter the name of the list printer driver for this device type. The
drivers convert output from the internal list format to one of the following formats: PCL-5,
PostScript (Level 2) or PRESCRIBE II.
The following table describes the R/3 System drivers for list printing in more detail:
December 1999 257](https://image.slidesharecdn.com/46bprinting-130417085750-phpapp01/85/46-b-printing-257-320.jpg)
![BC - SAP Printing Guide SAP AG
Editing Device Types
Drivers Printers
HPL2 Hewlett-Packard or compatible printers, that use printing language
PCL-5 (LaserJet III, 4, 5 and 6).
POST PostScript printers (PostScript Level 2)
PRES Kyocera printers that use the PRESCRIBE II printing language.
SWIN Windows printer, by way of the SAPlpd transfer process
[No entry] Leave the field empty if your device type should not use the list printing
drivers.
However, when implementing formats for your device type, you can
specify that individual formats should use a driver for list printing. For
information about this, see Editing Device Type Formats [Page 264].
• Printer character set: Enter the ID number of the R/3 character set compatible with the
printer model you are defining. This character set is used to convert output characters from
their R/3-internal representation to the codes needed for outputting the characters at the
printer. The character set must be defined in the R/3 spool system (Spool administration).
Enter the same ID number in all three character set fields. The first character set is used
for all output requests sent to printers of this type. The second and third character sets
are reserved for future use.
To select an R/3 character set for a printer, use the character set specified for a similar
device type, if possible. Otherwise, check that the character set identification on the
printer status sheet or in the printer manual is similar to that in the R/3 character set. If
you are still not sure which character set to use, compare the character codes in the R/3
character set with those in the technical guide to your printer, or do a test print with a
character set. (See Testing Output Devices [Page 219] for more information).
If you cannot find an R/3 character set that meets this requirement, then you can
define an additional character set. (See Maintaining Character Sets [Page 302] for
help.)
OCR-A or OCR-B (optical character recognition) printing: If your device type is
among those supported by R/3 for OCR, then you only need to enter the standard
R/3 character set for the device type. This character set includes the special OCR-A
characters hook, chair, and fork. The character set can be used for both normal and
OCR output. See Printer Types that Support OCR Printing [Page 146] for supported
printer types. OCR printing is not supported for Eastern European and Asian
character sets.
258 December 1999](https://image.slidesharecdn.com/46bprinting-130417085750-phpapp01/85/46-b-printing-258-320.jpg)
![SAP AG BC - SAP Printing Guide
Creating Formats
Creating Formats
Formats specify how the text is to appear on paper printouts. As the format names indicate, the
formats indicate mainly what paper size to use.
The R/3 System describes three different types of formats:
• Formats used by SAPscript. The standard formats are named after the page format used
• Formats used by the spool system. The names of the standard formats begin with the letter
X.
• Format names beginning with G are reserved for R/3 business graphics.
To create a new format for SAPscript form printing, see Creating Formats for SAPscript [Page
262].
To create a new format for list output, see Creating List Formats [Page 260].
December 1999 259](https://image.slidesharecdn.com/46bprinting-130417085750-phpapp01/85/46-b-printing-259-320.jpg)
![BC - SAP Printing Guide SAP AG
Creating List Formats
Creating List Formats
Use
The names of the R/3 standard formats for list printing indicate how many characters per line and
how many lines per page. Examples: X_65_80 (print 65 lines 80 characters wide per page);
X_65_120 (print 65 lines 120 characters wide per page).
All list formats use a non-proportional font (except for device types that use HPL2 or PRES
drivers for list output). For line printers, all formats assume that a printer uses a 12-inch paper
length. For page printers, all assume LETTER or DINA4 paper size.
Procedure
1. Choose Tools → CCMS → Spool → Spool administration, Full administration and
then Formats on the DeviceTypes tab.
2. To create your new format, on the next screen choose Change and then Create or
Create with reference.
Give the format a name starting with Y or Z (for customers the reserved namespace.)
This avoids conflicts with standard R/3 formats. If you are modifying a list format, then
follow R/3’s naming convention: Y or Z_<LL>_<CC> where <LL> is the number of lines
to print on a page, and <CC> is the number of characters to print on a line.
3. Enter L in the field Type (Format for ABAP lists). Choose Enter.
4. Enter ANY as the page format if you do not want to specify the page format. Before
Release 4.5A, with the "X formats" used by the spool system for printing ABAP lists
the paper size and alignment are specified but the page format is not required.
From Release 4.5A, list printer drivers interpret the page format and alignment
specifications. You adapt the list size to the paper tray information in the output device.
5. Enter the line and column number of the area to be printed.
6. Optional: Select List driver if your format is to be used for device types using one of
the list printing drivers (copies of device types HPLJ4000, KYOFS170, POST2 and
SWIN). Choose Enter.
7. Choose Edit → List driver atts to determine the layout attributes. On the next
screen you can determine the orientation of the output and define the margins.
Note that the page format you select also exists with the orientation (Landscape or
Portrait) you set for the format. If this is not the case, the system displays an error
message.
8. Save your entries.
Result
To implement the format, you need to define a device type format for the new format (for
information about this, see Implementing Device Type Formats [Page 266].)
260 December 1999](https://image.slidesharecdn.com/46bprinting-130417085750-phpapp01/85/46-b-printing-260-320.jpg)

![BC - SAP Printing Guide SAP AG
Creating Formats for SAPscript
Creating Formats for SAPscript
Use
A device type must have a format to match every page format that is used in a SAPscript form.
Prerequisite
You must have created a page format [Page 294] that your format references.
Procedure
1. Choose Tools → CCMS → Spool → Spool administration, Full administration and then
Format types on the DeviceTypes tab page.
2. To create your new format, on the next screen choose Change and then Create or Create
with reference.
3. Give the format a name starting with Y or Z (the reserved namespace for customers). This
avoids conflicts with R/3 standard formats. The format and page format names should be
identical. Example: If, for example, the page format name is ZDINA3, the corresponding
format must also be called ZDINA3.
4. In the field Type, enter S (Format for SAPscript).
5. Select a page format.
6. Select the fields Portrait and Landscape. These fields are purely documentary and have no
effect on processing.
7. Save your entries.
Result
To implement the format, you must implement the format in one or more device types (for more
information about this, see Implementing Formats for Device Types [Page 266].)
SAPscript uses the standard formats listed below. If you add a new device type, then you should
define at least these formats.
Since the format has a purely documentary role, you will need to add commands to the Printer
initialization action in the Device type → Formats to set the paper type at the printer for some of
these formats, as indicated in the table. For information about the commands to enter in the
Printer initialization action, see Editing Device Type Formats [Page 264].
DINA3 Format for the European DIN A3 (297 x 420 mm)paper format
DINA4 Format for the European DIN A4 (210 x 297 mm) paper format
DINA5 Format for the European DIN A5 (148 x 210 mm) paper format
EXECUTIVE Format for the American EXECUTIVE (7 ¼ x 10 ½ in.) paper format
LEGAL Format for the American LEGAL (8 ½ x 14 in.) paper format.
LETTER Format for the American LETTER (8 ½ x 11 in.) paper format.
262 December 1999](https://image.slidesharecdn.com/46bprinting-130417085750-phpapp01/85/46-b-printing-262-320.jpg)
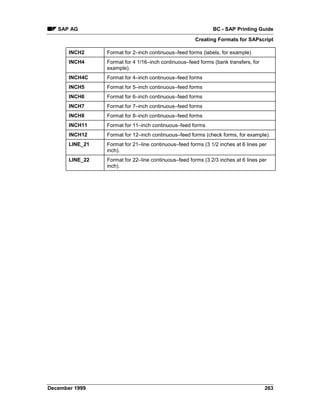
![BC - SAP Printing Guide SAP AG
Editing Device Type Formats
Editing Device Type Formats
To define a device format, do the following:
1. Select Tools → CCMS → Spool → Spool administration → Full administration and then
Device types.
2. In the Device types field, enter the device type whose device formats you want to alter.
Usually, this will be a device type you have copied. Confirm your entry and choose
Formats.
3. On the next screen, choose the device format you want to edit.
4. You see a list of the actions that may be defined in a device format. Those that are already
defined are marked in color. From this screen, you can edit the actions and the attributes of
the format for your device type.
With formats for ABAP lists, you can edit the following attributes:
Attributes: If you are working with any type of PostScript printer, make sure that
PostScript format type is selected for formats for ABAP lists. Do this for every PostScript
device format by choosing Attributes from this screen and selecting the appropriate
field.
With PostScript formats that use the printer for list printing, do not select the field
PostScript format type.
Editing actions: You can make changes to actions by double-clicking an action. When
you do so, the system opens a programming editor in which you can make your
changes. Your source for the device-specific commands that you need to enter should of
course be the technical guide or programming manual supplied with your printer or fax
machine.
Before you edit any actions, read important notes [Page 267].
You can include actions from other device formats with the I command. You can find
more information in the special characters note.
Driver for List Formats
From Release 4.5A, special drivers in the R/3 kernel now control the format of lists (this is no
longer handled by formatting actions). The drivers can now interpret page formats and paper tray
information. You can also print icons, symbols, lines and colors in lists using these drivers. You
can change the attributes of the formats that are passed onto the driver, such as margins and
font sizes.
The new drivers can also interpret paper tray specifications in the printer definition and adapt the
selected format to an existing paper format.
If you copy one of the device types HPLJ4000, KYOFS170 or POST2, you can specify in the
device type definition that the list printing driver should use all the list formats.
However you can also choose to assign the suitable list printing driver only for specific device
type formats (for device types HPLJ4000, KYOFS170 or POST2). To do this, proceed as follows:
1. Choose a list format from the list of device type formats.
264 December 1999](https://image.slidesharecdn.com/46bprinting-130417085750-phpapp01/85/46-b-printing-264-320.jpg)
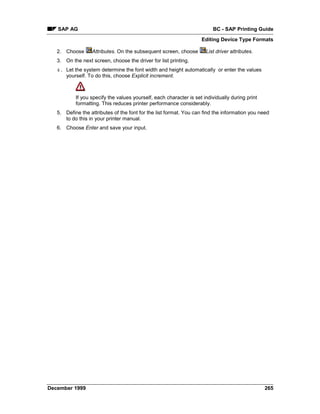
![BC - SAP Printing Guide SAP AG
Implementing Formats for Device Types
Implementing Formats for Device Types
Prerequisites
Make the following changes only to copies of SAP original device types.
To be able to implement a new device type format, you must Create the corresponding format
type [Page 259]. In addition, a page format must exist for this format type.
Procedure
1. Choose Tools → CCMS → Spool → Spool administration, Full administration
2. In the Device types field under the DeviceTypes tab page, enter the name of the copied
device type (Zxxx) and confirm your entry.
3. Choose Formats. Then choose Change and Create.
4. Enter the name of the format type that you want to use for your device type. Choose Enter.
5. Select the new format.
6. Copy the format of a device type for which this format is already in use. Then choose
Copy format, enter the required data and then choose Copy. This copies all the
template's actions and attributes into your new format.
You can also copy individual actions from a format. To do this, select the desired action
(printer initialization, for example) and choose Copy action, enter the required data
and choose Copy.
7. Save your device type format.
Result
Enter the copied device type in the definition of the output devices that are to use the new format.
For information about how to edit actions and attributes of a device type, see Editing Device Type
Formats [Page 264].
266 December 1999](https://image.slidesharecdn.com/46bprinting-130417085750-phpapp01/85/46-b-printing-266-320.jpg)
![SAP AG BC - SAP Printing Guide
Editing Format Actions
Editing Format Actions
For device types that use one of the drivers HPL2, POST, PRES, or SWIN for
formatting lists, formatting does not take place in the actions but is executed by the
drivers. You can edit the attributes of the formats so that you no longer have to enter
control sequences in the individual actions. For more information, see Editing Device
Type Formats [Page 264] .
The following is a description of how you edit the actions of formats that do not use any of the list
printer drivers:
• Sample device type formats: You can use the X_65_80 (list output) and DINA4 (SAPscript)
device type formats as templates for your own device type formats. If you are adding a new
format to an existing device type, then these device type formats can help you to identify the
actions and commands that the new device type format should contain.
• Which actions are required? Only the actions listed below are used by the R/3 System.
You can leave all other actions empty. They are reserved for future use.
Device Type Format Actions Used by R/3
Action Usage and Notes
Cover page Inserted as the first element in the output data stream, before the printer
initialization action.
Use: Prints an identification sheet at the start of an output request.
• The Cover page action is sent only if activated by
default (per printer in the Output device definition) or by
the user in the print selection screen.
• By default, the Cover page action of the X_PAPER
format is used. Standard R/3 device types define only
the X_PAPER cover page. You can override the
default for particular formats by defining a Cover page
action for the format.
For more information, see Maintaining Cover Pages for Output Requests
[Page 242] .
December 1999 267](https://image.slidesharecdn.com/46bprinting-130417085750-phpapp01/85/46-b-printing-267-320.jpg)
![BC - SAP Printing Guide SAP AG
Editing Format Actions
Printer Sent at the start of an output request after the cover page action (if any)
initialization has been sent to the printer.
Use: Configures the printer as required by the format of an output request.
• For List Formats [Page 260], see the X_65_80 device
format of a similar device type for the printer
commands that you should issue. Printer initializations
often specify the character set, page length, line feed,
character spacing, and font. Printer initializations vary
greatly, however, depending on device type.
• For SAPscript Formats [Page 262], see the DINA4
device format of a similar device type for the printer
commands that you should issue. Printer initializations
often specify the printer emulation and character set,
and possibly the perforation skip mode. You do not
need to specify the font, character pitch, line feed, or
paper type. The SAPscript printer drivers make these
specifications themselves via print controls. Printer
initializations vary greatly, however, depending on
device type and OTF driver.
• Add a # (no operation) for SWIN and related device
types.
Reset after exit Sent at the end of a print request.
Use: Reset a printer to a particular state, such as a particular emulation.
• Leave the action undefined or enter a comment if you
do not want to reset the printer.
• Ensure that the escape sequences you enter do not
cause a line feed or otherwise change the print
position.
• Add # (no operation) for SWIN and related device
types.
End of page Sent at the end of every page of an output request.
Use: Used in printing lists to generate a form feed (new page).
See the table below for a summary of the requirements for the end-of-page
and end-of-line actions.
End of line Sent at the end of each line in an output request.
Use: Used for list output and for most SAPscript output to generate a new
line (carriage return and line feed).
See the table below for a summary of the requirements for the end-of-page
and end-of-line actions.
Start a new page Sent at the start of every page of an output request.
Only defined in POSTSCPT list formats. Not defined in standard R/3 device
formats; has therefore no effect on output. Inserted in the output stream by
default so that you can use it if needed.
268 December 1999](https://image.slidesharecdn.com/46bprinting-130417085750-phpapp01/85/46-b-printing-268-320.jpg)
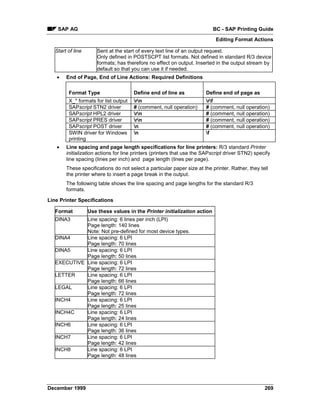
![BC - SAP Printing Guide SAP AG
Editing Format Actions
INCH11 Line spacing: 6 LPI
Page length: 66 lines
INCH12 Line spacing: 6 LPI
Page length: 72 lines
LINE_21 Line spacing: 6 LPI
Page length: 21 lines
LINE_22 Line spacing: 6 LPI
Page length: 22 lines
If you are defining device type formats for a page printer (SAPscript drivers POST,
PRES, HPL2), then refer to the corresponding device type format in a similar device type
for the line spacing and page length specifications required.
• Printer initialization action: Ensure that the escape sequences that you define match
the page dimensions and orientation specified in the format and page format associated
with a device type format.
Also, ensure that any character set specified in escape sequences matches the
character set specified in the device-type definition. The character set must also be
compatible with any implicit character set changes made at the printer by SAPscript font
changes. The spool system cannot test to ensure that these specifications match. To test
printing, see Testing Output Devices [Page 219] .
• The actions editor and special characters in printer initializations and print
controls: The system uses the R/3 programming editor for editing device escape
sequences. In the editor, you can use the special characters shown in the table below to
simplify entering escape sequences. You can also use a set of variables for defining
cover pages, such as $(BENUTZER) (user) and $(SPOOLID) (spool number).
(See Maintaining Cover Pages for Output Requests [Page 242] )
Character Meaning
e ESC (escape) symbol used by many printer manufacturers. It has the
hexadecimal value 1B and the decimal value 27.
0x Marks the following two characters as a hexadecimal number (one byte).
Example: 0xF0
# Marks an entire line as a comment at the beginning of the line The line is
not sent to the output device.
n Line feed (hexadecimal 0A)
r Carriage return (hexadecimal 0D)
f Form feed (hexadecimal 0C)
s Space character (when required at the end of a line) (Hexadecimal 20)
Line breaks: Note that the line ends on the printer escape screen are not sent to the
printer. To start a new line in the printer output stream, you must enter n or rn in
the device escape sequence.
270 December 1999](https://image.slidesharecdn.com/46bprinting-130417085750-phpapp01/85/46-b-printing-270-320.jpg)
![BC - SAP Printing Guide SAP AG
Print Controls
Print Controls
Print Controls
Print controls are generic format indicators for print operations, such as for activating bold,
changing the font size and so on. During formatting, the generic indicators are replaced by the
printer commands required by the specific device type. The print controls, together with the
Device Type Formats [Page 264], make up the language for the R/3 formatting of an available
printer or other output device.
To be able to use a new print control in a document, either the task of the print control must be
programmed in an ABAP report or ABAP program, or the print control must be added to
SAPscript documents. A print control can be either added directly to SAPscript or to the definition
of a SAPscript form.
Creating a new print control
If you are defining a completely new print control, you need to do the following:
1. Add it to the Standard print controls.
Procedure: Entering a Print Control in Standard Print Control [Page 273]
2. Implement it in the device types in which it is needed. Implementing a print control requires
simply that you specify the print command(s) that are to be triggered by the print control.
Procedure: Adding Print Controls to a Device Type Definition [Page 274]
3. Put the new print control into effect in the R/3 System by adding it to the ABAP reports (with
the PRINT-CONTROL statement) and SAPscript layout sets (in window texts with /: PRINT
CONTROL <name>) or standard texts in which it is to be used.
Changing print controls
Changing the definitions of existing print controls (for a new device type, for example) is simpler
than adding a new print control. You need only edit the print controls in the device type in which
they are required.
Do not change print controls in a standard R/3 device type. Do this only in a new device type or a
copy of an R/3 standard device type.
Procedure: Specifying Escape Sequences for Print Controls [Page 274]
272 December 1999](https://image.slidesharecdn.com/46bprinting-130417085750-phpapp01/85/46-b-printing-272-320.jpg)
![BC - SAP Printing Guide SAP AG
Adding Print Controls to a Device Type Definition
Adding Print Controls to a Device Type Definition
To add new print controls to a copy of a device type, proceed as follows:
1. Select Tools → CCMS → Spool → Spool administration, Full administration. Enter the name
of the device type in the Device types field and confirm your input.
2. Choose Print controls.
3. Choose Std print controls to select the print control you want to add to the device type
definition.
Specifying escape sequences for print controls
Enter the attributes and control character sequence of the new print control.
• Control character sequence: Enter the appropriate printer command found in your printer
manual.
You can enter the command either as:
• A hexadecimal string. In this case, be sure to select the Hex field.
If you work in a heterogeneous environment (ASCII hosts that use EBCDIC printers,
or EBCDIC hosts that use ASCII printers), enter the control character sequence in
hex, not as plain text. Hex values are not sent through the character set conversion,
but are passed directly as entered to the target output device.
For an ASCII printer, enter the hex values for the ASCII string to be sent to the
printer. For an EBCDIC printer, enter the hex values for the EBCDIC command
string. For more information, see the note on maintaining print controls in mixed
environments, below.
• Plain text. In this case, you can use the special characters (such as e for escape) shown at
the end of Editing Device Types [Page 257].
Be sure that the escape sequence you enter matches the meaning encoded in the print
control name. For example, if you define CI010, then the escape sequence that you
enter should configure the printer for character pitch 10.
If the escape sequence contains trailing spaces (spaces at the end of the string), then
enter the escape in single quotation marks:
Notes
You can reach all of the utilities described in the following notes by choosing Tools → CCMS →
Spool → Spool administration, Full administration and then Print controls (DeviceTypes tab) and
Change.
• Which print controls do I need? Are you defining the print controls for a new device type
from scratch? If this is the case, see Print Controls for List Output [Page 276] and SAPscript
Print Controls [Page 281] for lists of the print controls used by the R/3 System.
You can also use a similar device type as a guide to the print controls needed. The set of
print controls actually required by different devices varies considerably, so following an
example from the R/3 standard can save you extra work and/or help you ensure that all
required print controls are defined.
274 December 1999](https://image.slidesharecdn.com/46bprinting-130417085750-phpapp01/85/46-b-printing-274-320.jpg)
![BC - SAP Printing Guide SAP AG
Print Controls for List Output
Print Controls for List Output
The list below shows the print control keywords that have been are used in the R/3 System in list
printing.
Print controls are inserted in list output with the ABAP FORMAT and PRINT-CONTROL
statements. List output is handled differently by the System depending upon whether a list is
printed as it is being generated or directly from the display screen. If printed upon generation,
then both PRINT-CONTROL and FORMAT print controls are used. If from the display, then only
FORMAT print controls are used.
FORMAT and PRINT-CONTROL both use a variety of "built-in" print controls, print controls which
are accessed by way of FORMAT or PRINT-CONTROL arguments. PRINT-CONTROL also
offers the FUNCTION argument, with which any print control defined in the R/3 spool system can
be inserted into the output data.
Note that SAPscript uses its own private set of print controls when it formats text for output.
These print controls are listed separately: SAPscript Print Controls [Page 281].
Standard ABAP Print Controls for List Printing
ABAP Statement Print Controls Used by this Statement
276 December 1999](https://image.slidesharecdn.com/46bprinting-130417085750-phpapp01/85/46-b-printing-276-320.jpg)
![SAP AG BC - SAP Printing Guide
Print Controls for List Output
FORMAT COL<xx>: Set list colors for color and halftone printing (SWIN
driver and Microsoft Windows printers).
For more information, see
the ABAP User’s Guide The FORMAT statement and associated COL<xx> print controls
[Ext.] supersede color setting with PRINT-CONTROL and CO00<n>.
The R/3 standard includes these COL<xx> print controls:
• COL0H: Color off, font intensified
• COL0N: Color off, normal font
• COL0V: Color off, inverse font
• COL1H: Title color, font intensified
• COL1N: Title color, normal font
• COL1V: Title color, inverse font
• COL2H: Standard color, font intensified
• COL2N: Standard color, normal font
• COL2V: Standard color, inverse font
• COL3H: Total color, font intensified
• COL3N: Total color, normal font
• COL3V: Total color, inverse font
• COL4H: Key color, font intensified
• COL4N: Key color, normal font
• COL4V: Key color, inverse font
• COL5H: Positive color, intensified font
• COL5N: Positive color, normal font
• COL5V: Positive color, inverse font
• COL6H: Negative color, font intensified
• COL6N: Negative color, normal font
• COL6V: Negative color, inverse font
• COL7H: Group color, font intensified
• COL7N: Group color, normal font
• COL7V: Group color, inverse font
December 1999 277](https://image.slidesharecdn.com/46bprinting-130417085750-phpapp01/85/46-b-printing-277-320.jpg)
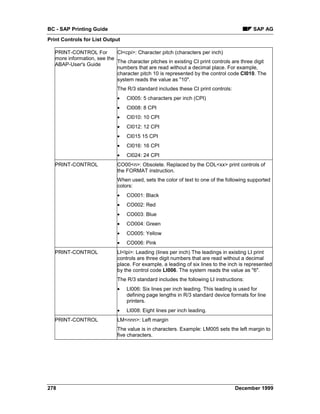

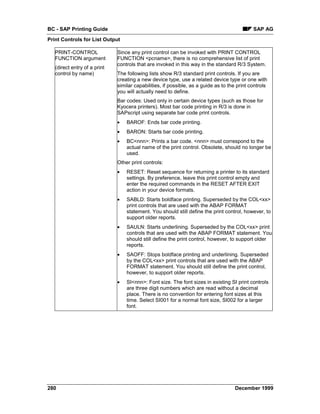
![SAP AG BC - SAP Printing Guide
SAPscript Print Controls
SAPscript Print Controls
Some of the print controls are reserved for SAPscript.
The print controls that must be defined for a device type depend on the SAPscript printer driver
that is to be used with the device type. The following objects display information about the print
controls used by each driver.
Print Controls for the Line Printer Driver STN2 [Page 282]
Print Controls for the HPL2 Driver for Hewlett Packard Printers PCL-4/PCL-5 [Page 284]
Print Controls for the Printer Driver PRES (Kyocera PRESCRIBE) [Page 285]
Print Controls for the Printer Driver POST [Page 286]
Description of all SAPscript Print Controls [Page 287]
For information about using print controls in SAPscript, see Adding Print Controls:
PRINT CONTROL [Ext.]
December 1999 281](https://image.slidesharecdn.com/46bprinting-130417085750-phpapp01/85/46-b-printing-281-320.jpg)
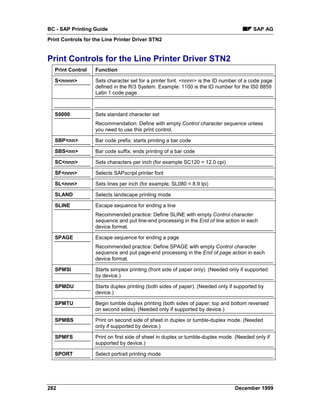
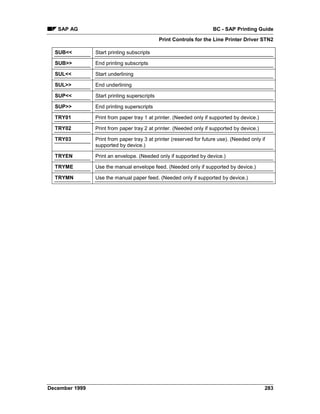
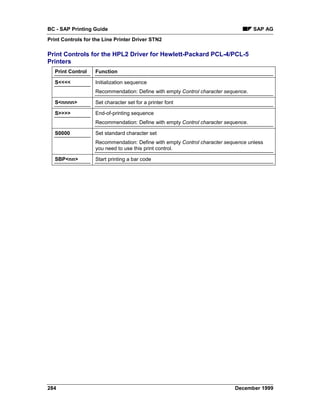
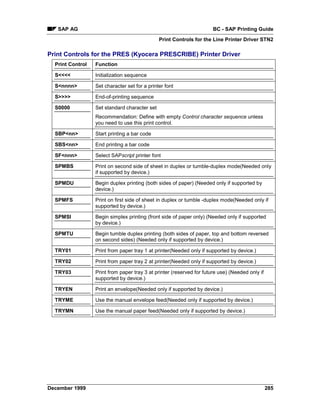
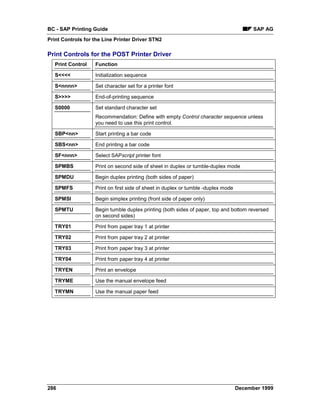
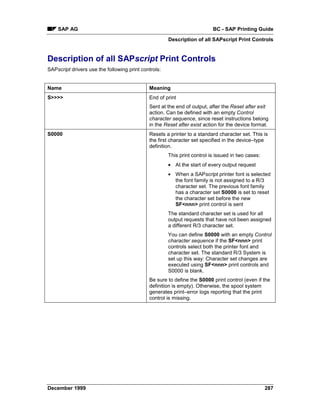
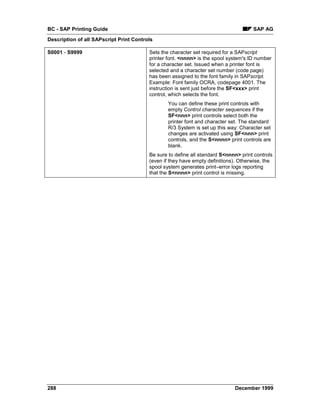
![SAP AG BC - SAP Printing Guide
Description of all SAPscript Print Controls
SF<nnn> Use the SAPscript printer font designated by the ID
number <nnn>. Sent whenever the font is changed.
Use these print controls to set both the printer font
and printer character set as required. You can then
leave the S<nnnn> print controls empty. This
simplifies maintenance of your device types.
The SAPscript OTF drivers use these print
controls to set the printer to the printer-
specific font corresponding to the SAPscript
font.
To make an SF<nnn> instruction available
to SAPscript, enter it for the corresponding
font in the SAPscript font maintenance
function: Tools →=CCMS → Spool → Font
maintenance.
Non–proportional fonts: Note that the step
size specified in SAPscript font maintenance
must match the actual step size setting at
the printer. Example: Font LNPRINT 85 is
defined with CPI 15.00. The printer must
therefore be set to 15 characters per inch.
You should make it a practice to set the
printer step size along with the font in the SF
print control.
Proportional fonts: Note that the step sizes
at the printer must match the Adobe Font
Metrics (AFM) data entered in SAPscript's
definition of the font used. Only the
SAPscript HPL2, PRES, and POST drivers
support proportional fonts.
You can use a test print to determine if the
printer step sizes and are compatible with
the AFM-metrics. Character spacing in the
print out should be correct, neither too wide
nor too tight nor uneven.
OCR-A and OCR-B fonts: SAP has maintained SF
print controls for switching to OCR printing for the
device types shown in the following topic: Printer
Types that Support OCR Printing [Page 146].
December 1999 289](https://image.slidesharecdn.com/46bprinting-130417085750-phpapp01/85/46-b-printing-289-320.jpg)
![BC - SAP Printing Guide SAP AG
Description of all SAPscript Print Controls
SBP<nn> Bar code prefix, the escape sequence that must be
sent before printing bar codes in a SAPscript form.
<nn> is an arbitrary number used to
distinguish different types of bar codes.
This bar code is maintained for all standard
R/3 device types that support bar code
printing. For a list of predefined bar codes,
see Predefined Bar Codes [Page 156].
Used by: All SAPscript printer drivers.
The PRES printer driver encloses the
data marked by the SBP and SBS escape
sequences in single quotation marks.
The POST driver encloses the data marked
by the SBP and SBS escape sequences in
parentheses. This marks the data as a
PostScript constant.
The other printer drivers pass the bar code data
without modification at the printer. If quotes or other
markings are required for bar code data, then you
must enter these as part of the SBP and SBS print
control definitions.
SBS<nn> Bar code suffix, the escape sequence that must
be sent after printing a bar code.
<nn> is an arbitrary number used to
distinguish different types of bar codes.
This bar code is maintained for all standard R/3
device types that support bar code printing. For a list
of predefined bar codes, see Predefined Bar Codes
[Page 156]
Duplex mode print controls
SPMSI Begin simplex printing (front side of paper only) with
the current page. If another mode was previously
active, then the printer is switched to simplex mode
at the start of the page and continues in this mode.
SPMDU Begin duplex printing (both sides of paper). The
current page is printed on the first side of a sheet in
duplex mode. If another mode was previously active,
then the printer is switched to duplex mode at the
start of the page and then continues in this mode.
290 December 1999](https://image.slidesharecdn.com/46bprinting-130417085750-phpapp01/85/46-b-printing-290-320.jpg)
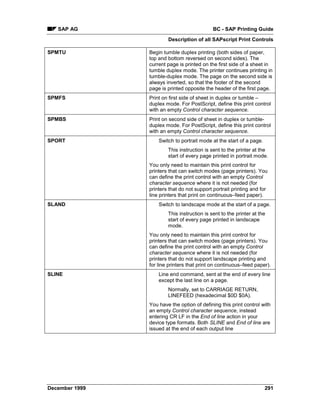
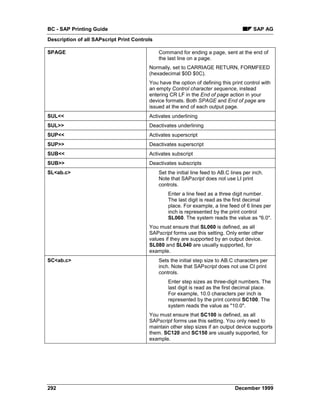
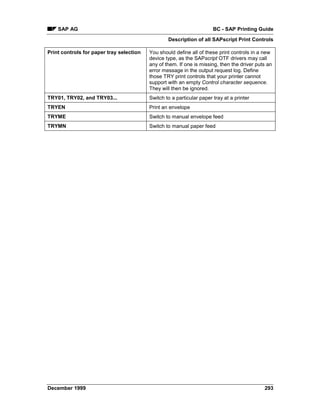
![BC - SAP Printing Guide SAP AG
Creating Page Formats
Creating Page Formats
To define a new page format, choose Tools → CCMS → Spool → Spool administration. Then
choose Full administration and then Page formats on the DeviceTypes tab page. On the next
screen choose Change and Create or Create with reference. Fill in the fields on the next
screen.
Activating a New Page Format
Before using a new page format, you must specify it as a page format in a SAPscript form. Be
careful when replacing a page format in a standard SAPscript form as the form may not
necessarily fit on the new page format.
You also have to define a format [Page 259] and device type format [Page 264] for the new page
format before you can use it.
Notes
• Every page format used by SAPscript must be defined using this function. In addition, note
the following two requirements:
– A R/3 spool system format must exist for every page format used by
SAPscript.
– The name of the page format must be identical to the name of the format.
SAP supplies predefined page formats and formats for all standard SAPscript forms.
• Do not change the dimensions or orientation in existing standard R/3 page formats. This may
cause errors during printing of SAPscript forms.
• The page dimensions and orientation you specify in a page format do not directly affect a
printer. That is, neither SAPscript nor the spool system automatically translates the
specifications into escape sequences for initializing the printer.
Therefore, ensure that the orientation and dimensions you specify here agree with the
orientation, margin settings, and other characteristics (if any) specified in the escape
sequences for each device type format with which the page format is used.
294 December 1999](https://image.slidesharecdn.com/46bprinting-130417085750-phpapp01/85/46-b-printing-294-320.jpg)
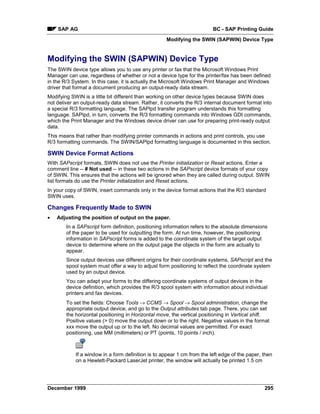
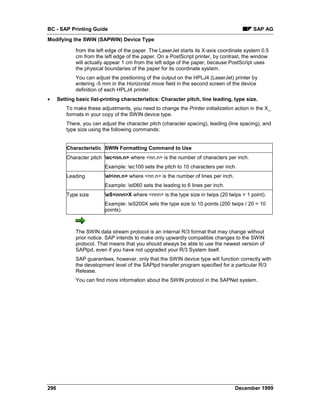
![SAP AG BC - SAP Printing Guide
Frequently Made Changes to Device Types
Frequently Made Changes to Device Types
Customizing the cover page. Do the following:
1. Copy the device type [Page 256]. Flag Use references so that the device format actions
reference the R/3 standard device type.
2. Do your customizing in the Cover page action in the X_PAPER device format of the copied
device type. If you want, you can override the default X_PAPER cover page by defining
Cover page actions for other formats. More information: Maintaining Cover Pages for Output
Requests [Page 242].
3. Use your new device type in place of the R/3 standard in Output device definitions in your
R/3 System. See for example Connecting a Printer or Fax to a Microsoft Windows System
[Page 69].
Adding a format for a new paper size or list output format. Do the following:
1. Copy the device type [Page 256]. Flag Use references so that the device format actions
reference the R/3 standard device type.
2. Define a new Page format [Page 294], Format [Page 259], and Device format [Page 264] to
implement the new paper size or list output format. Use the copied device format actions
from a similar device format to save work in defining the actions.
3. Make the new paper size available in the System by entering it in the appropriate SAPscript
forms (SAPscript Form Painter) and ABAP reports (REPORT specifications or NEW PAGE
PRINT ON LAYOUT statements).
Modifying SWIN printing. Do the following:
1. Copy the device type [Page 256]. Flag Use references so that the device format actions
reference the R/3 standard device types.
2. Modify the SWIN Device Type [Page 295]
• Maintaining print controls in mixed EBCDIC-ASCII environments: R/3 Systems on the
IBM AS/400 (EBCDIC) platform often use ASCII printers at PCs. It is also possible that an
ASCII-based R/3 System may print on EBCDIC printers at an EBCDIC host. To ensure
problem-free output in such mixed environments, Control character sequences in print
controls should be defined in hexadecimal format using the character set (ASCII or EBCDIC)
required by the printer. Hex format data in print controls ("X" hex column marked in the print
control definition) is passed to the output device without going through a character set
conversion. A command in hex format therefore always reaches the target output device in
form that is comprehensible to the device.
Avoid defining print controls with commands in character format, as this can lead to
problems caused by the R/3 spool system’s character set conversion.
Example: The command e&f2 for an ASCII printer should be represented as 1B266632
in a print control. This representation uses the ASCII hexadecimal representations of the
characters in the command.
December 1999 297](https://image.slidesharecdn.com/46bprinting-130417085750-phpapp01/85/46-b-printing-297-320.jpg)

![SAP AG BC - SAP Printing Guide
Transporting Device Types
Transporting Device Types
You can transport a device type definition using the R/3 organizer or spool administration (report
RSTXSCRP).
In the latter method, the R/3 System downloads an R/3 device type in ASCII file format to the file
system of the host system on which the report is run. To complete the transport, you then use the
report to upload any such file into another R/3 System.
Transporting a device type from one R/3 System to another copies all of the following
components:
• The device type
• All components belonging to the device type, such as print control definitions, device formats,
and SAPscript fonts. Only device type definitions and not definitions of individual printers are
transported. To transport a printer name definition, or printer identification, see Transporting
Printers (Device Definitions) [Page 301].
Procedure
1. Download the definition from the "source" R/3 System.
a) Choose Tools → CCMS → Spool → Spool administration and then Utilities → For
device types → Export.
b) Select Device type and then enter the following:
Object name: <device type name>
Mode: Export
Dataset name: <path name>
Path and file name for the download file. Omit the file name extension. The
download file is automatically given the extension .pri. The R/3 System must
have write access to the directory you specify.
2. Upload the definition into the "destination" R/3 System. If the "destination" application
server is on another host system than the "source" server, the download directory must
be accessible from the host system of the "destination" server.
a) Choose Tools → CCMS → Spool → Spool administration and then Utilities → For
device types → Import.
b) Select Device type and then enter the following:
Object name: <device type name>
Mode: Export
Dataset name: <Path_name>
Path and file name of the file that is to be uploaded. Do not use any path
extensions, the file automatically contains the extension .pri. The R/3 System
must have write access to the directory you specify.
December 1999 299](https://image.slidesharecdn.com/46bprinting-130417085750-phpapp01/85/46-b-printing-299-320.jpg)
![SAP AG BC - SAP Printing Guide
Transporting Printers (Device Definitions)
Transporting Printers (Device Definitions)
You can transport a printer name definition by choosing Edit → Transport.
Transporting a printer name definition transports only the identification of a particular printer, fax,
or other device. It does not transport the device type. For help in transporting a device type, see
Transporting Device Types [Page 299].
December 1999 301](https://image.slidesharecdn.com/46bprinting-130417085750-phpapp01/85/46-b-printing-301-320.jpg)
![BC - SAP Printing Guide SAP AG
Maintaining Character Sets
Maintaining Character Sets
The R/3 System manages its own character sets. These characters sets specify:
• Which characters a particular printer or screen display routine can output
• The hexadecimal code to use to send a character to a printer or display routine.
The following topics describe how to maintain character sets in spool administration.
In general, you only need to maintain character sets when you add a new device type to the R/3
System. To maintain character sets, do the following:
• Identify the manufacturer of the character set using Character Set Manufacturers [Page 304].
You only need to perform this step if the manufacturer of the character set is not already
identified in the spool system.
• Define the character set required by the printer using Character Sets [Page 305].
To do this, you must:
– Identify which characters are in the character set using their R/3 ID numbers
– Enter the binary code for each character, as required by the printer or
display routine.
The easiest method for defining a character set is to copy the existing character set that
most closely matches the new character set. Then add or delete characters as
necessary to customize the character set.
302 December 1999](https://image.slidesharecdn.com/46bprinting-130417085750-phpapp01/85/46-b-printing-302-320.jpg)
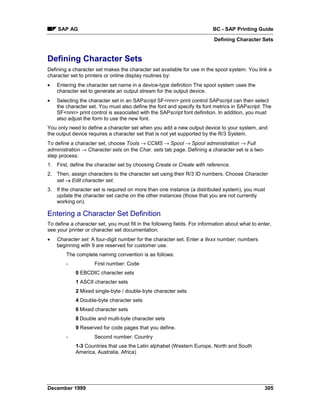
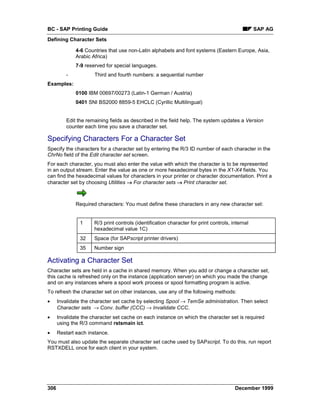

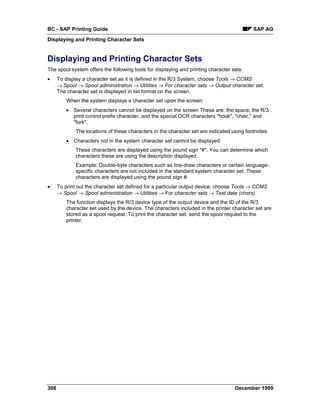
![SAP AG BC - SAP Printing Guide
Uploading Font Metrics Data for SAPscript
Uploading Font Metrics Data for SAPscript
The R/3 System is delivered with the font metrics data that is required for all standard SAPscript
forms. You will only need to upload font metrics data if the following are true:
• You want to use a typeface that is not included in the R/3 standard.
• You alter a SAPscript form or create your own form and printing program to use your special
typeface.
Uploading font metrics makes them available to SAPscript for filling text during output.
Prerequisites
There are two ways to upload font metrics. The method to use is determined by the type of font
metrics information available to you.
If you have the following:
• An .afm font metrics files in Adobe Font Metrics ASCII format, then use the SAPscript Load
AFM File [Page 310] function to upload the font metrics.
An ASCII-format.afm file is not usually delivered with a special font that you purchase.
However, the manufacturer of your font should be able to supply you with such files on
request. Usually, you will receive a set of four .afm files, one for each combination of the
attributes bold/non-bold, italics/normal.
• Any font that is installed in Microsoft Windows (for example, any TrueType font, any printer
font that you have installed in Windows), then use the SAPlpd/RSTXLMET method [Page
312] for uploading font metrics.
You can use this method to make a Windows font available for R/3 printing.
For correct printing results, you will probably have to use a Windows PC to print output
that uses the uploaded font. Even if the font is available elsewhere – in a UNIX
workstation for example – the Windows font metrics may not be exactly right for the other
environment.
December 1999 309](https://image.slidesharecdn.com/46bprinting-130417085750-phpapp01/85/46-b-printing-309-320.jpg)
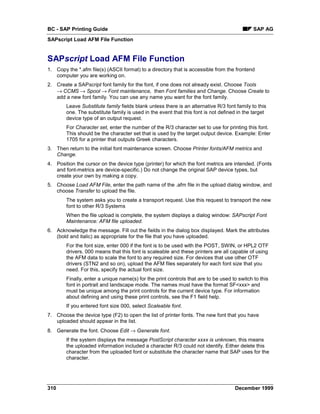
![SAP AG BC - SAP Printing Guide
SAPscript Load AFM File Function
Try to find the character among the characters supported by SAP. To display the SAP
character definitions, create a new R/3 session and choose Tools → CCMS → Spool →
Spool administration. Then choose Full administration and SAP Characters.
If you find an equivalent SAP character, then choose Edit metrics in the Change printer
fonts screen. Replace the unknown original name of the character with the R/3 name.
The character can now be printed from the R/3 System.
If you do not find an equivalent character, delete the unknown character from the
uploaded font metrics. The character cannot be printed from R/3. Choose Edit metrics
from the Change printer fonts screen. Then delete the line that defines the character.
Also reduce the number of characters that appears at the beginning of the AFM file.
Repeat this step until all unknown characters have been substituted or deleted and the
font has been successfully generated.
9. Repeat the upload procedure until you have added all of your *.afm files. You only need to
create the font family once.
10. Specify the print controls for switching to this font in portrait and landscape mode.
For more information about the printer commands the print controls should contain, see
the F1 field help for the print controls. For general help in defining print controls, see
Specifying Escape Sequences for Print Controls [Page 274].
11. Your font is now ready for use.
December 1999 311](https://image.slidesharecdn.com/46bprinting-130417085750-phpapp01/85/46-b-printing-311-320.jpg)
![BC - SAP Printing Guide SAP AG
SAPlpd / RSTXLMET Methods
SAPlpd / RSTXLMET Methods
1. Start or log onto the PC where the font is installed. (The font is only printed correctly on the
PC where it is installed.)
2. Start the print manager. Then open the Properties window of the printer where the font
metrics are to be produced. (Font metrics are device-specific, even for TrueType fonts.
Variations in standard fonts between device types are usually minimal.)
Set the printer to the highest supported resolution (for example, 600 DPI). Higher
resolutions increase the accuracy of the font metrics that SAPlpd generates.
3. Open a DOS command prompt window.
4. Generate the font metrics file. In the DOS window, enter the command:
saplpd -i<italics bold> -p<Printer name in Windows Print Manager>
- m<Windows font name>
The options are as follows:
• -i<italics bold>: Specify the attributes of the font using the value 0 for normal,
and 1 for attribute on. Example: -i00 for normal characters, -i01 for bold
characters, -i10 for italics, -i11 for bold italics.
• -p<printername>: Enter the name of the printer where the font is to be used. Find the
name in the Windows Print Manager.
• -w<WinCharSet>: The value for the Windows character set you want to display (for
example, 0 for ANSI characters). You can upload single-byte and double-byte fonts with
set character widths. See also, Setting the Character Set for SWIN and SAPlpd [Page
87].
• -m<font name>: The name of the font exactly as it appears in the Windows font
manager.
Search for SAPlpd if you cannot find it. It is located in the directory of the SAP GUI
frontend software.
The command generates an ASCII-format font metrics file called SAPlpd.MET.
Repeat this step until you have created four files, one for each of the -i variants.
For an example of a Windows *.bat file used to automate this step, see Sample *.bat
File for Generating Windows Font Metrics Files [Page 315].
5. Log on to the R/3 System where the font metrics are to be uploaded.
6. Create a SAPscript font family for the font, if one does not already exist. Tools →=CCMS →
Spool →=Font maintenance, then Font families and Change. Choose Create to add a new
font family. You can use any name you want for the font family.
Leave Substitute family fields blank unless there is an alternative R/3 font family to this
one. The substitute family is used in the event that this font is not defined in the target
device type of an output request.
312 December 1999](https://image.slidesharecdn.com/46bprinting-130417085750-phpapp01/85/46-b-printing-312-320.jpg)
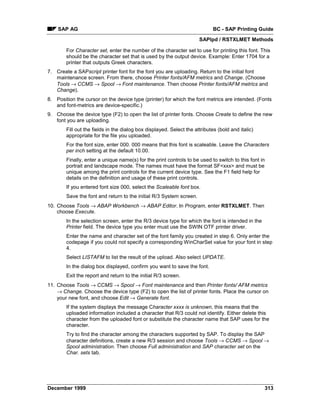
![BC - SAP Printing Guide SAP AG
SAPlpd / RSTXLMET Methods
If you find an equivalent SAP character, then choose Edit metrics in the Change printer
fonts screen. Replace the unknown original name of the character with the R/3 name.
The character can now be printed from the R/3 System.
If you do not find an equivalent character, delete the unknown character from the
uploaded font metrics. The character cannot be printed from R/3. Choose Edit metrics
from the Change printer fonts screen. Delete the line containing the definition of that
character. Also reduce the number of characters that appear at the beginning of the AFM
file.
Repeat this step until all unknown characters have been substituted or deleted and the
font has been successfully generated.
12. Repeat steps 7 through 11 until all of the SAPlpd files have been uploaded.
13. Specify the print controls for switching to this font in portrait and landscape mode.
For more information about the printer commands the print controls should contain, see
the F1 field help for the print controls. For general help in defining print controls, see
Specifying Escape Sequences for Print Controls [Page 274].
Result
The new font you have added to the R/3 System is now available for printing SAPscript
documents.
314 December 1999](https://image.slidesharecdn.com/46bprinting-130417085750-phpapp01/85/46-b-printing-314-320.jpg)
![BC - SAP Printing Guide SAP AG
Spool Servers
Spool Servers
A spool server is a R/3 application server on which one or more spool work processes are
running. Add the profile parameter rdisp/wp no spo to the instance profile of the relevant
server (Tools → CCMS → Configuration → Profile maintenance) and enter the desired number of
spool work processes.
For information about setting up frontend printing, see Frontend Printing on Local Printers
[Page 24]
Classifying Servers, Using Logical and Alternate Servers
Choosing Tools → CCMS → Spool → Spool administration → Spool servers on the Devices /
servers tab page, you can specify the following attributes and management information for spool
servers:
• Server classification: You can classify the spool server according to its intended use:
Production printing, test printing, high–volume printing and so. These classifications
correspond to our recommendation for organizing the output architecture for optimum
performance. The classification helps you to enforce your organization of printers as you
define new printers.
• Alternate servers: You can specify a "substitute" server for a spool server. The alternate
server takes over the processing of output requests if the original server is down or
unavailable. For more information, see Alternate Servers [Page 321].
• Logical servers: To help you organize your printing architecture and manage printers, you
can define logical servers. These let you, for example, define a spool server structure as the
standard in one R/3 System and transport the structure with only minimal changes to other
R/3 Systems. For more information, see Logical Servers [Page 319]
• Load balancing: You can specify whether the output processing workload of a server may
be distributed among its alternate servers. By default, load balancing is inactive. Instead, the
spool system assures that output requests are printed in the order that they are generated.
Procedure: Defining Spool Servers [Page 317].
316 December 1999](https://image.slidesharecdn.com/46bprinting-130417085750-phpapp01/85/46-b-printing-316-320.jpg)
![SAP AG BC - SAP Printing Guide
Defining Spool Servers
Defining Spool Servers
Procedure
1. Start the function. Choose Tools → CCMS → Spool → Spool administration, Full
administration and then Spool servers on the Devices / servers tab page.
2. Select a server. In the list, choose Change and then choose the spool server for which you
want to specify or change management information.
The list shows all real spool servers in your R/3 System as well as any logical servers
you have defined. The color-coding in the list indicates the status of each server and
whether the server is available for output–processing. For an explanation of the colors,
see Interpreting the Spool Server Display [Page 324].
To create a new definition for a logical server, choose Change and then Create or select
a new server and choose Create with reference.
3. Name the server, if this is a new entry. In the shorter System name field, enter a name for
the new logical server you are creating.
4. Define the server’s attributes. In the Attributes field, specify the options you want to use. All
attributes are optional.
– To classify a server: Choose the appropriate value from Possible entries for the Server
class field.
The system will test this value against the classification of devices you assign to this
server. It will warn you if the classifications do not match. For example, you will be
warned if you try to assign a high–volume printer to a production–printing server.
– To specify an alternate server: Enter the name of a logical or real server in the Alt
server field.
Should the server you are defining be inactive or not have a spool work process,
then the R/3 System uses this specification to find another spool server to carry out
output processing.
– To define a logical server: Select Logical server. Then choose Enter.
In the Mapping field, specify the real or logical server to which this logical server
should refer.
The spool system "maps" the logical server name to the server in Mapping. Because
this "mapping" is recursive, you can specify either a real server or another logical
server.
– To activate load balancing: Select Allow load balancing. Load balancing makes the
most sense if you set up logical servers and order your servers in Mapping and/or Alternate
server hierarchies.
5. Save the spool server definition and choose Back to return to the server display. Here, you
can use the server display functions to see how your servers are linked to one another
through the Mapping and Alternate server fields.
For help interpreting and manipulating the display, see Interpreting the Spool Server
Display [Page 324].
December 1999 317](https://image.slidesharecdn.com/46bprinting-130417085750-phpapp01/85/46-b-printing-317-320.jpg)
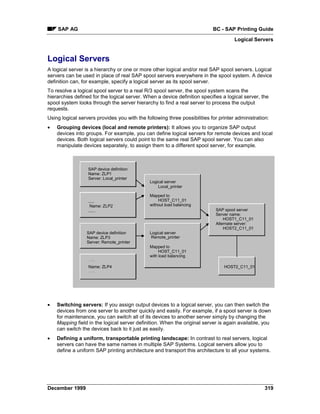
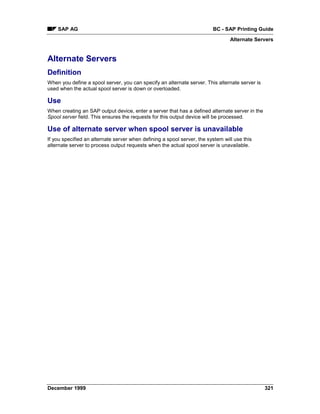
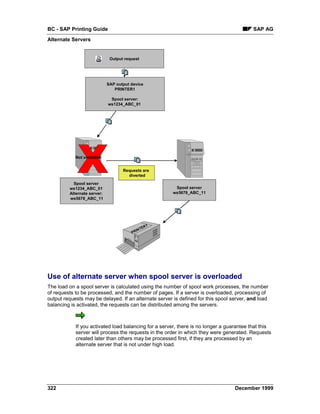

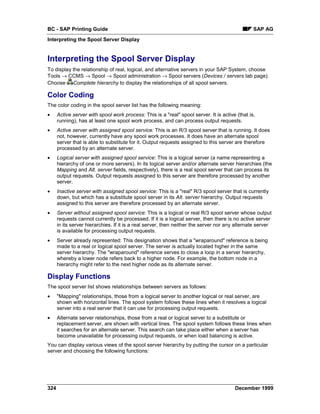
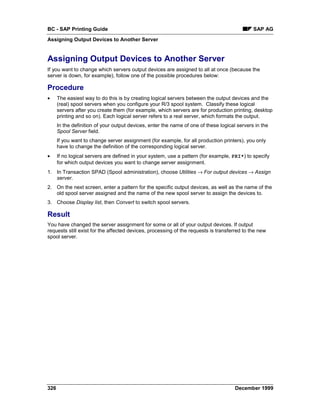
![SAP AG BC - SAP Printing Guide
Setting Parameters
Setting Parameters
This section provides summaries of profile parameters used by the spool system for access
method L, local printing. See the profile parameter documentation, available online in transaction
RZ11, for more information. Note that you need no longer set commands for access mode L in
system profile parameters. Instead, you can define command sets in device definitions that use
access method L.
You can configure the R/3 formatting programs with the system profile parameters shown in the
list below. You may have to change default values in some UNIX systems in order to
accommodate manufacturer-specific print commands. In other operating systems, no change
from the default values of these parameters is necessary.
In Windows systems, the R/3 spool system uses the Windows application interface for printing.
You therefore do not need to set any spool parameter that specifies a print command or
response format. No harm is done if the parameters are set, however.
The spool system itself is internally configured.
For more information, see the Computing Center Management System [Ext.] documentation.
• rspo/host_spool/print: The command which a printer program should use to have a host
spooler perform an output request.
Not required for Windows systems.
To have the formatting program pass spool request attributes to the host spooler, you
can enter the following variables in the command text:
&P The host-system name of the output device
&F The name of the file to be printed. The name is supplied in the
rspo/to_host/data_file parameter, described below.
&C The number of copies to print.
&& : A single '&'
&I : Job name of the R/3 spool
&J : Job name of the R/3 spool, with database name
&L: Format (layout)
&M Client of the owner
:
&O Owner
:
&m Client of the user printing
:
&o : User printing
&t : Telephone number (FAX)
&T : Title
&R : Recipient (cover sheet)
December 1999 327](https://image.slidesharecdn.com/46bprinting-130417085750-phpapp01/85/46-b-printing-327-320.jpg)
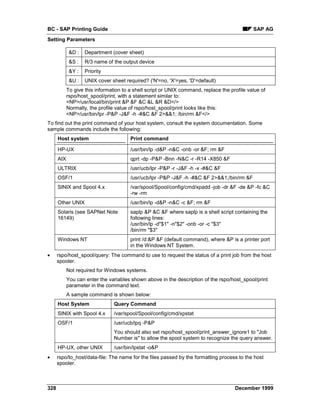
![SAP AG BC - SAP Printing Guide
Setting Parameters
The name that you select must meet the following requirements:
• It must contain a string of eight + characters.
The formatting program replaces these characters to create a unique file name.
• It must not exceed any length limitations imposed by the host spooler.
In normal operation, these files are deleted almost immediately. Should you want to
check the contents of these files, change the print command in rspo/host_spool/print
so that the files are not deleted.
• rspo/rspoget2_daemon/tcp_block_size: The block size for TCP/IP communications between
the formatting program and the transfer program.
Default: 1K blocks. In some network environments, larger block sizes, such as 8K, cause
communications problems.
• rsts/ccc/cachesize: The size of the shared-memory area that is created for translation tables
for character codes.
Default: 60K. If it overflows, the buffer is automatically reorganized. The buffer is also
reorganized if any character set is invalidated. Creation and reorganization of the buffer
result in system log messages with the reference "Buffer RSTSCCC".
You should enlarge the buffer if automatic reorganizations occur repeatedly. Before
enlarging the buffer, you must invalidate all entries as described under "Activating a
Character Set" in Defining a Character Set [Page 305].
December 1999 329](https://image.slidesharecdn.com/46bprinting-130417085750-phpapp01/85/46-b-printing-329-320.jpg)
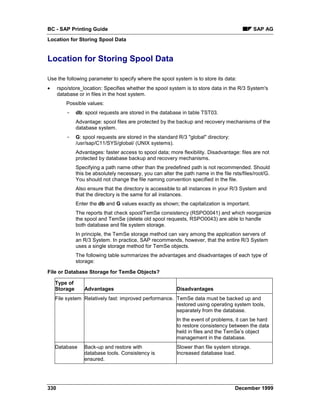
![SAP AG BC - SAP Printing Guide
Location for Storing Spool Data
Disk storage requirements: In some cases, spool data may occupy several
hundred megabytes of disk storage. If you use the G option, you must ensure that
enough free disk space is available for spool data.
Naming convention: the naming convention used for spool files, as well as all other
TemSe objects (background processing job logs, at this time), is as follows:
Files are stored by type and client of origin in a subdirectory with the name
<client><first five characters of object name>. The object name is specified in table
TST07.
Examples: 001SPOOL (spool requests directory, client 1), 001BCTLG (background
processing job logs, client 1).
Within these directories, the data belonging to a TemSe object is held as a individual
file. Spool data, for example, is held in files that are named with the ID numbers of
the spool requests.
You can also set the storage location individually for each output device [Page
332].
December 1999 331](https://image.slidesharecdn.com/46bprinting-130417085750-phpapp01/85/46-b-printing-331-320.jpg)
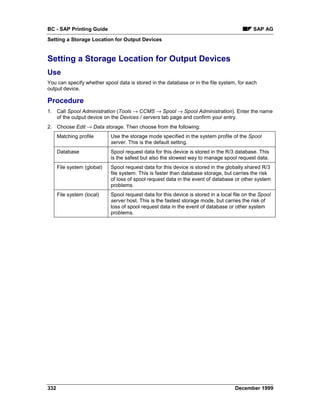
![SAP AG BC - SAP Printing Guide
Customer Enhancement for Spool Accounting
Customer Enhancement for Spool Accounting
Use
For accounting purposes, the spool system collects detailed use statistics. The spool system
does not provide an accounting tool, but makes the data available through the spool accounting
user exit. You can access the exit using the enhancement SPOOACC.
Features
The exit is designed to analyze and store the accounting information, before all the information is
deleted.
The exit is called when the report RSPO1041 is run to delete spool requests. An internal table of
type TSPJSTAT is transferred. This table contains the information about all print requests to be
deleted.
Only those records not processed elsewhere are transferred (see documentation for TSPJSTAT).
Activities
To activate spool accounting, use the following profile parameters:
• rspo/stat/jobs: An entry is written to the table TSPJSTAT for each output request.
• rspo/stat/query: Every time a printer is queried, data about the queue is written to table
TSPQSTAT.
For an example of the analysis of spool data statistics, see report RSPOSTAT.
For general information about R/3 function exists, see The R/3 Enhancement
Concept [Ext.] and transaction CMOD.
December 1999 333](https://image.slidesharecdn.com/46bprinting-130417085750-phpapp01/85/46-b-printing-333-320.jpg)
![BC - SAP Printing Guide SAP AG
Customer Enhancement for Spool Authorization Check
Customer Enhancement for Spool Authorization Check
Use
You can add your own authorization checks to those already implemented in the authorization
object S_SPO_ACT [Page 221] (Spool: Actions). An exit is provided for this purpose through the
enhancement SPOOAUTH. Once the enhancement is activated, the function module
EXIT_SAPLSPOR_001 is used for the check.
Features
When this function module is called, the general authorizations SP01 and SP0R are checked
centrally. You can use this function to tailor additional checks (for example, the check of the
authorization field of a spool request) to your own needs
The parameters that are passed are the type of access (ACCESS) and the header information for
a spool request (SPOOLREQ)
Activities
This enhancement mechanism is only used if the spool authorization check is set for the new
procedure using the CUSTOM option. To do this, set the parameter AUTHORITY to the value
CUSTOM in the TSPOPTIONS table.
For general information about R/3 function exists, see The R/3 Enhancement
Concept [Ext.] and transaction CMOD.
334 December 1999](https://image.slidesharecdn.com/46bprinting-130417085750-phpapp01/85/46-b-printing-334-320.jpg)


