SlideShare a Scribd company logo
1 of 593
Download to read offline
2003 ENGINE
Engine Mechanical - 2.2L (L61) - Saturn L Series
SPECIFICATIONS
FASTENER TIGHTENING SPECIFICATIONS
Fastener Tightening Specifications
Application
Specification
Metric English
A/C Compressor-to-Block Bolt 25 N.m 18 lb ft
Air Pipe Bolts 25 N.m 18 lb ft
Air Pipe Nut 16 N.m 11 lb ft
Balance Shaft Chain Guide (Adjustable) Bolt 10 N.m 89 lb in
Balance Shaft Chain Guide (Fixed) Bolts 10 N.m 89 lb in
Balance Shaft Chain Guide (Upper) Bolts 10 N.m 89 lb in
Balance Shaft Chain Tensioner Bolts 10 N.m 89 lb in
Balance Shaft Drive Sprockets 55 N.m 41 lb ft
Balance Shaft Retaining Bolts 10 N.m 89 lb in
Ball Stud-to-Steering Knuckle Nuts 100 N.m 74 lb ft
Battery Terminal Bolts 17 N.m 13 lb ft
Cam Cover Bolts-to-Hold J 43649 . See Special Tools and
Equipment.
10 N.m 89 lb in
Camshaft Bearing Cap Bolts 10 N.m 89 lb in
Camshaft Cover Bolts 10 N.m 89 lb in
Camshaft Cover Ground Strap Fastener 10 N.m 89 lb in
Camshaft Sprocket Bolts
 First Pass 85 N.m 63 lb ft
 Final Pass 30 degrees
Connecting Rod Bolts
 First Pass 25 N.m 18 lb ft
 Final Pass 100 degrees
Coolant Jacket Plug 20 N.m 15 lb in
Crankshaft Bearing Cap Initial Torque (Lower Crankcase-to-Block Bolts)
 First Pass 20 N.m 15 lb ft
 Final Pass 70 degrees
Crankshaft Damper Pulley Bolt
 First Pass 100 N.m 74 lb ft
 Final Pass 75 degrees
2003 Saturn L200
2003 ENGINE Engine Mechanical - 2.2L (L61) - Saturn L Series
2003 Saturn L200
2003 ENGINE Engine Mechanical - 2.2L (L61) - Saturn L Series
steve
Monday, May 09, 2011 12:51:59 PM Page 1 © 2006 Mitchell Repair Information Company, LLC.
steve
Monday, May 09, 2011 12:52:16 PM Page 1 © 2006 Mitchell Repair Information Company, LLC.
Crankshaft Position Sensor Bolt 10 N.m 89 lb in
Crankshaft Pulley Bolt
 First Pass 100 N.m 74 lb ft
 Final Pass 75 degrees
Cylinder Head Air Bleed Tube Fastener 15 N.m 11 lb in
Cylinder Head Bolts
 First Pass 30 N.m 22 lb ft
 Final Pass 155 degrees
Cylinder Head Front Bolts 35 N.m 26 lb ft
Cylinder Head Front Chaincase Bolts 20 N.m 15 lb ft
Cylinder Head Oil Gallery Plug 35 N.m 26 lb ft
Degas Hose Bracket Bolt 10 N.m 89 lb in
Drive Belt Tensioner Bolt 45 N.m 33 lb ft
EGR Cover Bolts 25 N.m 18 lb ft
Engine Coolant Temperature Sensor 20 N.m 15 lb ft
Engine Harness Bracket Bolts 10 N.m 89 lb in
Engine Mount Bracket-to-Engine Bolts 90 N.m 66 lb ft
Engine Mount-to-Body Bolts 55 N.m 41 lb ft
Engine Mount-to-Engine Mount Bracket Bolts 55 N.m 41 lb ft
Exhaust Manifold Heat Shield Bolts 25 N.m 18 lb ft
Exhaust Manifold Pipe-to-Exhaust Manifold Nuts 30 N.m 22 lb ft
Exhaust Manifold Pipe-to-Resonator Bolts 20 N.m 15 lb ft
Exhaust Manifold Studs-to-Cylinder Head 10 N.m 89 lb in
Exhaust Manifold-to-Cylinder Head Nuts 12 N.m 9 lb ft
Flywheel Bolt
 First Pass 53 N.m 39 lb ft
 Final Pass 25 degrees
Front Cover-to-Block Bolts 25 N.m 18 lb ft
Fuel Line Bolt 10 N.m 89 lb in
Fuel Rail Bracket Stud 10 N.m 89 lb in
Ignition Coil-to-Camshaft Cover Bolts 8 N.m 71 lb in
Intake Camshaft Rear Bearing Cap Bolts 25 N.m 18 lb ft
Intake Manifold Studs 6 N.m 56 lb in
Intake Manifold-to-Cylinder Head Bolts 10 N.m 89 lb in
Intake Manifold-to-Cylinder Head Nuts 10 N.m 89 lb in
Intake Manifold-to-Cylinder Head Studs 6 N.m 60 lb in
Knock Sensor Bolt 25 N.m 18 lb in
Knock Sensor-to-Engine Block Bolt 25 N.m 18 lb ft
Lower Crankcase-to-Block Peripheral Bolts 25 N.m 18 lb ft
2003 Saturn L200
2003 ENGINE Engine Mechanical - 2.2L (L61) - Saturn L Series
steve
Monday, May 09, 2011 12:51:59 PM Page 2 © 2006 Mitchell Repair Information Company, LLC.
Lower Engine-to-Transmission Bell Housing Bolts 65 N.m 48 lb ft
Oil Drain Plug 25 N.m 18 lb ft
Oil Filter Cap 25 N.m 18 lb ft
Oil Gallery Plug 35 N.m 26 lb ft
Oil Gallery Plug (Rear) 60 N.m 44 lb ft
Oil Level Indicator Tube-to-Intake Manifold Bolt 10 N.m 89 lb in
Oil Pan-to-Block Bolts 25 N.m 18 lb ft
Oil Pressure Switch 10 N.m 89 lb in
Oil pump Gerotor Cover Bolts 6 N.m 53 lb in
Oil Pump Pressure Relief Valve Plug 40 N.m 3 lb in
Oxygen Sensor Bolts 30 N.m 22 lb ft
Power Steering Pump Bolts 25 N.m 18 lb ft
Shift Control Rod Pinch Bolt
 First Pass 12 N.m 9 lb ft
 Final Pass 180 degrees
Spark Plugs 20 N.m 15 lb ft
Stabilizer Link-to-Strut Assembly 65 N.m 50 lb ft
Steering Gear-to-Intermediate Shaft Pinch Bolt 30 N.m 22 lb ft
Support Plate-to-Engine Block 10 N.m 89 lb in
Suspension Support Bolts
 First Pass 100 N.m 74 lb ft
 Final Pass 45 degrees
Thermostat Housing-to-Block Bolts 10 N.m 89 lb in
Throttle Body Bolts 10 N.m 89 lb in
Throttle Body Nuts 10 N.m 89 lb in
Throttle Body Studs-to-Cylinder Head 6 N.m 60 lb in
Tie Rod end Linkage Installer 45 N.m 35 lb ft
Tie Rod Nut 60 N.m 45 lb ft
Timing Chain Guide (Adjustable) Bolt 10 N.m 89 lb in
Timing Chain Guide (Fixed) Bolts 10 N.m 89 lb in
Timing Chain Guide (Upper) Bolts 10 N.m 89 lb in
Timing Chain Guide Bolt Access Hole Plug 40 N.m 30 lb ft
Timing Chain Oil Nozzle Bolt 10 N.m 89 lb in
Timing Chain Tensioner Bolts 75 N.m 55 lb ft
Torque Converter Bolts 75 N.m 55 lb ft
Transmission Nose Bracket Bolts 35 N.m 26 lb ft
Upper Bell Housing Bolts 65 N.m 48 lb ft
Water Pump Bolts 25 N.m 18 lb ft
Wheel Bolts (Final Torque) 125 N.m 92 lb ft
Wheel Bolts (Initial Torque) 63 N.m 46 lb ft
2003 Saturn L200
2003 ENGINE Engine Mechanical - 2.2L (L61) - Saturn L Series
steve
Monday, May 09, 2011 12:51:59 PM Page 3 © 2006 Mitchell Repair Information Company, LLC.
ENGINE MECHANICAL SPECIFICATIONS
Engine Mechanical Specifications
Application
Specification
Metric English
General Data
 Engine Type Inline 4 Cylinder
 Displacement 2.2 L 134 CID
 RPO L61
 Liter (VIN) F
 Bore 85.992-86.008 mm 3.3855-3.3861 in
 Compression Ratio 9.5:01
Balance Shaft
 Bearing Clearance 0.030-0.063 mm 0.0012-0.0025 in
 Bearing Diameter - Inside - Carrier 20.050-20.063 mm 0.7894-0.7899 in
 Bearing Diameter - Outside - Carrier 41.975-41.995 mm 1.6526-1.6534 in
 Bearing Journal Diameter 20.000-20.020 mm 0.7874-0.7882 in
 Bushing Clearance 0.033-0.102 mm 0.0013-0.0040 in
 Bushing Diameter - Inside 36.776-36.825 mm 1.4479-1.4498 in
 Bushing Journal Diameter 36.723-36.743 mm 1.4458-1.4466 in
 End Play 0.100-0.300 mm 0.0020-0.0118 in
Block
 Balance Shaft Bearing Bore Diameter - Carrier 42.000-42.016 mm 1.6535-1.6542 in
 Balance Shaft Bushing Bore Diameter 40.763-40.776 mm 1.6048-1.6054 in
 Crankshaft Main Bearing Bore Diameter 64.068-64.082 mm 2.5224-2.5229 in
 Cylinder Bore Diameter 85.992-86.008 mm 3.3855-3.3861 in
 Cylinder Bore Out-of-Round - Maximum 0.010 mm 0.0004 in
 Cylinder Bore Taper - Maximum 0.010 mm 0.0004 in
 Cylinder Head Deck Surface Flatness - Transverse 0.030 mm 0.0012 in
 Cylinder Head Deck Surface Flatness - Longitude 0.050 mm 0.002 in
 Cylinder Head Deck Surface Flatness - Overall 0.08 mm 0.0031 in
Camshaft
 Camshaft End Play 0.040-0.144 mm 0.0016-0.0057 in
 Camshaft Journal Diameter 26.935-26.960 mm 1.0604-1.0614 in
 Camshaft Thrust Surface 21.000-21.052 mm 0.8268-0.8252 in
2003 Saturn L200
2003 ENGINE Engine Mechanical - 2.2L (L61) - Saturn L Series
steve
Monday, May 09, 2011 12:51:59 PM Page 4 © 2006 Mitchell Repair Information Company, LLC.
Connecting Rod
 Connecting Rod Bearing Clearance 0.029-0.069 mm 0.0011-0.0027 in
 Connecting Rod Bore Diameter - Bearing End 52.118-52.134 mm 2.0519-2.05252 in
 Connecting Rod Bore Diameter - Pin End 20.007-20.021 mm 0.7877-0.7882 in
 Connecting Rod Side Clearance 0.070-0.370 mm 0.0028-0.0146 in
 Connecting Rod Straightness - Bend - Maximum 0.021 mm 0.0083 in
 Connecting Rod Straightness - Twist - Maximum 0.04 mm 0.0157 in
Crankshaft
 Connecting Rod Journal Diameter 49.000-49.014 mm 1.9291-1.9297 in
 Crankshaft End Play 0.050-0.380 mm 0.0012-0.0150 in
 Crankshaft Main Bearing Clearance 0.031-0.067 mm 0.0012-0.0026 in
 Crankshaft Main Journal Diameter 55.994-56.008 mm 2.2045-2.2050 in
Cylinder Head
 Surface Flatness - Block Deck - Transverse 0.030 mm 0.0012 in
 Surface Flatness - Block Deck - Longitude 0.050 mm 0.002 in
 Surface Flatness - Block Deck - Overall 0.1 mm 0.004 in
 Valve Guide Bore - Exhaust 6.000-6.012 mm 0.2362-0.2367 in
 Valve Guide Bore - Intake 6.000-6.012 mm 0.2362-0.2367 in
 Valve Lifter Bore Diameter - Stationary Lash
Adjusters
12.013-12.037 mm 0.4730-0.4739 in
Lubrication System
 Oil Pressure - Minimum - @1000 RPM 344.75-551.60 kPa 50-80 psi
Piston Rings
 Piston Ring End Gap - First Compression Ring 0.20-0.40 mm 0.008-0.016 in
 Piston Ring End Gap - Second Compression Ring 0.35-0.55 mm 0.014-0.022 in
 Piston Ring End Gap - Oil Control Ring - Rails 0.25-0.76 mm 0.010-0.030 in
 Piston Ring to Groove Clearance - First Compression
Ring
0.04-0.08 mm 0.0015-0.0031 in
 Piston Ring to Groove Clearance - Second
Compression Ring
0.030-0.069 mm 0.0012-0.0027 in
 Piston Ring to Groove Clearance - Oil Control Ring 0.090-0.106 mm 0.0035-0.0042 in
 Piston Ring Thickness - First Compression Ring 1.170-1.190 mm 0.0461-0.0469 in
 Piston Ring Thickness - Second Compression Ring 1.471-1.490 mm 0.0579-0.0587 in
 Piston Ring Thickness - Oil Control Ring - Rail -
Maximum
0.43 mm 0.0169 in
2003 Saturn L200
2003 ENGINE Engine Mechanical - 2.2L (L61) - Saturn L Series
steve
Monday, May 09, 2011 12:51:59 PM Page 5 © 2006 Mitchell Repair Information Company, LLC.
SEALERS, ADHESIVES, AND LUBRICANTS
Sealers, Adhesives, and Lubricants
 Piston Ring Thickness - Oil Control Ring - Spacer 1.574-1.651 mm 0.0620-0.0650 in
Pistons and Pins
 Piston - Piston Diameter - @14.5 mm up 85.967-85.982 mm 3.3845-3.3851 in
 Piston - Piston Pin Bore Diameter 20.002-20.007 mm 0.07875-0.7877 in
 Piston - Piston Ring Grove Width - Top 1.23-1.25 mm 0.0484-0.0492 in
 Piston - Piston Ring Grove Width - Second 1.52-1.54 mm 0.0598-0.0606 in
 Piston - Piston Ring Grove Width - Oil Control 2.52-2.54 mm 0.0992-0.1000 in
 Piston - Piston To Bore Clearance 0.010-0.041 mm 0.0004-0.0016 in
 Pin - Piston Pin Clearance to Connecting Rod Bore 0.007-0.026 mm 0.0003-0.0010 in
 Pin - Piston Pin Clearance to Piston Pin Bore 0.002-0.012 mm 0.0001-0.0005 in
 Pin - Piston Pin Diameter 19.995-20.000 mm 0.7872-0.7874 in
 Pin - Piston Pin End Play 0.19-1.16 mm 0.0075-0.0461 in
Valve System
 Valves - Valve Face Runout - Maximum 0.04 mm 0.0016 in
 Valves - Valve Seat Runout - Maximum 0.05 mm 0.0020 in
 Valves - Valve Stem Diameter - Intake 5.955-5.970 mm 0.2344-0.2355 in
 Valves - Valve Stem Diameter - Exhaust 5.935-5.950 mm 0.2337-0.2343 in
 Valves - Valve Stem to Guide Clearance - Intake 0.030-0.057 mm 0.0012-0.0022 in
 Valves - Valve Stem to Guide Clearance - Exhaust 0.050-0.077 mm 0.0020-0.0026 in
 Valve Lifters - Valve Lifter Diameter - Stationary
Lash Adjuster
11.986-12.000 mm 0.0005-0.0020 in
 Valve Lifters - Valve Lifter-to-Bore Clearance -
Stationary Lash Adjuster
0.013-0.051 mm 3.2210-3.2299 in
 Valve Springs - Valve Spring Load - Closed - @32.5
mm
245.0-271.0 N. - Eng Spec.
 Valve Springs - Valve Spring Load - Open - @32.5
mm
525.0-575.0 N. - Eng Spec.
Application Type of Material Part Number
# 6 Intake Rear Camshaft Cap Sealant
Permatex® Anaerobic Gasket
Maker 51813
Balance Shaft Lobes Lubricant 5 W 30 or equivalent
Cam Lobes Lubricant Engine Oil Supplement
Connecting Rod Bearings Lubricant 5 W 30 or equivalent
2003 Saturn L200
2003 ENGINE Engine Mechanical - 2.2L (L61) - Saturn L Series
steve
Monday, May 09, 2011 12:51:59 PM Page 6 © 2006 Mitchell Repair Information Company, LLC.
THREAD REPAIR SPECIFICATIONS
Engine Block - Front View
Crank Sensor O-ring Engine Oil 5 W 30 or equivalent
Crankshaft Main Bearings Lubricant 5 W 30 or equivalent
Cylinder Bore Lubricant 5 W 30 or equivalent
Cylinder Head Plugs Threadlocker 21485277
Dipstick Tube O-rings Lubricant Engine Oil Supplement
Engine Block Threaded Plugs Sealant 21485278
Engine Block To Bed Plate Sealant 21019581
Engine Oil 5 quarts 5 W 30 or equivalent
Engine Oil Level Indicator Tube O-ring Lubricant Engine Oil Supplement
Fuel Injector O-rings Engine Oil 5 W 30 or equivalent
Fuel Injector Tip Insulators Engine Oil 5 W 30 or equivalent
Intake and Exhaust Valve Stems Lubricant Engine Oil Supplement
Oil Filter Cap (Threads and O-ring Lead-in
Chamfers)
Engine Oil 5 W 30 or equivalent
Oil Pan to Bedplate Joint Sealant 21019581
Oil Pump - Pump Elements Engine Oil 5 W 30 or equivalent
Oxygen Sensor Threads Antiseize 12397953
Piston Pins Lubricant 5 W 30 or equivalent
Stationary Hydraulic Lash Adjusters Lubricant Engine Oil Supplement
Timing Chain Guide Bolt Access Hole Plug Threadlocker 21485277
Valve Rocker Arm / Valve Tip Lubricant Engine Oil Supplement
Water Feed Tube O-rings Lubricant Silicone Gel Lubricant
Water Pump Drain Plug Sealant 21485278
2003 Saturn L200
2003 ENGINE Engine Mechanical - 2.2L (L61) - Saturn L Series
steve
Monday, May 09, 2011 12:51:59 PM Page 7 © 2006 Mitchell Repair Information Company, LLC.
Fig. 1: Engine Block - Front View
Courtesy of GENERAL MOTORS CORP.
Engine Block - Front View
Service
Call
Out
Thread
Size Insert Drill
Counterbore
Tool Tap Driver
Drill Depth
(Maximum)
Tap Depth
(Maximum)
Engineering
Hole
Number
J 42385- MM (IN) MM (IN) -
1 M10 x 1.5 215 211 212 213 214 24.5 0.96 19.5 0.77 117
2 M8 x 1.25 210 206 207 208 209 23.5 0.93 18.5 0.73 109
3
M12 x
1.75
855 856 857 858 859 33.5 1.32 26.5 1.04 114
4 M8 x 1.25 210 206 207 208 209 23.5 0.93 18.5 0.73 110
5 M6 x 1 205 201 202 203 204 20 0.787 16 0.63 129
6 M6 x 1 205 201 202 203 204 20 0.787 16 0.63 130
7 M6 x 1 205 201 202 203 204 20 0.787 16 0.63 125
8 M6 x 1 205 201 202 203 204 20 0.787 16 0.63 126
9 M8 x 1.25 210 206 207 208 209 25.5 1.00 THRU 111
10 M6 x 1 205 201 202 203 204 20 0.787 16 0.63 127
11 M6 x 1 205 201 202 203 204 20 0.787 16 0.63 122
12 M6 x 1 205 201 202 203 204 20 0.787 16 0.63 128
13 M6 x 1 205 201 202 203 204 20 0.787 16 0.63 124
2003 Saturn L200
2003 ENGINE Engine Mechanical - 2.2L (L61) - Saturn L Series
steve
Monday, May 09, 2011 12:51:59 PM Page 8 © 2006 Mitchell Repair Information Company, LLC.
Engine Block - Back View
Fig. 2: Engine Block - Back View
Courtesy of GENERAL MOTORS CORP.
Engine Block - Back View
14 M6 x 1 205 201 202 203 204 20 0.787 16 0.63 123
15 M6 x 1 205 201 202 203 204 20 0.787 16 0.63 131
16 M6 x 1 205 201 202 203 204 20 0.787 16 0.63 119
17 M6 x 1 205 201 202 203 204 20 0.787 16 0.63 120
18 M8 x 1.25 210 206 207 208 209 23.5 0.93 18.5 0.73 106
19 M8 x 1.25 210 206 207 208 209 55 2.17 THRU 112
20 M8 x 1.25 210 206 207 208 209 23.5 0.93 18.5 0.73 108
21
M12 x
1.75
855 856 857 858 859 33.5 1.32 26.5 1.04 116
22
M12 x
1.75
855 856 857 858 859 33.5 1.32 26.5 1.04 115
Service
Call
Out
Thread
Size Insert Drill
Counterbore
Tool Tap Driver
Drill Depth
(Maximum)
Tap Depth
(Maximum)
Engineering
Hole
Number
J 42385- MM (IN) MM (IN) -
M12 x
2003 Saturn L200
2003 ENGINE Engine Mechanical - 2.2L (L61) - Saturn L Series
steve
Monday, May 09, 2011 12:51:59 PM Page 9 © 2006 Mitchell Repair Information Company, LLC.
Engine Block - Left Side View
Fig. 3: Engine Block - Left Side View
Courtesy of GENERAL MOTORS CORP.
Engine Block - Left Side View
1 1.75 855 856 857 858 859 39 1.535 33.5 1.32 204
2 M16 x 1.5 860 861 862 863 864 21 0.827 15 0.59 214
3 M10 x 1.5 215 211 212 213 214 29 1.161 THRU 206
4 M8 x 1.25 210 206 207 208 209 18 0.709 THRU 209
5 M8 x 1.25
854
No
Flange
206 207 208 209 18 0.709 THRU 208
6 M16 x 1.5 860 861 862 863 864 21 0.827 15 0.59 213
7
M12 x
1.75
855 856 857 858 859 39 1.535 33.5 1.32 203
Service
Call
Out
Thread
Size Insert Drill
Counterbore
Tool Tap Driver
Drill Depth
(Maximum)
Tap Depth
(Maximum)
Engineering
Hole
Number
J 42385- MM (IN) MM (IN) -
1
M12 x
1.75
865 856 857 858 859 19.50 0.768 12.5 0.49 515
2003 Saturn L200
2003 ENGINE Engine Mechanical - 2.2L (L61) - Saturn L Series
steve
Monday, May 09, 2011 12:51:59 PM Page 10 © 2006 Mitchell Repair Information Company, LLC.
Engine Block - Bottom View
Fig. 4: Engine Block - Bottom View
Courtesy of GENERAL MOTORS CORP.
Engine Block - Bottom View
2 M6 x 1.0 205 201 202 203 204 - - - - -
3
M12 x
1.75
865 856 857 858 859 19.50 0.768 12.5 0.49 514
4 M10 x 1.5 215 211 212 213 214 23.50 0.925 18.5 0.73 521
5 M10 x 1.5 215 211 212 213 214 23.50 0.925 18.5 0.73 519
6 M6 x 1.0 205 201 202 203 204 20.50 0.807 16.0 0.63 513
7 M6 x 1.0 205 201 202 203 204 20.50 0.807 16.0 0.63 512
8 M6 x 1.0 205 201 202 203 204 20.50 0.807 16.0 0.63 511
9 M6 x 1.0 205 201 202 203 204 - - - - -
10
M12 x
1.75
865 856 857 858 859 19.50 0.768 12.5 0.49 516
2003 Saturn L200
2003 ENGINE Engine Mechanical - 2.2L (L61) - Saturn L Series
steve
Monday, May 09, 2011 12:51:59 PM Page 11 © 2006 Mitchell Repair Information Company, LLC.
Engine Block - Right Side View
Service
Call
Out
Thread
Size Insert Drill
Counterbore
Tool Tap Driver
Drill Depth
(Maximum)
Tap Depth
(Maximum)
Engineering
Hole
Number
J 42385- MM (IN) MM (IN) -
1 M10 x 1.5 514 511 N/A 512 513 60 2.362 53.5 2.11 1415
2 M10 x 1.5 514 511 N/A 512 513 60 2.362 53.5 2.11 1408
3 M8 x 1.25 210 206 207 208 209 28 1.102 22 0.87 1425
4 M10 x 1.5 514 511 N/A 512 513 60 2.362 53.5 2.11 1416
5 M10 x 1.5 514 511 N/A 512 513 60 2.362 53.5 2.11 1409
6 M8 x 1.25 210 206 207 208 209 28 1.102 22 0.87 1426
7 M8 x 1.25 210 206 207 208 209 28 1.102 22 0.87 1432
8 M10 x 1.5 514 511 N/A 512 513 60 2.362 53.5 2.11 1404
9 M10 x 1.5 514 511 N/A 512 513 60 2.362 53.5 2.11 1417
10 M10 x 1.5 514 511 N/A 512 513 60 2.362 53.5 2.11 1422
11 M10 x 1.5 514 511 N/A 512 513 60 2.362 53.5 2.11 1406
12 M8 x 1.25 210 206 207 208 209 28 1.102 22 0.87 1431
13 M8 x 1.25 210 206 207 208 209 28 1.102 22 0.87 1430
14 M10 x 1.5 514 511 N/A 512 513 60 2.362 53.5 2.11 1412
15 M10 x 1.5 514 511 N/A 512 513 60 2.362 53.5 2.11 1421
16 M8 x 1.25 210 206 207 208 209 28 1.102 22 0.87 1429
17 M10 x 1.5 514 511 N/A 512 513 60 2.362 53.5 2.11 1411
18 M10 x 1.5 514 511 N/A 512 513 60 2.362 53.5 2.11 1420
19 M8 x 1.25 210 206 207 208 209 28 1.102 22 0.87 1428
20 M10 x 1.5 514 511 N/A 512 513 60 2.362 53.5 2.11 1410
21 M10 x 1.5 514 511 N/A 512 513 60 2.362 53.5 2.11 1419
22 M8 x 1.25 210 206 207 208 209 28 1.102 22 0.87 1427
23 M10 x 1.5 514 511 N/A 512 513 60 2.362 53.5 2.11 1405
24 M10 x 1.5 514 511 N/A 512 513 60 2.362 53.5 2.11 1418
25 M10 x 1.5 514 511 N/A 512 513 60 2.362 53.5 2.11 1413
26 M10 x 1.5 514 511 N/A 512 513 60 2.362 53.5 2.11 1403
27 M8 x 1.25 210 206 207 208 209 28 1.102 22 0.87 1423
28 M10 x 1.5 514 511 N/A 512 513 60 2.362 53.5 2.11 1414
29 M10 x 1.5 514 511 N/A 512 513 60 2.362 53.5 2.11 1407
30 M8 x 1.25 210 206 207 208 209 28 1.102 22 0.87 1424
2003 Saturn L200
2003 ENGINE Engine Mechanical - 2.2L (L61) - Saturn L Series
steve
Monday, May 09, 2011 12:51:59 PM Page 12 © 2006 Mitchell Repair Information Company, LLC.
Fig. 5: Engine Block - Right Side View
Courtesy of GENERAL MOTORS CORP.
Engine Block - Right Side View
Service
Call
Out
Thread
Size Insert Drill
Counterbore
Tool Tap Driver
Drill Depth
(Maximum)
Tap Depth
(Maximum)
Engineering
Hole
Number
J 42385- MM (IN) MM (IN) -
1
M12 x
1.75
865 856 857 858 859 19.50 0.778 12.5 0.49 613
2
M12 x
1.75
865 856 857 858 859 19.50 0.778 12.5 0.49 612
3 M6 x 1.0 205 201 202 203 204 20.50 0.807 16.5 .065 610
4
M12 x
1.75
865 856 857 858 859 15.50 0.610 12.5 0.49 606
5 M8 x 1.25 210 206 207 208 209 23.50 0.925 18.0 0.71 609
6 M8 x 1.25 210 206 207 208 209 23.50 0.925 18.0 0.71 608
7 M8 x 1.25 210 206 207 208 209 23.50 0.925 18.0 0.71 607
8
M12 x
1.75
855 856 857 858 859 33.50 1.319 26.5 1.04 617
9 M8 x 1.25 210 206 207 208 209 30.50 1.201 22.5 0.89 604
10 M8 x 1.25 210 206 207 208 209 30.50 1.201 22.5 0.89 605
11 M8 x 1.25 210 206 207 208 209 30.50 1.201 22.5 0.89 603
12 M8 x 1.25 210 206 207 208 209 30.50 1.201 22.5 0.89 601
2003 Saturn L200
2003 ENGINE Engine Mechanical - 2.2L (L61) - Saturn L Series
steve
Monday, May 09, 2011 12:51:59 PM Page 13 © 2006 Mitchell Repair Information Company, LLC.
Engine Block - Top View
Fig. 6: Engine Block - Top View
Courtesy of GENERAL MOTORS CORP.
Engine Block - Top View
13 M8 x 1.25 210 206 207 208 209 30.50 1.201 22.5 0.89 602
14
M12 x
1.75
855 856 857 858 859 33.50 1.319 26.5 1.04 616
15
M12 x
1.75
865 856 857 858 859 19.50 0.778 12.5 0.49 614
Service
Call
Out
Thread
Size Insert Drill
Counterbore
Tool Tap Driver
Drill Depth
(Maximum)
Tap Depth
(Maximum)
Engineering
Hole
Number
J 42385- MM (IN) MM (IN) -
1 M11 x 1.5 507 504 N/A 505 506 113.30 4.461 107.3 4.22 308
2003 Saturn L200
2003 ENGINE Engine Mechanical - 2.2L (L61) - Saturn L Series
steve
Monday, May 09, 2011 12:51:59 PM Page 14 © 2006 Mitchell Repair Information Company, LLC.
Lower Crankcase - Front View
Fig. 7: Identifying Front Lower Crankcase Thread Sizes
Courtesy of GENERAL MOTORS CORP.
Lower Crankcase - Front View
2
M12 x
1.75
865 856 857 858 859 13.50 0.531 12.5 0.49 317
3 M11 x 1.5 507 504 N/A 505 506 113.30 4.461 107.3 4.22 309
4 M11 x 1.5 507 504 N/A 505 506 113.30 4.461 107.3 4.22 310
5 M11 x 1.5 507 504 N/A 505 506 113.30 4.461 107.3 4.22 302
6 M11 x 1.5 507 504 N/A 505 506 113.30 4.461 107.3 4.22 305
7 M11 x 1.5 507 504 N/A 505 506 113.30 4.461 107.3 4.22 304
8 M11 x 1.5 507 504 N/A 505 506 113.30 4.461 107.3 4.22 303
9 M11 x 1.5 507 504 N/A 505 506 113.30 4.461 107.3 4.22 301
10 M8 x 1.25 210 206 207 208 209 23.50 0.925 18.5 0.73 313
11 M8 x 1.25 210 206 207 208 209 23.50 0.925 18.5 0.73 311
12 M8 x 1.25 210 206 207 208 209 23.50 0.925 18.5 0.73 312
13 M11 x 1.5 507 504 N/A 505 506 113.30 4.461 107.3 4.22 306
14 M8 x 1.25 210 206 207 208 209 23.50 0.925 18.5 0.73 314
15 M11 x 1.5 507 504 N/A 505 506 113.30 4.461 107.3 4.22 307
16
M12 x
1.75
865 856 857 858 859 13.50 0.531 12.5 0.49 316
Service
Call
Out
Thread
Size Insert Drill
Counterbore
Tool Tap Driver
Drill Depth
(Maximum)
Tap Depth
(Maximum)
Engineering
Hole
Number
J 42385- MM (IN) MM (IN) -
1 M8 x 1.25 210 206 207 208 209 23.50 0.925 18.5 0.73 138
2 M8 x 1.25 210 206 207 208 209 30.50 1.201 25.5 1.00 139
2003 Saturn L200
2003 ENGINE Engine Mechanical - 2.2L (L61) - Saturn L Series
steve
Monday, May 09, 2011 12:51:59 PM Page 15 © 2006 Mitchell Repair Information Company, LLC.
Lower Crankcase - Back View
Fig. 8: Identifying Rear Lower Crankcase Thread Sizes
Courtesy of GENERAL MOTORS CORP.
Lower Crankcase - Back View
Lower Crankcase - Bottom View
3 M8 x 1.25 210 206 207 208 209 30.50 1.201 25.5 1.00 140
4 M8 x 1.25 210 206 207 208 209 23.50 0.925 18.5 0.73 141
Service
Call
Out
Thread
Size Insert Drill
Counterbore
Tool Tap Driver
Drill Depth
(Maximum)
Tap Depth
(Maximum)
Engineering
Hole
Number
J 42385- MM (IN) MM (IN) -
1 M10 x 1.5 215 211 212 213 214 29.50 1.161 THRU 207
2003 Saturn L200
2003 ENGINE Engine Mechanical - 2.2L (L61) - Saturn L Series
steve
Monday, May 09, 2011 12:51:59 PM Page 16 © 2006 Mitchell Repair Information Company, LLC.
Fig. 9: Identifying Lower Bottom Crankcase Thread Sizes
Courtesy of GENERAL MOTORS CORP.
Lower Crankcase - Bottom View
Service
Call
Out
Thread
Size Insert Drill
Counterbore
Tool Tap Driver
Drill Depth
(Maximum)
Tap Depth
(Maximum)
Engineering
Hole
Number
J 42385- MM (IN) MM (IN) -
1 M8 x 1.25 210 206 207 208 209 23.50 0.925 18.5 0.73 415
2 M8 x 1.25 210 206 207 208 209 23.50 0.925 18.5 0.73 416
3 M8 x 1.25 210 206 207 208 209 23.50 0.925 18.5 0.73 417
4 M8 x 1.25 210 206 207 208 209 23.50 0.925 18.5 0.73 418
5 M8 x 1.25 210 206 207 208 209 23.50 0.925 18.5 0.73 419
6 M8 x 1.25 210 206 207 208 209 23.50 0.925 18.5 0.73 405
7 M8 x 1.25 210 206 207 208 209 23.50 0.925 18.5 0.73 406
8 M8 x 1.25 210 206 207 208 209 23.50 0.925 18.5 0.73 407
9 M8 x 1.25 210 206 207 208 209 23.50 0.925 18.5 0.73 408
10 M8 x 1.25 210 206 207 208 209 23.50 0.925 18.5 0.73 409
11 M8 x 1.25 210 206 207 208 209 23.50 0.925 18.5 0.73 410
2003 Saturn L200
2003 ENGINE Engine Mechanical - 2.2L (L61) - Saturn L Series
steve
Monday, May 09, 2011 12:52:00 PM Page 17 © 2006 Mitchell Repair Information Company, LLC.
Lower Crankcase - Left View
Fig. 10: Identifying Lower Left Crankcase Thread Sizes
Courtesy of GENERAL MOTORS CORP.
Lower Crankcase - Left View
Lower Crankcase - Right View
12 M8 x 1.25 210 206 207 208 209 23.50 0.925 18.5 0.73 411
13 M8 x 1.25 210 206 207 208 209 23.50 0.925 18.5 0.73 412
14 M8 x 1.25 210 206 207 208 209 23.50 0.925 18.5 0.73 413
15 M8 x 1.25 210 206 207 208 209 23.50 0.925 18.5 0.73 414
Service
Call
Out
Thread
Size Insert Drill
Counterbore
Tool Tap Driver
Drill Depth
(Maximum)
Tap Depth
(Maximum)
Engineering
Hole
Number
J 42385- MM (IN) MM (IN) -
1 M10 x 1.5 215 211 212 213 214 28.50 1.122 22.5 0.89 518
2 M10 x 1.5 215 211 212 213 214 28.50 1.122 22.5 0.89 517
3 M10 x 1.5 215 211 212 213 214 28.50 1.122 22.5 0.89 520
2003 Saturn L200
2003 ENGINE Engine Mechanical - 2.2L (L61) - Saturn L Series
steve
Monday, May 09, 2011 12:52:00 PM Page 18 © 2006 Mitchell Repair Information Company, LLC.
Fig. 11: Identifying Lower Right Crankcase Thread Sizes
Courtesy of GENERAL MOTORS CORP.
Lower Crankcase - Right View
Cylinder Head - Top View
Service
Call Out
Thread
Size Insert Drill
Counterbore
Tool Tap Driver
Drill Depth
(Maximum)
Tap Depth
(Maximum)
Engineering
Hole
Number
J 42385- MM (IN) MM (IN) -
1
M8 x
1.25
210 211 212 213 214 30.50 1.201 22.5 0.886 615
2003 Saturn L200
2003 ENGINE Engine Mechanical - 2.2L (L61) - Saturn L Series
steve
Monday, May 09, 2011 12:52:00 PM Page 19 © 2006 Mitchell Repair Information Company, LLC.
Fig. 12: Cylinder Head - Top View
Courtesy of GENERAL MOTORS CORP.
Cylinder Head - Top View
Service
Call
Out
Thread
Size Insert Drill
Counterbore
Tool Tap Driver
Drill Depth
(Maximum)
Tap Depth
(Maximum)
Engineering
Hole
Number
J 42385- MM (IN) MM (IN) -
1 M6 x 1.0 205 852 N/A 203 204 24 0.945 20 0.787 2515
2 M6 x 1.0 205 852 N/A 203 204 24 0.945 20 0.787 2514
3 M6 x 1.0 205 201 202 203 204 20 0.787 16 0.630 2812
4 M6 x 1.0 205 201 202 203 204 20 0.787 16 0.630 2820
5 M6 x 1.0 205 201 202 203 204 20 0.787 16 0.630 2710
6 M6 x 1.0 205 852 N/A 203 204 24 0.945 20 0.787 2513
7 M6 x 1.0 205 852 N/A 203 204 24 0.945 20 0.787 2512
8 M8 x 1.25
854
No
Flange
206 207 208 209 THRU THRU 2980
9 M6 x 1.0 205 201 202 203 204 20 0.787 16 0.630 2811
10 M6 x 1.0 205 201 202 203 204 20 0.787 16 0.630 2810
11 M6 x 1.0 205 852 N/A 203 204 24 0.945 20 0.787 2510
12 M6 x 1.0 205 852 N/A 203 204 24 0.945 20 0.787 2511
13 M6 x 1.0 205 201 202 203 204 16 0.630 THRU 2910
14 M6 x 1.0 205 201 202 203 204 16 0.630 THRU 2911
2003 Saturn L200
2003 ENGINE Engine Mechanical - 2.2L (L61) - Saturn L Series
steve
Monday, May 09, 2011 12:52:00 PM Page 20 © 2006 Mitchell Repair Information Company, LLC.
Cylinder Head - Intake Manifold Deck View
15 M6 x 1.0 205 852 N/A 203 204 24 0.945 20 0.787 2520
16 M6 x 1.0 205 852 N/A 203 204 24 0.945 20 0.787 2521
17 M6 x 1.0 205 201 202 203 204 20 0.787 16 0.630 2815
18 M6 x 1.0 205 201 202 203 204 20 0.787 16 0.630 2816
19 M6 x 1.0 205 852 N/A 203 204 24 0.945 20 0.787 2523
20 M6 x 1.0 205 852 N/A 203 204 24 0.945 20 0.787 2522
21 M6 x 1.0 205 201 202 203 204 20 0.787 16 0.630 2817
22 M6 x 1.0 205 852 N/A 203 204 24 0.945 20 0.787 2525
23 M6 x 1.0 205 852 N/A 203 204 24 0.945 20 0.787 2524
24 M6 x 1.0 205 201 202 203 204 20 0.787 16 0.630 2821
25 M6 x 1.0 205 852 N/A 203 204 24 0.945 20 0.787 2527
26 M6 x 1.0 205 852 N/A 203 204 24 0.945 20 0.787 2526
27 M6 x 1.0 205 201 202 203 204 20 0.787 16 0.630 2818
28 M6 x 1.0 205 201 202 203 204 20 0.787 16 0.630 2822
29 M6 x 1.0 205 852 N/A 203 204 24 0.945 20 0.787 2529
30 M6 x 1.0 205 852 N/A 203 204 24 0.945 20 0.787 2528
31 M6 x 1.0 205 201 202 203 204 20 0.787 16 0.630 2819
32 M6 x 1.0 205 201 202 203 204 20 0.787 16 0.630 2823
33 M8 x 1.25 210 206 207 208 209 25 0.984 20 0.787 2621
34 M8 x 1.25 210 206 207 208 209 25 0.984 20 0.787 2622
35 M8 x 1.25
854
No
Flange
853 N/A 208 209 25 0.984 20 0.787 2541
36 M8 x 1.25
854
No
Flange
853 N/A 208 209 25 0.984 20 0.787 2540
37 M6 x 1.0 210 206 207 208 209 20 0.787 16 0.630 2814
38 M6 x 1.0 205 852 N/A 203 204 24 0.945 20 0.787 2519
39 M6 x 1.0 205 852 N/A 203 204 24 0.945 20 0.787 2518
40 M6 x 1.0 210 206 207 208 209 20 0.787 16 0.630 2711
41 M6 x 1.0 210 206 207 208 209 20 0.787 16 0.630 2813
42 M6 x 1.0 205 852 N/A 203 204 24 0.945 20 0.787 2517
43 M6 x 1.0 205 852 N/A 203 204 24 0.945 20 0.787 2516
2003 Saturn L200
2003 ENGINE Engine Mechanical - 2.2L (L61) - Saturn L Series
steve
Monday, May 09, 2011 12:52:00 PM Page 21 © 2006 Mitchell Repair Information Company, LLC.
Fig. 13: Cylinder Head - Intake Manifold Deck View
Courtesy of GENERAL MOTORS CORP.
Cylinder Head - Intake Manifold Deck View
Cylinder Head - Exhaust Manifold Deck View
Service
Call
Out
Thread
Size Insert Drill
Counterbore
Tool Tap Driver
Drill Depth
(Maximum)
Tap Depth
(Maximum)
Engineering
Hole
Number
J 42385- MM (IN) MM (IN) -
1 M6 x 1.0 205 201 202 203 204 20 0.787 16 0.630 4117
2 M6 x 1.0 205 201 202 203 204 20 0.787 16 0.630 4116
3 M6 x 1.0 205 201 202 203 204 20 0.787 16 0.630 4115
4 M6 x 1.0 205 201 202 203 204 20 0.787 16 0.630 4114
5 M6 x 1.0 205 201 202 203 204 20 0.787 16 0.630 4113
6 M6 x 1.0 205 201 202 203 204 20 0.787 16 0.630 4112
7 M6 x 1.0 205 201 202 203 204 20 0.787 16 0.630 4111
8 M6 x 1.0 205 201 202 203 204 20 0.787 16 0.630 4110
9 M6 x 1.0 205 201 202 203 204 20 0.787 16 0.630 4118
2003 Saturn L200
2003 ENGINE Engine Mechanical - 2.2L (L61) - Saturn L Series
steve
Monday, May 09, 2011 12:52:00 PM Page 22 © 2006 Mitchell Repair Information Company, LLC.
Fig. 14: Cylinder Head - Exhaust Manifold Deck View
Courtesy of GENERAL MOTORS CORP.
Cylinder Head - Exhaust Manifold Deck View
Cylinder Head - Front View
Service
Call
Out
Thread
Size Insert Drill
Counterbore
Tool Tap Driver
Drill Depth
(Maximum)
Tap Depth
(Maximum)
Engineering
Hole
Number
J 42385- MM (IN) MM (IN) -
1 M8 x 1.25 210 206 207 208 209 25 0.984 20 0.78 3118
2 M8 x 1.25 210 206 207 208 209 25 0.984 20 0.78 3119
3 M8 x 1.25 210 206 207 208 209 25 0.984 20 0.78 3210
4 M27 x 2.0 N/A N/A N/A N/A N/A THRU 12 0.78 3810
5 M8 x 1.25 210 206 207 208 209 25 0.984 20 0.78 3110
6 M8 x 1.25 210 206 207 208 209 25 0.984 20 0.78 3111
7 M8 x 1.25 210 206 207 208 209 25 0.984 20 0.78 3112
8 M8 x 1.25 210 206 207 208 209 25 0.984 20 0.78 3113
9 M8 x 1.25 210 206 207 208 209 25 0.984 20 0.78 3114
10 M8 x 1.25 210 206 207 208 209 25 0.984 20 0.78 3115
11 M6 x 1.0 205 201 202 203 204 20 0.78 16 0.630 3310
12 M8 x 1.25 210 206 207 208 209 25 0.984 20 0.78 3116
13 M8 x 1.25 210 206 207 208 209 25 0.984 20 0.78 3610
14 M8 x 1.25 210 206 207 208 209 25 0.984 20 0.78 3117
2003 Saturn L200
2003 ENGINE Engine Mechanical - 2.2L (L61) - Saturn L Series
steve
Monday, May 09, 2011 12:52:00 PM Page 23 © 2006 Mitchell Repair Information Company, LLC.
Fig. 15: Cylinder Head - Front View
Courtesy of GENERAL MOTORS CORP.
Cylinder Head - Front View
Cylinder Head - Back View
Service
Call
Out
Thread
Size Insert Drill
Counterbore
Tool Tap Driver
Drill Depth
(Maximum)
Tap Depth
(Maximum)
Engineering
Hole
Number
J 42385- MM (IN) MM (IN) -
1 M8 x 1.25 210 206 207 208 209 25 0.984 20 0.787 6310
2 M6 x 1.0 205 201 202 203 204 20 0.787 16 0.630 6210
2003 Saturn L200
2003 ENGINE Engine Mechanical - 2.2L (L61) - Saturn L Series
steve
Monday, May 09, 2011 12:52:00 PM Page 24 © 2006 Mitchell Repair Information Company, LLC.
Fig. 16: Cylinder Head - Back View
Courtesy of GENERAL MOTORS CORP.
Cylinder Head - Back View
Service
Call
Out
Thread
Size Insert Drill
Counterbore
Tool Tap Driver
Drill Depth
(Maximum)
Tap Depth
(Maximum)
Engineering
Hole
Number
J 42385- MM (IN) MM (IN) -
1
M12 x
1.75
865 856 857 858 859 17 0.670 14 0.551 5011
2
M12 x
1.75
865 856 857 858 859 17 0.670 14 0.551 5010
3 M8 x 1.25 210 206 207 208 209 25 0.984 20 0.787 5031
4 M8 x 1.25 210 206 207 208 209 25 0.984 20 0.787 5030
5
M12 x
1.75
865 856 857 858 859 17 0.670 14 0.551 5310
6
M12 x
1.75
865 856 857 858 859 17 0.670 14 0.551 5020
7 M8 x 1.25 210 206 207 208 209 25 0.984 THRU 5111
8 M8 x 1.25
854
No
Flange
206 207 208 209 25 0.984 THRU 5110
2003 Saturn L200
2003 ENGINE Engine Mechanical - 2.2L (L61) - Saturn L Series
steve
Monday, May 09, 2011 12:52:00 PM Page 25 © 2006 Mitchell Repair Information Company, LLC.
Note: 1, 2, 5, 6 holes are oil passages.
Cylinder Head - Bottom View
Fig. 17: Cylinder Head - Bottom View
Courtesy of GENERAL MOTORS CORP.
Cylinder Head - Bottom View
COMPONENT LOCATOR
DISASSEMBLED VIEWS
Service
Call
Out
Thread
Size Insert Drill
Counterbore
Tool Tap Driver
Drill Depth
(Maximum)
Tap Depth
(Maximum)
Engineering
Hole
Number
J 42385- MM (IN) MM (IN) -
1
M12 x
1.75
865 856 857 858 859 17 0.670 14 0.551 1510
2 N/A N/A N/A N/A N/A N/A N/A N/A N/A N/A 1213
3 N/A N/A N/A N/A N/A N/A N/A N/A N/A N/A 1212
4 N/A N/A N/A N/A N/A N/A N/A N/A N/A N/A 1211
5 N/A N/A N/A N/A N/A N/A N/A N/A N/A N/A 1210
2003 Saturn L200
2003 ENGINE Engine Mechanical - 2.2L (L61) - Saturn L Series
steve
Monday, May 09, 2011 12:52:00 PM Page 26 © 2006 Mitchell Repair Information Company, LLC.
Fig. 18: Cylinder Head and Components
Courtesy of GENERAL MOTORS CORP.
Callouts For Fig. 18
Callout Component Name
1 Engine Oil Fill Cap
2 Ignition Module and Coil Housing Assembly Bolt
3 Ignition Module and Coil Housing Assembly
4 Camshaft Cover
5 Camshaft Cover Gasket
2003 Saturn L200
2003 ENGINE Engine Mechanical - 2.2L (L61) - Saturn L Series
steve
Monday, May 09, 2011 12:52:00 PM Page 27 © 2006 Mitchell Repair Information Company, LLC.
6 Camshaft Bearing Cap Bolt
7 Camshaft Bearing Cap
8 Fuel Rail Assembly Bolt
9 Fuel Line Assembly
10 Injector Wiring Harness
11 Fuel Rail Assembly (with Fuel Injectors)
12 Cylinder Head
13 Front Engine Lift Bracket
14 Engine Lift Bracket Bolt
15 Cylinder Head Bolt
16 Oil Flow Check Valve
17 Exhaust Manifold Stud
18 Exhaust Valve
19 Intake Valve
20 Camshaft Cover Grounding Strap Bolt
21 Cylinder Head Oil Passage Plug
22 Cylinder Head Oil Passage Plug
23 Spark Plug
24 Valve Stem Seal
25 Valve Spring
26 Valve Spring Retainer
27 Valve Keys
28 Hydraulic Lash Adjuster
29 Roller Finger Follower
30 Rear Engine Lift Bracket Bolt
31 Rear Engine Lift Bracket
32 EGR Port Cover Gasket
33 EGR Port Cover
34 EGR Port Cover Bolt
35 Camshaft Bearing Cap
36 Camshaft Bearing Cap Bolt
37 Camshaft Bearing Cap
38 Camshaft Bearing Cap Bolt
39 Exhaust Camshaft
40 Intake Camshaft
41 Camshaft Cover Grounding Strap
42 Camshaft Cover Grounding Strap Bolt
43 Camshaft Cover Bolt
2003 Saturn L200
2003 ENGINE Engine Mechanical - 2.2L (L61) - Saturn L Series
steve
Monday, May 09, 2011 12:52:00 PM Page 28 © 2006 Mitchell Repair Information Company, LLC.
Fig. 19: Engine Block and Components
Courtesy of GENERAL MOTORS CORP.
Callouts For Fig. 19
2003 Saturn L200
2003 ENGINE Engine Mechanical - 2.2L (L61) - Saturn L Series
steve
Monday, May 09, 2011 12:52:00 PM Page 29 © 2006 Mitchell Repair Information Company, LLC.
Callout Component Name
1 Thermostat Housing
2 Thermostat Housing to Engine Block Seal
3 Water Transfer Pipe
4 Water Transfer Pipe to Water Pump Seal
5 Water Pump Bolt
6 Water Pump
7 Water Pump to Engine Block Seal
8 Water Pump Bolt
9 Oil Filter Cap
10 Oil Filter
11 Oil Filter to Engine Block Seal
12 Cylinder Head Alignment Pin
13 Intake Balance Shaft Rear Bearing
14 Intake Balance Shaft
15 Intake Balance Shaft Bearing Carrier
16 Intake Balance Shaft Drive Sprocket
17 Intake Balance Shaft Drive Sprocket Bolt
18 Exhaust Balance Shaft Drive Sprocket Bolt
19 Exhaust Balance Shaft Drive Sprocket
20 Exhaust Balance Shaft Bearing Carrier Bolt
21 Exhaust Balance Shaft
22 Exhaust Balance Shaft Rear Bearing Engine
23 Front Cover Alignment Pin
24 Engine Oil Passage Plug
25 Engine Oil Passage Plug
26 Top Compression Piston Ring
27 Second Compression Piston Ring
28 Piston Oil Ring Assembly
29 Piston
30 Piston Pin
31 Piston Pin Retainer
32 Connecting Rod
33 Connecting Rod Cap Bolt
34 Connecting Rod Bearing
35 Crankshaft Thrust Bearing
36 Crankshaft Bearing
37 Crankshaft Damper Alignment Key
38 Crankshaft
39 Crankshaft Rear Seal
40 Starter Ring Gear
2003 Saturn L200
2003 ENGINE Engine Mechanical - 2.2L (L61) - Saturn L Series
steve
Monday, May 09, 2011 12:52:00 PM Page 30 © 2006 Mitchell Repair Information Company, LLC.
Flywheel
42 Flywheel to Crankshaft Bolt
43 Engine Oil Pan Baffle
44 Engine Oil Pan
45 Pan Drain Plug
46 Engine Oil Pan Nut
47 Engine Oil Pan Stud
48 Engine Oil Pan Bolt
49 Engine Oil Pickup
50 Lower Crankcase to Engine Block Bolt
51 Lower Crankcase to Engine Block Bolt
52 Crankshaft Bearing Bolt
53 Lower Crankcase to Engine Block Bolt
54 Lower Crankcase
55 Lower Crankcase Alignment Pin
56 Lower Crankcase Alignment Pin
57 Engine Block
58 Water Jacket Plug
59 Engine Block to Transmission Alignment Pin
60 Cylinder Head to Engine Block Bolt
61 Water Jacket Drain Plug
62 Water Pump to Engine Block Bolt
63 Thermostat Housing to Engine Block Bolt
64 Thermostat Housing to Engine Block Bolt
65 Thermostat Gasket
66 Thermostat
2003 Saturn L200
2003 ENGINE Engine Mechanical - 2.2L (L61) - Saturn L Series
steve
Monday, May 09, 2011 12:52:00 PM Page 31 © 2006 Mitchell Repair Information Company, LLC.
Fig. 20: Timing Chain and Components
Courtesy of GENERAL MOTORS CORP.
Callouts For Fig. 20
Callout Component Name
1 Upper Timing Chain Guide Bolt
2 Upper Timing Chain Guide
3 Timing Chain
4 Intake Camshaft Sprocket
5 Intake Camshaft Sprocket to Camshaft Bolt
6 Fixed Timing Chain Guide Bolt
7 Fixed Timing Chain Guide
8 Fixed Timing Chain Guide Bolt
9 Oil Pump Cover Bolt
10 Oil Pump Cover
11 Oil Pump Inner Gerotor
12 Oil Pump Outer Gerotor
13 Engine Front Cover Gasket
14 Engine Front Cover
15 Engine Front Cover Access Plate Bolt
16 Front Crankshaft Seal
17 Crankshaft Damper
2003 Saturn L200
2003 ENGINE Engine Mechanical - 2.2L (L61) - Saturn L Series
steve
Monday, May 09, 2011 12:52:00 PM Page 32 © 2006 Mitchell Repair Information Company, LLC.
18 Crankshaft Damper Bolt
19 Engine Front Cover Bolt
20 Oil Pressure Relief Valve Plunger
21 Oil Pressure Relieve Valve Spring
22 Oil Pressure Relief Valve Plug
23 Crankshaft Sprocket Alignment Key
24 Timing Chain Oil Nozzle
25 Exhaust Camshaft Sprocket to Camshaft Bolt
26 Timing Chain Drive Sprocket
27 Adjustable Timing Chain Guide Bolt
28 Adjustable Timing Chain Guide
29 Timing Chain Tensioner Seal
30 Timing Chain Tensioner
31 Drive Chain Guide Bolt
32 Balance Shaft Drive Chain Guide
33 Balance Shaft Drive Sprocket
34 Adjustable Balance Shaft Drive Chain Guide Bolt
35 Adjustable Balance Shaft Drive Chain Guide
36 Balance Shaft Drive Chain Tensioner Assembly
37 Water Pump
38 Water Pump Drive Sprocket Bolt
39 Balance Shaft Drive Chain Guide
40 Balance Shaft Drive Chain Guide Bolt
41 Engine Front Cover Access Plate Seal
42 Engine Front Cover Access Plate
2003 Saturn L200
2003 ENGINE Engine Mechanical - 2.2L (L61) - Saturn L Series
steve
Monday, May 09, 2011 12:52:00 PM Page 33 © 2006 Mitchell Repair Information Company, LLC.
Fig. 21: Intake Manifold and Components
Courtesy of GENERAL MOTORS CORP.
Callouts For Fig. 21
2003 Saturn L200
2003 ENGINE Engine Mechanical - 2.2L (L61) - Saturn L Series
steve
Monday, May 09, 2011 12:52:00 PM Page 34 © 2006 Mitchell Repair Information Company, LLC.
Callout Component Name
1 Fuel Pressure Regulator Vacuum Line
2 Accelerator Control Cable Bracket
3 Throttle Body Nut
4 Throttle Body Nut
5 Throttle Body Bolt
6 Throttle Body
7 Intake Manifold Bolt
8 Throttle Body Seal
9 Intake Manifold
10 Intake Manifold Gasket
11 Map Sensor
12 Throttle Body Stud
2003 Saturn L200
2003 ENGINE Engine Mechanical - 2.2L (L61) - Saturn L Series
steve
Monday, May 09, 2011 12:52:00 PM Page 35 © 2006 Mitchell Repair Information Company, LLC.
2003 Saturn L200
2003 ENGINE Engine Mechanical - 2.2L (L61) - Saturn L Series
steve
Monday, May 09, 2011 12:52:00 PM Page 36 © 2006 Mitchell Repair Information Company, LLC.
Fig. 22: Exhaust Manifold and Components
Courtesy of GENERAL MOTORS CORP.
Callouts For Fig. 22
Callout Component Name
1 Exhaust Manifold Heat Shield
2 Air Pipe Nut
3 Air Pipe
4 Air Pipe Bolt
5 Air Pipe Gasket
6 Exhaust Manifold Heat Shield Stud
7 Exhaust Manifold Gasket
8 Exhaust Manifold
9 Exhaust Flex Decoupler Stud
10 Exhaust Manifold Nut
2003 Saturn L200
2003 ENGINE Engine Mechanical - 2.2L (L61) - Saturn L Series
steve
Monday, May 09, 2011 12:52:00 PM Page 37 © 2006 Mitchell Repair Information Company, LLC.
Fig. 23: Accessory and Engine Drive Belt Components
Courtesy of GENERAL MOTORS CORP.
Callouts For Fig. 23
Callout Component Name
2003 Saturn L200
2003 ENGINE Engine Mechanical - 2.2L (L61) - Saturn L Series
steve
Monday, May 09, 2011 12:52:00 PM Page 38 © 2006 Mitchell Repair Information Company, LLC.
DIAGNOSTIC INFORMATION AND PROCEDURES
DRIVE BELT AND TENSIONER COMPLAINT/CONDITION CHART
Drive Belt and Tensioner Complaint/Condition Chart
1 Power Steering Pump
2 Power Steering Pressure Line
3 Generator Bolt
4 Generator Pulley
5 Accessory Drive Belt
6 Air Compressor Bolt
7 Air Conditioning Compressor
8 Accessory Drive Belt Tensioner Bolt
9 Accessory Drive Belt Tensioner
10 Generator Assembly
11 Starter Assembly
12 Power Steering Pump Bolt
13 Starter Assembly to Engine Block Bolt
Complaint/Condition Possible Cause(s) Correction(s)
Tension too High
Wrong belt. Belt routing and
alignment on pulleys.
Replace belt, check belt, and
pulleys for proper belt installation
and
alignment in grooves.
Wrong pulley.
Check pulley diameters against
another vehicle or good parts.
Tensioner inoperative. Replace tensioner.
Tension too Low
Wrong belt. Replace belt.
Worn belt. Replace belt.
Tensioner inoperative or broken
internal spring.
Replace tensioner.
(Do not attempt to repair)
Wrong pulley.
Check pulley diameters against
another vehicle or good parts.
Belt Chirp
Wrong belt. Check belt tension.
Belt misaligned. Check pulley alignment.
Belt installed incorrectly.
Check for belt alignment in
grooves.
Tensioner inoperative. Check belt tensioner motion.
Tensioner partially seized. Check tensioner movement.
Tensioner inoperative. Check belt tension.
Tensioner/idler pulley bearing.
Check tensioner/idler pulley
bearings.
Tensioner inoperative. Check belt tension.
2003 Saturn L200
2003 ENGINE Engine Mechanical - 2.2L (L61) - Saturn L Series
steve
Monday, May 09, 2011 12:52:00 PM Page 39 © 2006 Mitchell Repair Information Company, LLC.
DIAGNOSTIC STARTING POINT - ENGINE MECHANICAL
Begin the system diagnosis by reviewing the Disassembled Views, Engine Component Description,
Lubrication Description, and New Product Information in Engine Unit Repair. Reviewing the description and
operation information will help you determine the correct symptom diagnostic procedure when a malfunction
exists. Reviewing the description and operation information will also help you determine if the condition
described by the customer is normal operation. Refer to Symptoms - Engine Mechanical in order to identify
the correct procedure for diagnosing the system and where the procedure is located.
SYMPTOMS - ENGINE MECHANICAL
Strategy Based Diagnostics
1. Perform the DIAGNOSTIC STARTING POINT -- ENGINE CONTROLS in Self-Diagnostics - 2.2L
in Engine Performance before using the symptom tables, if applicable.
2. Review the system operations in order to familiarize yourself with the system functions. Refer to
Disassembled Views, Engine Component Description, and Lubrication Description in Engine Unit
Intermittent Squeal or Whistle
Noise
Notice: Diagnosis is difficult.
Requires accessory drive belt
removal and engine cold starts to
validate concern. Do not run
engine for more than 3 minutes
with accessory drive belt off.
Tensioner/idler pulley bearing.
Check tensioner/idler pulley
bearings.
Wrong belt. Check for proper belt.
Worn belt.
Inspect belt for wear and check
tension.
Excessive pulley radial/axial
runout.
Replace pulley.
Belt misaligned. Check pulley alignment.
Water pump, power steering
pump, generator, A/C
compressor, tensioner or idler
bearing/loads.
Check all accessories for
bearing/component seizure.
Oil pump pressure regulator.
Replace oil pump pressure
regulator valve.
Accessory Drive Growl with A/C
On During Acceleration and/or
Growl from Belt Tensioner.
Belt tensioner (internal).
IMPORTANT:
Do not disassemble the belt
tensioner.
Check belt tensioner movement.
Check belt tension.
Water pump, power steering
pump, generator, A/C
compressor, tensioner, or idler
bearing.
Replace faulty component.
Hoot or Growl Noise Idler pulley bearing. Replace idler pulley bearing.
IMPORTANT: Saturn service tool SA9217NE Chassis Ear Tool (or equivalent) should be used
to locate source(s) of noises caused by vibration(s).
2003 Saturn L200
2003 ENGINE Engine Mechanical - 2.2L (L61) - Saturn L Series
steve
Monday, May 09, 2011 12:52:00 PM Page 40 © 2006 Mitchell Repair Information Company, LLC.
Repair.
All diagnosis on a vehicle should follow a logical process. Strategy based diagnostics is a uniform approach for
repairing all systems. The diagnostic flow may always be used in order to resolve a system condition. The
diagnostic flow is the place to start when repairs are necessary.
Visual/Physical Inspection
 Inspect for aftermarket devices which could affect the operation of the engine.
 Inspect the easily accessible or visible system components for obvious damage or conditions which could
cause the symptom.
 Check for the correct oil level, proper oil viscosity, and correct filter application.
 Verify the exact operating conditions under which the concern exists. Note factors such as engine RPM,
ambient temperature, engine temperature, amount of engine warm-up time, and other specifics.
 Compare the engine sounds, if applicable, to a known good engine and make sure you are not trying to
correct a normal condition.
Intermittent
Test the vehicle under the same conditions that the customer reported in order to verify the system is operating
properly.
Symptom List
Refer to a symptom diagnostic procedure from the following list in order to diagnose the symptom:
 Base Engine Misfire without Internal Engine Noises
 Base Engine Misfire with Abnormal Internal Lower Engine Noises
 Base Engine Misfire with Abnormal Valve Train Noise
 Base Engine Misfire with Coolant Consumption
 Base Engine Misfire with Excessive Oil Consumption
 Engine Compression Test
 Engine Noise on Start-Up, but Only Lasting a Few Seconds
 Upper Engine Noise, Regardless of Engine Speed
 Lower Engine Noise, Regardless of Engine Speed
 Engine Noise Under Load
 Engine Will Not Crank - Crankshaft Will Not Rotate
 Oil Consumption Diagnosis
 Oil Pressure Diagnosis and Testing
 Oil Leak Diagnosis
 Coolant in Combustion Chamber
 Coolant in Engine Oil
2003 Saturn L200
2003 ENGINE Engine Mechanical - 2.2L (L61) - Saturn L Series
steve
Monday, May 09, 2011 12:52:00 PM Page 41 © 2006 Mitchell Repair Information Company, LLC.
BASE ENGINE MISFIRE WITHOUT INTERNAL ENGINE NOISES
Base Engine Misfire without Internal Engine Noises
Cause Correction
Abnormalities, severe cracking, bumps, or missing
areas in the accessory drive belt
Abnormalities in the accessory drive system and/or
components may cause engine RPM variations and
lead to a misfire DTC. A misfire code may be
present without an actual misfire condition.
Replace the drive belt.
Worn, damaged, or mis-aligned accessory drive
components or excessive pulley runout may lead to
a misfire DTC.
A misfire code may be present without an actual
misfire condition.
Inspect the components, and repair or replace as
required.
A loose or improperly installed engine flywheel or
crankshaft balancer
A misfire code may be present without an actual
misfire condition.
Repair or replace the flywheel and/or balancer as
required.
Restricted exhaust system
A severe restriction in the exhaust flow can cause
significant loss of engine performance and may set a
DTC. Possible causes of restrictions include
collapsed or dented pipes or plugged mufflers and/or
catalytic converters.
Repair or replace as required.
Improperly installed or damaged vacuum hoses Repair or replace as required.
Improper sealing between the intake manifold and
cylinder heads or throttle body.
Replace the intake manifold, gaskets, cylinder
heads, and/or throttle body as required.
Improperly installed or damaged MAP sensor
The sealing grommet of the MAP sensor should not
be torn or damaged.
Repair or replace the MAP sensor as required.
Damage to the MAP sensor housing Replace the intake manifold.
Worn or loose rocker arms
The rocker arm bearing end caps and/or needle
bearings should be intact and in the proper position.
Replace the valve rocker arms as required.
Stuck valves
Carbon buildup on the valve stem can cause the
valve not to close properly.
Repair or replace as required.
Excessively worn or mis-aligned timing chain Replace the timing chain and sprockets as required.
Worn camshaft lobes Replace the camshaft and valve lifters.
Excessive oil pressure
A lubrication system with excessive oil pressure
may lead to excessive valve lifter pump up and loss
of compression.
 Perform an oil pressure test. Refer to Oil
Pressure Diagnosis and Testing.
 Repair or replace the oil pump as required.
Faulty cylinder head gaskets and/or cracking or  Inspect for spark plugs saturated by coolant.
2003 Saturn L200
2003 ENGINE Engine Mechanical - 2.2L (L61) - Saturn L Series
steve
Monday, May 09, 2011 12:52:00 PM Page 42 © 2006 Mitchell Repair Information Company, LLC.
BASE ENGINE MISFIRE WITH ABNORMAL INTERNAL LOWER ENGINE NOISES
Base Engine Misfire with Abnormal Internal Lower Engine Noises
other damage to the cylinder heads and engine block
cooling system passages
Coolant consumption may or may not cause the
engine to overheat.
 Inspect the cylinder heads, engine block,
and/or head gaskets.
 Repair or replace as required.
Worn piston rings
Oil consumption may or may not cause the engine to
misfire.
 Inspect the spark plugs for oil deposits.
 Inspect the cylinders for a loss of
compression. Refer to Engine Compression
Test.
 Perform cylinder leak down and compression
testing to identify the cause.
 Repair or replace as required.
A damaged crankshaft reluctor wheel
A damaged crankshaft reluctor wheel can result in
different symptoms depending on the severity and
location of the damage.
 Systems with electronic communications, DIS
or coil per cylinder, and severe reluctor ring
damage may exhibit periodic loss of
crankshaft position, stop delivering a signal,
and then re-sync the crankshaft position.
 Systems with electronic communication, DIS
or coil per cylinder, and slight reluctor ring
damage may exhibit no loss of crankshaft
position and no misfire may occur. However,
a P0300 DTC may be set.
 Systems with mechanical communications,
high voltage switch, and severe reluctor ring
damage may cause additional pulses and
effect fuel and spark delivery to the point of
generating a P0300 DTC or P0336.
Replace the sensor and/or crankshaft as required.
Cause Correction
Abnormalities, severe cracking, bumps or missing
areas in the accessory drive belt
Abnormalities in the accessory drive system and/or
components may cause engine RPM variations,
noises similar to a faulty lower engine, and also lead
to a misfire condition. A misfire code may be
present without an actual misfire condition.
Replace the drive belt.
Worn, damaged, or mis-aligned accessory drive
components or excessive pulley runout
Inspect the components, repair or replace as
required.
2003 Saturn L200
2003 ENGINE Engine Mechanical - 2.2L (L61) - Saturn L Series
steve
Monday, May 09, 2011 12:52:00 PM Page 43 © 2006 Mitchell Repair Information Company, LLC.
BASE ENGINE MISFIRE WITH ABNORMAL VALVE TRAIN NOISE
Base Engine Misfire with Abnormal Valve Train Noise
BASE ENGINE MISFIRE WITH COOLANT CONSUMPTION
Base Engine Misfire with Coolant Consumption
A misfire code may be present without an actual
misfire condition.
Loose or improperly installed engine flywheel or
crankshaft balancer
A misfire code may be present without an actual
misfire condition.
Repair or replace the flywheel and/or balancer as
required.
Worn piston rings
Oil consumption may or may not cause the engine
to misfire.
 Inspect the spark plugs for oil deposits.
 Inspect the cylinders for a loss of
compression. Refer to Engine Compression
Test.
 Perform cylinder leak down and compression
testing to determine the cause.
 Repair or replace as required.
Worn crankshaft thrust bearings
Severely worn thrust surfaces on the crankshaft
and/or thrust bearing may permit fore and aft
movement of the crankshaft, and create a DTC
without an actual misfire condition.
Replace the crankshaft and bearings as required.
Cause Correction
Worn or loose rocker arms
The rocker arm bearing end caps and/or needle
bearings should intact within the rocker arm
assembly.
Replace the valve rocker arms as required.
Stuck valves
Carbon buildup on the valve stem can cause the
valve to not close properly.
Repair or replace as required.
Excessively worn or mis-aligned timing chain Replace the timing chain and sprockets as required.
Worn camshaft lobes Replace the camshaft and valve lifters.
Sticking lifters Replace as required.
Cause Correction
Faulty cylinder head gaskets and/or cracking, or
other damage to the cylinder heads and engine block
cooling system passages.
Coolant consumption may or may not cause the
engine to overheat.
 Inspect for spark plugs saturated by coolant.
 Perform a cylinder leak down test.
 Inspect the cylinder heads and engine block
for damage to the coolant passages and/or a
faulty head gasket.
2003 Saturn L200
2003 ENGINE Engine Mechanical - 2.2L (L61) - Saturn L Series
steve
Monday, May 09, 2011 12:52:00 PM Page 44 © 2006 Mitchell Repair Information Company, LLC.
BASE ENGINE MISFIRE WITH EXCESSIVE OIL CONSUMPTION
Base Engine Misfire with Excessive Oil Consumption
ENGINE NOISE ON START-UP, BUT ONLY LASTING A FEW SECONDS
Engine Noise on Start-Up, but Only Lasting a Few Seconds
UPPER ENGINE NOISE, REGARDLESS OF ENGINE SPEED
Upper Engine Noise, Regardless of Engine Speed
 Repair or replace as required.
Cause Correction
Worn valves, valve guides and/or valve stem oil
seals
 Inspect the spark plugs for oil deposits.
 Repair or replace as required.
Worn piston rings
Oil consumption may or may not cause the engine
to misfire.
 Inspect the spark plugs for oil deposits.
 Inspect the cylinders for a loss of
compression. Refer to Engine Compression
Test.
 Perform cylinder leak down and compression
testing to determine the cause.
 Repair or replace as required.
Cause Correction
Incorrect oil filter without anti-drainback feature Install the correct oil filter.
Incorrect oil viscosity 1. Drain the oil.
2. Install the correct viscosity oil.
High valve lifter leak down rate Replace the lifters as required.
Worn crankshaft thrust bearing  Inspect the thrust bearing and crankshaft.
 Repair or replace as required.
Damaged or faulty oil filter by-pass valve  Inspect the oil filter by-pass valve for proper
operation.
 Repair or replace as required.
Cause Correction
Low oil pressure  Perform an oil pressure test. Refer to Oil
Pressure Diagnosis and Testing.
 Repair or replace as required.
Loose and/or worn valve rocker arm attachments  Inspect the valve rocker arm stud, nut or bolt.
 Repair or replace as required.
Worn valve rocker arm Replace the valve rocker arm.
2003 Saturn L200
2003 ENGINE Engine Mechanical - 2.2L (L61) - Saturn L Series
steve
Monday, May 09, 2011 12:52:00 PM Page 45 © 2006 Mitchell Repair Information Company, LLC.
LOWER ENGINE NOISE, REGARDLESS OF ENGINE SPEED
Lower Engine Noise, Regardless of Engine Speed
Improper lubrication to the valve rocker arms Inspect the following components, and repair or
replace as required:
 The valve rocker arm
 The valve lifter
 The oil filter bypass valve
 The oil pump and pump screen
 The engine block oil galleries
Broken valve spring Replace the valve spring.
Worn or dirty valve lifters Replace the valve lifters.
Stretched or broken timing chain and/or damaged
sprocket teeth
Replace the timing chain and sprockets.
Worn, damaged, or faulty timing chain tensioners Replace tensioners
Worn engine camshaft lobes  Inspect the engine camshaft lobes.
 Replace the camshaft and valve lifters as
required.
Worn valve guides or valve stems Inspect the following components, and repair as
required:
 The valves
 The valve guides
Stuck valves
Carbon on the valve stem or valve seat may cause
the valve to stay open.
Inspect the following components, and repair as
required:
 The valves
 The valve guides
Cause Correction
Low oil pressure  Perform an oil pressure test. Refer to Oil
Pressure Diagnosis and Testing.
 Repair or replace damaged components as
required.
Worn accessory drive components
Abnormalities, such as severe cracking, bumps, or
missing areas in the accessory drive belt and/or
misalignment of system components
 Inspect the accessory drive system.
 Repair or replace as required.
Loose or damaged crankshaft balancer  Inspect the crankshaft balancer.
 Repair or replace as required.
Detonation or spark knock Verify the correct operation of the ignition system.
2003 Saturn L200
2003 ENGINE Engine Mechanical - 2.2L (L61) - Saturn L Series
steve
Monday, May 09, 2011 12:52:00 PM Page 46 © 2006 Mitchell Repair Information Company, LLC.
ENGINE NOISE UNDER LOAD
Engine Noise Under Load
Refer to DETONATION/SPARK KNOCK in
Troubleshooting No Codes - 2.2L in Engine
Performance.
Loose torque converter bolts  Inspect the torque converter bolts and
flywheel.
 Repair or replace as required.
Loose or damaged flywheel Repair or replace the flywheel.
Damaged oil pan, contacting the oil pump screen
An oil pan that has been damaged, may improperly
position the oil pump screen, preventing proper oil
flow to the oil pump.
 Inspect the oil pan.
 Inspect the oil pump screen.
 Repair or replace as required.
Oil pump screen loose, damaged or restricted  Inspect the oil pump screen.
 Repair or replace as required.
Worn or damaged balance shafts or bushings  Inspect the balance shaft and bushings.
 Replace as required.
Excessive piston-to-cylinder bore clearance  Inspect the piston and cylinder bore.
 Repair as required.
Excessive piston pin-to-bore clearance  Inspect the piston, piston pin, and the
connecting rod.
 Repair or replace as required.
Excessive connecting rod bearing clearance Inspect the following components, and repair as
required:
 The connecting rod bearings
 The connecting rods
 The crankshaft
 The crankshaft journals
Excessive crankshaft bearing clearance Inspect the following components, and repair as
required:
 The crankshaft bearings
 The crankshaft journals
Incorrect piston, piston pin, and connecting rod
installation
Pistons must be installed with the mark or dimple
on the top of the piston, facing the front of the
engine. Piston pins must be centered in the
connecting rod pin bore.
 Verify the pistons, piston pins and connecting
rods are installed correctly.
 Repair as required.
2003 Saturn L200
2003 ENGINE Engine Mechanical - 2.2L (L61) - Saturn L Series
steve
Monday, May 09, 2011 12:52:00 PM Page 47 © 2006 Mitchell Repair Information Company, LLC.
ENGINE WILL NOT CRANK - CRANKSHAFT WILL NOT ROTATE
Engine Will Not Crank - Crankshaft Will Not Rotate
Cause Correction
Low oil pressure  Perform an oil pressure test. Refer to Oil
Pressure Diagnosis and Testing.
 Repair or replace as required.
Detonation or spark knock Verify the correct operation of the ignition. Refer to
DETONATION/SPARK KNOCK in
Troubleshooting No Codes - 2.2L in Engine
Performance.
Loose torque converter bolts  Inspect the torque converter bolts and
flywheel.
 Repair as required.
Cracked flywheel, automatic transmission  Inspect the flywheel bolts and flywheel.
 Repair as required.
Excessive connecting rod bearing clearance Inspect the following components, and repair as
required:
 The connecting rod bearings
 The connecting rods
 The crankshaft
Excessive crankshaft bearing clearance Inspect the following components, and repair as
required:
 The crankshaft bearings
 The crankshaft journals
 The cylinder block crankshaft bearing bore
Cause Correction
Seized accessory drive system component 1. Remove accessory drive belts.
2. Rotate crankshaft by hand at the balancer or
flywheel location.
Hydraulically locked cylinder
 Coolant/antifreeze in cylinder
 Oil in cylinder
 Fuel in cylinder
1. Remove spark plugs and check for fluid.
2. Inspect for broken head gasket.
3. Inspect for cracked engine block or cylinder
head.
4. Inspect for a sticking fuel injector.
5. Inspect for cracked cylinder wall.
Seized automatic transmission torque converter 1. Remove the torque converter bolts.
2003 Saturn L200
2003 ENGINE Engine Mechanical - 2.2L (L61) - Saturn L Series
steve
Monday, May 09, 2011 12:52:00 PM Page 48 © 2006 Mitchell Repair Information Company, LLC.
COOLANT IN COMBUSTION CHAMBER
Coolant in Combustion Chamber
2. Rotate crankshaft by hand at the balancer or
flywheel location.
Seized manual transmission 1. Disengage the clutch.
2. Rotate crankshaft by hand at the balancer or
flywheel location.
Refer to Unit Repair Manual - Manual
Transmission.
Broken timing chain and/or gears  Inspect timing chain and gears.
 Repair as required.
Seized balance shaft  Inspect balance shaft.
 Repair as required.
Material in cylinder
 Broken valve
 Piston material
 Foreign material
 Cracked cylinder wall
 Inspect cylinder for damaged components
and/or foreign materials.
 Inspect for fallen cylinder wall.
 Repair or replace as required.
Seized crankshaft or connecting rod bearings  Inspect crankshaft and connecting rod
bearings.
 Inspect for fallen cylinder wall.
 Repair as required.
Bent or broken connecting rod  Inspect connecting rods.
 Repair as required.
Broken crankshaft  Inspect crankshaft.
 Repair as required.
Cause Correction
DEFINITION: Excessive white smoke and/or coolant type odor coming from the exhaust pipe may
indicate coolant in the combustion chamber. Low coolant levels, an inoperative cooling fan, or a faulty
thermostat may lead to an "overtemperature" condition which may cause engine component damage.
1. A slower than normal cranking speed may indicate coolant entering the combustion chamber. Refer
to Engine Will Not Crank - Crankshaft Will Not Rotate.
2. Remove the spark plugs and inspect for spark plugs saturated by coolant or coolant in the cylinder
bore.
3. Inspect by performing a cylinder leak-down test. During this test, excessive air bubbles within the
2003 Saturn L200
2003 ENGINE Engine Mechanical - 2.2L (L61) - Saturn L Series
steve
Monday, May 09, 2011 12:52:00 PM Page 49 © 2006 Mitchell Repair Information Company, LLC.
COOLANT IN ENGINE OIL
Coolant in Engine Oil
ENGINE COMPRESSION TEST
Perform the following steps in order to conduct a compression test for the L61.
1. Conduct the following steps in order to check cylinder compression.
coolant may indicate a faulty gasket or damaged component.
4. Inspect by performing a cylinder compression test. Two cylinders "side-by-side" on the engine
block, with low compression, may indicate a failed cylinder head gasket. Refer to Engine
Compression Test.
Faulty cylinder head gasket Replace the head gasket and components as
required. Refer to Cylinder Head Cleaning and
Inspection and Cylinder Head Replacement.
Warped cylinder head Replace the cylinder head and gasket. Refer to
Cylinder Head Cleaning and Inspection.
Cracked cylinder head Replace the cylinder head and gasket.
Cracked cylinder sleeve Replace the components as required.
Cylinder head or block porosity Replace the components as required.
Cause Correction
DEFINITION: Foamy or discolored oil or an engine oil "overfill" condition may indicate coolant
entering the engine crankcase. Low coolant levels, an inoperative cooling fan, or a faulty thermostat may
lead to an "overtemperature" condition which may cause engine component damage. Contaminated
engine oil and oil filter should be changed.
1. Inspect the oil for excessive foaming or an overfill condition. Oil diluted by coolant may not
properly lubricate the crankshaft bearings and may lead to component damage. Refer to Lower
Engine Noise, Regardless of Engine Speed.
2. Inspect by performing a cylinder leak-down test. During this test, excessive air bubbles within the
cooling system may indicate a faulty gasket or damaged component.
3. Inspect by performing a cylinder compression test. Two cylinders "side-by-side" on the engine
block with low compression may indicate a failed cylinder head gasket. Refer to Engine
Compression Test.
Faulty cylinder head gasket Replace the head gasket and components as
required. Refer to Cylinder Head Cleaning and
Inspection and Cylinder Head Replacement.
Warped cylinder head Replace the cylinder head and gasket. Refer to
Cylinder Head Cleaning and Inspection.
Cracked cylinder head Replace the cylinder head and gasket.
Cracked cylinder sleeve Replace the components as required.
Cylinder head or block porosity Replace the components as required.
2003 Saturn L200
2003 ENGINE Engine Mechanical - 2.2L (L61) - Saturn L Series
steve
Monday, May 09, 2011 12:52:00 PM Page 50 © 2006 Mitchell Repair Information Company, LLC.
1. Engine should be at room temperature.
2. Disconnect wiring from the ignition module.
3. Remove the spark plugs.
4. Throttle body valve should be wide open.
5. Battery should be at or near full charge.
2. For each cylinder, crank engine through four compression strokes.
3. The lowest reading cylinder should not be less than 70% of the highest.
4. No cylinder reading should be less than 689 kPa (100 psi).
 Normal - Compression builds up quickly and evenly to specified compression on each cylinder.
 Piston Rings - Compression low on first stroke. Tends to build up on following strokes but does not reach
normal. Improves considerably with addition of oil.
 Valves - Compression low on first stroke. Does not tend to build up on the following strokes. Does not
improve much with the addition of oil. Use approximately three squirts from a plunger-type oiler.
CYLINDER LEAKAGE TEST
Tools Required
J 35667-A Cylinder Head Leakdown Tester or equivalent. See Special Tools and Equipment.
 Worn or burnt valves
 Broken valve springs
 Stuck valve lifters
 Incorrect valve lash/adjustment
 Damaged piston
 Worn piston rings
 Worn or scored cylinder bore
 Damaged cylinder head gasket
 Cracked or damaged cylinder head
 Cracked or damaged engine block
IMPORTANT: The results of a compression test will fall into the following categories:
IMPORTANT: A leakage test may be performed in order to measure cylinder/combustion
chamber leakage. High leakage may indicate one or more of the following:
CAUTION: Refer to BATTERY DISCONNECT CAUTION in Cautions and Notices.
2003 Saturn L200
2003 ENGINE Engine Mechanical - 2.2L (L61) - Saturn L Series
steve
Monday, May 09, 2011 12:52:00 PM Page 51 © 2006 Mitchell Repair Information Company, LLC.
1. Disconnect the battery ground negative cable.
2. Remove the spark plugs. Refer to SPARK PLUGS - 2.2L in Removal and Installation in Engine
Performance.
3. Rotate the crankshaft to place the piston in the cylinder being tested at Top Dead Center (TDC) of the
compression stroke.
4. Install the J 35667-A or equivalent. See Special Tools and Equipment.
5. Apply shop air pressure to the J 35667-A and adjust according to the manufacturers instructions. See
Special Tools and Equipment.
6. Record the cylinder leakage value. Cylinder leakage that exceeds 25 percent in considered excessive and
may require component service. In excessive leakage situations, inspect for the following conditions:
 Air leakage sounds at the throttle body or air inlet hose that may indicate a worn or burnt intake
valve or a broken valve spring.
 Air leakage sounds at the exhaust system tailpipe that may indicate a worn or burnt exhaust valve
or a broken valve spring.
 Air leakage sounds from the crankcase, oil level indicator tube, or oil fill tube that may indicate
worn piston rings, a damaged piston, a worn or scored cylinder bore, a damaged engine block or a
damaged cylinder head.
 Air bubbles in the cooling system may indicate a damaged cylinder head or a damaged cylinder
head gasket.
7. Perform the leakage test on the remaining cylinders and record the values.
OIL CONSUMPTION DIAGNOSIS
Excessive oil consumption (not due to leaks) is the use of 0.9L (1 qt) or more of engine oil within 3
200kilometers (2,000 miles). The causes of excessive oil consumption include the following conditions:
 External oil leaks. Tighten bolts and/or replace gaskets and oil seals as necessary.
 Incorrect oil level or improper reading of oil level indicator. With the vehicle on a level surface, allow
adequate drain down time and check for the correct oil level.
 Improper oil viscosity. Use recommended SAE viscosity for the prevailing temperatures.
 Continuous high speed driving and/or severe usage.
 Crankcase ventilation system restrictions or malfunctioning components.
 Valve guides and/or valve stem oil seals worn, or the seal omitted. Ream guides and install oversize
service valves and/or new valve stem oil seals.
 Piston rings broken, improperly installed, worn, or not seated properly. Allow adequate time for rings to
seat. Replace broken or worn rings as necessary.
 Piston improperly installed.
IMPORTANT: It may be necessary to hold the crankshaft balancer bolt to prevent the
engine from rotating.
2003 Saturn L200
2003 ENGINE Engine Mechanical - 2.2L (L61) - Saturn L Series
steve
Monday, May 09, 2011 12:52:00 PM Page 52 © 2006 Mitchell Repair Information Company, LLC.
Oil Consumption Test Procedure
1. Check the engine for external oil leakage and the air intake and PCV systems for excessive oil pull over.
2. Change the engine oil and filter.
3. Warm the engine up and check the oil level after approximately 10 minutes with vehicle on a level
surface. Note exactly where the dipstick reads, relative to the dipstick MAX mark.
4. Inform the customer an oil consumption test is now in progress and any oil added must be documented.
5. Record the vehicle's mileage, date of oil change and exact location of oil level on the Customer Service
Order.
6. Have customer check the engine oil level at each fuel fill and return the vehicle if oil level is at the "MIN"
mark. If the oil level remains in the "CROSS HATCH" area, have the customer continue operating the
vehicle for a minimum of 3,200 kilometers (2,000 miles) before returning the vehicle for final oil
consumption verification.
7. If the engine uses more than one quart of oil in 3,200 kilometers (2,000 miles), after the initial 4,800
kilometers (3,000 miles) break in period, document the oil consumption usage on the Customer Service
Order and continue with the following checks.
8. If the engine is using oil, perform a compression test. Refer to "Engine Compression Test" procedure in
this section of the service manual.
 If cylinder compression is found within acceptable limits, replace the valve stem seals.
 If compression is not found within acceptable limits, perform an engine cylinder leakage test,
crankcase pressure check, and repair as necessary.
Valve Train Diagnosis
A light tapping at one-half engine speed, or any varying frequency, can indicate a valve train problem. These
tapping noises increase with engine speed.
Before attempting to judge the valve train noises, thoroughly warm up the engine. By doing this you will bring
all engine components to a normal state of expansion. Also, run the engine at various speeds and listen for
engine noises with the hood closed while sitting in the driver's seat. The causes of the valve train noise include
the following conditions:
 Low oil pressure
 Broken valve springs
 Sticking valves
 Lifters worn, dirty or failed
 Worn valve guides
 Excessive valve stem to guide clearance
IMPORTANT: Complaints of high engine oil consumption are not always thoroughly
investigated before major repairs are performed. During initial engine break in,
it is normal for the engine to use from one to three quarts of oil during the first
4,800-9600 kilometers (3,000-6,000miles), depending on driving conditions.
2003 Saturn L200
2003 ENGINE Engine Mechanical - 2.2L (L61) - Saturn L Series
steve
Monday, May 09, 2011 12:52:00 PM Page 53 © 2006 Mitchell Repair Information Company, LLC.
 Failed oil drain back valve
Vehicle Speed Sensitive Vibration Diagnosis
Definition: Vehicle speed sensitive vibrations can be heard or felt as the speed of the vehicle (mph) varies.
The operating speed of the engine (rpm) does not effect a vehicle speed sensitive vibration.
OIL PRESSURE DIAGNOSIS AND TESTING
Tools Required
J 44953 Oil Pressure Gage Adapter. See Special Tools and Equipment.
 With the vehicle on a level surface, allow adequate drain down time of 2-3 minutes and measure for a low
oil level.
Add the recommended grade engine oil and fill the crankcase until the oil level measures full on the oil
level indicator.
 Run the engine, and verify low, or no oil pressure on the vehicle gage or light. Listen for a noisy valve
train or a knocking noise.
 Inspect for the following:
 Oil diluted by moisture or unburned fuel mixtures
 Improper oil viscosity for the expected temperature
 Incorrect or malfunctioning oil pressure sender
 Incorrect or malfunctioning oil pressure gage
 Plugged oil filter
 Malfunctioning oil bypass valve
 Remove the oil pressure sender or another engine block oil gallery plug.
 Install J 44953 and an oil pressure gage and measure the engine oil pressure. See Special Tools and
Equipment.
 Compare the readings to specifications. Refer to Engine Mechanical Specifications.
 If the engine oil pressure is below specifications, inspect the engine for one or more of the following:
 Oil pump worn or dirty
Refer to Oil Pump Disassemble.
 Oil pump-to-engine front cover bolts loose
Refer to Engine Front Cover and Oil Pump Installation.
 Oil pump screen loose, plugged, or damaged
2003 Saturn L200
2003 ENGINE Engine Mechanical - 2.2L (L61) - Saturn L Series
steve
Monday, May 09, 2011 12:52:00 PM Page 54 © 2006 Mitchell Repair Information Company, LLC.
 Oil pump screen O-ring seal missing or damaged
 Malfunctioning oil pump pressure regulator valve
 Excessive bearing clearance
Refer to Crankshaft and Bearings Cleaning and Inspection.
 Cracked, porous or restricted oil galleries
 Oil gallery plugs missing or incorrectly installed
Refer to Engine Block Assemble.
 Broken lash adjusters
OIL LEAK DIAGNOSIS
DEFINITION: You can repair most fluid leaks by first visually locating the leak, repairing or replacing the
component, or by resealing the gasket surface. Once the leak is identified, determine the cause of the leak.
Repair the cause of the leak as well as the leak itself.
Oil Leak Diagnosis
Step Action Value(s) Yes No
1
1. Operate the vehicle until it reaches normal
operating temperature.
2. Refer to Engine Mechanical Specifications in this
service manual.
3. Park the vehicle on a level surface, over a large
sheet of paper or other clean surface.
4. Wait 15 minutes.
5. Check for drippings.
Are drippings present?
-
Go to Step 2 System OK
2
Can you identify the type of fluid and the approximate
location of the leak?
-
Go to Step 10 Go to Step 3
3
1. Visually inspect the suspected area. Use a small
mirror to assist in looking at hard to see areas.
2. Check for leaks at the following locations:
 Sealing surfaces
 Fittings
 Cracked or damaged components
Can you identify the type of fluid and the approximate
location of the leak?
- - -
2003 Saturn L200
2003 ENGINE Engine Mechanical - 2.2L (L61) - Saturn L Series
steve
Monday, May 09, 2011 12:52:00 PM Page 55 © 2006 Mitchell Repair Information Company, LLC.
- - Go to Step 10 Go to Step 4
4
1. Completely clean the entire engine and
surrounding components.
2. Operate the vehicle for several miles at normal
operating temperature and at varying speeds.
3. Park the vehicle on a level surface, over a large
sheet of paper or other clean surface.
4. Wait (15 minutes).
5. Identify the type of fluid, and the approximate
location of the leak.
- - -
Can you identify the type of fluid and the approximate
location of the leak?
-
Go to Step 10 Go to Step 5
5
1. Visually inspect the suspected area. Use a small
mirror to assist in looking at hard to see areas.
2. Check for leaks at the following locations:
 Sealing surfaces
 Fittings
 Cracked or damaged components
- - -
Can you identify the type of fluid and the approximate
location of the leak?
-
Go to Step 10 Go to Step 6
6
1. Completely clean the entire engine and
surrounding components.
2. Apply an aerosol-type powder (baby powder, foot
powder, etc.) to the suspected area.
3. Operate the vehicle for several miles at normal
operating temperature and at varying speeds.
4. Identify the type of fluid, and the approximate
location of the leak, from the discolorations in the
powder surface.
- - -
Can you identify the type of fluid and the approximate
location of the leak?
-
Go to Step 10 Go to Step 7
7
1. Visually inspect the suspected area. Use a small
mirror to assist in looking at hard to see areas.
2. Check for leaks at the following locations:
 Sealing surfaces
 Fittings
 Cracked or damaged components
- - -
Can you identify the type of fluid and the approximate
location of the leak?
-
Go to Step 10 Go to Step 8
Use J28428E Dye and Light Kit in order to identify the
type of fluid, and the approximate location of the leak.
2003 Saturn L200
2003 ENGINE Engine Mechanical - 2.2L (L61) - Saturn L Series
steve
Monday, May 09, 2011 12:52:00 PM Page 56 © 2006 Mitchell Repair Information Company, LLC.
CRANKCASE VENTILATION SYSTEM FUNCTIONAL TEST
Functional Check of the Positive Crankcase Ventilation (PCV) System
1. Disconnect the PCV hose.
2. Start the engine.
3. Check for vacuum at the hose. If there is no vacuum, check for a plugged hose or manifold port.
4. Check for a hose that collapses when blocked (vacuum applied). Replace the plugged or deteriorated
hoses.
5. Allow the engine to idle at the normal operating temperature.
8
Refer to the manufacturer's instructions when using the
tool.
- - -
Can you identify the type of fluid and the approximate
location of the leak?
-
Go to Step 10 Go to Step 9
9
1. Visually inspect the suspected area. Use a small
mirror to assist in looking at hard to see areas.
2. Check for leaks at the following locations:
 Sealing surfaces
 Fittings
 Cracked or damaged components
- - -
Can you identify the type of fluid and the approximate
location of the leak?
-
Go to Step 10 System OK
10
1. Inspect the engine for mechanical damage. Special
interest should be shown to the following areas:
 Higher than recommended fluid levels
 Higher than recommended fluid pressures
 Plugged or malfunctioning fluid filters or
pressure bypass valves
 Plugged or malfunctioning engine
ventilation system
 Improperly tightened or damaged fasteners
 Cracked or porous components
 Improper sealants or gaskets where required
 Improper sealant or gasket installation
 Damaged or worn gaskets or seals
 Damaged or worn sealing surfaces
2. Inspect the engine for customer modifications.
- - -
Is there mechanical damage, or customer modifications
to the engine?
-
Go to Step 11 System OK
11 Repair or replace all damaged or modified components. - Go to Step 1 -
2003 Saturn L200
2003 ENGINE Engine Mechanical - 2.2L (L61) - Saturn L Series
steve
Monday, May 09, 2011 12:52:00 PM Page 57 © 2006 Mitchell Repair Information Company, LLC.
6. Remove the engine oil dipstick and install a vacuum gage on the dipstick tube.
7. Block off the PCV system fresh air intake passage.
8. Run the engine at 1500 RPM for 30 seconds, then read the vacuum gage while the engine is running at
1500 RPM.
If a vacuum is present, this indicates that the crankcase ventilation system is functioning properly. No vacuum
indicates that the engine may not be sealed and is drawing in outside air. Check the valve covers, oil pan gasket,
or other sealing areas for leaks. If the vacuum gage registers a positive pressure through the dipstick tube, check
for a plugged hose or engine blow-by.
Results of Incorrect Operation
A plugged PCV hose may cause the following conditions:
 A rough idle
 Stalling or a slow idle speed
 Oil leaks
 Sludge in the engine
A leaking hose would cause the following conditions:
 A rough idle
 Stalling
 A high idle speed
Theory of Operation
The positive crankcase ventilation system (PCV) flows fresh air into the engine crankcase to dilute the
unburned hydrocarbons present and route them into the intake manifold where they are consumed during the
combustion process.
DRIVE BELT EXCESSIVE WEAR DIAGNOSIS
2003 Saturn L200
2003 ENGINE Engine Mechanical - 2.2L (L61) - Saturn L Series
steve
Monday, May 09, 2011 12:52:00 PM Page 58 © 2006 Mitchell Repair Information Company, LLC.
Fig. 24: Minor Cracks DO NOT Warrant Drive Belt Replacement
Courtesy of GENERAL MOTORS CORP.
Minor cracks in the belt rib are normal. They are the result of reverse bending around a backside pulley. Do not
replace belts for minor cracks.
2003 Saturn L200
2003 ENGINE Engine Mechanical - 2.2L (L61) - Saturn L Series
steve
Monday, May 09, 2011 12:52:00 PM Page 59 © 2006 Mitchell Repair Information Company, LLC.
2003 Saturn L200
2003 ENGINE Engine Mechanical - 2.2L (L61) - Saturn L Series
steve
Monday, May 09, 2011 12:52:00 PM Page 60 © 2006 Mitchell Repair Information Company, LLC.
Fig. 25: Chunking, Cord Breakage Or Separation DO Warrant Drive Belt Replacement
Courtesy of GENERAL MOTORS CORP.
Belts that have chunking longer than 5 mm (13/16 in) in one or more places should be replaced.
Belts should also be replaced if cord breakage or fabric separation is observed.
DRIVE BELT TENSIONER DIAGNOSIS
Drive Belt Tensioner Diagnosis
REPAIR INSTRUCTIONS
DRIVE BELT REPLACEMENT
Removal Procedure
Step Action Yes No
1
Remove the drive belt. Inspect the drive belt tensioner
pulley.
Is the drive belt tensioner pulley loose or misaligned? Go to Step 4 Go to Step 2
2
Rotate the drive belt tensioner.
Does the tensioner rotate without any unusual resistance
or binding? Go to Step 3 Go to Step 4
3
1. Use a torque wrench in order to measure the torque
required to move the tensioner off of the stop.
2. Use a torque wrench on a known good tensioner in
order to measure the torque required to move the
tensioner off of the stop.
Is the first torque reading within 10 percent of the second
torque reading? System OK Go to Step 4
4
Replace the drive belt tensioner. Refer to Drive Belt
Tensioner Replacement.
Is the repair complete? System OK
-
2003 Saturn L200
2003 ENGINE Engine Mechanical - 2.2L (L61) - Saturn L Series
steve
Monday, May 09, 2011 12:52:00 PM Page 61 © 2006 Mitchell Repair Information Company, LLC.
Fig. 26: Loosening Belt Tensioner To Remove/Install Drive Belt
Courtesy of GENERAL MOTORS CORP.
1. Depress the tensioner arm using a 3/8 in. drive breaker bar.
2. Remove the belt assembly off the idler or the A/C compressor pulley.
3. Remove the accessory drive belt.
Installation Procedure
2003 Saturn L200
2003 ENGINE Engine Mechanical - 2.2L (L61) - Saturn L Series
steve
Monday, May 09, 2011 12:52:00 PM Page 62 © 2006 Mitchell Repair Information Company, LLC.
Fig. 27: Loosening Belt Tensioner To Remove/Install Drive Belt
Courtesy of GENERAL MOTORS CORP.
1. Route the belt around all of the pulleys, except for the idler pulley.
2. Depress the tensioner arm using a 3/8 in. drive breaker bar.
3. Slip the belt over the idler pulley.
DRIVE BELT TENSIONER REPLACEMENT
Removal Procedure
IMPORTANT: Make sure that the belt is properly aligned on the pulleys.
2003 Saturn L200
2003 ENGINE Engine Mechanical - 2.2L (L61) - Saturn L Series
steve
Monday, May 09, 2011 12:52:00 PM Page 63 © 2006 Mitchell Repair Information Company, LLC.
Fig. 28: Loosening Belt Tensioner To Remove/Install Drive Belt
Courtesy of GENERAL MOTORS CORP.
1. Remove the accessory drive belt.
CAUTION: The tensioner assembly's internal parts are not serviceable. To avoid
injury, do not disassemble the tensioner.
2003 Saturn L200
2003 ENGINE Engine Mechanical - 2.2L (L61) - Saturn L Series
steve
Monday, May 09, 2011 12:52:00 PM Page 64 © 2006 Mitchell Repair Information Company, LLC.
Fig. 29: Removing & Installing Belt Tensioner Bolt
Courtesy of GENERAL MOTORS CORP.
2. Remove the belt tensioner bolt.
3. Remove the belt tensioner.
Installation Procedure
2003 Saturn L200
2003 ENGINE Engine Mechanical - 2.2L (L61) - Saturn L Series
steve
Monday, May 09, 2011 12:52:00 PM Page 65 © 2006 Mitchell Repair Information Company, LLC.
Fig. 30: Removing & Installing Belt Tensioner Bolt
Courtesy of GENERAL MOTORS CORP.
1. Install the belt tensioner attachment bolt.
Tighten: Tighten the drive belt tensioner bolt 45 N.m (33 lb ft).
NOTE: Refer to FASTENER NOTICE in Cautions and Notices.
2003 Saturn L200
2003 ENGINE Engine Mechanical - 2.2L (L61) - Saturn L Series
steve
Monday, May 09, 2011 12:52:00 PM Page 66 © 2006 Mitchell Repair Information Company, LLC.
Fig. 31: Loosening Belt Tensioner To Remove/Install Drive Belt
Courtesy of GENERAL MOTORS CORP.
2. Install the accessory drive belt.
ENGINE OIL PRESSURE SENSOR AND/OR SWITCH REPLACEMENT
Removal Procedure
2003 Saturn L200
2003 ENGINE Engine Mechanical - 2.2L (L61) - Saturn L Series
steve
Monday, May 09, 2011 12:52:00 PM Page 67 © 2006 Mitchell Repair Information Company, LLC.
Fig. 32: Disconnecting Engine Oil Pressure Switch
Courtesy of GENERAL MOTORS CORP.
1. Turn the ignition OFF.
2. Disconnect the engine oil pressure (EOP) switch harness connector.
3. Remove the EOP switch using a 1 1/6 inch deep well socket.
Installation Procedure
1. Apply the RTV sealant, or equivalent, to the EOP switch threads.
NOTE: Refer to FASTENER NOTICE in Cautions and Notices.
2003 Saturn L200
2003 ENGINE Engine Mechanical - 2.2L (L61) - Saturn L Series
steve
Monday, May 09, 2011 12:52:00 PM Page 68 © 2006 Mitchell Repair Information Company, LLC.
2. Install the EOP switch.
Tighten: Tighten the engine oil pressure switch to 10 N.m (89 lb in).
3. Connect the EOP switch harness connector. Push in the connector until a click is heard, then pull back to
confirm a positive engagement.
4. Check the oil level and fill if low.
5. Start the engine and check the engine for leaks.
ENGINE MOUNT INSPECTION
1. Support the engine.
2. Observe the engine mount while raising the engine. Raising the engine removes the weight from the
engine mount and creates slight tension on the rubber.
3. Replace the engine mount if the engine mount exhibits any of the following conditions:
 The hard rubber is covered with heat check cracks.
 The rubber is separated from the metal plate of the engine mount.
 The rubber is split through the center of the engine mount.
 The engine mount itself is leaking fluid.
4. For engine mount replacement. Refer to Engine Mount Replacement.
POWERTRAIN MOUNT BALANCE PROCEDURE - TOTAL MOUNT (W/AUTOMATIC
TRANSAXLE)
1. Raise and support the vehicle. Refer to Lifting and Jacking the Vehicle in General Information.
IMPORTANT: Before replacing any engine mount due to suspected fluid loss, verify that
the source of the fluid is the engine mount, not the engine or accessories.
IMPORTANT: Follow the balance procedure in the order listed in the following steps.
Powertrain mounts must be tightened in sequence.
2003 Saturn L200
2003 ENGINE Engine Mechanical - 2.2L (L61) - Saturn L Series
steve
Monday, May 09, 2011 12:52:00 PM Page 69 © 2006 Mitchell Repair Information Company, LLC.
Fig. 33: Removing/Installing Front Transaxle Mount Through Bolt
Courtesy of GENERAL MOTORS CORP.
2. Loosen the front transmission mount through bolt. Do not remove.
2003 Saturn L200
2003 ENGINE Engine Mechanical - 2.2L (L61) - Saturn L Series
steve
Monday, May 09, 2011 12:52:00 PM Page 70 © 2006 Mitchell Repair Information Company, LLC.
Fig. 34: Removing & Installing Rear Exhaust Manifold Heat Shield
Courtesy of GENERAL MOTORS CORP.
3. Loosen the rear transmission mount through bolt. Do not remove.
4. Position two floor jacks with wood blocks under the engine and transmission to support the powertrain
assembly.
2003 Saturn L200
2003 ENGINE Engine Mechanical - 2.2L (L61) - Saturn L Series
steve
Monday, May 09, 2011 12:52:00 PM Page 71 © 2006 Mitchell Repair Information Company, LLC.
Fig. 35: Locating Transmission Mount-To-Transmission Bolts
Courtesy of GENERAL MOTORS CORP.
5. From the engine compartment, loosen the transmission mount to transmission bolts.
2003 Saturn L200
2003 ENGINE Engine Mechanical - 2.2L (L61) - Saturn L Series
steve
Monday, May 09, 2011 12:52:00 PM Page 72 © 2006 Mitchell Repair Information Company, LLC.
Fig. 36: Locating Engine Mount-To-Intermediate Bracket Bolts
Courtesy of GENERAL MOTORS CORP.
6. Loosen the engine mount to intermediate bracket bolts.
7. Reposition the floor jacks to allow a 1/8 inch gap between the mount and mount bracket.
2003 Saturn L200
2003 ENGINE Engine Mechanical - 2.2L (L61) - Saturn L Series
steve
Monday, May 09, 2011 12:52:00 PM Page 73 © 2006 Mitchell Repair Information Company, LLC.
Fig. 37: Locating Transmission Mount-To-Transmission Bolts
Courtesy of GENERAL MOTORS CORP.
8. Tighten the transmission mount to transmission bolts using the following sequence:
1. Rear bolt
2. Middle bolt
3. Front bolt
Tighten: Tighten the bolts to 55 N.m (41 lb ft).
NOTE: Refer to FASTENER NOTICE in Cautions and Notices.
2003 Saturn L200
2003 ENGINE Engine Mechanical - 2.2L (L61) - Saturn L Series
steve
Monday, May 09, 2011 12:52:00 PM Page 74 © 2006 Mitchell Repair Information Company, LLC.
Fig. 38: Locating Engine Mount-To-Intermediate Bracket Bolts
Courtesy of GENERAL MOTORS CORP.
9. Tighten the engine mount to intermediate bracket bolts starting with the center bolt.
Tighten: Tighten the bolts to 55 N.m (41 lb ft).
10. Remove the floor jacks.
11. Shake the powertrain vigorously from front to rear and allow the powertrain to settle.
2003 Saturn L200
2003 ENGINE Engine Mechanical - 2.2L (L61) - Saturn L Series
steve
Monday, May 09, 2011 12:52:00 PM Page 75 © 2006 Mitchell Repair Information Company, LLC.
Fig. 39: Locating Rear Transmission Mount Through-Bolt - Automatic Transaxle
Courtesy of GENERAL MOTORS CORP.
12. Tighten the rear transmission mount through bolt.
Tighten: Tighten the bolts to 90 N.m (66 lb ft).
2003 Saturn L200
2003 ENGINE Engine Mechanical - 2.2L (L61) - Saturn L Series
steve
Monday, May 09, 2011 12:52:00 PM Page 76 © 2006 Mitchell Repair Information Company, LLC.
Fig. 40: Removing/Installing Front Transaxle Mount Through Bolt
Courtesy of GENERAL MOTORS CORP.
13. Tighten the front transmission mount through bolt.
Tighten: Tighten the bolts to 60 N.m (44 lb ft).
14. Lower the vehicle.
POWERTRAIN MOUNT BALANCE PROCEDURE - TOTAL MOUNT (W/MANUAL TRANSAXLE)
IMPORTANT: Follow the balance procedure in the order listed in the following steps.
Powertrain mounts must be tightened in sequence.
2003 Saturn L200
2003 ENGINE Engine Mechanical - 2.2L (L61) - Saturn L Series
steve
Monday, May 09, 2011 12:52:00 PM Page 77 © 2006 Mitchell Repair Information Company, LLC.
1. Raise and support the vehicle. Refer to Lifting and Jacking the Vehicle in General Information.
Fig. 41: Locating Front Transmission Mount Through-Bolt - Manual Transaxle
Courtesy of GENERAL MOTORS CORP.
2. Loosen the front transmission mount through bolt. Do not remove.
2003 Saturn L200
2003 ENGINE Engine Mechanical - 2.2L (L61) - Saturn L Series
steve
Monday, May 09, 2011 12:52:00 PM Page 78 © 2006 Mitchell Repair Information Company, LLC.
Fig. 42: Locating Rear Transmission Mount Through-Bolt - Manual Transaxle
Courtesy of GENERAL MOTORS CORP.
3. Loosen the rear transmission mount through bolt. Do not remove.
4. Position two floor jacks with wood blocks under the engine and transmission to support the powertrain
assembly.
2003 Saturn L200
2003 ENGINE Engine Mechanical - 2.2L (L61) - Saturn L Series
steve
Monday, May 09, 2011 12:52:00 PM Page 79 © 2006 Mitchell Repair Information Company, LLC.
Fig. 43: Locating Transmission Mount-To-Transmission Bolts
Courtesy of GENERAL MOTORS CORP.
5. From the engine compartment, loosen the transmission mount to transmission bolts.
2003 Saturn L200
2003 ENGINE Engine Mechanical - 2.2L (L61) - Saturn L Series
steve
Monday, May 09, 2011 12:52:00 PM Page 80 © 2006 Mitchell Repair Information Company, LLC.
Fig. 44: Locating Engine Mount-To-Intermediate Bracket Bolts
Courtesy of GENERAL MOTORS CORP.
6. Loosen the engine mount to intermediate bracket bolts.
7. Reposition the floor jacks to allow a 1/8 inch gap between the mount and mount bracket.
2003 Saturn L200
2003 ENGINE Engine Mechanical - 2.2L (L61) - Saturn L Series
steve
Monday, May 09, 2011 12:52:00 PM Page 81 © 2006 Mitchell Repair Information Company, LLC.
Fig. 45: Locating Transmission Mount-To-Transmission Bolts
Courtesy of GENERAL MOTORS CORP.
8. Tighten the transmission mount to transmission bolts using the following sequence:
1. Rear bolt
2. Middle bolt
3. Front bolt
Tighten: Tighten the bolts to 55 N.m (41 lb ft).
NOTE: Refer to FASTENER NOTICE in Cautions and Notices.
2003 Saturn L200
2003 ENGINE Engine Mechanical - 2.2L (L61) - Saturn L Series
steve
Monday, May 09, 2011 12:52:00 PM Page 82 © 2006 Mitchell Repair Information Company, LLC.
Fig. 46: Locating Engine Mount-To-Intermediate Bracket Bolts
Courtesy of GENERAL MOTORS CORP.
9. Tighten the engine mount to intermediate bracket bolts starting with the center bolt.
Tighten: Tighten the bolts to 55 N.m (41 lb ft).
10. Remove the floor jacks.
11. Shake the powertrain vigorously from front to rear and allow the powertrain to settle.
2003 Saturn L200
2003 ENGINE Engine Mechanical - 2.2L (L61) - Saturn L Series
steve
Monday, May 09, 2011 12:52:00 PM Page 83 © 2006 Mitchell Repair Information Company, LLC.
Fig. 47: Locating Rear Transmission Mount Through-Bolt - Manual Transaxle
Courtesy of GENERAL MOTORS CORP.
12. Tighten the rear transmission mount through bolt.
Tighten: Tighten the bolts to 60 N.m (44 lb ft).
2003 Saturn L200
2003 ENGINE Engine Mechanical - 2.2L (L61) - Saturn L Series
steve
Monday, May 09, 2011 12:52:00 PM Page 84 © 2006 Mitchell Repair Information Company, LLC.
Fig. 48: Locating Front Transmission Mount Through-Bolt - Manual Transaxle
Courtesy of GENERAL MOTORS CORP.
13. Tighten the front transmission mount through bolt.
Tighten: Tighten the bolts to 55 N.m (41 lb ft).
14. Lower the vehicle.
POWERTRAIN MOUNT BALANCE PROCEDURE - LOWER MOUNT (W/AUTOMATIC
TRANSAXLE)
IMPORTANT: Follow the balance procedure in the order listed in the following steps.
Powertrain mounts must be tightened in sequence.
2003 Saturn L200
2003 ENGINE Engine Mechanical - 2.2L (L61) - Saturn L Series
steve
Monday, May 09, 2011 12:52:01 PM Page 85 © 2006 Mitchell Repair Information Company, LLC.
1. Raise and support the vehicle. Refer to Lifting and Jacking the Vehicle in General Information.
Fig. 49: Removing/Installing Front Transaxle Mount Through Bolt
Courtesy of GENERAL MOTORS CORP.
2. Loosen the front transmission mount through bolt. Do not remove.
2003 Saturn L200
2003 ENGINE Engine Mechanical - 2.2L (L61) - Saturn L Series
steve
Monday, May 09, 2011 12:52:01 PM Page 86 © 2006 Mitchell Repair Information Company, LLC.
Fig. 50: Locating Rear Transmission Mount Through-Bolt - Automatic Transaxle
Courtesy of GENERAL MOTORS CORP.
3. Loosen the rear transmission mount through bolt. Do not remove.
4. Shake the powertrain vigorously from front to rear and allow powertrain to settle.
5. Tighten the rear transmission mount through bolt.
Tighten: Tighten the bolt to 90 N.m (66 lb ft).
NOTE: Refer to FASTENER NOTICE in Cautions and Notices.
2003 Saturn L200
2003 ENGINE Engine Mechanical - 2.2L (L61) - Saturn L Series
steve
Monday, May 09, 2011 12:52:01 PM Page 87 © 2006 Mitchell Repair Information Company, LLC.
Fig. 51: Removing/Installing Front Transaxle Mount Through Bolt
Courtesy of GENERAL MOTORS CORP.
6. Tighten the front transmission mount through bolt.
Tighten: Tighten the bolt to 60 N.m (44 lb ft).
7. Lower the vehicle.
POWERTRAIN MOUNT BALANCE PROCEDURE - LOWER MOUNT (W/MANUAL TRANSAXLE)
IMPORTANT: Follow the balance procedure in the order listed in the following steps.
Powertrain mounts must be tightened in sequence.
2003 Saturn L200
2003 ENGINE Engine Mechanical - 2.2L (L61) - Saturn L Series
steve
Monday, May 09, 2011 12:52:01 PM Page 88 © 2006 Mitchell Repair Information Company, LLC.
1. Raise and support the vehicle. Refer to Lifting and Jacking the Vehicle in General Information.
Fig. 52: Locating Front Transmission Mount Through-Bolt - Manual Transaxle
Courtesy of GENERAL MOTORS CORP.
2. Loosen the front transmission mount through bolt. Do not remove.
2003 Saturn L200
2003 ENGINE Engine Mechanical - 2.2L (L61) - Saturn L Series
steve
Monday, May 09, 2011 12:52:01 PM Page 89 © 2006 Mitchell Repair Information Company, LLC.
Fig. 53: Locating Rear Transmission Mount Through-Bolt - Manual Transaxle
Courtesy of GENERAL MOTORS CORP.
3. Loosen the rear transmission mount through bolt. Do not remove.
4. Shake the powertrain vigorously from front to rear and allow powertrain to settle.
5. Tighten the rear transmission mount through bolt.
Tighten: Tighten the bolt to 60 N.m (44 lb ft).
NOTE: Refer to FASTENER NOTICE in Cautions and Notices.
2003 Saturn L200
2003 ENGINE Engine Mechanical - 2.2L (L61) - Saturn L Series
steve
Monday, May 09, 2011 12:52:01 PM Page 90 © 2006 Mitchell Repair Information Company, LLC.
Fig. 54: Locating Front Transmission Mount Through-Bolt - Manual Transaxle
Courtesy of GENERAL MOTORS CORP.
6. Tighten the front transmission mount through bolt.
Tighten: Tighten the bolt to 55 N.m (41 lb ft).
7. Lower the vehicle.
ENGINE MOUNT BRACKET REPLACEMENT
Removal Procedure
2003 Saturn L200
2003 ENGINE Engine Mechanical - 2.2L (L61) - Saturn L Series
steve
Monday, May 09, 2011 12:52:01 PM Page 91 © 2006 Mitchell Repair Information Company, LLC.
Fig. 55: Exploded View Of Engine Mount Assembly
Courtesy of GENERAL MOTORS CORP.
1. Remove the engine mount. Refer to Engine Mount Replacement.
2003 Saturn L200
2003 ENGINE Engine Mechanical - 2.2L (L61) - Saturn L Series
steve
Monday, May 09, 2011 12:52:01 PM Page 92 © 2006 Mitchell Repair Information Company, LLC.
Fig. 56: Removing & Installing Engine Mount Bracket
Courtesy of GENERAL MOTORS CORP.
2. Remove the engine mount bracket to engine bolts.
3. Remove the engine mount bracket from the engine.
Installation Procedure
NOTE: Refer to FASTENER NOTICE in Cautions and Notices.
2003 Saturn L200
2003 ENGINE Engine Mechanical - 2.2L (L61) - Saturn L Series
steve
Monday, May 09, 2011 12:52:01 PM Page 93 © 2006 Mitchell Repair Information Company, LLC.
2.2 l engine
2.2 l engine
2.2 l engine
2.2 l engine
2.2 l engine
2.2 l engine
2.2 l engine
2.2 l engine
2.2 l engine
2.2 l engine
2.2 l engine
2.2 l engine
2.2 l engine
2.2 l engine
2.2 l engine
2.2 l engine
2.2 l engine
2.2 l engine
2.2 l engine
2.2 l engine
2.2 l engine
2.2 l engine
2.2 l engine
2.2 l engine
2.2 l engine
2.2 l engine
2.2 l engine
2.2 l engine
2.2 l engine
2.2 l engine
2.2 l engine
2.2 l engine
2.2 l engine
2.2 l engine
2.2 l engine
2.2 l engine
2.2 l engine
2.2 l engine
2.2 l engine
2.2 l engine
2.2 l engine
2.2 l engine
2.2 l engine
2.2 l engine
2.2 l engine
2.2 l engine
2.2 l engine
2.2 l engine
2.2 l engine
2.2 l engine
2.2 l engine
2.2 l engine
2.2 l engine
2.2 l engine
2.2 l engine
2.2 l engine
2.2 l engine
2.2 l engine
2.2 l engine
2.2 l engine
2.2 l engine
2.2 l engine
2.2 l engine
2.2 l engine
2.2 l engine
2.2 l engine
2.2 l engine
2.2 l engine
2.2 l engine
2.2 l engine
2.2 l engine
2.2 l engine
2.2 l engine
2.2 l engine
2.2 l engine
2.2 l engine
2.2 l engine
2.2 l engine
2.2 l engine
2.2 l engine
2.2 l engine
2.2 l engine
2.2 l engine
2.2 l engine
2.2 l engine
2.2 l engine
2.2 l engine
2.2 l engine
2.2 l engine
2.2 l engine
2.2 l engine
2.2 l engine
2.2 l engine
2.2 l engine
2.2 l engine
2.2 l engine
2.2 l engine
2.2 l engine
2.2 l engine
2.2 l engine
2.2 l engine
2.2 l engine
2.2 l engine
2.2 l engine
2.2 l engine
2.2 l engine
2.2 l engine
2.2 l engine
2.2 l engine
2.2 l engine
2.2 l engine
2.2 l engine
2.2 l engine
2.2 l engine
2.2 l engine
2.2 l engine
2.2 l engine
2.2 l engine
2.2 l engine
2.2 l engine
2.2 l engine
2.2 l engine
2.2 l engine
2.2 l engine
2.2 l engine
2.2 l engine
2.2 l engine
2.2 l engine
2.2 l engine
2.2 l engine
2.2 l engine
2.2 l engine
2.2 l engine
2.2 l engine
2.2 l engine
2.2 l engine
2.2 l engine
2.2 l engine
2.2 l engine
2.2 l engine
2.2 l engine
2.2 l engine
2.2 l engine
2.2 l engine
2.2 l engine
2.2 l engine
2.2 l engine
2.2 l engine
2.2 l engine
2.2 l engine
2.2 l engine
2.2 l engine
2.2 l engine
2.2 l engine
2.2 l engine
2.2 l engine
2.2 l engine
2.2 l engine
2.2 l engine
2.2 l engine
2.2 l engine
2.2 l engine
2.2 l engine
2.2 l engine
2.2 l engine
2.2 l engine
2.2 l engine
2.2 l engine
2.2 l engine
2.2 l engine
2.2 l engine
2.2 l engine
2.2 l engine
2.2 l engine
2.2 l engine
2.2 l engine
2.2 l engine
2.2 l engine
2.2 l engine
2.2 l engine
2.2 l engine
2.2 l engine
2.2 l engine
2.2 l engine
2.2 l engine
2.2 l engine
2.2 l engine
2.2 l engine
2.2 l engine
2.2 l engine
2.2 l engine
2.2 l engine
2.2 l engine
2.2 l engine
2.2 l engine
2.2 l engine
2.2 l engine
2.2 l engine
2.2 l engine
2.2 l engine
2.2 l engine
2.2 l engine
2.2 l engine
2.2 l engine
2.2 l engine
2.2 l engine
2.2 l engine
2.2 l engine
2.2 l engine
2.2 l engine
2.2 l engine
2.2 l engine
2.2 l engine
2.2 l engine
2.2 l engine
2.2 l engine
2.2 l engine
2.2 l engine
2.2 l engine
2.2 l engine
2.2 l engine
2.2 l engine
2.2 l engine
2.2 l engine
2.2 l engine
2.2 l engine
2.2 l engine
2.2 l engine
2.2 l engine
2.2 l engine
2.2 l engine
2.2 l engine
2.2 l engine
2.2 l engine
2.2 l engine
2.2 l engine
2.2 l engine
2.2 l engine
2.2 l engine
2.2 l engine
2.2 l engine
2.2 l engine
2.2 l engine
2.2 l engine
2.2 l engine
2.2 l engine
2.2 l engine
2.2 l engine
2.2 l engine
2.2 l engine
2.2 l engine
2.2 l engine
2.2 l engine
2.2 l engine
2.2 l engine
2.2 l engine
2.2 l engine
2.2 l engine
2.2 l engine
2.2 l engine
2.2 l engine
2.2 l engine
2.2 l engine
2.2 l engine
2.2 l engine
2.2 l engine
2.2 l engine
2.2 l engine
2.2 l engine
2.2 l engine
2.2 l engine
2.2 l engine
2.2 l engine
2.2 l engine
2.2 l engine
2.2 l engine
2.2 l engine
2.2 l engine
2.2 l engine
2.2 l engine
2.2 l engine
2.2 l engine
2.2 l engine
2.2 l engine
2.2 l engine
2.2 l engine
2.2 l engine
2.2 l engine
2.2 l engine
2.2 l engine
2.2 l engine
2.2 l engine
2.2 l engine
2.2 l engine
2.2 l engine
2.2 l engine
2.2 l engine
2.2 l engine
2.2 l engine
2.2 l engine
2.2 l engine
2.2 l engine
2.2 l engine
2.2 l engine
2.2 l engine
2.2 l engine
2.2 l engine
2.2 l engine
2.2 l engine
2.2 l engine
2.2 l engine
2.2 l engine
2.2 l engine
2.2 l engine
2.2 l engine
2.2 l engine
2.2 l engine
2.2 l engine
2.2 l engine
2.2 l engine
2.2 l engine
2.2 l engine
2.2 l engine
2.2 l engine
2.2 l engine
2.2 l engine
2.2 l engine
2.2 l engine
2.2 l engine
2.2 l engine
2.2 l engine
2.2 l engine
2.2 l engine
2.2 l engine
2.2 l engine
2.2 l engine
2.2 l engine
2.2 l engine
2.2 l engine
2.2 l engine
2.2 l engine
2.2 l engine
2.2 l engine
2.2 l engine
2.2 l engine
2.2 l engine
2.2 l engine
2.2 l engine
2.2 l engine
2.2 l engine
2.2 l engine
2.2 l engine
2.2 l engine
2.2 l engine
2.2 l engine
2.2 l engine
2.2 l engine
2.2 l engine
2.2 l engine
2.2 l engine
2.2 l engine
2.2 l engine
2.2 l engine
2.2 l engine
2.2 l engine
2.2 l engine
2.2 l engine
2.2 l engine
2.2 l engine
2.2 l engine
2.2 l engine
2.2 l engine
2.2 l engine
2.2 l engine
2.2 l engine
2.2 l engine
2.2 l engine
2.2 l engine
2.2 l engine
2.2 l engine
2.2 l engine
2.2 l engine
2.2 l engine
2.2 l engine
2.2 l engine
2.2 l engine
2.2 l engine
2.2 l engine
2.2 l engine
2.2 l engine
2.2 l engine
2.2 l engine
2.2 l engine
2.2 l engine
2.2 l engine
2.2 l engine
2.2 l engine
2.2 l engine
2.2 l engine
2.2 l engine
2.2 l engine
2.2 l engine
2.2 l engine
2.2 l engine
2.2 l engine
2.2 l engine
2.2 l engine
2.2 l engine
2.2 l engine
2.2 l engine
2.2 l engine
2.2 l engine
2.2 l engine
2.2 l engine
2.2 l engine
2.2 l engine
2.2 l engine
2.2 l engine
2.2 l engine
2.2 l engine
2.2 l engine
2.2 l engine
2.2 l engine
2.2 l engine
2.2 l engine
2.2 l engine
2.2 l engine
2.2 l engine
2.2 l engine
2.2 l engine
2.2 l engine
2.2 l engine
2.2 l engine
2.2 l engine
2.2 l engine
2.2 l engine
2.2 l engine
2.2 l engine
2.2 l engine
2.2 l engine
2.2 l engine
2.2 l engine
2.2 l engine
2.2 l engine
2.2 l engine
2.2 l engine
2.2 l engine
2.2 l engine
2.2 l engine
2.2 l engine
2.2 l engine
2.2 l engine
2.2 l engine
2.2 l engine
2.2 l engine
2.2 l engine
2.2 l engine
2.2 l engine
2.2 l engine
2.2 l engine
2.2 l engine
2.2 l engine
2.2 l engine
2.2 l engine
2.2 l engine
2.2 l engine
2.2 l engine
2.2 l engine
2.2 l engine
2.2 l engine
2.2 l engine
2.2 l engine
2.2 l engine
2.2 l engine
2.2 l engine
2.2 l engine
2.2 l engine
2.2 l engine
2.2 l engine
2.2 l engine
2.2 l engine
2.2 l engine
2.2 l engine
2.2 l engine
2.2 l engine
2.2 l engine
2.2 l engine
2.2 l engine
2.2 l engine
2.2 l engine
2.2 l engine
2.2 l engine
2.2 l engine
2.2 l engine
2.2 l engine
2.2 l engine
2.2 l engine
2.2 l engine
2.2 l engine
2.2 l engine

More Related Content

What's hot

285 os motores_chevrolet_completo
285 os motores_chevrolet_completo285 os motores_chevrolet_completo
285 os motores_chevrolet_completolograii
 
manuais serviço caminhões VW
manuais serviço caminhões VWmanuais serviço caminhões VW
manuais serviço caminhões VWMauro Reis
 
Curso mecanica-camion-volquete-serie-nl-10-volvo
Curso mecanica-camion-volquete-serie-nl-10-volvoCurso mecanica-camion-volquete-serie-nl-10-volvo
Curso mecanica-camion-volquete-serie-nl-10-volvoElino Enel Silencio
 
Manaul de serviço cbr600 f(3) (2001~) informac
Manaul de serviço cbr600 f(3) (2001~) informacManaul de serviço cbr600 f(3) (2001~) informac
Manaul de serviço cbr600 f(3) (2001~) informacThiago Huari
 
Curso de sistemas de inyeccion diesel
Curso de sistemas de inyeccion dieselCurso de sistemas de inyeccion diesel
Curso de sistemas de inyeccion dieselMario Salas
 
Manual de serviço ms nx 4 falcon - 00 x6b-mcg-002 cilindro
Manual de serviço ms nx 4 falcon - 00 x6b-mcg-002 cilindroManual de serviço ms nx 4 falcon - 00 x6b-mcg-002 cilindro
Manual de serviço ms nx 4 falcon - 00 x6b-mcg-002 cilindroThiago Huari
 
Manual de serviço xl250 r (1983) mskb7831p embreage
Manual de serviço xl250 r (1983)   mskb7831p embreageManual de serviço xl250 r (1983)   mskb7831p embreage
Manual de serviço xl250 r (1983) mskb7831p embreageThiago Huari
 
Manual de serviço cg150 titan ks es esd manivela
Manual de serviço cg150 titan ks es esd manivelaManual de serviço cg150 titan ks es esd manivela
Manual de serviço cg150 titan ks es esd manivelaThiago Huari
 
Manual de serviço nx150 manutenc
Manual de serviço nx150 manutencManual de serviço nx150 manutenc
Manual de serviço nx150 manutencThiago Huari
 
Manual de serviço cg150 titan ks es esd informac
Manual de serviço cg150 titan ks es esd informacManual de serviço cg150 titan ks es esd informac
Manual de serviço cg150 titan ks es esd informacThiago Huari
 
Dd15 engine torque spec
Dd15 engine torque specDd15 engine torque spec
Dd15 engine torque specjhstruckrepair
 
Manual de serviço cg125 titan ks es kse cg125 cargo (2002) alternad
Manual de serviço cg125 titan  ks es kse cg125 cargo (2002) alternadManual de serviço cg125 titan  ks es kse cg125 cargo (2002) alternad
Manual de serviço cg125 titan ks es kse cg125 cargo (2002) alternadThiago Huari
 

What's hot (20)

Manual Volvo
Manual VolvoManual Volvo
Manual Volvo
 
Tabela de torque
Tabela de torqueTabela de torque
Tabela de torque
 
MF4283
MF4283MF4283
MF4283
 
285 os motores_chevrolet_completo
285 os motores_chevrolet_completo285 os motores_chevrolet_completo
285 os motores_chevrolet_completo
 
manuais serviço caminhões VW
manuais serviço caminhões VWmanuais serviço caminhões VW
manuais serviço caminhões VW
 
Caja manual
Caja manualCaja manual
Caja manual
 
CA Árbol de transmisión en camiones
CA Árbol de transmisión en camionesCA Árbol de transmisión en camiones
CA Árbol de transmisión en camiones
 
Curso mecanica-camion-volquete-serie-nl-10-volvo
Curso mecanica-camion-volquete-serie-nl-10-volvoCurso mecanica-camion-volquete-serie-nl-10-volvo
Curso mecanica-camion-volquete-serie-nl-10-volvo
 
Manaul de serviço cbr600 f(3) (2001~) informac
Manaul de serviço cbr600 f(3) (2001~) informacManaul de serviço cbr600 f(3) (2001~) informac
Manaul de serviço cbr600 f(3) (2001~) informac
 
Curso de sistemas de inyeccion diesel
Curso de sistemas de inyeccion dieselCurso de sistemas de inyeccion diesel
Curso de sistemas de inyeccion diesel
 
Fuel d13
Fuel d13Fuel d13
Fuel d13
 
Manual de serviço ms nx 4 falcon - 00 x6b-mcg-002 cilindro
Manual de serviço ms nx 4 falcon - 00 x6b-mcg-002 cilindroManual de serviço ms nx 4 falcon - 00 x6b-mcg-002 cilindro
Manual de serviço ms nx 4 falcon - 00 x6b-mcg-002 cilindro
 
Programa Autodidáctico 233
Programa Autodidáctico 233Programa Autodidáctico 233
Programa Autodidáctico 233
 
Manual de serviço xl250 r (1983) mskb7831p embreage
Manual de serviço xl250 r (1983)   mskb7831p embreageManual de serviço xl250 r (1983)   mskb7831p embreage
Manual de serviço xl250 r (1983) mskb7831p embreage
 
Iveco
IvecoIveco
Iveco
 
Manual de serviço cg150 titan ks es esd manivela
Manual de serviço cg150 titan ks es esd manivelaManual de serviço cg150 titan ks es esd manivela
Manual de serviço cg150 titan ks es esd manivela
 
Manual de serviço nx150 manutenc
Manual de serviço nx150 manutencManual de serviço nx150 manutenc
Manual de serviço nx150 manutenc
 
Manual de serviço cg150 titan ks es esd informac
Manual de serviço cg150 titan ks es esd informacManual de serviço cg150 titan ks es esd informac
Manual de serviço cg150 titan ks es esd informac
 
Dd15 engine torque spec
Dd15 engine torque specDd15 engine torque spec
Dd15 engine torque spec
 
Manual de serviço cg125 titan ks es kse cg125 cargo (2002) alternad
Manual de serviço cg125 titan  ks es kse cg125 cargo (2002) alternadManual de serviço cg125 titan  ks es kse cg125 cargo (2002) alternad
Manual de serviço cg125 titan ks es kse cg125 cargo (2002) alternad
 

Similar to 2.2 l engine

2007 GMC YUKON Service Repair Manual
2007 GMC YUKON Service Repair Manual2007 GMC YUKON Service Repair Manual
2007 GMC YUKON Service Repair Manualjkmdmm mkueoi
 
2008 GMC YUKON Service Repair Manual
2008 GMC YUKON Service Repair Manual2008 GMC YUKON Service Repair Manual
2008 GMC YUKON Service Repair Manualjhsjenfn ysehfjn
 
Massey ferguson mf 230 tractor service repair manual
Massey ferguson mf 230 tractor service repair manualMassey ferguson mf 230 tractor service repair manual
Massey ferguson mf 230 tractor service repair manualhfjsejdkemmn
 
Massey ferguson mf 240 tractor service repair manual
Massey ferguson mf 240 tractor service repair manualMassey ferguson mf 240 tractor service repair manual
Massey ferguson mf 240 tractor service repair manualwedsrffcdgdv
 
Massey ferguson mf 235 tractor service repair manual
Massey ferguson mf 235 tractor service repair manualMassey ferguson mf 235 tractor service repair manual
Massey ferguson mf 235 tractor service repair manualregdfcgvdgvf
 
Massey ferguson mf 250 tractor service repair manual
Massey ferguson mf 250 tractor service repair manualMassey ferguson mf 250 tractor service repair manual
Massey ferguson mf 250 tractor service repair manualfhhsjdkmem
 
Massey ferguson mf 245 tractor service repair manual
Massey ferguson mf 245 tractor service repair manualMassey ferguson mf 245 tractor service repair manual
Massey ferguson mf 245 tractor service repair manualfjskekazswdmme
 
Allis chalmers models 7020 tractor service repair manual
Allis chalmers models 7020 tractor service repair manualAllis chalmers models 7020 tractor service repair manual
Allis chalmers models 7020 tractor service repair manualfjjskekkdmme
 
Allis chalmers models 7040 tractor service repair manual
Allis chalmers models 7040 tractor service repair manualAllis chalmers models 7040 tractor service repair manual
Allis chalmers models 7040 tractor service repair manualufjjsjekkdemd
 
Allis chalmers models 7020 tractor service repair manual
Allis chalmers models 7020 tractor service repair manualAllis chalmers models 7020 tractor service repair manual
Allis chalmers models 7020 tractor service repair manualufusejkksemm
 
Allis chalmers models 7020 tractor service repair manual
Allis chalmers models 7020 tractor service repair manualAllis chalmers models 7020 tractor service repair manual
Allis chalmers models 7020 tractor service repair manualfjskekazxdmmme
 
Allis chalmers models 7010 tractor service repair manual
Allis chalmers models 7010 tractor service repair manualAllis chalmers models 7010 tractor service repair manual
Allis chalmers models 7010 tractor service repair manualufusejkksemm
 
Allis chalmers models 7020 tractor service repair manual
Allis chalmers models 7020 tractor service repair manualAllis chalmers models 7020 tractor service repair manual
Allis chalmers models 7020 tractor service repair manualfjskkkdmem
 
Allis chalmers models 7060 tractor service repair manual
Allis chalmers models 7060 tractor service repair manualAllis chalmers models 7060 tractor service repair manual
Allis chalmers models 7060 tractor service repair manualfjjskqazxedmmem
 
Allis chalmers models 7030 tractor service repair manual
Allis chalmers models 7030 tractor service repair manualAllis chalmers models 7030 tractor service repair manual
Allis chalmers models 7030 tractor service repair manualfjjsekfksmemer
 
Allis chalmers models 7010 tractor service repair manual
Allis chalmers models 7010 tractor service repair manualAllis chalmers models 7010 tractor service repair manual
Allis chalmers models 7010 tractor service repair manualjfjkskekfmsme
 
Allis chalmers models 7045 tractor service repair manual
Allis chalmers models 7045 tractor service repair manualAllis chalmers models 7045 tractor service repair manual
Allis chalmers models 7045 tractor service repair manualufjjsjkkskemmd
 
Allis chalmers models 7020 tractor service repair manual
Allis chalmers models 7020 tractor service repair manualAllis chalmers models 7020 tractor service repair manual
Allis chalmers models 7020 tractor service repair manualfudjjjskeskmmd
 
Allis chalmers models 7080 tractor service repair manual
Allis chalmers models 7080 tractor service repair manualAllis chalmers models 7080 tractor service repair manual
Allis chalmers models 7080 tractor service repair manualfjseoldkekm
 
Allis chalmers models 7010 tractor service repair manual
Allis chalmers models 7010 tractor service repair manualAllis chalmers models 7010 tractor service repair manual
Allis chalmers models 7010 tractor service repair manualfjjskekkdmme
 

Similar to 2.2 l engine (20)

2007 GMC YUKON Service Repair Manual
2007 GMC YUKON Service Repair Manual2007 GMC YUKON Service Repair Manual
2007 GMC YUKON Service Repair Manual
 
2008 GMC YUKON Service Repair Manual
2008 GMC YUKON Service Repair Manual2008 GMC YUKON Service Repair Manual
2008 GMC YUKON Service Repair Manual
 
Massey ferguson mf 230 tractor service repair manual
Massey ferguson mf 230 tractor service repair manualMassey ferguson mf 230 tractor service repair manual
Massey ferguson mf 230 tractor service repair manual
 
Massey ferguson mf 240 tractor service repair manual
Massey ferguson mf 240 tractor service repair manualMassey ferguson mf 240 tractor service repair manual
Massey ferguson mf 240 tractor service repair manual
 
Massey ferguson mf 235 tractor service repair manual
Massey ferguson mf 235 tractor service repair manualMassey ferguson mf 235 tractor service repair manual
Massey ferguson mf 235 tractor service repair manual
 
Massey ferguson mf 250 tractor service repair manual
Massey ferguson mf 250 tractor service repair manualMassey ferguson mf 250 tractor service repair manual
Massey ferguson mf 250 tractor service repair manual
 
Massey ferguson mf 245 tractor service repair manual
Massey ferguson mf 245 tractor service repair manualMassey ferguson mf 245 tractor service repair manual
Massey ferguson mf 245 tractor service repair manual
 
Allis chalmers models 7020 tractor service repair manual
Allis chalmers models 7020 tractor service repair manualAllis chalmers models 7020 tractor service repair manual
Allis chalmers models 7020 tractor service repair manual
 
Allis chalmers models 7040 tractor service repair manual
Allis chalmers models 7040 tractor service repair manualAllis chalmers models 7040 tractor service repair manual
Allis chalmers models 7040 tractor service repair manual
 
Allis chalmers models 7020 tractor service repair manual
Allis chalmers models 7020 tractor service repair manualAllis chalmers models 7020 tractor service repair manual
Allis chalmers models 7020 tractor service repair manual
 
Allis chalmers models 7020 tractor service repair manual
Allis chalmers models 7020 tractor service repair manualAllis chalmers models 7020 tractor service repair manual
Allis chalmers models 7020 tractor service repair manual
 
Allis chalmers models 7010 tractor service repair manual
Allis chalmers models 7010 tractor service repair manualAllis chalmers models 7010 tractor service repair manual
Allis chalmers models 7010 tractor service repair manual
 
Allis chalmers models 7020 tractor service repair manual
Allis chalmers models 7020 tractor service repair manualAllis chalmers models 7020 tractor service repair manual
Allis chalmers models 7020 tractor service repair manual
 
Allis chalmers models 7060 tractor service repair manual
Allis chalmers models 7060 tractor service repair manualAllis chalmers models 7060 tractor service repair manual
Allis chalmers models 7060 tractor service repair manual
 
Allis chalmers models 7030 tractor service repair manual
Allis chalmers models 7030 tractor service repair manualAllis chalmers models 7030 tractor service repair manual
Allis chalmers models 7030 tractor service repair manual
 
Allis chalmers models 7010 tractor service repair manual
Allis chalmers models 7010 tractor service repair manualAllis chalmers models 7010 tractor service repair manual
Allis chalmers models 7010 tractor service repair manual
 
Allis chalmers models 7045 tractor service repair manual
Allis chalmers models 7045 tractor service repair manualAllis chalmers models 7045 tractor service repair manual
Allis chalmers models 7045 tractor service repair manual
 
Allis chalmers models 7020 tractor service repair manual
Allis chalmers models 7020 tractor service repair manualAllis chalmers models 7020 tractor service repair manual
Allis chalmers models 7020 tractor service repair manual
 
Allis chalmers models 7080 tractor service repair manual
Allis chalmers models 7080 tractor service repair manualAllis chalmers models 7080 tractor service repair manual
Allis chalmers models 7080 tractor service repair manual
 
Allis chalmers models 7010 tractor service repair manual
Allis chalmers models 7010 tractor service repair manualAllis chalmers models 7010 tractor service repair manual
Allis chalmers models 7010 tractor service repair manual
 

More from Jeff Sparks

2005 front suspension
2005 front suspension2005 front suspension
2005 front suspensionJeff Sparks
 
2005 engine electrical
2005 engine electrical2005 engine electrical
2005 engine electricalJeff Sparks
 
2005 engine cooling
2005 engine cooling2005 engine cooling
2005 engine coolingJeff Sparks
 
2005 elelctrical component locator
2005 elelctrical component locator2005 elelctrical component locator
2005 elelctrical component locatorJeff Sparks
 
2005 disc brakes
2005 disc brakes2005 disc brakes
2005 disc brakesJeff Sparks
 
2005 axle shafts
2005 axle shafts2005 axle shafts
2005 axle shaftsJeff Sparks
 
2005 antilock brakes
2005 antilock brakes2005 antilock brakes
2005 antilock brakesJeff Sparks
 
2004 wiring part 3
2004 wiring part 32004 wiring part 3
2004 wiring part 3Jeff Sparks
 
2004 wiring part 2
2004 wiring part 22004 wiring part 2
2004 wiring part 2Jeff Sparks
 
2003 power steering
2003 power steering2003 power steering
2003 power steeringJeff Sparks
 
2001 electrical component locator
2001 electrical component locator2001 electrical component locator
2001 electrical component locatorJeff Sparks
 
2001 drive belt routing
2001 drive belt routing2001 drive belt routing
2001 drive belt routingJeff Sparks
 
2000 02 rear suspension
2000 02 rear suspension2000 02 rear suspension
2000 02 rear suspensionJeff Sparks
 
2000 01 steering column
2000 01 steering column2000 01 steering column
2000 01 steering columnJeff Sparks
 
2000 01 power steering
2000 01 power steering2000 01 power steering
2000 01 power steeringJeff Sparks
 
2000 01 engine cooling
2000 01 engine cooling2000 01 engine cooling
2000 01 engine coolingJeff Sparks
 

More from Jeff Sparks (20)

2005 front suspension
2005 front suspension2005 front suspension
2005 front suspension
 
2005 engine electrical
2005 engine electrical2005 engine electrical
2005 engine electrical
 
2005 engine cooling
2005 engine cooling2005 engine cooling
2005 engine cooling
 
2005 elelctrical component locator
2005 elelctrical component locator2005 elelctrical component locator
2005 elelctrical component locator
 
2005 disc brakes
2005 disc brakes2005 disc brakes
2005 disc brakes
 
2005 axle shafts
2005 axle shafts2005 axle shafts
2005 axle shafts
 
2005 antilock brakes
2005 antilock brakes2005 antilock brakes
2005 antilock brakes
 
2004 wiring
2004 wiring2004 wiring
2004 wiring
 
2004 wiring part 3
2004 wiring part 32004 wiring part 3
2004 wiring part 3
 
2004 wiring part 2
2004 wiring part 22004 wiring part 2
2004 wiring part 2
 
2003 power steering
2003 power steering2003 power steering
2003 power steering
 
2001 fuses
2001 fuses2001 fuses
2001 fuses
 
2001 electrical component locator
2001 electrical component locator2001 electrical component locator
2001 electrical component locator
 
2001 drive belt routing
2001 drive belt routing2001 drive belt routing
2001 drive belt routing
 
2001 airbag
2001 airbag2001 airbag
2001 airbag
 
2000 02 rear suspension
2000 02 rear suspension2000 02 rear suspension
2000 02 rear suspension
 
2000 01 steering column
2000 01 steering column2000 01 steering column
2000 01 steering column
 
2000 01 hvac
2000 01 hvac2000 01 hvac
2000 01 hvac
 
2000 01 power steering
2000 01 power steering2000 01 power steering
2000 01 power steering
 
2000 01 engine cooling
2000 01 engine cooling2000 01 engine cooling
2000 01 engine cooling
 

Recently uploaded

John Deere 300 3029 4039 4045 6059 6068 Engine Operation and Service Manual
John Deere 300 3029 4039 4045 6059 6068 Engine Operation and Service ManualJohn Deere 300 3029 4039 4045 6059 6068 Engine Operation and Service Manual
John Deere 300 3029 4039 4045 6059 6068 Engine Operation and Service ManualExcavator
 
Hot And Sexy 🥵 Call Girls Delhi Daryaganj {9711199171} Ira Malik High class G...
Hot And Sexy 🥵 Call Girls Delhi Daryaganj {9711199171} Ira Malik High class G...Hot And Sexy 🥵 Call Girls Delhi Daryaganj {9711199171} Ira Malik High class G...
Hot And Sexy 🥵 Call Girls Delhi Daryaganj {9711199171} Ira Malik High class G...shivangimorya083
 
BLUE VEHICLES the kids picture show 2024
BLUE VEHICLES the kids picture show 2024BLUE VEHICLES the kids picture show 2024
BLUE VEHICLES the kids picture show 2024AHOhOops1
 
The 10th anniversary, Hyundai World Rally Team's amazing journey
The 10th anniversary, Hyundai World Rally Team's amazing journeyThe 10th anniversary, Hyundai World Rally Team's amazing journey
The 10th anniversary, Hyundai World Rally Team's amazing journeyHyundai Motor Group
 
John Deere 200lc Excavator Operation And Tests Repair Manual.pdf
John Deere 200lc Excavator Operation And Tests Repair Manual.pdfJohn Deere 200lc Excavator Operation And Tests Repair Manual.pdf
John Deere 200lc Excavator Operation And Tests Repair Manual.pdfExcavator
 
Not Sure About VW EGR Valve Health Look For These Symptoms
Not Sure About VW EGR Valve Health Look For These SymptomsNot Sure About VW EGR Valve Health Look For These Symptoms
Not Sure About VW EGR Valve Health Look For These SymptomsFifth Gear Automotive
 
Alia +91-9537192988-Experience the Unmatchable Pleasure with Model Ahmedabad ...
Alia +91-9537192988-Experience the Unmatchable Pleasure with Model Ahmedabad ...Alia +91-9537192988-Experience the Unmatchable Pleasure with Model Ahmedabad ...
Alia +91-9537192988-Experience the Unmatchable Pleasure with Model Ahmedabad ...Niya Khan
 
VIP Kolkata Call Girl Kasba 👉 8250192130 Available With Room
VIP Kolkata Call Girl Kasba 👉 8250192130  Available With RoomVIP Kolkata Call Girl Kasba 👉 8250192130  Available With Room
VIP Kolkata Call Girl Kasba 👉 8250192130 Available With Roomdivyansh0kumar0
 
2024 WRC Hyundai World Rally Team’s i20 N Rally1 Hybrid
2024 WRC Hyundai World Rally Team’s i20 N Rally1 Hybrid2024 WRC Hyundai World Rally Team’s i20 N Rally1 Hybrid
2024 WRC Hyundai World Rally Team’s i20 N Rally1 HybridHyundai Motor Group
 
Hyundai World Rally Team in action at 2024 WRC
Hyundai World Rally Team in action at 2024 WRCHyundai World Rally Team in action at 2024 WRC
Hyundai World Rally Team in action at 2024 WRCHyundai Motor Group
 
꧁༒☬ 7042364481 (Call Girl) In Dwarka Delhi Escort Service In Delhi Ncr☬༒꧂
꧁༒☬ 7042364481 (Call Girl) In Dwarka Delhi Escort Service In Delhi Ncr☬༒꧂꧁༒☬ 7042364481 (Call Girl) In Dwarka Delhi Escort Service In Delhi Ncr☬༒꧂
꧁༒☬ 7042364481 (Call Girl) In Dwarka Delhi Escort Service In Delhi Ncr☬༒꧂Hot Call Girls In Sector 58 (Noida)
 
UNIT-V-ELECTRIC AND HYBRID VEHICLES.pptx
UNIT-V-ELECTRIC AND HYBRID VEHICLES.pptxUNIT-V-ELECTRIC AND HYBRID VEHICLES.pptx
UNIT-V-ELECTRIC AND HYBRID VEHICLES.pptxDineshKumar4165
 
Beautiful Vip Call Girls Punjabi Bagh 9711199012 Call /Whatsapps
Beautiful Vip  Call Girls Punjabi Bagh 9711199012 Call /WhatsappsBeautiful Vip  Call Girls Punjabi Bagh 9711199012 Call /Whatsapps
Beautiful Vip Call Girls Punjabi Bagh 9711199012 Call /Whatsappssapnasaifi408
 
Crash Vehicle Emergency Rescue Slideshow.ppt
Crash Vehicle Emergency Rescue Slideshow.pptCrash Vehicle Emergency Rescue Slideshow.ppt
Crash Vehicle Emergency Rescue Slideshow.pptVlademirGebDubouzet1
 
定制(UW毕业证书)华盛顿大学毕业证成绩单原版一比一
定制(UW毕业证书)华盛顿大学毕业证成绩单原版一比一定制(UW毕业证书)华盛顿大学毕业证成绩单原版一比一
定制(UW毕业证书)华盛顿大学毕业证成绩单原版一比一ffhuih11ff
 
Russian Call Girls Delhi Indirapuram {9711199171} Aarvi Gupta ✌️Independent ...
Russian  Call Girls Delhi Indirapuram {9711199171} Aarvi Gupta ✌️Independent ...Russian  Call Girls Delhi Indirapuram {9711199171} Aarvi Gupta ✌️Independent ...
Russian Call Girls Delhi Indirapuram {9711199171} Aarvi Gupta ✌️Independent ...shivangimorya083
 
Innovating Manufacturing with CNC Technology
Innovating Manufacturing with CNC TechnologyInnovating Manufacturing with CNC Technology
Innovating Manufacturing with CNC Technologyquickpartslimitlessm
 
Hauz Khas Call Girls ☎ 7042364481 independent Escorts Service in delhi
Hauz Khas Call Girls ☎ 7042364481 independent Escorts Service in delhiHauz Khas Call Girls ☎ 7042364481 independent Escorts Service in delhi
Hauz Khas Call Girls ☎ 7042364481 independent Escorts Service in delhiHot Call Girls In Sector 58 (Noida)
 
UNOSAFE ELEVATOR PRIVATE LTD BANGALORE BROUCHER
UNOSAFE ELEVATOR PRIVATE LTD BANGALORE BROUCHERUNOSAFE ELEVATOR PRIVATE LTD BANGALORE BROUCHER
UNOSAFE ELEVATOR PRIVATE LTD BANGALORE BROUCHERunosafeads
 

Recently uploaded (20)

John Deere 300 3029 4039 4045 6059 6068 Engine Operation and Service Manual
John Deere 300 3029 4039 4045 6059 6068 Engine Operation and Service ManualJohn Deere 300 3029 4039 4045 6059 6068 Engine Operation and Service Manual
John Deere 300 3029 4039 4045 6059 6068 Engine Operation and Service Manual
 
Hot And Sexy 🥵 Call Girls Delhi Daryaganj {9711199171} Ira Malik High class G...
Hot And Sexy 🥵 Call Girls Delhi Daryaganj {9711199171} Ira Malik High class G...Hot And Sexy 🥵 Call Girls Delhi Daryaganj {9711199171} Ira Malik High class G...
Hot And Sexy 🥵 Call Girls Delhi Daryaganj {9711199171} Ira Malik High class G...
 
BLUE VEHICLES the kids picture show 2024
BLUE VEHICLES the kids picture show 2024BLUE VEHICLES the kids picture show 2024
BLUE VEHICLES the kids picture show 2024
 
The 10th anniversary, Hyundai World Rally Team's amazing journey
The 10th anniversary, Hyundai World Rally Team's amazing journeyThe 10th anniversary, Hyundai World Rally Team's amazing journey
The 10th anniversary, Hyundai World Rally Team's amazing journey
 
John Deere 200lc Excavator Operation And Tests Repair Manual.pdf
John Deere 200lc Excavator Operation And Tests Repair Manual.pdfJohn Deere 200lc Excavator Operation And Tests Repair Manual.pdf
John Deere 200lc Excavator Operation And Tests Repair Manual.pdf
 
Not Sure About VW EGR Valve Health Look For These Symptoms
Not Sure About VW EGR Valve Health Look For These SymptomsNot Sure About VW EGR Valve Health Look For These Symptoms
Not Sure About VW EGR Valve Health Look For These Symptoms
 
Alia +91-9537192988-Experience the Unmatchable Pleasure with Model Ahmedabad ...
Alia +91-9537192988-Experience the Unmatchable Pleasure with Model Ahmedabad ...Alia +91-9537192988-Experience the Unmatchable Pleasure with Model Ahmedabad ...
Alia +91-9537192988-Experience the Unmatchable Pleasure with Model Ahmedabad ...
 
VIP Kolkata Call Girl Kasba 👉 8250192130 Available With Room
VIP Kolkata Call Girl Kasba 👉 8250192130  Available With RoomVIP Kolkata Call Girl Kasba 👉 8250192130  Available With Room
VIP Kolkata Call Girl Kasba 👉 8250192130 Available With Room
 
2024 WRC Hyundai World Rally Team’s i20 N Rally1 Hybrid
2024 WRC Hyundai World Rally Team’s i20 N Rally1 Hybrid2024 WRC Hyundai World Rally Team’s i20 N Rally1 Hybrid
2024 WRC Hyundai World Rally Team’s i20 N Rally1 Hybrid
 
Hyundai World Rally Team in action at 2024 WRC
Hyundai World Rally Team in action at 2024 WRCHyundai World Rally Team in action at 2024 WRC
Hyundai World Rally Team in action at 2024 WRC
 
꧁༒☬ 7042364481 (Call Girl) In Dwarka Delhi Escort Service In Delhi Ncr☬༒꧂
꧁༒☬ 7042364481 (Call Girl) In Dwarka Delhi Escort Service In Delhi Ncr☬༒꧂꧁༒☬ 7042364481 (Call Girl) In Dwarka Delhi Escort Service In Delhi Ncr☬༒꧂
꧁༒☬ 7042364481 (Call Girl) In Dwarka Delhi Escort Service In Delhi Ncr☬༒꧂
 
UNIT-V-ELECTRIC AND HYBRID VEHICLES.pptx
UNIT-V-ELECTRIC AND HYBRID VEHICLES.pptxUNIT-V-ELECTRIC AND HYBRID VEHICLES.pptx
UNIT-V-ELECTRIC AND HYBRID VEHICLES.pptx
 
Beautiful Vip Call Girls Punjabi Bagh 9711199012 Call /Whatsapps
Beautiful Vip  Call Girls Punjabi Bagh 9711199012 Call /WhatsappsBeautiful Vip  Call Girls Punjabi Bagh 9711199012 Call /Whatsapps
Beautiful Vip Call Girls Punjabi Bagh 9711199012 Call /Whatsapps
 
Indian Downtown Call Girls # 00971528903066 # Indian Call Girls In Downtown D...
Indian Downtown Call Girls # 00971528903066 # Indian Call Girls In Downtown D...Indian Downtown Call Girls # 00971528903066 # Indian Call Girls In Downtown D...
Indian Downtown Call Girls # 00971528903066 # Indian Call Girls In Downtown D...
 
Crash Vehicle Emergency Rescue Slideshow.ppt
Crash Vehicle Emergency Rescue Slideshow.pptCrash Vehicle Emergency Rescue Slideshow.ppt
Crash Vehicle Emergency Rescue Slideshow.ppt
 
定制(UW毕业证书)华盛顿大学毕业证成绩单原版一比一
定制(UW毕业证书)华盛顿大学毕业证成绩单原版一比一定制(UW毕业证书)华盛顿大学毕业证成绩单原版一比一
定制(UW毕业证书)华盛顿大学毕业证成绩单原版一比一
 
Russian Call Girls Delhi Indirapuram {9711199171} Aarvi Gupta ✌️Independent ...
Russian  Call Girls Delhi Indirapuram {9711199171} Aarvi Gupta ✌️Independent ...Russian  Call Girls Delhi Indirapuram {9711199171} Aarvi Gupta ✌️Independent ...
Russian Call Girls Delhi Indirapuram {9711199171} Aarvi Gupta ✌️Independent ...
 
Innovating Manufacturing with CNC Technology
Innovating Manufacturing with CNC TechnologyInnovating Manufacturing with CNC Technology
Innovating Manufacturing with CNC Technology
 
Hauz Khas Call Girls ☎ 7042364481 independent Escorts Service in delhi
Hauz Khas Call Girls ☎ 7042364481 independent Escorts Service in delhiHauz Khas Call Girls ☎ 7042364481 independent Escorts Service in delhi
Hauz Khas Call Girls ☎ 7042364481 independent Escorts Service in delhi
 
UNOSAFE ELEVATOR PRIVATE LTD BANGALORE BROUCHER
UNOSAFE ELEVATOR PRIVATE LTD BANGALORE BROUCHERUNOSAFE ELEVATOR PRIVATE LTD BANGALORE BROUCHER
UNOSAFE ELEVATOR PRIVATE LTD BANGALORE BROUCHER
 

2.2 l engine

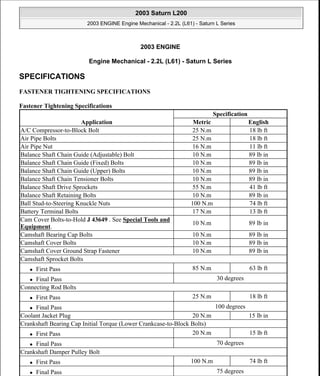
  • 1. 2003 ENGINE Engine Mechanical - 2.2L (L61) - Saturn L Series SPECIFICATIONS FASTENER TIGHTENING SPECIFICATIONS Fastener Tightening Specifications Application Specification Metric English A/C Compressor-to-Block Bolt 25 N.m 18 lb ft Air Pipe Bolts 25 N.m 18 lb ft Air Pipe Nut 16 N.m 11 lb ft Balance Shaft Chain Guide (Adjustable) Bolt 10 N.m 89 lb in Balance Shaft Chain Guide (Fixed) Bolts 10 N.m 89 lb in Balance Shaft Chain Guide (Upper) Bolts 10 N.m 89 lb in Balance Shaft Chain Tensioner Bolts 10 N.m 89 lb in Balance Shaft Drive Sprockets 55 N.m 41 lb ft Balance Shaft Retaining Bolts 10 N.m 89 lb in Ball Stud-to-Steering Knuckle Nuts 100 N.m 74 lb ft Battery Terminal Bolts 17 N.m 13 lb ft Cam Cover Bolts-to-Hold J 43649 . See Special Tools and Equipment. 10 N.m 89 lb in Camshaft Bearing Cap Bolts 10 N.m 89 lb in Camshaft Cover Bolts 10 N.m 89 lb in Camshaft Cover Ground Strap Fastener 10 N.m 89 lb in Camshaft Sprocket Bolts  First Pass 85 N.m 63 lb ft  Final Pass 30 degrees Connecting Rod Bolts  First Pass 25 N.m 18 lb ft  Final Pass 100 degrees Coolant Jacket Plug 20 N.m 15 lb in Crankshaft Bearing Cap Initial Torque (Lower Crankcase-to-Block Bolts)  First Pass 20 N.m 15 lb ft  Final Pass 70 degrees Crankshaft Damper Pulley Bolt  First Pass 100 N.m 74 lb ft  Final Pass 75 degrees 2003 Saturn L200 2003 ENGINE Engine Mechanical - 2.2L (L61) - Saturn L Series 2003 Saturn L200 2003 ENGINE Engine Mechanical - 2.2L (L61) - Saturn L Series steve Monday, May 09, 2011 12:51:59 PM Page 1 © 2006 Mitchell Repair Information Company, LLC. steve Monday, May 09, 2011 12:52:16 PM Page 1 © 2006 Mitchell Repair Information Company, LLC.
  • 2. Crankshaft Position Sensor Bolt 10 N.m 89 lb in Crankshaft Pulley Bolt  First Pass 100 N.m 74 lb ft  Final Pass 75 degrees Cylinder Head Air Bleed Tube Fastener 15 N.m 11 lb in Cylinder Head Bolts  First Pass 30 N.m 22 lb ft  Final Pass 155 degrees Cylinder Head Front Bolts 35 N.m 26 lb ft Cylinder Head Front Chaincase Bolts 20 N.m 15 lb ft Cylinder Head Oil Gallery Plug 35 N.m 26 lb ft Degas Hose Bracket Bolt 10 N.m 89 lb in Drive Belt Tensioner Bolt 45 N.m 33 lb ft EGR Cover Bolts 25 N.m 18 lb ft Engine Coolant Temperature Sensor 20 N.m 15 lb ft Engine Harness Bracket Bolts 10 N.m 89 lb in Engine Mount Bracket-to-Engine Bolts 90 N.m 66 lb ft Engine Mount-to-Body Bolts 55 N.m 41 lb ft Engine Mount-to-Engine Mount Bracket Bolts 55 N.m 41 lb ft Exhaust Manifold Heat Shield Bolts 25 N.m 18 lb ft Exhaust Manifold Pipe-to-Exhaust Manifold Nuts 30 N.m 22 lb ft Exhaust Manifold Pipe-to-Resonator Bolts 20 N.m 15 lb ft Exhaust Manifold Studs-to-Cylinder Head 10 N.m 89 lb in Exhaust Manifold-to-Cylinder Head Nuts 12 N.m 9 lb ft Flywheel Bolt  First Pass 53 N.m 39 lb ft  Final Pass 25 degrees Front Cover-to-Block Bolts 25 N.m 18 lb ft Fuel Line Bolt 10 N.m 89 lb in Fuel Rail Bracket Stud 10 N.m 89 lb in Ignition Coil-to-Camshaft Cover Bolts 8 N.m 71 lb in Intake Camshaft Rear Bearing Cap Bolts 25 N.m 18 lb ft Intake Manifold Studs 6 N.m 56 lb in Intake Manifold-to-Cylinder Head Bolts 10 N.m 89 lb in Intake Manifold-to-Cylinder Head Nuts 10 N.m 89 lb in Intake Manifold-to-Cylinder Head Studs 6 N.m 60 lb in Knock Sensor Bolt 25 N.m 18 lb in Knock Sensor-to-Engine Block Bolt 25 N.m 18 lb ft Lower Crankcase-to-Block Peripheral Bolts 25 N.m 18 lb ft 2003 Saturn L200 2003 ENGINE Engine Mechanical - 2.2L (L61) - Saturn L Series steve Monday, May 09, 2011 12:51:59 PM Page 2 © 2006 Mitchell Repair Information Company, LLC.
  • 3. Lower Engine-to-Transmission Bell Housing Bolts 65 N.m 48 lb ft Oil Drain Plug 25 N.m 18 lb ft Oil Filter Cap 25 N.m 18 lb ft Oil Gallery Plug 35 N.m 26 lb ft Oil Gallery Plug (Rear) 60 N.m 44 lb ft Oil Level Indicator Tube-to-Intake Manifold Bolt 10 N.m 89 lb in Oil Pan-to-Block Bolts 25 N.m 18 lb ft Oil Pressure Switch 10 N.m 89 lb in Oil pump Gerotor Cover Bolts 6 N.m 53 lb in Oil Pump Pressure Relief Valve Plug 40 N.m 3 lb in Oxygen Sensor Bolts 30 N.m 22 lb ft Power Steering Pump Bolts 25 N.m 18 lb ft Shift Control Rod Pinch Bolt  First Pass 12 N.m 9 lb ft  Final Pass 180 degrees Spark Plugs 20 N.m 15 lb ft Stabilizer Link-to-Strut Assembly 65 N.m 50 lb ft Steering Gear-to-Intermediate Shaft Pinch Bolt 30 N.m 22 lb ft Support Plate-to-Engine Block 10 N.m 89 lb in Suspension Support Bolts  First Pass 100 N.m 74 lb ft  Final Pass 45 degrees Thermostat Housing-to-Block Bolts 10 N.m 89 lb in Throttle Body Bolts 10 N.m 89 lb in Throttle Body Nuts 10 N.m 89 lb in Throttle Body Studs-to-Cylinder Head 6 N.m 60 lb in Tie Rod end Linkage Installer 45 N.m 35 lb ft Tie Rod Nut 60 N.m 45 lb ft Timing Chain Guide (Adjustable) Bolt 10 N.m 89 lb in Timing Chain Guide (Fixed) Bolts 10 N.m 89 lb in Timing Chain Guide (Upper) Bolts 10 N.m 89 lb in Timing Chain Guide Bolt Access Hole Plug 40 N.m 30 lb ft Timing Chain Oil Nozzle Bolt 10 N.m 89 lb in Timing Chain Tensioner Bolts 75 N.m 55 lb ft Torque Converter Bolts 75 N.m 55 lb ft Transmission Nose Bracket Bolts 35 N.m 26 lb ft Upper Bell Housing Bolts 65 N.m 48 lb ft Water Pump Bolts 25 N.m 18 lb ft Wheel Bolts (Final Torque) 125 N.m 92 lb ft Wheel Bolts (Initial Torque) 63 N.m 46 lb ft 2003 Saturn L200 2003 ENGINE Engine Mechanical - 2.2L (L61) - Saturn L Series steve Monday, May 09, 2011 12:51:59 PM Page 3 © 2006 Mitchell Repair Information Company, LLC.
  • 4. ENGINE MECHANICAL SPECIFICATIONS Engine Mechanical Specifications Application Specification Metric English General Data  Engine Type Inline 4 Cylinder  Displacement 2.2 L 134 CID  RPO L61  Liter (VIN) F  Bore 85.992-86.008 mm 3.3855-3.3861 in  Compression Ratio 9.5:01 Balance Shaft  Bearing Clearance 0.030-0.063 mm 0.0012-0.0025 in  Bearing Diameter - Inside - Carrier 20.050-20.063 mm 0.7894-0.7899 in  Bearing Diameter - Outside - Carrier 41.975-41.995 mm 1.6526-1.6534 in  Bearing Journal Diameter 20.000-20.020 mm 0.7874-0.7882 in  Bushing Clearance 0.033-0.102 mm 0.0013-0.0040 in  Bushing Diameter - Inside 36.776-36.825 mm 1.4479-1.4498 in  Bushing Journal Diameter 36.723-36.743 mm 1.4458-1.4466 in  End Play 0.100-0.300 mm 0.0020-0.0118 in Block  Balance Shaft Bearing Bore Diameter - Carrier 42.000-42.016 mm 1.6535-1.6542 in  Balance Shaft Bushing Bore Diameter 40.763-40.776 mm 1.6048-1.6054 in  Crankshaft Main Bearing Bore Diameter 64.068-64.082 mm 2.5224-2.5229 in  Cylinder Bore Diameter 85.992-86.008 mm 3.3855-3.3861 in  Cylinder Bore Out-of-Round - Maximum 0.010 mm 0.0004 in  Cylinder Bore Taper - Maximum 0.010 mm 0.0004 in  Cylinder Head Deck Surface Flatness - Transverse 0.030 mm 0.0012 in  Cylinder Head Deck Surface Flatness - Longitude 0.050 mm 0.002 in  Cylinder Head Deck Surface Flatness - Overall 0.08 mm 0.0031 in Camshaft  Camshaft End Play 0.040-0.144 mm 0.0016-0.0057 in  Camshaft Journal Diameter 26.935-26.960 mm 1.0604-1.0614 in  Camshaft Thrust Surface 21.000-21.052 mm 0.8268-0.8252 in 2003 Saturn L200 2003 ENGINE Engine Mechanical - 2.2L (L61) - Saturn L Series steve Monday, May 09, 2011 12:51:59 PM Page 4 © 2006 Mitchell Repair Information Company, LLC.
  • 5. Connecting Rod  Connecting Rod Bearing Clearance 0.029-0.069 mm 0.0011-0.0027 in  Connecting Rod Bore Diameter - Bearing End 52.118-52.134 mm 2.0519-2.05252 in  Connecting Rod Bore Diameter - Pin End 20.007-20.021 mm 0.7877-0.7882 in  Connecting Rod Side Clearance 0.070-0.370 mm 0.0028-0.0146 in  Connecting Rod Straightness - Bend - Maximum 0.021 mm 0.0083 in  Connecting Rod Straightness - Twist - Maximum 0.04 mm 0.0157 in Crankshaft  Connecting Rod Journal Diameter 49.000-49.014 mm 1.9291-1.9297 in  Crankshaft End Play 0.050-0.380 mm 0.0012-0.0150 in  Crankshaft Main Bearing Clearance 0.031-0.067 mm 0.0012-0.0026 in  Crankshaft Main Journal Diameter 55.994-56.008 mm 2.2045-2.2050 in Cylinder Head  Surface Flatness - Block Deck - Transverse 0.030 mm 0.0012 in  Surface Flatness - Block Deck - Longitude 0.050 mm 0.002 in  Surface Flatness - Block Deck - Overall 0.1 mm 0.004 in  Valve Guide Bore - Exhaust 6.000-6.012 mm 0.2362-0.2367 in  Valve Guide Bore - Intake 6.000-6.012 mm 0.2362-0.2367 in  Valve Lifter Bore Diameter - Stationary Lash Adjusters 12.013-12.037 mm 0.4730-0.4739 in Lubrication System  Oil Pressure - Minimum - @1000 RPM 344.75-551.60 kPa 50-80 psi Piston Rings  Piston Ring End Gap - First Compression Ring 0.20-0.40 mm 0.008-0.016 in  Piston Ring End Gap - Second Compression Ring 0.35-0.55 mm 0.014-0.022 in  Piston Ring End Gap - Oil Control Ring - Rails 0.25-0.76 mm 0.010-0.030 in  Piston Ring to Groove Clearance - First Compression Ring 0.04-0.08 mm 0.0015-0.0031 in  Piston Ring to Groove Clearance - Second Compression Ring 0.030-0.069 mm 0.0012-0.0027 in  Piston Ring to Groove Clearance - Oil Control Ring 0.090-0.106 mm 0.0035-0.0042 in  Piston Ring Thickness - First Compression Ring 1.170-1.190 mm 0.0461-0.0469 in  Piston Ring Thickness - Second Compression Ring 1.471-1.490 mm 0.0579-0.0587 in  Piston Ring Thickness - Oil Control Ring - Rail - Maximum 0.43 mm 0.0169 in 2003 Saturn L200 2003 ENGINE Engine Mechanical - 2.2L (L61) - Saturn L Series steve Monday, May 09, 2011 12:51:59 PM Page 5 © 2006 Mitchell Repair Information Company, LLC.
  • 6. SEALERS, ADHESIVES, AND LUBRICANTS Sealers, Adhesives, and Lubricants  Piston Ring Thickness - Oil Control Ring - Spacer 1.574-1.651 mm 0.0620-0.0650 in Pistons and Pins  Piston - Piston Diameter - @14.5 mm up 85.967-85.982 mm 3.3845-3.3851 in  Piston - Piston Pin Bore Diameter 20.002-20.007 mm 0.07875-0.7877 in  Piston - Piston Ring Grove Width - Top 1.23-1.25 mm 0.0484-0.0492 in  Piston - Piston Ring Grove Width - Second 1.52-1.54 mm 0.0598-0.0606 in  Piston - Piston Ring Grove Width - Oil Control 2.52-2.54 mm 0.0992-0.1000 in  Piston - Piston To Bore Clearance 0.010-0.041 mm 0.0004-0.0016 in  Pin - Piston Pin Clearance to Connecting Rod Bore 0.007-0.026 mm 0.0003-0.0010 in  Pin - Piston Pin Clearance to Piston Pin Bore 0.002-0.012 mm 0.0001-0.0005 in  Pin - Piston Pin Diameter 19.995-20.000 mm 0.7872-0.7874 in  Pin - Piston Pin End Play 0.19-1.16 mm 0.0075-0.0461 in Valve System  Valves - Valve Face Runout - Maximum 0.04 mm 0.0016 in  Valves - Valve Seat Runout - Maximum 0.05 mm 0.0020 in  Valves - Valve Stem Diameter - Intake 5.955-5.970 mm 0.2344-0.2355 in  Valves - Valve Stem Diameter - Exhaust 5.935-5.950 mm 0.2337-0.2343 in  Valves - Valve Stem to Guide Clearance - Intake 0.030-0.057 mm 0.0012-0.0022 in  Valves - Valve Stem to Guide Clearance - Exhaust 0.050-0.077 mm 0.0020-0.0026 in  Valve Lifters - Valve Lifter Diameter - Stationary Lash Adjuster 11.986-12.000 mm 0.0005-0.0020 in  Valve Lifters - Valve Lifter-to-Bore Clearance - Stationary Lash Adjuster 0.013-0.051 mm 3.2210-3.2299 in  Valve Springs - Valve Spring Load - Closed - @32.5 mm 245.0-271.0 N. - Eng Spec.  Valve Springs - Valve Spring Load - Open - @32.5 mm 525.0-575.0 N. - Eng Spec. Application Type of Material Part Number # 6 Intake Rear Camshaft Cap Sealant Permatex® Anaerobic Gasket Maker 51813 Balance Shaft Lobes Lubricant 5 W 30 or equivalent Cam Lobes Lubricant Engine Oil Supplement Connecting Rod Bearings Lubricant 5 W 30 or equivalent 2003 Saturn L200 2003 ENGINE Engine Mechanical - 2.2L (L61) - Saturn L Series steve Monday, May 09, 2011 12:51:59 PM Page 6 © 2006 Mitchell Repair Information Company, LLC.
  • 7. THREAD REPAIR SPECIFICATIONS Engine Block - Front View Crank Sensor O-ring Engine Oil 5 W 30 or equivalent Crankshaft Main Bearings Lubricant 5 W 30 or equivalent Cylinder Bore Lubricant 5 W 30 or equivalent Cylinder Head Plugs Threadlocker 21485277 Dipstick Tube O-rings Lubricant Engine Oil Supplement Engine Block Threaded Plugs Sealant 21485278 Engine Block To Bed Plate Sealant 21019581 Engine Oil 5 quarts 5 W 30 or equivalent Engine Oil Level Indicator Tube O-ring Lubricant Engine Oil Supplement Fuel Injector O-rings Engine Oil 5 W 30 or equivalent Fuel Injector Tip Insulators Engine Oil 5 W 30 or equivalent Intake and Exhaust Valve Stems Lubricant Engine Oil Supplement Oil Filter Cap (Threads and O-ring Lead-in Chamfers) Engine Oil 5 W 30 or equivalent Oil Pan to Bedplate Joint Sealant 21019581 Oil Pump - Pump Elements Engine Oil 5 W 30 or equivalent Oxygen Sensor Threads Antiseize 12397953 Piston Pins Lubricant 5 W 30 or equivalent Stationary Hydraulic Lash Adjusters Lubricant Engine Oil Supplement Timing Chain Guide Bolt Access Hole Plug Threadlocker 21485277 Valve Rocker Arm / Valve Tip Lubricant Engine Oil Supplement Water Feed Tube O-rings Lubricant Silicone Gel Lubricant Water Pump Drain Plug Sealant 21485278 2003 Saturn L200 2003 ENGINE Engine Mechanical - 2.2L (L61) - Saturn L Series steve Monday, May 09, 2011 12:51:59 PM Page 7 © 2006 Mitchell Repair Information Company, LLC.
  • 8. Fig. 1: Engine Block - Front View Courtesy of GENERAL MOTORS CORP. Engine Block - Front View Service Call Out Thread Size Insert Drill Counterbore Tool Tap Driver Drill Depth (Maximum) Tap Depth (Maximum) Engineering Hole Number J 42385- MM (IN) MM (IN) - 1 M10 x 1.5 215 211 212 213 214 24.5 0.96 19.5 0.77 117 2 M8 x 1.25 210 206 207 208 209 23.5 0.93 18.5 0.73 109 3 M12 x 1.75 855 856 857 858 859 33.5 1.32 26.5 1.04 114 4 M8 x 1.25 210 206 207 208 209 23.5 0.93 18.5 0.73 110 5 M6 x 1 205 201 202 203 204 20 0.787 16 0.63 129 6 M6 x 1 205 201 202 203 204 20 0.787 16 0.63 130 7 M6 x 1 205 201 202 203 204 20 0.787 16 0.63 125 8 M6 x 1 205 201 202 203 204 20 0.787 16 0.63 126 9 M8 x 1.25 210 206 207 208 209 25.5 1.00 THRU 111 10 M6 x 1 205 201 202 203 204 20 0.787 16 0.63 127 11 M6 x 1 205 201 202 203 204 20 0.787 16 0.63 122 12 M6 x 1 205 201 202 203 204 20 0.787 16 0.63 128 13 M6 x 1 205 201 202 203 204 20 0.787 16 0.63 124 2003 Saturn L200 2003 ENGINE Engine Mechanical - 2.2L (L61) - Saturn L Series steve Monday, May 09, 2011 12:51:59 PM Page 8 © 2006 Mitchell Repair Information Company, LLC.
  • 9. Engine Block - Back View Fig. 2: Engine Block - Back View Courtesy of GENERAL MOTORS CORP. Engine Block - Back View 14 M6 x 1 205 201 202 203 204 20 0.787 16 0.63 123 15 M6 x 1 205 201 202 203 204 20 0.787 16 0.63 131 16 M6 x 1 205 201 202 203 204 20 0.787 16 0.63 119 17 M6 x 1 205 201 202 203 204 20 0.787 16 0.63 120 18 M8 x 1.25 210 206 207 208 209 23.5 0.93 18.5 0.73 106 19 M8 x 1.25 210 206 207 208 209 55 2.17 THRU 112 20 M8 x 1.25 210 206 207 208 209 23.5 0.93 18.5 0.73 108 21 M12 x 1.75 855 856 857 858 859 33.5 1.32 26.5 1.04 116 22 M12 x 1.75 855 856 857 858 859 33.5 1.32 26.5 1.04 115 Service Call Out Thread Size Insert Drill Counterbore Tool Tap Driver Drill Depth (Maximum) Tap Depth (Maximum) Engineering Hole Number J 42385- MM (IN) MM (IN) - M12 x 2003 Saturn L200 2003 ENGINE Engine Mechanical - 2.2L (L61) - Saturn L Series steve Monday, May 09, 2011 12:51:59 PM Page 9 © 2006 Mitchell Repair Information Company, LLC.
  • 10. Engine Block - Left Side View Fig. 3: Engine Block - Left Side View Courtesy of GENERAL MOTORS CORP. Engine Block - Left Side View 1 1.75 855 856 857 858 859 39 1.535 33.5 1.32 204 2 M16 x 1.5 860 861 862 863 864 21 0.827 15 0.59 214 3 M10 x 1.5 215 211 212 213 214 29 1.161 THRU 206 4 M8 x 1.25 210 206 207 208 209 18 0.709 THRU 209 5 M8 x 1.25 854 No Flange 206 207 208 209 18 0.709 THRU 208 6 M16 x 1.5 860 861 862 863 864 21 0.827 15 0.59 213 7 M12 x 1.75 855 856 857 858 859 39 1.535 33.5 1.32 203 Service Call Out Thread Size Insert Drill Counterbore Tool Tap Driver Drill Depth (Maximum) Tap Depth (Maximum) Engineering Hole Number J 42385- MM (IN) MM (IN) - 1 M12 x 1.75 865 856 857 858 859 19.50 0.768 12.5 0.49 515 2003 Saturn L200 2003 ENGINE Engine Mechanical - 2.2L (L61) - Saturn L Series steve Monday, May 09, 2011 12:51:59 PM Page 10 © 2006 Mitchell Repair Information Company, LLC.
  • 11. Engine Block - Bottom View Fig. 4: Engine Block - Bottom View Courtesy of GENERAL MOTORS CORP. Engine Block - Bottom View 2 M6 x 1.0 205 201 202 203 204 - - - - - 3 M12 x 1.75 865 856 857 858 859 19.50 0.768 12.5 0.49 514 4 M10 x 1.5 215 211 212 213 214 23.50 0.925 18.5 0.73 521 5 M10 x 1.5 215 211 212 213 214 23.50 0.925 18.5 0.73 519 6 M6 x 1.0 205 201 202 203 204 20.50 0.807 16.0 0.63 513 7 M6 x 1.0 205 201 202 203 204 20.50 0.807 16.0 0.63 512 8 M6 x 1.0 205 201 202 203 204 20.50 0.807 16.0 0.63 511 9 M6 x 1.0 205 201 202 203 204 - - - - - 10 M12 x 1.75 865 856 857 858 859 19.50 0.768 12.5 0.49 516 2003 Saturn L200 2003 ENGINE Engine Mechanical - 2.2L (L61) - Saturn L Series steve Monday, May 09, 2011 12:51:59 PM Page 11 © 2006 Mitchell Repair Information Company, LLC.
  • 12. Engine Block - Right Side View Service Call Out Thread Size Insert Drill Counterbore Tool Tap Driver Drill Depth (Maximum) Tap Depth (Maximum) Engineering Hole Number J 42385- MM (IN) MM (IN) - 1 M10 x 1.5 514 511 N/A 512 513 60 2.362 53.5 2.11 1415 2 M10 x 1.5 514 511 N/A 512 513 60 2.362 53.5 2.11 1408 3 M8 x 1.25 210 206 207 208 209 28 1.102 22 0.87 1425 4 M10 x 1.5 514 511 N/A 512 513 60 2.362 53.5 2.11 1416 5 M10 x 1.5 514 511 N/A 512 513 60 2.362 53.5 2.11 1409 6 M8 x 1.25 210 206 207 208 209 28 1.102 22 0.87 1426 7 M8 x 1.25 210 206 207 208 209 28 1.102 22 0.87 1432 8 M10 x 1.5 514 511 N/A 512 513 60 2.362 53.5 2.11 1404 9 M10 x 1.5 514 511 N/A 512 513 60 2.362 53.5 2.11 1417 10 M10 x 1.5 514 511 N/A 512 513 60 2.362 53.5 2.11 1422 11 M10 x 1.5 514 511 N/A 512 513 60 2.362 53.5 2.11 1406 12 M8 x 1.25 210 206 207 208 209 28 1.102 22 0.87 1431 13 M8 x 1.25 210 206 207 208 209 28 1.102 22 0.87 1430 14 M10 x 1.5 514 511 N/A 512 513 60 2.362 53.5 2.11 1412 15 M10 x 1.5 514 511 N/A 512 513 60 2.362 53.5 2.11 1421 16 M8 x 1.25 210 206 207 208 209 28 1.102 22 0.87 1429 17 M10 x 1.5 514 511 N/A 512 513 60 2.362 53.5 2.11 1411 18 M10 x 1.5 514 511 N/A 512 513 60 2.362 53.5 2.11 1420 19 M8 x 1.25 210 206 207 208 209 28 1.102 22 0.87 1428 20 M10 x 1.5 514 511 N/A 512 513 60 2.362 53.5 2.11 1410 21 M10 x 1.5 514 511 N/A 512 513 60 2.362 53.5 2.11 1419 22 M8 x 1.25 210 206 207 208 209 28 1.102 22 0.87 1427 23 M10 x 1.5 514 511 N/A 512 513 60 2.362 53.5 2.11 1405 24 M10 x 1.5 514 511 N/A 512 513 60 2.362 53.5 2.11 1418 25 M10 x 1.5 514 511 N/A 512 513 60 2.362 53.5 2.11 1413 26 M10 x 1.5 514 511 N/A 512 513 60 2.362 53.5 2.11 1403 27 M8 x 1.25 210 206 207 208 209 28 1.102 22 0.87 1423 28 M10 x 1.5 514 511 N/A 512 513 60 2.362 53.5 2.11 1414 29 M10 x 1.5 514 511 N/A 512 513 60 2.362 53.5 2.11 1407 30 M8 x 1.25 210 206 207 208 209 28 1.102 22 0.87 1424 2003 Saturn L200 2003 ENGINE Engine Mechanical - 2.2L (L61) - Saturn L Series steve Monday, May 09, 2011 12:51:59 PM Page 12 © 2006 Mitchell Repair Information Company, LLC.
  • 13. Fig. 5: Engine Block - Right Side View Courtesy of GENERAL MOTORS CORP. Engine Block - Right Side View Service Call Out Thread Size Insert Drill Counterbore Tool Tap Driver Drill Depth (Maximum) Tap Depth (Maximum) Engineering Hole Number J 42385- MM (IN) MM (IN) - 1 M12 x 1.75 865 856 857 858 859 19.50 0.778 12.5 0.49 613 2 M12 x 1.75 865 856 857 858 859 19.50 0.778 12.5 0.49 612 3 M6 x 1.0 205 201 202 203 204 20.50 0.807 16.5 .065 610 4 M12 x 1.75 865 856 857 858 859 15.50 0.610 12.5 0.49 606 5 M8 x 1.25 210 206 207 208 209 23.50 0.925 18.0 0.71 609 6 M8 x 1.25 210 206 207 208 209 23.50 0.925 18.0 0.71 608 7 M8 x 1.25 210 206 207 208 209 23.50 0.925 18.0 0.71 607 8 M12 x 1.75 855 856 857 858 859 33.50 1.319 26.5 1.04 617 9 M8 x 1.25 210 206 207 208 209 30.50 1.201 22.5 0.89 604 10 M8 x 1.25 210 206 207 208 209 30.50 1.201 22.5 0.89 605 11 M8 x 1.25 210 206 207 208 209 30.50 1.201 22.5 0.89 603 12 M8 x 1.25 210 206 207 208 209 30.50 1.201 22.5 0.89 601 2003 Saturn L200 2003 ENGINE Engine Mechanical - 2.2L (L61) - Saturn L Series steve Monday, May 09, 2011 12:51:59 PM Page 13 © 2006 Mitchell Repair Information Company, LLC.
  • 14. Engine Block - Top View Fig. 6: Engine Block - Top View Courtesy of GENERAL MOTORS CORP. Engine Block - Top View 13 M8 x 1.25 210 206 207 208 209 30.50 1.201 22.5 0.89 602 14 M12 x 1.75 855 856 857 858 859 33.50 1.319 26.5 1.04 616 15 M12 x 1.75 865 856 857 858 859 19.50 0.778 12.5 0.49 614 Service Call Out Thread Size Insert Drill Counterbore Tool Tap Driver Drill Depth (Maximum) Tap Depth (Maximum) Engineering Hole Number J 42385- MM (IN) MM (IN) - 1 M11 x 1.5 507 504 N/A 505 506 113.30 4.461 107.3 4.22 308 2003 Saturn L200 2003 ENGINE Engine Mechanical - 2.2L (L61) - Saturn L Series steve Monday, May 09, 2011 12:51:59 PM Page 14 © 2006 Mitchell Repair Information Company, LLC.
  • 15. Lower Crankcase - Front View Fig. 7: Identifying Front Lower Crankcase Thread Sizes Courtesy of GENERAL MOTORS CORP. Lower Crankcase - Front View 2 M12 x 1.75 865 856 857 858 859 13.50 0.531 12.5 0.49 317 3 M11 x 1.5 507 504 N/A 505 506 113.30 4.461 107.3 4.22 309 4 M11 x 1.5 507 504 N/A 505 506 113.30 4.461 107.3 4.22 310 5 M11 x 1.5 507 504 N/A 505 506 113.30 4.461 107.3 4.22 302 6 M11 x 1.5 507 504 N/A 505 506 113.30 4.461 107.3 4.22 305 7 M11 x 1.5 507 504 N/A 505 506 113.30 4.461 107.3 4.22 304 8 M11 x 1.5 507 504 N/A 505 506 113.30 4.461 107.3 4.22 303 9 M11 x 1.5 507 504 N/A 505 506 113.30 4.461 107.3 4.22 301 10 M8 x 1.25 210 206 207 208 209 23.50 0.925 18.5 0.73 313 11 M8 x 1.25 210 206 207 208 209 23.50 0.925 18.5 0.73 311 12 M8 x 1.25 210 206 207 208 209 23.50 0.925 18.5 0.73 312 13 M11 x 1.5 507 504 N/A 505 506 113.30 4.461 107.3 4.22 306 14 M8 x 1.25 210 206 207 208 209 23.50 0.925 18.5 0.73 314 15 M11 x 1.5 507 504 N/A 505 506 113.30 4.461 107.3 4.22 307 16 M12 x 1.75 865 856 857 858 859 13.50 0.531 12.5 0.49 316 Service Call Out Thread Size Insert Drill Counterbore Tool Tap Driver Drill Depth (Maximum) Tap Depth (Maximum) Engineering Hole Number J 42385- MM (IN) MM (IN) - 1 M8 x 1.25 210 206 207 208 209 23.50 0.925 18.5 0.73 138 2 M8 x 1.25 210 206 207 208 209 30.50 1.201 25.5 1.00 139 2003 Saturn L200 2003 ENGINE Engine Mechanical - 2.2L (L61) - Saturn L Series steve Monday, May 09, 2011 12:51:59 PM Page 15 © 2006 Mitchell Repair Information Company, LLC.
  • 16. Lower Crankcase - Back View Fig. 8: Identifying Rear Lower Crankcase Thread Sizes Courtesy of GENERAL MOTORS CORP. Lower Crankcase - Back View Lower Crankcase - Bottom View 3 M8 x 1.25 210 206 207 208 209 30.50 1.201 25.5 1.00 140 4 M8 x 1.25 210 206 207 208 209 23.50 0.925 18.5 0.73 141 Service Call Out Thread Size Insert Drill Counterbore Tool Tap Driver Drill Depth (Maximum) Tap Depth (Maximum) Engineering Hole Number J 42385- MM (IN) MM (IN) - 1 M10 x 1.5 215 211 212 213 214 29.50 1.161 THRU 207 2003 Saturn L200 2003 ENGINE Engine Mechanical - 2.2L (L61) - Saturn L Series steve Monday, May 09, 2011 12:51:59 PM Page 16 © 2006 Mitchell Repair Information Company, LLC.
  • 17. Fig. 9: Identifying Lower Bottom Crankcase Thread Sizes Courtesy of GENERAL MOTORS CORP. Lower Crankcase - Bottom View Service Call Out Thread Size Insert Drill Counterbore Tool Tap Driver Drill Depth (Maximum) Tap Depth (Maximum) Engineering Hole Number J 42385- MM (IN) MM (IN) - 1 M8 x 1.25 210 206 207 208 209 23.50 0.925 18.5 0.73 415 2 M8 x 1.25 210 206 207 208 209 23.50 0.925 18.5 0.73 416 3 M8 x 1.25 210 206 207 208 209 23.50 0.925 18.5 0.73 417 4 M8 x 1.25 210 206 207 208 209 23.50 0.925 18.5 0.73 418 5 M8 x 1.25 210 206 207 208 209 23.50 0.925 18.5 0.73 419 6 M8 x 1.25 210 206 207 208 209 23.50 0.925 18.5 0.73 405 7 M8 x 1.25 210 206 207 208 209 23.50 0.925 18.5 0.73 406 8 M8 x 1.25 210 206 207 208 209 23.50 0.925 18.5 0.73 407 9 M8 x 1.25 210 206 207 208 209 23.50 0.925 18.5 0.73 408 10 M8 x 1.25 210 206 207 208 209 23.50 0.925 18.5 0.73 409 11 M8 x 1.25 210 206 207 208 209 23.50 0.925 18.5 0.73 410 2003 Saturn L200 2003 ENGINE Engine Mechanical - 2.2L (L61) - Saturn L Series steve Monday, May 09, 2011 12:52:00 PM Page 17 © 2006 Mitchell Repair Information Company, LLC.
  • 18. Lower Crankcase - Left View Fig. 10: Identifying Lower Left Crankcase Thread Sizes Courtesy of GENERAL MOTORS CORP. Lower Crankcase - Left View Lower Crankcase - Right View 12 M8 x 1.25 210 206 207 208 209 23.50 0.925 18.5 0.73 411 13 M8 x 1.25 210 206 207 208 209 23.50 0.925 18.5 0.73 412 14 M8 x 1.25 210 206 207 208 209 23.50 0.925 18.5 0.73 413 15 M8 x 1.25 210 206 207 208 209 23.50 0.925 18.5 0.73 414 Service Call Out Thread Size Insert Drill Counterbore Tool Tap Driver Drill Depth (Maximum) Tap Depth (Maximum) Engineering Hole Number J 42385- MM (IN) MM (IN) - 1 M10 x 1.5 215 211 212 213 214 28.50 1.122 22.5 0.89 518 2 M10 x 1.5 215 211 212 213 214 28.50 1.122 22.5 0.89 517 3 M10 x 1.5 215 211 212 213 214 28.50 1.122 22.5 0.89 520 2003 Saturn L200 2003 ENGINE Engine Mechanical - 2.2L (L61) - Saturn L Series steve Monday, May 09, 2011 12:52:00 PM Page 18 © 2006 Mitchell Repair Information Company, LLC.
  • 19. Fig. 11: Identifying Lower Right Crankcase Thread Sizes Courtesy of GENERAL MOTORS CORP. Lower Crankcase - Right View Cylinder Head - Top View Service Call Out Thread Size Insert Drill Counterbore Tool Tap Driver Drill Depth (Maximum) Tap Depth (Maximum) Engineering Hole Number J 42385- MM (IN) MM (IN) - 1 M8 x 1.25 210 211 212 213 214 30.50 1.201 22.5 0.886 615 2003 Saturn L200 2003 ENGINE Engine Mechanical - 2.2L (L61) - Saturn L Series steve Monday, May 09, 2011 12:52:00 PM Page 19 © 2006 Mitchell Repair Information Company, LLC.
  • 20. Fig. 12: Cylinder Head - Top View Courtesy of GENERAL MOTORS CORP. Cylinder Head - Top View Service Call Out Thread Size Insert Drill Counterbore Tool Tap Driver Drill Depth (Maximum) Tap Depth (Maximum) Engineering Hole Number J 42385- MM (IN) MM (IN) - 1 M6 x 1.0 205 852 N/A 203 204 24 0.945 20 0.787 2515 2 M6 x 1.0 205 852 N/A 203 204 24 0.945 20 0.787 2514 3 M6 x 1.0 205 201 202 203 204 20 0.787 16 0.630 2812 4 M6 x 1.0 205 201 202 203 204 20 0.787 16 0.630 2820 5 M6 x 1.0 205 201 202 203 204 20 0.787 16 0.630 2710 6 M6 x 1.0 205 852 N/A 203 204 24 0.945 20 0.787 2513 7 M6 x 1.0 205 852 N/A 203 204 24 0.945 20 0.787 2512 8 M8 x 1.25 854 No Flange 206 207 208 209 THRU THRU 2980 9 M6 x 1.0 205 201 202 203 204 20 0.787 16 0.630 2811 10 M6 x 1.0 205 201 202 203 204 20 0.787 16 0.630 2810 11 M6 x 1.0 205 852 N/A 203 204 24 0.945 20 0.787 2510 12 M6 x 1.0 205 852 N/A 203 204 24 0.945 20 0.787 2511 13 M6 x 1.0 205 201 202 203 204 16 0.630 THRU 2910 14 M6 x 1.0 205 201 202 203 204 16 0.630 THRU 2911 2003 Saturn L200 2003 ENGINE Engine Mechanical - 2.2L (L61) - Saturn L Series steve Monday, May 09, 2011 12:52:00 PM Page 20 © 2006 Mitchell Repair Information Company, LLC.
  • 21. Cylinder Head - Intake Manifold Deck View 15 M6 x 1.0 205 852 N/A 203 204 24 0.945 20 0.787 2520 16 M6 x 1.0 205 852 N/A 203 204 24 0.945 20 0.787 2521 17 M6 x 1.0 205 201 202 203 204 20 0.787 16 0.630 2815 18 M6 x 1.0 205 201 202 203 204 20 0.787 16 0.630 2816 19 M6 x 1.0 205 852 N/A 203 204 24 0.945 20 0.787 2523 20 M6 x 1.0 205 852 N/A 203 204 24 0.945 20 0.787 2522 21 M6 x 1.0 205 201 202 203 204 20 0.787 16 0.630 2817 22 M6 x 1.0 205 852 N/A 203 204 24 0.945 20 0.787 2525 23 M6 x 1.0 205 852 N/A 203 204 24 0.945 20 0.787 2524 24 M6 x 1.0 205 201 202 203 204 20 0.787 16 0.630 2821 25 M6 x 1.0 205 852 N/A 203 204 24 0.945 20 0.787 2527 26 M6 x 1.0 205 852 N/A 203 204 24 0.945 20 0.787 2526 27 M6 x 1.0 205 201 202 203 204 20 0.787 16 0.630 2818 28 M6 x 1.0 205 201 202 203 204 20 0.787 16 0.630 2822 29 M6 x 1.0 205 852 N/A 203 204 24 0.945 20 0.787 2529 30 M6 x 1.0 205 852 N/A 203 204 24 0.945 20 0.787 2528 31 M6 x 1.0 205 201 202 203 204 20 0.787 16 0.630 2819 32 M6 x 1.0 205 201 202 203 204 20 0.787 16 0.630 2823 33 M8 x 1.25 210 206 207 208 209 25 0.984 20 0.787 2621 34 M8 x 1.25 210 206 207 208 209 25 0.984 20 0.787 2622 35 M8 x 1.25 854 No Flange 853 N/A 208 209 25 0.984 20 0.787 2541 36 M8 x 1.25 854 No Flange 853 N/A 208 209 25 0.984 20 0.787 2540 37 M6 x 1.0 210 206 207 208 209 20 0.787 16 0.630 2814 38 M6 x 1.0 205 852 N/A 203 204 24 0.945 20 0.787 2519 39 M6 x 1.0 205 852 N/A 203 204 24 0.945 20 0.787 2518 40 M6 x 1.0 210 206 207 208 209 20 0.787 16 0.630 2711 41 M6 x 1.0 210 206 207 208 209 20 0.787 16 0.630 2813 42 M6 x 1.0 205 852 N/A 203 204 24 0.945 20 0.787 2517 43 M6 x 1.0 205 852 N/A 203 204 24 0.945 20 0.787 2516 2003 Saturn L200 2003 ENGINE Engine Mechanical - 2.2L (L61) - Saturn L Series steve Monday, May 09, 2011 12:52:00 PM Page 21 © 2006 Mitchell Repair Information Company, LLC.
  • 22. Fig. 13: Cylinder Head - Intake Manifold Deck View Courtesy of GENERAL MOTORS CORP. Cylinder Head - Intake Manifold Deck View Cylinder Head - Exhaust Manifold Deck View Service Call Out Thread Size Insert Drill Counterbore Tool Tap Driver Drill Depth (Maximum) Tap Depth (Maximum) Engineering Hole Number J 42385- MM (IN) MM (IN) - 1 M6 x 1.0 205 201 202 203 204 20 0.787 16 0.630 4117 2 M6 x 1.0 205 201 202 203 204 20 0.787 16 0.630 4116 3 M6 x 1.0 205 201 202 203 204 20 0.787 16 0.630 4115 4 M6 x 1.0 205 201 202 203 204 20 0.787 16 0.630 4114 5 M6 x 1.0 205 201 202 203 204 20 0.787 16 0.630 4113 6 M6 x 1.0 205 201 202 203 204 20 0.787 16 0.630 4112 7 M6 x 1.0 205 201 202 203 204 20 0.787 16 0.630 4111 8 M6 x 1.0 205 201 202 203 204 20 0.787 16 0.630 4110 9 M6 x 1.0 205 201 202 203 204 20 0.787 16 0.630 4118 2003 Saturn L200 2003 ENGINE Engine Mechanical - 2.2L (L61) - Saturn L Series steve Monday, May 09, 2011 12:52:00 PM Page 22 © 2006 Mitchell Repair Information Company, LLC.
  • 23. Fig. 14: Cylinder Head - Exhaust Manifold Deck View Courtesy of GENERAL MOTORS CORP. Cylinder Head - Exhaust Manifold Deck View Cylinder Head - Front View Service Call Out Thread Size Insert Drill Counterbore Tool Tap Driver Drill Depth (Maximum) Tap Depth (Maximum) Engineering Hole Number J 42385- MM (IN) MM (IN) - 1 M8 x 1.25 210 206 207 208 209 25 0.984 20 0.78 3118 2 M8 x 1.25 210 206 207 208 209 25 0.984 20 0.78 3119 3 M8 x 1.25 210 206 207 208 209 25 0.984 20 0.78 3210 4 M27 x 2.0 N/A N/A N/A N/A N/A THRU 12 0.78 3810 5 M8 x 1.25 210 206 207 208 209 25 0.984 20 0.78 3110 6 M8 x 1.25 210 206 207 208 209 25 0.984 20 0.78 3111 7 M8 x 1.25 210 206 207 208 209 25 0.984 20 0.78 3112 8 M8 x 1.25 210 206 207 208 209 25 0.984 20 0.78 3113 9 M8 x 1.25 210 206 207 208 209 25 0.984 20 0.78 3114 10 M8 x 1.25 210 206 207 208 209 25 0.984 20 0.78 3115 11 M6 x 1.0 205 201 202 203 204 20 0.78 16 0.630 3310 12 M8 x 1.25 210 206 207 208 209 25 0.984 20 0.78 3116 13 M8 x 1.25 210 206 207 208 209 25 0.984 20 0.78 3610 14 M8 x 1.25 210 206 207 208 209 25 0.984 20 0.78 3117 2003 Saturn L200 2003 ENGINE Engine Mechanical - 2.2L (L61) - Saturn L Series steve Monday, May 09, 2011 12:52:00 PM Page 23 © 2006 Mitchell Repair Information Company, LLC.
  • 24. Fig. 15: Cylinder Head - Front View Courtesy of GENERAL MOTORS CORP. Cylinder Head - Front View Cylinder Head - Back View Service Call Out Thread Size Insert Drill Counterbore Tool Tap Driver Drill Depth (Maximum) Tap Depth (Maximum) Engineering Hole Number J 42385- MM (IN) MM (IN) - 1 M8 x 1.25 210 206 207 208 209 25 0.984 20 0.787 6310 2 M6 x 1.0 205 201 202 203 204 20 0.787 16 0.630 6210 2003 Saturn L200 2003 ENGINE Engine Mechanical - 2.2L (L61) - Saturn L Series steve Monday, May 09, 2011 12:52:00 PM Page 24 © 2006 Mitchell Repair Information Company, LLC.
  • 25. Fig. 16: Cylinder Head - Back View Courtesy of GENERAL MOTORS CORP. Cylinder Head - Back View Service Call Out Thread Size Insert Drill Counterbore Tool Tap Driver Drill Depth (Maximum) Tap Depth (Maximum) Engineering Hole Number J 42385- MM (IN) MM (IN) - 1 M12 x 1.75 865 856 857 858 859 17 0.670 14 0.551 5011 2 M12 x 1.75 865 856 857 858 859 17 0.670 14 0.551 5010 3 M8 x 1.25 210 206 207 208 209 25 0.984 20 0.787 5031 4 M8 x 1.25 210 206 207 208 209 25 0.984 20 0.787 5030 5 M12 x 1.75 865 856 857 858 859 17 0.670 14 0.551 5310 6 M12 x 1.75 865 856 857 858 859 17 0.670 14 0.551 5020 7 M8 x 1.25 210 206 207 208 209 25 0.984 THRU 5111 8 M8 x 1.25 854 No Flange 206 207 208 209 25 0.984 THRU 5110 2003 Saturn L200 2003 ENGINE Engine Mechanical - 2.2L (L61) - Saturn L Series steve Monday, May 09, 2011 12:52:00 PM Page 25 © 2006 Mitchell Repair Information Company, LLC.
  • 26. Note: 1, 2, 5, 6 holes are oil passages. Cylinder Head - Bottom View Fig. 17: Cylinder Head - Bottom View Courtesy of GENERAL MOTORS CORP. Cylinder Head - Bottom View COMPONENT LOCATOR DISASSEMBLED VIEWS Service Call Out Thread Size Insert Drill Counterbore Tool Tap Driver Drill Depth (Maximum) Tap Depth (Maximum) Engineering Hole Number J 42385- MM (IN) MM (IN) - 1 M12 x 1.75 865 856 857 858 859 17 0.670 14 0.551 1510 2 N/A N/A N/A N/A N/A N/A N/A N/A N/A N/A 1213 3 N/A N/A N/A N/A N/A N/A N/A N/A N/A N/A 1212 4 N/A N/A N/A N/A N/A N/A N/A N/A N/A N/A 1211 5 N/A N/A N/A N/A N/A N/A N/A N/A N/A N/A 1210 2003 Saturn L200 2003 ENGINE Engine Mechanical - 2.2L (L61) - Saturn L Series steve Monday, May 09, 2011 12:52:00 PM Page 26 © 2006 Mitchell Repair Information Company, LLC.
  • 27. Fig. 18: Cylinder Head and Components Courtesy of GENERAL MOTORS CORP. Callouts For Fig. 18 Callout Component Name 1 Engine Oil Fill Cap 2 Ignition Module and Coil Housing Assembly Bolt 3 Ignition Module and Coil Housing Assembly 4 Camshaft Cover 5 Camshaft Cover Gasket 2003 Saturn L200 2003 ENGINE Engine Mechanical - 2.2L (L61) - Saturn L Series steve Monday, May 09, 2011 12:52:00 PM Page 27 © 2006 Mitchell Repair Information Company, LLC.
  • 28. 6 Camshaft Bearing Cap Bolt 7 Camshaft Bearing Cap 8 Fuel Rail Assembly Bolt 9 Fuel Line Assembly 10 Injector Wiring Harness 11 Fuel Rail Assembly (with Fuel Injectors) 12 Cylinder Head 13 Front Engine Lift Bracket 14 Engine Lift Bracket Bolt 15 Cylinder Head Bolt 16 Oil Flow Check Valve 17 Exhaust Manifold Stud 18 Exhaust Valve 19 Intake Valve 20 Camshaft Cover Grounding Strap Bolt 21 Cylinder Head Oil Passage Plug 22 Cylinder Head Oil Passage Plug 23 Spark Plug 24 Valve Stem Seal 25 Valve Spring 26 Valve Spring Retainer 27 Valve Keys 28 Hydraulic Lash Adjuster 29 Roller Finger Follower 30 Rear Engine Lift Bracket Bolt 31 Rear Engine Lift Bracket 32 EGR Port Cover Gasket 33 EGR Port Cover 34 EGR Port Cover Bolt 35 Camshaft Bearing Cap 36 Camshaft Bearing Cap Bolt 37 Camshaft Bearing Cap 38 Camshaft Bearing Cap Bolt 39 Exhaust Camshaft 40 Intake Camshaft 41 Camshaft Cover Grounding Strap 42 Camshaft Cover Grounding Strap Bolt 43 Camshaft Cover Bolt 2003 Saturn L200 2003 ENGINE Engine Mechanical - 2.2L (L61) - Saturn L Series steve Monday, May 09, 2011 12:52:00 PM Page 28 © 2006 Mitchell Repair Information Company, LLC.
  • 29. Fig. 19: Engine Block and Components Courtesy of GENERAL MOTORS CORP. Callouts For Fig. 19 2003 Saturn L200 2003 ENGINE Engine Mechanical - 2.2L (L61) - Saturn L Series steve Monday, May 09, 2011 12:52:00 PM Page 29 © 2006 Mitchell Repair Information Company, LLC.
  • 30. Callout Component Name 1 Thermostat Housing 2 Thermostat Housing to Engine Block Seal 3 Water Transfer Pipe 4 Water Transfer Pipe to Water Pump Seal 5 Water Pump Bolt 6 Water Pump 7 Water Pump to Engine Block Seal 8 Water Pump Bolt 9 Oil Filter Cap 10 Oil Filter 11 Oil Filter to Engine Block Seal 12 Cylinder Head Alignment Pin 13 Intake Balance Shaft Rear Bearing 14 Intake Balance Shaft 15 Intake Balance Shaft Bearing Carrier 16 Intake Balance Shaft Drive Sprocket 17 Intake Balance Shaft Drive Sprocket Bolt 18 Exhaust Balance Shaft Drive Sprocket Bolt 19 Exhaust Balance Shaft Drive Sprocket 20 Exhaust Balance Shaft Bearing Carrier Bolt 21 Exhaust Balance Shaft 22 Exhaust Balance Shaft Rear Bearing Engine 23 Front Cover Alignment Pin 24 Engine Oil Passage Plug 25 Engine Oil Passage Plug 26 Top Compression Piston Ring 27 Second Compression Piston Ring 28 Piston Oil Ring Assembly 29 Piston 30 Piston Pin 31 Piston Pin Retainer 32 Connecting Rod 33 Connecting Rod Cap Bolt 34 Connecting Rod Bearing 35 Crankshaft Thrust Bearing 36 Crankshaft Bearing 37 Crankshaft Damper Alignment Key 38 Crankshaft 39 Crankshaft Rear Seal 40 Starter Ring Gear 2003 Saturn L200 2003 ENGINE Engine Mechanical - 2.2L (L61) - Saturn L Series steve Monday, May 09, 2011 12:52:00 PM Page 30 © 2006 Mitchell Repair Information Company, LLC.
  • 31. Flywheel 42 Flywheel to Crankshaft Bolt 43 Engine Oil Pan Baffle 44 Engine Oil Pan 45 Pan Drain Plug 46 Engine Oil Pan Nut 47 Engine Oil Pan Stud 48 Engine Oil Pan Bolt 49 Engine Oil Pickup 50 Lower Crankcase to Engine Block Bolt 51 Lower Crankcase to Engine Block Bolt 52 Crankshaft Bearing Bolt 53 Lower Crankcase to Engine Block Bolt 54 Lower Crankcase 55 Lower Crankcase Alignment Pin 56 Lower Crankcase Alignment Pin 57 Engine Block 58 Water Jacket Plug 59 Engine Block to Transmission Alignment Pin 60 Cylinder Head to Engine Block Bolt 61 Water Jacket Drain Plug 62 Water Pump to Engine Block Bolt 63 Thermostat Housing to Engine Block Bolt 64 Thermostat Housing to Engine Block Bolt 65 Thermostat Gasket 66 Thermostat 2003 Saturn L200 2003 ENGINE Engine Mechanical - 2.2L (L61) - Saturn L Series steve Monday, May 09, 2011 12:52:00 PM Page 31 © 2006 Mitchell Repair Information Company, LLC.
  • 32. Fig. 20: Timing Chain and Components Courtesy of GENERAL MOTORS CORP. Callouts For Fig. 20 Callout Component Name 1 Upper Timing Chain Guide Bolt 2 Upper Timing Chain Guide 3 Timing Chain 4 Intake Camshaft Sprocket 5 Intake Camshaft Sprocket to Camshaft Bolt 6 Fixed Timing Chain Guide Bolt 7 Fixed Timing Chain Guide 8 Fixed Timing Chain Guide Bolt 9 Oil Pump Cover Bolt 10 Oil Pump Cover 11 Oil Pump Inner Gerotor 12 Oil Pump Outer Gerotor 13 Engine Front Cover Gasket 14 Engine Front Cover 15 Engine Front Cover Access Plate Bolt 16 Front Crankshaft Seal 17 Crankshaft Damper 2003 Saturn L200 2003 ENGINE Engine Mechanical - 2.2L (L61) - Saturn L Series steve Monday, May 09, 2011 12:52:00 PM Page 32 © 2006 Mitchell Repair Information Company, LLC.
  • 33. 18 Crankshaft Damper Bolt 19 Engine Front Cover Bolt 20 Oil Pressure Relief Valve Plunger 21 Oil Pressure Relieve Valve Spring 22 Oil Pressure Relief Valve Plug 23 Crankshaft Sprocket Alignment Key 24 Timing Chain Oil Nozzle 25 Exhaust Camshaft Sprocket to Camshaft Bolt 26 Timing Chain Drive Sprocket 27 Adjustable Timing Chain Guide Bolt 28 Adjustable Timing Chain Guide 29 Timing Chain Tensioner Seal 30 Timing Chain Tensioner 31 Drive Chain Guide Bolt 32 Balance Shaft Drive Chain Guide 33 Balance Shaft Drive Sprocket 34 Adjustable Balance Shaft Drive Chain Guide Bolt 35 Adjustable Balance Shaft Drive Chain Guide 36 Balance Shaft Drive Chain Tensioner Assembly 37 Water Pump 38 Water Pump Drive Sprocket Bolt 39 Balance Shaft Drive Chain Guide 40 Balance Shaft Drive Chain Guide Bolt 41 Engine Front Cover Access Plate Seal 42 Engine Front Cover Access Plate 2003 Saturn L200 2003 ENGINE Engine Mechanical - 2.2L (L61) - Saturn L Series steve Monday, May 09, 2011 12:52:00 PM Page 33 © 2006 Mitchell Repair Information Company, LLC.
  • 34. Fig. 21: Intake Manifold and Components Courtesy of GENERAL MOTORS CORP. Callouts For Fig. 21 2003 Saturn L200 2003 ENGINE Engine Mechanical - 2.2L (L61) - Saturn L Series steve Monday, May 09, 2011 12:52:00 PM Page 34 © 2006 Mitchell Repair Information Company, LLC.
  • 35. Callout Component Name 1 Fuel Pressure Regulator Vacuum Line 2 Accelerator Control Cable Bracket 3 Throttle Body Nut 4 Throttle Body Nut 5 Throttle Body Bolt 6 Throttle Body 7 Intake Manifold Bolt 8 Throttle Body Seal 9 Intake Manifold 10 Intake Manifold Gasket 11 Map Sensor 12 Throttle Body Stud 2003 Saturn L200 2003 ENGINE Engine Mechanical - 2.2L (L61) - Saturn L Series steve Monday, May 09, 2011 12:52:00 PM Page 35 © 2006 Mitchell Repair Information Company, LLC.
  • 36. 2003 Saturn L200 2003 ENGINE Engine Mechanical - 2.2L (L61) - Saturn L Series steve Monday, May 09, 2011 12:52:00 PM Page 36 © 2006 Mitchell Repair Information Company, LLC.
  • 37. Fig. 22: Exhaust Manifold and Components Courtesy of GENERAL MOTORS CORP. Callouts For Fig. 22 Callout Component Name 1 Exhaust Manifold Heat Shield 2 Air Pipe Nut 3 Air Pipe 4 Air Pipe Bolt 5 Air Pipe Gasket 6 Exhaust Manifold Heat Shield Stud 7 Exhaust Manifold Gasket 8 Exhaust Manifold 9 Exhaust Flex Decoupler Stud 10 Exhaust Manifold Nut 2003 Saturn L200 2003 ENGINE Engine Mechanical - 2.2L (L61) - Saturn L Series steve Monday, May 09, 2011 12:52:00 PM Page 37 © 2006 Mitchell Repair Information Company, LLC.
  • 38. Fig. 23: Accessory and Engine Drive Belt Components Courtesy of GENERAL MOTORS CORP. Callouts For Fig. 23 Callout Component Name 2003 Saturn L200 2003 ENGINE Engine Mechanical - 2.2L (L61) - Saturn L Series steve Monday, May 09, 2011 12:52:00 PM Page 38 © 2006 Mitchell Repair Information Company, LLC.
  • 39. DIAGNOSTIC INFORMATION AND PROCEDURES DRIVE BELT AND TENSIONER COMPLAINT/CONDITION CHART Drive Belt and Tensioner Complaint/Condition Chart 1 Power Steering Pump 2 Power Steering Pressure Line 3 Generator Bolt 4 Generator Pulley 5 Accessory Drive Belt 6 Air Compressor Bolt 7 Air Conditioning Compressor 8 Accessory Drive Belt Tensioner Bolt 9 Accessory Drive Belt Tensioner 10 Generator Assembly 11 Starter Assembly 12 Power Steering Pump Bolt 13 Starter Assembly to Engine Block Bolt Complaint/Condition Possible Cause(s) Correction(s) Tension too High Wrong belt. Belt routing and alignment on pulleys. Replace belt, check belt, and pulleys for proper belt installation and alignment in grooves. Wrong pulley. Check pulley diameters against another vehicle or good parts. Tensioner inoperative. Replace tensioner. Tension too Low Wrong belt. Replace belt. Worn belt. Replace belt. Tensioner inoperative or broken internal spring. Replace tensioner. (Do not attempt to repair) Wrong pulley. Check pulley diameters against another vehicle or good parts. Belt Chirp Wrong belt. Check belt tension. Belt misaligned. Check pulley alignment. Belt installed incorrectly. Check for belt alignment in grooves. Tensioner inoperative. Check belt tensioner motion. Tensioner partially seized. Check tensioner movement. Tensioner inoperative. Check belt tension. Tensioner/idler pulley bearing. Check tensioner/idler pulley bearings. Tensioner inoperative. Check belt tension. 2003 Saturn L200 2003 ENGINE Engine Mechanical - 2.2L (L61) - Saturn L Series steve Monday, May 09, 2011 12:52:00 PM Page 39 © 2006 Mitchell Repair Information Company, LLC.
  • 40. DIAGNOSTIC STARTING POINT - ENGINE MECHANICAL Begin the system diagnosis by reviewing the Disassembled Views, Engine Component Description, Lubrication Description, and New Product Information in Engine Unit Repair. Reviewing the description and operation information will help you determine the correct symptom diagnostic procedure when a malfunction exists. Reviewing the description and operation information will also help you determine if the condition described by the customer is normal operation. Refer to Symptoms - Engine Mechanical in order to identify the correct procedure for diagnosing the system and where the procedure is located. SYMPTOMS - ENGINE MECHANICAL Strategy Based Diagnostics 1. Perform the DIAGNOSTIC STARTING POINT -- ENGINE CONTROLS in Self-Diagnostics - 2.2L in Engine Performance before using the symptom tables, if applicable. 2. Review the system operations in order to familiarize yourself with the system functions. Refer to Disassembled Views, Engine Component Description, and Lubrication Description in Engine Unit Intermittent Squeal or Whistle Noise Notice: Diagnosis is difficult. Requires accessory drive belt removal and engine cold starts to validate concern. Do not run engine for more than 3 minutes with accessory drive belt off. Tensioner/idler pulley bearing. Check tensioner/idler pulley bearings. Wrong belt. Check for proper belt. Worn belt. Inspect belt for wear and check tension. Excessive pulley radial/axial runout. Replace pulley. Belt misaligned. Check pulley alignment. Water pump, power steering pump, generator, A/C compressor, tensioner or idler bearing/loads. Check all accessories for bearing/component seizure. Oil pump pressure regulator. Replace oil pump pressure regulator valve. Accessory Drive Growl with A/C On During Acceleration and/or Growl from Belt Tensioner. Belt tensioner (internal). IMPORTANT: Do not disassemble the belt tensioner. Check belt tensioner movement. Check belt tension. Water pump, power steering pump, generator, A/C compressor, tensioner, or idler bearing. Replace faulty component. Hoot or Growl Noise Idler pulley bearing. Replace idler pulley bearing. IMPORTANT: Saturn service tool SA9217NE Chassis Ear Tool (or equivalent) should be used to locate source(s) of noises caused by vibration(s). 2003 Saturn L200 2003 ENGINE Engine Mechanical - 2.2L (L61) - Saturn L Series steve Monday, May 09, 2011 12:52:00 PM Page 40 © 2006 Mitchell Repair Information Company, LLC.
  • 41. Repair. All diagnosis on a vehicle should follow a logical process. Strategy based diagnostics is a uniform approach for repairing all systems. The diagnostic flow may always be used in order to resolve a system condition. The diagnostic flow is the place to start when repairs are necessary. Visual/Physical Inspection  Inspect for aftermarket devices which could affect the operation of the engine.  Inspect the easily accessible or visible system components for obvious damage or conditions which could cause the symptom.  Check for the correct oil level, proper oil viscosity, and correct filter application.  Verify the exact operating conditions under which the concern exists. Note factors such as engine RPM, ambient temperature, engine temperature, amount of engine warm-up time, and other specifics.  Compare the engine sounds, if applicable, to a known good engine and make sure you are not trying to correct a normal condition. Intermittent Test the vehicle under the same conditions that the customer reported in order to verify the system is operating properly. Symptom List Refer to a symptom diagnostic procedure from the following list in order to diagnose the symptom:  Base Engine Misfire without Internal Engine Noises  Base Engine Misfire with Abnormal Internal Lower Engine Noises  Base Engine Misfire with Abnormal Valve Train Noise  Base Engine Misfire with Coolant Consumption  Base Engine Misfire with Excessive Oil Consumption  Engine Compression Test  Engine Noise on Start-Up, but Only Lasting a Few Seconds  Upper Engine Noise, Regardless of Engine Speed  Lower Engine Noise, Regardless of Engine Speed  Engine Noise Under Load  Engine Will Not Crank - Crankshaft Will Not Rotate  Oil Consumption Diagnosis  Oil Pressure Diagnosis and Testing  Oil Leak Diagnosis  Coolant in Combustion Chamber  Coolant in Engine Oil 2003 Saturn L200 2003 ENGINE Engine Mechanical - 2.2L (L61) - Saturn L Series steve Monday, May 09, 2011 12:52:00 PM Page 41 © 2006 Mitchell Repair Information Company, LLC.
  • 42. BASE ENGINE MISFIRE WITHOUT INTERNAL ENGINE NOISES Base Engine Misfire without Internal Engine Noises Cause Correction Abnormalities, severe cracking, bumps, or missing areas in the accessory drive belt Abnormalities in the accessory drive system and/or components may cause engine RPM variations and lead to a misfire DTC. A misfire code may be present without an actual misfire condition. Replace the drive belt. Worn, damaged, or mis-aligned accessory drive components or excessive pulley runout may lead to a misfire DTC. A misfire code may be present without an actual misfire condition. Inspect the components, and repair or replace as required. A loose or improperly installed engine flywheel or crankshaft balancer A misfire code may be present without an actual misfire condition. Repair or replace the flywheel and/or balancer as required. Restricted exhaust system A severe restriction in the exhaust flow can cause significant loss of engine performance and may set a DTC. Possible causes of restrictions include collapsed or dented pipes or plugged mufflers and/or catalytic converters. Repair or replace as required. Improperly installed or damaged vacuum hoses Repair or replace as required. Improper sealing between the intake manifold and cylinder heads or throttle body. Replace the intake manifold, gaskets, cylinder heads, and/or throttle body as required. Improperly installed or damaged MAP sensor The sealing grommet of the MAP sensor should not be torn or damaged. Repair or replace the MAP sensor as required. Damage to the MAP sensor housing Replace the intake manifold. Worn or loose rocker arms The rocker arm bearing end caps and/or needle bearings should be intact and in the proper position. Replace the valve rocker arms as required. Stuck valves Carbon buildup on the valve stem can cause the valve not to close properly. Repair or replace as required. Excessively worn or mis-aligned timing chain Replace the timing chain and sprockets as required. Worn camshaft lobes Replace the camshaft and valve lifters. Excessive oil pressure A lubrication system with excessive oil pressure may lead to excessive valve lifter pump up and loss of compression.  Perform an oil pressure test. Refer to Oil Pressure Diagnosis and Testing.  Repair or replace the oil pump as required. Faulty cylinder head gaskets and/or cracking or  Inspect for spark plugs saturated by coolant. 2003 Saturn L200 2003 ENGINE Engine Mechanical - 2.2L (L61) - Saturn L Series steve Monday, May 09, 2011 12:52:00 PM Page 42 © 2006 Mitchell Repair Information Company, LLC.
  • 43. BASE ENGINE MISFIRE WITH ABNORMAL INTERNAL LOWER ENGINE NOISES Base Engine Misfire with Abnormal Internal Lower Engine Noises other damage to the cylinder heads and engine block cooling system passages Coolant consumption may or may not cause the engine to overheat.  Inspect the cylinder heads, engine block, and/or head gaskets.  Repair or replace as required. Worn piston rings Oil consumption may or may not cause the engine to misfire.  Inspect the spark plugs for oil deposits.  Inspect the cylinders for a loss of compression. Refer to Engine Compression Test.  Perform cylinder leak down and compression testing to identify the cause.  Repair or replace as required. A damaged crankshaft reluctor wheel A damaged crankshaft reluctor wheel can result in different symptoms depending on the severity and location of the damage.  Systems with electronic communications, DIS or coil per cylinder, and severe reluctor ring damage may exhibit periodic loss of crankshaft position, stop delivering a signal, and then re-sync the crankshaft position.  Systems with electronic communication, DIS or coil per cylinder, and slight reluctor ring damage may exhibit no loss of crankshaft position and no misfire may occur. However, a P0300 DTC may be set.  Systems with mechanical communications, high voltage switch, and severe reluctor ring damage may cause additional pulses and effect fuel and spark delivery to the point of generating a P0300 DTC or P0336. Replace the sensor and/or crankshaft as required. Cause Correction Abnormalities, severe cracking, bumps or missing areas in the accessory drive belt Abnormalities in the accessory drive system and/or components may cause engine RPM variations, noises similar to a faulty lower engine, and also lead to a misfire condition. A misfire code may be present without an actual misfire condition. Replace the drive belt. Worn, damaged, or mis-aligned accessory drive components or excessive pulley runout Inspect the components, repair or replace as required. 2003 Saturn L200 2003 ENGINE Engine Mechanical - 2.2L (L61) - Saturn L Series steve Monday, May 09, 2011 12:52:00 PM Page 43 © 2006 Mitchell Repair Information Company, LLC.
  • 44. BASE ENGINE MISFIRE WITH ABNORMAL VALVE TRAIN NOISE Base Engine Misfire with Abnormal Valve Train Noise BASE ENGINE MISFIRE WITH COOLANT CONSUMPTION Base Engine Misfire with Coolant Consumption A misfire code may be present without an actual misfire condition. Loose or improperly installed engine flywheel or crankshaft balancer A misfire code may be present without an actual misfire condition. Repair or replace the flywheel and/or balancer as required. Worn piston rings Oil consumption may or may not cause the engine to misfire.  Inspect the spark plugs for oil deposits.  Inspect the cylinders for a loss of compression. Refer to Engine Compression Test.  Perform cylinder leak down and compression testing to determine the cause.  Repair or replace as required. Worn crankshaft thrust bearings Severely worn thrust surfaces on the crankshaft and/or thrust bearing may permit fore and aft movement of the crankshaft, and create a DTC without an actual misfire condition. Replace the crankshaft and bearings as required. Cause Correction Worn or loose rocker arms The rocker arm bearing end caps and/or needle bearings should intact within the rocker arm assembly. Replace the valve rocker arms as required. Stuck valves Carbon buildup on the valve stem can cause the valve to not close properly. Repair or replace as required. Excessively worn or mis-aligned timing chain Replace the timing chain and sprockets as required. Worn camshaft lobes Replace the camshaft and valve lifters. Sticking lifters Replace as required. Cause Correction Faulty cylinder head gaskets and/or cracking, or other damage to the cylinder heads and engine block cooling system passages. Coolant consumption may or may not cause the engine to overheat.  Inspect for spark plugs saturated by coolant.  Perform a cylinder leak down test.  Inspect the cylinder heads and engine block for damage to the coolant passages and/or a faulty head gasket. 2003 Saturn L200 2003 ENGINE Engine Mechanical - 2.2L (L61) - Saturn L Series steve Monday, May 09, 2011 12:52:00 PM Page 44 © 2006 Mitchell Repair Information Company, LLC.
  • 45. BASE ENGINE MISFIRE WITH EXCESSIVE OIL CONSUMPTION Base Engine Misfire with Excessive Oil Consumption ENGINE NOISE ON START-UP, BUT ONLY LASTING A FEW SECONDS Engine Noise on Start-Up, but Only Lasting a Few Seconds UPPER ENGINE NOISE, REGARDLESS OF ENGINE SPEED Upper Engine Noise, Regardless of Engine Speed  Repair or replace as required. Cause Correction Worn valves, valve guides and/or valve stem oil seals  Inspect the spark plugs for oil deposits.  Repair or replace as required. Worn piston rings Oil consumption may or may not cause the engine to misfire.  Inspect the spark plugs for oil deposits.  Inspect the cylinders for a loss of compression. Refer to Engine Compression Test.  Perform cylinder leak down and compression testing to determine the cause.  Repair or replace as required. Cause Correction Incorrect oil filter without anti-drainback feature Install the correct oil filter. Incorrect oil viscosity 1. Drain the oil. 2. Install the correct viscosity oil. High valve lifter leak down rate Replace the lifters as required. Worn crankshaft thrust bearing  Inspect the thrust bearing and crankshaft.  Repair or replace as required. Damaged or faulty oil filter by-pass valve  Inspect the oil filter by-pass valve for proper operation.  Repair or replace as required. Cause Correction Low oil pressure  Perform an oil pressure test. Refer to Oil Pressure Diagnosis and Testing.  Repair or replace as required. Loose and/or worn valve rocker arm attachments  Inspect the valve rocker arm stud, nut or bolt.  Repair or replace as required. Worn valve rocker arm Replace the valve rocker arm. 2003 Saturn L200 2003 ENGINE Engine Mechanical - 2.2L (L61) - Saturn L Series steve Monday, May 09, 2011 12:52:00 PM Page 45 © 2006 Mitchell Repair Information Company, LLC.
  • 46. LOWER ENGINE NOISE, REGARDLESS OF ENGINE SPEED Lower Engine Noise, Regardless of Engine Speed Improper lubrication to the valve rocker arms Inspect the following components, and repair or replace as required:  The valve rocker arm  The valve lifter  The oil filter bypass valve  The oil pump and pump screen  The engine block oil galleries Broken valve spring Replace the valve spring. Worn or dirty valve lifters Replace the valve lifters. Stretched or broken timing chain and/or damaged sprocket teeth Replace the timing chain and sprockets. Worn, damaged, or faulty timing chain tensioners Replace tensioners Worn engine camshaft lobes  Inspect the engine camshaft lobes.  Replace the camshaft and valve lifters as required. Worn valve guides or valve stems Inspect the following components, and repair as required:  The valves  The valve guides Stuck valves Carbon on the valve stem or valve seat may cause the valve to stay open. Inspect the following components, and repair as required:  The valves  The valve guides Cause Correction Low oil pressure  Perform an oil pressure test. Refer to Oil Pressure Diagnosis and Testing.  Repair or replace damaged components as required. Worn accessory drive components Abnormalities, such as severe cracking, bumps, or missing areas in the accessory drive belt and/or misalignment of system components  Inspect the accessory drive system.  Repair or replace as required. Loose or damaged crankshaft balancer  Inspect the crankshaft balancer.  Repair or replace as required. Detonation or spark knock Verify the correct operation of the ignition system. 2003 Saturn L200 2003 ENGINE Engine Mechanical - 2.2L (L61) - Saturn L Series steve Monday, May 09, 2011 12:52:00 PM Page 46 © 2006 Mitchell Repair Information Company, LLC.
  • 47. ENGINE NOISE UNDER LOAD Engine Noise Under Load Refer to DETONATION/SPARK KNOCK in Troubleshooting No Codes - 2.2L in Engine Performance. Loose torque converter bolts  Inspect the torque converter bolts and flywheel.  Repair or replace as required. Loose or damaged flywheel Repair or replace the flywheel. Damaged oil pan, contacting the oil pump screen An oil pan that has been damaged, may improperly position the oil pump screen, preventing proper oil flow to the oil pump.  Inspect the oil pan.  Inspect the oil pump screen.  Repair or replace as required. Oil pump screen loose, damaged or restricted  Inspect the oil pump screen.  Repair or replace as required. Worn or damaged balance shafts or bushings  Inspect the balance shaft and bushings.  Replace as required. Excessive piston-to-cylinder bore clearance  Inspect the piston and cylinder bore.  Repair as required. Excessive piston pin-to-bore clearance  Inspect the piston, piston pin, and the connecting rod.  Repair or replace as required. Excessive connecting rod bearing clearance Inspect the following components, and repair as required:  The connecting rod bearings  The connecting rods  The crankshaft  The crankshaft journals Excessive crankshaft bearing clearance Inspect the following components, and repair as required:  The crankshaft bearings  The crankshaft journals Incorrect piston, piston pin, and connecting rod installation Pistons must be installed with the mark or dimple on the top of the piston, facing the front of the engine. Piston pins must be centered in the connecting rod pin bore.  Verify the pistons, piston pins and connecting rods are installed correctly.  Repair as required. 2003 Saturn L200 2003 ENGINE Engine Mechanical - 2.2L (L61) - Saturn L Series steve Monday, May 09, 2011 12:52:00 PM Page 47 © 2006 Mitchell Repair Information Company, LLC.
  • 48. ENGINE WILL NOT CRANK - CRANKSHAFT WILL NOT ROTATE Engine Will Not Crank - Crankshaft Will Not Rotate Cause Correction Low oil pressure  Perform an oil pressure test. Refer to Oil Pressure Diagnosis and Testing.  Repair or replace as required. Detonation or spark knock Verify the correct operation of the ignition. Refer to DETONATION/SPARK KNOCK in Troubleshooting No Codes - 2.2L in Engine Performance. Loose torque converter bolts  Inspect the torque converter bolts and flywheel.  Repair as required. Cracked flywheel, automatic transmission  Inspect the flywheel bolts and flywheel.  Repair as required. Excessive connecting rod bearing clearance Inspect the following components, and repair as required:  The connecting rod bearings  The connecting rods  The crankshaft Excessive crankshaft bearing clearance Inspect the following components, and repair as required:  The crankshaft bearings  The crankshaft journals  The cylinder block crankshaft bearing bore Cause Correction Seized accessory drive system component 1. Remove accessory drive belts. 2. Rotate crankshaft by hand at the balancer or flywheel location. Hydraulically locked cylinder  Coolant/antifreeze in cylinder  Oil in cylinder  Fuel in cylinder 1. Remove spark plugs and check for fluid. 2. Inspect for broken head gasket. 3. Inspect for cracked engine block or cylinder head. 4. Inspect for a sticking fuel injector. 5. Inspect for cracked cylinder wall. Seized automatic transmission torque converter 1. Remove the torque converter bolts. 2003 Saturn L200 2003 ENGINE Engine Mechanical - 2.2L (L61) - Saturn L Series steve Monday, May 09, 2011 12:52:00 PM Page 48 © 2006 Mitchell Repair Information Company, LLC.
  • 49. COOLANT IN COMBUSTION CHAMBER Coolant in Combustion Chamber 2. Rotate crankshaft by hand at the balancer or flywheel location. Seized manual transmission 1. Disengage the clutch. 2. Rotate crankshaft by hand at the balancer or flywheel location. Refer to Unit Repair Manual - Manual Transmission. Broken timing chain and/or gears  Inspect timing chain and gears.  Repair as required. Seized balance shaft  Inspect balance shaft.  Repair as required. Material in cylinder  Broken valve  Piston material  Foreign material  Cracked cylinder wall  Inspect cylinder for damaged components and/or foreign materials.  Inspect for fallen cylinder wall.  Repair or replace as required. Seized crankshaft or connecting rod bearings  Inspect crankshaft and connecting rod bearings.  Inspect for fallen cylinder wall.  Repair as required. Bent or broken connecting rod  Inspect connecting rods.  Repair as required. Broken crankshaft  Inspect crankshaft.  Repair as required. Cause Correction DEFINITION: Excessive white smoke and/or coolant type odor coming from the exhaust pipe may indicate coolant in the combustion chamber. Low coolant levels, an inoperative cooling fan, or a faulty thermostat may lead to an "overtemperature" condition which may cause engine component damage. 1. A slower than normal cranking speed may indicate coolant entering the combustion chamber. Refer to Engine Will Not Crank - Crankshaft Will Not Rotate. 2. Remove the spark plugs and inspect for spark plugs saturated by coolant or coolant in the cylinder bore. 3. Inspect by performing a cylinder leak-down test. During this test, excessive air bubbles within the 2003 Saturn L200 2003 ENGINE Engine Mechanical - 2.2L (L61) - Saturn L Series steve Monday, May 09, 2011 12:52:00 PM Page 49 © 2006 Mitchell Repair Information Company, LLC.
  • 50. COOLANT IN ENGINE OIL Coolant in Engine Oil ENGINE COMPRESSION TEST Perform the following steps in order to conduct a compression test for the L61. 1. Conduct the following steps in order to check cylinder compression. coolant may indicate a faulty gasket or damaged component. 4. Inspect by performing a cylinder compression test. Two cylinders "side-by-side" on the engine block, with low compression, may indicate a failed cylinder head gasket. Refer to Engine Compression Test. Faulty cylinder head gasket Replace the head gasket and components as required. Refer to Cylinder Head Cleaning and Inspection and Cylinder Head Replacement. Warped cylinder head Replace the cylinder head and gasket. Refer to Cylinder Head Cleaning and Inspection. Cracked cylinder head Replace the cylinder head and gasket. Cracked cylinder sleeve Replace the components as required. Cylinder head or block porosity Replace the components as required. Cause Correction DEFINITION: Foamy or discolored oil or an engine oil "overfill" condition may indicate coolant entering the engine crankcase. Low coolant levels, an inoperative cooling fan, or a faulty thermostat may lead to an "overtemperature" condition which may cause engine component damage. Contaminated engine oil and oil filter should be changed. 1. Inspect the oil for excessive foaming or an overfill condition. Oil diluted by coolant may not properly lubricate the crankshaft bearings and may lead to component damage. Refer to Lower Engine Noise, Regardless of Engine Speed. 2. Inspect by performing a cylinder leak-down test. During this test, excessive air bubbles within the cooling system may indicate a faulty gasket or damaged component. 3. Inspect by performing a cylinder compression test. Two cylinders "side-by-side" on the engine block with low compression may indicate a failed cylinder head gasket. Refer to Engine Compression Test. Faulty cylinder head gasket Replace the head gasket and components as required. Refer to Cylinder Head Cleaning and Inspection and Cylinder Head Replacement. Warped cylinder head Replace the cylinder head and gasket. Refer to Cylinder Head Cleaning and Inspection. Cracked cylinder head Replace the cylinder head and gasket. Cracked cylinder sleeve Replace the components as required. Cylinder head or block porosity Replace the components as required. 2003 Saturn L200 2003 ENGINE Engine Mechanical - 2.2L (L61) - Saturn L Series steve Monday, May 09, 2011 12:52:00 PM Page 50 © 2006 Mitchell Repair Information Company, LLC.
  • 51. 1. Engine should be at room temperature. 2. Disconnect wiring from the ignition module. 3. Remove the spark plugs. 4. Throttle body valve should be wide open. 5. Battery should be at or near full charge. 2. For each cylinder, crank engine through four compression strokes. 3. The lowest reading cylinder should not be less than 70% of the highest. 4. No cylinder reading should be less than 689 kPa (100 psi).  Normal - Compression builds up quickly and evenly to specified compression on each cylinder.  Piston Rings - Compression low on first stroke. Tends to build up on following strokes but does not reach normal. Improves considerably with addition of oil.  Valves - Compression low on first stroke. Does not tend to build up on the following strokes. Does not improve much with the addition of oil. Use approximately three squirts from a plunger-type oiler. CYLINDER LEAKAGE TEST Tools Required J 35667-A Cylinder Head Leakdown Tester or equivalent. See Special Tools and Equipment.  Worn or burnt valves  Broken valve springs  Stuck valve lifters  Incorrect valve lash/adjustment  Damaged piston  Worn piston rings  Worn or scored cylinder bore  Damaged cylinder head gasket  Cracked or damaged cylinder head  Cracked or damaged engine block IMPORTANT: The results of a compression test will fall into the following categories: IMPORTANT: A leakage test may be performed in order to measure cylinder/combustion chamber leakage. High leakage may indicate one or more of the following: CAUTION: Refer to BATTERY DISCONNECT CAUTION in Cautions and Notices. 2003 Saturn L200 2003 ENGINE Engine Mechanical - 2.2L (L61) - Saturn L Series steve Monday, May 09, 2011 12:52:00 PM Page 51 © 2006 Mitchell Repair Information Company, LLC.
  • 52. 1. Disconnect the battery ground negative cable. 2. Remove the spark plugs. Refer to SPARK PLUGS - 2.2L in Removal and Installation in Engine Performance. 3. Rotate the crankshaft to place the piston in the cylinder being tested at Top Dead Center (TDC) of the compression stroke. 4. Install the J 35667-A or equivalent. See Special Tools and Equipment. 5. Apply shop air pressure to the J 35667-A and adjust according to the manufacturers instructions. See Special Tools and Equipment. 6. Record the cylinder leakage value. Cylinder leakage that exceeds 25 percent in considered excessive and may require component service. In excessive leakage situations, inspect for the following conditions:  Air leakage sounds at the throttle body or air inlet hose that may indicate a worn or burnt intake valve or a broken valve spring.  Air leakage sounds at the exhaust system tailpipe that may indicate a worn or burnt exhaust valve or a broken valve spring.  Air leakage sounds from the crankcase, oil level indicator tube, or oil fill tube that may indicate worn piston rings, a damaged piston, a worn or scored cylinder bore, a damaged engine block or a damaged cylinder head.  Air bubbles in the cooling system may indicate a damaged cylinder head or a damaged cylinder head gasket. 7. Perform the leakage test on the remaining cylinders and record the values. OIL CONSUMPTION DIAGNOSIS Excessive oil consumption (not due to leaks) is the use of 0.9L (1 qt) or more of engine oil within 3 200kilometers (2,000 miles). The causes of excessive oil consumption include the following conditions:  External oil leaks. Tighten bolts and/or replace gaskets and oil seals as necessary.  Incorrect oil level or improper reading of oil level indicator. With the vehicle on a level surface, allow adequate drain down time and check for the correct oil level.  Improper oil viscosity. Use recommended SAE viscosity for the prevailing temperatures.  Continuous high speed driving and/or severe usage.  Crankcase ventilation system restrictions or malfunctioning components.  Valve guides and/or valve stem oil seals worn, or the seal omitted. Ream guides and install oversize service valves and/or new valve stem oil seals.  Piston rings broken, improperly installed, worn, or not seated properly. Allow adequate time for rings to seat. Replace broken or worn rings as necessary.  Piston improperly installed. IMPORTANT: It may be necessary to hold the crankshaft balancer bolt to prevent the engine from rotating. 2003 Saturn L200 2003 ENGINE Engine Mechanical - 2.2L (L61) - Saturn L Series steve Monday, May 09, 2011 12:52:00 PM Page 52 © 2006 Mitchell Repair Information Company, LLC.
  • 53. Oil Consumption Test Procedure 1. Check the engine for external oil leakage and the air intake and PCV systems for excessive oil pull over. 2. Change the engine oil and filter. 3. Warm the engine up and check the oil level after approximately 10 minutes with vehicle on a level surface. Note exactly where the dipstick reads, relative to the dipstick MAX mark. 4. Inform the customer an oil consumption test is now in progress and any oil added must be documented. 5. Record the vehicle's mileage, date of oil change and exact location of oil level on the Customer Service Order. 6. Have customer check the engine oil level at each fuel fill and return the vehicle if oil level is at the "MIN" mark. If the oil level remains in the "CROSS HATCH" area, have the customer continue operating the vehicle for a minimum of 3,200 kilometers (2,000 miles) before returning the vehicle for final oil consumption verification. 7. If the engine uses more than one quart of oil in 3,200 kilometers (2,000 miles), after the initial 4,800 kilometers (3,000 miles) break in period, document the oil consumption usage on the Customer Service Order and continue with the following checks. 8. If the engine is using oil, perform a compression test. Refer to "Engine Compression Test" procedure in this section of the service manual.  If cylinder compression is found within acceptable limits, replace the valve stem seals.  If compression is not found within acceptable limits, perform an engine cylinder leakage test, crankcase pressure check, and repair as necessary. Valve Train Diagnosis A light tapping at one-half engine speed, or any varying frequency, can indicate a valve train problem. These tapping noises increase with engine speed. Before attempting to judge the valve train noises, thoroughly warm up the engine. By doing this you will bring all engine components to a normal state of expansion. Also, run the engine at various speeds and listen for engine noises with the hood closed while sitting in the driver's seat. The causes of the valve train noise include the following conditions:  Low oil pressure  Broken valve springs  Sticking valves  Lifters worn, dirty or failed  Worn valve guides  Excessive valve stem to guide clearance IMPORTANT: Complaints of high engine oil consumption are not always thoroughly investigated before major repairs are performed. During initial engine break in, it is normal for the engine to use from one to three quarts of oil during the first 4,800-9600 kilometers (3,000-6,000miles), depending on driving conditions. 2003 Saturn L200 2003 ENGINE Engine Mechanical - 2.2L (L61) - Saturn L Series steve Monday, May 09, 2011 12:52:00 PM Page 53 © 2006 Mitchell Repair Information Company, LLC.
  • 54.  Failed oil drain back valve Vehicle Speed Sensitive Vibration Diagnosis Definition: Vehicle speed sensitive vibrations can be heard or felt as the speed of the vehicle (mph) varies. The operating speed of the engine (rpm) does not effect a vehicle speed sensitive vibration. OIL PRESSURE DIAGNOSIS AND TESTING Tools Required J 44953 Oil Pressure Gage Adapter. See Special Tools and Equipment.  With the vehicle on a level surface, allow adequate drain down time of 2-3 minutes and measure for a low oil level. Add the recommended grade engine oil and fill the crankcase until the oil level measures full on the oil level indicator.  Run the engine, and verify low, or no oil pressure on the vehicle gage or light. Listen for a noisy valve train or a knocking noise.  Inspect for the following:  Oil diluted by moisture or unburned fuel mixtures  Improper oil viscosity for the expected temperature  Incorrect or malfunctioning oil pressure sender  Incorrect or malfunctioning oil pressure gage  Plugged oil filter  Malfunctioning oil bypass valve  Remove the oil pressure sender or another engine block oil gallery plug.  Install J 44953 and an oil pressure gage and measure the engine oil pressure. See Special Tools and Equipment.  Compare the readings to specifications. Refer to Engine Mechanical Specifications.  If the engine oil pressure is below specifications, inspect the engine for one or more of the following:  Oil pump worn or dirty Refer to Oil Pump Disassemble.  Oil pump-to-engine front cover bolts loose Refer to Engine Front Cover and Oil Pump Installation.  Oil pump screen loose, plugged, or damaged 2003 Saturn L200 2003 ENGINE Engine Mechanical - 2.2L (L61) - Saturn L Series steve Monday, May 09, 2011 12:52:00 PM Page 54 © 2006 Mitchell Repair Information Company, LLC.
  • 55.  Oil pump screen O-ring seal missing or damaged  Malfunctioning oil pump pressure regulator valve  Excessive bearing clearance Refer to Crankshaft and Bearings Cleaning and Inspection.  Cracked, porous or restricted oil galleries  Oil gallery plugs missing or incorrectly installed Refer to Engine Block Assemble.  Broken lash adjusters OIL LEAK DIAGNOSIS DEFINITION: You can repair most fluid leaks by first visually locating the leak, repairing or replacing the component, or by resealing the gasket surface. Once the leak is identified, determine the cause of the leak. Repair the cause of the leak as well as the leak itself. Oil Leak Diagnosis Step Action Value(s) Yes No 1 1. Operate the vehicle until it reaches normal operating temperature. 2. Refer to Engine Mechanical Specifications in this service manual. 3. Park the vehicle on a level surface, over a large sheet of paper or other clean surface. 4. Wait 15 minutes. 5. Check for drippings. Are drippings present? - Go to Step 2 System OK 2 Can you identify the type of fluid and the approximate location of the leak? - Go to Step 10 Go to Step 3 3 1. Visually inspect the suspected area. Use a small mirror to assist in looking at hard to see areas. 2. Check for leaks at the following locations:  Sealing surfaces  Fittings  Cracked or damaged components Can you identify the type of fluid and the approximate location of the leak? - - - 2003 Saturn L200 2003 ENGINE Engine Mechanical - 2.2L (L61) - Saturn L Series steve Monday, May 09, 2011 12:52:00 PM Page 55 © 2006 Mitchell Repair Information Company, LLC.
  • 56. - - Go to Step 10 Go to Step 4 4 1. Completely clean the entire engine and surrounding components. 2. Operate the vehicle for several miles at normal operating temperature and at varying speeds. 3. Park the vehicle on a level surface, over a large sheet of paper or other clean surface. 4. Wait (15 minutes). 5. Identify the type of fluid, and the approximate location of the leak. - - - Can you identify the type of fluid and the approximate location of the leak? - Go to Step 10 Go to Step 5 5 1. Visually inspect the suspected area. Use a small mirror to assist in looking at hard to see areas. 2. Check for leaks at the following locations:  Sealing surfaces  Fittings  Cracked or damaged components - - - Can you identify the type of fluid and the approximate location of the leak? - Go to Step 10 Go to Step 6 6 1. Completely clean the entire engine and surrounding components. 2. Apply an aerosol-type powder (baby powder, foot powder, etc.) to the suspected area. 3. Operate the vehicle for several miles at normal operating temperature and at varying speeds. 4. Identify the type of fluid, and the approximate location of the leak, from the discolorations in the powder surface. - - - Can you identify the type of fluid and the approximate location of the leak? - Go to Step 10 Go to Step 7 7 1. Visually inspect the suspected area. Use a small mirror to assist in looking at hard to see areas. 2. Check for leaks at the following locations:  Sealing surfaces  Fittings  Cracked or damaged components - - - Can you identify the type of fluid and the approximate location of the leak? - Go to Step 10 Go to Step 8 Use J28428E Dye and Light Kit in order to identify the type of fluid, and the approximate location of the leak. 2003 Saturn L200 2003 ENGINE Engine Mechanical - 2.2L (L61) - Saturn L Series steve Monday, May 09, 2011 12:52:00 PM Page 56 © 2006 Mitchell Repair Information Company, LLC.
  • 57. CRANKCASE VENTILATION SYSTEM FUNCTIONAL TEST Functional Check of the Positive Crankcase Ventilation (PCV) System 1. Disconnect the PCV hose. 2. Start the engine. 3. Check for vacuum at the hose. If there is no vacuum, check for a plugged hose or manifold port. 4. Check for a hose that collapses when blocked (vacuum applied). Replace the plugged or deteriorated hoses. 5. Allow the engine to idle at the normal operating temperature. 8 Refer to the manufacturer's instructions when using the tool. - - - Can you identify the type of fluid and the approximate location of the leak? - Go to Step 10 Go to Step 9 9 1. Visually inspect the suspected area. Use a small mirror to assist in looking at hard to see areas. 2. Check for leaks at the following locations:  Sealing surfaces  Fittings  Cracked or damaged components - - - Can you identify the type of fluid and the approximate location of the leak? - Go to Step 10 System OK 10 1. Inspect the engine for mechanical damage. Special interest should be shown to the following areas:  Higher than recommended fluid levels  Higher than recommended fluid pressures  Plugged or malfunctioning fluid filters or pressure bypass valves  Plugged or malfunctioning engine ventilation system  Improperly tightened or damaged fasteners  Cracked or porous components  Improper sealants or gaskets where required  Improper sealant or gasket installation  Damaged or worn gaskets or seals  Damaged or worn sealing surfaces 2. Inspect the engine for customer modifications. - - - Is there mechanical damage, or customer modifications to the engine? - Go to Step 11 System OK 11 Repair or replace all damaged or modified components. - Go to Step 1 - 2003 Saturn L200 2003 ENGINE Engine Mechanical - 2.2L (L61) - Saturn L Series steve Monday, May 09, 2011 12:52:00 PM Page 57 © 2006 Mitchell Repair Information Company, LLC.
  • 58. 6. Remove the engine oil dipstick and install a vacuum gage on the dipstick tube. 7. Block off the PCV system fresh air intake passage. 8. Run the engine at 1500 RPM for 30 seconds, then read the vacuum gage while the engine is running at 1500 RPM. If a vacuum is present, this indicates that the crankcase ventilation system is functioning properly. No vacuum indicates that the engine may not be sealed and is drawing in outside air. Check the valve covers, oil pan gasket, or other sealing areas for leaks. If the vacuum gage registers a positive pressure through the dipstick tube, check for a plugged hose or engine blow-by. Results of Incorrect Operation A plugged PCV hose may cause the following conditions:  A rough idle  Stalling or a slow idle speed  Oil leaks  Sludge in the engine A leaking hose would cause the following conditions:  A rough idle  Stalling  A high idle speed Theory of Operation The positive crankcase ventilation system (PCV) flows fresh air into the engine crankcase to dilute the unburned hydrocarbons present and route them into the intake manifold where they are consumed during the combustion process. DRIVE BELT EXCESSIVE WEAR DIAGNOSIS 2003 Saturn L200 2003 ENGINE Engine Mechanical - 2.2L (L61) - Saturn L Series steve Monday, May 09, 2011 12:52:00 PM Page 58 © 2006 Mitchell Repair Information Company, LLC.
  • 59. Fig. 24: Minor Cracks DO NOT Warrant Drive Belt Replacement Courtesy of GENERAL MOTORS CORP. Minor cracks in the belt rib are normal. They are the result of reverse bending around a backside pulley. Do not replace belts for minor cracks. 2003 Saturn L200 2003 ENGINE Engine Mechanical - 2.2L (L61) - Saturn L Series steve Monday, May 09, 2011 12:52:00 PM Page 59 © 2006 Mitchell Repair Information Company, LLC.
  • 60. 2003 Saturn L200 2003 ENGINE Engine Mechanical - 2.2L (L61) - Saturn L Series steve Monday, May 09, 2011 12:52:00 PM Page 60 © 2006 Mitchell Repair Information Company, LLC.
  • 61. Fig. 25: Chunking, Cord Breakage Or Separation DO Warrant Drive Belt Replacement Courtesy of GENERAL MOTORS CORP. Belts that have chunking longer than 5 mm (13/16 in) in one or more places should be replaced. Belts should also be replaced if cord breakage or fabric separation is observed. DRIVE BELT TENSIONER DIAGNOSIS Drive Belt Tensioner Diagnosis REPAIR INSTRUCTIONS DRIVE BELT REPLACEMENT Removal Procedure Step Action Yes No 1 Remove the drive belt. Inspect the drive belt tensioner pulley. Is the drive belt tensioner pulley loose or misaligned? Go to Step 4 Go to Step 2 2 Rotate the drive belt tensioner. Does the tensioner rotate without any unusual resistance or binding? Go to Step 3 Go to Step 4 3 1. Use a torque wrench in order to measure the torque required to move the tensioner off of the stop. 2. Use a torque wrench on a known good tensioner in order to measure the torque required to move the tensioner off of the stop. Is the first torque reading within 10 percent of the second torque reading? System OK Go to Step 4 4 Replace the drive belt tensioner. Refer to Drive Belt Tensioner Replacement. Is the repair complete? System OK - 2003 Saturn L200 2003 ENGINE Engine Mechanical - 2.2L (L61) - Saturn L Series steve Monday, May 09, 2011 12:52:00 PM Page 61 © 2006 Mitchell Repair Information Company, LLC.
  • 62. Fig. 26: Loosening Belt Tensioner To Remove/Install Drive Belt Courtesy of GENERAL MOTORS CORP. 1. Depress the tensioner arm using a 3/8 in. drive breaker bar. 2. Remove the belt assembly off the idler or the A/C compressor pulley. 3. Remove the accessory drive belt. Installation Procedure 2003 Saturn L200 2003 ENGINE Engine Mechanical - 2.2L (L61) - Saturn L Series steve Monday, May 09, 2011 12:52:00 PM Page 62 © 2006 Mitchell Repair Information Company, LLC.
  • 63. Fig. 27: Loosening Belt Tensioner To Remove/Install Drive Belt Courtesy of GENERAL MOTORS CORP. 1. Route the belt around all of the pulleys, except for the idler pulley. 2. Depress the tensioner arm using a 3/8 in. drive breaker bar. 3. Slip the belt over the idler pulley. DRIVE BELT TENSIONER REPLACEMENT Removal Procedure IMPORTANT: Make sure that the belt is properly aligned on the pulleys. 2003 Saturn L200 2003 ENGINE Engine Mechanical - 2.2L (L61) - Saturn L Series steve Monday, May 09, 2011 12:52:00 PM Page 63 © 2006 Mitchell Repair Information Company, LLC.
  • 64. Fig. 28: Loosening Belt Tensioner To Remove/Install Drive Belt Courtesy of GENERAL MOTORS CORP. 1. Remove the accessory drive belt. CAUTION: The tensioner assembly's internal parts are not serviceable. To avoid injury, do not disassemble the tensioner. 2003 Saturn L200 2003 ENGINE Engine Mechanical - 2.2L (L61) - Saturn L Series steve Monday, May 09, 2011 12:52:00 PM Page 64 © 2006 Mitchell Repair Information Company, LLC.
  • 65. Fig. 29: Removing & Installing Belt Tensioner Bolt Courtesy of GENERAL MOTORS CORP. 2. Remove the belt tensioner bolt. 3. Remove the belt tensioner. Installation Procedure 2003 Saturn L200 2003 ENGINE Engine Mechanical - 2.2L (L61) - Saturn L Series steve Monday, May 09, 2011 12:52:00 PM Page 65 © 2006 Mitchell Repair Information Company, LLC.
  • 66. Fig. 30: Removing & Installing Belt Tensioner Bolt Courtesy of GENERAL MOTORS CORP. 1. Install the belt tensioner attachment bolt. Tighten: Tighten the drive belt tensioner bolt 45 N.m (33 lb ft). NOTE: Refer to FASTENER NOTICE in Cautions and Notices. 2003 Saturn L200 2003 ENGINE Engine Mechanical - 2.2L (L61) - Saturn L Series steve Monday, May 09, 2011 12:52:00 PM Page 66 © 2006 Mitchell Repair Information Company, LLC.
  • 67. Fig. 31: Loosening Belt Tensioner To Remove/Install Drive Belt Courtesy of GENERAL MOTORS CORP. 2. Install the accessory drive belt. ENGINE OIL PRESSURE SENSOR AND/OR SWITCH REPLACEMENT Removal Procedure 2003 Saturn L200 2003 ENGINE Engine Mechanical - 2.2L (L61) - Saturn L Series steve Monday, May 09, 2011 12:52:00 PM Page 67 © 2006 Mitchell Repair Information Company, LLC.
  • 68. Fig. 32: Disconnecting Engine Oil Pressure Switch Courtesy of GENERAL MOTORS CORP. 1. Turn the ignition OFF. 2. Disconnect the engine oil pressure (EOP) switch harness connector. 3. Remove the EOP switch using a 1 1/6 inch deep well socket. Installation Procedure 1. Apply the RTV sealant, or equivalent, to the EOP switch threads. NOTE: Refer to FASTENER NOTICE in Cautions and Notices. 2003 Saturn L200 2003 ENGINE Engine Mechanical - 2.2L (L61) - Saturn L Series steve Monday, May 09, 2011 12:52:00 PM Page 68 © 2006 Mitchell Repair Information Company, LLC.
  • 69. 2. Install the EOP switch. Tighten: Tighten the engine oil pressure switch to 10 N.m (89 lb in). 3. Connect the EOP switch harness connector. Push in the connector until a click is heard, then pull back to confirm a positive engagement. 4. Check the oil level and fill if low. 5. Start the engine and check the engine for leaks. ENGINE MOUNT INSPECTION 1. Support the engine. 2. Observe the engine mount while raising the engine. Raising the engine removes the weight from the engine mount and creates slight tension on the rubber. 3. Replace the engine mount if the engine mount exhibits any of the following conditions:  The hard rubber is covered with heat check cracks.  The rubber is separated from the metal plate of the engine mount.  The rubber is split through the center of the engine mount.  The engine mount itself is leaking fluid. 4. For engine mount replacement. Refer to Engine Mount Replacement. POWERTRAIN MOUNT BALANCE PROCEDURE - TOTAL MOUNT (W/AUTOMATIC TRANSAXLE) 1. Raise and support the vehicle. Refer to Lifting and Jacking the Vehicle in General Information. IMPORTANT: Before replacing any engine mount due to suspected fluid loss, verify that the source of the fluid is the engine mount, not the engine or accessories. IMPORTANT: Follow the balance procedure in the order listed in the following steps. Powertrain mounts must be tightened in sequence. 2003 Saturn L200 2003 ENGINE Engine Mechanical - 2.2L (L61) - Saturn L Series steve Monday, May 09, 2011 12:52:00 PM Page 69 © 2006 Mitchell Repair Information Company, LLC.
  • 70. Fig. 33: Removing/Installing Front Transaxle Mount Through Bolt Courtesy of GENERAL MOTORS CORP. 2. Loosen the front transmission mount through bolt. Do not remove. 2003 Saturn L200 2003 ENGINE Engine Mechanical - 2.2L (L61) - Saturn L Series steve Monday, May 09, 2011 12:52:00 PM Page 70 © 2006 Mitchell Repair Information Company, LLC.
  • 71. Fig. 34: Removing & Installing Rear Exhaust Manifold Heat Shield Courtesy of GENERAL MOTORS CORP. 3. Loosen the rear transmission mount through bolt. Do not remove. 4. Position two floor jacks with wood blocks under the engine and transmission to support the powertrain assembly. 2003 Saturn L200 2003 ENGINE Engine Mechanical - 2.2L (L61) - Saturn L Series steve Monday, May 09, 2011 12:52:00 PM Page 71 © 2006 Mitchell Repair Information Company, LLC.
  • 72. Fig. 35: Locating Transmission Mount-To-Transmission Bolts Courtesy of GENERAL MOTORS CORP. 5. From the engine compartment, loosen the transmission mount to transmission bolts. 2003 Saturn L200 2003 ENGINE Engine Mechanical - 2.2L (L61) - Saturn L Series steve Monday, May 09, 2011 12:52:00 PM Page 72 © 2006 Mitchell Repair Information Company, LLC.
  • 73. Fig. 36: Locating Engine Mount-To-Intermediate Bracket Bolts Courtesy of GENERAL MOTORS CORP. 6. Loosen the engine mount to intermediate bracket bolts. 7. Reposition the floor jacks to allow a 1/8 inch gap between the mount and mount bracket. 2003 Saturn L200 2003 ENGINE Engine Mechanical - 2.2L (L61) - Saturn L Series steve Monday, May 09, 2011 12:52:00 PM Page 73 © 2006 Mitchell Repair Information Company, LLC.
  • 74. Fig. 37: Locating Transmission Mount-To-Transmission Bolts Courtesy of GENERAL MOTORS CORP. 8. Tighten the transmission mount to transmission bolts using the following sequence: 1. Rear bolt 2. Middle bolt 3. Front bolt Tighten: Tighten the bolts to 55 N.m (41 lb ft). NOTE: Refer to FASTENER NOTICE in Cautions and Notices. 2003 Saturn L200 2003 ENGINE Engine Mechanical - 2.2L (L61) - Saturn L Series steve Monday, May 09, 2011 12:52:00 PM Page 74 © 2006 Mitchell Repair Information Company, LLC.
  • 75. Fig. 38: Locating Engine Mount-To-Intermediate Bracket Bolts Courtesy of GENERAL MOTORS CORP. 9. Tighten the engine mount to intermediate bracket bolts starting with the center bolt. Tighten: Tighten the bolts to 55 N.m (41 lb ft). 10. Remove the floor jacks. 11. Shake the powertrain vigorously from front to rear and allow the powertrain to settle. 2003 Saturn L200 2003 ENGINE Engine Mechanical - 2.2L (L61) - Saturn L Series steve Monday, May 09, 2011 12:52:00 PM Page 75 © 2006 Mitchell Repair Information Company, LLC.
  • 76. Fig. 39: Locating Rear Transmission Mount Through-Bolt - Automatic Transaxle Courtesy of GENERAL MOTORS CORP. 12. Tighten the rear transmission mount through bolt. Tighten: Tighten the bolts to 90 N.m (66 lb ft). 2003 Saturn L200 2003 ENGINE Engine Mechanical - 2.2L (L61) - Saturn L Series steve Monday, May 09, 2011 12:52:00 PM Page 76 © 2006 Mitchell Repair Information Company, LLC.
  • 77. Fig. 40: Removing/Installing Front Transaxle Mount Through Bolt Courtesy of GENERAL MOTORS CORP. 13. Tighten the front transmission mount through bolt. Tighten: Tighten the bolts to 60 N.m (44 lb ft). 14. Lower the vehicle. POWERTRAIN MOUNT BALANCE PROCEDURE - TOTAL MOUNT (W/MANUAL TRANSAXLE) IMPORTANT: Follow the balance procedure in the order listed in the following steps. Powertrain mounts must be tightened in sequence. 2003 Saturn L200 2003 ENGINE Engine Mechanical - 2.2L (L61) - Saturn L Series steve Monday, May 09, 2011 12:52:00 PM Page 77 © 2006 Mitchell Repair Information Company, LLC.
  • 78. 1. Raise and support the vehicle. Refer to Lifting and Jacking the Vehicle in General Information. Fig. 41: Locating Front Transmission Mount Through-Bolt - Manual Transaxle Courtesy of GENERAL MOTORS CORP. 2. Loosen the front transmission mount through bolt. Do not remove. 2003 Saturn L200 2003 ENGINE Engine Mechanical - 2.2L (L61) - Saturn L Series steve Monday, May 09, 2011 12:52:00 PM Page 78 © 2006 Mitchell Repair Information Company, LLC.
  • 79. Fig. 42: Locating Rear Transmission Mount Through-Bolt - Manual Transaxle Courtesy of GENERAL MOTORS CORP. 3. Loosen the rear transmission mount through bolt. Do not remove. 4. Position two floor jacks with wood blocks under the engine and transmission to support the powertrain assembly. 2003 Saturn L200 2003 ENGINE Engine Mechanical - 2.2L (L61) - Saturn L Series steve Monday, May 09, 2011 12:52:00 PM Page 79 © 2006 Mitchell Repair Information Company, LLC.
  • 80. Fig. 43: Locating Transmission Mount-To-Transmission Bolts Courtesy of GENERAL MOTORS CORP. 5. From the engine compartment, loosen the transmission mount to transmission bolts. 2003 Saturn L200 2003 ENGINE Engine Mechanical - 2.2L (L61) - Saturn L Series steve Monday, May 09, 2011 12:52:00 PM Page 80 © 2006 Mitchell Repair Information Company, LLC.
  • 81. Fig. 44: Locating Engine Mount-To-Intermediate Bracket Bolts Courtesy of GENERAL MOTORS CORP. 6. Loosen the engine mount to intermediate bracket bolts. 7. Reposition the floor jacks to allow a 1/8 inch gap between the mount and mount bracket. 2003 Saturn L200 2003 ENGINE Engine Mechanical - 2.2L (L61) - Saturn L Series steve Monday, May 09, 2011 12:52:00 PM Page 81 © 2006 Mitchell Repair Information Company, LLC.
  • 82. Fig. 45: Locating Transmission Mount-To-Transmission Bolts Courtesy of GENERAL MOTORS CORP. 8. Tighten the transmission mount to transmission bolts using the following sequence: 1. Rear bolt 2. Middle bolt 3. Front bolt Tighten: Tighten the bolts to 55 N.m (41 lb ft). NOTE: Refer to FASTENER NOTICE in Cautions and Notices. 2003 Saturn L200 2003 ENGINE Engine Mechanical - 2.2L (L61) - Saturn L Series steve Monday, May 09, 2011 12:52:00 PM Page 82 © 2006 Mitchell Repair Information Company, LLC.
  • 83. Fig. 46: Locating Engine Mount-To-Intermediate Bracket Bolts Courtesy of GENERAL MOTORS CORP. 9. Tighten the engine mount to intermediate bracket bolts starting with the center bolt. Tighten: Tighten the bolts to 55 N.m (41 lb ft). 10. Remove the floor jacks. 11. Shake the powertrain vigorously from front to rear and allow the powertrain to settle. 2003 Saturn L200 2003 ENGINE Engine Mechanical - 2.2L (L61) - Saturn L Series steve Monday, May 09, 2011 12:52:00 PM Page 83 © 2006 Mitchell Repair Information Company, LLC.
  • 84. Fig. 47: Locating Rear Transmission Mount Through-Bolt - Manual Transaxle Courtesy of GENERAL MOTORS CORP. 12. Tighten the rear transmission mount through bolt. Tighten: Tighten the bolts to 60 N.m (44 lb ft). 2003 Saturn L200 2003 ENGINE Engine Mechanical - 2.2L (L61) - Saturn L Series steve Monday, May 09, 2011 12:52:00 PM Page 84 © 2006 Mitchell Repair Information Company, LLC.
  • 85. Fig. 48: Locating Front Transmission Mount Through-Bolt - Manual Transaxle Courtesy of GENERAL MOTORS CORP. 13. Tighten the front transmission mount through bolt. Tighten: Tighten the bolts to 55 N.m (41 lb ft). 14. Lower the vehicle. POWERTRAIN MOUNT BALANCE PROCEDURE - LOWER MOUNT (W/AUTOMATIC TRANSAXLE) IMPORTANT: Follow the balance procedure in the order listed in the following steps. Powertrain mounts must be tightened in sequence. 2003 Saturn L200 2003 ENGINE Engine Mechanical - 2.2L (L61) - Saturn L Series steve Monday, May 09, 2011 12:52:01 PM Page 85 © 2006 Mitchell Repair Information Company, LLC.
  • 86. 1. Raise and support the vehicle. Refer to Lifting and Jacking the Vehicle in General Information. Fig. 49: Removing/Installing Front Transaxle Mount Through Bolt Courtesy of GENERAL MOTORS CORP. 2. Loosen the front transmission mount through bolt. Do not remove. 2003 Saturn L200 2003 ENGINE Engine Mechanical - 2.2L (L61) - Saturn L Series steve Monday, May 09, 2011 12:52:01 PM Page 86 © 2006 Mitchell Repair Information Company, LLC.
  • 87. Fig. 50: Locating Rear Transmission Mount Through-Bolt - Automatic Transaxle Courtesy of GENERAL MOTORS CORP. 3. Loosen the rear transmission mount through bolt. Do not remove. 4. Shake the powertrain vigorously from front to rear and allow powertrain to settle. 5. Tighten the rear transmission mount through bolt. Tighten: Tighten the bolt to 90 N.m (66 lb ft). NOTE: Refer to FASTENER NOTICE in Cautions and Notices. 2003 Saturn L200 2003 ENGINE Engine Mechanical - 2.2L (L61) - Saturn L Series steve Monday, May 09, 2011 12:52:01 PM Page 87 © 2006 Mitchell Repair Information Company, LLC.
  • 88. Fig. 51: Removing/Installing Front Transaxle Mount Through Bolt Courtesy of GENERAL MOTORS CORP. 6. Tighten the front transmission mount through bolt. Tighten: Tighten the bolt to 60 N.m (44 lb ft). 7. Lower the vehicle. POWERTRAIN MOUNT BALANCE PROCEDURE - LOWER MOUNT (W/MANUAL TRANSAXLE) IMPORTANT: Follow the balance procedure in the order listed in the following steps. Powertrain mounts must be tightened in sequence. 2003 Saturn L200 2003 ENGINE Engine Mechanical - 2.2L (L61) - Saturn L Series steve Monday, May 09, 2011 12:52:01 PM Page 88 © 2006 Mitchell Repair Information Company, LLC.
  • 89. 1. Raise and support the vehicle. Refer to Lifting and Jacking the Vehicle in General Information. Fig. 52: Locating Front Transmission Mount Through-Bolt - Manual Transaxle Courtesy of GENERAL MOTORS CORP. 2. Loosen the front transmission mount through bolt. Do not remove. 2003 Saturn L200 2003 ENGINE Engine Mechanical - 2.2L (L61) - Saturn L Series steve Monday, May 09, 2011 12:52:01 PM Page 89 © 2006 Mitchell Repair Information Company, LLC.
  • 90. Fig. 53: Locating Rear Transmission Mount Through-Bolt - Manual Transaxle Courtesy of GENERAL MOTORS CORP. 3. Loosen the rear transmission mount through bolt. Do not remove. 4. Shake the powertrain vigorously from front to rear and allow powertrain to settle. 5. Tighten the rear transmission mount through bolt. Tighten: Tighten the bolt to 60 N.m (44 lb ft). NOTE: Refer to FASTENER NOTICE in Cautions and Notices. 2003 Saturn L200 2003 ENGINE Engine Mechanical - 2.2L (L61) - Saturn L Series steve Monday, May 09, 2011 12:52:01 PM Page 90 © 2006 Mitchell Repair Information Company, LLC.
  • 91. Fig. 54: Locating Front Transmission Mount Through-Bolt - Manual Transaxle Courtesy of GENERAL MOTORS CORP. 6. Tighten the front transmission mount through bolt. Tighten: Tighten the bolt to 55 N.m (41 lb ft). 7. Lower the vehicle. ENGINE MOUNT BRACKET REPLACEMENT Removal Procedure 2003 Saturn L200 2003 ENGINE Engine Mechanical - 2.2L (L61) - Saturn L Series steve Monday, May 09, 2011 12:52:01 PM Page 91 © 2006 Mitchell Repair Information Company, LLC.
  • 92. Fig. 55: Exploded View Of Engine Mount Assembly Courtesy of GENERAL MOTORS CORP. 1. Remove the engine mount. Refer to Engine Mount Replacement. 2003 Saturn L200 2003 ENGINE Engine Mechanical - 2.2L (L61) - Saturn L Series steve Monday, May 09, 2011 12:52:01 PM Page 92 © 2006 Mitchell Repair Information Company, LLC.
  • 93. Fig. 56: Removing & Installing Engine Mount Bracket Courtesy of GENERAL MOTORS CORP. 2. Remove the engine mount bracket to engine bolts. 3. Remove the engine mount bracket from the engine. Installation Procedure NOTE: Refer to FASTENER NOTICE in Cautions and Notices. 2003 Saturn L200 2003 ENGINE Engine Mechanical - 2.2L (L61) - Saturn L Series steve Monday, May 09, 2011 12:52:01 PM Page 93 © 2006 Mitchell Repair Information Company, LLC.