The user's manual provides instructions for using a washing machine. It describes the main features like the fuzzy control, transparent window, pulsator, and waterfall flow. It provides safety instructions that users should follow to prevent electric shocks or fires. The manual also illustrates and labels the main parts of the washing machine like the control panel, water supply hoses, drain hose, detergent box, and spin basket. It explains the different wash cycles and provides guidance on installation, maintenance, and troubleshooting.
Automatic Irrigation System merupakan sebuah prototipe untuk suatu sistem irigasi atau pengairan secara otomatis berbasis mikrokontroller Arduino yang diintegerasikan dengan sensor jarak (Ultrasonic Sensor), motor dinamo dan pompa (pump) dengan menggunakan indikator lampu LED.
Disusun oleh :
Andika Jamal Nurganda 151611004
Putri Sintia Sari 151611021
Rizki Verdian 151611025
Program Studi D3-Teknik Refrigerasi & Tata Udara
Politeknik Negeri Bandung
2016
The JLL D100 treadmill is intended to every family member can use it thanks to the Digital Controller technology which makes the change of speed smoother and safer. The D100 running machine starts at 0.3 km/h (the lowest speed available in the UK market) which makes this home treadmill great for those who are in rehabilitation of injuries and elderly people.
Best folding treadmill for home, Foldable and easy transport. Great for homes with limited space. Shock absorption system that reduces the impact to your joints. Suitable for all age groups.
Digital Controller Technology combined with the lowest start up speed in the U.K of 0.3km/h and reaching a maximum of 16km/h this foldable treadmill is smooth, responsive and safe.
Motor: DC Continuous Power 2.5 HP (1800W), Peak Power 4.5 HP (3350W)
Speed: 0.3-16 km/h = 0.18 - 10 mph
Running Area: 115 cm (length) x 40 cm(width) / 45.3" x 15.8"
Maximum User Weight: 120 kg or 18.8 St or 264 lb
Running Programmes: 10 (you can re-set the 3 first programmes)
Entertainment: High Powered Speakers, iPod/iPhone/MP3 Connectivity and USB interface
Sensor built into the Handrails
Emergency stop safety key, smooth start/stop function, heart rate control program, safety handrail with speed buttons
Shock Absorption System
CrystalClear Pool Pump 637R manual, Intex KrystalClear pool filter pump manual.ported to slideshow by Corvoxpoolandspapparts.com your rare pool and spa parts super store! all trademarks are trademarks of the rightful owners. We only want to help our clients to have a backup of their pool manuals!
Maintaining a submersible pump is crucial for ensuring its longevity and efficiency. Regular cleaning not only prevents clogs and blockages but also optimizes the pump's performance. In this comprehensive guide, we will take you through the step-by-step process of cleaning a submersible pump, equipping you with the knowledge to keep your pump running smoothly for years to come.
Neuro-symbolic is not enough, we need neuro-*semantic*Frank van Harmelen
Neuro-symbolic (NeSy) AI is on the rise. However, simply machine learning on just any symbolic structure is not sufficient to really harvest the gains of NeSy. These will only be gained when the symbolic structures have an actual semantics. I give an operational definition of semantics as “predictable inference”.
All of this illustrated with link prediction over knowledge graphs, but the argument is general.
Transcript: Selling digital books in 2024: Insights from industry leaders - T...BookNet Canada
The publishing industry has been selling digital audiobooks and ebooks for over a decade and has found its groove. What’s changed? What has stayed the same? Where do we go from here? Join a group of leading sales peers from across the industry for a conversation about the lessons learned since the popularization of digital books, best practices, digital book supply chain management, and more.
Link to video recording: https://bnctechforum.ca/sessions/selling-digital-books-in-2024-insights-from-industry-leaders/
Presented by BookNet Canada on May 28, 2024, with support from the Department of Canadian Heritage.
Accelerate your Kubernetes clusters with Varnish CachingThijs Feryn
A presentation about the usage and availability of Varnish on Kubernetes. This talk explores the capabilities of Varnish caching and shows how to use the Varnish Helm chart to deploy it to Kubernetes.
This presentation was delivered at K8SUG Singapore. See https://feryn.eu/presentations/accelerate-your-kubernetes-clusters-with-varnish-caching-k8sug-singapore-28-2024 for more details.
State of ICS and IoT Cyber Threat Landscape Report 2024 previewPrayukth K V
The IoT and OT threat landscape report has been prepared by the Threat Research Team at Sectrio using data from Sectrio, cyber threat intelligence farming facilities spread across over 85 cities around the world. In addition, Sectrio also runs AI-based advanced threat and payload engagement facilities that serve as sinks to attract and engage sophisticated threat actors, and newer malware including new variants and latent threats that are at an earlier stage of development.
The latest edition of the OT/ICS and IoT security Threat Landscape Report 2024 also covers:
State of global ICS asset and network exposure
Sectoral targets and attacks as well as the cost of ransom
Global APT activity, AI usage, actor and tactic profiles, and implications
Rise in volumes of AI-powered cyberattacks
Major cyber events in 2024
Malware and malicious payload trends
Cyberattack types and targets
Vulnerability exploit attempts on CVEs
Attacks on counties – USA
Expansion of bot farms – how, where, and why
In-depth analysis of the cyber threat landscape across North America, South America, Europe, APAC, and the Middle East
Why are attacks on smart factories rising?
Cyber risk predictions
Axis of attacks – Europe
Systemic attacks in the Middle East
Download the full report from here:
https://sectrio.com/resources/ot-threat-landscape-reports/sectrio-releases-ot-ics-and-iot-security-threat-landscape-report-2024/
GDG Cloud Southlake #33: Boule & Rebala: Effective AppSec in SDLC using Deplo...James Anderson
Effective Application Security in Software Delivery lifecycle using Deployment Firewall and DBOM
The modern software delivery process (or the CI/CD process) includes many tools, distributed teams, open-source code, and cloud platforms. Constant focus on speed to release software to market, along with the traditional slow and manual security checks has caused gaps in continuous security as an important piece in the software supply chain. Today organizations feel more susceptible to external and internal cyber threats due to the vast attack surface in their applications supply chain and the lack of end-to-end governance and risk management.
The software team must secure its software delivery process to avoid vulnerability and security breaches. This needs to be achieved with existing tool chains and without extensive rework of the delivery processes. This talk will present strategies and techniques for providing visibility into the true risk of the existing vulnerabilities, preventing the introduction of security issues in the software, resolving vulnerabilities in production environments quickly, and capturing the deployment bill of materials (DBOM).
Speakers:
Bob Boule
Robert Boule is a technology enthusiast with PASSION for technology and making things work along with a knack for helping others understand how things work. He comes with around 20 years of solution engineering experience in application security, software continuous delivery, and SaaS platforms. He is known for his dynamic presentations in CI/CD and application security integrated in software delivery lifecycle.
Gopinath Rebala
Gopinath Rebala is the CTO of OpsMx, where he has overall responsibility for the machine learning and data processing architectures for Secure Software Delivery. Gopi also has a strong connection with our customers, leading design and architecture for strategic implementations. Gopi is a frequent speaker and well-known leader in continuous delivery and integrating security into software delivery.
LF Energy Webinar: Electrical Grid Modelling and Simulation Through PowSyBl -...DanBrown980551
Do you want to learn how to model and simulate an electrical network from scratch in under an hour?
Then welcome to this PowSyBl workshop, hosted by Rte, the French Transmission System Operator (TSO)!
During the webinar, you will discover the PowSyBl ecosystem as well as handle and study an electrical network through an interactive Python notebook.
PowSyBl is an open source project hosted by LF Energy, which offers a comprehensive set of features for electrical grid modelling and simulation. Among other advanced features, PowSyBl provides:
- A fully editable and extendable library for grid component modelling;
- Visualization tools to display your network;
- Grid simulation tools, such as power flows, security analyses (with or without remedial actions) and sensitivity analyses;
The framework is mostly written in Java, with a Python binding so that Python developers can access PowSyBl functionalities as well.
What you will learn during the webinar:
- For beginners: discover PowSyBl's functionalities through a quick general presentation and the notebook, without needing any expert coding skills;
- For advanced developers: master the skills to efficiently apply PowSyBl functionalities to your real-world scenarios.
Elevating Tactical DDD Patterns Through Object CalisthenicsDorra BARTAGUIZ
After immersing yourself in the blue book and its red counterpart, attending DDD-focused conferences, and applying tactical patterns, you're left with a crucial question: How do I ensure my design is effective? Tactical patterns within Domain-Driven Design (DDD) serve as guiding principles for creating clear and manageable domain models. However, achieving success with these patterns requires additional guidance. Interestingly, we've observed that a set of constraints initially designed for training purposes remarkably aligns with effective pattern implementation, offering a more ‘mechanical’ approach. Let's explore together how Object Calisthenics can elevate the design of your tactical DDD patterns, offering concrete help for those venturing into DDD for the first time!
Essentials of Automations: Optimizing FME Workflows with ParametersSafe Software
Are you looking to streamline your workflows and boost your projects’ efficiency? Do you find yourself searching for ways to add flexibility and control over your FME workflows? If so, you’re in the right place.
Join us for an insightful dive into the world of FME parameters, a critical element in optimizing workflow efficiency. This webinar marks the beginning of our three-part “Essentials of Automation” series. This first webinar is designed to equip you with the knowledge and skills to utilize parameters effectively: enhancing the flexibility, maintainability, and user control of your FME projects.
Here’s what you’ll gain:
- Essentials of FME Parameters: Understand the pivotal role of parameters, including Reader/Writer, Transformer, User, and FME Flow categories. Discover how they are the key to unlocking automation and optimization within your workflows.
- Practical Applications in FME Form: Delve into key user parameter types including choice, connections, and file URLs. Allow users to control how a workflow runs, making your workflows more reusable. Learn to import values and deliver the best user experience for your workflows while enhancing accuracy.
- Optimization Strategies in FME Flow: Explore the creation and strategic deployment of parameters in FME Flow, including the use of deployment and geometry parameters, to maximize workflow efficiency.
- Pro Tips for Success: Gain insights on parameterizing connections and leveraging new features like Conditional Visibility for clarity and simplicity.
We’ll wrap up with a glimpse into future webinars, followed by a Q&A session to address your specific questions surrounding this topic.
Don’t miss this opportunity to elevate your FME expertise and drive your projects to new heights of efficiency.
GraphRAG is All You need? LLM & Knowledge GraphGuy Korland
Guy Korland, CEO and Co-founder of FalkorDB, will review two articles on the integration of language models with knowledge graphs.
1. Unifying Large Language Models and Knowledge Graphs: A Roadmap.
https://arxiv.org/abs/2306.08302
2. Microsoft Research's GraphRAG paper and a review paper on various uses of knowledge graphs:
https://www.microsoft.com/en-us/research/blog/graphrag-unlocking-llm-discovery-on-narrative-private-data/
Securing your Kubernetes cluster_ a step-by-step guide to success !KatiaHIMEUR1
Today, after several years of existence, an extremely active community and an ultra-dynamic ecosystem, Kubernetes has established itself as the de facto standard in container orchestration. Thanks to a wide range of managed services, it has never been so easy to set up a ready-to-use Kubernetes cluster.
However, this ease of use means that the subject of security in Kubernetes is often left for later, or even neglected. This exposes companies to significant risks.
In this talk, I'll show you step-by-step how to secure your Kubernetes cluster for greater peace of mind and reliability.
Dev Dives: Train smarter, not harder – active learning and UiPath LLMs for do...UiPathCommunity
💥 Speed, accuracy, and scaling – discover the superpowers of GenAI in action with UiPath Document Understanding and Communications Mining™:
See how to accelerate model training and optimize model performance with active learning
Learn about the latest enhancements to out-of-the-box document processing – with little to no training required
Get an exclusive demo of the new family of UiPath LLMs – GenAI models specialized for processing different types of documents and messages
This is a hands-on session specifically designed for automation developers and AI enthusiasts seeking to enhance their knowledge in leveraging the latest intelligent document processing capabilities offered by UiPath.
Speakers:
👨🏫 Andras Palfi, Senior Product Manager, UiPath
👩🏫 Lenka Dulovicova, Product Program Manager, UiPath
Monitoring Java Application Security with JDK Tools and JFR Events
20060214185511218 bp5 01124-j-cas-en[1]
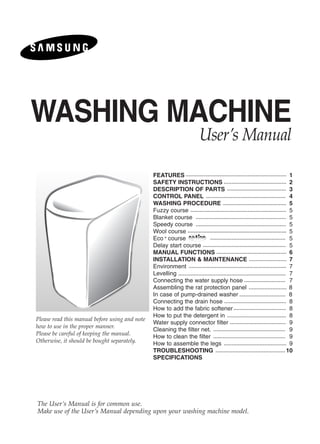
1. WASHING MACHINE
User’s Manual
FEATURES 1
SAFETY INSTRUCTIONS 2
DESCRIPTION OF PARTS 3
CONTROL PANEL 4
WASHING PROCEDURE 5
Fuzzy course 5
Blanket course 5
Speedy course 5
Wool course 5
Eco course 5
Delay start course 5
MANUAL FUNCTIONS 6
INSTALLATION & MAINTENANCE 7
Environment 7
Levelling 7
Connecting the water supply hose 7
Assembling the rat protection panel 8
In case of pump-drained washer 8
Connecting the drain hose 8
How to add the fabric softener 8
How to put the detergent in 8
Please read this manual before using and note
Water supply connector filter 9
how to use in the proper manner.
Cleaning the filter net. 9
Please be careful of keeping the manual.
How to clean the filter 9
Otherwise, it should be bought separately. How to assemble the legs 9
TROUBLESHOOTING 10
SPECIFICATIONS
The User’s Manual is for common use.
Make use of the User’s Manual depending upon your washing machine model.
2. FEATURES
FUZZY CONTROL
• Fuzzy control operates with best washing course
by sensing the washload like artificial intelligence.
TRANSPARENT WINDOW
• This Transparent Window is the new concept to solve the curiosity
of users to see inside of washing machine while operation.
While operation, the laundry progress inside of washing machine can be checked by
looking through the transparent window.
PULSATOR
• The Pulsator helps water and detergent to go through fabrics efficiently
while providing both the powerful water action to clean larger and heavier clothes and
the gentle water action to clean all delicates with less wear and tear on clothes.
WATERFALL FLOW
• The Waterfall Flow injected from under the pulsator cascades with full force back into the tub,
pushing down any clothes that float right under the water surface. It is this Waterfall Flow that
enables this washing machine to effectively wash large and heavy items, such as bluejeans
and blankets.
MAGIC FILTER
• This unique magic Filter ensures that all the lint inside the tub is captured for top quality filtering
results to deliver consistently effective cleaning results.
SOFTENER DISPENSER
• The Softener Dispenser releases the fabric
softener at the appropriate time when the last
rinsing proceeds.
CAS SYSTEM
• Child Lock Function ( page2)
• Auto Restart
The power is turned on automatically after power failure.
• Saving Energy
The Eco+ course, it is a wash course to saving the energy
reduces laundry time for frequent and soiled clothes.
1
3. SAFETY INSTRUCTIONS
Please note that the following precautions for safety intend to prevent unpredictable danger and damage
by helping the proper use in safety.
When using hot water in washing, please make sure that the water should not exceed 50˚C.
• Plastic parts may be deformed or damaged, and an electric shock or a fire may take place.
WARNING CAUTIONS
There might be serious injury or fatal accident when There might be a slight injury or damage when you
you violate this instruction. violate this instruction.
If the power supply cord or plug is damaged or Don’t’ install it in the area with moisture or outdoor
loosened, do not use. where it has rain or snow
• An electric shock or a fire may take place. • An electric shock or a fire may take place.
Do not pull the cord off or touch it with moist hands. Please unplug the power supply cord when you do
• An electric shock or a fire may take place. not use it.
Do not bend the power supply cord by force or • An electric shock or a fire may take place.
press it with heavy things. If there is dust or water on the power supply plug
• An electric shock or a fire may take place. and its connected part, please remove it completely.
Do not install the washer nearby electric implement or • An electric shock or a fire may take place.
don’t put a candle light or cigarette light on the washer. Do not make your kids look into the inside of the
• A fire may take place. washer.
Do not disassemble, repair or remodel it recklessly. • If your kid falls into the washer, his life could be
• When you need to repair it, please call service in danger.
agent. An electric shock or a fire may take place. Ventilate immediately without touching the power
During operation, do not put your hands or metal plug if gas is leaking.
materials under the washer. • An electric shock or a fire may take place if it
• You may be hurt by spinning board beneath catches flame.
the washer.
If the washer makes strange noise, smell or smoke,
Stay away from the washer when the bottom of the unplug it promptly and call service agent.
washer sinks into the water. • An electric shock or a fire may take place.
• There might be an electric shock. Please
wait until the water drains out completely. When cleaning, don’t spray water to the parts of the
washer directly.
Do not put laundry stained with gasoline, benzene, • It may make it’s life span shorten.
or alcohol in the washer, and keep the materials Also an electric shock or fire may take place
away from the washer.
• An explosion or a fire may take place. Don’t use several appliances together with an outlet.
• A fire may take place due to unusual heat.
During spinning, don’t put your hand in the spinning tub.
• It may hurt your hands. If it does not stop within Don’t press the button with an awl or pin.
15 seconds after you open the lid, call • An electric shock or a fire may take place.
service agent immediately.
Child-Lock function: This is a device to protect children from being accidentally hurt while
playing with the washer.
How to start the Child-Lock function:
- Press the "Power" button to go to an initial washing mode.
- By pressing "Start/Hold" button, you start washing and in case Child Lock function is needed during the laundry
- Push the "Course" button and get the function started.
(Note: You cannot perform the function without the "Power" button on.)
In the event that you would like to modify the Child-Lock function, "L" signal flashes in the "signal window
showing the rest of the set time" every two seconds, which means it is locked and indicates how much
time is left until the function is released.
To release the function of Child-Lock:
- In case the "Child-Lock" is programmed, press both the "Function" and "Course" buttons in sequence.
2
4. WATER SUPPLY HOSE(HOT)
FILTER LID
Be sure to keep the lid WATER SUPPLY HOSE (COLD)
closed during washing
and spinning.
DRAIN-HOSE (PUMP)
Lint will be collected in
the filter during DETERGENT BOX
washing.
FABRIC SOFTENER
DISPENSER
SPIN BASKET
POWER CORD
3
BLEACH INLET
PULSATOR
GROUND LEAD
The User’s Manual is for common use.
When the water pipe is
FRONT CONTROL
DESCRIPTION OF PARTS
metal, make sure to cover
PANEL the end of the ground wire.
WATER DRAIN HOSE
ADJUSTABLE LEGS
Make use of the User’s Manual depending upon your washing machine model.
Adjust the length
of the legs when
installing the washer.
SOUND ABSORPTION
PANEL
5. CONTROL PANEL
For more details, see control panel of your washing machine.
POWER BUTTON POWER
Press this button once to operate.
Press once again to turn the power off.
START/
START/HOLD BUTTON HOLD
Use to pause and restart the operation.
To change the washing procedure during operation, press this button to stop,
and once again to restart after changing the procedure.
DELAY START BUTTON DELAY
START
Press this button when delay start washing is needed.
COURSE
COURSE SELECT BUTTON
With every press of this button, the washing course changes;
FUZZY ➔ BLANKET➔ SPEEDY ➔ WOOL ➔ ECO ➔ FUZZY
FUNCTION
FUNCTION SELECT BUTTON
With every press of this button, the function changes; SOAK,WASH,RI NSE,SPI N ➔
WASH ➔ RINSE ➔ SPIN ➔ WASH&RINSE ➔ RINSE&SPIN ➔ WASH,RINSE,SPIN
WATER LEVEL SELECT BUTTON WATER
LEVEL
According to the washload,select the water level ;
MED ➔ HIGH ➔ EXTRA LOW ➔ LOW
WATER
SUPPLY
WATER SUPPLY SELECT BUTTON
As you press this button, the type of water is selected as follows.
COLD ➔ COLD + HOT ➔ HOT ➔ COLD
REMAINING TIME INDICATOR LIGHT
The indicator light shows the remaining time (in minutes) of each wash cycle.
At the end of the cycle,the power automatically switches off.
4
6. WASHING PROCEDURE
Before starting washing, check the following; Put the laundry into the washer and add detergent, too.
Connect the water supply hose to the water tap. Leave a tap Be careful not to overload. Use right detergent
open. Plug the power cord in. Make sure to lay down the for the fabrics you are washing.
drain hose. (In case no drain pump)
FUZZY COURSE WOOL COURSE START/
START/ POWER COURSE
Selects the best washing course POWER HOLD HOLD
automatically.
1. Press the POWER Button to"ON". 1.Press the power button to "ON".
2. Press the START/HOLD button. 2.Press the course select three times.
Water level is selected automatically. 3.Press the START/HOLD button.
Washing,rinsing, and spinning follow. Washing,rinsing, and spinning follow.
If you want to pause, press the START/HOLD If you want to pause, press the START/HOLD
button again.You can change the course when paused. button again.You can change the course when paused.
3. Close the lid. 4. Close the lid.
CAUTION . . .
-Do not use water above 30˚C for WOOL washing.
-Refer to the tag attached on the clothes for washing
BLANKET COURSE information.
-Fasten buttons and turn inside out before washing.
START/ -Use the detergent indicated in the laundry.
POWER COURSE HOLD
-When the degree of dirt is extreme, soak the laundry in warm
water for about 10 minutes before pressing the WOOL course
1. Press the power button to "ON".
button in order to enhance washing efficiency.
2. Press the course select button once.
3. Press the START/HOLD button
Water level is selected automatically.
Washing, rinsing, and spinning follow. ECO COURSE
If you want to pause, press the START/HOLD
button again.You can change the course when paused. START/
POWER COURSE HOLD
4. Close the lid.
1. Press the power button to "ON".
2. Press the course select button four times.
3. Press the START/HOLD button
SPEEDY COURSE Water level is selected automatically.
Washing, rinsing, and spinning follow.
POWER COURSE
START/ If you want to pause, press the START/HOLD
HOLD
button again.You can change the course when paused.
Because washing is speedy, it is 4. Close the lid.
good for light or less stained laundry.
1. Press the power button to "ON".
2. Press the course select button twice. DELAY START COURSE
3. Press the START/HOLD button
Water level is selected automatically. POWER COURSE DELAY START/
Washing, rinsing, and spinning follow. START HOLD
If you want to pause, press the START/HOLD Select this course when you have to go out or do
button again.You can change the course when paused.
something else.
4. Close the lid.
1. Press the power button to "ON".
2. Press the DELAY START button once.
You may change the delay start time with
use the DEALY START button. (from 3 hours to 18 hours)
3. Press the START/HOLD button and put
the proper amount of detergent into tub.
4. Close the lid.
The washing finishes by the time you reserved.
5
7. MANUAL FUNCTIONS
Each washing course changes manually.
Ex) If you want to wash in the speedy course : Power - Select speedy course - Wash - Start/Hold button
SOAK FUNCTION (Including WASH, RINSE, SPIN)
Press the POWER button.
Select the course(Press the course button).
FUNCTION START/ ➔ FUZZY, BLANKET, SPEED, WOOL, ECO
POWER COURSE
HOLD Press the FUNCTION SELECT button once.
once Press the START/HOLD button once.
Water level is selected automatically.
Washing,rinsing, and spinning follow.
WASH ONLY
Press the POWER button.
Press the FUNCTION SELECT button twice.
START/
POWER FUNCTION Press the START/HOLD button once.
HOLD
Washing goes on for 18 minutes.
twice
When the FUNCTION button is pressed during washing, the wash
time can be changed to between 3 and 25 minutes in duration.
RINSE ONLY
Press the FUNCTION button three times.
START/ Press the START/HOLD button once.
POWER FUNCTION
HOLD Rinsing goes on for 15 minutes.
three times When the FUNCTION button is pressed during rinsing, the rinse
times can be changed to between 1 to 5 times in duration.
SPIN ONLY
POWER FUNCTION
START/ Press the FUNCTION button four times.
HOLD Press the START/HOLD button once.
four times Spin drying goes on for 11 minutes.
When the FUNCTION button is pressed during spinning,
the spin time can be changed to from 1 to 7 minutes.
WASH AND RINSE
START/
Press the FUNCTION button five times.
POWER FUNCTION Press the START/HOLD button once.
HOLD
Washing and rinsing go on for 38 minutes.
five times
When the FUNCTION button is pressed during working, the rinse
times can be changed to between 1 to 5 times in duration.
RINSE AND SPIN
START/ Press the FUNCTION button six times.
POWER FUNCTION
HOLD Press the START/HOLD button once.
six times Rinsing and spin drying follow.
When the FUNCTION button is pressed during working, the rinse
times can be changed to between 1 and 5 times in duration.
6
8. INSTALLATION & MAINTENANCE
The User’s Manual is for common use.
Make use of the User’s Manual depending upon your washing machine model.
ENVIRONMENT Never install the washer near water.
Leave some space Do not place the washer in steamy rooms or where the
Maintain at least 10cm between the washer and the wall. washer is directly exposed to rain.Moisture may destroy the
Place the washer on a sturdy flat surface. electrical insulation causing an electrical shock hazard.
If the washer is placed on an uneven or weak surface, Avoid direct sunlight or heaters.
noise or vibration occurs. (Allowable is 1˚) As plastic and electrical components are affected by direct
Adjust the legs for even placement. heat,never place the washer near furnaces, boilers, etc.
Do not place under direct sunlight.
LEVELLING • If the washer is not leveled with the ground, it makes the machine tremble more or be out of order.
So, make sure that the washer is leveled properly.
SEE IF THE MACHINE IS PLACED LEVEL BY CHECKING 1. Adjust the side horizontally
THE POSITION OF THE WASHING TUB. first and the front
• Open the lid of the machine, pour water into the tub up to the level in same direction ❷ next.
just below the pulsator, and adjust the legs so that the pulsator is
positioned at the center of the water as shown in the figure. 2. If the thread is not
• Place the machine more than within the limit, adjust
10cm away from the wall. the height of
the legs.
• Adjust the legs on feet
for levelling .
Loosen Lock
CONNECTING THE WATER SUPPLY HOSE
1. Remove the adaptor 5. Connect the other end of the water
from the water supply hose to the inlet water valve
supply hose. at the back of the washer.
Screw the hose clockwise all the
way in.
2. First,using a "+" type 5-1.Connect the other end of the water
screw driver, loosen the supply hose to the inlet water valve
four screws on the adaptor. a at the top of the washer.
Next,take the adaptor and b
Screw the hose clockwise all the way in.
turn part(b) following the
arrow for gap about 5mm
between them.
3. Connect adaptor to the
If the water tap is a screw type,assemble
water tap by tightening
a water supply hose that fits to the
the screws firmly.
a tap as shown.
Then, turn part (b)
b
following the arrow and
put (a) and (b)together.
4. Connect the water supply NOTICE After completing connection, if water leaks from the hose,
hose to the adaptor. Pull down then repeat the same steps.
the part (c) of the water supply Use the most conventional type of faucet for water supply.
hose .When the part (c)is released, c In case the faucet is square or too big,remove the spacing
the hose is automatically ring before inserting the faucet into the adaptor.
connected to the adaptor
making a 'click' sound.
7
9. ASSEMBLING THE RAT PROTECTION PANEL
Tilt the washer a little and lift up the panel until it clicks, 1.Insert the sound
finally fix the panel with screw to the base as shown absorbing panel
in the figure. to the assembling
hole on back side
to the end.
Rear-side
2.If you have difficulty
inserting the panel
lift up the washer a
little and insert it
IN CASE OF PUMP-DRAINED WASHER
Take out the cap-hose and Be sure to join tightly the drain hose into Be sure to join tightly the drain Install the drain hose in the
connect the outlet-hose. the drain-outlet on the back of the hose into the drain-outlet position of about 90~100cm
machine. on the side of the machine. above the ground.
90~100cm
70~80cm
cap-hose
outlet-hose
CONNECTING THE DRAIN HOSE (a)
After pressing the joint ring(a), insert the drain hose(b)
to drain direction.
(b)
HOW TO ADD THE FABRIC SOFTENER
• When a proper amount (one time does) of fabric • Do not open the lid during the Spin Dry cycle.
softener is stored in the softener inlet,it is If added too early, its effectiveness will decrease.
automatically put in at the last rinsing cycle. • Do not leave the softener
• Do not use detergent, bleach or starch into into the Softener
the Softener Inlet. Dispenser for a long time.
• Using too much softener may produce Because softner
unsatisfactory results. became stiff.
HOW TO PUT THE DETERGENT IN
1.Open the detergent box by pulling in the direction of the arrow as shown in the
figure and then put the powder detergent in the detergent box.
2. Put in one-time amount of detergent evenly so the detergent may not brim over the box.
Detergent Device
Put the detergent
in proportion to
water level
Softener Device
Softener
baseline
CAUTION : If softener is stored over the above base line, it may flow down at any time.
8
10. WATER SUPPLY CONNECTOR FILTER
inlet water
valve
1.Pull out the filter and wash well. 2. Pull in the filter and connect 3. Check if there is a leakage.
the hose to the inlet water Note to tighten up the
valve tightly. connector.
CLEANING THE FILTER NET Clean the filter net often to keep the washer clean.
1. Push the upper part 2. Open the cover as 3. Clean the filter. 4. Close the cover and insert the
of the filter and pull in. shown in the figure. lower part of the filter in the
basket first and then push the
filter with "click" sound .
1. Push up and 2. Remove the collected 3. Clean the filter. 4. Pull down the filter net.
pull out the filter net. lint from the filter net.
HOW TO CLEAN THE FILTER
1. Place a rag under the washer filter not to wet the floor. (pump drained washer)
2. Rotate the filter counterclockwise 1.Place a rag under washer filter not to wet the floor.
and pull out the filter. 2.Turn the filter-cap to the left.
3. Remove dirts and rotate 3.Take the filter out and
the filter clockwise remove dirts.
until it locks in position. 4. Reassemble in
reverse order.
HOW TO ASSEMBLE THE LEGS
Hook
1. Check the 4 Legs.(Front-right. Front-left. Hole
Rear-right. Rear-left)
2
2. Lay down the Washing Machine to the front. 1
3. Insert the hook of leg in to the square hole Base
of base.
4. Push the leg to the arrow direction to “Click”.
Screw
5. Finaly fix the legs on the base
with screw like a figure.
9
11. TROUBLESHOOTING
Washing machine won't work Water dose not drain
Is the water tap opened? Is the drain hose down?(No pump)
Is the washer plugged in? Is the drain hose frozen?
Is the power cut off? Is the drain hose clogged?
Is there enough water? If the water dose not drain in 15
minutes, a buzzer will sound,and the
remaining time indicator will show "5E".
Water is not supplied
Is the water tap opened?
Is the water cut off? Spinning does not work
Is the water supply hose or hose Is the laundry spread out evenly
connection clogged? in the washer?
Is the water tap frozen? Is the washer set on a sturdy
If water is not supplied in 1 hour,a flat surface?
buzzer will sound, and the remaining
time indicator will show "4E".
Water is overflowed
Restart after spinning.
If the error sign still indicates,
call agency.
10
12. IN CASE THE NEED FOR SERVICING ARISES.
If any problem occurs with your products,do not hestitate to call any nearby.
Name, address, telephone number is required.
SPECIFICATIONS
WASH 330W HIGH 56 l
POWER
CONSUMPTION MED 49 l
SPIN 240W
STANDARD LOW 41 l
W540xD560xH850(LOW BASE) WATER LEVEL
DIMENSIONS(mm) W540xD560xH910(HIGH BASE) MIN 34 l
WEIGHT 31 kg WATER USAGE 164 l
0.05~0.78 MPa PULSATOR
WATER PRESSURE (0.5 ~ 8.0 kg . f/cm2) 113 rpm
ROTATING SPEED
WASHING TYPE Stirring Type
CODE NO. : DC68-01124J