SlideShare a Scribd company logo
2000-01 ENGINES
1.8L 4-Cylinder - Prizm
ENGINE IDENTIFICATION
Vehicle Identification Number (VIN) is located on top of dash panel, near lower left corner of
windshield. Engine may be identified by the eighth character of VIN.
ENGINE IDENTIFICATION CODES
ADJUSTMENT
VALVE CLEARANCE ADJUSTMENT
1. Disconnect negative battery cable. Disconnect all necessary control cables, hoses and
electrical connections. Remove valve cover and gasket.
2. Rotate crankshaft so cylinder No. 1 is at TDC of compression stroke. Valve lifters on
cylinder No. 1 should be loose and valve lifters on cylinder No. 4 should be tight. If they are
not, rotate crankshaft one revolution. Ensure timing mark on crankshaft pulley aligns with
"0" mark on timing belt cover.
3. Using feeler gauge, check clearance between camshaft lobe and adjusting shim for the
following: all valves on cylinder No. 1, intake valves on cylinder No. 2 and exhaust valves
on cylinder No. 3. Record all readings.
4. Rotate crankshaft 360 degrees. Check clearance between camshaft lobe and adjusting shim
for the following: all valves on cylinder No. 4, intake valves on cylinder No. 3 and exhaust
valves on cylinder No. 2. If clearance is not within specification, adjust by replacing
adjusting shim. See VALVE CLEARANCE SPECIFICATIONS table.
VALVE CLEARANCE SPECIFICATIONS
NOTE: For repair procedures not covered in this article. See ENGINE
OVERHAUL PROCEDURES article in GENERAL INFORMATION.
Application Code
Prizm LSi 1.8L 8
NOTE: Adjust valve clearance with engine cold.
Application Clearance: In. (mm)
Intake (1)
.006-.010 (.15-.25)
2000 Chevrolet Prizm
2000-01 ENGINES 1.8L 4-Cylinder - Prizm
2000 Chevrolet Prizm
2000-01 ENGINES 1.8L 4-Cylinder - Prizm
MY
Tuesday, March 31, 2009 10:43:14 AM Page 1 © 2005 Mitchell Repair Information Company, LLC.
MY
Tuesday, March 31, 2009 10:43:23 AM Page 1 © 2005 Mitchell Repair Information Company, LLC.
5. Rotate engine until camshaft lobe faces away from valve to be adjusted. Insert Valve Spring
Depressor (J-39871-1) between camshaft and adjusting shim. See Fig. 1 .
6. Install Valve Lash Spring Spacer (J-39871-2) between camshaft and valve lifter. Ensure
bottom edge of valve lash spring spacer contacts valve lifter, NOT adjusting shim. Remove
valve spring depressor. Using small screwdriver and magnet, remove adjusting shim from
valve lifter.
Fig. 1: Adjusting Valve Clearance (Typical)
Courtesy of GENERAL MOTORS CORP.
7. To determine correct adjusting shim thickness for shim replacement, measure and record
thickness of removed shim. Locate measured values of removed shim and valve clearance on
appropriate adjusting shim selection chart to determine correct shim thickness. See Fig. 2
Exhaust (1)
.010-.014 (.25-.35)
(1) Adjust valve clearance with engine cold.
2000 Chevrolet Prizm
2000-01 ENGINES 1.8L 4-Cylinder - Prizm
MY
Tuesday, March 31, 2009 10:43:14 AM Page 2 © 2005 Mitchell Repair Information Company, LLC.
and Fig. 3 .
8. Install correct shim thickness to obtain proper clearance. See VALVE CLEARANCE
SPECIFICATIONS table. Repeat procedure if necessary. Before installing valve cover,
install NEW gasket to cylinder head and NEW seal washers to valve cover. Install valve
cover in reverse order of removal.
Fig. 2: Exhaust Valve Adjusting Shim Selection Chart
Courtesy of TOYOTA MOTOR SALES, U.S.A., INC.
2000 Chevrolet Prizm
2000-01 ENGINES 1.8L 4-Cylinder - Prizm
MY
Tuesday, March 31, 2009 10:43:14 AM Page 3 © 2005 Mitchell Repair Information Company, LLC.
Fig. 3: Intake Valve Adjusting Shim Selection Chart
Courtesy of TOYOTA MOTOR SALES, U.S.A., INC.
TROUBLE SHOOTING
REMOVAL & INSTALLATION
FUEL PRESSURE RELEASE
NOTE: To trouble shoot engine mechanical components, see appropriate
table in TROUBLE SHOOTING article in GENERAL INFORMATION.
NOTE: For installation reference, label all electrical connectors, vacuum
hoses and fuel lines before removing. Also place mating marks on
engine hood and other major assemblies before removing.
2000 Chevrolet Prizm
2000-01 ENGINES 1.8L 4-Cylinder - Prizm
MY
Tuesday, March 31, 2009 10:43:14 AM Page 4 © 2005 Mitchell Repair Information Company, LLC.
1. Loosen fuel tank cap to release fuel tank pressure. Disconnect circuit opening relay located
behind radio. Start engine and allow engine to stall. Crank engine again for an additional 3
seconds, to ensure relief of any remaining pressure.
2. Disconnect negative battery cable. Connect circuit opening relay and tighten fuel filler cap.
Wrap fuel component or fitting with shop towel during removal.
ENGINE
Removal
1. Release fuel pressure. See FUEL PRESSURE RELEASE . Disconnect battery cables, and
remove battery. Remove hood. Raise and support vehicle. Drain engine oil and cooling
system. Remove lower engine splash covers.
2. Disconnect necessary coolant hoses and fuel lines. Remove air intake duct and control
cables from throttle body. Remove air cleaner. Disconnect necessary vacuum hoses,
electrical connections and engine ground wires. Remove cruise control actuator (if
equipped). Remove 4 ignition coil bolts. Remove ignition coils with spark plug wires
attached.
3. Remove serpentine belt. Unplug and remove washer reservoir. On M/T models, remove
crankshaft pulley, generator, and drive belt tensioner. Disconnect and remove oxygen sensor
and gasket. Unbolt ground wire at engine lift hook. Disconnect starter wiring, then remove
starter. Unbolt all wiring harness brackets. Ensure all electrical connectors are disconnected,
then reroute harness off to side.
4. On A/T models, remove torque converter access cover, then remove 6 torque converter
bolts. Remove power steering through-bolts and nuts. Secure power steering pump aside.
Remove exhaust pipe retainer bolts and springs from exhaust manifold. Also remove heat
shield around axle shaft boot. Remove the 4 bottom transmission-to-engine mounting bolts.
5. Lower vehicle and connect engine hoist. Unbolt upper transmission-to-engine mounting
bolts. Remove right side engine mount and bracket. Verify all hoses and wires are
disconnected from engine, then lift engine out of vehicle.
Installation
To install, reverse removal procedure. Tighten all fasteners to specification. See TORQUE
SPECIFICATIONS . Adjust all control cables. Adjust fluid levels.
INTAKE MANIFOLD
NOTE: Engine and transaxle are removed separately.
2000 Chevrolet Prizm
2000-01 ENGINES 1.8L 4-Cylinder - Prizm
MY
Tuesday, March 31, 2009 10:43:14 AM Page 5 © 2005 Mitchell Repair Information Company, LLC.
Removal
1. Disconnect negative battery cable. Drain cooling system. Disconnect throttle cable and TV
cable (A/T models) from throttle body.
2. Unhook IAT sensor from air cleaner, and remove air cleaner hose from throttle body.
Remove air cleaner top assembly. Disconnect all electrical components and coolant by-pass
hoses from throttle body.
3. Disconnect fuel injector connectors. Remove harness bolts, then disconnect wiring harness
from intake manifold. Remove intake manifold support bracket bolts and bracket.
Disconnect upper radiator hose at radiator, then remove radiator hose support bracket.
Remove injector harness support brackets. Remove intake manifold with throttle body.
Inspection
Check intake manifold for cracks and warpage. Replace intake manifold if warpage
exceeds .004" (.10 mm).
Installation
To complete installation, reverse removal procedure. Tighten all fasteners to specification. See
TORQUE SPECIFICATIONS .
EXHAUST MANIFOLD
Removal
Disconnect negative battery cable. Disconnect oxygen sensor wiring connector. Remove exhaust
manifold brace. Disconnect exhaust pipe from exhaust manifold. Remove heat shield from exhaust
manifold. Remove exhaust manifold bolts/nuts, exhaust manifold and gasket.
Inspection
Check exhaust manifold for cracks and warpage. Replace exhaust manifold if warpage
exceeds .004" (.10 mm).
Installation
To install, reverse removal procedure. Tighten bolts/nuts to specification. See TORQUE
SPECIFICATIONS .
NOTE: Always install NEW gasket whenever intake manifold is removed.
2000 Chevrolet Prizm
2000-01 ENGINES 1.8L 4-Cylinder - Prizm
MY
Tuesday, March 31, 2009 10:43:14 AM Page 6 © 2005 Mitchell Repair Information Company, LLC.
CYLINDER HEAD
Removal
1. Release fuel pressure. See FUEL PRESSURE RELEASE . Disconnect battery. Drain
cooling system and engine oil. Disconnect throttle cable, all electrical components and 2
coolant bypass hoses from throttle body. Remove air cleaner hose and upper air cleaner
assembly.
2. Disconnect temperature sensor. Disconnect fuel injector connectors and move injector
harness aside. Remove upper radiator hose, injector harness brackets, intake manifold
support brackets, oxygen sensor and gasket, and all necessary vacuum hoses.
3. Disconnect and remove ignition coils, with spark plug wires attached. Disconnect fuel line
at fuel rail, then unbolt and remove fuel rail. Disconnect all electrical connectors, hoses and
vacuum lines. Remove coolant bypass pipe. Position wiring harness aside. Remove camshaft
position and coolant temperature sensors.
4. Remove exhaust pipe bolts and springs, pipe-to-manifold seal, and support bracket bolt.
Remove PCV valve and hoses, then unbolt and remove valve cover. Remove timing chain.
See TIMING CHAIN .
5. Remove intake and exhaust camshaft sprockets. Note original location of camshaft bearing
caps for installation reference. Remove camshaft bearing cap bolts in sequence. See Fig. 4 .
Remove camshafts.
6. Using a wooden block, lift engine with a floor jack and reposition holding fixture. Loosen
cylinder head bolts in sequence. See Fig. 5 . Remove head bolts and washers. Remove
cylinder head.
NOTE: Manufacturer recommends removing timing chain and camshaft
sprockets when removing cylinder head.
2000 Chevrolet Prizm
2000-01 ENGINES 1.8L 4-Cylinder - Prizm
MY
Tuesday, March 31, 2009 10:43:14 AM Page 7 © 2005 Mitchell Repair Information Company, LLC.
2000 Chevrolet Prizm
2000-01 ENGINES 1.8L 4-Cylinder - Prizm
MY
Tuesday, March 31, 2009 10:43:14 AM Page 8 © 2005 Mitchell Repair Information Company, LLC.
Fig. 4: Camshaft Bearing Cap Bolt Removal & Installation Sequence
Courtesy of TOYOTA MOTOR SALES, U.S.A., INC.
Fig. 5: Cylinder Head Bolt Removal & Installation Sequence
2000 Chevrolet Prizm
2000-01 ENGINES 1.8L 4-Cylinder - Prizm
MY
Tuesday, March 31, 2009 10:43:14 AM Page 9 © 2005 Mitchell Repair Information Company, LLC.
Courtesy of TOYOTA MOTOR SALES, U.S.A., INC.
Fig. 6: Exploded View Of Cylinder Head & Timing Chain Components
Courtesy of TOYOTA MOTOR SALES, U.S.A., INC.
2000 Chevrolet Prizm
2000-01 ENGINES 1.8L 4-Cylinder - Prizm
MY
Tuesday, March 31, 2009 10:43:14 AM Page 10 © 2005 Mitchell Repair Information Company, LLC.
Inspection
Inspect cylinder head surface and manifold sealing areas for cracks and warpage. Replace
cylinder head if warpage exceeds specification. Inspect cylinder block deck warpage along all 4
edges and diagonally across cylinder head. Replace cylinder block if warpage exceeds
specification. See CYLINDER HEAD and CYLINDER BLOCK tables under ENGINE
SPECIFICATIONS.
Installation
1. Before installing cylinder head bolts, apply light coat of engine oil onto threads and below
bolt heads. Using multiple steps, tighten cylinder head bolts in sequence to specification.
See Fig. 5 . See TORQUE SPECIFICATIONS . Install manifolds, if removed. See
INTAKE MANIFOLD and EXHAUST MANIFOLD .
2. Reposition engine holding fixture, and support engine by support hook. Remove floorjack.
Install camshafts and timing chain. See CAMSHAFT and TIMING CHAIN . If cylinder
head components were serviced, check valve clearance. See VALVE CLEARANCE
ADJUSTMENT under ADJUSTMENTS. Install valve cover.
3. Install coolant temperature and camshaft position sensors. Tighten camshaft position sensor
bolt to specification. See TORQUE SPECIFICATIONS . Install coolant bypass pipe to
cylinder head, and tighten bolt to specification. See TORQUE SPECIFICATIONS .
4. Reinstall engine ground wires. Use new "O" rings on fuel injectors and install fuel rail to
cylinder head. Secure fuel rail with 3 bolts, and reconnect fuel line to fuel rail. Install 2
ignition coils and spark plug wires. Tighten 4 bracket bolts to specification. See TORQUE
SPECIFICATIONS . Reconnect coil connectors.
5. Raise vehicle and install exhaust manifold bracket bolt. Replace exhaust pipe seal, and
secure pipe onto manifold using 2 springs and bolts. Tighten exhaust pipe-to-manifold bolts
to specification. See TORQUE SPECIFICATIONS . Lower vehicle. Install oxygen
sensor, harness and manifold support brackets, all vacuum hoses, and all electrical
connectors.
6. Install upper radiator hose and reconnect coolant bypass hoses to throttle body. Install air
cleaner, and reconnect IAT sensor. Use 2 bolts to attach generator to engine. Tighten bolts
to specification. See TORQUE SPECIFICATIONS . Connect positive cable and
electrical connector to generator. Install serpentine belt.
7. Reconnect fluid line and washer pump connector to window washer reservoir, then reinstall
reservoir. Refill engine oil and coolant.
CRANKSHAFT FRONT SEAL
Removal & Installation
2000 Chevrolet Prizm
2000-01 ENGINES 1.8L 4-Cylinder - Prizm
MY
Tuesday, March 31, 2009 10:43:14 AM Page 11 © 2005 Mitchell Repair Information Company, LLC.
1. Crankshaft front seal is mounted in timing chain cover. See Fig. 6 . Remove serpentine belt
and crankshaft pulley bolt. Using puller, remove crankshaft pulley. Pry seal from timing
chain cover. DO NOT damage sealing surfaces.
2. Coat lip of NEW seal with grease. Using hammer and Seal Installer (SST 09309-37010),
install seal until seal surface is flush with timing chain cover. Install crankshaft pulley and
torque to specifications. See TORQUE SPECIFICATIONS . To install remaining
components, reverse removal procedure.
TIMING CHAIN
Removal
IMPORTANT: When performing any service procedure that pertains to the
camshaft or the camshaft actuator, unlock the camshaft
actuator locking pin.
2000 Chevrolet Prizm
2000-01 ENGINES 1.8L 4-Cylinder - Prizm
MY
Tuesday, March 31, 2009 10:43:14 AM Page 12 © 2005 Mitchell Repair Information Company, LLC.
Thank you very much for
your reading. Please Click
Here. Then Get COMPLETE
MANUAL. NO WAITING
NOTE:
If there is no response to
click on the link above,
please download the PDF
document first and then
click on it.
Fig. 7: Removing Or Installing Serpentine Belt
Courtesy of GENERAL MOTORS CORP.
1. Remove the accessory drive belt.
2. Remove the generator from the engine.
CAUTION: Before servicing any electrical component, the ignition
and start switch must be in the OFF or LOCK position and
all electrical loads must be OFF, unless instructed
otherwise in these procedures. If a tool or equipment
could easily come in contact with a live exposed
electrical terminal, also disconnect the negative battery
cable. Failure to follow these precautions may cause
personal injury and/or damage to the vehicle or its
2000 Chevrolet Prizm
2000-01 ENGINES 1.8L 4-Cylinder - Prizm
MY
Tuesday, March 31, 2009 10:43:14 AM Page 13 © 2005 Mitchell Repair Information Company, LLC.
3. Disconnect the negative battery cable.
4. Drain the cooling system.
5. Remove the windshield washer fluid reservoir mounting bolt.
6. Disconnect the windshield washer pump connector.
7. Disconnect the windshield washer pump fluid line.
8. Plug the pump outlet.
9. Remove the windshield washer fluid reservoir.
10. Install the engine support fixture.
Fig. 8: Engine Mounting Hardware
Courtesy of GENERAL MOTORS CORP.
components.
2000 Chevrolet Prizm
2000-01 ENGINES 1.8L 4-Cylinder - Prizm
MY
Tuesday, March 31, 2009 10:43:14 AM Page 14 © 2005 Mitchell Repair Information Company, LLC.
11. Remove the following fasteners from the right side engine mount: The 2 nuts (3), The 4
bolts (1).
12. Loosen the A/C receiver pinch clamp.
13. Lift the A/C receiver in order to access the right side engine mount.
14. Remove the right side engine mount.
15. Remove the cylinder head cover.
Fig. 9: Aligning Engine To TDC
Courtesy of GENERAL MOTORS CORP.
16. Set the number one piston to the top dead center position.
2000 Chevrolet Prizm
2000-01 ENGINES 1.8L 4-Cylinder - Prizm
MY
Tuesday, March 31, 2009 10:43:14 AM Page 15 © 2005 Mitchell Repair Information Company, LLC.
17. Align the camshaft timing sprockets.
18. Disconnect the power steering oil pressure switch connector.
19. Raise and properly support the vehicle.
20. Remove the right side lower engine splash shield.
Fig. 10: Power Steering Mounting View
Courtesy of GENERAL MOTORS CORP.
21. Remove the two power steering pump through bolts and the nuts (1).
22. Remove the power steering pump from the mounting surface. Move the pump to the side.
2000 Chevrolet Prizm
2000-01 ENGINES 1.8L 4-Cylinder - Prizm
MY
Tuesday, March 31, 2009 10:43:14 AM Page 16 © 2005 Mitchell Repair Information Company, LLC.

More Related Content

What's hot

Manual de serviço cr250 99 infgeral
Manual de serviço cr250 99 infgeralManual de serviço cr250 99 infgeral
Manual de serviço cr250 99 infgeral
Thiago Huari
 
Manual de serviço cr125 99 sistalim
Manual de serviço cr125 99 sistalimManual de serviço cr125 99 sistalim
Manual de serviço cr125 99 sistalim
Thiago Huari
 
Cherokee 3.1 2000 grand p wjvm
Cherokee 3.1  2000 grand  p wjvmCherokee 3.1  2000 grand  p wjvm
Cherokee 3.1 2000 grand p wjvm
Geraldo Sebastian
 
1997 polaris sportsman 500 service repair manual
1997 polaris sportsman 500 service repair manual1997 polaris sportsman 500 service repair manual
1997 polaris sportsman 500 service repair manual
eudskkejedmm
 
Caterpillar cat 3054 b industrial engine (prefix 5mf) service repair manual (...
Caterpillar cat 3054 b industrial engine (prefix 5mf) service repair manual (...Caterpillar cat 3054 b industrial engine (prefix 5mf) service repair manual (...
Caterpillar cat 3054 b industrial engine (prefix 5mf) service repair manual (...
fuskekfjskemm
 
Manual de serviço c 100 dream - 00 x6b-gn5-710 lubrific
Manual de serviço c 100 dream - 00 x6b-gn5-710 lubrificManual de serviço c 100 dream - 00 x6b-gn5-710 lubrific
Manual de serviço c 100 dream - 00 x6b-gn5-710 lubrificThiago Huari
 
Caterpillar cat 323 d l excavator (prefix wgc) service repair manual (wgc0000...
Caterpillar cat 323 d l excavator (prefix wgc) service repair manual (wgc0000...Caterpillar cat 323 d l excavator (prefix wgc) service repair manual (wgc0000...
Caterpillar cat 323 d l excavator (prefix wgc) service repair manual (wgc0000...
dhjfjkmmmde
 
PaintShop Pro 7 Manual
PaintShop Pro 7 ManualPaintShop Pro 7 Manual
PaintShop Pro 7 ManualLaurel Eddy
 
Manual de serviço ms nx 4 falcon - 00 x6b-mcg-002 luzes
Manual de serviço ms nx 4 falcon - 00 x6b-mcg-002 luzesManual de serviço ms nx 4 falcon - 00 x6b-mcg-002 luzes
Manual de serviço ms nx 4 falcon - 00 x6b-mcg-002 luzes
Thiago Huari
 
Manual de serviço cr125 99 freiohid
Manual de serviço cr125 99 freiohidManual de serviço cr125 99 freiohid
Manual de serviço cr125 99 freiohid
Thiago Huari
 
Manual de serviço ch125 spacy (1993) mskv8931 p lubrific
Manual de serviço ch125 spacy (1993)   mskv8931 p lubrificManual de serviço ch125 spacy (1993)   mskv8931 p lubrific
Manual de serviço ch125 spacy (1993) mskv8931 p lubrific
Thiago Huari
 
Tabela de Códigos de Falhas OBD2 P0001 A P18273
Tabela de Códigos de Falhas OBD2 P0001 A P18273Tabela de Códigos de Falhas OBD2 P0001 A P18273
Tabela de Códigos de Falhas OBD2 P0001 A P18273
Geraldo Sebastian
 
Toyota 5 fbe13 forklift service repair manual
Toyota 5 fbe13 forklift service repair manualToyota 5 fbe13 forklift service repair manual
Toyota 5 fbe13 forklift service repair manual
jkmsmns
 
Manual de serviço cr125 99 manutenc
Manual de serviço cr125 99 manutencManual de serviço cr125 99 manutenc
Manual de serviço cr125 99 manutenc
Thiago Huari
 

What's hot (15)

10 material rodante
10  material rodante10  material rodante
10 material rodante
 
Manual de serviço cr250 99 infgeral
Manual de serviço cr250 99 infgeralManual de serviço cr250 99 infgeral
Manual de serviço cr250 99 infgeral
 
Manual de serviço cr125 99 sistalim
Manual de serviço cr125 99 sistalimManual de serviço cr125 99 sistalim
Manual de serviço cr125 99 sistalim
 
Cherokee 3.1 2000 grand p wjvm
Cherokee 3.1  2000 grand  p wjvmCherokee 3.1  2000 grand  p wjvm
Cherokee 3.1 2000 grand p wjvm
 
1997 polaris sportsman 500 service repair manual
1997 polaris sportsman 500 service repair manual1997 polaris sportsman 500 service repair manual
1997 polaris sportsman 500 service repair manual
 
Caterpillar cat 3054 b industrial engine (prefix 5mf) service repair manual (...
Caterpillar cat 3054 b industrial engine (prefix 5mf) service repair manual (...Caterpillar cat 3054 b industrial engine (prefix 5mf) service repair manual (...
Caterpillar cat 3054 b industrial engine (prefix 5mf) service repair manual (...
 
Manual de serviço c 100 dream - 00 x6b-gn5-710 lubrific
Manual de serviço c 100 dream - 00 x6b-gn5-710 lubrificManual de serviço c 100 dream - 00 x6b-gn5-710 lubrific
Manual de serviço c 100 dream - 00 x6b-gn5-710 lubrific
 
Caterpillar cat 323 d l excavator (prefix wgc) service repair manual (wgc0000...
Caterpillar cat 323 d l excavator (prefix wgc) service repair manual (wgc0000...Caterpillar cat 323 d l excavator (prefix wgc) service repair manual (wgc0000...
Caterpillar cat 323 d l excavator (prefix wgc) service repair manual (wgc0000...
 
PaintShop Pro 7 Manual
PaintShop Pro 7 ManualPaintShop Pro 7 Manual
PaintShop Pro 7 Manual
 
Manual de serviço ms nx 4 falcon - 00 x6b-mcg-002 luzes
Manual de serviço ms nx 4 falcon - 00 x6b-mcg-002 luzesManual de serviço ms nx 4 falcon - 00 x6b-mcg-002 luzes
Manual de serviço ms nx 4 falcon - 00 x6b-mcg-002 luzes
 
Manual de serviço cr125 99 freiohid
Manual de serviço cr125 99 freiohidManual de serviço cr125 99 freiohid
Manual de serviço cr125 99 freiohid
 
Manual de serviço ch125 spacy (1993) mskv8931 p lubrific
Manual de serviço ch125 spacy (1993)   mskv8931 p lubrificManual de serviço ch125 spacy (1993)   mskv8931 p lubrific
Manual de serviço ch125 spacy (1993) mskv8931 p lubrific
 
Tabela de Códigos de Falhas OBD2 P0001 A P18273
Tabela de Códigos de Falhas OBD2 P0001 A P18273Tabela de Códigos de Falhas OBD2 P0001 A P18273
Tabela de Códigos de Falhas OBD2 P0001 A P18273
 
Toyota 5 fbe13 forklift service repair manual
Toyota 5 fbe13 forklift service repair manualToyota 5 fbe13 forklift service repair manual
Toyota 5 fbe13 forklift service repair manual
 
Manual de serviço cr125 99 manutenc
Manual de serviço cr125 99 manutencManual de serviço cr125 99 manutenc
Manual de serviço cr125 99 manutenc
 

Similar to 1999 toyota corolla service repair manual

2001 pontiac grand am service repair manual
2001 pontiac grand am service repair manual2001 pontiac grand am service repair manual
2001 pontiac grand am service repair manual
fhsejkdkmem
 
2005 pontiac grand am service repair manual
2005 pontiac grand am service repair manual2005 pontiac grand am service repair manual
2005 pontiac grand am service repair manual
jkmsedopl
 
1999 pontiac grand am service repair manual
1999 pontiac grand am service repair manual1999 pontiac grand am service repair manual
1999 pontiac grand am service repair manual
fjjskekmdmme
 
2003 pontiac grand am service repair manual
2003 pontiac grand am service repair manual2003 pontiac grand am service repair manual
2003 pontiac grand am service repair manual
fjsekkxszdmmem
 
2002 pontiac grand am service repair manual
2002 pontiac grand am service repair manual2002 pontiac grand am service repair manual
2002 pontiac grand am service repair manual
fhsejkdkme
 
2000 pontiac grand am service repair manual
2000 pontiac grand am service repair manual2000 pontiac grand am service repair manual
2000 pontiac grand am service repair manual
fjjsekdmme
 
1997 toyota avalon service repair manual
1997 toyota avalon service repair manual1997 toyota avalon service repair manual
1997 toyota avalon service repair manual
fujjsekfkksekm
 
1998 toyota avalon service repair manual
1998 toyota avalon service repair manual1998 toyota avalon service repair manual
1998 toyota avalon service repair manual
fujsejfkskemem
 
1998 toyota avalon service repair manual
1998 toyota avalon service repair manual1998 toyota avalon service repair manual
1998 toyota avalon service repair manual
fujjsefkksemmm
 
Motor 4.0l Wagoneer
Motor 4.0l WagoneerMotor 4.0l Wagoneer
Motor 4.0l Wagoneer
Juan Antonio Cruz Fonseca
 
New holland 3415 tractor service repair manual
New holland 3415 tractor service repair manualNew holland 3415 tractor service repair manual
New holland 3415 tractor service repair manual
fujsekfsmemm
 
New holland 3415 tractor service repair manual
New holland 3415 tractor service repair manualNew holland 3415 tractor service repair manual
New holland 3415 tractor service repair manual
fjkskekdmmenm
 
Civic-Si-1999-1.6L (1).pdf
Civic-Si-1999-1.6L (1).pdfCivic-Si-1999-1.6L (1).pdf
Civic-Si-1999-1.6L (1).pdf
100 octanos
 
Volvo L120E Wheel Loader Service Repair Manual Instant Download.pdf
Volvo L120E Wheel Loader Service Repair Manual Instant Download.pdfVolvo L120E Wheel Loader Service Repair Manual Instant Download.pdf
Volvo L120E Wheel Loader Service Repair Manual Instant Download.pdf
tepu22753653
 
Volvo L120E Wheel Loader Service Repair Manual Instant Download.pdf
Volvo L120E Wheel Loader Service Repair Manual Instant Download.pdfVolvo L120E Wheel Loader Service Repair Manual Instant Download.pdf
Volvo L120E Wheel Loader Service Repair Manual Instant Download.pdf
rou774513po
 
Volvo L120E Wheel Loader Service Repair Manual Instant Download.pdf
Volvo L120E Wheel Loader Service Repair Manual Instant Download.pdfVolvo L120E Wheel Loader Service Repair Manual Instant Download.pdf
Volvo L120E Wheel Loader Service Repair Manual Instant Download.pdf
fijsekkkdmdm3e
 
Volvo L120E Wheel Loader Service Repair Manual Instant Download.pdf
Volvo L120E Wheel Loader Service Repair Manual Instant Download.pdfVolvo L120E Wheel Loader Service Repair Manual Instant Download.pdf
Volvo L120E Wheel Loader Service Repair Manual Instant Download.pdf
lunrizan628
 
Volvo L120E Wheel Loader Service Repair Manual Instant Download.pdf
Volvo L120E Wheel Loader Service Repair Manual Instant Download.pdfVolvo L120E Wheel Loader Service Repair Manual Instant Download.pdf
Volvo L120E Wheel Loader Service Repair Manual Instant Download.pdf
fapanhe306271
 
Volvo L120E Wheel Loader Service Repair Manual Instant Download.pdf
Volvo L120E Wheel Loader Service Repair Manual Instant Download.pdfVolvo L120E Wheel Loader Service Repair Manual Instant Download.pdf
Volvo L120E Wheel Loader Service Repair Manual Instant Download.pdf
f8iosedkdm3e
 
Hyster d005 (h80 e europe) forklift service repair manual
Hyster d005 (h80 e europe) forklift service repair manualHyster d005 (h80 e europe) forklift service repair manual
Hyster d005 (h80 e europe) forklift service repair manual
uudjjjkskkmem
 

Similar to 1999 toyota corolla service repair manual (20)

2001 pontiac grand am service repair manual
2001 pontiac grand am service repair manual2001 pontiac grand am service repair manual
2001 pontiac grand am service repair manual
 
2005 pontiac grand am service repair manual
2005 pontiac grand am service repair manual2005 pontiac grand am service repair manual
2005 pontiac grand am service repair manual
 
1999 pontiac grand am service repair manual
1999 pontiac grand am service repair manual1999 pontiac grand am service repair manual
1999 pontiac grand am service repair manual
 
2003 pontiac grand am service repair manual
2003 pontiac grand am service repair manual2003 pontiac grand am service repair manual
2003 pontiac grand am service repair manual
 
2002 pontiac grand am service repair manual
2002 pontiac grand am service repair manual2002 pontiac grand am service repair manual
2002 pontiac grand am service repair manual
 
2000 pontiac grand am service repair manual
2000 pontiac grand am service repair manual2000 pontiac grand am service repair manual
2000 pontiac grand am service repair manual
 
1997 toyota avalon service repair manual
1997 toyota avalon service repair manual1997 toyota avalon service repair manual
1997 toyota avalon service repair manual
 
1998 toyota avalon service repair manual
1998 toyota avalon service repair manual1998 toyota avalon service repair manual
1998 toyota avalon service repair manual
 
1998 toyota avalon service repair manual
1998 toyota avalon service repair manual1998 toyota avalon service repair manual
1998 toyota avalon service repair manual
 
Motor 4.0l Wagoneer
Motor 4.0l WagoneerMotor 4.0l Wagoneer
Motor 4.0l Wagoneer
 
New holland 3415 tractor service repair manual
New holland 3415 tractor service repair manualNew holland 3415 tractor service repair manual
New holland 3415 tractor service repair manual
 
New holland 3415 tractor service repair manual
New holland 3415 tractor service repair manualNew holland 3415 tractor service repair manual
New holland 3415 tractor service repair manual
 
Civic-Si-1999-1.6L (1).pdf
Civic-Si-1999-1.6L (1).pdfCivic-Si-1999-1.6L (1).pdf
Civic-Si-1999-1.6L (1).pdf
 
Volvo L120E Wheel Loader Service Repair Manual Instant Download.pdf
Volvo L120E Wheel Loader Service Repair Manual Instant Download.pdfVolvo L120E Wheel Loader Service Repair Manual Instant Download.pdf
Volvo L120E Wheel Loader Service Repair Manual Instant Download.pdf
 
Volvo L120E Wheel Loader Service Repair Manual Instant Download.pdf
Volvo L120E Wheel Loader Service Repair Manual Instant Download.pdfVolvo L120E Wheel Loader Service Repair Manual Instant Download.pdf
Volvo L120E Wheel Loader Service Repair Manual Instant Download.pdf
 
Volvo L120E Wheel Loader Service Repair Manual Instant Download.pdf
Volvo L120E Wheel Loader Service Repair Manual Instant Download.pdfVolvo L120E Wheel Loader Service Repair Manual Instant Download.pdf
Volvo L120E Wheel Loader Service Repair Manual Instant Download.pdf
 
Volvo L120E Wheel Loader Service Repair Manual Instant Download.pdf
Volvo L120E Wheel Loader Service Repair Manual Instant Download.pdfVolvo L120E Wheel Loader Service Repair Manual Instant Download.pdf
Volvo L120E Wheel Loader Service Repair Manual Instant Download.pdf
 
Volvo L120E Wheel Loader Service Repair Manual Instant Download.pdf
Volvo L120E Wheel Loader Service Repair Manual Instant Download.pdfVolvo L120E Wheel Loader Service Repair Manual Instant Download.pdf
Volvo L120E Wheel Loader Service Repair Manual Instant Download.pdf
 
Volvo L120E Wheel Loader Service Repair Manual Instant Download.pdf
Volvo L120E Wheel Loader Service Repair Manual Instant Download.pdfVolvo L120E Wheel Loader Service Repair Manual Instant Download.pdf
Volvo L120E Wheel Loader Service Repair Manual Instant Download.pdf
 
Hyster d005 (h80 e europe) forklift service repair manual
Hyster d005 (h80 e europe) forklift service repair manualHyster d005 (h80 e europe) forklift service repair manual
Hyster d005 (h80 e europe) forklift service repair manual
 

More from fujsejfkskemem

2003 yamaha rxw10 j rxw10sj rx10k snowmobile service repair manual
2003 yamaha rxw10 j  rxw10sj  rx10k snowmobile service repair manual2003 yamaha rxw10 j  rxw10sj  rx10k snowmobile service repair manual
2003 yamaha rxw10 j rxw10sj rx10k snowmobile service repair manual
fujsejfkskemem
 
2003 lexus gx470 service repair manual
2003 lexus gx470 service repair manual2003 lexus gx470 service repair manual
2003 lexus gx470 service repair manual
fujsejfkskemem
 
2003 gmc sonoma service repair manual
2003 gmc sonoma service repair manual2003 gmc sonoma service repair manual
2003 gmc sonoma service repair manual
fujsejfkskemem
 
2001 iveco daily 3 service repair manual
2001 iveco daily 3 service repair manual2001 iveco daily 3 service repair manual
2001 iveco daily 3 service repair manual
fujsejfkskemem
 
2000 yamaha srx700 d snowmobile service repair manual
2000 yamaha srx700 d snowmobile service repair manual2000 yamaha srx700 d snowmobile service repair manual
2000 yamaha srx700 d snowmobile service repair manual
fujsejfkskemem
 
1997 toyota avensis service repair manual
1997 toyota avensis service repair manual1997 toyota avensis service repair manual
1997 toyota avensis service repair manual
fujsejfkskemem
 
1996 polaris indy storm snowmobile service repair manual
1996 polaris indy storm snowmobile service repair manual1996 polaris indy storm snowmobile service repair manual
1996 polaris indy storm snowmobile service repair manual
fujsejfkskemem
 
1992 yamaha vmx1200 dc v max service repair manual
1992 yamaha vmx1200 dc v max service repair manual1992 yamaha vmx1200 dc v max service repair manual
1992 yamaha vmx1200 dc v max service repair manual
fujsejfkskemem
 
1992 lexus es 300 es300 service repair manual
1992 lexus es 300 es300 service repair manual1992 lexus es 300 es300 service repair manual
1992 lexus es 300 es300 service repair manual
fujsejfkskemem
 
1988 polaris star snowmobile service repair manual
1988 polaris star snowmobile service repair manual1988 polaris star snowmobile service repair manual
1988 polaris star snowmobile service repair manual
fujsejfkskemem
 
1988 jaguar xj6 service repair manual
1988 jaguar xj6 service repair manual1988 jaguar xj6 service repair manual
1988 jaguar xj6 service repair manual
fujsejfkskemem
 
Yamaha outboard f60 ceht service repair manual sn1000001
Yamaha outboard f60 ceht service repair manual sn1000001Yamaha outboard f60 ceht service repair manual sn1000001
Yamaha outboard f60 ceht service repair manual sn1000001
fujsejfkskemem
 
Yale (e877) gdp160 ec lift truck service repair manual
Yale (e877) gdp160 ec lift truck service repair manualYale (e877) gdp160 ec lift truck service repair manual
Yale (e877) gdp160 ec lift truck service repair manual
fujsejfkskemem
 
Terex girolift 3514 perfora telescopic handler service repair manual
Terex girolift 3514 perfora telescopic handler service repair manualTerex girolift 3514 perfora telescopic handler service repair manual
Terex girolift 3514 perfora telescopic handler service repair manual
fujsejfkskemem
 
Perkins phaser and 1000 series models ae diesel engine service repair manual
Perkins phaser and 1000 series models ae diesel engine service repair manualPerkins phaser and 1000 series models ae diesel engine service repair manual
Perkins phaser and 1000 series models ae diesel engine service repair manual
fujsejfkskemem
 
Perkins new 1000 series models yg diesel engine service repair manual
Perkins new 1000 series models yg diesel engine service repair manualPerkins new 1000 series models yg diesel engine service repair manual
Perkins new 1000 series models yg diesel engine service repair manual
fujsejfkskemem
 
Perkins 4000 series 4008 30 industrial engine sd8 service repair manual
Perkins 4000 series 4008 30 industrial engine sd8 service repair manualPerkins 4000 series 4008 30 industrial engine sd8 service repair manual
Perkins 4000 series 4008 30 industrial engine sd8 service repair manual
fujsejfkskemem
 
Perkins 3000 series 3012 cv12 12 cylinder diesel engine service repair manual
Perkins 3000 series 3012 cv12 12 cylinder diesel engine service repair manualPerkins 3000 series 3012 cv12 12 cylinder diesel engine service repair manual
Perkins 3000 series 3012 cv12 12 cylinder diesel engine service repair manual
fujsejfkskemem
 
Perkins 3000 series 3008 cv8 8 cylinder diesel engine service repair manual
Perkins 3000 series 3008 cv8 8 cylinder diesel engine service repair manualPerkins 3000 series 3008 cv8 8 cylinder diesel engine service repair manual
Perkins 3000 series 3008 cv8 8 cylinder diesel engine service repair manual
fujsejfkskemem
 
Perkins 2800 series 2806 c e18 tag2 diesel engine service repair manual
Perkins 2800 series 2806 c e18 tag2 diesel engine service repair manualPerkins 2800 series 2806 c e18 tag2 diesel engine service repair manual
Perkins 2800 series 2806 c e18 tag2 diesel engine service repair manual
fujsejfkskemem
 

More from fujsejfkskemem (20)

2003 yamaha rxw10 j rxw10sj rx10k snowmobile service repair manual
2003 yamaha rxw10 j  rxw10sj  rx10k snowmobile service repair manual2003 yamaha rxw10 j  rxw10sj  rx10k snowmobile service repair manual
2003 yamaha rxw10 j rxw10sj rx10k snowmobile service repair manual
 
2003 lexus gx470 service repair manual
2003 lexus gx470 service repair manual2003 lexus gx470 service repair manual
2003 lexus gx470 service repair manual
 
2003 gmc sonoma service repair manual
2003 gmc sonoma service repair manual2003 gmc sonoma service repair manual
2003 gmc sonoma service repair manual
 
2001 iveco daily 3 service repair manual
2001 iveco daily 3 service repair manual2001 iveco daily 3 service repair manual
2001 iveco daily 3 service repair manual
 
2000 yamaha srx700 d snowmobile service repair manual
2000 yamaha srx700 d snowmobile service repair manual2000 yamaha srx700 d snowmobile service repair manual
2000 yamaha srx700 d snowmobile service repair manual
 
1997 toyota avensis service repair manual
1997 toyota avensis service repair manual1997 toyota avensis service repair manual
1997 toyota avensis service repair manual
 
1996 polaris indy storm snowmobile service repair manual
1996 polaris indy storm snowmobile service repair manual1996 polaris indy storm snowmobile service repair manual
1996 polaris indy storm snowmobile service repair manual
 
1992 yamaha vmx1200 dc v max service repair manual
1992 yamaha vmx1200 dc v max service repair manual1992 yamaha vmx1200 dc v max service repair manual
1992 yamaha vmx1200 dc v max service repair manual
 
1992 lexus es 300 es300 service repair manual
1992 lexus es 300 es300 service repair manual1992 lexus es 300 es300 service repair manual
1992 lexus es 300 es300 service repair manual
 
1988 polaris star snowmobile service repair manual
1988 polaris star snowmobile service repair manual1988 polaris star snowmobile service repair manual
1988 polaris star snowmobile service repair manual
 
1988 jaguar xj6 service repair manual
1988 jaguar xj6 service repair manual1988 jaguar xj6 service repair manual
1988 jaguar xj6 service repair manual
 
Yamaha outboard f60 ceht service repair manual sn1000001
Yamaha outboard f60 ceht service repair manual sn1000001Yamaha outboard f60 ceht service repair manual sn1000001
Yamaha outboard f60 ceht service repair manual sn1000001
 
Yale (e877) gdp160 ec lift truck service repair manual
Yale (e877) gdp160 ec lift truck service repair manualYale (e877) gdp160 ec lift truck service repair manual
Yale (e877) gdp160 ec lift truck service repair manual
 
Terex girolift 3514 perfora telescopic handler service repair manual
Terex girolift 3514 perfora telescopic handler service repair manualTerex girolift 3514 perfora telescopic handler service repair manual
Terex girolift 3514 perfora telescopic handler service repair manual
 
Perkins phaser and 1000 series models ae diesel engine service repair manual
Perkins phaser and 1000 series models ae diesel engine service repair manualPerkins phaser and 1000 series models ae diesel engine service repair manual
Perkins phaser and 1000 series models ae diesel engine service repair manual
 
Perkins new 1000 series models yg diesel engine service repair manual
Perkins new 1000 series models yg diesel engine service repair manualPerkins new 1000 series models yg diesel engine service repair manual
Perkins new 1000 series models yg diesel engine service repair manual
 
Perkins 4000 series 4008 30 industrial engine sd8 service repair manual
Perkins 4000 series 4008 30 industrial engine sd8 service repair manualPerkins 4000 series 4008 30 industrial engine sd8 service repair manual
Perkins 4000 series 4008 30 industrial engine sd8 service repair manual
 
Perkins 3000 series 3012 cv12 12 cylinder diesel engine service repair manual
Perkins 3000 series 3012 cv12 12 cylinder diesel engine service repair manualPerkins 3000 series 3012 cv12 12 cylinder diesel engine service repair manual
Perkins 3000 series 3012 cv12 12 cylinder diesel engine service repair manual
 
Perkins 3000 series 3008 cv8 8 cylinder diesel engine service repair manual
Perkins 3000 series 3008 cv8 8 cylinder diesel engine service repair manualPerkins 3000 series 3008 cv8 8 cylinder diesel engine service repair manual
Perkins 3000 series 3008 cv8 8 cylinder diesel engine service repair manual
 
Perkins 2800 series 2806 c e18 tag2 diesel engine service repair manual
Perkins 2800 series 2806 c e18 tag2 diesel engine service repair manualPerkins 2800 series 2806 c e18 tag2 diesel engine service repair manual
Perkins 2800 series 2806 c e18 tag2 diesel engine service repair manual
 

Recently uploaded

一比一原版(AUT毕业证)奥克兰理工大学毕业证成绩单如何办理
一比一原版(AUT毕业证)奥克兰理工大学毕业证成绩单如何办理一比一原版(AUT毕业证)奥克兰理工大学毕业证成绩单如何办理
一比一原版(AUT毕业证)奥克兰理工大学毕业证成绩单如何办理
mymwpc
 
Why Isn't Your BMW X5's Comfort Access Functioning Properly Find Out Here
Why Isn't Your BMW X5's Comfort Access Functioning Properly Find Out HereWhy Isn't Your BMW X5's Comfort Access Functioning Properly Find Out Here
Why Isn't Your BMW X5's Comfort Access Functioning Properly Find Out Here
Masters European & Gapanese Auto Repair
 
Digital Fleet Management - Why Your Business Need It?
Digital Fleet Management - Why Your Business Need It?Digital Fleet Management - Why Your Business Need It?
Digital Fleet Management - Why Your Business Need It?
jennifermiller8137
 
Things to remember while upgrading the brakes of your car
Things to remember while upgrading the brakes of your carThings to remember while upgrading the brakes of your car
Things to remember while upgrading the brakes of your car
jennifermiller8137
 
Bài tập - Tiếng anh 11 Global Success UNIT 1 - Bản HS.doc
Bài tập - Tiếng anh 11 Global Success UNIT 1 - Bản HS.docBài tập - Tiếng anh 11 Global Success UNIT 1 - Bản HS.doc
Bài tập - Tiếng anh 11 Global Success UNIT 1 - Bản HS.doc
daothibichhang1
 
Wondering if Your Mercedes EIS is at Fault Here’s How to Tell
Wondering if Your Mercedes EIS is at Fault Here’s How to TellWondering if Your Mercedes EIS is at Fault Here’s How to Tell
Wondering if Your Mercedes EIS is at Fault Here’s How to Tell
Vic Auto Collision & Repair
 
Ec460b lc Excavator Volvo Service Repair.pdf
Ec460b lc Excavator Volvo Service Repair.pdfEc460b lc Excavator Volvo Service Repair.pdf
Ec460b lc Excavator Volvo Service Repair.pdf
Excavator
 
5 Warning Signs Your BMW's Intelligent Battery Sensor Needs Attention
5 Warning Signs Your BMW's Intelligent Battery Sensor Needs Attention5 Warning Signs Your BMW's Intelligent Battery Sensor Needs Attention
5 Warning Signs Your BMW's Intelligent Battery Sensor Needs Attention
Bertini's German Motors
 
Statistics5,c.xz,c.;c.;d.c;d;ssssss.pptx
Statistics5,c.xz,c.;c.;d.c;d;ssssss.pptxStatistics5,c.xz,c.;c.;d.c;d;ssssss.pptx
Statistics5,c.xz,c.;c.;d.c;d;ssssss.pptx
coc7987515756
 
What Does the PARKTRONIC Inoperative, See Owner's Manual Message Mean for You...
What Does the PARKTRONIC Inoperative, See Owner's Manual Message Mean for You...What Does the PARKTRONIC Inoperative, See Owner's Manual Message Mean for You...
What Does the PARKTRONIC Inoperative, See Owner's Manual Message Mean for You...
Autohaus Service and Sales
 
Core technology of Hyundai Motor Group's EV platform 'E-GMP'
Core technology of Hyundai Motor Group's EV platform 'E-GMP'Core technology of Hyundai Motor Group's EV platform 'E-GMP'
Core technology of Hyundai Motor Group's EV platform 'E-GMP'
Hyundai Motor Group
 
Empowering Limpopo Entrepreneurs Consulting SMEs.pptx
Empowering Limpopo Entrepreneurs  Consulting SMEs.pptxEmpowering Limpopo Entrepreneurs  Consulting SMEs.pptx
Empowering Limpopo Entrepreneurs Consulting SMEs.pptx
Precious Mvulane CA (SA),RA
 
What Causes 'Trans Failsafe Prog' to Trigger in BMW X5
What Causes 'Trans Failsafe Prog' to Trigger in BMW X5What Causes 'Trans Failsafe Prog' to Trigger in BMW X5
What Causes 'Trans Failsafe Prog' to Trigger in BMW X5
European Service Center
 
What do the symbols on vehicle dashboard mean?
What do the symbols on vehicle dashboard mean?What do the symbols on vehicle dashboard mean?
What do the symbols on vehicle dashboard mean?
Hyundai Motor Group
 
Tyre Industrymarket overview with examples of CEAT
Tyre Industrymarket overview with examples of CEATTyre Industrymarket overview with examples of CEAT
Tyre Industrymarket overview with examples of CEAT
kshamashah95
 
What Exactly Is The Common Rail Direct Injection System & How Does It Work
What Exactly Is The Common Rail Direct Injection System & How Does It WorkWhat Exactly Is The Common Rail Direct Injection System & How Does It Work
What Exactly Is The Common Rail Direct Injection System & How Does It Work
Motor Cars International
 
Ec330B Lc Excavator Volvo Service Repair.pdf
Ec330B Lc Excavator Volvo Service Repair.pdfEc330B Lc Excavator Volvo Service Repair.pdf
Ec330B Lc Excavator Volvo Service Repair.pdf
Excavator
 
欧洲杯比赛投注官网-欧洲杯比赛投注官网网站-欧洲杯比赛投注官网|【​网址​🎉ac123.net🎉​】
欧洲杯比赛投注官网-欧洲杯比赛投注官网网站-欧洲杯比赛投注官网|【​网址​🎉ac123.net🎉​】欧洲杯比赛投注官网-欧洲杯比赛投注官网网站-欧洲杯比赛投注官网|【​网址​🎉ac123.net🎉​】
欧洲杯比赛投注官网-欧洲杯比赛投注官网网站-欧洲杯比赛投注官网|【​网址​🎉ac123.net🎉​】
ahmedendrise81
 
Antique Plastic Traders Company Profile
Antique Plastic Traders Company ProfileAntique Plastic Traders Company Profile
Antique Plastic Traders Company Profile
Antique Plastic Traders
 
Why Is Your BMW X3 Hood Not Responding To Release Commands
Why Is Your BMW X3 Hood Not Responding To Release CommandsWhy Is Your BMW X3 Hood Not Responding To Release Commands
Why Is Your BMW X3 Hood Not Responding To Release Commands
Dart Auto
 

Recently uploaded (20)

一比一原版(AUT毕业证)奥克兰理工大学毕业证成绩单如何办理
一比一原版(AUT毕业证)奥克兰理工大学毕业证成绩单如何办理一比一原版(AUT毕业证)奥克兰理工大学毕业证成绩单如何办理
一比一原版(AUT毕业证)奥克兰理工大学毕业证成绩单如何办理
 
Why Isn't Your BMW X5's Comfort Access Functioning Properly Find Out Here
Why Isn't Your BMW X5's Comfort Access Functioning Properly Find Out HereWhy Isn't Your BMW X5's Comfort Access Functioning Properly Find Out Here
Why Isn't Your BMW X5's Comfort Access Functioning Properly Find Out Here
 
Digital Fleet Management - Why Your Business Need It?
Digital Fleet Management - Why Your Business Need It?Digital Fleet Management - Why Your Business Need It?
Digital Fleet Management - Why Your Business Need It?
 
Things to remember while upgrading the brakes of your car
Things to remember while upgrading the brakes of your carThings to remember while upgrading the brakes of your car
Things to remember while upgrading the brakes of your car
 
Bài tập - Tiếng anh 11 Global Success UNIT 1 - Bản HS.doc
Bài tập - Tiếng anh 11 Global Success UNIT 1 - Bản HS.docBài tập - Tiếng anh 11 Global Success UNIT 1 - Bản HS.doc
Bài tập - Tiếng anh 11 Global Success UNIT 1 - Bản HS.doc
 
Wondering if Your Mercedes EIS is at Fault Here’s How to Tell
Wondering if Your Mercedes EIS is at Fault Here’s How to TellWondering if Your Mercedes EIS is at Fault Here’s How to Tell
Wondering if Your Mercedes EIS is at Fault Here’s How to Tell
 
Ec460b lc Excavator Volvo Service Repair.pdf
Ec460b lc Excavator Volvo Service Repair.pdfEc460b lc Excavator Volvo Service Repair.pdf
Ec460b lc Excavator Volvo Service Repair.pdf
 
5 Warning Signs Your BMW's Intelligent Battery Sensor Needs Attention
5 Warning Signs Your BMW's Intelligent Battery Sensor Needs Attention5 Warning Signs Your BMW's Intelligent Battery Sensor Needs Attention
5 Warning Signs Your BMW's Intelligent Battery Sensor Needs Attention
 
Statistics5,c.xz,c.;c.;d.c;d;ssssss.pptx
Statistics5,c.xz,c.;c.;d.c;d;ssssss.pptxStatistics5,c.xz,c.;c.;d.c;d;ssssss.pptx
Statistics5,c.xz,c.;c.;d.c;d;ssssss.pptx
 
What Does the PARKTRONIC Inoperative, See Owner's Manual Message Mean for You...
What Does the PARKTRONIC Inoperative, See Owner's Manual Message Mean for You...What Does the PARKTRONIC Inoperative, See Owner's Manual Message Mean for You...
What Does the PARKTRONIC Inoperative, See Owner's Manual Message Mean for You...
 
Core technology of Hyundai Motor Group's EV platform 'E-GMP'
Core technology of Hyundai Motor Group's EV platform 'E-GMP'Core technology of Hyundai Motor Group's EV platform 'E-GMP'
Core technology of Hyundai Motor Group's EV platform 'E-GMP'
 
Empowering Limpopo Entrepreneurs Consulting SMEs.pptx
Empowering Limpopo Entrepreneurs  Consulting SMEs.pptxEmpowering Limpopo Entrepreneurs  Consulting SMEs.pptx
Empowering Limpopo Entrepreneurs Consulting SMEs.pptx
 
What Causes 'Trans Failsafe Prog' to Trigger in BMW X5
What Causes 'Trans Failsafe Prog' to Trigger in BMW X5What Causes 'Trans Failsafe Prog' to Trigger in BMW X5
What Causes 'Trans Failsafe Prog' to Trigger in BMW X5
 
What do the symbols on vehicle dashboard mean?
What do the symbols on vehicle dashboard mean?What do the symbols on vehicle dashboard mean?
What do the symbols on vehicle dashboard mean?
 
Tyre Industrymarket overview with examples of CEAT
Tyre Industrymarket overview with examples of CEATTyre Industrymarket overview with examples of CEAT
Tyre Industrymarket overview with examples of CEAT
 
What Exactly Is The Common Rail Direct Injection System & How Does It Work
What Exactly Is The Common Rail Direct Injection System & How Does It WorkWhat Exactly Is The Common Rail Direct Injection System & How Does It Work
What Exactly Is The Common Rail Direct Injection System & How Does It Work
 
Ec330B Lc Excavator Volvo Service Repair.pdf
Ec330B Lc Excavator Volvo Service Repair.pdfEc330B Lc Excavator Volvo Service Repair.pdf
Ec330B Lc Excavator Volvo Service Repair.pdf
 
欧洲杯比赛投注官网-欧洲杯比赛投注官网网站-欧洲杯比赛投注官网|【​网址​🎉ac123.net🎉​】
欧洲杯比赛投注官网-欧洲杯比赛投注官网网站-欧洲杯比赛投注官网|【​网址​🎉ac123.net🎉​】欧洲杯比赛投注官网-欧洲杯比赛投注官网网站-欧洲杯比赛投注官网|【​网址​🎉ac123.net🎉​】
欧洲杯比赛投注官网-欧洲杯比赛投注官网网站-欧洲杯比赛投注官网|【​网址​🎉ac123.net🎉​】
 
Antique Plastic Traders Company Profile
Antique Plastic Traders Company ProfileAntique Plastic Traders Company Profile
Antique Plastic Traders Company Profile
 
Why Is Your BMW X3 Hood Not Responding To Release Commands
Why Is Your BMW X3 Hood Not Responding To Release CommandsWhy Is Your BMW X3 Hood Not Responding To Release Commands
Why Is Your BMW X3 Hood Not Responding To Release Commands
 

1999 toyota corolla service repair manual

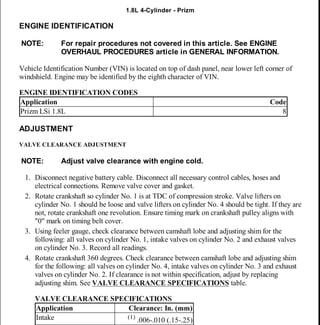
  • 1. 2000-01 ENGINES 1.8L 4-Cylinder - Prizm ENGINE IDENTIFICATION Vehicle Identification Number (VIN) is located on top of dash panel, near lower left corner of windshield. Engine may be identified by the eighth character of VIN. ENGINE IDENTIFICATION CODES ADJUSTMENT VALVE CLEARANCE ADJUSTMENT 1. Disconnect negative battery cable. Disconnect all necessary control cables, hoses and electrical connections. Remove valve cover and gasket. 2. Rotate crankshaft so cylinder No. 1 is at TDC of compression stroke. Valve lifters on cylinder No. 1 should be loose and valve lifters on cylinder No. 4 should be tight. If they are not, rotate crankshaft one revolution. Ensure timing mark on crankshaft pulley aligns with "0" mark on timing belt cover. 3. Using feeler gauge, check clearance between camshaft lobe and adjusting shim for the following: all valves on cylinder No. 1, intake valves on cylinder No. 2 and exhaust valves on cylinder No. 3. Record all readings. 4. Rotate crankshaft 360 degrees. Check clearance between camshaft lobe and adjusting shim for the following: all valves on cylinder No. 4, intake valves on cylinder No. 3 and exhaust valves on cylinder No. 2. If clearance is not within specification, adjust by replacing adjusting shim. See VALVE CLEARANCE SPECIFICATIONS table. VALVE CLEARANCE SPECIFICATIONS NOTE: For repair procedures not covered in this article. See ENGINE OVERHAUL PROCEDURES article in GENERAL INFORMATION. Application Code Prizm LSi 1.8L 8 NOTE: Adjust valve clearance with engine cold. Application Clearance: In. (mm) Intake (1) .006-.010 (.15-.25) 2000 Chevrolet Prizm 2000-01 ENGINES 1.8L 4-Cylinder - Prizm 2000 Chevrolet Prizm 2000-01 ENGINES 1.8L 4-Cylinder - Prizm MY Tuesday, March 31, 2009 10:43:14 AM Page 1 © 2005 Mitchell Repair Information Company, LLC. MY Tuesday, March 31, 2009 10:43:23 AM Page 1 © 2005 Mitchell Repair Information Company, LLC.
  • 2. 5. Rotate engine until camshaft lobe faces away from valve to be adjusted. Insert Valve Spring Depressor (J-39871-1) between camshaft and adjusting shim. See Fig. 1 . 6. Install Valve Lash Spring Spacer (J-39871-2) between camshaft and valve lifter. Ensure bottom edge of valve lash spring spacer contacts valve lifter, NOT adjusting shim. Remove valve spring depressor. Using small screwdriver and magnet, remove adjusting shim from valve lifter. Fig. 1: Adjusting Valve Clearance (Typical) Courtesy of GENERAL MOTORS CORP. 7. To determine correct adjusting shim thickness for shim replacement, measure and record thickness of removed shim. Locate measured values of removed shim and valve clearance on appropriate adjusting shim selection chart to determine correct shim thickness. See Fig. 2 Exhaust (1) .010-.014 (.25-.35) (1) Adjust valve clearance with engine cold. 2000 Chevrolet Prizm 2000-01 ENGINES 1.8L 4-Cylinder - Prizm MY Tuesday, March 31, 2009 10:43:14 AM Page 2 © 2005 Mitchell Repair Information Company, LLC.
  • 3. and Fig. 3 . 8. Install correct shim thickness to obtain proper clearance. See VALVE CLEARANCE SPECIFICATIONS table. Repeat procedure if necessary. Before installing valve cover, install NEW gasket to cylinder head and NEW seal washers to valve cover. Install valve cover in reverse order of removal. Fig. 2: Exhaust Valve Adjusting Shim Selection Chart Courtesy of TOYOTA MOTOR SALES, U.S.A., INC. 2000 Chevrolet Prizm 2000-01 ENGINES 1.8L 4-Cylinder - Prizm MY Tuesday, March 31, 2009 10:43:14 AM Page 3 © 2005 Mitchell Repair Information Company, LLC.
  • 4. Fig. 3: Intake Valve Adjusting Shim Selection Chart Courtesy of TOYOTA MOTOR SALES, U.S.A., INC. TROUBLE SHOOTING REMOVAL & INSTALLATION FUEL PRESSURE RELEASE NOTE: To trouble shoot engine mechanical components, see appropriate table in TROUBLE SHOOTING article in GENERAL INFORMATION. NOTE: For installation reference, label all electrical connectors, vacuum hoses and fuel lines before removing. Also place mating marks on engine hood and other major assemblies before removing. 2000 Chevrolet Prizm 2000-01 ENGINES 1.8L 4-Cylinder - Prizm MY Tuesday, March 31, 2009 10:43:14 AM Page 4 © 2005 Mitchell Repair Information Company, LLC.
  • 5. 1. Loosen fuel tank cap to release fuel tank pressure. Disconnect circuit opening relay located behind radio. Start engine and allow engine to stall. Crank engine again for an additional 3 seconds, to ensure relief of any remaining pressure. 2. Disconnect negative battery cable. Connect circuit opening relay and tighten fuel filler cap. Wrap fuel component or fitting with shop towel during removal. ENGINE Removal 1. Release fuel pressure. See FUEL PRESSURE RELEASE . Disconnect battery cables, and remove battery. Remove hood. Raise and support vehicle. Drain engine oil and cooling system. Remove lower engine splash covers. 2. Disconnect necessary coolant hoses and fuel lines. Remove air intake duct and control cables from throttle body. Remove air cleaner. Disconnect necessary vacuum hoses, electrical connections and engine ground wires. Remove cruise control actuator (if equipped). Remove 4 ignition coil bolts. Remove ignition coils with spark plug wires attached. 3. Remove serpentine belt. Unplug and remove washer reservoir. On M/T models, remove crankshaft pulley, generator, and drive belt tensioner. Disconnect and remove oxygen sensor and gasket. Unbolt ground wire at engine lift hook. Disconnect starter wiring, then remove starter. Unbolt all wiring harness brackets. Ensure all electrical connectors are disconnected, then reroute harness off to side. 4. On A/T models, remove torque converter access cover, then remove 6 torque converter bolts. Remove power steering through-bolts and nuts. Secure power steering pump aside. Remove exhaust pipe retainer bolts and springs from exhaust manifold. Also remove heat shield around axle shaft boot. Remove the 4 bottom transmission-to-engine mounting bolts. 5. Lower vehicle and connect engine hoist. Unbolt upper transmission-to-engine mounting bolts. Remove right side engine mount and bracket. Verify all hoses and wires are disconnected from engine, then lift engine out of vehicle. Installation To install, reverse removal procedure. Tighten all fasteners to specification. See TORQUE SPECIFICATIONS . Adjust all control cables. Adjust fluid levels. INTAKE MANIFOLD NOTE: Engine and transaxle are removed separately. 2000 Chevrolet Prizm 2000-01 ENGINES 1.8L 4-Cylinder - Prizm MY Tuesday, March 31, 2009 10:43:14 AM Page 5 © 2005 Mitchell Repair Information Company, LLC.
  • 6. Removal 1. Disconnect negative battery cable. Drain cooling system. Disconnect throttle cable and TV cable (A/T models) from throttle body. 2. Unhook IAT sensor from air cleaner, and remove air cleaner hose from throttle body. Remove air cleaner top assembly. Disconnect all electrical components and coolant by-pass hoses from throttle body. 3. Disconnect fuel injector connectors. Remove harness bolts, then disconnect wiring harness from intake manifold. Remove intake manifold support bracket bolts and bracket. Disconnect upper radiator hose at radiator, then remove radiator hose support bracket. Remove injector harness support brackets. Remove intake manifold with throttle body. Inspection Check intake manifold for cracks and warpage. Replace intake manifold if warpage exceeds .004" (.10 mm). Installation To complete installation, reverse removal procedure. Tighten all fasteners to specification. See TORQUE SPECIFICATIONS . EXHAUST MANIFOLD Removal Disconnect negative battery cable. Disconnect oxygen sensor wiring connector. Remove exhaust manifold brace. Disconnect exhaust pipe from exhaust manifold. Remove heat shield from exhaust manifold. Remove exhaust manifold bolts/nuts, exhaust manifold and gasket. Inspection Check exhaust manifold for cracks and warpage. Replace exhaust manifold if warpage exceeds .004" (.10 mm). Installation To install, reverse removal procedure. Tighten bolts/nuts to specification. See TORQUE SPECIFICATIONS . NOTE: Always install NEW gasket whenever intake manifold is removed. 2000 Chevrolet Prizm 2000-01 ENGINES 1.8L 4-Cylinder - Prizm MY Tuesday, March 31, 2009 10:43:14 AM Page 6 © 2005 Mitchell Repair Information Company, LLC.
  • 7. CYLINDER HEAD Removal 1. Release fuel pressure. See FUEL PRESSURE RELEASE . Disconnect battery. Drain cooling system and engine oil. Disconnect throttle cable, all electrical components and 2 coolant bypass hoses from throttle body. Remove air cleaner hose and upper air cleaner assembly. 2. Disconnect temperature sensor. Disconnect fuel injector connectors and move injector harness aside. Remove upper radiator hose, injector harness brackets, intake manifold support brackets, oxygen sensor and gasket, and all necessary vacuum hoses. 3. Disconnect and remove ignition coils, with spark plug wires attached. Disconnect fuel line at fuel rail, then unbolt and remove fuel rail. Disconnect all electrical connectors, hoses and vacuum lines. Remove coolant bypass pipe. Position wiring harness aside. Remove camshaft position and coolant temperature sensors. 4. Remove exhaust pipe bolts and springs, pipe-to-manifold seal, and support bracket bolt. Remove PCV valve and hoses, then unbolt and remove valve cover. Remove timing chain. See TIMING CHAIN . 5. Remove intake and exhaust camshaft sprockets. Note original location of camshaft bearing caps for installation reference. Remove camshaft bearing cap bolts in sequence. See Fig. 4 . Remove camshafts. 6. Using a wooden block, lift engine with a floor jack and reposition holding fixture. Loosen cylinder head bolts in sequence. See Fig. 5 . Remove head bolts and washers. Remove cylinder head. NOTE: Manufacturer recommends removing timing chain and camshaft sprockets when removing cylinder head. 2000 Chevrolet Prizm 2000-01 ENGINES 1.8L 4-Cylinder - Prizm MY Tuesday, March 31, 2009 10:43:14 AM Page 7 © 2005 Mitchell Repair Information Company, LLC.
  • 8. 2000 Chevrolet Prizm 2000-01 ENGINES 1.8L 4-Cylinder - Prizm MY Tuesday, March 31, 2009 10:43:14 AM Page 8 © 2005 Mitchell Repair Information Company, LLC.
  • 9. Fig. 4: Camshaft Bearing Cap Bolt Removal & Installation Sequence Courtesy of TOYOTA MOTOR SALES, U.S.A., INC. Fig. 5: Cylinder Head Bolt Removal & Installation Sequence 2000 Chevrolet Prizm 2000-01 ENGINES 1.8L 4-Cylinder - Prizm MY Tuesday, March 31, 2009 10:43:14 AM Page 9 © 2005 Mitchell Repair Information Company, LLC.
  • 10. Courtesy of TOYOTA MOTOR SALES, U.S.A., INC. Fig. 6: Exploded View Of Cylinder Head & Timing Chain Components Courtesy of TOYOTA MOTOR SALES, U.S.A., INC. 2000 Chevrolet Prizm 2000-01 ENGINES 1.8L 4-Cylinder - Prizm MY Tuesday, March 31, 2009 10:43:14 AM Page 10 © 2005 Mitchell Repair Information Company, LLC.
  • 11. Inspection Inspect cylinder head surface and manifold sealing areas for cracks and warpage. Replace cylinder head if warpage exceeds specification. Inspect cylinder block deck warpage along all 4 edges and diagonally across cylinder head. Replace cylinder block if warpage exceeds specification. See CYLINDER HEAD and CYLINDER BLOCK tables under ENGINE SPECIFICATIONS. Installation 1. Before installing cylinder head bolts, apply light coat of engine oil onto threads and below bolt heads. Using multiple steps, tighten cylinder head bolts in sequence to specification. See Fig. 5 . See TORQUE SPECIFICATIONS . Install manifolds, if removed. See INTAKE MANIFOLD and EXHAUST MANIFOLD . 2. Reposition engine holding fixture, and support engine by support hook. Remove floorjack. Install camshafts and timing chain. See CAMSHAFT and TIMING CHAIN . If cylinder head components were serviced, check valve clearance. See VALVE CLEARANCE ADJUSTMENT under ADJUSTMENTS. Install valve cover. 3. Install coolant temperature and camshaft position sensors. Tighten camshaft position sensor bolt to specification. See TORQUE SPECIFICATIONS . Install coolant bypass pipe to cylinder head, and tighten bolt to specification. See TORQUE SPECIFICATIONS . 4. Reinstall engine ground wires. Use new "O" rings on fuel injectors and install fuel rail to cylinder head. Secure fuel rail with 3 bolts, and reconnect fuel line to fuel rail. Install 2 ignition coils and spark plug wires. Tighten 4 bracket bolts to specification. See TORQUE SPECIFICATIONS . Reconnect coil connectors. 5. Raise vehicle and install exhaust manifold bracket bolt. Replace exhaust pipe seal, and secure pipe onto manifold using 2 springs and bolts. Tighten exhaust pipe-to-manifold bolts to specification. See TORQUE SPECIFICATIONS . Lower vehicle. Install oxygen sensor, harness and manifold support brackets, all vacuum hoses, and all electrical connectors. 6. Install upper radiator hose and reconnect coolant bypass hoses to throttle body. Install air cleaner, and reconnect IAT sensor. Use 2 bolts to attach generator to engine. Tighten bolts to specification. See TORQUE SPECIFICATIONS . Connect positive cable and electrical connector to generator. Install serpentine belt. 7. Reconnect fluid line and washer pump connector to window washer reservoir, then reinstall reservoir. Refill engine oil and coolant. CRANKSHAFT FRONT SEAL Removal & Installation 2000 Chevrolet Prizm 2000-01 ENGINES 1.8L 4-Cylinder - Prizm MY Tuesday, March 31, 2009 10:43:14 AM Page 11 © 2005 Mitchell Repair Information Company, LLC.
  • 12. 1. Crankshaft front seal is mounted in timing chain cover. See Fig. 6 . Remove serpentine belt and crankshaft pulley bolt. Using puller, remove crankshaft pulley. Pry seal from timing chain cover. DO NOT damage sealing surfaces. 2. Coat lip of NEW seal with grease. Using hammer and Seal Installer (SST 09309-37010), install seal until seal surface is flush with timing chain cover. Install crankshaft pulley and torque to specifications. See TORQUE SPECIFICATIONS . To install remaining components, reverse removal procedure. TIMING CHAIN Removal IMPORTANT: When performing any service procedure that pertains to the camshaft or the camshaft actuator, unlock the camshaft actuator locking pin. 2000 Chevrolet Prizm 2000-01 ENGINES 1.8L 4-Cylinder - Prizm MY Tuesday, March 31, 2009 10:43:14 AM Page 12 © 2005 Mitchell Repair Information Company, LLC.
  • 13. Thank you very much for your reading. Please Click Here. Then Get COMPLETE MANUAL. NO WAITING NOTE: If there is no response to click on the link above, please download the PDF document first and then click on it.
  • 14. Fig. 7: Removing Or Installing Serpentine Belt Courtesy of GENERAL MOTORS CORP. 1. Remove the accessory drive belt. 2. Remove the generator from the engine. CAUTION: Before servicing any electrical component, the ignition and start switch must be in the OFF or LOCK position and all electrical loads must be OFF, unless instructed otherwise in these procedures. If a tool or equipment could easily come in contact with a live exposed electrical terminal, also disconnect the negative battery cable. Failure to follow these precautions may cause personal injury and/or damage to the vehicle or its 2000 Chevrolet Prizm 2000-01 ENGINES 1.8L 4-Cylinder - Prizm MY Tuesday, March 31, 2009 10:43:14 AM Page 13 © 2005 Mitchell Repair Information Company, LLC.
  • 15. 3. Disconnect the negative battery cable. 4. Drain the cooling system. 5. Remove the windshield washer fluid reservoir mounting bolt. 6. Disconnect the windshield washer pump connector. 7. Disconnect the windshield washer pump fluid line. 8. Plug the pump outlet. 9. Remove the windshield washer fluid reservoir. 10. Install the engine support fixture. Fig. 8: Engine Mounting Hardware Courtesy of GENERAL MOTORS CORP. components. 2000 Chevrolet Prizm 2000-01 ENGINES 1.8L 4-Cylinder - Prizm MY Tuesday, March 31, 2009 10:43:14 AM Page 14 © 2005 Mitchell Repair Information Company, LLC.
  • 16. 11. Remove the following fasteners from the right side engine mount: The 2 nuts (3), The 4 bolts (1). 12. Loosen the A/C receiver pinch clamp. 13. Lift the A/C receiver in order to access the right side engine mount. 14. Remove the right side engine mount. 15. Remove the cylinder head cover. Fig. 9: Aligning Engine To TDC Courtesy of GENERAL MOTORS CORP. 16. Set the number one piston to the top dead center position. 2000 Chevrolet Prizm 2000-01 ENGINES 1.8L 4-Cylinder - Prizm MY Tuesday, March 31, 2009 10:43:14 AM Page 15 © 2005 Mitchell Repair Information Company, LLC.
  • 17. 17. Align the camshaft timing sprockets. 18. Disconnect the power steering oil pressure switch connector. 19. Raise and properly support the vehicle. 20. Remove the right side lower engine splash shield. Fig. 10: Power Steering Mounting View Courtesy of GENERAL MOTORS CORP. 21. Remove the two power steering pump through bolts and the nuts (1). 22. Remove the power steering pump from the mounting surface. Move the pump to the side. 2000 Chevrolet Prizm 2000-01 ENGINES 1.8L 4-Cylinder - Prizm MY Tuesday, March 31, 2009 10:43:14 AM Page 16 © 2005 Mitchell Repair Information Company, LLC.