This document provides instructions for assembling and disassembling a computer system unit. It describes the necessary tools, safety precautions and step-by-step processes for installing components like the motherboard, CPU, RAM, expansion cards, fans and internal connectors. The goals are to learn how to properly build and take apart a computer system.
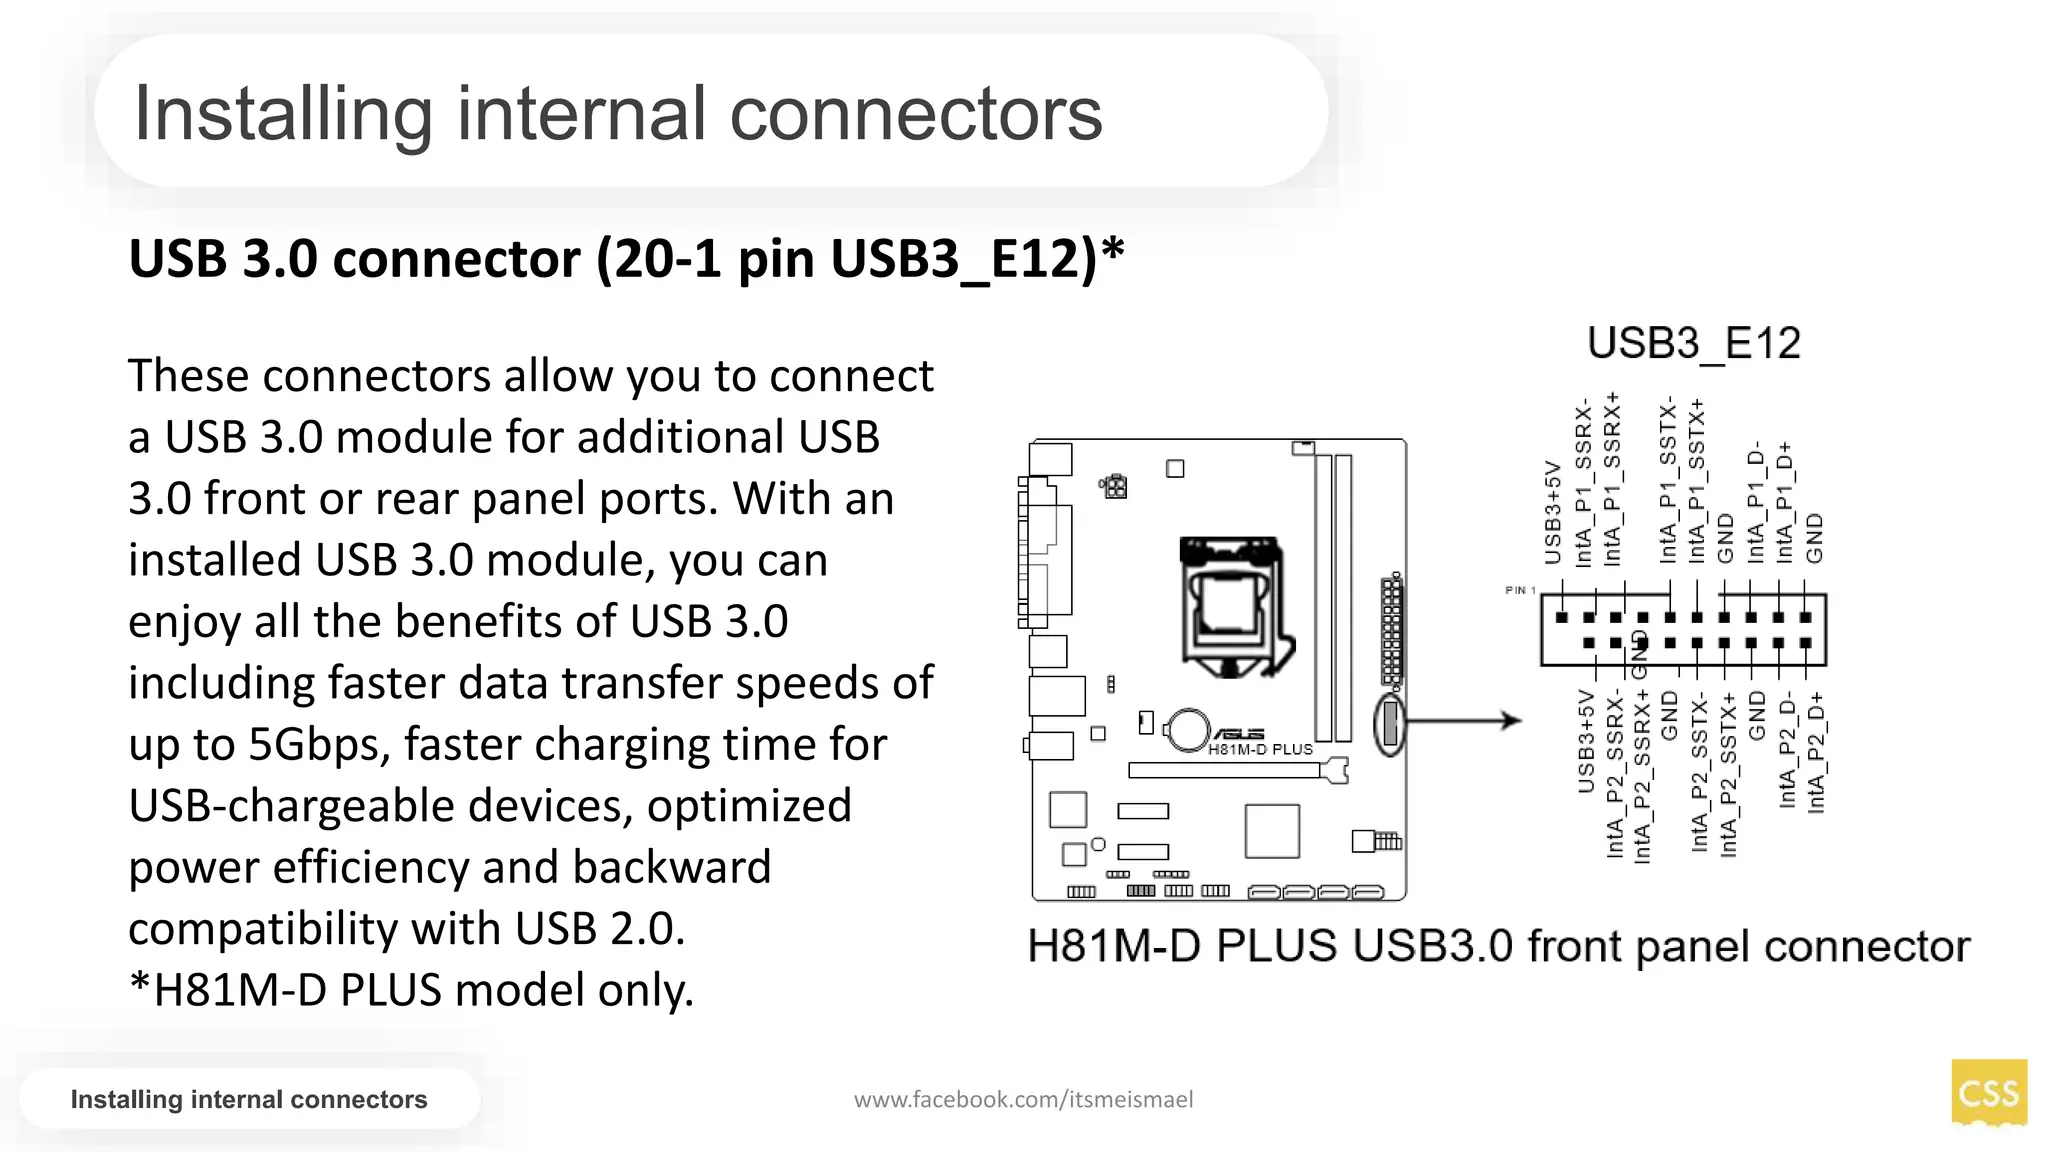
What To Do If 511 CPU Fan is Not Detected In BiosLoura Wind
A CPU fan is crucial for a computer system to properly disperse heat and maintain your
CPU’s relaxed, healthy state. Consequently, your computer must function properly. If it
fails, you will see this notification.
What To Do If 511 CPU Fan is Not Detected In BiosLoura Wind
A CPU fan is crucial for a computer system to properly disperse heat and maintain your
CPU’s relaxed, healthy state. Consequently, your computer must function properly. If it
fails, you will see this notification.
Accelerate your Kubernetes clusters with Varnish CachingThijs Feryn
A presentation about the usage and availability of Varnish on Kubernetes. This talk explores the capabilities of Varnish caching and shows how to use the Varnish Helm chart to deploy it to Kubernetes.
This presentation was delivered at K8SUG Singapore. See https://feryn.eu/presentations/accelerate-your-kubernetes-clusters-with-varnish-caching-k8sug-singapore-28-2024 for more details.
Key Trends Shaping the Future of Infrastructure.pdfCheryl Hung
Keynote at DIGIT West Expo, Glasgow on 29 May 2024.
Cheryl Hung, ochery.com
Sr Director, Infrastructure Ecosystem, Arm.
The key trends across hardware, cloud and open-source; exploring how these areas are likely to mature and develop over the short and long-term, and then considering how organisations can position themselves to adapt and thrive.
Epistemic Interaction - tuning interfaces to provide information for AI supportAlan Dix
Paper presented at SYNERGY workshop at AVI 2024, Genoa, Italy. 3rd June 2024
https://alandix.com/academic/papers/synergy2024-epistemic/
As machine learning integrates deeper into human-computer interactions, the concept of epistemic interaction emerges, aiming to refine these interactions to enhance system adaptability. This approach encourages minor, intentional adjustments in user behaviour to enrich the data available for system learning. This paper introduces epistemic interaction within the context of human-system communication, illustrating how deliberate interaction design can improve system understanding and adaptation. Through concrete examples, we demonstrate the potential of epistemic interaction to significantly advance human-computer interaction by leveraging intuitive human communication strategies to inform system design and functionality, offering a novel pathway for enriching user-system engagements.
Essentials of Automations: Optimizing FME Workflows with ParametersSafe Software
Are you looking to streamline your workflows and boost your projects’ efficiency? Do you find yourself searching for ways to add flexibility and control over your FME workflows? If so, you’re in the right place.
Join us for an insightful dive into the world of FME parameters, a critical element in optimizing workflow efficiency. This webinar marks the beginning of our three-part “Essentials of Automation” series. This first webinar is designed to equip you with the knowledge and skills to utilize parameters effectively: enhancing the flexibility, maintainability, and user control of your FME projects.
Here’s what you’ll gain:
- Essentials of FME Parameters: Understand the pivotal role of parameters, including Reader/Writer, Transformer, User, and FME Flow categories. Discover how they are the key to unlocking automation and optimization within your workflows.
- Practical Applications in FME Form: Delve into key user parameter types including choice, connections, and file URLs. Allow users to control how a workflow runs, making your workflows more reusable. Learn to import values and deliver the best user experience for your workflows while enhancing accuracy.
- Optimization Strategies in FME Flow: Explore the creation and strategic deployment of parameters in FME Flow, including the use of deployment and geometry parameters, to maximize workflow efficiency.
- Pro Tips for Success: Gain insights on parameterizing connections and leveraging new features like Conditional Visibility for clarity and simplicity.
We’ll wrap up with a glimpse into future webinars, followed by a Q&A session to address your specific questions surrounding this topic.
Don’t miss this opportunity to elevate your FME expertise and drive your projects to new heights of efficiency.
Dev Dives: Train smarter, not harder – active learning and UiPath LLMs for do...UiPathCommunity
💥 Speed, accuracy, and scaling – discover the superpowers of GenAI in action with UiPath Document Understanding and Communications Mining™:
See how to accelerate model training and optimize model performance with active learning
Learn about the latest enhancements to out-of-the-box document processing – with little to no training required
Get an exclusive demo of the new family of UiPath LLMs – GenAI models specialized for processing different types of documents and messages
This is a hands-on session specifically designed for automation developers and AI enthusiasts seeking to enhance their knowledge in leveraging the latest intelligent document processing capabilities offered by UiPath.
Speakers:
👨🏫 Andras Palfi, Senior Product Manager, UiPath
👩🏫 Lenka Dulovicova, Product Program Manager, UiPath
The Art of the Pitch: WordPress Relationships and SalesLaura Byrne
Clients don’t know what they don’t know. What web solutions are right for them? How does WordPress come into the picture? How do you make sure you understand scope and timeline? What do you do if sometime changes?
All these questions and more will be explored as we talk about matching clients’ needs with what your agency offers without pulling teeth or pulling your hair out. Practical tips, and strategies for successful relationship building that leads to closing the deal.
2. 1. Configure a computer.
2. Set the computer system properly.
3. Learn how to assemble/disassemble computer.
LEARNING OBJECTIVES
www.facebook.com/itsmeismael
3. Phillips-head (cross-shaped) screwdriver
Needle-nose pliers
Anti-static Wrist Strap
A large level working space
Anti-static bag
TOOLS, MATERIALS AND EQUIPMENT
www.facebook.com/itsmeismael
Before you begin building or refitting a computer, you should
have some basic tools:
4. TOOLS, MATERIALS AND EQUIPMENT
www.facebook.com/itsmeismael
Some other tools and equipment can come in handy as well,
such as:
Electrical tape
Wire or nylon ties
Flashlight, preferably hands-free
A second, working computer to swap parts, look for tips, ask for help on-line,
download drivers and patches, etc. - very useful
A can of compressed air - useful when working with older parts that have collected
dust. A better alternative but also expensive, is a vacuum cleaner designed for
cleaning electronics.
Proper preparation is the key to a successful build.
5. In order to begin a simple work using computer, we should
build first our system unit, and basic computer configuration
setup.
This information sheet informs you how to build a computer
in very plain simple instruction
INTRODUCTIONS
www.facebook.com/itsmeismael
6. installing motherboard component
www.facebook.com/itsmeismael
Unplug the power cord
Hold edge components
Use anti-static wrist rap
Prepare anti static pad or bag
Before you install the motherboard, study the configuration of your chassis to
ensure that the motherboard fits into it.
Take note of the following precautions before installing motherboard
components or changing any motherboard settings.
Installing motherboard
7. installing motherboard component
www.facebook.com/itsmeismael
When installing the motherboard, ensure
that you place it into the chassis in the
correct orientation. The edge with external
ports goes to the rear part of the chassis as
indicated in the image below.
H81M-D PLUS
Installing motherboard
9. Safety procedures
www.facebook.com/itsmeismael
Unplug the power cord
Upon purchase of the motherboard, ensure that the PnP cap is on the socket and the
socket contacts are not bent
Use anti-static wrist rap
Keep the cap after installing the
motherboard
Installing processor
11. Install CPU heatsink fan
www.facebook.com/itsmeismael
Apply the Thermal Interface Material
to the CPU heatsink and CPU before
you install the heatsink and fan if
necessary.
Installing processor
13. Install system memory
www.facebook.com/itsmeismael
This motherboard comes with two Double Data Rate 3 (DDR3) Dual Inline Memory
Module (DIMM) sockets. A DDR3 module is notched differently from a DDR or DDR2
module. DO NOT install a DDR or DDR2 memory module to the DDR3 slot.
According to Intel® CPU spec, DIMM voltage below 1.65V is recommended to
protect the CPU.
You may install 1GB, 2GB, 4GB, and 8GB unbuffered non-ECC DDR3 DIMMs into the
DIMM sockets.
Installing RAM
14. Install system memory
www.facebook.com/itsmeismael
Unplug the power supply before adding or
removing DIMMs or other system components.
Failure to do so can cause severe damage to
both the motherboard and the components.
1. Press the retaining clips outward to unlock
a DIMM socket.
2. Align a DIMM on the socket such that the
notch on the DIMM matches the DIMM slot
key on the socket.
Installing RAM
A DIMM is keyed with a notch so that it fits in only one
direction. DO NOT force a DIMM into
a socket in the wrong direction to avoid damaging the
DIMM.
16. Removing system memory
www.facebook.com/itsmeismael
1. Simultaneously press the retaining clips
outward to unlock the DIMM.
Support the DIMM lightly with your fingers
when pressing the retaining clips. The DIMM
might get damaged when it flips out with extra
force.
2. Remove the DIMM from the socket.
Installing RAM
2
1
1
DIMMnotch
17. Installing expansion cards
www.facebook.com/itsmeismael
Unplug the power cord before adding or removing expansion cards. Failure to do so
may cause you physical injury and damage motherboard components.
Installing expansion cards
To install an expansion card:
1.Before installing the expansion card, read the documentation that came
with it and make the necessary hardware settings for the card.
2.Remove the system unit cover (if your motherboard is already installed in
a chassis).
18. Installing expansion cards
www.facebook.com/itsmeismael
Installing expansion cards
3.Remove the bracket opposite the slot that you intend to use. Keep the
screw for later use.
4.Align the card connector with the slot and press firmly until the card is
completely
5.seated on the slot.
6.Secure the card to the chassis with the screw you removed earlier.
7.Replace the system cover.
19. Installing internal connectors
www.facebook.com/itsmeismael
Installing internal connectors
Front panel audio connector (10-1 pin AAFP)
This connector is for a chassis-
mounted front panel audio
I/O module that supports
either HD Audio or legacy
AC`97 audio standard.
Connect one end of the front
panel audio I/O module cable
to this connector.
20. Installing internal connectors
www.facebook.com/itsmeismael
Installing internal connectors
Digital audio connector (4-1 pin SPDIF_OUT)
This connector is for an
additional Sony/Philips Digital
Interface (S/PDIF) port.
Connect the S/PDIF Out
module cable to this
connector, then install the
module to a slot opening at
the back of the system
chassis.
21. Installing internal connectors
www.facebook.com/itsmeismael
Installing internal connectors
CPU and chassis fan connectors (4-pin
CPU_FAN, 4-pin CHA_FAN)
Connect the fan cables to the
fan connectors on the
motherboard, ensuring that
the black wire of each cable
matches the ground pin of the
connector.
Do not forget to connect the fan cables to the fan connectors. Insufficient air flow inside the system
may damage the motherboard components. These are not jumpers! Do not place jumper caps on the
fan connectors! The CPU_FAN connector supports a CPU fan of maximum 1A (12 W) fan power.
22. Installing internal connectors
www.facebook.com/itsmeismael
Installing internal connectors
USB 2.0 connectors (10-1 pin USB910,
USB1112)
These connectors are for USB 2.0
ports. Connect the USB module
cable to any of these connectors,
then install the module to a slot
opening at the back of the system
chassis. These USB connectors
comply with USB 2.0 specifications
and supports up to 480Mbps
connection speed.
Never connect a 1394 cable to the USB connectors.
Doing so will damage the motherboard! The USB 2.0
module is purchased separately.
23. Installing internal connectors
www.facebook.com/itsmeismael
Installing internal connectors
ATX power connectors (24-pin
EATXPWR, 4-pin ATX12V)
These connectors are for ATX
power supply plugs. The
power supply plugs are
designed to fit these
connectors in only one
orientation. Find the proper
orientation and push down
firmly until the connectors
completely fit.
28. Installing internal connectors
www.facebook.com/itsmeismael
Installing internal connectors
Serial port connector (10-1 pin COM)
This connector is for a
serial (COM) port.
Connect the serial port
module cable to this
connector, then install
the module to a slot
opening at the back of
the system chassis.
29. Installing internal connectors
www.facebook.com/itsmeismael
Installing internal connectors
USB 3.0 connector (20-1 pin USB3_E12)*
These connectors allow you to connect
a USB 3.0 module for additional USB
3.0 front or rear panel ports. With an
installed USB 3.0 module, you can
enjoy all the benefits of USB 3.0
including faster data transfer speeds of
up to 5Gbps, faster charging time for
USB-chargeable devices, optimized
power efficiency and backward
compatibility with USB 2.0.
*H81M-D PLUS model only.
30. Installing internal connectors
www.facebook.com/itsmeismael
Installing internal connectors
Onboard LEDs (Standby Power LED)
The motherboard comes with
a standby power LED that
lights up to indicate that the
system is ON, in sleep mode,
or in soft-off mode. This is a
reminder that you should shut
down the system and unplug
the power cable before
removing or plugging in any
motherboard component.
31. Installing sound card
www.facebook.com/itsmeismael
Installing sound card
Most new desktop computers come with a built-in
sound card that you can replace. If your computer
doesn't have a sound card installed or you want to
upgrade the sound playback or recording capabilities
of your computer, you can install a sound card.
Before installing a sound card, you'll need the following:
sound card An empty PCI slot
A Phillips screwdriver
32. Installation procedures
www.facebook.com/itsmeismael
Installing sound card
1. Turn off your computer and unplug it from its power
source.
2. Open the computer case
3. After opening the case, ground yourself by touching the
metal casing that surrounds the jack where the power
cord plugs in.
33. To Remove an Existing Sound Card
www.facebook.com/itsmeismael
Installing sound card
1. Turn off your computer and unplug it from its power
source.
2. Open the computer case
3. After opening the case, ground yourself by touching the
metal casing that surrounds the jack where the power
cord plugs in.