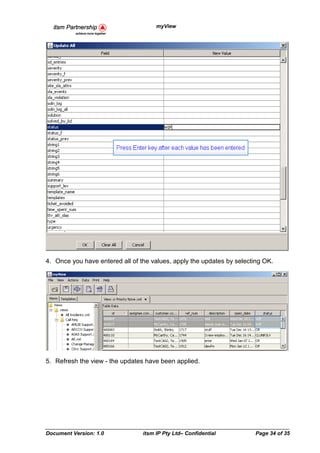
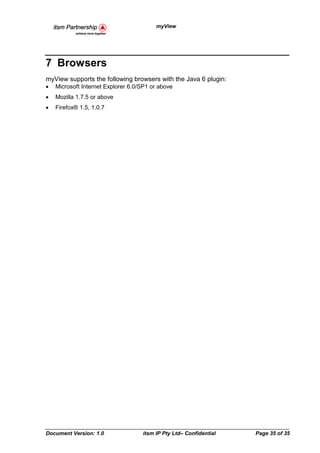
This document provides a user guide for myView, a product that allows users to create, customize, and share views of CA Service Manager data. It describes how to launch myView, create and modify views, access the Service Manager web interface, print records, and maintain data through exporting, importing, and updating records. Key capabilities include generating system views, adding filters and charts to views, opening records, creating new calls, and using templates for printing. The guide also covers preferences, exporting to CSV, and importing data via the GUI or command line.
Redbook: Running IBM WebSphere Application Server on System p and AIX: Optimi...Monty Poppe
This IBM Redbooks publication describes how to run the IBM Java Virtual Machine for AIX and WebSphere Application Server V6.1 on IBM System p and the AIX 5L Operating Systems. In terms of provisioning, tuning and maintenance, it consolidates information from all of these areas into a single resource and explains how you can implement, tune, and utilize the unique features of the IBM POWER Systems platform, AIX, and WebSphere Application Server together for maximum optimization. The book is intended for UNIX system administrators, Java developers, infrastructure designers, J2EE architects, project managers, performance testers and anyone who runs WebSphere Application Server on System p and AIX. It may contain some information which you already know, and other information that is new to you, depending on your background. AIX system administrators may be expert in configuring logical partitions and advanced virtualization, but may gain an understanding from this book about how WebSphere deployment teams may be able to exploit the features of IBM POWER Systems and AIX. WebSphere infrastructure architects may already know exactly how they want their redundant systems to work, but might learn how AIX teams can provide two or three physical servers that provide all of the different levels of application services necessary for the entire application lifecycle environment.
IBM Features on Demand (FoD) is a new licensing procedure to enable features on System x, BladeCenter, and Flex System servers and components.Features on Demand enables you to buy the features that you need now with the ability to enhance your system later without costly hardware upgrades.This paper describes the processes involved with activating and installing the FoD upgrades. For more information on Pure Systems, visit http://ibm.co/18vDnp6.
Visit the official Scribd Channel of IBM India Smarter Computing at http://bit.ly/VwO86R to get access to more documents.
Learn about Implementing Systems Management of IBM PureFlex System.This IBM Redbooks publication introduces IBM PureFlex System and its management devices and appliances. It provides implementation guidelines for managing Linux KVM, IBM PowerVM, VMware vSphere and Microsoft Hyper-V virtualization environments. For more information on Pure Systems, visit http://ibm.co/18vDnp6.
Visit http://on.fb.me/LT4gdu to 'Like' the official Facebook page of IBM India Smarter Computing.
In this session, we will explore System Center data center end-to-end monitoring solution that helps IT specialists view systems across the data center to identify potential problems that could affect systems from responding to enterprise business demands. We will discuss how System Center Operations Manager (Ops Manager) is an integral part of this solution, and centrally monitors the health of systems in the data center including configuration changes to ensure that services and distributed applications are functioning to respond to end user requests.
For more information about this PDF file. Please visit http://www.tallyspot.com
Ideal spot for a obtain Tally 9 ERP and download free Tally.ERP 9 versions. Up-grade Tally
Accounting Software & .NET Subscription, Advanced Web Interface Accounting Software for Asia & Most
ERP Software Products. Import data from tally & Data Connectivity to Tally.ERP 9 Import.
BISP is committed to provide BEST learning material to the beginners and advance learners.In the same series, we have prepared a complete end-to end Hands-on Guide for WebLogicAdministration. The document focuses on detailed information about WebLogic Admin Consoleand Scripting tool. Join our professional training program and learn from experts
Whitepaper Availability complete visibility service providerS. Hanau
Visibility can be a challenge for service providers when trying to provide Availability for their customers. This lack of visibility can cause challenges when it comes to performance, data Availability and verified data recovery. Veeam® — along with our partners LabTech Software and Kaseya — has created solutions to combat these challenges to provide Availability for the Always-On Enterprise™.
Every IT asset has at least one local, privileged login account. This includes workstations, servers, network devices, databases, applications and more. Some assets also have privileged accounts used to run services or authenticate one application to another.
Passwords for privileged accounts are used to install software, manage the device and perform technical support functions. They are often “all powerful,” having unlimited access to system functions and data. Consequently, compromise of privileged passwords is effectively compromise of the device.
Secure management of access to privileged accounts is essential to IT security. This document identifies technical challenges and offers solutions for effectively managing large numbers of sensitive passwords.
Learn about IBM Workload Deployer that provides a solution to creating, deploying, and managing workloads in an on-premise or private cloud. It is rich in features that allow you to quickly build and
deploy virtual systems from base images, to extend those images, and to customize them for future use as repeatable deployable units. IBM Workload Deployer also provides an application-centric capability that provides rapid deployment of business applications.
2. myView
Table of Contents
1 Introduction ............................................................................................................. 4
2 Launching myView ................................................................................................. 5
2.1 myView client Launch ...................................................................................... 5
2.2 Preferences ....................................................................................................... 7
3 Views........................................................................................................................ 9
3.1 Generate System Views ................................................................................... 9
3.1.1 Sharing views ................................................................................................. 10
3.2 Creating a view ................................................................................................ 11
3.3 Modify view attributes .................................................................................... 14
3.4 Modify view conditions ................................................................................... 14
3.5 How to create a chart...................................................................................... 15
4 Accessing Service Manager Web Interface ........................................................ 18
4.1 How to open a record? ................................................................................... 18
4.2 How to access CA Service Manager Home page? ....................................... 19
4.3 How to create a new call? .............................................................................. 20
4.4 How to use a Quick Call template? ............................................................... 21
5 Printing .................................................................................................................. 22
5.1 How to print selected records to a template? .............................................. 22
5.2 Creating a print template ................................................................................ 24
5.3 How to print a table ......................................................................................... 25
5.4 How to print a chart ........................................................................................ 26
6 Maintaining Data ................................................................................................... 28
6.1 How to export data? ....................................................................................... 28
6.1.1 GUI export...................................................................................................... 28
6.1.2 Command line export ..................................................................................... 29
6.2 How to import Data? ....................................................................................... 29
6.2.1 Import CSV format ......................................................................................... 30
6.2.1.1 Comment Column Headings .................................................................... 30
6.2.1.2 Blank values ............................................................................................. 30
6.2.1.3 References to Linked Tables ................................................................... 30
6.2.1.4 Key Columns ............................................................................................ 30
6.2.2 Import using the GUI upload .......................................................................... 31
Document Version: 1.0 itsm IP Pty Ltd– Confidential Page 2 of 35
3. myView
6.2.3 Command line import ..................................................................................... 32
6.3 Updating selected records ............................................................................. 33
7 Browsers ............................................................................................................... 35
Document Version: 1.0 itsm IP Pty Ltd– Confidential Page 3 of 35
4. myView
1 Introduction
Welcome to myView – a comprehensive product to make the most of your CA
Service Manager. myView is aimed at team leaders, analysts and users who need
capabilities to
• Create, customise and share views with team members on specific areas that they need
to work on.
• To generate effective presentation of their jobs.
• Update any field on multiple jobs.
• Export list of jobs to CSV file.
• Export selected jobs to templates such as HTML, XML, Text and Rich Text Format.
• Easily import data from CSV files.
• To log calls with ease by using the existing CA Service Manager template.
• Automate the migration and maintenance of data.
Document Version: 1.0 itsm IP Pty Ltd– Confidential Page 4 of 35
5. myView
2 Launching myView
2.1 myView client Launch
myView is delivered through Java WebStart technology. To launch myView, click on
the Launch icon on your Service Desk Now! home page. This is shown in the
following screen shots.
The Java WebStart window will open to download myView. If necessary, select run
from the security dialog
Document Version: 1.0 itsm IP Pty Ltd– Confidential Page 5 of 35
6. myView
The myView Login window opens – enter your user name, password and host to log
in. The user information entered for the first time, will be saved for the subsequent
sessions.
Document Version: 1.0 itsm IP Pty Ltd– Confidential Page 6 of 35
7. myView
2.2 Preferences
Once logged in, you can access the myView preferences by selecting Select File-
>Preferences. The preferences dialog is then displayed (see the following figure).
Your preferences are saved to an XML file in <USER_HOME>/myView.
Table 1 myView preferences
Field Definition
View Directory This is the directory where all of your views are stored. By default this is
<USER_HOME>/myView/views. However, teams may have a shared
drive for storing common views.
Print Template Directory This is the directory where your templates for printing records are
stored. By default this is <USER_HOME>/myView. However, teams
may have a shared drive for common templates.
Refresh Interval This is the time in minutes between the automatic refresh of table data.
A value of 0 means no automatic refresh.
Document Version: 1.0 itsm IP Pty Ltd– Confidential Page 7 of 35
8. myView
Field Definition
User Name Your user name to log in to CA Service Manager. Changes to this do
not take effect until you log back in.
Host The CA Service Manager host. Changes to this do not take effect until
you log back in.
Port The CA Service Manager Web Services port number (default is 8080).
Changes to this do not take effect until you log back in.
Protocol The protocol used to communicate with CA Service Manager Web
Services. Default is http. Changes to this do not take effect until you log
back in.
Log Level The level of debug logging. 0 means no debug logging.
Row Limit The number of rows that can be returned from a query before the user
prompt to truncate or load all is displayed. Large values can impact on
performance.
Even/Odd row colours Row colouring
Document Version: 1.0 itsm IP Pty Ltd– Confidential Page 8 of 35
9. myView
3 Views
3.1 Generate System Views
When you run myView for the first time, you probably won’t have any views on your
computer. If you don’t have any shared views, you can download the system views
on your computer. These views are stored in the directory specified in section 2.2
Preferences.
Select View->Generate System Views. Note that this may take some time and you
will probably be prompted to Load All of the views.
When you log back in, all views are available in the left hand side Views tab. Double
click on the View tab to load the views.
Document Version: 1.0 itsm IP Pty Ltd– Confidential Page 9 of 35
10. myView
3.1.1 Sharing views
The views are stored as xml files. You can delete views that you don't need. The
views can also be copied to a shared directory.
In myView Preferences, the default view directory is specified. By default, this is the
user’s home directory, but this can be set to a shared drive. This then allows the
views to be shared between team members.
Note that it may be a better idea to have the team members copy the views to their
own local directory, so that they can individualise their views, without impacting on
other team members.
Document Version: 1.0 itsm IP Pty Ltd– Confidential Page 10 of 35
11. myView
Figure 1 Example file listing of view files.
3.2 Creating a view
To create a new view, follow the steps given below:
1. Select File->New View
Document Version: 1.0 itsm IP Pty Ltd– Confidential Page 11 of 35
12. myView
2. Select the table that you want to create the view for.
3. Create a file to save the view in. Note that you need to include the .xml
extension.
Document Version: 1.0 itsm IP Pty Ltd– Confidential Page 12 of 35
13. myView
4. Select the attributes that you want to have in your view. Note that any attribute on
1
the record and the attributes on related records can be selected by expanding
the attribute tree. This can be expanded to any number of levels.
5. Select View->Modify View Condition to add filters to your view.
1
The records must share a 1 to 1 or 1 to many relationship, i.e., many to many relationships cannot be displayed. As an
example, in an activity log view, the call request information can be displayed, however, in a call request view, activity log
cannot be displayed as there may be many activity logs entries for the one call request.
Document Version: 1.0 itsm IP Pty Ltd– Confidential Page 13 of 35
14. myView
6. Add the conditions
7. Save your view
3.3 Modify view attributes
To modify the view attributes, select View->Modify View Attributes.
3.4 Modify view conditions
To modify the view conditions, select View->Modify View Conditions.
Document Version: 1.0 itsm IP Pty Ltd– Confidential Page 14 of 35
15. myView
3.5 How to create a chart
Charts can be easily added to a view. These charts provide a quick dashboard
representation of the selected view. To add a chart to a view, follow these steps:
1. Select the view that you want to chart.
2. Select View->Chart
3. Add the attributes to the chart
Document Version: 1.0 itsm IP Pty Ltd– Confidential Page 15 of 35
16. myView
4. Select the type of the chart - either Bar or Pie chart
5. If the chart has any date fields, choose how the dates should be grouped.
6. Select OK to display the chart.
Document Version: 1.0 itsm IP Pty Ltd– Confidential Page 16 of 35
17. myView
Figure 2 View with chart
Document Version: 1.0 itsm IP Pty Ltd– Confidential Page 17 of 35
18. myView
4 Accessing Service Manager Web Interface
From myView, it is easy to launch the CA Service Manager web interface and work
seamlessly. You can perform your tasks from myView interface.
• Open a record by double clicking on the record within a view
• Launch the CA Service Desk home page by clicking on the Home icon.
• Create a new call by selecting the Create New Call menu item.
• Create a call from a template by double clicking on the template within the Templates
tab.
4.1 How to open a record?
Double click on the record that you want to open in Service Manager. The Service
Manager web page for the record is displayed as follows.
Document Version: 1.0 itsm IP Pty Ltd– Confidential Page 18 of 35
19. myView
4.2 How to access CA Service Manager Home page?
To launch the Service Manager home page, select Actions->CA SD Web, the
Service Manager home page will open - automatically logged in.
Document Version: 1.0 itsm IP Pty Ltd– Confidential Page 19 of 35
20. myView
4.3 How to create a new call?
To create a new request, select Actions->New Request. The CA Web page will be
displayed and is ready to be populated.
Document Version: 1.0 itsm IP Pty Ltd– Confidential Page 20 of 35
21. myView
4.4 How to use a Quick Call template?
From the template tab, double click on a template to create a new request. The
Service Manager web page will be displayed based on the selected template.
Document Version: 1.0 itsm IP Pty Ltd– Confidential Page 21 of 35
22. myView
5 Printing
myView has the capability to merge call records into common templates such as MS
Word documents. This allows you to easily print out records using standard
templates such as company letterhead and quotation documents. myView supports
templates based on the following formats:
• MS Office Rich Text Format
• HTML
• XML
• SQL
• Text
• CSV
5.1 How to print selected records to a template?
To print to a template, follow the steps given below:
1. First select the printing template - Print->Select Print Template
Document Version: 1.0 itsm IP Pty Ltd– Confidential Page 22 of 35
23. myView
2. Select the printing template.
3. Select the record(s) that you want to print. Then select Print->Print Records
Document Version: 1.0 itsm IP Pty Ltd– Confidential Page 23 of 35
24. myView
RecordNumber
Affected End User
details
Affected End User
Telephone number
The record is printed using the selected template. Note the fields that have been
populated.
5.2 Creating a print template
Templates used by myView are created with tags. When printing a record through
the template, tags are replaced with the field from the Service Desk record. The
format for the tags is
• Text based formats : @{fieldname} e.g., @{customer.dept.name}
• RTF documents : @{customer.dept.name} e.g., @{customer.dept.name}
Note that when creating RTF documents it is best to first create the document in MS
Word and finalise the layout. Use XXX as the field tag. Save the document as RTF,
then open in NotePad. Search for XXX and replace with @{fieldname}. This is
because sometimes when the document is saved as RTF, the field names can be
split over multiple lines, and myView cannot find the correct tag character sequence.
Document Version: 1.0 itsm IP Pty Ltd– Confidential Page 24 of 35
25. myView
5.3 How to print a table
1. To print the current view, select Print->Print Table
2. The printer dialog is displayed. Select the destination printer.
Document Version: 1.0 itsm IP Pty Ltd– Confidential Page 25 of 35
26. myView
The table is printed as displayed.
5.4 How to print a chart
1. To print the current chart, select Print->Print Chart
2. The printer dialog is displayed. Select the output printer
Document Version: 1.0 itsm IP Pty Ltd– Confidential Page 26 of 35
27. myView
3. The chart is printed as displayed.
Note that there is currently a known problem that Pie charts cannot be printed.
Document Version: 1.0 itsm IP Pty Ltd– Confidential Page 27 of 35
28. myView
6 Maintaining Data
An effective data management process is essential for successful service delivery.
myView provides easy to use graphical user interface (GUI) with pre-configured
spreadsheets and command line capabilities to make the data management process
simple.
The following are the typical scenarios encountered when maintaining the data in CA
Service Manager (during initial implementation and ongoing maintenance):
• Initial migration of data from existing systems into CA Service Manager, e.g., migration
of calls, people data from HR systems into a new instance of CA Service Manager.
• Ongoing periodic data inserts and updates such as nightly updates of CI data (network
management tools) and people data (HR systems).
• Extracts of data out of CA Service Manager to be imported into external systems.
• Bulk updates of data such as re-assigning or closing large numbers of calls.
• Integration of external systems such as network management tools being able to
automatically raise calls within CA Service Manager.
The following sections explain how to use the myView user interface to manage and
maintain the data with CA Service Manager.
6.1 How to export data?
myView can export data from a view into a CSV file. This allows data extracts to be
integrated into external systems and enables the system administrator to verify what
has been configured in CA Service Manager.
6.1.1 GUI export
From the GUI, myView allows you to easily export the data from the current view to a
CSV file.
1. Export the current table view to CSV file by selecting Data->Export to CSV
2. Create the file to save the data.
Document Version: 1.0 itsm IP Pty Ltd– Confidential Page 28 of 35
29. myView
Figure 3 Example of a saved CSV file
The table is then saved as a CSV and can be opened in a spreadsheet application.
6.1.2 Command line export
The command line export from myView allows exports to be scripted and scheduled.
The command line takes 2 parameters
1. Input View file. This is the XML view file that defines what data will be exported.
2. Output CSV file. This is the CSV file that the data is written to.
E.g.,
java -classpath "ipTableViewerdistipTableViewer.jar" com.itsmp.table.ipTableValues
All.xml all_cr.csv
6.2 How to import Data?
The data import capabilities of myView allow you to easily migrate data from legacy
systems for initial data load, as well as ongoing periodic data imports. These imports
can be run from the command line and hence automated.
Document Version: 1.0 itsm IP Pty Ltd– Confidential Page 29 of 35
30. myView
The cornerstone of the data import process is the CSV spreadsheet. These are the
same format as the CSV spreadsheets created by data export. The first row in the
spreadsheet is a heading row. This defines the attributes that are imported.
6.2.1 Import CSV format
6.2.1.1 Comment Column Headings
Column headings that begin with a ‘#’ are ignored during import. This allows the
Create Status column to be added to the CSV file without impacting on subsequent
imports. This also means that you can easily comment out columns you don’t want
to import, e.g., temporary calculation columns.
6.2.1.2 Blank values
On a row by row basis, only cells that have a value (i.e., are not empty) are passed
into CA Service Manager for the insert/update.
6.2.1.3 References to Linked Tables
Columns with reference to other tables, such as customer contact information and
status code fields, normally use an internal identifier that has little meaning. To make
the import process easier, linked tables can be referenced using the dot notation (as
used in the view definition).
Examples:
• Customer.email_address : This allows the customer column to be looked up based on
their email address. During the import process, internally within myView, the
customer.email_address is translated into the internal identifier.
• Status.sym : This allows the status column to be populated with entries such as ’07
Closed’ rather than ‘CL’
Enabling user friendly linkages to other tables, allows the imports to be portable
across environments.
6.2.1.4 Key Columns
With data loading, it is handy to be able to do an ‘insert-update’, i.e., if the row
currently exists, you can update it, otherwise you can insert a new row.
To identify if the record is existing, column headings that begin with a ‘*’ are treated
as key columns. These columns are used to search for an existing record. If a
unique record is found, then the row is updated, otherwise a new record is inserted.
As an example, for contact records, the email address can be used as the unique
key. In the CSV file, specify the email address column as *email_address. This
would allow an HR system to insert new contacts (if the email address does not exist
in CA Service Manager) or to update an existing contact (email address does exist in
CA Service Manager).
Document Version: 1.0 itsm IP Pty Ltd– Confidential Page 30 of 35
31. myView
6.2.2 Import using the GUI upload
myView allows you to create records in Service Manager from CSV files.
1. To create records in Service Manager from a CSV file, first load the CSV file with
Data->Load from CSV
2. Choose the table to load the records into.
3. Choose the CSV file.
Document Version: 1.0 itsm IP Pty Ltd– Confidential Page 31 of 35
32. myView
4. The CSV file is loaded into myView. The values can be reviewed and modified
before uploading into CA Service Manager.
5. Select Data->Upload in SD to create the records in Service Manager
The records are created in Service Manager. A Status column is added. If the record
is created, the reference number is displayed. If an error is encountered, the error
text is displayed in this column.
6.2.3 Command line import
myView can also be invoked from the command line. This allows other applications,
such as network monitoring tools, to be easily integrated into Service Manager.
The myView command line allows records to be created in Service Manager by
either supplying a CSV file to create multiple records (see section 6.2) or by
supplying the fieldname values on the command line (for creating single records).
Command line options are:
• -t, --table_name <table name>. This option is mandatory and specifies the table
name of the record to be created, e.g., cr
Document Version: 1.0 itsm IP Pty Ltd– Confidential Page 32 of 35
33. myView
• -c, --csv : Create records using a CSV file
• -i, --input_file : the CSV input file – mandatory if –csv is chosen
If you are not using CSV files, you can specify the list of values on the command line
as <field_name> <value>
E.g.,
java -cp " ipTableViewer.jar" com.itsmp.csv.ipCsvTableModel -t cr description test
customer.userid Administrator call_back_date "01/08/2010 12:32:00"
The use of the values on the command line allows easy integration with network
management tools for tasks such as generating call records when an SNMP trap is
received.
6.3 Updating selected records
Often it is necessary to update multiple records, e.g., reassigning calls to another
group, closing calls, etc. This is achieved in myView as follows:
1. Select the rows to be updated
2. Select Actions->Update All
3. Enter the values to be updated.
Note : Press Enter key after each value has been entered
Document Version: 1.0 itsm IP Pty Ltd– Confidential Page 33 of 35
34. myView
4. Once you have entered all of the values, apply the updates by selecting OK.
5. Refresh the view - the updates have been applied.
Document Version: 1.0 itsm IP Pty Ltd– Confidential Page 34 of 35
35. myView
7 Browsers
myView supports the following browsers with the Java 6 plugin:
• Microsoft Internet Explorer 6.0/SP1 or above
• Mozilla 1.7.5 or above
• Firefox® 1.5, 1.0.7
Document Version: 1.0 itsm IP Pty Ltd– Confidential Page 35 of 35