Dw
- 1. Dw 補講
Web サイト制作の流れ
1. ボックスレイアウト
2. CSS 初期設定
3. header
4. navi
5. side
6. contents
7. footer
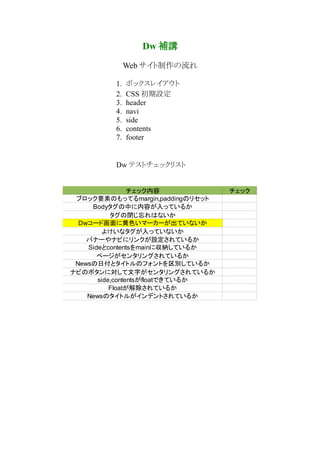
Dw テストチェックリスト
チェック内容 チェック
ブロック要素のもってるmargin,paddingのリセット
Bodyタグの中に内容が入っているか
タグの閉じ忘れはないか
Dwコード画面に黄色いマーカーが出ていないか
よけいなタグが入っていないか
バナーやナビにリンクが設定されているか
Sideとcontentsをmainに収納しているか
ページがセンタリングされているか
Newsの日付とタイトルのフォントを区別しているか
ナビのボタンに対して文字がセンタリングされているか
side,contentsがfloatできているか
Floatが解除されているか
Newsのタイトルがインデントされているか
- 5. STEP2. タイトルロゴを h1 要素として header の中にいれる。
STEP3. h1 要素の幅、高さをタイトルロゴの大きさにする。
STEP4. Illustrator のデータから h1 要素の座標を算出
STEP5.header の padding を設定して、h1 を座標の位置に配置
※h1 に margin を使用して設置しようとすると全体が下にさがる
- 6. 4. navi
STEP1. navi のボックスに使用していた div タグを ul に変更
STEP2. css で navi の liststyle をなしにする
STEP3. li タグをボタンの数だけ ul タグの中に設置
STEP4. css で li タグの幅、高さをナビボタンの画像の大きさに設定
STEP5. css で li タグの背景画像をナビボタン画像に設定
STEP6. li タグに float を設定して横並びにする
STEP7. float 解除
STEP8. Illustrator のデータを参考に文字を li 要素の中に記述
STEP9. Illustrator の文字データを参考に css で li 要素の文字サイズなどを設定
STEP10. css で li 要素の文字をセンタリング
STEP11. li 要素の文字をリンクできるように a タグで囲む
STEP12. a 要素の css に初期設定されている下線をなくし、色をもどす
STEP13. a:hover の css 設定をし、ロールオーバーしたときに赤くなるよう設定
- 7. 5. side
STEP1. side のボックスに背景画像を設定
STEP2. バナー画像を挿入し、リンク設定をする。
STEP3. ul,li を使用してバナーをリストにする。
STEP4. ul の幅を画像サイズにする。(高さは指定しないこと)
STEP5. css で ul の liststyle をなしにする
STEP6. Illustrator のデータを参考に css で side の padding,li の margin を調整
6. contents
STEP1. News ボックス用の div を 2 つ設置
STEP2. illustrator のデータを参考に div の大きさや margin、背景画像を設定
STEP3. 見出しとなる News の文字を h2 タグで囲み、newsbox の div にいれる
STEP4. illustrator のデータを参考に h2 のフォントサイズ、カラー、境界線などを設定
STEP5. 日付を dt,タイトルを dd にした dl リストを h2 の下に設置
STEP6. Illustrator のデータを参考に dl,dt,dd の css を設定
※日付、内容のフォントの区別をし、内容はインデントする
STEP7. dl の下に Next ボタンを挿入、リンクを設定し、p タグで囲む
STEP8. Illustrator のデータを参考に p タグの css 設定をする
STEP9. newsbox の下に「TOP へ戻る」を入力、リンクを設定し、p タグで囲む
STEP10. p タグの css を設定し、文字を右ぞろい、幅を newsbox と同じにする
STEP.11. a 要素の css に初期設定されている下線をなくし、色をもどす