SlideShare a Scribd company logo
1 of 43
Download to read offline
I love playing in the rain. I wait all year long for the monsoons to come.
Mum’s always paranoid about letting me out in the rain. She thinks i’ll
catch a cold and fever.

A few days ago, my mum and I came up with a plan. We decided to
make a rain costume that made playing in the rain superfun as well as
protected me from falling sick.


Here’s how we made our sea monster
We started by collecting all kinds of plastic waste around the house. We found old bottles,
coloured plastic bags, garbage bags, cans, pipes. We tried to find as many different patterns,
colours, textures as we could.

I drew a creature from my imagination. It had long tentacles, huge eyes, and spikes on it’s
back. Using colours from all the waste we’d gathered, I coloured in the drawing.
We took the bubblewrap bag and cut out holes for my head and arms. This made a
protective coat for my body. The bubblewrap coat is awesome. It’s great fun to burst the
bubbles.
We took the bubblewrap bag and cut out holes for my head and arms. This made a
protective coat for my body. The bubblewrap coat is awesome. It’s great fun to burst the
bubbles.
We took the bubblewrap bag and cut out holes for my head and arms. This made a
protective coat for my body. The bubblewrap coat is awesome. It’s great fun to burst the
bubbles.
We took the bubblewrap bag and cut out holes for my head and arms. This made a
protective coat for my body. The bubblewrap coat is awesome. It’s great fun to burst the
bubbles.
We took the bubblewrap bag and cut out holes for my head and arms. This made a
protective coat for my body. The bubblewrap coat is awesome. It’s great fun to burst the
bubbles.
We took the bubblewrap bag and cut out holes for my head and arms. This made a
protective coat for my body. The bubblewrap coat is awesome. It’s great fun to burst the
bubbles.
Next, we cut out two shapes and stitched them together to make a hood. We stitched this
hood onto the bubblewrap coat. My protective cover was ready.
Next, we cut out two shapes and stitched them together to make a hood. We stitched this
hood onto the bubblewrap coat. My protective cover was ready.
Next, we cut out two shapes and stitched them together to make a hood. We stitched this
hood onto the bubblewrap coat. My protective cover was ready.
Next, we cut out two shapes and stitched them together to make a hood. We stitched this
hood onto the bubblewrap coat. My protective cover was ready.
Next, we cut out two shapes and stitched them together to make a hood. We stitched this
hood onto the bubblewrap coat. My protective cover was ready.
Next, we cut out two shapes and stitched them together to make a hood. We stitched this
hood onto the bubblewrap coat. My protective cover was ready.
Now we began to build the monster. We first cut out the shapes we wanted for the eyes and
the spikes. We stitched them on the sides (they could also be stuck) and stuffed them with
waste plastic bags to make them look 3d.

We cut out teeth on the hood and made tentacles from shiny reflector tape. These glow like
crazy!
We stitched these features onto the bubblewrap cover.

Now it was time to give the monster super powers.
Squirt!
Splash!
Spray!
We stitched these features onto the bubblewrap cover.

Now it was time to give the monster super powers.
Squirt!
Splash!
Spray!
Sponges are really cool. They absorb lots of water and it’s so much fun to squirt it out! We
cut them out into star,s fish, shells. We made a big pocket out of bubblewrap and attached it
onto the main coat. This pocket carried the sponges in the rain.
Sponges are really cool. They absorb lots of water and it’s so much fun to squirt it out! We
cut them out into star,s fish, shells. We made a big pocket out of bubblewrap and attached it
onto the main coat. This pocket carried the sponges in the rain.
We cut out big monster feet from foam. On these we stuck pair of my brother’s old
slippers using rubber solution.
We cut out big monster feet from foam. On these we stuck pair of my brother’s old
slippers using rubber solution.
We cut out big monster feet from foam. On these we stuck pair of my brother’s old
slippers using rubber solution.
We cut out big monster feet from foam. On these we stuck pair of my brother’s old
slippers using rubber solution.
Mum got a cool idea for collecting rainwater and using it for spraying water on others.
She took a plastic can and cut it into half. We found a bag that the can fit into tightly and
attached two ribbon straps onto it.(straps from old bags will work better). She made two holes
at the bottom of the bag and the can into which we fit two hose pipes. We made them leak-
proof by using Mseal.
And now, it’s time to put on my costume and have kickass fun!


                                                                -
And now, it’s time to put on my costume and have kickass fun!


                                                                -
Final diy
Final diy
Final diy

More Related Content

Viewers also liked (13)

Ind eng-095-ppt
Ind eng-095-pptInd eng-095-ppt
Ind eng-095-ppt
 
Paper vs plastic (2)
Paper vs plastic (2)Paper vs plastic (2)
Paper vs plastic (2)
 
Bag ban survey
Bag ban surveyBag ban survey
Bag ban survey
 
Smarter than a 5th grader template
Smarter than a 5th grader templateSmarter than a 5th grader template
Smarter than a 5th grader template
 
Material Recovery Facility- MSW
Material Recovery Facility- MSWMaterial Recovery Facility- MSW
Material Recovery Facility- MSW
 
Recovery And Recycling of Municipal Solid Waste
Recovery And Recycling of Municipal Solid WasteRecovery And Recycling of Municipal Solid Waste
Recovery And Recycling of Municipal Solid Waste
 
Garbage in garbage out ppt
Garbage in garbage out pptGarbage in garbage out ppt
Garbage in garbage out ppt
 
Plastic bag presentation
Plastic bag presentationPlastic bag presentation
Plastic bag presentation
 
5 R- Reduce, Reuse, Recycle, Refuse, Recover
5 R-  Reduce, Reuse, Recycle, Refuse, Recover5 R-  Reduce, Reuse, Recycle, Refuse, Recover
5 R- Reduce, Reuse, Recycle, Refuse, Recover
 
Waste Management Using the 5Rs Techniques
Waste Management Using the 5Rs TechniquesWaste Management Using the 5Rs Techniques
Waste Management Using the 5Rs Techniques
 
проект йогурт
проект йогуртпроект йогурт
проект йогурт
 
Reduce, Reuse and Recycle (3R)
Reduce, Reuse and Recycle (3R)Reduce, Reuse and Recycle (3R)
Reduce, Reuse and Recycle (3R)
 
Plastic pollution ppt
Plastic pollution pptPlastic pollution ppt
Plastic pollution ppt
 

Similar to Final diy

Kids crafts
Kids craftsKids crafts
Kids crafts
Pilarin3
 
Dkhc cozy blanket beds
Dkhc cozy blanket bedsDkhc cozy blanket beds
Dkhc cozy blanket beds
STEM2
 
Listening skill nuy,tong,beam
Listening skill nuy,tong,beamListening skill nuy,tong,beam
Listening skill nuy,tong,beam
TJ Beam
 
Birth of Two Teddy Bears
Birth of Two Teddy BearsBirth of Two Teddy Bears
Birth of Two Teddy Bears
suesbearyunique
 
DUMP OR DONATE PRESENTATION
DUMP OR DONATE PRESENTATIONDUMP OR DONATE PRESENTATION
DUMP OR DONATE PRESENTATION
Freedom Malik
 

Similar to Final diy (20)

Kids crafts
Kids craftsKids crafts
Kids crafts
 
Keepsake plywood-rocking-elephant
Keepsake plywood-rocking-elephantKeepsake plywood-rocking-elephant
Keepsake plywood-rocking-elephant
 
Diy halloween costume ideas for kids
Diy halloween costume ideas for kidsDiy halloween costume ideas for kids
Diy halloween costume ideas for kids
 
Props
PropsProps
Props
 
IND-ENG-2014-022
IND-ENG-2014-022IND-ENG-2014-022
IND-ENG-2014-022
 
Gargoyles
GargoylesGargoyles
Gargoyles
 
Dkhc cozy blanket beds
Dkhc cozy blanket bedsDkhc cozy blanket beds
Dkhc cozy blanket beds
 
Listening skill nuy,tong,beam
Listening skill nuy,tong,beamListening skill nuy,tong,beam
Listening skill nuy,tong,beam
 
Crafts-for-preschool-activities-for-preschool-children-pdf
Crafts-for-preschool-activities-for-preschool-children-pdfCrafts-for-preschool-activities-for-preschool-children-pdf
Crafts-for-preschool-activities-for-preschool-children-pdf
 
Zebar matters july
Zebar matters julyZebar matters july
Zebar matters july
 
How to throw the best dinosaur-themed party
How to throw the best dinosaur-themed partyHow to throw the best dinosaur-themed party
How to throw the best dinosaur-themed party
 
Birth of Two Teddy Bears
Birth of Two Teddy BearsBirth of Two Teddy Bears
Birth of Two Teddy Bears
 
Kids birthday party ideas
Kids birthday party ideasKids birthday party ideas
Kids birthday party ideas
 
DUMP OR DONATE PRESENTATION
DUMP OR DONATE PRESENTATIONDUMP OR DONATE PRESENTATION
DUMP OR DONATE PRESENTATION
 
Portfolio
PortfolioPortfolio
Portfolio
 
Dreamcatcher.pdf
Dreamcatcher.pdfDreamcatcher.pdf
Dreamcatcher.pdf
 
Clothes - vocabulary and idioms - Branislava Živković - Jelena Stefanović
Clothes - vocabulary and idioms - Branislava Živković - Jelena StefanovićClothes - vocabulary and idioms - Branislava Živković - Jelena Stefanović
Clothes - vocabulary and idioms - Branislava Živković - Jelena Stefanović
 
Commas Part 2: Commas to Separate Adjectives
Commas Part 2:  Commas to Separate AdjectivesCommas Part 2:  Commas to Separate Adjectives
Commas Part 2: Commas to Separate Adjectives
 
Zine3 - on body image, puppets and dolls.
Zine3 - on body image, puppets and dolls.Zine3 - on body image, puppets and dolls.
Zine3 - on body image, puppets and dolls.
 
Insects
InsectsInsects
Insects
 

Final diy

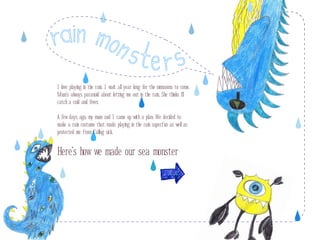
  • 1. I love playing in the rain. I wait all year long for the monsoons to come. Mum’s always paranoid about letting me out in the rain. She thinks i’ll catch a cold and fever. A few days ago, my mum and I came up with a plan. We decided to make a rain costume that made playing in the rain superfun as well as protected me from falling sick. Here’s how we made our sea monster
  • 2. We started by collecting all kinds of plastic waste around the house. We found old bottles, coloured plastic bags, garbage bags, cans, pipes. We tried to find as many different patterns, colours, textures as we could. I drew a creature from my imagination. It had long tentacles, huge eyes, and spikes on it’s back. Using colours from all the waste we’d gathered, I coloured in the drawing.
  • 3. We started by collecting all kinds of plastic waste around the house. We found old bottles, coloured plastic bags, garbage bags, cans, pipes. We tried to find as many different patterns, colours, textures as we could. I drew a creature from my imagination. It had long tentacles, huge eyes, and spikes on it’s back. Using colours from all the waste we’d gathered, I coloured in the drawing.
  • 4. We started by collecting all kinds of plastic waste around the house. We found old bottles, coloured plastic bags, garbage bags, cans, pipes. We tried to find as many different patterns, colours, textures as we could. I drew a creature from my imagination. It had long tentacles, huge eyes, and spikes on it’s back. Using colours from all the waste we’d gathered, I coloured in the drawing.
  • 5. We started by collecting all kinds of plastic waste around the house. We found old bottles, coloured plastic bags, garbage bags, cans, pipes. We tried to find as many different patterns, colours, textures as we could. I drew a creature from my imagination. It had long tentacles, huge eyes, and spikes on it’s back. Using colours from all the waste we’d gathered, I coloured in the drawing.
  • 6. We took the bubblewrap bag and cut out holes for my head and arms. This made a protective coat for my body. The bubblewrap coat is awesome. It’s great fun to burst the bubbles.
  • 7. We took the bubblewrap bag and cut out holes for my head and arms. This made a protective coat for my body. The bubblewrap coat is awesome. It’s great fun to burst the bubbles.
  • 8. We took the bubblewrap bag and cut out holes for my head and arms. This made a protective coat for my body. The bubblewrap coat is awesome. It’s great fun to burst the bubbles.
  • 9. We took the bubblewrap bag and cut out holes for my head and arms. This made a protective coat for my body. The bubblewrap coat is awesome. It’s great fun to burst the bubbles.
  • 10. We took the bubblewrap bag and cut out holes for my head and arms. This made a protective coat for my body. The bubblewrap coat is awesome. It’s great fun to burst the bubbles.
  • 11. We took the bubblewrap bag and cut out holes for my head and arms. This made a protective coat for my body. The bubblewrap coat is awesome. It’s great fun to burst the bubbles.
  • 12. Next, we cut out two shapes and stitched them together to make a hood. We stitched this hood onto the bubblewrap coat. My protective cover was ready.
  • 13. Next, we cut out two shapes and stitched them together to make a hood. We stitched this hood onto the bubblewrap coat. My protective cover was ready.
  • 14. Next, we cut out two shapes and stitched them together to make a hood. We stitched this hood onto the bubblewrap coat. My protective cover was ready.
  • 15. Next, we cut out two shapes and stitched them together to make a hood. We stitched this hood onto the bubblewrap coat. My protective cover was ready.
  • 16. Next, we cut out two shapes and stitched them together to make a hood. We stitched this hood onto the bubblewrap coat. My protective cover was ready.
  • 17. Next, we cut out two shapes and stitched them together to make a hood. We stitched this hood onto the bubblewrap coat. My protective cover was ready.
  • 18. Now we began to build the monster. We first cut out the shapes we wanted for the eyes and the spikes. We stitched them on the sides (they could also be stuck) and stuffed them with waste plastic bags to make them look 3d. We cut out teeth on the hood and made tentacles from shiny reflector tape. These glow like crazy!
  • 19. Now we began to build the monster. We first cut out the shapes we wanted for the eyes and the spikes. We stitched them on the sides (they could also be stuck) and stuffed them with waste plastic bags to make them look 3d. We cut out teeth on the hood and made tentacles from shiny reflector tape. These glow like crazy!
  • 20. Now we began to build the monster. We first cut out the shapes we wanted for the eyes and the spikes. We stitched them on the sides (they could also be stuck) and stuffed them with waste plastic bags to make them look 3d. We cut out teeth on the hood and made tentacles from shiny reflector tape. These glow like crazy!
  • 21. Now we began to build the monster. We first cut out the shapes we wanted for the eyes and the spikes. We stitched them on the sides (they could also be stuck) and stuffed them with waste plastic bags to make them look 3d. We cut out teeth on the hood and made tentacles from shiny reflector tape. These glow like crazy!
  • 22. Now we began to build the monster. We first cut out the shapes we wanted for the eyes and the spikes. We stitched them on the sides (they could also be stuck) and stuffed them with waste plastic bags to make them look 3d. We cut out teeth on the hood and made tentacles from shiny reflector tape. These glow like crazy!
  • 23. Now we began to build the monster. We first cut out the shapes we wanted for the eyes and the spikes. We stitched them on the sides (they could also be stuck) and stuffed them with waste plastic bags to make them look 3d. We cut out teeth on the hood and made tentacles from shiny reflector tape. These glow like crazy!
  • 24. Now we began to build the monster. We first cut out the shapes we wanted for the eyes and the spikes. We stitched them on the sides (they could also be stuck) and stuffed them with waste plastic bags to make them look 3d. We cut out teeth on the hood and made tentacles from shiny reflector tape. These glow like crazy!
  • 25. Now we began to build the monster. We first cut out the shapes we wanted for the eyes and the spikes. We stitched them on the sides (they could also be stuck) and stuffed them with waste plastic bags to make them look 3d. We cut out teeth on the hood and made tentacles from shiny reflector tape. These glow like crazy!
  • 26. We stitched these features onto the bubblewrap cover. Now it was time to give the monster super powers. Squirt! Splash! Spray!
  • 27. We stitched these features onto the bubblewrap cover. Now it was time to give the monster super powers. Squirt! Splash! Spray!
  • 28. Sponges are really cool. They absorb lots of water and it’s so much fun to squirt it out! We cut them out into star,s fish, shells. We made a big pocket out of bubblewrap and attached it onto the main coat. This pocket carried the sponges in the rain.
  • 29. Sponges are really cool. They absorb lots of water and it’s so much fun to squirt it out! We cut them out into star,s fish, shells. We made a big pocket out of bubblewrap and attached it onto the main coat. This pocket carried the sponges in the rain.
  • 30. We cut out big monster feet from foam. On these we stuck pair of my brother’s old slippers using rubber solution.
  • 31. We cut out big monster feet from foam. On these we stuck pair of my brother’s old slippers using rubber solution.
  • 32. We cut out big monster feet from foam. On these we stuck pair of my brother’s old slippers using rubber solution.
  • 33. We cut out big monster feet from foam. On these we stuck pair of my brother’s old slippers using rubber solution.
  • 34. Mum got a cool idea for collecting rainwater and using it for spraying water on others. She took a plastic can and cut it into half. We found a bag that the can fit into tightly and attached two ribbon straps onto it.(straps from old bags will work better). She made two holes at the bottom of the bag and the can into which we fit two hose pipes. We made them leak- proof by using Mseal.
  • 35. Mum got a cool idea for collecting rainwater and using it for spraying water on others. She took a plastic can and cut it into half. We found a bag that the can fit into tightly and attached two ribbon straps onto it.(straps from old bags will work better). She made two holes at the bottom of the bag and the can into which we fit two hose pipes. We made them leak- proof by using Mseal.
  • 36. Mum got a cool idea for collecting rainwater and using it for spraying water on others. She took a plastic can and cut it into half. We found a bag that the can fit into tightly and attached two ribbon straps onto it.(straps from old bags will work better). She made two holes at the bottom of the bag and the can into which we fit two hose pipes. We made them leak- proof by using Mseal.
  • 37. Mum got a cool idea for collecting rainwater and using it for spraying water on others. She took a plastic can and cut it into half. We found a bag that the can fit into tightly and attached two ribbon straps onto it.(straps from old bags will work better). She made two holes at the bottom of the bag and the can into which we fit two hose pipes. We made them leak- proof by using Mseal.
  • 38. Mum got a cool idea for collecting rainwater and using it for spraying water on others. She took a plastic can and cut it into half. We found a bag that the can fit into tightly and attached two ribbon straps onto it.(straps from old bags will work better). She made two holes at the bottom of the bag and the can into which we fit two hose pipes. We made them leak- proof by using Mseal.
  • 39. And now, it’s time to put on my costume and have kickass fun! -
  • 40. And now, it’s time to put on my costume and have kickass fun! -