Implementation procedure of OPNET, and Qualnet
•Download as DOCX, PDF•
1 like•217 views

Implementation procedure of OPNET, and Qualnet, NS2

Recommended
More Related Content
Similar to Implementation procedure of OPNET, and Qualnet
Similar to Implementation procedure of OPNET, and Qualnet (20)
More from Thesis Scientist Private Limited
More from Thesis Scientist Private Limited (20)
Recently uploaded
Recently uploaded (20)
Implementation procedure of OPNET, and Qualnet
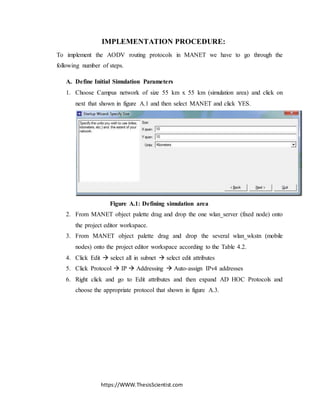
- 1. https://WWW.ThesisScientist.com IMPLEMENTATION PROCEDURE: To implement the AODV routing protocols in MANET we have to go through the following number of steps. A. Define Initial Simulation Parameters 1. Choose Campus network of size 55 km x 55 km (simulation area) and click on next that shown in figure A.1 and then select MANET and click YES. Figure A.1: Defining simulation area 2. From MANET object palette drag and drop the one wlan_server (fixed node) onto the project editor workspace. 3. From MANET object palette drag and drop the several wlan_wkstn (mobile nodes) onto the project editor workspace according to the Table 4.2. 4. Click Edit select all in subnet select edit attributes 5. Click Protocol IP Addressing Auto-assign IPv4 addresses 6. Right click and go to Edit attributes and then expand AD HOC Protocols and choose the appropriate protocol that shown in figure A.3.
- 3. https://WWW.ThesisScientist.com Figure A.3: Defining Ad hoc protocols 7. For apply appropriate protocol on selected object tick on ‘apply to selected objects’ click OK Save
- 4. https://WWW.ThesisScientist.com B. Application Configuration This procedure defines the configuration steps for setting up the application that will be deployed in the profile configuration. 1. Drag and drop the application configuration object from the MANET object palette onto the project editor workspace and name it appropriately 2. Right click and go to edit attributes 3. Expand application definitions and enter the number of rows (1) 4. Click on the row and enter the name (FTP) Figure A.4: Application Configuration 5. Under description choose Ftp, High load and click OK. This sets the application to model the high load FTP traffic. C. Profile Configuration
- 5. https://WWW.ThesisScientist.com This procedure defines the configuration of the profiles to be deployed in the MANET. 1. Drag and drop the Profile Configuration object from the MANET object palette onto the project editor workspace and name it appropriately 2. Right click and go to edit attributes 3. Expand profile configuration and enter the number of rows (1) 4. Enter the profile name 5. Under applications enter the number of rows (1) and choose FTP 6. Under FTP set the start time offset (seconds) to constant (0) and duration (seconds) to constant (10). This sets the time from the start of the profile to the start of the application. 7. Under FTP repeatability set inter-repetition time (seconds) to uniform (10, 20) and number of repetitions to constant (3). This defines when the next session of
- 6. https://WWW.ThesisScientist.com the application will start and the distribution name and parameters used for generating random session counts respectively. 8. Set the start time (seconds) to uniform (100, 3400) and duration to end of simulation. This defines at what instance the profile will start from the beginning of the simulation. 9. Leave repeatability at default of constant (300) for inter-repetition time and constant (0) for number of repetitions. 10. Click OK D. Deploying Traffic To deploy the configured profile to the network, follow the following procedure. 1. Protocol Applications Deploy Defined 2. Select all mobile nodes and transfer to sources under your profile 3. Select the server and transfer to server under application: FTP 4. Click apply and then OK to complete the deployment Figure A.6: Deploying Traffic E. Mobility Configuration Mobility Configuration defines the mobility pattern and model that the nodes will follow during the simulation. We use the random waypoint mobility model for our simulations. 1. Drag and drop the mobility configuration object from the object palette onto the workspace and name it appropriately
- 7. https://WWW.ThesisScientist.com 2. Right click on the mobility configuration object and edit attributes that shown in figure A.7. 3. In mobility configuration object attribute dialog box firstly expand default random waypoint then under the random waypoint parameters set speed (meters/seconds) to constant (10). This sets the speed at which the mobile node will be moving. 4. Under the random waypoint parameters set pause time (seconds) to constant (200). This sets the duration of the pause time for the mobile stations before changing direction to the new destination during the simulation and start time (seconds) to constant (0). 5. Leave the rest as default and click OK 6. To deploy the mobility profile to the MANET, Select Topology Random Mobility Set mobility profile 7. Enter the default random waypoint profile and click OK
- 8. https://WWW.ThesisScientist.com Figure A.7: Mobil ity configuration F. Collect Statistics The following procedure should be followed to collect global statistics for all the nodes. 1. In the workspace, right click and choose “choose individual DES statistics” 2. Expand global statistics and choose AODV, DSR and wireless LAN 3. Click OK and save G. Duplicate Scenario 1. Scenarios Duplicate scenarios 2. Enter the name of the new scenario 3. Change the number of mobile nodes, AD HOC protocol and speed as appropriate according to the table above
- 9. https://WWW.ThesisScientist.com 4. Save. 5. Repeat the procedure for all the protocols in each category. H. Running Simulation 1. For running scenarios firstly we click on Scenarios Manage Scenarios. After that Manage Scenarios window will pops up, in this window we will enter the appropriate simulation time of all defined scenarios. 2. In Manage Scenario window, click ‘collect’ under results for all the scenarios and enter the appropriate simulation time for all scenarios then click OK to run the simulation. After that DES Execution Manager window will be appear that shown in figure A.8. Figure A.8: DES Execution Manager I. Viewing Results 1. For viewing result firstly we click on DES Results Compare Results or View Result. 2. Select the scenarios or project from the Result Browser pop up window for which you want to compare the results.
- 10. https://WWW.ThesisScientist.com Figure A.10: Result Browser 3. In result browser Expand Global statistics, choose the appropriate statistics you want to view that shown in figure A.10.