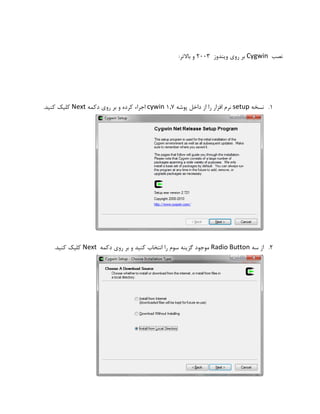
SlideShare a Scribd company logo
1 of 9
Download to read offline
‫ﻧﺼﺐ ‪ Cygwin‬ﺑﺮ روي وﻳﻨﺪوز 3002 و ﺑﺎﻻﺗﺮ:‬

‫1. ﻧﺴﺨﻪ ‪ setup‬ﻧﺮم اﻓﺰار را از داﺧﻞ ﭘﻮﺷﻪ 7,1 ‪ cywin‬اﺟﺮاء ﻛﺮده و ﺑﺮ روي دﻛﻤﻪ ‪ Next‬ﻛﻠﻴﻚ ﻛﻨﻴﺪ.‬

‫2. از ﺳﻪ ‪ Radio Button‬ﻣﻮﺟﻮد ﮔﺰﻳﻨﻪ ﺳﻮم را اﻧﺘﺨﺎب ﻛﻨﻴﺪ و ﺑﺮ روي دﻛﻤﻪ ‪ Next‬ﻛﻠﻴﻚ ﻛﻨﻴﺪ.‬
‫3. ﻫﻤﺎﻧﻄﻮر ﻛﻪ در ﺷﻜﻞ ﻧﺸﺎن داده ﺷﺪه اﺳﺖ در ﻗﺴﻤﺖ ‪ Root Directory‬ﻣﻘﺪار ‪ C:cygwin‬و در‬
‫ﻗﺴﻤﺖ ‪ Install For‬ﮔﺰﻳﻨﻪ ‪ All Users‬را اﻧﺘﺨﺎب ﻛﻨﻴﺪ و ﺑﺮ روي دﻛﻤﻪ ‪ Next‬ﻛﻠﻴﻚ ﻛﻨﻴﺪ:‬

‫4. در اﻳﻦ ﻣﺮﺣﻠﻪ ﺑﺎﻳﺪ ﻣﻨﺒﻊ ﻧﺼﺐ ﻧﺮم اﻓﺰار را ﻣﺸﺨﺺ ﻛﻨﻴﺪ. ﻣﻘﺪار اﻳﻦ ﮔﺰﻳﻨﻪ ﺑﺴﺘﮕﻲ ﺑﻪ ﻣﺤﻠﻲ دارد ﻛﻪ ﻧﺮم‬
‫اﻓﺰار در آن ﻗﺮار دارد. ﺑﺎ ﻣﺸﺨﺺ ﻛﺮدن اﻳﻦ ﻣﻘﺪار ﺑﺮ روي دﻛﻤﻪ ‪ Next‬ﻛﻠﻴﻚ ﻛﻨﻴﺪ.‬
‫5. ﺑﺎ ﻛﻠﻴﻚ ﺑﺮ روي دﻛﻤﻪ ‪ Next‬ﻧﺮم اﻓﺰار ﭘﺲ از ﭼﻚ ﻛﺮدن ﭼﮕﻮﻧﮕﻲ ﻧﺼﺐ ) ﺑﻪ ﺻﻮرت ‪ Local‬و ﻳﺎ‬
‫‪ (Online‬وارد ﻣﺮﺣﻠﻪ اﻧﺘﺨﺎب ‪ Package‬ﻫﺎ ﻣﻲ ﺷﻮد.‬
‫6. در اﻳﻦ ﻣﺮﺣﻠﻪ ‪ Package‬ﻫﺎي ﻣﻮرد ﻧﻴﺎز ﺑﺮاي ﭘﻴﺎده ﺳﺎزي ‪ SSH‬در وﻳﻨﺪوز اﻧﺘﺨﺎب ﻣﻲ ﺷﻮﻧﺪ.‬
‫‪ Package‬ﻫﺎي ﻣﻮرد ﻧﻴﺎز )ﻫﻤﺎﻧﻄﻮر ﻛﻪ در ﺷﻜﻠﻬﺎي زﻳﺮ ﻗﺎﺑﻞ ﻣﺸﺎﻫﺪه اﺳﺖ( ﻋﺒﺎرﺗﻨﺪ از‬
‫‪ .a‬در ﻗﺴﻤﺖ ‪ Archive‬ﭘﻜﻴﺞ ﻫﺎي ‪ )unzip & zip‬ﺗﻮﺟﻪ داﺷﺘﻪ ﺑﺎﺷﻴﺪ ﻛﻪ ﻫﻢ ﺑﺎﻳﺪ ‪ Bin‬و ﻫﻢ‬
‫‪ Source‬ﭘﻜﻴﺞ ﻫﺎي اﻧﺘﺨﺎب ﺷﻮﻧﺪ.(‬
‫‪ .b‬در ﻗﺴﻤﺖ ‪ Net‬ﭘﻜﻴﺞ ﻫﺎي ‪openssh & openssl‬‬
‫ﭘﺲ از اﻧﺘﺨﺎب اﻳﻦ ﭘﻜﻴﺞ ﻫﺎي ﺑﺮ روي دﻛﻤﻪ ‪ Next‬ﻛﻠﻴﻚ ﻛﻨﻴﺪ.‬

‫7. در اﻳﻦ ﻣﺮﺣﻠﻪ از اﻧﺘﺨﺎب ﮔﺰﻳﻨﻪ )‪ Select required packages (RECOMMENDED‬اﻃﻤﻴﻨﺎن‬
‫ﺣﺎﺻﻞ ﻛﺮده و ﺑﺮ روي دﻛﻤﻪ ‪ Next‬ﻛﻠﻴﻚ ﻛﻨﻴﺪ.‬
‫8. ﻫﻤﺎﻧﻈﻮر ﻛﻪ در ﺷﻜﻞ زﻳﺮ ﻣﺸﺎﻫﺪه ﻣﻲ ﺷﻮد در اﻳﻦ ﻣﺮﺣﻠﻪ اﺑﺘﺪا ﻧﺼﺐ ﻧﺮم اﻓﺰار ﺷﺮوع ﻣﻲ ﺷﻮد و ﭘﺲ از‬
‫اﺗﻤﺎم ﻧﺼﺐ وﻳﺰارد اﺗﻤﺎم ﻧﺼﺐ ﻇﺎﻫﺮ ﻣﻲ ﺷﻮد. ﺑﺮ روي دﻛﻤﻪ ‪ Finish‬ﻛﻠﻴﻚ ﻛﻨﻴﺪ.‬

‫9. ﭘﺲ از اﺗﻤﺎم ﻧﺼﺐ ﻓﺎﻳﻞ ‪ cygwin.bat‬ﻣﻮﺟﻮد در ﻣﺴﻴﺮ ﻧﺼﺐ )‪ (C:cygwin‬را ﺑﺎ اﺳﺘﻔﺎده از وﻳﺮاﻳﺸﮕﺮ‬
‫‪ notepad‬ﺑﺎز ﻛﺮده و ﺧﻂ زﻳﺮ را ﺑﻪ آن اﺿﺎﻓﻪ ﻛﻨﻴﺪ‬
‫‪set CYGWIN=binmode tty ntsec‬‬
‫ اﺳﺘﻔﺎده ﻧﻤﻮد. ﺷﻜﻞ زﻳﺮ‬Desktop ‫ ﻣﻲ ﺗﻮان از اﻳﻜﻮن ﻣﻮﺟﻮد ﺑﺮ روي‬cygwin ‫01. ﺑﺮاي ورود ﺑﻪ ﻧﺮم اﻓﺰار‬
.‫ را ﻧﺸﺎن ﻣﻲ دﻫﺪ‬cygwin ‫ﺧﻂ ﻓﺮﻣﺎن ﻧﺮم اﻓﺰار‬

‫“ ﻓﺮﻣﺎن زﻳﺮ را در ﺧﻂ‬can not create /home/userid” ‫در ﺻﻮرت ﻣﺸﺎﻫﺪه ﭘﻴﻐﺎﻣﻲ ﻣﺒﺘﻨﻲ ﺑﺮ‬
mkpasswd –l > /etc/passwd

:‫ اﺟﺮاء ﻛﻨﻴﺪ‬cygwin ‫ﻓﺮﻣﺎن‬

:‫ در ﺳﻄﺢ وﻳﻨﺪوز ﻣﺮاﺣﻞ زﻳﺮ ﺑﺎﻳﺪ اﺟﺮاء ﺷﻮد‬ssh ‫11. ﺑﺮاي ﻧﺼﺐ ﺳﺮوﻳﺲ‬

‫ اﺟﺮاء ﻛﻨﻴﺪ و ورودي ﻫﺎي ﻣﻮرد ﻧﻴﺎز را‬cygwin ‫ را در ﺧﻂ ﻓﺮﻣﺎن‬ssh-host-config ‫. ﻓﺮﻣﺎن‬a
: (‫ ﻣﺸﺨﺺ ﺷﺪه اﻧﺪ‬Bold ‫ﻣﻄﺎﺑﻖ ﺷﻜﻞ زﻳﺮ وارد ﻛﻨﻴﺪ ) ورودي ﻫﺎي ﺑﻪ ﺻﻮرت‬

$ssh-host-config
***Info: Generating /etc/ssh_host_key
***Info: Generating /etc/ssh_host_rsa_key
***Info: Generating /etc/ssh_host_dsa_key
***Info: Creating default /etc/ssh_config file
***Info: Creating default /etc/sshd_config file
***Info: Privilege separation is set to yes by default since OpenSSH 3,3.
***Info: However, this requires a non-privileged account called 'sshd.'
***Info: For more info on privilege separation read /usr/share/doc/openssh/README.privsep.
***Query: Should privilege separation be used? (yes/no) yes
***Info: Note that creating a new user requires that the current account have
***Info: Administrator privileges. Should this script attempt to create a
***Query: new local account 'sshd'? (yes/no) yes
***Info: Updating /etc/sshd_config file

***Warning: The following functions require administrator privileges!
***Query: Do you want to install sshd as a service?
***Query: (Say "no" if it is already installed as a service) (yes/no) yes
***Query: Enter the value of CYGWIN for the daemon: [] binmode tty ntsec
***Info: On Windows Server 2003, Windows Vista, and above, the
***Info: SYSTEM account cannot setuid to other users -- a capability
***Info: sshd requires. You need to have or to create a privileged
***Info: account. This script will help you do so.
***Info: You appear to be running Windows 2003 Server or later. On 2003
***Info: and later systems, it's not possible to use the LocalSystem
***Info: account for services that can change the user id without an
***Info: explicit password (such as passwordless logins [e.g. public key
***Info: authentication] via sshd.(
***Info: If you want to enable that functionality, it's required to create
***Info: a new account with special privileges (unless a similar account
***Info: already exists). This account is then used to run these special
***Info: servers.
***Info: Note that creating a new user requires that the current account
***Info: have Administrator privileges itself.
***Info: No privileged account could be found.
***Info: This script plans to use 'cyg_server.'
***Info: 'cyg_server' will only be used by registered services.
***Query: Do you want to use a different name? (yes/no) no
***Query: Create new privileged user account 'cyg_server'? (yes/no) yes
***Info: Please enter a password for new user cyg_server. Please be sure
***Info: that this password matches the password rules given on your system.
***Info: Entering no password will exit the configuration.
***Query: Please enter the password : ******
***Query: Reenter:******
***Info: User 'cyg_server' has been created with password ‘*******.’
***Info: If you change the password, please remember also to change the
***Info: password for the installed services which use (or will soon use(
***Info: the 'cyg_server' account.
***Info: Also keep in mind that the user 'cyg_server' needs read permissions
***Info: on all users' relevant files for the services running as 'cyg_server.'
***Info: In particular, for the sshd server all users' .ssh/authorized_keys
***Info: files must have appropriate permissions to allow public key
***Info: authentication. (Re-)running ssh-user-config for each user will set
***Info: these permissions corrently. [Similary restrictions apply, for
***Info: instance, for .rhosts files if the rshd server is running, etc.[
***Info: The sshd service has been installed under the 'cyg_server'
***Info: account. To start the service now, call `net start sshd' or
***Info: `cygrunsrv -S sshd'. Otherwise, it will start automatically
***Info: after the next reboot.
***Info: Host configuration finished. Have fun!

Public & Private ‫ در ﺟﻬﺖ اﻳﺠﺎد ﻛﻠﻴﺪﻫﺎي‬ssh-user-config ‫. اﺟﺮاي ﻓﺮﻣﺎن‬b
$ssh-user-config
***Query: Shall I create an SSH1 RSA identity file for you? (yes/no) yes
***Info: Generating /home/Administrator/.ssh/identity
Enter passphrase (empty for no passphrase:(
Enter same passphrase again:
***Query: Do you want to use this identity to login to this machine? (yes/no) yes
***Info: Adding to /home/Administrator/.ssh/authorized_keys
***Query: Shall I create an SSH2 RSA identity file for you? (yes/no) yes
***Info: Generating /home/Administrator/.ssh/id_rsa
Enter passphrase (empty for no passphrase:(
Enter same passphrase again:
***Query: Do you want to use this identity to login to this machine? (yes/no) yes
***Info: Adding to /home/Administrator/.ssh/authorized_keys
***Query: Shall I create an SSH2 DSA identity file for you? (yes/no(
***Query: Shall I create an SSH2 DSA identity file for you? (yes/no) yes
***Info: Generating /home/Administrator/.ssh/id_dsa
Enter passphrase (empty for no passphrase:(
Enter same passphrase again:
***Query: Do you want to use this identity to login to this machine? (yes/no) yes
***Info: Adding to /home/Administrator/.ssh/authorized_keys
***Info: Configuration finished. Have fun!

Control Panel/ Administrative Tools/ ) ‫ در وﻳﻨﺪوز‬services ‫. ﺑﺎ ورود ﺑﻪ ﻗﺴﻤﺖ‬c
.‫ را استارت کنيد‬Cygwin ‫( سرويس ايجاد شده برای‬Services
Grid ‫ و ﺳﺮور‬agent ‫ ﻣﻴﺎن‬User Equivalency ‫21. ﺑﺮ ﻗﺮاري‬
:‫ﺑﺎ اﺟﺮاي ﻓﺮﻣﺎن ﻫﺎي زﻳﺮ اﻳﻦ اﻣﺮ اﻧﺠﺎم ﻣﻲ ﭘﺬﻳﺮد‬

1.
2.
3.
4.
5.
6.
7.

cat ~/.ssh/id_rsa.pub >> ~/.ssh/authorized_keys
cat ~/.ssh/id_dsa.pub >> ~/.ssh/authorized_keys
ssh Administrator@grid-server cat ~/.ssh/id_rsa.pub >> ~/.ssh/authorized_keys
ssh Administrator@grid-server cat ~/.ssh/id_dsa.pub >> ~/.ssh/authorized_keys
ssh Administrator@agent-server cat ~/.ssh/id_rsa.pub >> ~/.ssh/authorized_keys
ssh Administrator@agent-server cat ~/.ssh/id_dsa.pub >> ~/.ssh/authorized_keys
chmod 644 ~/.ssh/authorized_keys

.‫ ﻧﻴﺎز ﺑﻪ اﺟﺮاء ﺷﺪن دارﻧﺪ‬Agent ‫*ﺧﻄﻬﺎي 4،3،2،1 ﻓﻘﻂ در زﻣﺎن اﺿﺎﻓﻪ ﻛﺮدن اوﻟﻴﻦ‬
:‫ از ﻓﺮﻣﺎن زﻳﺮ اﺳﺘﻔﺎده ﻛﻨﻴﺪ‬User Equivalency ‫31. ﺑﺮاي ﺗﺴﺖ ﺑﺮﻗﺮار ﺑﻮدن‬
On grid server# Ssh grid-server date
On agent server# Ssh agent-server date

‫ اﺳﺖ. از داﻳﺮﻛﺘﻮري ﻣﻨﺒﻊ ﻧﺮم‬Agent ‫ از ﺳﺮور‬Silent ‫ ﺑﻪ ﺻﻮرت‬Agent ‫41. ﻣﺮﺣﻠﻪ آﺧﺮ ﻧﺼﺐ ﻧﺮم اﻓﺰار‬
additional- ‫ وارد ﻣﺴﻴﺮ ...... ﺷﻮﻳﺪ و ﭘﺎراﻣﺘﺮﻫﺎي ﻣﻮرد اﺷﺎره در زﻳﺮ را در ﻓﺎﻳﻞ‬Agent ‫اﻓﺰار‬
:‫ ﻣﻘﺪار دﻫﻲ ﻛﻨﻴﺪ‬agent.rsp
SECURITY_UPDATES_VIA_MYORACLESUPPORT=false
DECLINE_SECURITY_UPDATES=True
INSTALL_UPDATES_SELECTION="skip"
ORACLE_AGENT_HOME_LOCATION=”windows path of installation: D:”
OMS_HOST=”Ip address of grid control server: 10,200,23,19”
OMS_PORT=”Port number for uploading xml files to grid control server: 7201”
AGENT_REGISTRATION_PASSWORD=”Registration password to register agent on grid control: qwert123”

‫ ﺑﺎ‬setup.exe ‫ ﺑﺎ ورود ﺑﻪ ﻣﺴﻴﺮ .... و اﺟﺮاي ﻓﺎﻳﻞ‬Response ‫51. ﭘﺲ اﻧﺠﺎم ﺗﻐﻴﻴﺮات در ﻓﺎﻳﻞ‬
:‫ﭘﺎراﻣﺘﺮﻫﺎي زﻳﺮ ﻧﺼﺐ ﺷﺮوع ﻣﻲ ﺷﻮد‬
setup.exe –silent –responsefile ….

More Related Content

Similar to Cygwin installation

SOP - 2013 Server Build
SOP - 2013 Server BuildSOP - 2013 Server Build
SOP - 2013 Server Build
Robert Jones
 
Manual 70-410 _Yves
Manual 70-410 _YvesManual 70-410 _Yves
Manual 70-410 _Yves
Yves Mukusa
 
Free tools for win server administration
Free tools for win server administrationFree tools for win server administration
Free tools for win server administration
Concentrated Technology
 
Taishaun_OwnensCNS-533_Lab
Taishaun_OwnensCNS-533_LabTaishaun_OwnensCNS-533_Lab
Taishaun_OwnensCNS-533_Lab
Taishaun Owens
 
14038356 installation-guide-of-centos-5
14038356 installation-guide-of-centos-514038356 installation-guide-of-centos-5
14038356 installation-guide-of-centos-5
Hind Sahel
 
Hyperion 9.X Installation
Hyperion 9.X InstallationHyperion 9.X Installation
Hyperion 9.X Installation
Sandeep Chekuri
 

Similar to Cygwin installation (20)

How to configure Nagios in Fedora ?
How to configure Nagios in Fedora ?How to configure Nagios in Fedora ?
How to configure Nagios in Fedora ?
 
SOP - 2013 Server Build
SOP - 2013 Server BuildSOP - 2013 Server Build
SOP - 2013 Server Build
 
Manual 70-410 _Yves
Manual 70-410 _YvesManual 70-410 _Yves
Manual 70-410 _Yves
 
Securing Windows Remote Desktop With Copssh
Securing Windows Remote Desktop With CopsshSecuring Windows Remote Desktop With Copssh
Securing Windows Remote Desktop With Copssh
 
Free tools for win server administration
Free tools for win server administrationFree tools for win server administration
Free tools for win server administration
 
Taishaun_OwnensCNS-533_Lab
Taishaun_OwnensCNS-533_LabTaishaun_OwnensCNS-533_Lab
Taishaun_OwnensCNS-533_Lab
 
Gluster Storage Platform Installation Guide
Gluster Storage Platform Installation GuideGluster Storage Platform Installation Guide
Gluster Storage Platform Installation Guide
 
Intalacion de owncloud
Intalacion de owncloudIntalacion de owncloud
Intalacion de owncloud
 
Howto Pxeboot
Howto PxebootHowto Pxeboot
Howto Pxeboot
 
Handson1 6 federp
Handson1 6 federpHandson1 6 federp
Handson1 6 federp
 
14038356 installation-guide-of-centos-5
14038356 installation-guide-of-centos-514038356 installation-guide-of-centos-5
14038356 installation-guide-of-centos-5
 
10 resource kit remote administration tools
10 resource kit remote administration tools10 resource kit remote administration tools
10 resource kit remote administration tools
 
Free radius billing server with practical vpn exmaple
Free radius billing server with practical vpn exmapleFree radius billing server with practical vpn exmaple
Free radius billing server with practical vpn exmaple
 
Instalasaun ubuntu 12+ subsonic
Instalasaun ubuntu 12+ subsonicInstalasaun ubuntu 12+ subsonic
Instalasaun ubuntu 12+ subsonic
 
TrinityCore server install guide
TrinityCore server install guideTrinityCore server install guide
TrinityCore server install guide
 
Nat mikrotik
Nat mikrotikNat mikrotik
Nat mikrotik
 
Hyperion 9.X Installation
Hyperion 9.X InstallationHyperion 9.X Installation
Hyperion 9.X Installation
 
Sistemas operacionais 8
Sistemas operacionais 8Sistemas operacionais 8
Sistemas operacionais 8
 
Virtualization and Socket Programing
Virtualization and Socket ProgramingVirtualization and Socket Programing
Virtualization and Socket Programing
 
Quick-Start Guide: Deploying Your Cloudian HyperStore Hybrid Storage Service
Quick-Start Guide: Deploying Your Cloudian HyperStore Hybrid Storage ServiceQuick-Start Guide: Deploying Your Cloudian HyperStore Hybrid Storage Service
Quick-Start Guide: Deploying Your Cloudian HyperStore Hybrid Storage Service
 

More from Mohsen B (12)

Problem details
Problem detailsProblem details
Problem details
 
Using sap-netweaver-with-dbim-2594359
Using sap-netweaver-with-dbim-2594359Using sap-netweaver-with-dbim-2594359
Using sap-netweaver-with-dbim-2594359
 
Restore procedure
Restore procedureRestore procedure
Restore procedure
 
Backup script
Backup scriptBackup script
Backup script
 
Refresh standby using rman backup
Refresh standby using rman backupRefresh standby using rman backup
Refresh standby using rman backup
 
Using a physical standby database for read write
Using a physical standby database for read writeUsing a physical standby database for read write
Using a physical standby database for read write
 
Cman
CmanCman
Cman
 
Huge pages
Huge pagesHuge pages
Huge pages
 
Simple network troubleshooting
Simple network troubleshootingSimple network troubleshooting
Simple network troubleshooting
 
Rhel asmlib to_udev
Rhel asmlib to_udevRhel asmlib to_udev
Rhel asmlib to_udev
 
Finding root blocker in oracle database
Finding root blocker in oracle databaseFinding root blocker in oracle database
Finding root blocker in oracle database
 
Oracle & sql server comparison 2
Oracle & sql server comparison 2Oracle & sql server comparison 2
Oracle & sql server comparison 2
 

Recently uploaded

Cloud Frontiers: A Deep Dive into Serverless Spatial Data and FME
Cloud Frontiers:  A Deep Dive into Serverless Spatial Data and FMECloud Frontiers:  A Deep Dive into Serverless Spatial Data and FME
Cloud Frontiers: A Deep Dive into Serverless Spatial Data and FME
Safe Software
 
Finding Java's Hidden Performance Traps @ DevoxxUK 2024
Finding Java's Hidden Performance Traps @ DevoxxUK 2024Finding Java's Hidden Performance Traps @ DevoxxUK 2024
Finding Java's Hidden Performance Traps @ DevoxxUK 2024
Victor Rentea
 
Why Teams call analytics are critical to your entire business
Why Teams call analytics are critical to your entire businessWhy Teams call analytics are critical to your entire business
Why Teams call analytics are critical to your entire business
panagenda
 

Recently uploaded (20)

Boost Fertility New Invention Ups Success Rates.pdf
Boost Fertility New Invention Ups Success Rates.pdfBoost Fertility New Invention Ups Success Rates.pdf
Boost Fertility New Invention Ups Success Rates.pdf
 
AXA XL - Insurer Innovation Award Americas 2024
AXA XL - Insurer Innovation Award Americas 2024AXA XL - Insurer Innovation Award Americas 2024
AXA XL - Insurer Innovation Award Americas 2024
 
Spring Boot vs Quarkus the ultimate battle - DevoxxUK
Spring Boot vs Quarkus the ultimate battle - DevoxxUKSpring Boot vs Quarkus the ultimate battle - DevoxxUK
Spring Boot vs Quarkus the ultimate battle - DevoxxUK
 
Emergent Methods: Multi-lingual narrative tracking in the news - real-time ex...
Emergent Methods: Multi-lingual narrative tracking in the news - real-time ex...Emergent Methods: Multi-lingual narrative tracking in the news - real-time ex...
Emergent Methods: Multi-lingual narrative tracking in the news - real-time ex...
 
Ransomware_Q4_2023. The report. [EN].pdf
Ransomware_Q4_2023. The report. [EN].pdfRansomware_Q4_2023. The report. [EN].pdf
Ransomware_Q4_2023. The report. [EN].pdf
 
Strategize a Smooth Tenant-to-tenant Migration and Copilot Takeoff
Strategize a Smooth Tenant-to-tenant Migration and Copilot TakeoffStrategize a Smooth Tenant-to-tenant Migration and Copilot Takeoff
Strategize a Smooth Tenant-to-tenant Migration and Copilot Takeoff
 
Apidays New York 2024 - Scaling API-first by Ian Reasor and Radu Cotescu, Adobe
Apidays New York 2024 - Scaling API-first by Ian Reasor and Radu Cotescu, AdobeApidays New York 2024 - Scaling API-first by Ian Reasor and Radu Cotescu, Adobe
Apidays New York 2024 - Scaling API-first by Ian Reasor and Radu Cotescu, Adobe
 
Cloud Frontiers: A Deep Dive into Serverless Spatial Data and FME
Cloud Frontiers:  A Deep Dive into Serverless Spatial Data and FMECloud Frontiers:  A Deep Dive into Serverless Spatial Data and FME
Cloud Frontiers: A Deep Dive into Serverless Spatial Data and FME
 
Exploring the Future Potential of AI-Enabled Smartphone Processors
Exploring the Future Potential of AI-Enabled Smartphone ProcessorsExploring the Future Potential of AI-Enabled Smartphone Processors
Exploring the Future Potential of AI-Enabled Smartphone Processors
 
How to Troubleshoot Apps for the Modern Connected Worker
How to Troubleshoot Apps for the Modern Connected WorkerHow to Troubleshoot Apps for the Modern Connected Worker
How to Troubleshoot Apps for the Modern Connected Worker
 
Finding Java's Hidden Performance Traps @ DevoxxUK 2024
Finding Java's Hidden Performance Traps @ DevoxxUK 2024Finding Java's Hidden Performance Traps @ DevoxxUK 2024
Finding Java's Hidden Performance Traps @ DevoxxUK 2024
 
presentation ICT roal in 21st century education
presentation ICT roal in 21st century educationpresentation ICT roal in 21st century education
presentation ICT roal in 21st century education
 
Apidays New York 2024 - APIs in 2030: The Risk of Technological Sleepwalk by ...
Apidays New York 2024 - APIs in 2030: The Risk of Technological Sleepwalk by ...Apidays New York 2024 - APIs in 2030: The Risk of Technological Sleepwalk by ...
Apidays New York 2024 - APIs in 2030: The Risk of Technological Sleepwalk by ...
 
Apidays New York 2024 - Passkeys: Developing APIs to enable passwordless auth...
Apidays New York 2024 - Passkeys: Developing APIs to enable passwordless auth...Apidays New York 2024 - Passkeys: Developing APIs to enable passwordless auth...
Apidays New York 2024 - Passkeys: Developing APIs to enable passwordless auth...
 
Apidays New York 2024 - Accelerating FinTech Innovation by Vasa Krishnan, Fin...
Apidays New York 2024 - Accelerating FinTech Innovation by Vasa Krishnan, Fin...Apidays New York 2024 - Accelerating FinTech Innovation by Vasa Krishnan, Fin...
Apidays New York 2024 - Accelerating FinTech Innovation by Vasa Krishnan, Fin...
 
Apidays New York 2024 - The value of a flexible API Management solution for O...
Apidays New York 2024 - The value of a flexible API Management solution for O...Apidays New York 2024 - The value of a flexible API Management solution for O...
Apidays New York 2024 - The value of a flexible API Management solution for O...
 
ProductAnonymous-April2024-WinProductDiscovery-MelissaKlemke
ProductAnonymous-April2024-WinProductDiscovery-MelissaKlemkeProductAnonymous-April2024-WinProductDiscovery-MelissaKlemke
ProductAnonymous-April2024-WinProductDiscovery-MelissaKlemke
 
Why Teams call analytics are critical to your entire business
Why Teams call analytics are critical to your entire businessWhy Teams call analytics are critical to your entire business
Why Teams call analytics are critical to your entire business
 
AWS Community Day CPH - Three problems of Terraform
AWS Community Day CPH - Three problems of TerraformAWS Community Day CPH - Three problems of Terraform
AWS Community Day CPH - Three problems of Terraform
 
Strategies for Landing an Oracle DBA Job as a Fresher
Strategies for Landing an Oracle DBA Job as a FresherStrategies for Landing an Oracle DBA Job as a Fresher
Strategies for Landing an Oracle DBA Job as a Fresher
 

Cygwin installation

  • 1. ‫ﻧﺼﺐ ‪ Cygwin‬ﺑﺮ روي وﻳﻨﺪوز 3002 و ﺑﺎﻻﺗﺮ:‬ ‫1. ﻧﺴﺨﻪ ‪ setup‬ﻧﺮم اﻓﺰار را از داﺧﻞ ﭘﻮﺷﻪ 7,1 ‪ cywin‬اﺟﺮاء ﻛﺮده و ﺑﺮ روي دﻛﻤﻪ ‪ Next‬ﻛﻠﻴﻚ ﻛﻨﻴﺪ.‬ ‫2. از ﺳﻪ ‪ Radio Button‬ﻣﻮﺟﻮد ﮔﺰﻳﻨﻪ ﺳﻮم را اﻧﺘﺨﺎب ﻛﻨﻴﺪ و ﺑﺮ روي دﻛﻤﻪ ‪ Next‬ﻛﻠﻴﻚ ﻛﻨﻴﺪ.‬
  • 2. ‫3. ﻫﻤﺎﻧﻄﻮر ﻛﻪ در ﺷﻜﻞ ﻧﺸﺎن داده ﺷﺪه اﺳﺖ در ﻗﺴﻤﺖ ‪ Root Directory‬ﻣﻘﺪار ‪ C:cygwin‬و در‬ ‫ﻗﺴﻤﺖ ‪ Install For‬ﮔﺰﻳﻨﻪ ‪ All Users‬را اﻧﺘﺨﺎب ﻛﻨﻴﺪ و ﺑﺮ روي دﻛﻤﻪ ‪ Next‬ﻛﻠﻴﻚ ﻛﻨﻴﺪ:‬ ‫4. در اﻳﻦ ﻣﺮﺣﻠﻪ ﺑﺎﻳﺪ ﻣﻨﺒﻊ ﻧﺼﺐ ﻧﺮم اﻓﺰار را ﻣﺸﺨﺺ ﻛﻨﻴﺪ. ﻣﻘﺪار اﻳﻦ ﮔﺰﻳﻨﻪ ﺑﺴﺘﮕﻲ ﺑﻪ ﻣﺤﻠﻲ دارد ﻛﻪ ﻧﺮم‬ ‫اﻓﺰار در آن ﻗﺮار دارد. ﺑﺎ ﻣﺸﺨﺺ ﻛﺮدن اﻳﻦ ﻣﻘﺪار ﺑﺮ روي دﻛﻤﻪ ‪ Next‬ﻛﻠﻴﻚ ﻛﻨﻴﺪ.‬
  • 3. ‫5. ﺑﺎ ﻛﻠﻴﻚ ﺑﺮ روي دﻛﻤﻪ ‪ Next‬ﻧﺮم اﻓﺰار ﭘﺲ از ﭼﻚ ﻛﺮدن ﭼﮕﻮﻧﮕﻲ ﻧﺼﺐ ) ﺑﻪ ﺻﻮرت ‪ Local‬و ﻳﺎ‬ ‫‪ (Online‬وارد ﻣﺮﺣﻠﻪ اﻧﺘﺨﺎب ‪ Package‬ﻫﺎ ﻣﻲ ﺷﻮد.‬
  • 4. ‫6. در اﻳﻦ ﻣﺮﺣﻠﻪ ‪ Package‬ﻫﺎي ﻣﻮرد ﻧﻴﺎز ﺑﺮاي ﭘﻴﺎده ﺳﺎزي ‪ SSH‬در وﻳﻨﺪوز اﻧﺘﺨﺎب ﻣﻲ ﺷﻮﻧﺪ.‬ ‫‪ Package‬ﻫﺎي ﻣﻮرد ﻧﻴﺎز )ﻫﻤﺎﻧﻄﻮر ﻛﻪ در ﺷﻜﻠﻬﺎي زﻳﺮ ﻗﺎﺑﻞ ﻣﺸﺎﻫﺪه اﺳﺖ( ﻋﺒﺎرﺗﻨﺪ از‬ ‫‪ .a‬در ﻗﺴﻤﺖ ‪ Archive‬ﭘﻜﻴﺞ ﻫﺎي ‪ )unzip & zip‬ﺗﻮﺟﻪ داﺷﺘﻪ ﺑﺎﺷﻴﺪ ﻛﻪ ﻫﻢ ﺑﺎﻳﺪ ‪ Bin‬و ﻫﻢ‬ ‫‪ Source‬ﭘﻜﻴﺞ ﻫﺎي اﻧﺘﺨﺎب ﺷﻮﻧﺪ.(‬ ‫‪ .b‬در ﻗﺴﻤﺖ ‪ Net‬ﭘﻜﻴﺞ ﻫﺎي ‪openssh & openssl‬‬ ‫ﭘﺲ از اﻧﺘﺨﺎب اﻳﻦ ﭘﻜﻴﺞ ﻫﺎي ﺑﺮ روي دﻛﻤﻪ ‪ Next‬ﻛﻠﻴﻚ ﻛﻨﻴﺪ.‬ ‫7. در اﻳﻦ ﻣﺮﺣﻠﻪ از اﻧﺘﺨﺎب ﮔﺰﻳﻨﻪ )‪ Select required packages (RECOMMENDED‬اﻃﻤﻴﻨﺎن‬ ‫ﺣﺎﺻﻞ ﻛﺮده و ﺑﺮ روي دﻛﻤﻪ ‪ Next‬ﻛﻠﻴﻚ ﻛﻨﻴﺪ.‬
  • 5. ‫8. ﻫﻤﺎﻧﻈﻮر ﻛﻪ در ﺷﻜﻞ زﻳﺮ ﻣﺸﺎﻫﺪه ﻣﻲ ﺷﻮد در اﻳﻦ ﻣﺮﺣﻠﻪ اﺑﺘﺪا ﻧﺼﺐ ﻧﺮم اﻓﺰار ﺷﺮوع ﻣﻲ ﺷﻮد و ﭘﺲ از‬ ‫اﺗﻤﺎم ﻧﺼﺐ وﻳﺰارد اﺗﻤﺎم ﻧﺼﺐ ﻇﺎﻫﺮ ﻣﻲ ﺷﻮد. ﺑﺮ روي دﻛﻤﻪ ‪ Finish‬ﻛﻠﻴﻚ ﻛﻨﻴﺪ.‬ ‫9. ﭘﺲ از اﺗﻤﺎم ﻧﺼﺐ ﻓﺎﻳﻞ ‪ cygwin.bat‬ﻣﻮﺟﻮد در ﻣﺴﻴﺮ ﻧﺼﺐ )‪ (C:cygwin‬را ﺑﺎ اﺳﺘﻔﺎده از وﻳﺮاﻳﺸﮕﺮ‬ ‫‪ notepad‬ﺑﺎز ﻛﺮده و ﺧﻂ زﻳﺮ را ﺑﻪ آن اﺿﺎﻓﻪ ﻛﻨﻴﺪ‬ ‫‪set CYGWIN=binmode tty ntsec‬‬
  • 6. ‫ اﺳﺘﻔﺎده ﻧﻤﻮد. ﺷﻜﻞ زﻳﺮ‬Desktop ‫ ﻣﻲ ﺗﻮان از اﻳﻜﻮن ﻣﻮﺟﻮد ﺑﺮ روي‬cygwin ‫01. ﺑﺮاي ورود ﺑﻪ ﻧﺮم اﻓﺰار‬ .‫ را ﻧﺸﺎن ﻣﻲ دﻫﺪ‬cygwin ‫ﺧﻂ ﻓﺮﻣﺎن ﻧﺮم اﻓﺰار‬ ‫“ ﻓﺮﻣﺎن زﻳﺮ را در ﺧﻂ‬can not create /home/userid” ‫در ﺻﻮرت ﻣﺸﺎﻫﺪه ﭘﻴﻐﺎﻣﻲ ﻣﺒﺘﻨﻲ ﺑﺮ‬ mkpasswd –l > /etc/passwd :‫ اﺟﺮاء ﻛﻨﻴﺪ‬cygwin ‫ﻓﺮﻣﺎن‬ :‫ در ﺳﻄﺢ وﻳﻨﺪوز ﻣﺮاﺣﻞ زﻳﺮ ﺑﺎﻳﺪ اﺟﺮاء ﺷﻮد‬ssh ‫11. ﺑﺮاي ﻧﺼﺐ ﺳﺮوﻳﺲ‬ ‫ اﺟﺮاء ﻛﻨﻴﺪ و ورودي ﻫﺎي ﻣﻮرد ﻧﻴﺎز را‬cygwin ‫ را در ﺧﻂ ﻓﺮﻣﺎن‬ssh-host-config ‫. ﻓﺮﻣﺎن‬a : (‫ ﻣﺸﺨﺺ ﺷﺪه اﻧﺪ‬Bold ‫ﻣﻄﺎﺑﻖ ﺷﻜﻞ زﻳﺮ وارد ﻛﻨﻴﺪ ) ورودي ﻫﺎي ﺑﻪ ﺻﻮرت‬ $ssh-host-config ***Info: Generating /etc/ssh_host_key ***Info: Generating /etc/ssh_host_rsa_key ***Info: Generating /etc/ssh_host_dsa_key ***Info: Creating default /etc/ssh_config file ***Info: Creating default /etc/sshd_config file ***Info: Privilege separation is set to yes by default since OpenSSH 3,3. ***Info: However, this requires a non-privileged account called 'sshd.' ***Info: For more info on privilege separation read /usr/share/doc/openssh/README.privsep. ***Query: Should privilege separation be used? (yes/no) yes ***Info: Note that creating a new user requires that the current account have ***Info: Administrator privileges. Should this script attempt to create a ***Query: new local account 'sshd'? (yes/no) yes ***Info: Updating /etc/sshd_config file ***Warning: The following functions require administrator privileges! ***Query: Do you want to install sshd as a service? ***Query: (Say "no" if it is already installed as a service) (yes/no) yes
  • 7. ***Query: Enter the value of CYGWIN for the daemon: [] binmode tty ntsec ***Info: On Windows Server 2003, Windows Vista, and above, the ***Info: SYSTEM account cannot setuid to other users -- a capability ***Info: sshd requires. You need to have or to create a privileged ***Info: account. This script will help you do so. ***Info: You appear to be running Windows 2003 Server or later. On 2003 ***Info: and later systems, it's not possible to use the LocalSystem ***Info: account for services that can change the user id without an ***Info: explicit password (such as passwordless logins [e.g. public key ***Info: authentication] via sshd.( ***Info: If you want to enable that functionality, it's required to create ***Info: a new account with special privileges (unless a similar account ***Info: already exists). This account is then used to run these special ***Info: servers. ***Info: Note that creating a new user requires that the current account ***Info: have Administrator privileges itself. ***Info: No privileged account could be found. ***Info: This script plans to use 'cyg_server.' ***Info: 'cyg_server' will only be used by registered services. ***Query: Do you want to use a different name? (yes/no) no ***Query: Create new privileged user account 'cyg_server'? (yes/no) yes ***Info: Please enter a password for new user cyg_server. Please be sure ***Info: that this password matches the password rules given on your system. ***Info: Entering no password will exit the configuration. ***Query: Please enter the password : ****** ***Query: Reenter:****** ***Info: User 'cyg_server' has been created with password ‘*******.’ ***Info: If you change the password, please remember also to change the ***Info: password for the installed services which use (or will soon use( ***Info: the 'cyg_server' account. ***Info: Also keep in mind that the user 'cyg_server' needs read permissions ***Info: on all users' relevant files for the services running as 'cyg_server.' ***Info: In particular, for the sshd server all users' .ssh/authorized_keys ***Info: files must have appropriate permissions to allow public key ***Info: authentication. (Re-)running ssh-user-config for each user will set ***Info: these permissions corrently. [Similary restrictions apply, for ***Info: instance, for .rhosts files if the rshd server is running, etc.[
  • 8. ***Info: The sshd service has been installed under the 'cyg_server' ***Info: account. To start the service now, call `net start sshd' or ***Info: `cygrunsrv -S sshd'. Otherwise, it will start automatically ***Info: after the next reboot. ***Info: Host configuration finished. Have fun! Public & Private ‫ در ﺟﻬﺖ اﻳﺠﺎد ﻛﻠﻴﺪﻫﺎي‬ssh-user-config ‫. اﺟﺮاي ﻓﺮﻣﺎن‬b $ssh-user-config ***Query: Shall I create an SSH1 RSA identity file for you? (yes/no) yes ***Info: Generating /home/Administrator/.ssh/identity Enter passphrase (empty for no passphrase:( Enter same passphrase again: ***Query: Do you want to use this identity to login to this machine? (yes/no) yes ***Info: Adding to /home/Administrator/.ssh/authorized_keys ***Query: Shall I create an SSH2 RSA identity file for you? (yes/no) yes ***Info: Generating /home/Administrator/.ssh/id_rsa Enter passphrase (empty for no passphrase:( Enter same passphrase again: ***Query: Do you want to use this identity to login to this machine? (yes/no) yes ***Info: Adding to /home/Administrator/.ssh/authorized_keys ***Query: Shall I create an SSH2 DSA identity file for you? (yes/no( ***Query: Shall I create an SSH2 DSA identity file for you? (yes/no) yes ***Info: Generating /home/Administrator/.ssh/id_dsa Enter passphrase (empty for no passphrase:( Enter same passphrase again: ***Query: Do you want to use this identity to login to this machine? (yes/no) yes ***Info: Adding to /home/Administrator/.ssh/authorized_keys ***Info: Configuration finished. Have fun! Control Panel/ Administrative Tools/ ) ‫ در وﻳﻨﺪوز‬services ‫. ﺑﺎ ورود ﺑﻪ ﻗﺴﻤﺖ‬c .‫ را استارت کنيد‬Cygwin ‫( سرويس ايجاد شده برای‬Services
  • 9. Grid ‫ و ﺳﺮور‬agent ‫ ﻣﻴﺎن‬User Equivalency ‫21. ﺑﺮ ﻗﺮاري‬ :‫ﺑﺎ اﺟﺮاي ﻓﺮﻣﺎن ﻫﺎي زﻳﺮ اﻳﻦ اﻣﺮ اﻧﺠﺎم ﻣﻲ ﭘﺬﻳﺮد‬ 1. 2. 3. 4. 5. 6. 7. cat ~/.ssh/id_rsa.pub >> ~/.ssh/authorized_keys cat ~/.ssh/id_dsa.pub >> ~/.ssh/authorized_keys ssh Administrator@grid-server cat ~/.ssh/id_rsa.pub >> ~/.ssh/authorized_keys ssh Administrator@grid-server cat ~/.ssh/id_dsa.pub >> ~/.ssh/authorized_keys ssh Administrator@agent-server cat ~/.ssh/id_rsa.pub >> ~/.ssh/authorized_keys ssh Administrator@agent-server cat ~/.ssh/id_dsa.pub >> ~/.ssh/authorized_keys chmod 644 ~/.ssh/authorized_keys .‫ ﻧﻴﺎز ﺑﻪ اﺟﺮاء ﺷﺪن دارﻧﺪ‬Agent ‫*ﺧﻄﻬﺎي 4،3،2،1 ﻓﻘﻂ در زﻣﺎن اﺿﺎﻓﻪ ﻛﺮدن اوﻟﻴﻦ‬ :‫ از ﻓﺮﻣﺎن زﻳﺮ اﺳﺘﻔﺎده ﻛﻨﻴﺪ‬User Equivalency ‫31. ﺑﺮاي ﺗﺴﺖ ﺑﺮﻗﺮار ﺑﻮدن‬ On grid server# Ssh grid-server date On agent server# Ssh agent-server date ‫ اﺳﺖ. از داﻳﺮﻛﺘﻮري ﻣﻨﺒﻊ ﻧﺮم‬Agent ‫ از ﺳﺮور‬Silent ‫ ﺑﻪ ﺻﻮرت‬Agent ‫41. ﻣﺮﺣﻠﻪ آﺧﺮ ﻧﺼﺐ ﻧﺮم اﻓﺰار‬ additional- ‫ وارد ﻣﺴﻴﺮ ...... ﺷﻮﻳﺪ و ﭘﺎراﻣﺘﺮﻫﺎي ﻣﻮرد اﺷﺎره در زﻳﺮ را در ﻓﺎﻳﻞ‬Agent ‫اﻓﺰار‬ :‫ ﻣﻘﺪار دﻫﻲ ﻛﻨﻴﺪ‬agent.rsp SECURITY_UPDATES_VIA_MYORACLESUPPORT=false DECLINE_SECURITY_UPDATES=True INSTALL_UPDATES_SELECTION="skip" ORACLE_AGENT_HOME_LOCATION=”windows path of installation: D:” OMS_HOST=”Ip address of grid control server: 10,200,23,19” OMS_PORT=”Port number for uploading xml files to grid control server: 7201” AGENT_REGISTRATION_PASSWORD=”Registration password to register agent on grid control: qwert123” ‫ ﺑﺎ‬setup.exe ‫ ﺑﺎ ورود ﺑﻪ ﻣﺴﻴﺮ .... و اﺟﺮاي ﻓﺎﻳﻞ‬Response ‫51. ﭘﺲ اﻧﺠﺎم ﺗﻐﻴﻴﺮات در ﻓﺎﻳﻞ‬ :‫ﭘﺎراﻣﺘﺮﻫﺎي زﻳﺮ ﻧﺼﺐ ﺷﺮوع ﻣﻲ ﺷﻮد‬ setup.exe –silent –responsefile ….