Anatomy of a 96 mustang ccrm r1-4
•
4 likes•7,709 views

This document describes how a 96 Ford Mustang Constant Control Relay Module is designed, how it works and how to test it.

Recommended
More Related Content
What's hot
What's hot (20)
Similar to Anatomy of a 96 mustang ccrm r1-4
Similar to Anatomy of a 96 mustang ccrm r1-4 (20)
Recently uploaded
Recently uploaded (20)
Anatomy of a 96 mustang ccrm r1-4
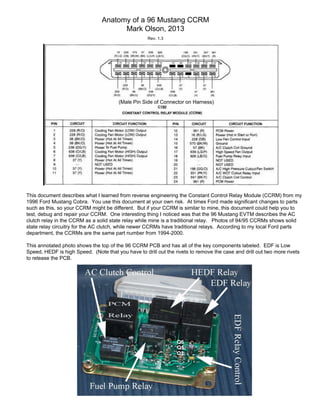
- 1. Anatomy of a 96 Mustang CCRM Mark Olson, 2013 Rev. 1.3 (Male Pin Side of Connector on Harness) This document describes what I learned from reverse engineering the Constant Control Relay Module (CCRM) from my 1996 Ford Mustang Cobra. You use this document at your own risk. At times Ford made significant changes to parts such as this, so your CCRM might be different. But if your CCRM is similar to mine, this document could help you to test, debug and repair your CCRM. One interesting thing I noticed was that the 96 Mustang EVTM describes the AC clutch relay in the CCRM as a solid state relay while mine is a traditional relay. Photos of 94/95 CCRMs shows solid state relay circuitry for the AC clutch, while newer CCRMs have traditional relays. According to my local Ford parts department, the CCRMs are the same part number from 1994-2000. This annotated photo shows the top of the 96 CCRM PCB and has all of the key components labeled. EDF is Low Speed, HEDF is high Speed. (Note that you have to drill out the rivets to remove the case and drill out two more rivets to release the PCB. Q6 Q5 Q2
- 2. Anatomy of a 96 Mustang CCRM Power Power Hot at all Times Schematics Pin 8 Pin 10 Low Speed Fan Circuit Analysis: Hot in Start & Run Pin 13 The low speed fan PCM output appears to be a logic-level PCM output. When Pin 14 is high, Q2 is turned on, Q5 is turned D1 off and Q6 is turned on, which turns on the fan. When Pin Relay K1 14 is low, Q2 is turned off, Q5 is turned on and Q6 is To IMRC & AC Clutch turned off, which turns off the fan. D5 protects Q6 from the GND Pin 16 relay field collapse EMF. R14 supplies base current to turn Pin 15 Q6 on. R12 supplies base current to turn Q5 on. R11 and From R19 + R9 cuts the input voltage to 1/3 of the voltage on Pin Chassis 14. Assuming the PCM has an open-collector output, R4 Ground PCM Power pulls pin 14 to near battery voltage when the input is high. Power PCM Pin 12 At 12V, the input to Q2 will try to go to 3V, which pumps Pin 24 C3 1uF plenty of current into the base, turning Q2 on. At near 0v, 100V the base of Q2 is very close to 0V, turning Q2 off. C4 and C9 act in conjunction with the resistors as low and higher Power Hot at all times frequency filters, respectively. Pin 11 Fuel Note: Pump - All diodes are 4201A K2 Relay - All transistors are N530 (Fairchild FPN 530 Low Saturation NPN transistor equiv?) Pump Relay Input Fuel - 1998 CCRM uses Fairchild B744 transistors Pin 18 - All resistors are 1/4W, 5% (W6 is 1% in 98) - K? is a relay that is not marked on the silk screen R25* - K1, K3, K4 are 40A Bosch PCB-mount relays (Tyco V23234-B0001-X011 in 98) Output Pump Fuel - K2 is an Omron G8H-UA-007108 (G8HL-1A4P in 98) Pin 5 - K? is an Omron G8SN-UA-007116 - Items with an asterisk (*) are not installed, D8 is not installed in 1998 CCRMs. - I have no idea what the resistor between Pin 19 and ground is for Input Switch Cutout Press/ AC WOT AC Hi Fan Pin 21 AC Used W6 1K Not Clutch Pin 19 K? Relay Relay Pin 22 Low Output Clutch Speed AC Pin 23 K4 Fan D8 Relay R14 D5 22K R12 100K Hot at all Times Power Pin 3 C C Pin 4 High B Q5 B Q6 Speed E E Speed Speed K3 Fan Input High High Fan Pin 17 Relay 1500 Pin 6 Fan Out R4 47uF Pin 7 D10* C R9 10V 0.01uF R19 B Q2 Speed Speed C4 C9 Input 100K 100 Low Fan 100K E Pin 14 R11 Pin 1 Low Fan Out Pin 2
- 3. Anatomy of a 96 Mustang CCRM Bench Testing Mark Olson, 2013 24 23 22 21 18 17 16 15 14 13 12 11 10 8 7 6 5 4 3 2 1 CCRM Connector Female Pin Side (CCRM Itself) CCRM Testing Procedure: 1. Test PCM relay K1 and D1: Put the ohmmeter red lead on Pin13, and the black lead on Pin 15. You should read about 2.5M ohms. Reverse the leads and you should read an open circuit. If you don’t get that, open the CCRM and check for the same resistances across D1. If you don’t get it, replace D1. Check the K1 coil for about 85 ohms. If you get an open circuit, replace K1. Check the resistance across Pins 8 & 12. You should read an open circuit. If the coil and diode are good, put +12V on Pin 13 and ground on Pin 15. You should hear the relay click and read near 0 ohms across Pins 8 & 12. If Pins 8 & 12 don’t behave correctly replace relay K1. 2. Test Fuel Pump relay K2: Put an ohmmeter across Pins 12 & 18. You should read about 75 ohms. If it is an open circuit or a hard short, replace relay K2. Check the resistance across Pins 5 & 11. It should read an open circuit. Put 12V across pins 12 & 18. You should hear the relay click and you should then see near 0 ohms across pins 5 & 11. If Pins 5 & 11 don’t behave correctly replace relay K2. 3. Test AC Clutch relay K?: Put an ohmmeter across Pins 12 & 22. You should read about 180 ohms. If it is an open circuit or a hard short, replace relay K?. Put the ohmmeter red lead on Pin 15 and the black lead on Pin 23. You should read about 2.5M ohms. Reverse the leads and you should read an open circuit. Check the resistance across Pins 21 & 23. It should read a short circuit. Put 12V across pins 12 & 22. You should hear the relay click and you should then see a short circuit across pins 21 & 23. If Pins 21 & 23 don’t behave correctly replace relay K?. 4. Test High Speed Fan relay K3: Put an ohmmeter across Pins 12 & 17. You should read about 85 ohms. If it is an open circuit or a hard short, replace relay K3. Check the resistance across Pins 3 & 6. It should read an open circuit. Put 12V across pins 12 & 17. You should hear the relay click and you should then see near 0 ohms across pins 3 & 6. If Pins 3 & 6 don’t behave correctly replace relay K3. 5. Test Low Speed Fan relay K4: Check the resistance across Pins 1 & 3. You should read an open circuit. If you don’t, replace relay K4. Put +12V on Pin 12 and Ground on Pin 15. You should hear the relay click and see a closed circuit across Pins 1 & 3. Ground Pin14, and you should hear the relay click and see an open circuit across Pins 1 & 3. If Pins 1 & 3 don’t behave correctly, follow the debug strategy in 6 below. 6. Debug Low Speed Fan solid state circuit: (rough guidelines) With +12V on Pin 12 and Ground on Pin 14, you should see about 1.145V on the base of Q2. If you see near 0V, replace Q2. You should see about 0.5V on the collector of Q2. If you see 12V, replace Q2. If you see near 0.5V on Q2's collector, go to A below. Ground Pin14. You should see very near 0V on the base of Q2. You should see near 12V on the collector of Q2. If you see 1V or less, replace Q2. If you see near 12V on Q2's collector, go to A below. A. Debug Transistor Q5: With Pin 14 not grounded, you should see about 12V on the collector of Q5. When you ground Pin 14, the collector of Q5 should go to 1.4V or less. If the Q5 collector doesn’t behave that way, replace Q5. If it does behave that way, go to B below. B. Debug Transistor Q6: With Pin 24 not grounded, the collector of Q6 should be less than 1V. When you ground Pin 14, the collector of Q6 should go to about 12V. If the Q6 collector doesn’t behave that way, replace Q6. If it does behave that way, go to C below. C. Debug Relay K4: Unhook power and grounds. Measure the resistance across the windings of Relay K4. It should read near 85 ohms. If not, replace relay K4.