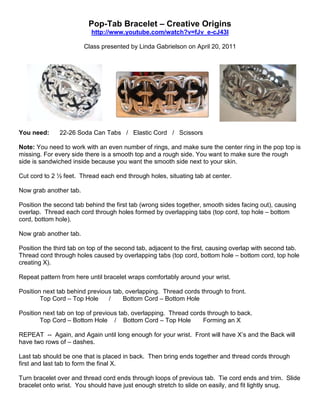
1. Pop-Tab Bracelet – Creative Origins
http://www.youtube.com/watch?v=fJv_e-cJ43I
Class presented by Linda Gabrielson on April 20, 2011
You need: 22-26 Soda Can Tabs / Elastic Cord / Scissors
Note: You need to work with an even number of rings, and make sure the center ring in the pop top is
missing. For every side there is a smooth top and a rough side. You want to make sure the rough
side is sandwiched inside because you want the smooth side next to your skin.
Cut cord to 2 ½ feet. Thread each end through holes, situating tab at center.
Now grab another tab.
Position the second tab behind the first tab (wrong sides together, smooth sides facing out), causing
overlap. Thread each cord through holes formed by overlapping tabs (top cord, top hole – bottom
cord, bottom hole).
Now grab another tab.
Position the third tab on top of the second tab, adjacent to the first, causing overlap with second tab.
Thread cord through holes caused by overlapping tabs (top cord, bottom hole – bottom cord, top hole
creating X).
Repeat pattern from here until bracelet wraps comfortably around your wrist.
Position next tab behind previous tab, overlapping. Thread cords through to front.
Top Cord – Top Hole / Bottom Cord – Bottom Hole
Position next tab on top of previous tab, overlapping. Thread cords through to back.
Top Cord – Bottom Hole / Bottom Cord – Top Hole Forming an X
REPEAT -- Again, and Again until long enough for your wrist. Front will have X’s and the Back will
have two rows of – dashes.
Last tab should be one that is placed in back. Then bring ends together and thread cords through
first and last tab to form the final X.
Turn bracelet over and thread cord ends through loops of previous tab. Tie cord ends and trim. Slide
bracelet onto wrist. You should have just enough stretch to slide on easily, and fit lightly snug.