Navigating the Deluge_ Dubai Floods and the Resilience of Dubai International...
9ist_accesstutorial
1. ACCESS TUTORIAL - DVD STORE
You are the owner of a new DVD store. To keep track of all the members, movies available, and the loans,
you need to create a database.
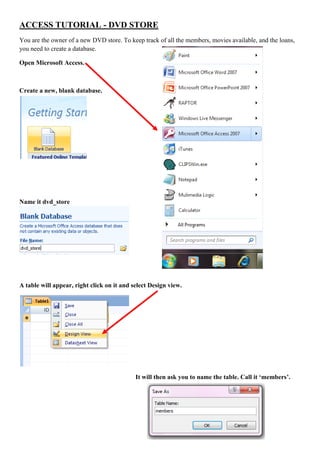
Open Microsoft Access.
Create a new, blank database.
Name it dvd_store
A table will appear, right click on it and select Design view.
It will then ask you to name the table. Call it ‘members’.
2. Fill out this new page with the following information. Ensure that if you use capitals in the field name,
that you do for all the field names in all the tables. Select member ID as the Primary Key (this should
be done automatically).
Once you have filled that out, you will right click
on the members tab, and select ‘Datasheet View’.
Make sure you select SAVE!!!!
It should then look like this:
You will then need to make another table for the movies.
Select the Create tab at the top, and select ‘Table’.
Once the new table comes up, right click on the
table1 tab and select ‘Design View’.
3. Save this table as ‘dvd’.
Copy the following information into the table.
Right click the dvd tab and select the ‘Datasheet View’.
Make sure you select save.
Once you have done this, create another table.
Once the table has appeared, right click on the table1 tab and select ‘Design View’.
4. Save the table as ‘loans’.
Once the table is in design view, enter in the following details.
Right click on the loans tab, and select ‘Datasheet View’.
You should now have all three of these tables and the fields entered.
You now need to enter in the details of the members, the dvds, and create loans.
Select the members tab and enter in the following details. Also enter in another 4 members.
5. Once you have done that, you need to enter in the movie titles for the dvds. Enter in the following
information and create another 4 movie entries. Use the internet to research the movie title, director,
year and genre.
To enter in the loans, click on the loans tab. Enter into the Design View.
For the member ID and dvd ID, select the
‘Lookup’ option at the bottom and change the
Display control to ‘List Box’, make sure
Row Source Type is ‘Table/Query’ and the
Row Source is ‘members’.
6. Do the same for the dvd ID, but the Row sources will be ‘dvd’.
Go back to Datasheet View.
You will then notice that the member ID and
the dvd ID have a drop down option of all
the member IDs and the dvd IDs.
This will make entering loans easier.
7. Enter in the following loans:
Once that is completed, close all the tables, but not the program. Select the ‘Database Tools’ tab and
select the ‘relationships’ tool. This will allow you to create relationships between the tables.
A small table will appear. Click on each table and select add. They will then appear behind the box.
Close the box.
.
Click on the dvd ID in the dvd table and
drag it to hover over the dvd ID in the
loans table. An option will appear to
clarify the relationship. You will need to
also select the box ‘Enforced Referential
Integrity’. This will create a one-to-many
relationship, indicating that one dvd and
be on many different loans (as there are
many copies of the one dvd).
8. Click ‘create’ and a line will appear, representing the relationship.
Do the same for member ID. Click on member ID in the members table, drag it to hover over the
member ID in the loans table. Again select the ‘Enforced Referential Integrity’ to create a one-to-
many relationship.
9. Then click ‘create’, you can rearrange the table boxes, and the relationship lines will remain the same.
Close the relationship display, but be sure to save!
If you then reopen the ‘members’ and ‘dvd’ tables, you can click on the same box on the left of the
columns, and you can see the dvds that the members have on loan.
10. If you look on the ‘dvd’ table you will be able to see the dvd titles, and the members who have that
movie out on loan.
Close all the tables.
As the owner of the store, you will need to create a form of all the loans that have been taken out. To
do this, you will need to select the ‘Create’ tab at the top, then select ‘More Forms’ to find the option
‘Form Wizard’.
11. The Wizard Form will appear. Select the Table: loans in the ’Tables/Queries’ option. Select and more
across
loan ID
date taken out
date due back
into the ‘selected fields’ box.
You will need to then select the Table: members, then Table: dvd, and select the following options so
that they appear in the ‘Selected Fields’ box.
Select ‘Next’ once all the above options are present.
12. They will need to be presented in order of loans. Click next.
Selected ‘Columnar’ and click next.
13. Select ‘Office’ then click next.
Name the form ‘loans_form’ and click ‘finish’.
It will then present the forms for all the loans. At the bottom, you will see that there are 7 present
loans, so can view all the loans by clicking on the arrows.
Close these forms.