SlideShare a Scribd company logo
1 of 2
Download to read offline
3
① Connect camera and PC by network cable in the same LAN, power
on. Connecting as following (PoE switch, camera, PC connection
photo).
2.Ping device address
② Left click window【Start 】menu, input ”cmd” in【Program/
file searcher】 to open window command(or you can press
shortcut ”win+R” directly on keyboard to input ”cmd”), from the Cursor
blinking side, input ”Ping *** *** *** ***” and press “Enter” (For
example, when the camera IP address is 192.168.1.168, then input
“ping 192.168.1.168” and press ”Enter”) to check the system statistical
connect information. For example as below photo, when system
statistical connect information is data package: sent=4, received=4,
loss=0, <0% loss> means PC and camera signal communication is
normal, you can login the camera by webpage.
1
Please download and install OCX plugin when the first time you connect
to the camera, open 【IP Search 】 tool and click 【Search】,
double click the camera you need to connect, webpage of login will
come out, then click【Download】to download the OCX plugin and
install. After installation, please click to refresh the webpage and input
user and password (Default Factory setting user is admin, default
password is admin, we strongly suggest you to change the user and
password to higher safety level), details are shown as below photo:
3.Connection and login
4
IP Camera
Quick Start Guide
Statement
Thank you for using our products, please read this manual carefully
before trying.
This manual is applicable to network series products.
This manual may contain information that is technically inaccurate,
inconsistent in the product's function and operation, or in a
typographical error. Our company will update the context in the
manual according to the enhancement of product features. Updated
content will be added in the new version of this manual without
further notice. If there is manual description of the product does not
match with the physical, in order to prevail in kind.
Safety Precautions
This equipment should be installed in a well-ventilated environment.
Please keep proper space with the ground during installation. It is
good for the heat dissipation of the machine. Do not block the
ventilation door of the equipment, away from the heat source and
avoid high temperature environment.
This product can not withstand heavy loads. Do not place heavy
objects or multi-layer overlays on this product.
Power must be under safety certification, Its output voltage, current,
voltage polarity and operating temperature must comply with the
power requirements of this equipment.
When using this equipment in thunder and lightning conditions,
please pay attention to install lightning protection device or cut off
the power.
In order to get high quality video and pictures, make sure your
internet connection is stable and smooth.
Please read this manual carefully and keep it properly before using our
network camera products.
Related tools and documents of products, please download from
www.herospeed.net.
1.Network Settings
IPv4 address of the PC needs to be in the same network segment
as the IP address of the IP camera to make it could be used
normally(Note: The default IP address of the IP Camera:
192.168.1.168.). Specific settings in window system can refer to
the following methods:
① Check the IPv4 address of PC, click 【Start】 / 【Control Panel】 /
【Network and Internet】 / 【Network and Sharing Center】 / 【Local
Network】 / 【Details】.
② Set the PC IPv4 address(E.g PC:192.168.1.165)
Method one:
③ Or add PC and network cameras in a same network segment
(E.g:192.168.1.165).
Note: The IPv4 address can not be conflicted when you add in
LAN.
Use IP search tool 6.1.4.2 or above version, changing searched IP
camera to the same network segment as the PC's. (Note: Default IP
address of the IP Camera: 192.168.1.168. Default Username: admin,
default password: admin; the changed URL can not conflict with the IP
address of other devices in the LAN).
Method Two:
2
3-1
3-2
3-3
3-4
5
4.Real-time preview and parameter
configuration
① Enter the user name and password of the device in the
browser user interface and enter the real-time preview interface.
② Click 【Configuration】 to enter the device and other functions,
including local configuration, system, local network, video, image
and event configuration. Users can selectively set these features to
achieve better performance based on the actual situation of the
application scenario.
6.BitVision Download
Under the NVR main menu, you can also set Recording, Playback,
Motion Detection, coding parameters and other operations.
Before adding device, please confirm that the IP address of NVR
and the device are in the same network segment and do not
conflict.
Click the 【Camera】under the NVR main menu to enter the menu
and click【Add】. Tick the device to be added and click 【Add】,
click 【Cancel】 to complete the addition. As shown in the
following figure:
5.Add Device
6
5-1
5-2
5-3
5-4
iOS App
7 8
Download and install BitVision on smart phone by following way.
1. In the Android phone Google App Store or iPhone App Store
enter ”BitVision” search, download and install.
2. Scan the following QR codes to download and install the App.
Android ios
3. Download from the following website:
Android App download address:
https://play.google.com/store/apps/details?id=com.gzch.lsplat.bitdog
iOS App download address:
https://itunes.apple.com/app/id1419463554
7.Add device on BitVision App
Open BitVision App( New user please register an account ), follow
up next steps to add the devices.
① ② ③ ④
⑤ ⑥ ⑦ ⑧
8.Preview on BitVision App
① ② ③ ④
① Click on the right part of the sliding menu to enter the main
interface;
② Click 【Real time】, click 【 】to enter the “Device manage”
interface.
③ Choose the device channel you want to preview, click【Done】.
④ Start to play the real-time video.
① Click 【Device manage】 in the menu bar.;
② Click 【 】;
③ Click 【 Add device】;
④ Click 【SN Add】;
⑤ Scan the QR Code printed on the device sticker or posted on the
P2P interface;
⑥ Enter device user name, password and Captcha (printed on the
label), click 【Submit】;
⑦ Click 【Please set the device name】, enter the device name, click
【Done】; Click 【Please choose a group】, choose camera group,
click 【Done】, click 【Finish】.
⑧ The device was successfully added to the device list.

More Related Content

Similar to IP Camera Quick Start Guide Bitvision.pdf

WECON Remote Access User Manual
WECON Remote Access User ManualWECON Remote Access User Manual
WECON Remote Access User ManualLily Zheng
 
wifi hidden clock camera spy radio clock camera
wifi hidden clock camera spy radio clock camera wifi hidden clock camera spy radio clock camera
wifi hidden clock camera spy radio clock camera george david
 
DIY Mobile VR with Unity 3d & Cardboard SDK
DIY Mobile VR with Unity 3d & Cardboard SDKDIY Mobile VR with Unity 3d & Cardboard SDK
DIY Mobile VR with Unity 3d & Cardboard SDKBond University
 
Vo ip guide
Vo ip guideVo ip guide
Vo ip guideACP
 
P series quick installation manual
P series quick installation manualP series quick installation manual
P series quick installation manualJoaquín Sánchez
 
Gsg Sucr Update Service En 1213 2005 1
Gsg  Sucr Update Service En 1213 2005 1Gsg  Sucr Update Service En 1213 2005 1
Gsg Sucr Update Service En 1213 2005 1Piyush Kumar
 
시크 SICK Lector63x 2D DPM스캐너 고정식바코드스캐너 산업용바코드리더 이미지스캐너 매뉴얼
시크 SICK Lector63x 2D DPM스캐너 고정식바코드스캐너 산업용바코드리더 이미지스캐너 매뉴얼시크 SICK Lector63x 2D DPM스캐너 고정식바코드스캐너 산업용바코드리더 이미지스캐너 매뉴얼
시크 SICK Lector63x 2D DPM스캐너 고정식바코드스캐너 산업용바코드리더 이미지스캐너 매뉴얼HION IT
 
Creating peer to peer network nadia perandos bisnar
Creating peer to peer network nadia perandos bisnarCreating peer to peer network nadia perandos bisnar
Creating peer to peer network nadia perandos bisnarPerla Pelicano Corpez
 
Workshop lab 2020
Workshop lab   2020Workshop lab   2020
Workshop lab 2020JimCarver9
 
Wi fi ruckus config
Wi fi ruckus configWi fi ruckus config
Wi fi ruckus configtmukumba
 
Wireless Presentation System | Prijector Pro - User's Manual
Wireless Presentation System | Prijector Pro - User's ManualWireless Presentation System | Prijector Pro - User's Manual
Wireless Presentation System | Prijector Pro - User's ManualPrijector
 
Wfc878r eop hwsg_npd6407-00_en
Wfc878r eop hwsg_npd6407-00_enWfc878r eop hwsg_npd6407-00_en
Wfc878r eop hwsg_npd6407-00_enHerrySyafitri
 
Cpu224 xp eth-ethernet_interface
Cpu224 xp eth-ethernet_interfaceCpu224 xp eth-ethernet_interface
Cpu224 xp eth-ethernet_interfacearco zhang
 
Llunitebe2018 implement modern management as like brewing a beer
Llunitebe2018 implement modern management as like brewing a beerLlunitebe2018 implement modern management as like brewing a beer
Llunitebe2018 implement modern management as like brewing a beerKenny Buntinx
 
A step by step guide to develop temperature sensor io t application using ibm...
A step by step guide to develop temperature sensor io t application using ibm...A step by step guide to develop temperature sensor io t application using ibm...
A step by step guide to develop temperature sensor io t application using ibm...Azilen Technologies Pvt. Ltd.
 

Similar to IP Camera Quick Start Guide Bitvision.pdf (20)

WECON Remote Access User Manual
WECON Remote Access User ManualWECON Remote Access User Manual
WECON Remote Access User Manual
 
wifi hidden clock camera spy radio clock camera
wifi hidden clock camera spy radio clock camera wifi hidden clock camera spy radio clock camera
wifi hidden clock camera spy radio clock camera
 
DIY Mobile VR with Unity 3d & Cardboard SDK
DIY Mobile VR with Unity 3d & Cardboard SDKDIY Mobile VR with Unity 3d & Cardboard SDK
DIY Mobile VR with Unity 3d & Cardboard SDK
 
Fire Eye Appliance Quick Start
Fire Eye Appliance Quick StartFire Eye Appliance Quick Start
Fire Eye Appliance Quick Start
 
Vo ip guide
Vo ip guideVo ip guide
Vo ip guide
 
P series quick installation manual
P series quick installation manualP series quick installation manual
P series quick installation manual
 
Gsg Sucr Update Service En 1213 2005 1
Gsg  Sucr Update Service En 1213 2005 1Gsg  Sucr Update Service En 1213 2005 1
Gsg Sucr Update Service En 1213 2005 1
 
시크 SICK Lector63x 2D DPM스캐너 고정식바코드스캐너 산업용바코드리더 이미지스캐너 매뉴얼
시크 SICK Lector63x 2D DPM스캐너 고정식바코드스캐너 산업용바코드리더 이미지스캐너 매뉴얼시크 SICK Lector63x 2D DPM스캐너 고정식바코드스캐너 산업용바코드리더 이미지스캐너 매뉴얼
시크 SICK Lector63x 2D DPM스캐너 고정식바코드스캐너 산업용바코드리더 이미지스캐너 매뉴얼
 
SCCM HOw to
SCCM HOw toSCCM HOw to
SCCM HOw to
 
Creating peer to peer network nadia perandos bisnar
Creating peer to peer network nadia perandos bisnarCreating peer to peer network nadia perandos bisnar
Creating peer to peer network nadia perandos bisnar
 
Workshop lab 2020
Workshop lab   2020Workshop lab   2020
Workshop lab 2020
 
Wi fi ruckus config
Wi fi ruckus configWi fi ruckus config
Wi fi ruckus config
 
Wireless Presentation System | Prijector Pro - User's Manual
Wireless Presentation System | Prijector Pro - User's ManualWireless Presentation System | Prijector Pro - User's Manual
Wireless Presentation System | Prijector Pro - User's Manual
 
Watch power user manual 20160301
Watch power user manual 20160301Watch power user manual 20160301
Watch power user manual 20160301
 
Wfc878r eop hwsg_npd6407-00_en
Wfc878r eop hwsg_npd6407-00_enWfc878r eop hwsg_npd6407-00_en
Wfc878r eop hwsg_npd6407-00_en
 
Cpu224 xp eth-ethernet_interface
Cpu224 xp eth-ethernet_interfaceCpu224 xp eth-ethernet_interface
Cpu224 xp eth-ethernet_interface
 
dadvar
dadvardadvar
dadvar
 
Llunitebe2018 implement modern management as like brewing a beer
Llunitebe2018 implement modern management as like brewing a beerLlunitebe2018 implement modern management as like brewing a beer
Llunitebe2018 implement modern management as like brewing a beer
 
Mobile App - Jmeter (1)
Mobile App - Jmeter (1)Mobile App - Jmeter (1)
Mobile App - Jmeter (1)
 
A step by step guide to develop temperature sensor io t application using ibm...
A step by step guide to develop temperature sensor io t application using ibm...A step by step guide to develop temperature sensor io t application using ibm...
A step by step guide to develop temperature sensor io t application using ibm...
 

Recently uploaded

办理(UofR毕业证书)罗切斯特大学毕业证成绩单原版一比一
办理(UofR毕业证书)罗切斯特大学毕业证成绩单原版一比一办理(UofR毕业证书)罗切斯特大学毕业证成绩单原版一比一
办理(UofR毕业证书)罗切斯特大学毕业证成绩单原版一比一z xss
 
Call Girls Service Adil Nagar 7001305949 Need escorts Service Pooja Vip
Call Girls Service Adil Nagar 7001305949 Need escorts Service Pooja VipCall Girls Service Adil Nagar 7001305949 Need escorts Service Pooja Vip
Call Girls Service Adil Nagar 7001305949 Need escorts Service Pooja VipCall Girls Lucknow
 
VIP Kolkata Call Girl Salt Lake 👉 8250192130 Available With Room
VIP Kolkata Call Girl Salt Lake 👉 8250192130  Available With RoomVIP Kolkata Call Girl Salt Lake 👉 8250192130  Available With Room
VIP Kolkata Call Girl Salt Lake 👉 8250192130 Available With Roomishabajaj13
 
Font Performance - NYC WebPerf Meetup April '24
Font Performance - NYC WebPerf Meetup April '24Font Performance - NYC WebPerf Meetup April '24
Font Performance - NYC WebPerf Meetup April '24Paul Calvano
 
定制(AUT毕业证书)新西兰奥克兰理工大学毕业证成绩单原版一比一
定制(AUT毕业证书)新西兰奥克兰理工大学毕业证成绩单原版一比一定制(AUT毕业证书)新西兰奥克兰理工大学毕业证成绩单原版一比一
定制(AUT毕业证书)新西兰奥克兰理工大学毕业证成绩单原版一比一Fs
 
Chennai Call Girls Alwarpet Phone 🍆 8250192130 👅 celebrity escorts service
Chennai Call Girls Alwarpet Phone 🍆 8250192130 👅 celebrity escorts serviceChennai Call Girls Alwarpet Phone 🍆 8250192130 👅 celebrity escorts service
Chennai Call Girls Alwarpet Phone 🍆 8250192130 👅 celebrity escorts servicevipmodelshub1
 
Contact Rya Baby for Call Girls New Delhi
Contact Rya Baby for Call Girls New DelhiContact Rya Baby for Call Girls New Delhi
Contact Rya Baby for Call Girls New Delhimiss dipika
 
VIP Kolkata Call Girl Alambazar 👉 8250192130 Available With Room
VIP Kolkata Call Girl Alambazar 👉 8250192130  Available With RoomVIP Kolkata Call Girl Alambazar 👉 8250192130  Available With Room
VIP Kolkata Call Girl Alambazar 👉 8250192130 Available With Roomdivyansh0kumar0
 
定制(Management毕业证书)新加坡管理大学毕业证成绩单原版一比一
定制(Management毕业证书)新加坡管理大学毕业证成绩单原版一比一定制(Management毕业证书)新加坡管理大学毕业证成绩单原版一比一
定制(Management毕业证书)新加坡管理大学毕业证成绩单原版一比一Fs
 
办理多伦多大学毕业证成绩单|购买加拿大UTSG文凭证书
办理多伦多大学毕业证成绩单|购买加拿大UTSG文凭证书办理多伦多大学毕业证成绩单|购买加拿大UTSG文凭证书
办理多伦多大学毕业证成绩单|购买加拿大UTSG文凭证书zdzoqco
 
定制(Lincoln毕业证书)新西兰林肯大学毕业证成绩单原版一比一
定制(Lincoln毕业证书)新西兰林肯大学毕业证成绩单原版一比一定制(Lincoln毕业证书)新西兰林肯大学毕业证成绩单原版一比一
定制(Lincoln毕业证书)新西兰林肯大学毕业证成绩单原版一比一Fs
 
Blepharitis inflammation of eyelid symptoms cause everything included along w...
Blepharitis inflammation of eyelid symptoms cause everything included along w...Blepharitis inflammation of eyelid symptoms cause everything included along w...
Blepharitis inflammation of eyelid symptoms cause everything included along w...Excelmac1
 
定制(UAL学位证)英国伦敦艺术大学毕业证成绩单原版一比一
定制(UAL学位证)英国伦敦艺术大学毕业证成绩单原版一比一定制(UAL学位证)英国伦敦艺术大学毕业证成绩单原版一比一
定制(UAL学位证)英国伦敦艺术大学毕业证成绩单原版一比一Fs
 
Call Girls In The Ocean Pearl Retreat Hotel New Delhi 9873777170
Call Girls In The Ocean Pearl Retreat Hotel New Delhi 9873777170Call Girls In The Ocean Pearl Retreat Hotel New Delhi 9873777170
Call Girls In The Ocean Pearl Retreat Hotel New Delhi 9873777170Sonam Pathan
 
Git and Github workshop GDSC MLRITM
Git and Github  workshop GDSC MLRITMGit and Github  workshop GDSC MLRITM
Git and Github workshop GDSC MLRITMgdsc13
 
Magic exist by Marta Loveguard - presentation.pptx
Magic exist by Marta Loveguard - presentation.pptxMagic exist by Marta Loveguard - presentation.pptx
Magic exist by Marta Loveguard - presentation.pptxMartaLoveguard
 
PHP-based rendering of TYPO3 Documentation
PHP-based rendering of TYPO3 DocumentationPHP-based rendering of TYPO3 Documentation
PHP-based rendering of TYPO3 DocumentationLinaWolf1
 

Recently uploaded (20)

办理(UofR毕业证书)罗切斯特大学毕业证成绩单原版一比一
办理(UofR毕业证书)罗切斯特大学毕业证成绩单原版一比一办理(UofR毕业证书)罗切斯特大学毕业证成绩单原版一比一
办理(UofR毕业证书)罗切斯特大学毕业证成绩单原版一比一
 
Call Girls Service Adil Nagar 7001305949 Need escorts Service Pooja Vip
Call Girls Service Adil Nagar 7001305949 Need escorts Service Pooja VipCall Girls Service Adil Nagar 7001305949 Need escorts Service Pooja Vip
Call Girls Service Adil Nagar 7001305949 Need escorts Service Pooja Vip
 
VIP Kolkata Call Girl Salt Lake 👉 8250192130 Available With Room
VIP Kolkata Call Girl Salt Lake 👉 8250192130  Available With RoomVIP Kolkata Call Girl Salt Lake 👉 8250192130  Available With Room
VIP Kolkata Call Girl Salt Lake 👉 8250192130 Available With Room
 
Font Performance - NYC WebPerf Meetup April '24
Font Performance - NYC WebPerf Meetup April '24Font Performance - NYC WebPerf Meetup April '24
Font Performance - NYC WebPerf Meetup April '24
 
Model Call Girl in Jamuna Vihar Delhi reach out to us at 🔝9953056974🔝
Model Call Girl in  Jamuna Vihar Delhi reach out to us at 🔝9953056974🔝Model Call Girl in  Jamuna Vihar Delhi reach out to us at 🔝9953056974🔝
Model Call Girl in Jamuna Vihar Delhi reach out to us at 🔝9953056974🔝
 
定制(AUT毕业证书)新西兰奥克兰理工大学毕业证成绩单原版一比一
定制(AUT毕业证书)新西兰奥克兰理工大学毕业证成绩单原版一比一定制(AUT毕业证书)新西兰奥克兰理工大学毕业证成绩单原版一比一
定制(AUT毕业证书)新西兰奥克兰理工大学毕业证成绩单原版一比一
 
Chennai Call Girls Alwarpet Phone 🍆 8250192130 👅 celebrity escorts service
Chennai Call Girls Alwarpet Phone 🍆 8250192130 👅 celebrity escorts serviceChennai Call Girls Alwarpet Phone 🍆 8250192130 👅 celebrity escorts service
Chennai Call Girls Alwarpet Phone 🍆 8250192130 👅 celebrity escorts service
 
Contact Rya Baby for Call Girls New Delhi
Contact Rya Baby for Call Girls New DelhiContact Rya Baby for Call Girls New Delhi
Contact Rya Baby for Call Girls New Delhi
 
VIP Kolkata Call Girl Alambazar 👉 8250192130 Available With Room
VIP Kolkata Call Girl Alambazar 👉 8250192130  Available With RoomVIP Kolkata Call Girl Alambazar 👉 8250192130  Available With Room
VIP Kolkata Call Girl Alambazar 👉 8250192130 Available With Room
 
Hot Sexy call girls in Rk Puram 🔝 9953056974 🔝 Delhi escort Service
Hot Sexy call girls in  Rk Puram 🔝 9953056974 🔝 Delhi escort ServiceHot Sexy call girls in  Rk Puram 🔝 9953056974 🔝 Delhi escort Service
Hot Sexy call girls in Rk Puram 🔝 9953056974 🔝 Delhi escort Service
 
定制(Management毕业证书)新加坡管理大学毕业证成绩单原版一比一
定制(Management毕业证书)新加坡管理大学毕业证成绩单原版一比一定制(Management毕业证书)新加坡管理大学毕业证成绩单原版一比一
定制(Management毕业证书)新加坡管理大学毕业证成绩单原版一比一
 
办理多伦多大学毕业证成绩单|购买加拿大UTSG文凭证书
办理多伦多大学毕业证成绩单|购买加拿大UTSG文凭证书办理多伦多大学毕业证成绩单|购买加拿大UTSG文凭证书
办理多伦多大学毕业证成绩单|购买加拿大UTSG文凭证书
 
定制(Lincoln毕业证书)新西兰林肯大学毕业证成绩单原版一比一
定制(Lincoln毕业证书)新西兰林肯大学毕业证成绩单原版一比一定制(Lincoln毕业证书)新西兰林肯大学毕业证成绩单原版一比一
定制(Lincoln毕业证书)新西兰林肯大学毕业证成绩单原版一比一
 
Blepharitis inflammation of eyelid symptoms cause everything included along w...
Blepharitis inflammation of eyelid symptoms cause everything included along w...Blepharitis inflammation of eyelid symptoms cause everything included along w...
Blepharitis inflammation of eyelid symptoms cause everything included along w...
 
定制(UAL学位证)英国伦敦艺术大学毕业证成绩单原版一比一
定制(UAL学位证)英国伦敦艺术大学毕业证成绩单原版一比一定制(UAL学位证)英国伦敦艺术大学毕业证成绩单原版一比一
定制(UAL学位证)英国伦敦艺术大学毕业证成绩单原版一比一
 
Call Girls In The Ocean Pearl Retreat Hotel New Delhi 9873777170
Call Girls In The Ocean Pearl Retreat Hotel New Delhi 9873777170Call Girls In The Ocean Pearl Retreat Hotel New Delhi 9873777170
Call Girls In The Ocean Pearl Retreat Hotel New Delhi 9873777170
 
Git and Github workshop GDSC MLRITM
Git and Github  workshop GDSC MLRITMGit and Github  workshop GDSC MLRITM
Git and Github workshop GDSC MLRITM
 
Magic exist by Marta Loveguard - presentation.pptx
Magic exist by Marta Loveguard - presentation.pptxMagic exist by Marta Loveguard - presentation.pptx
Magic exist by Marta Loveguard - presentation.pptx
 
young call girls in Uttam Nagar🔝 9953056974 🔝 Delhi escort Service
young call girls in Uttam Nagar🔝 9953056974 🔝 Delhi escort Serviceyoung call girls in Uttam Nagar🔝 9953056974 🔝 Delhi escort Service
young call girls in Uttam Nagar🔝 9953056974 🔝 Delhi escort Service
 
PHP-based rendering of TYPO3 Documentation
PHP-based rendering of TYPO3 DocumentationPHP-based rendering of TYPO3 Documentation
PHP-based rendering of TYPO3 Documentation
 

IP Camera Quick Start Guide Bitvision.pdf

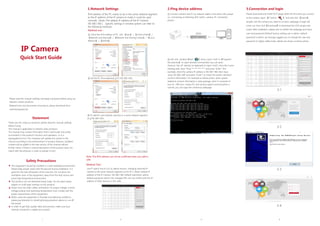
  • 1. 3 ① Connect camera and PC by network cable in the same LAN, power on. Connecting as following (PoE switch, camera, PC connection photo). 2.Ping device address ② Left click window【Start 】menu, input ”cmd” in【Program/ file searcher】 to open window command(or you can press shortcut ”win+R” directly on keyboard to input ”cmd”), from the Cursor blinking side, input ”Ping *** *** *** ***” and press “Enter” (For example, when the camera IP address is 192.168.1.168, then input “ping 192.168.1.168” and press ”Enter”) to check the system statistical connect information. For example as below photo, when system statistical connect information is data package: sent=4, received=4, loss=0, <0% loss> means PC and camera signal communication is normal, you can login the camera by webpage. 1 Please download and install OCX plugin when the first time you connect to the camera, open 【IP Search 】 tool and click 【Search】, double click the camera you need to connect, webpage of login will come out, then click【Download】to download the OCX plugin and install. After installation, please click to refresh the webpage and input user and password (Default Factory setting user is admin, default password is admin, we strongly suggest you to change the user and password to higher safety level), details are shown as below photo: 3.Connection and login 4 IP Camera Quick Start Guide Statement Thank you for using our products, please read this manual carefully before trying. This manual is applicable to network series products. This manual may contain information that is technically inaccurate, inconsistent in the product's function and operation, or in a typographical error. Our company will update the context in the manual according to the enhancement of product features. Updated content will be added in the new version of this manual without further notice. If there is manual description of the product does not match with the physical, in order to prevail in kind. Safety Precautions This equipment should be installed in a well-ventilated environment. Please keep proper space with the ground during installation. It is good for the heat dissipation of the machine. Do not block the ventilation door of the equipment, away from the heat source and avoid high temperature environment. This product can not withstand heavy loads. Do not place heavy objects or multi-layer overlays on this product. Power must be under safety certification, Its output voltage, current, voltage polarity and operating temperature must comply with the power requirements of this equipment. When using this equipment in thunder and lightning conditions, please pay attention to install lightning protection device or cut off the power. In order to get high quality video and pictures, make sure your internet connection is stable and smooth. Please read this manual carefully and keep it properly before using our network camera products. Related tools and documents of products, please download from www.herospeed.net. 1.Network Settings IPv4 address of the PC needs to be in the same network segment as the IP address of the IP camera to make it could be used normally(Note: The default IP address of the IP Camera: 192.168.1.168.). Specific settings in window system can refer to the following methods: ① Check the IPv4 address of PC, click 【Start】 / 【Control Panel】 / 【Network and Internet】 / 【Network and Sharing Center】 / 【Local Network】 / 【Details】. ② Set the PC IPv4 address(E.g PC:192.168.1.165) Method one: ③ Or add PC and network cameras in a same network segment (E.g:192.168.1.165). Note: The IPv4 address can not be conflicted when you add in LAN. Use IP search tool 6.1.4.2 or above version, changing searched IP camera to the same network segment as the PC's. (Note: Default IP address of the IP Camera: 192.168.1.168. Default Username: admin, default password: admin; the changed URL can not conflict with the IP address of other devices in the LAN). Method Two: 2 3-1 3-2 3-3 3-4
  • 2. 5 4.Real-time preview and parameter configuration ① Enter the user name and password of the device in the browser user interface and enter the real-time preview interface. ② Click 【Configuration】 to enter the device and other functions, including local configuration, system, local network, video, image and event configuration. Users can selectively set these features to achieve better performance based on the actual situation of the application scenario. 6.BitVision Download Under the NVR main menu, you can also set Recording, Playback, Motion Detection, coding parameters and other operations. Before adding device, please confirm that the IP address of NVR and the device are in the same network segment and do not conflict. Click the 【Camera】under the NVR main menu to enter the menu and click【Add】. Tick the device to be added and click 【Add】, click 【Cancel】 to complete the addition. As shown in the following figure: 5.Add Device 6 5-1 5-2 5-3 5-4 iOS App 7 8 Download and install BitVision on smart phone by following way. 1. In the Android phone Google App Store or iPhone App Store enter ”BitVision” search, download and install. 2. Scan the following QR codes to download and install the App. Android ios 3. Download from the following website: Android App download address: https://play.google.com/store/apps/details?id=com.gzch.lsplat.bitdog iOS App download address: https://itunes.apple.com/app/id1419463554 7.Add device on BitVision App Open BitVision App( New user please register an account ), follow up next steps to add the devices. ① ② ③ ④ ⑤ ⑥ ⑦ ⑧ 8.Preview on BitVision App ① ② ③ ④ ① Click on the right part of the sliding menu to enter the main interface; ② Click 【Real time】, click 【 】to enter the “Device manage” interface. ③ Choose the device channel you want to preview, click【Done】. ④ Start to play the real-time video. ① Click 【Device manage】 in the menu bar.; ② Click 【 】; ③ Click 【 Add device】; ④ Click 【SN Add】; ⑤ Scan the QR Code printed on the device sticker or posted on the P2P interface; ⑥ Enter device user name, password and Captcha (printed on the label), click 【Submit】; ⑦ Click 【Please set the device name】, enter the device name, click 【Done】; Click 【Please choose a group】, choose camera group, click 【Done】, click 【Finish】. ⑧ The device was successfully added to the device list.