Stacking cisco 3750 switches benefits & stacking rules
•Download as DOCX, PDF•
0 likes•483 views

Stacking cisco 3750 switches benefits & stacking rules. More...

Recommended
More Related Content
Similar to Stacking cisco 3750 switches benefits & stacking rules
Similar to Stacking cisco 3750 switches benefits & stacking rules (20)
More from IT Tech
More from IT Tech (20)
Recently uploaded
Recently uploaded (20)
Stacking cisco 3750 switches benefits & stacking rules
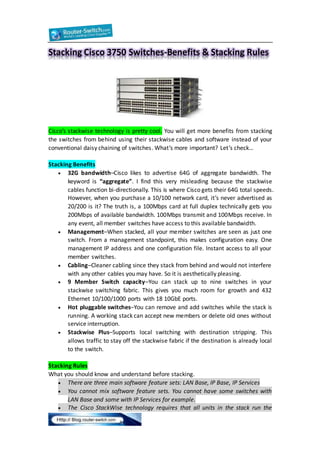
- 1. Stacking Cisco 3750 Switches-Benefits & Stacking Rules Cisco’s stackwise technology is pretty cool. You will get more benefits from stacking the switches from behind using their stackwise cables and software instead of your conventional daisy chaining of switches. What’s more important? Let’s check… Stacking Benefits 32G bandwidth–Cisco likes to advertise 64G of aggregate bandwidth. The keyword is “aggregate”. I find this very misleading because the stackwise cables function bi-directionally. This is where Cisco gets their 64G total speeds. However, when you purchase a 10/100 network card, it’s never advertised as 20/200 is it? The truth is, a 100Mbps card at full duplex technically gets you 200Mbps of available bandwidth. 100Mbps transmit and 100Mbps receive. In any event, all member switches have access to this available bandwidth. Management–When stacked, all your member switches are seen as just one switch. From a management standpoint, this makes configuration easy. One management IP address and one configuration file. Instant access to all your member switches. Cabling–Cleaner cabling since they stack from behind and would not interfere with any other cables you may have. So it is aesthetically pleasing. 9 Member Switch capacity–You can stack up to nine switches in your stackwise switching fabric. This gives you much room for growth and 432 Ethernet 10/100/1000 ports with 18 10GbE ports. Hot pluggable switches–You can remove and add switches while the stack is running. A working stack can accept new members or delete old ones without service interruption. Stackwise Plus–Supports local switching with destination stripping. This allows traffic to stay off the stackwise fabric if the destination is already local to the switch. Stacking Rules What you should know and understand before stacking. There are three main software feature sets: LAN Base, IP Base, IP Services You cannot mix software feature sets. You cannot have some switches with LAN Base and some with IP Services for example. The Cisco StackWise technology requires that all units in the stack run the
- 2. same release of Cisco IOS Software. A standalone switch is a switch stack with one stack member that also operates as the stack master. Make sure that you power off the switches that you add to or remove from the switch stack. I have not found a clear reason for this, perhaps it’s to prevent any corruption of the stack. Obviously you can add or remove a switch during stack production. A new, out-of-the-box switch (one that has not joined a switch stack or has not been manually assigned a stack member number) ships with a default stack member number of 1. When it joins a switch stack, its default stack member number changes to the lowest available member number in the stack. If you manually change the stack member number, it only takes effect when you reset that specific member switch. A higher priority value for a stack member increases its likelihood of being elected stack master and retaining its stack member number. The priority value can be 1 to 15. The default priority value is 1. You can manually define the priority value for a stack member. I always like to define which switch is the MASTER. The configuration that you create on the switch stack is called the provisioned configuration. The switch that is added to the switch stack and that receives this configuration is called the provisioned switch. Each software image includes a stack protocol version. In order to remain compatible, protocol versions should be similar. Connecting to individual console ports on a member switch still talks to MASTER switch. Go to Stacking Once your first switch has been turned on (you don’t need to have the stackwise cables plugged in yet), you can define this switch as the MASTER. To do that you need to go into configuration mode: switch(config)# switch 1 priority 15 switch# copy run start switch# reload switch 1 indicates your current switch. All switches are switch 1 by default. Priority 15 is the highest you can set your switch which causes it to become the MASTER. If you want your second switch to become the MASTER you can make it priori ty 14. If you only have two, then there’s no need to since the only remaining switch will become MASTER by default if the original MASTER fails or goes offline. Assuming you have at least two Cisco 3750′s, and connect them together in a
- 3. criss-cross fashion. Now you can turn on switch#2. You can console into switch#2 as it boots up so you can get an idea of when the bootup process has finished. Once it is done, issue this command: This command will indicate your MASTER switch and switch#2 as just a member switch. Stack Verification How can we tell the stackwise cables were properly inserted? Here you will see that the ring speed is 32G. If you read my “stacking benefits” further up, you will remember my gripe about this and why I think Cisco is misleading when they advertise 64G. Someone may be looking for 64G as the ring speed and wonder if their setup is incorrect.
- 4. LED lights–You can physically verify which switch is the MASTER by looking at the front panel LED lights. The MASTER LED light will be lit solid green. Stack Notes: Below are commands and miscellaneous notes that may be useful. Enable mode commands show switch = show member switches that have successfully been added to the stack and their priorities. Find which switch is the MASTER switch. show switch detail = Provide port status of stackwise ports. show switch stack-ring speed = stack ring status, configuration and protocol. What really matters here are the ring status and configuration. reload slot <member switch number> = For example: reload slot 4 will only reboot the member switch that is switch#4. remote command <member switch number> show version = You can specify output specifically for a member switch. If you want the IOS version of member switch#2 you would type: remote command 2 show version. Not every command is supported under “remote command”. no switch <member switch number> provision = If you’ve removed a member switch physically from your stack, you should run this command to permanently remove it from the stack status when you issue the “show switch” command. archive copy-sw = copies IOS from one switch to another. Configuration Mode Commands switch <switch number> priority <priority number>=Configures the priority for a particular switch. Priorities range from 1 – 15. switch 1 renumber 2 = Reconfigures switch 1 as switch 2 and only takes effect after this switch reloads. You can use the “reload slot” command do this so you don’t have
- 5. to reload the entire stack. But you cannot renumber to an already used switch#. More Notes: -Cisco recommends that you leave a blank module if your switch supports modules. If you leave it open, the switch will overheat due to airflow issues. Cisco sells blank modules if you don’t have one. -Only power on/off switches after you already have the switch stacked. For example, if you’re adding a new switch to the stack, don’t have it powered on while you are connecting the stackwise cables. Connect the cables and then power on the new switch. -archive copy-sw command–What does this command really do? It basically issues this command if you wanted to do it manually. copy flash1: flashX (where X is your slot number from your member switch) -Backup original IOS image–You can back up your original image before they become part of the stack. I ran into an issue with a corrupted image once and it was a bad experience. Issue a “show flash:” to find the location of your image. Then issue “copy flash: tftp:” to save it to your TFTP server. You can always use XMODEM to install the image if your switch can’t boot up. -LED lights–Lights on the switch indicate who is MASTER. -Once stacked, there are two types of levels: system-level and interface-level. - Each stack has only one configuration file, which is distributed to each member in the stack. This allows each switch in the stack to share the same network topology, MAC address, and routing information. In addition, it allows for any member to become the master, if the master ever fails. -A break in any one of the cables will result in the stack bandwidth being reduced to half of its full capacity. Subsecond timing mechanisms detect traffic problems and immediately institute failover. More Related Cisco Stack Topics: Cisco 3750 Stacking Configuration Main Differences between Lines of Cisco 3750 Series Switches Cisco Catalyst 3750-X: Redundant StackPower Cabling Information Get Green with Catalyst 3750 Cisco 3850 vs. 3750-X Series