
Recommended
Recommended
More Related Content
Similar to 33.docxSTEP 1 Understand the UML Diagram Analyze and under.docx
Similar to 33.docxSTEP 1 Understand the UML Diagram Analyze and under.docx (20)
More from gilbertkpeters11344
More from gilbertkpeters11344 (20)
Recently uploaded
Recently uploaded (20)
33.docxSTEP 1 Understand the UML Diagram Analyze and under.docx
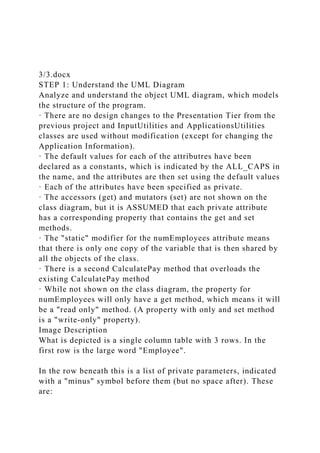
- 1. 3/3.docx STEP 1: Understand the UML Diagram Analyze and understand the object UML diagram, which models the structure of the program. · There are no design changes to the Presentation Tier from the previous project and InputUtilities and ApplicationsUtilities classes are used without modification (except for changing the Application Information). · The default values for each of the attributres have been declared as a constants, which is indicated by the ALL_CAPS in the name, and the attributes are then set using the default values · Each of the attributes have been specified as private. · The accessors (get) and mutators (set) are not shown on the class diagram, but it is ASSUMED that each private attribute has a corresponding property that contains the get and set methods. · The "static" modifier for the numEmployees attribute means that there is only one copy of the variable that is then shared by all the objects of the class. · There is a second CalculatePay method that overloads the existing CalculatePay method · While not shown on the class diagram, the property for numEmployees will only have a get method, which means it will be a "read only" method. (A property with only and set method is a "write-only" property). Image Description What is depicted is a single column table with 3 rows. In the first row is the large word "Employee". In the row beneath this is a list of private parameters, indicated with a "minus" symbol before them (but no space after). These are:
- 2. -MIN_DEPENDENTS int =0 -MAX_DEPENDENTS int = 10 -MIN_SALARY double = 20000 MAX_SALARY double = 20000 DEFAULT_NAME string = "Not given" DEFAULT_GENDER char = 'U' -firstName : String -lastName : string -gender : char -dependents : int -annualSalary : double -static numEmployees: int = 0 In the third and final row beneath this is another list of public parameters, indicated with a "plus" symbol before them (but no space after). These are: +Employee() +Employee(in first : string, in last : string, in gen : char, in dep : int, in salary : double) +ToString : string +CalculateWeeklyPay() : double +CalcuateWeeklyPay(modifiedSalary double) Press the ESC key to close the image description and return to lecture. STEP 2: Create the Project You will want to use the Week 2 project as the starting point for the lab. To do this, you will want to create a new project by following these steps: 1. Create a new project named "CIS247_WK3_Lab_LASTNAME". An empty project will then be created. 2. Delete the default Program.cs file that is created. 3. Click on Project->Add Existing Item…. Select the .cs files containing the InputUtilities, ApplicationUtilities, Employee,
- 3. and Program classes from your project folder from last week's lab. 4. The namespaces for the classes should all be "Employee", but you should verify that the namespaces for all the classes are the same. 5. Update the program information in the ApplicationUtilities.DisplayApplicationInformation method to reflect your name, current lab, and program description. 6. Build and execute the project. For each week's assignments you will follow these steps create a new project that reuses the program from the previous week. STEP 3: Modify the Employee Be sure you follow proper commenting and programming styles (header, indentation, line spacing, etc.). Using the Employee class diagram as a guide modify the Employee class: 1. Add the constants to the class using the following as an example: public const double MIN_SALARY = 20000; 2. In the default constructor, update assignment statements to use the defined constants 3. Change all the employee class attributes to private. 4. Create a private static numEmployees variable and initialize it to zero 5. Increment numEmployees by 1 in each of the constructors 6. For each private attribute, create a well-named property that contains the get and set methods. The get method of the property only needs to return the value of the attribute; but the set method of each property needs to validate the provided value using the following validation rules: a. If the provided first or last values are empty, or a null value, then set the name to DEFAULT_NAME. b. If the provided gender value is 'F', 'f', 'M', or 'm' set the value; otherwise set the value to DEFAULT_GENDER. c. If the provided dependent value is between the
- 4. MIN_DEPENDENTS and MAX_DEPENDENTS (inclusive) then set dependent to the provided value; if the provided value is less than MIN_DEPENDENTS set the dependents to MIN_DEPENDENTS; else if provided value is greater than MAX_DEPENDENTS set the dependents to MAX_DEPENDENTS. d. If the provided salary value is between the MIN_SALARY and MAX_SALARY (inclusive) the set the annualSalary to the provided value; if the provided value is less than MIN_SALARY set the annualSalary to MIN_SALARY; else if provided value is greater than MAX_SALARY set the annualSalary to MAX_SALARY. e. For the numEmployee attribute create a property called NumberEmployees that only contains a "get" method, external objects should NOT be allowed modify the numEmployee value. Since numEmployees is a static method, the property must be declared as static. 7. In the parameterized constructor, change statements that set the attributes so that the properties are used, which ensures that attributes are validated prior to be set. 8. Create the overloaded CalculateWeeklyPay method that accepts a double "modifiedSalary" argument. The method shall update the annualSalary attribute (use the AnnualSalary property to ensure the value is valid), and then return the updated weekly pay based on the new annual salary value. STEP 4: Modify the Main Method In the Main class, create code statements that perform the following operations. Be sure you follow proper commenting and programming styles (header, indentation, line spacing, etc.) and use the ApplicationUtiltities methods to logically separate the operations in the output. To access a property of an object/class, you continue to use the DOT notation; however, a property DOES NOT require the parenthesis and you just use the assignment operator (=) to set or get the value, which makes using propertys very easy. For
- 5. example to set the first name, the statement would look something like: employee1.FirstName = "John" To get the full name, the statement would look look something like: theName = employee1.FirstName + " " + employee1.LastName Notice, there is no use of parenethese, only the assignment operator, when using properties. The Main method code from the previous week's lab performed the following operations, ensure that your project correctly implements these operations before moving on the new operations for this week. 1. Display the program information. 2. Create an Employee object using the default constructor. 3. Prompt for and then set the first name, last name, gender, dependents, and annual salary. Remember to use the appropriate methods in the InputUtilties class to prompt for and retreive the values. 4. Display the employee information. 5. Create a second Employee object using the multi-argument constructor using data of your choosing that is the correct type and within the valid ranges for each of the attributes. 6. Display the Employee information for the second employee object. 7. Terminate the application Once your code is working and implements the previous week's operations, modify the code to implement the following new requirements (updated code should implement all previous requirements except as noted below). 1. After the first employee information is provided, display the number of employees created. 2. Prompt the user to provide an updated annual salary for employee1, retrieve the value and invoke the overloaded CalculateWeeklyPay, and then display only the updated weekly pay. 3. Create a third Employee object using the parameterized
- 6. constructor setting each of the attributes with the following values: "Sue", "Smith", 'F', 15, 500000.0 4. Display the employee information for the third Employee object and verify that the dependents and annual salary values have been set to the maximum values by the properties. If not, make sure you change the parameterized constructor to use the properties to set the attributes. 5. Display the number of employees created. STEP 5: Compile and Test When done, compile and execute your code. Debug errors until your code is error-free. Check your output to ensure that you have the desired output, modify your code as necessary, and rebuild. The following shows some sample output, but your output may look different. On-screen output display: *********************** Employee Information ********************** First Name: John Last Name: Doe Gender: M Dependents: 7 Annual Salary: $32,500.00 Weekly Pay: $625.00 total employees: 1 *********************** Employee Information ********************** First Name: Mary Last Name: Noia Gender: F Dependents: 5 Annual Salary: $24,000.00 Weekly Pay: $461.54 Total Employees:2 *********************** Employee Information **********************
- 7. First Name: Sue Last Name: Smith Gender: F Dependents: 10 Annual Salary: $100,000 Weekly Pay: $1,923.00 Total Employees:3 Press the ESC key to close the image description and return to lecture. STEP 6: Submit Deliverables · Capture the output window and paste it into a Word Document. · Put the zip file and screen shots (Word document) 4/4.docx STEP 1: Understand the UML Diagram Analyze and understand the object UML diagram, which models the structure of the program. · There are no design changes to the Presentation Tier from the previous project and InputUtilities and ApplicationsUtilities classes are used without modification (except for changing the Application Information). · A new class called Benefits that holds the health insurance company, life insurance amount, and vacation days. There are constant attributes defined for each of the default values and the minimum and maximum values. This composition relationhip is specified in the UML class diagram as a solid diamond connecting to the Emploee class. · The Benefits class shall contain properties that contain get and set methods for each of the attributes in the Benefits class, and each attribute value shall be properly validated in the properties. · The Employee class contains a new attribute called benefit that is of type Benefits. There will be a property in the
- 8. Employee class that can set and get the benefit attribute. · Each constructor of Employee class will need to instansiate the benefit attribute. On-screen output display: The image of the logic tier depicts 2 classes, the Employee Class and the Benefits Class Employee Class Diagram Description What is depicted is a single column table with 3 rows. In the first row is the large word "Employee". In the row beneath this is a list of private parameters, indicated with a "minus" symbol before them (but no space after), and protected members parameters, indicated with a “pound” sign. These are: -MIN_DEPENDENTS int =0 -MAX_DEPENDENTS int = 10 -MIN_SALARY double = 20000 -MAX_SALARY double = 20000 -DEFAULT_NAME string = "Not given" -DEFAULT_GENDER char = 'U' #firstName : string = DEFAULT_NAME #lastName : string = DEFAULT_NAME #gender : char = DEFAULT_GENDER #dependents : int = MIN_DEPENDENTS #annualSalary : double = MIN_SALARY #static numEmployees: int = 0 #benefit : Benefits #employeeType : string Note: only the instance members need to be set to protected, the Properties themselves will remain public.
- 9. In the third and final row beneath this is another list of public parameters, indicated with a "plus" symbol before them (but no space after). These are: +Employee() +Employee(in type : string) +Employee(in type : string, in first : string, in last : string, in gen : char, in dep : int, in salary : double, in benefits : Benefit) +ToString : string +CalculateWeeklyPay() : double +CalcuateWeeklyPay(in modifiedSalary :double) Benefits Class Diagram Description What is depicted is a single column table with 3 rows. In the first row is the large word "Benefits". In the row beneath this is a list of private parameters, indicated with a "minus" symbol before them (but no space after). These are: -DEFAULT_HEALTH_INSURANCE string = “Blue Cross” -MIN_LIFE_INSURANCE double = 0 -MAX_LIFE_INSURANCE double = 1000000 -MIN_VACATION int = 0 -MAX_VACATION int = 45 -healthInsuranceCompany : string = DEFAULT_HEALTH_INSURANCE -lifeInsuranceAmount : double = MIN_LIFE_INSURANCE -vacationDays : int = MIN_VACATION In the third and final row beneath this is another list of public parameters, indicated with a "plus" symbol before them (but no space after). These are: +Benefit()
- 10. +Benefit(in health : string, in life : double, in vacation : int) +ToString : string Lastly, there is a line between the Employee class and Benefits class indicating the HAS-A relationship. The Employee class HAS-A Benefits class as a property. This denotes composition. Press the ESC key to close the image description and return to lecture. STEP 2: Create the Project You will want to use the Week 3 project as the starting point for the lab. To do this, you will want to create a new project by following these steps: 1. Create a new project named "CIS247_WK4_Lab_LASTNAME". An empty project will then be created. 2. Delete the default Program.cs file that is created. 3. Now that we are beginning to add more classes to our projects the Solution Explorer can become difficult to organize so you will create folders to hold the Presentation Tier and Logic Tier Files in order to organize the project. One thing to remember, even though we only have a few files in our project, a professional program will have 100's if not 1000's of files in a project so you will want to get practice in organizing your project files in a logical folder heirarchy and we will use the Tiered Architecture structure shown in the UML Class diagram for the folder
- 11. structure. You will find that creating folders within MS Visual Studio is very similiar to creating folders in Windows Explorer. Follow these directions to create the folders: 1. Select the project and then right click 2. Select Add 3. Select New Folder 4. Enter the name of the folder 4. Add the following three folders to your project (1) Presentation Tier, (2) Logic Tier, and (3) Utilities. 5. You are going to add the files from the previous week lab to the project just as you did before, but now you add the existing files to the corresponding folder 6. Select the PresentationTier folder, right click and select Add then Existing Item, navigate to your previous week's project and select the InputUtitilies.cs and Program.cs files and click add. These two files will then be added to the Presentation. [Hint: you can also drag and drop the files directly from Windows Explorer directly into the corresponding folder in your project!] 7. Add the previous week's Employee.cs file to the Logic Tier folder. You will also add the new Benefits class to this folder. 8. Add the ApplicationUtilities.cs file to the Utilities folder. 9. Your solution explorer should look similiar to the following (note: you can rename any folder by selecting the folder, right click, and then Rename just like you do in Windows).
- 12. 10. The namespaces for the classes should all be "Employee", but you should verify that the namespaces for all the classes are the same. 11. Update the program information in the ApplicationUtilities.DisplayApplicationInformation method to reflect your name, current lab, and program description. 12. Build and execute the project. STEP 3: Create the Benefits Class Using the Benefit class diagram as a guide, build the Benefit class by adding a new class to the Logic Tier folder. 1. Create a property for each of the listed private attributes and validate the provided value using the following rules: a. If the insurance company provided is empty or null then set the healthInsuranceCompany to DEFAULT_HEALTH_INSURANCE b. If the provided life insurance value is between the MIN_LIFE_INSURANCE and MAX_LIFE_INSURANCE (inclusive) then set lifeInsuranceAmount to the provided value; if the provided value is less than MIN_LIFE_INSURANCE set the lifeInsuranceAmount to MIN_LIFE_INSURANCE; else if provided value is greater than MAX_LIFE_INSURANCE; set thelifeInsuranceAmount to MAX_LIFE_INSURANCE. c. If the provided vacation days value is between the MIN_VACATION and MAX_VACATION (inclusive) the set the
- 13. vacationDays to the provided value; if the provided value is less than MIN_VACATION set the vacationDays to MIN_VACATION; else if provided value is greater than MAX_VACATION set the vacationDays value to MAX_VACATION. 2. In the parameterized constructor, set the attributes so that the properties are used, which ensures that attributes are validated prior to be set. 3. Create an overridden ToString method that collects and formats the attribute information for the benefit object. Ensure to display life insurance amount in currency format. STEP 4: Modify the Employee Class Using the Employee class diagram as a guide, modify the Employee class 1. Add a private attribute called "benefit" to the employee class of type Benefits 2. Create a public Benefit property that returns the benefit attribute. In the set method of the property, if the provided value is null then re-instantiate the benefit variable; otherwise, set the provided value to the benefit variable. [Hint: to check if a object is null use the syntax "if (object != null)"] 3. In the default constructor, instantiate the benefit variable using the Benefits default constructor 4. In the parameterized constructor, add a benefit argument of
- 14. type Benefits, and then set the value of this parameter to the Benefit property (using the property will ensure that any null benefit object is correctly instansiated.) 5. Modify the ToString method to the Employee class, by adding a call to the Benefits ToString methods at the end of the Employee ToString method. STEP 5: Modify the Main Method In the previous labs you learned how to access an object/class methods and properties using the DOT notation. For example, to access the calculatePay method of an employee object you used a statement similiar to: employee1.CalculateWeeklyPay(modifiedSalary) Notice that the Employee class now has a public Benefit object inside it. This means that you can access the set methods of the Benefit object using the transitive notation: containingObject.containedObject.methodName() or containingObject.containedObject.PropertyName That is to access the members of contained object, you start at the containing object, then "transit" to the contained object, then to the contained objects members. As an example, to set the life insurance amount of an employee object, the statement would look something like: employee1.Benefit.LifeInsuranceAmount = 100000; Notice, the containing object is "employee1", the contained
- 15. object is "Benefit", and the property of Benefit we are accessing is LifeInsuranceAmount. The code in the previous week's project performed the following operations 1. Display the program information. 2. Create an Employee object using the default constructor. 3. Prompt for and then set the first name, last name, gender, dependents, and annual salary. Remember to use the appropriate methods in the InputUtilties class to prompt for and retreive the values. 4. Display the employee information. 5. After the first employee information is provided, display the number of employees created. 6. Prompt the user to provide an updated annual salary for employee1, retrieve the value and invoke the overloaded CalculateWeeklyPay, and then display only the updated weekly pay. 7. Create a second Employee object using the multi-argument constructor using data of your choosing that is of the correct type for each input. 8. Display the Employee information for the second employee object. 9. Create a third Employee object using the parameterized constructor setting each of the attributes with the following values: "Sue", "Smith", 'F', 15, 500000.0
- 16. 10. Display the employee information for the third Employee object and verify that the dependents and annual salary values have been set to the maximum values by the properties. If not, make sure you change the parameterized constructor to use the properties to set the attributes. 11. Display the number of employees created. 12. Terminate the application Once your code is working and implements the previous week's operations, modify the code to implement the following new requirements (updated code should implement all previous requirements except as noted below). 1. After you collect the information for the first employee object, prompt for and collect the Health Insurance Company, the LifeInsuranceAmount, and the number of vacation days. 2. Display the updated employee 1 information 3. Display the number of employees created. 4. Create a new, standalone benefits object using the multi- argument constructor using data of your choosing that is of the correct type for each input. 5. Modify the second employee object instantiation and add the newly created benefit object to the constructor call. 6. Display the updated employee 2 information 7. Display the number of employees created. 8. Create a new, standalone benefits object using the multi- argument constructor using the following invalid data "" (empty
- 17. string), 10000000, -10 9. Modify the third employee object instantiation and add the newly created benefit object to the constructor call. 10. Display the updated employee 3 information and verify that the default values for the benefit object have been correctly set. 11. Display the number of employees created. STEP 6: Compile and Test When done, compile and execute your code. Debug errors until your code is error-free. Check your output to ensure that you have the desired output, modify your code as necessary, and rebuild. The following shows some sample output, but your output may look different. On-screen output display: *********************** Employee Information ********************** First Name: John Last Name: Doe Gender: M Dependents: 7 Annual Salary: $32,500.00 Weekly Pay: $625.00 Health Insurance Company: Tricare Life Insurance Amount: $100,000 Vacation Days: 15 total employees: 1
- 18. *********************** Employee Information ********************** First Name: Mary Last Name: Noia Gender: F Dependents: 5 Annual Salary: $24,000.00 Weekly Pay: $461.54 Health Insurance Company: Tricare Life Insurance Amount: $250,000 Vacation Days: 21 Total Employees:2 *********************** Employee Information ********************** First Name: Sue Last Name: Smith Gender: F Dependents: 10 Annual Salary: $100,000 Weekly Pay: $1,923.00 Health Insurance Company: not given Life Insurance Amount: $250,000 Vacation Days: 0 Total Employees:3 Press the ESC key to close the image description and return to
- 19. lecture. STEP 7: Submit Deliverables · Capture the output window and paste it into a Word Document. · Put the zip file and screen shots (Word document) 5/5.docx STEP 1: Understand the UML Diagram Analyze and understand the object UML diagram, which models the structure of the program. · There are two new Employee derived classes (1) Salaried and (2) Hourly that are derived from the Employee class. · The Employee class contains a new attribute employeeType and a new constructor that accepts as an argument the assigned employee type. · Both the Salaried and the Hourly classes override only the CalculateWeeklyPay method of the Employee class (note, this is the method without any parameters.) · The Salaried class has one attribute "managementLevel" that has possible values from MIN_MANAGEMENT_LEVEL to MAX_MANAGEMENT_LEVEL and a BONUS_PERCENT. · The Salaried class has a default constructor and parameterized constructor that accepts all the general employee information
- 20. plus the management level. · The Hourly has a wage attribute, which respresents the hourly wage that ranges from MIN_WAGE to MAX_WAGE, a hours attributes, which represents the number of hours worked in a week that ranges from MIN_HOURS to MAX_Hours, and a category attributes that accepts string values. · The Hourly class has a default constructor and parameterized constructor that accepts all the general employee information plus the hours and wage value. · The Presentation Tier contains two new classes (1) The EmployeeInput class and the EmployeeOutput class · The EmployeeInput class contains three static methods (1) CollectEmployeeInformation, which accepts any type of Employee object as a argument; (2) CollectHourlyInformation, which accepts only Hourly objects as an argument, and (3) CollectSalariedInformation, which accepts only Salaried objects as an argument. · The EmployeeOutput class contains two methods (1) DisplayEmployeeInformation, which accepts any Employee type as an argument and (2) DisplayNumberObjects method. · All the access specifers for the Employee attributes are changed to protected and are depicted with the "#" symbol. Presentation Tier Description The image of the presentation tier depicts 5 classes, the Program Class, ApplicationUtilities, InputUtilities,
- 21. EmployeeInput, and EmployeeOutput. Only the EmployeeInput and EmployeeOutput classes are describe here. Both utility classes are the same as they were since given in Week 2. Program changes based on lab specification, not formal definition other than the Main method is specified. EmployeeInput Class Diagram Description What is depicted is a single column table with 3 rows. In the first row is the large word "EmployeeInput". The second row is blank. In essence there are no constructors since the methods in this class are all static. In the third and final row beneath this is a list of public methods, indicated with a "plus" symbol before them (but no space after). As stated previously, all these methods are static. These are: +CollectEmployeeInformation(in theEmployee : Employee) +CollectHourlyInformation(in theEmployee : Hourly) +CollectSalariedInformation(in theEmployee : Salaried) Lastly, there is a line between the Program class and EmployeeInput class indicating the uses relationship. The Program class uses the static methods from EmployeeInput. EmployeeOutput Class Diagram Description What is depicted is a single column table with 3 rows. In the first row is the large word "EmployeeOutput". The second row is blank. In essence there are no constructors since the methods in this class are all static.
- 22. In the third and final row beneath this is a list of public methods, indicated with a "plus" symbol before them (but no space after). As stated previously, all these methods are static. These are: +DisplayEmployeeInformation(in theEmployee : Employee) +DisplayNumberObjects() Lastly, there is a line between the Program class and EmployeeOutput class indicating the uses relationship. The Program class uses the static methods from EmployeeOutput. Logic Tier Description The image of the logic tier depicts 4 classes, the Employee Class, the Benefits Class, the Hourly Class (derived from Employee), and Salaried Class (also, derived from Employee). Employee Class Diagram Description Note: no change in structure from Week 4 What is depicted is a single column table with 3 rows. In the first row is the large word "Employee". In the row beneath this is a list of private parameters, indicated with a "minus" symbol before them (but no space after), and protected members parameters, indicated with a “pound” sign. These are: -MIN_DEPENDENTS int =0 -MAX_DEPENDENTS int = 10 -MIN_SALARY double = 20000 -MAX_SALARY double = 20000
- 23. -DEFAULT_NAME string = "Not given" -DEFAULT_GENDER char = 'U' #firstName : string = DEFAULT_NAME #lastName : string = DEFAULT_NAME #gender : char = DEFAULT_GENDER #dependents : int = MIN_DEPENDENTS #annualSalary : double = MIN_SALARY #static numEmployees: int = 0 #benefit : Benefits #employeeType : string Note: only the instance members need to be set to protected, the Properties themselves will remain public. In the third and final row beneath this is another list of public parameters, indicated with a "plus" symbol before them (but no space after). These are: +Employee() +Employee(in type : string) +Employee(in type : string, in first : string, in last : string, in gen : char, in dep : int, in salary : double, in benefits : Benefit) +ToString : string +CalculateWeeklyPay() : double +CalcuateWeeklyPay(in modifiedSalary :double) Benefits Class Diagram Description Note: no change in structure from Week 4 What is depicted is a single column table with 3 rows. In the
- 24. first row is the large word "Benefits". In the row beneath this is a list of private parameters, indicated with a "minus" symbol before them (but no space after). These are: -DEFAULT_HEALTH_INSURANCE string = “Blue Cross” -MIN_LIFE_INSURANCE double = 0 -MAX_LIFE_INSURANCE double = 1000000 -MIN_VACATION int = 0 -MAX_VACATION int = 45 -healthInsuranceCompany : string = DEFAULT_HEALTH_INSURANCE -lifeInsuranceAmount : double = MIN_LIFE_INSURANCE -vacationDays : int = MIN_VACATION In the third and final row beneath this is another list of public parameters, indicated with a "plus" symbol before them (but no space after). These are: +Benefit() +Benefit(in health : string, in life : double, in vacation : int) +ToString : string There is a line between the Employee class and Benefits class indicating the HAS-A relationship. The Employee class HAS-A Benefits class as a property. This denotes composition. Hourly Class Diagram Description Note: this is new this week What is depicted is a single column table with 3 rows. In the
- 25. first row is the large word "Hourly". In the row beneath this is a list of private parameters, indicated with a "minus" symbol before them (but no space after). These are: -MIN_WAGE : double = 10 -MAX_WAGE : double = 75 -MIN_HOURS : double = 0 -MAX_HOURS : double = 50 -wage : double -hours : double -category : string In the third and final row beneath this is another list of public parameters, indicated with a "plus" symbol before them (but no space after). These are: +Hourly() +Hourly(in fname : string, in lname : string, in gen : char, in dep : int, in wage : double, in hours : double, in ben : Benefit, in category : string) +CalculateWeeklyPay() : double +ToString : string There is an arrow pointing from the Hourly class to the Employee class indicating the IS-A relationship. The Hourly class IS-A type of Employee. This is an example of inheritance. Salaried Class Diagram Description Note: this is new this week
- 26. What is depicted is a single column table with 3 rows. In the first row is the large word "Salaried". In the row beneath this is a list of private parameters, indicated with a "minus" symbol before them (but no space after). These are: -MIN_MANAGEMENT_LEVEL : int = 0 -MAX_MANAGEMENT_LEVEL : int = 3 -BONUS_PERCENT : double = .10 -managementLevel : int In the third and final row beneath this is another list of public parameters, indicated with a "plus" symbol before them (but no space after). These are: +Salaried() +Salaried(in fname : string, in lname : string, in gen : char, in dep : int, in sal : double , in ben : Benefit, in manLevel : int) +CalculateWeeklyPay() : double +ToString : string There is an arrow pointing from the Salaried class to the Employee class indicating the IS-A relationship. The Salaried class IS-A type of Employee. This is an example of inheritance. Press the ESC key to close the image description and return to lecture. STEP 2: Create the Project You will want to use the Week 4 project as the starting point for
- 27. the lab. Use the directions from the previous weeks labs to create the project and the folders. 1. Create a new project named "CIS247_WK4_Lab_LASTNAME". An empty project will then be created. 2. Delete the default Program.cs file that is created. 3. Add the Logic Tier, Presentation Tier, and Utilities folders to your proejct 4. Add the Week 4 project files to the appropraties folders. 5. Update the program information in the ApplicationUtilities.DisplayApplicationInformation method to reflect your name, current lab, and program description Note: as an alternative you can open up the Week 4 project and make modifications to the existing project. Remember, there is a copy of your project in the zip file you submitted for grading. Before attempting this week's steps ensure that the Week 4 project is error free. STEP 3: Modify the Employee Class 1. Change the access specifier for all the private attributes to protected. 2. Add the new attribute employeeType, along with a "read only" property (that is only a "get" method) to access the employee type value. 3. Add a new constructor that only accepts the type attribute, which is then used to set the employeeType value. Also, this
- 28. constructor should initialize all the default values. You can call the default constructor using the syntax: public Employee(string employeeType) : this() {} 4. Modify the parameterized constructor that accepts the employee information to accept the employee type, and then set the employeeType with this value. 5. Modify the ToString Method to include the employee type. STEP 4: Create the Salaried Class 1. Using the UML Diagrams, create the Salaried class, ensuring to specify that the Salary class inherits from the Employee class. 2. For each of the constructors listed in the Salaried class ensure to invoke the appropriate super class constructor and pass the correct arguments to the super class constructor. 3. Override the CalculateWeeklyPay method to add a 10 percent bonus to the annualSalary depending on the management level. The bonus percent is a fixed 10 percent, and should be implemented as a constant. However, depending on the management level the actual bonus percentage fluctuates (i.e., actualBonusPercentage = managementLevel * BONUS_PERCENT). 4. Override the ToString method to add the management level to the employee information. STEP 5: Create the Hourly Class 1. Using the UML Diagrams, create the Hourly classes, ensuring
- 29. to specify that the Hourly class inherits from the Employee class. 2. For each of the constructors listed in the Hourly class ensure to invoke the appropriate super class constructor and pass the correct arguments to the super class constructor. Notice, that the Hourly employee DOES NOT have an annual salary, which we will then have to calculate (see below). 3. Create a Category property (get/set) and the valid category types are "temporary", "part time", "full time". 4. Create a Hours property (get/set) for the hours attributes and validate the input using the constants shown in the UML diagram, but since an Hourly employee does not have a formal annual salary we will need to calculate this each time the hour (and wage) properties are set. Add the following code after the validation code in the hours property: base.AnnualSalary = CalculateWeeklyPay() * 48; (assumes working 48 weeks a year). 5. Create an Wage property (get/set) for the wage attributes and validate the input using the constants shown in the UML diagram. Add the following code after the validation code in the wage property: base.AnnualSalary = CalculateWeeklyPay() * 48; (assumes working 48 weeks a year) 6. Override the CalculateWeeklyPay method by multiplying the wages by the number of hours. 7. Update the ToString method to add the category, hours, and
- 30. wages to the hourly employee information. STEP 6: Create the EmployeeInput Class 1. Create a new class in the Presentation Tier folder called "EmployeeInput" 2. Create a static void method called CollectEmployeeInformation that has a single Employee parameter. The declaration should look something like the following: public static void CollectEmployeeInformation(Employee theEmployee) 3. Write code statements similiar to what you created in the Week 4 project to collect the generic employee information from the user, except instead of using specific employee objects use the "theEmployee" parameters. For example: In Week 4, you had something like: employee1.FirstName = InputUtilities.GetStringInputValue("First name"); In the CollectionEmployeeInformation method this can be translated to the following; theEmployee.FirstName = InputUtilities.GetStringInputValue("First name");
- 31. 4. Write statements to collect all the generic employee information, including the Benefits information, as you did in the Week 4 project. However, since not all derived types have a AnnualSalary value, DO NOT collect the annual salary data. 5. Create a new static void method called CollectEmployeeInformation that accepts an Hourly employee object. Using the InputUtilities methods write statements to collect the wage and hours from the user. 6. Create a new static void method called CollectSalariedInformation that accepts a Salaried employee object. Using the InputUtilties methods write statements to collect the management level and the annual salary. STEP 7: Create the EmployeeOutputClass 1. Create a new class in the Presentation Tier folder called "EmployeeOuput" 2. Create a static void method called DisplayEmployeeInformation that has a single Employee parameter. The declaration should look something like the following: public static void DisplayEmployeeInformation(Employee theEmployee) 3. In the DisplayEmployeeInformation method write an output statement that displays theEmployee object to string method to the console.
- 32. 4. Create static method called DisplayNumberObject that displays the number of employees created. 5. Invoke these methods from the main program to display the employee information and number of objects created. [Hint: move the the statements from the main program into these methods.] STEP 8: Create the Main Program 1. Create an array of type Employee that will hold three employee objects. Create three new objects, one Employee, one Hourly and one Salaried in positions 0, 1 and 2 of the array respectively. Make sure to use the constructors the accept the employee type and provide appropriate values for the employee type (e.g. "Generic", "Hourly", "Salaried"). 2. Using a FOR loop iterate through the array and collect all the generic employee information, using the EmployeeInput.CollectEmployeeInformation method. 3. If the current item in the array is an Hourly object, then use the EmployeeInput.CollectHourlyInformation method to collect the hourly information. 4. If the current item in the array is a Salaried object, then use the EmployeeInput.CollectSalariedInformation method to collect the salaried information. Use the following if statement to determine the specific type of object:
- 33. if (employeeList[i] is Hourly) EmployeeInput.CollectHourlyInformation((Hourly)employeeLis t[i]);else if (employeeList[i] is Salaried) EmployeeInput.CollectSalariedInformation((Salaried)employee List[i]); 5. After the information has been collected display the employee information using the EmployeeOutput.DisplayEmployeeInformation method. 6. Before terminating the program display the number of employee objects that have been created. STEP 9: Compile and Test When done, compile and run your program. Then debug any errors until your code is error-free. Check your output to ensure that you have the desired output and modify your code as necessary and rebuild. The output of your program should resemble the following:
- 34. total Number of Employess in Database: 3 Press the ESC key to close the image description and return to lecture. STEP 10: Submit Deliverables · Capture the console output window and paste into a Word document. · Put the zip file and screen shots (Word document) 6/6.docx STEP 1: Understand the UML Diagram Analyze and understand the object UML diagram, which models the structure of the program. · The Employee class has been specifed as abstract, which is denoted by the name of the class being italized Employee · The Employee class as a new method CalculateNetPay which is an abstract method, denoted by the italized name of the method. Since this method is an abstract method the CalculateNetPay method WILL NOT have an implementation in the Employee class. · The Salaried and Hourly classes both have a new method CalculateNetPay that is inherited from the abstract Employee class and the Salaried and Hourly class both MUST implement
- 35. the CalculateNetPay method.The image of the logic tier depicts 4 classes, the Employee Class, the Benefits Class, the Hourly Class (derived from Employee), and Salaried Class (also, derived from Employee). Employee Class Diagram Description What is depicted is a single column table with 3 rows. In the first row is the large word that is in italics "Employee". When a class name is italicized it is abstract. In the row beneath this is a list of private parameters, indicated with a "minus" symbol before them (but no space after), and protected members parameters, indicated with a “pound” sign. These are: -MIN_DEPENDENTS int =0 -MAX_DEPENDENTS int = 10 -MIN_SALARY double = 20000 -MAX_SALARY double = 100000 -DEFAULT_NAME string = "Not given" -DEFAULT_GENDER char = 'U' #firstName : string = DEFAULT_NAME #lastName : string = DEFAULT_NAME #gender : char = DEFAULT_GENDER #dependents : int = MIN_DEPENDENTS #annualSalary : double = MIN_SALARY #static numEmployees: int = 0
- 36. #benefit : Benefits #employeeType : string Note: only the instance members need to be set to protected, the Properties themselves will remain public. In the third and final row beneath this is another list of public parameters, indicated with a "plus" symbol before them (but no space after). These are: +Employee() +Employee(in type : string) +Employee(in type : string, in first : string, in last : string, in gen : char, in dep : int, in salary : double, in benefits : Benefit) +ToString : string +CalculateWeeklyPay() : double +CalculateWeeklyPay(in modifiedSalary :double) +CalculateNetPay() : double Note: the CalculateNetPay method is italicized, this means that this is an abstract method. Benefits Class Diagram Description Note: no change in structure from Week 5 What is depicted is a single column table with 3 rows. In the first row is the large word "Benefits". In the row beneath this is a list of private parameters, indicated with a "minus" symbol before them (but no space after). These are: -DEFAULT_HEALTH_INSURANCE string = “Blue Cross”
- 37. -MIN_LIFE_INSURANCE double = 0 -MAX_LIFE_INSURANCE double = 1000000 -MIN_VACATION int = 0 -MAX_VACATION int = 45 -healthInsuranceCompany : string = DEFAULT_HEALTH_INSURANCE -lifeInsuranceAmount : double = MIN_LIFE_INSURANCE -vacationDays : int = MIN_VACATION In the third and final row beneath this is another list of public parameters, indicated with a "plus" symbol before them (but no space after). These are: +Benefit() +Benefit(in health : string, in life : double, in vacation : int) +ToString : string There is a line between the Employee class and Benefits class indicating the HAS-A relationship. The Employee class HAS-A Benefits class as a property. This denotes composition. Hourly Class Diagram Description What is depicted is a single column table with 3 rows. In the first row is the large word "Hourly". In the row beneath this is a list of private parameters, indicated with a "minus" symbol before them (but no space after). These are: -MIN_WAGE : double = 10 -MAX_WAGE : double = 75
- 38. -MIN_HOURS : double = 0 -MAX_HOURS : double = 50 -TAX_RATE : double = .82 -wage : double -hours : double -category : string In the third and final row beneath this is another list of public parameters, indicated with a "plus" symbol before them (but no space after). These are: +Hourly() +Hourly(in fname : string, in lname : string, in gen : char, in dep : int, in wage : double, in hours : double, in ben : Benefit, in category : string) +CalculateWeeklyPay() : double +ToString() : string +CalculateNetPay() : double There is an arrow pointing from the Hourly class to the Employee class indicating the IS-A relationship. The Hourly class IS-A type of Employee. This is an example of inheritance. Salaried Class Diagram Description What is depicted is a single column table with 3 rows. In the first row is the large word "Salaried". In the row beneath this is a list of private parameters, indicated with a "minus" symbol before them (but no space after). These are:
- 39. -MIN_MANAGEMENT_LEVEL : int = 0 -MAX_MANAGEMENT_LEVEL : int = 3 -BONUS_PERCENT : double = .10 -TAX_RATE : double = .73 -managementLevel : int In the third and final row beneath this is another list of public parameters, indicated with a "plus" symbol before them (but no space after). These are: +Salaried() +Salaried(in fname : string, in lname : string, in gen : char, in dep : int, in sal : double , in ben : Benefit, in manLevel : int) +CalculateWeeklyPay() : double +ToString() : string +CalculateNetPay() : double There is an arrow pointing from the Salaried class to the Employee class indicating the IS-A relationship. The Salaried class IS-A type of Employee. This is an example of inheritance. Press the ESC key to close the image description and return to lecture. STEP 2: Create the Project You will want to use the Week 5 project as the starting point for the lab. Use the directions from the previous weeks labs to create the project and the folders. 1. Create a new project named
- 40. "CIS247_WK4_Lab_LASTNAME". An empty project will then be created. 2. Delete the default Program.cs file that is created. 3. Add the Logic Tier, Presentation Tier, and Utilities folders to your proejct 4. Add the Week 5 project files to the appropraties folders. 5. Update the program information in the ApplicationUtilities.DisplayApplicationInformation method to reflect your name, current lab, and program description. Note: as an alternative you can open up the Week 5 project and make modifications to the existing project. Remember, there is a copy of your project in the zip file you submitted for grading. Before attempting this week's steps ensure that the Week 5 project is error free. STEP 3: Modify the Employee Class 1. Modify the class declaration of the Employee class to specify that the Employee class is an abstract class 2. Declare an abstract method called CalculateNetPay that returns a double value. 3. Modify the ToString Method to include the weekly net pay in currency format. STEP 4: Modify the Salaried Class 1. Add a double constant called TAX_RATE and set the value to .73 2. Implement the CalculateNetPay method by multiplying the
- 41. weekly pay by the tax rate. STEP 5: Modify the Hourly Class 1. Add a double constant called TAX_RATE and set the value to .82 2. Implement the CalculateNetPay method by multiplying the weekly pay by the tax rate. STEP 6: Create the Main Program 1. Change the employeeList array to only hold two objects 2. Create one Hourly employee object and store it in the array. 3. Create one Salaried employee object and store it in the array. 4. As you did in the Week 5 lab, prompt for and collect the information for each of the objects. Note: iterating through the array should not require any changes from the previous iteration of the project--but make sure that the loop stays within the bounds of the array. STEP 7: Compile and Test When done, compile and run your program. Then debug any errors until your code is error-free. Check your output to ensure that you have the desired output and modify your code as necessary and rebuild. The output of your program should resemble the following: total Number of Employess in Database: 2 Press the ESC key to close the image description and return to lecture. STEP 8: Submit Deliverables
- 42. · Capture the console output window and paste into a Word document. · Put the zip file and screen shots (Word document) CIS247_WK2_Lab_Rosado.zip CIS247_WK2_Lab_Rosado/ApplicationUtilities.cs using System; using System.Collections.Generic; using System.Linq; using System.Text; namespace Employee { public class ApplicationUtilities {
- 43. public static void DisplayApplicationInformation() { Console.WriteLine("Welcome the Basic Employee Program"); Console.WriteLine("CIS247a, Week 2 Lab"); Console.WriteLine("Name: Danlel Rosado"); Console.WriteLine("This program accepts user input as a string, then makes the nappropriate data conversion and assigns the value to Employee objects"); Console.WriteLine(); } public static void DisplayDivider(string outputTitle) { Console.WriteLine("n********* " + outputTitle + "
- 44. *********n"); } public static void TerminateApplication()//this method terminates the application { DisplayDivider("Program Termination"); Console.Write("Thank you. Press any key to terminate the program..."); Console.ReadLine(); } public static void PauseExecution()//this method pauses the application { Console.Write("nProgram paused, press any key to continue...");
- 45. Console.ReadLine(); Console.WriteLine(); } public static double CalculateWeeklyPay(double Salary)//this method calculates the weekly salary from the annual salary { double value = 0; value = Salary / 52; return value; } } }
- 49. CIS247_WK2_Lab_Rosado/CIS247_WK2_Lab_Rosado.csproj.u ser <Project xmlns="http://schemas.microsoft.com/developer/msbuild/2003" /> CIS247_WK2_Lab_Rosado/InputUtilities.cs using System; using System.Collections.Generic; using System.Linq; using System.Text; namespace Employee
- 50. { public class InputUtilities { public static string GetInput(string inputType) { string strInput = String.Empty; Console.Write("Enter the " + inputType + ": "); strInput = Console.ReadLine(); return strInput; } public static string getStringInputValue(string inputType)
- 51. { string value = String.Empty; bool valid = false; string inputString = String.Empty; do { inputString = GetInput(inputType); if (!String.IsNullOrEmpty(inputString)) { value = inputString; valid = true; } else
- 52. { value = "Invalid input"; valid = false; } if (!valid) Console.WriteLine("Invalid " + inputType + " try again!"); } while (!valid); return value; } public static int getIntegerInputValue(string inputType) {
- 53. bool valid = false; int value = 0; string inputString = String.Empty; do { inputString = GetInput(inputType); if (!(String.IsNullOrEmpty(inputString))) { valid = Int32.TryParse(inputString, out value); } if (!valid) Console.WriteLine("Invalid " + inputType + " try again!");
- 54. } while (!valid); return value; } public static double getDoubleInputValue(string inputType) { bool valid = false; double value = 0; string inputString = String.Empty; do { inputString = GetInput(inputType);
- 55. if (!(String.IsNullOrEmpty(inputString))) { valid = Double.TryParse(inputString, out value); } if (!valid) Console.WriteLine("Invalid " + inputType + " try again!"); } while (!valid); return value; } public static char getCharInputValue(string inputType) {
- 56. bool valid = false; char value = 'u'; string inputString = String.Empty; do { inputString = GetInput(inputType); if (!(String.IsNullOrEmpty(inputString))) { valid = Char.TryParse(inputString, out value); } if (!valid) Console.WriteLine("Invalid " + inputType + " try again!");
- 57. } while (!valid); return value; } } } CIS247_WK2_Lab_Rosado/obj/Debug/CIS247_WK2_Lab_Rosa do.csproj.FileListAbsolute.txt C:UsersSMITHDocumentsVisual Studio 2008ProjectsCIS247_WK2_Lab_RosadoCIS247_WK2_Lab_R
- 58. osadoobjDebugResolveAssemblyReference.cache C:UsersSMITHDocumentsVisual Studio 2008ProjectsCIS247_WK2_Lab_RosadoCIS247_WK2_Lab_R osadobinDebugCIS247_WK2_Lab_Rosado.exe C:UsersSMITHDocumentsVisual Studio 2008ProjectsCIS247_WK2_Lab_RosadoCIS247_WK2_Lab_R osadobinDebugCIS247_WK2_Lab_Rosado.pdb C:UsersSMITHDocumentsVisual Studio 2008ProjectsCIS247_WK2_Lab_RosadoCIS247_WK2_Lab_R osadoobjDebugCIS247_WK2_Lab_Rosado.exe C:UsersSMITHDocumentsVisual Studio 2008ProjectsCIS247_WK2_Lab_RosadoCIS247_WK2_Lab_R osadoobjDebugCIS247_WK2_Lab_Rosado.pdb CIS247_WK2_Lab_Rosado/obj/Debug/CIS247_WK2_Lab_Rosa do.exe CIS247_WK2_Lab_Rosado/obj/Debug/CIS247_WK2_Lab_Rosa do.pdb
- 60. CIS247_WK2_Lab_Rosado/obj/Debug/ConsoleApplication1.exe CIS247_WK2_Lab_Rosado/obj/Debug/ConsoleApplication1.pdb CIS247_WK2_Lab_Rosado/Program.cs /* Program Description: Basic User Interface * This program uses methods to prompt the user for the following: 1. first name, which is a string data type 1. second name, which is a string data type 2. gender 3. Annnual salary The program then calculates the weekly salary and displays the summary Programmed by Danlel Risaldo*/
- 61. using System; using System.Collections.Generic; using System.Linq; using System.Text; namespace Employee { class Employee { string firstName=string.Empty ; string lastName=string.Empty ; char gender; int dependents=0;
- 62. double annualSalary=0; double weeklyPay=0; static void Main(string[] args) { Employee p = new Employee();//class instance ApplicationUtilities.DisplayApplicationInformation(); ApplicationUtilities.DisplayDivider("Start Program"); ApplicationUtilities.DisplayDivider("Prompt for Employee information and create first employee"); p.firstName = InputUtilities.getStringInputValue("First Name"); p.lastName = InputUtilities.getStringInputValue("Last Name");
- 63. p.gender = Convert.ToChar(InputUtilities.getCharInputValue("Gender")); p.dependents=InputUtilities.getIntegerInputValue("Dependents" ); p.annualSalary =InputUtilities.getDoubleInputValue("Annual Salary"); p.weeklyPay = ApplicationUtilities.CalculateWeeklyPay(p.annualSalary); Console.WriteLine(p.ToString()); ApplicationUtilities.PauseExecution(); Console.WriteLine(p.NewEmployee("Smith", "Kimberly", "M", 5, 5000.00)); ApplicationUtilities.TerminateApplication();
- 64. Console.ReadLine(); } public override string ToString() { string output; output = "rn" + "============ Employee Information ============"; output += "rntt" + " Name: " + firstName + " " + lastName; output += "rnt" + " Gender: " + gender ; output += "rnt" + " Dependents: " + dependents; output += "rnt" + "Annual Salary: " +
- 65. annualSalary.ToString("C2"); output += "rnt" + " Weekly Pay: " + weeklyPay.ToString("C2"); return output; } public string NewEmployee(string firstName, string lastName, string gender, int dependents, double annualSalary) { string output; output = "rn" + "============ Employee Information ============";
- 66. output += "rntt" + " Name: " + firstName + " " + lastName; output += "rnt" + " Gender: " + gender; output += "rnt" + " Dependents: " + dependents; output += "rnt" + "Annual Salary: " + annualSalary.ToString("C2"); output += "rnt" + " Weekly Pay: " + ApplicationUtilities.CalculateWeeklyPay(annualSalary).ToStrin g("C2"); return output; } }
- 67. } CIS247_WK2_Lab_Rosado/Properties/AssemblyInfo.cs using System.Reflection; using System.Runtime.CompilerServices; using System.Runtime.InteropServices; // General Information about an assembly is controlled through the following // set of attributes. Change these attribute values to modify the information // associated with an assembly. [assembly: AssemblyTitle("ConsoleApplication1")] [assembly: AssemblyDescription("")]
- 68. [assembly: AssemblyConfiguration("")] [assembly: AssemblyCompany("")] [assembly: AssemblyProduct("ConsoleApplication1")] [assembly: AssemblyCopyright("Copyright © 2015")] [assembly: AssemblyTrademark("")] [assembly: AssemblyCulture("")] // Setting ComVisible to false makes the types in this assembly not visible // to COM components. If you need to access a type in this assembly from // COM, set the ComVisible attribute to true on that type. [assembly: ComVisible(false)]
- 69. // The following GUID is for the ID of the typelib if this project is exposed to COM [assembly: Guid("bfe61bca-e540-4ac0-9712-bfe946c2de04")] // Version information for an assembly consists of the following four values: // // Major Version // Minor Version // Build Number // Revision // // You can specify all the values or you can default the Build
- 70. and Revision Numbers // by using the '*' as shown below: // [assembly: AssemblyVersion("1.0.*")] [assembly: AssemblyVersion("1.0.0.0")] [assembly: AssemblyFileVersion("1.0.0.0")] CIS247_WK2_Lab_Rosado.sln Microsoft Visual Studio