1. 2008 SUSPENSION
Front Suspension - Ascender, Envoy & Trailblazer
SPECIFICATIONS
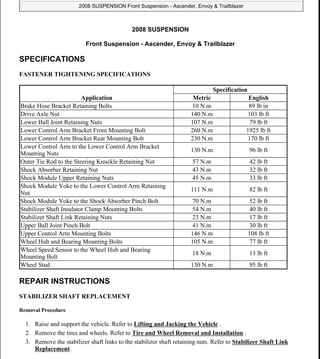
FASTENER TIGHTENING SPECIFICATIONS
REPAIR INSTRUCTIONS
STABILIZER SHAFT REPLACEMENT
Removal Procedure
1. Raise and support the vehicle. Refer to Lifting and Jacking the Vehicle .
2. Remove the tires and wheels. Refer to Tire and Wheel Removal and Installation .
3. Remove the stabilizer shaft links to the stabilizer shaft retaining nuts. Refer to Stabilizer Shaft Link
Replacement.
Application
Specification
Metric English
Brake Hose Bracket Retaining Bolts 10 N.m 89 lb in
Drive Axle Nut 140 N.m 103 lb ft
Lower Ball Joint Retaining Nuts 107 N.m 79 lb ft
Lower Control Arm Bracket Front Mounting Bolt 260 N.m 1925 lb ft
Lower Control Arm Bracket Rear Mounting Bolt 230 N.m 170 lb ft
Lower Control Arm to the Lower Control Arm Bracket
Mounting Nuts
130 N.m 96 lb ft
Outer Tie Rod to the Steering Knuckle Retaining Nut 57 N.m 42 lb ft
Shock Absorber Retaining Nut 43 N.m 32 lb ft
Shock Module Upper Retaining Nuts 45 N.m 33 lb ft
Shock Module Yoke to the Lower Control Arm Retaining
Nut
111 N.m 82 lb ft
Shock Module Yoke to the Shock Absorber Pinch Bolt 70 N.m 52 lb ft
Stabilizer Shaft Insulator Clamp Mounting Bolts 54 N.m 40 lb ft
Stabilizer Shaft Link Retaining Nuts 23 N.m 17 lb ft
Upper Ball Joint Pinch Bolt 41 N.m 30 lb ft
Upper Control Arm Mounting Bolts 146 N.m 108 lb ft
Wheel Hub and Bearing Mounting Bolts 105 N.m 77 lb ft
Wheel Speed Sensor to the Wheel Hub and Bearing
Mounting Bolt
18 N.m 13 lb ft
Wheel Stud 130 N.m 95 lb ft
2008 Isuzu Ascender LS
2008 SUSPENSION Front Suspension - Ascender, Envoy & Trailblazer
2008 Isuzu Ascender LS
2008 SUSPENSION Front Suspension - Ascender, Envoy & Trailblazer
Microsoft
Thursday, July 30, 2009 11:19:53 AM Page 1 © 2005 Mitchell Repair Information Company, LLC.
Microsoft
Thursday, July 30, 2009 11:19:58 AM Page 1 © 2005 Mitchell Repair Information Company, LLC.
2. Fig. 1: View Of Stabilizer Shaft, Insulator, Insulator Clamp & Mounting Bolts
Courtesy of GENERAL MOTORS CORP.
4. Remove the stabilizer shaft insulator clamp mounting bolts.
5. Remove the stabilizer shaft insulator clamp from the stabilizer shaft insulator.
6. Remove the stabilizer shaft insulators from the stabilizer shaft.
IMPORTANT: Note the position of the bend in the stabilizer shaft.
2008 Isuzu Ascender LS
2008 SUSPENSION Front Suspension - Ascender, Envoy & Trailblazer
Microsoft
Thursday, July 30, 2009 11:19:53 AM Page 2 © 2005 Mitchell Repair Information Company, LLC.
3. 7. If equipped with a LL8 6 cylinder engine, do the following:
Remove the engine protection shield. Refer to Engine Protection Shield Replacement .
Remove the engine mount nuts-to-frame bracket.
Fig. 2: View Of Wood Block Between Engine Oil Pan & Pole Jack
Courtesy of GENERAL MOTORS CORP.
Install a pole jack underneath the oil pan.
Insert a block of wood between the oil pan and the pole jack.
Raise the engine 10 mm measuring from the bottom of the oil pan to the rear edge of the front
suspension crossmember.
IMPORTANT: The jackstand should only be used to support the weight of the
powertrain. DO NOT lift the entire weight of the front end of the
vehicle by the jackstand.
2008 Isuzu Ascender LS
2008 SUSPENSION Front Suspension - Ascender, Envoy & Trailblazer
Microsoft
Thursday, July 30, 2009 11:19:53 AM Page 3 © 2005 Mitchell Repair Information Company, LLC.
4. 8. Remove the stabilizer shaft from the vehicle.
Installation Procedure
Fig. 3: View Of Stabilizer Shaft, Insulator, Insulator Clamp & Mounting Bolts
Courtesy of GENERAL MOTORS CORP.
NOTE: The stabilizer shaft must be installed with the bend down and away from the
engine. If the stabilizer shaft is installed improperly, contact between the
stabilizer shaft and oil filter may occur.
2008 Isuzu Ascender LS
2008 SUSPENSION Front Suspension - Ascender, Envoy & Trailblazer
Microsoft
Thursday, July 30, 2009 11:19:53 AM Page 4 © 2005 Mitchell Repair Information Company, LLC.
5. 1. Install the stabilizer shaft to the vehicle, with the bend down and away from the engine. There may be a
label on the shaft. If so, it should be on the LH side.
2. If equipped with a LL8 6 cylinder engine, do the following:
Lower the engine.
Install the engine mounting nuts-to-frame bracket.
Tighten: Tighten the engine mount nuts to 70 N.m (52 lb ft).
Fig. 4: View Of Wood Block Between Engine Oil Pan & Pole Jack
Courtesy of GENERAL MOTORS CORP.
Remove the block of wood between the oil pan and the pole jack.
Remove the jackstand from underneath the oil pan.
NOTE: Refer to Fastener Notice .
2008 Isuzu Ascender LS
2008 SUSPENSION Front Suspension - Ascender, Envoy & Trailblazer
Microsoft
Thursday, July 30, 2009 11:19:53 AM Page 5 © 2005 Mitchell Repair Information Company, LLC.
6. Install the engine protection shield. Refer to Engine Protection Shield Replacement .
3. Install the stabilizer shaft insulators to the stabilizer shaft.
4. Install the stabilizer shaft insulator clamp to the stabilizer shaft insulator.
5. Install the stabilizer shaft insulator clamp mounting bolts.
Tighten: Tighten the stabilizer shaft insulator clamp mounting bolts to 54 N.m (40 lb ft).
6. Install the stabilizer shaft links to the stabilizer shaft. Refer to Stabilizer Shaft Link Replacement.
7. Install the tires and wheels. Refer to Tire and Wheel Removal and Installation .
8. Lower the vehicle.
STABILIZER SHAFT LINK REPLACEMENT
Removal Procedure
1. Raise and support the vehicle. Refer to Lifting and Jacking the Vehicle .
2. Remove the tire and wheel assembly. Refer to Tire and Wheel Removal and Installation .
3. Remove any dirt or debris from the threads of the stabilizer link bolt.
2008 Isuzu Ascender LS
2008 SUSPENSION Front Suspension - Ascender, Envoy & Trailblazer
Microsoft
Thursday, July 30, 2009 11:19:53 AM Page 6 © 2005 Mitchell Repair Information Company, LLC.
7. Fig. 5: Exploded View Of Stabilizer Shaft Link Components
Courtesy of GENERAL MOTORS CORP.
4. Use the proper size wrench or socket to hold the stabilizer bolt while removing the stabilizer shaft nut (1).
2008 Isuzu Ascender LS
2008 SUSPENSION Front Suspension - Ascender, Envoy & Trailblazer
Microsoft
Thursday, July 30, 2009 11:19:54 AM Page 7 © 2005 Mitchell Repair Information Company, LLC.
8. 5. Remove the washer (2) and the insulator (3) from the stabilizer shaft link bolt (9).
6. Remove the stabilizer shaft link bolt (9), washer (8) and the insulator (7).
7. Remove the insulators (4) (6), spacer (5).
Installation Procedure
2008 Isuzu Ascender LS
2008 SUSPENSION Front Suspension - Ascender, Envoy & Trailblazer
Microsoft
Thursday, July 30, 2009 11:19:54 AM Page 8 © 2005 Mitchell Repair Information Company, LLC.
9. Fig. 6: Exploded View Of Stabilizer Shaft Link Components
Courtesy of GENERAL MOTORS CORP.
1. Install the washer (8) and the insulator (7) on the stabilizer shaft link bolt (9).
2008 Isuzu Ascender LS
2008 SUSPENSION Front Suspension - Ascender, Envoy & Trailblazer
Microsoft
Thursday, July 30, 2009 11:19:54 AM Page 9 © 2005 Mitchell Repair Information Company, LLC.
10. 2. Position the insulators (4) (6), spacer (5) between the stabilizer shaft and the lower control arm.
3. Install the stabilizer shaft link bolt (9), washer (8) and the insulator (7).
4. Install the insulator (3) and the washer (2).
5. Install the stabilizer shaft link nut.
Tighten: Tighten the stabilizer shaft link nut to 23 N.m (17 lb ft).
6. Install the tire and wheel assembly. Refer to Tire and Wheel Removal and Installation .
7. Remove the support and lower the vehicle.
STABILIZER SHAFT INSULATOR REPLACEMENT
Removal Procedure
IMPORTANT: When installing the spacer (5) and the insulators (3), (4), (6) and (7),
ensure that the insulators are properly seated in the stabilizer shaft and
the lower control arm.
IMPORTANT: Use the stabilizer shaft bolt (9) to align the spacer (5) and the insulators
(3), (4), (6) and (7) during the installation of the stabilizer shaft bolt (9).
NOTE: Refer to Fastener Notice .
2008 Isuzu Ascender LS
2008 SUSPENSION Front Suspension - Ascender, Envoy & Trailblazer
Microsoft
Thursday, July 30, 2009 11:19:54 AM Page 10 © 2005 Mitchell Repair Information Company, LLC.
11. Thank you very much for
your reading. Please Click
Here. Then Get COMPLETE
MANUAL. NO WAITING
NOTE:
If there is no response to
click on the link above,
please download the PDF
document first and then
click on it.
12. Fig. 7: View Of Stabilizer Shaft, Insulator, Insulator Clamp & Mounting Bolts
Courtesy of GENERAL MOTORS CORP.
1. Raise and support the vehicle. Refer to Lifting and Jacking the Vehicle .
2. Remove the stabilizer shaft insulator clamp mounting bolts.
3. Remove the stabilizer shaft insulator clamp from the stabilizer shaft insulator.
4. Lower the stabilizer shaft and remove the stabilizer shaft insulator.
Installation Procedure
2008 Isuzu Ascender LS
2008 SUSPENSION Front Suspension - Ascender, Envoy & Trailblazer
Microsoft
Thursday, July 30, 2009 11:19:54 AM Page 11 © 2005 Mitchell Repair Information Company, LLC.
13. Fig. 8: View Of Stabilizer Shaft, Insulator, Insulator Clamp & Mounting Bolts
Courtesy of GENERAL MOTORS CORP.
1. Install the stabilizer shaft insulator to stabilizer shaft with slit facing the front of the vehicle.
2. Install the stabilizer shaft insulator clamp to the stabilizer shaft insulator.
3. Install the stabilizer shaft insulator clamp mounting bolts.
NOTE: Refer to Fastener Notice .
2008 Isuzu Ascender LS
2008 SUSPENSION Front Suspension - Ascender, Envoy & Trailblazer
Microsoft
Thursday, July 30, 2009 11:19:54 AM Page 12 © 2005 Mitchell Repair Information Company, LLC.
14. Tighten: Tighten the stabilizer shaft insulator clamp mounting bolts to 54 N.m (40 lb ft).
4. Lower the vehicle.
UPPER CONTROL ARM BALL JOINT REPLACEMENT
Tools Required
J 9519-E Lower Ball Joint Remover and Installer. See Special Tools.
J 21474-01 Control Arm Bushing Set. See Special Tools.
J 45117 Ball Joint Installation Spacer. See Special Tools.
Removal Procedure
2008 Isuzu Ascender LS
2008 SUSPENSION Front Suspension - Ascender, Envoy & Trailblazer
Microsoft
Thursday, July 30, 2009 11:19:54 AM Page 13 © 2005 Mitchell Repair Information Company, LLC.
15. Fig. 9: View Of Upper Ball Joint Retaining Clip
Courtesy of GENERAL MOTORS CORP.
1. Raise and support the vehicle. Refer to Lifting and Jacking the Vehicle .
2. Remove the tire and wheel. Refer to Tire and Wheel Removal and Installation .
3. Remove the steering knuckle with wheel hub attached. Refer to Steering Knuckle Replacement (4WD).
4. Remove the upper ball joint retaining clip.
2008 Isuzu Ascender LS
2008 SUSPENSION Front Suspension - Ascender, Envoy & Trailblazer
Microsoft
Thursday, July 30, 2009 11:19:54 AM Page 14 © 2005 Mitchell Repair Information Company, LLC.
16. Fig. 10: Illustrating Removal Of Upper Ball Joint From Steering Knuckle
Courtesy of GENERAL MOTORS CORP.
5. Remove the upper ball joint boot.
6. Remove the upper ball joint from the steering knuckle using J 9519-E . See Special Tools.
Installation Procedure
2008 Isuzu Ascender LS
2008 SUSPENSION Front Suspension - Ascender, Envoy & Trailblazer
Microsoft
Thursday, July 30, 2009 11:19:54 AM Page 15 © 2005 Mitchell Repair Information Company, LLC.