Best VIP Call Girls Noida Sector 40 Call Me: 8448380779
Fit extra electrical sockets
1. FIT EXTRA ELECTRICAL
SOCKETS
No special manual skills are required, but a sound
knowledge of electrical work is an advantage.
Working with electricity is potentially dangerous, and you
should not attempt to convert or add sockets unless you
have the necessary experience and knowledge. If in doubt,
enlist the help of a professional electrician.
Always turn off the electricity supply at the consumer unit
when working on electrical installations. Wear eye protectors
and gloves when using a club hammer and bolster.
An adequate number of electrical sockets will eliminate the
inconvenience and expense of extension leads.
To increase the number of sockets in your home either
convert existing single-socket outlets to doubles or fit
additional sockets. Single sockets will be either 'flush', i.e.
they don't stick out from the wall, or 'surface-mounted', i.e.
boxes that do stick out a little bit from the wall.
2 - Preparation
The following assumes your house is wired conventionally,
using modern materials. Old round-pin sockets should be
replaced by an electrician.
Most socket outlets in modern homes are connected to what
is known as a ring circuit or ring main. From a 30amp fuse
or 32amp miniature circuit breaker (MCB) in the consumer
unit, a length of 2.5mm² two-core-and-earth cable runs
from one socket to another and then back to the consumer
unit where it is connected to the same set of terminals from
which it originated.
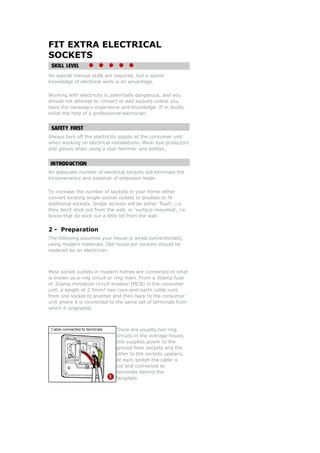
There are usually two ring
circuits in the average h
one supplies power to the
ground floor sockets and the
other to the sockets upstairs
At each socket the cable is
cut and connected to
terminals behind the
faceplate.
ouse,
.
2. Some homes have only one
or two socket outlets per
room, but the number can b
increased with the addi
an extension known as a
spur. This comprises a s
2.5mm² cable connected to
the terminals of an existi
socket or to a separate
junction box on the ring
circuit. From there, the spur cable runs to a new socket. You
can have as many spurs as there were socket outlets on the
ring originally. Each original double socket counts as two.
e
tion of
ingle
ng
dividual radial circuits are used to supply power to a singleIn
appliance such as a cooker or shower unit, but radial circuits
can also be used to supply a number of sockets. Spurs can
also be connected to this multi-outlet type of radial circuit.
A radial-circuit cable terminates at the last socket - it does
ingle sockets on a ring or radial circuit can be converted to
not return to the consumer unit as with a ring-circuit cable.
A 2.5mm² two-core-and-earth cable is used for a floor area
up to 20m² (24yds²), and the circuit must be protected by a
20amp fuse or MCB. Higher-rated fuses and cable are
required for larger floor areas.
S
doubles or even fused triple sockets. Spur sockets can also
be upgraded, provided the spur cable is serving only the one
socket outlet.
3 - Testing the circuit
it, turn off the electricity
tep 2: Unscrew the socket faceplate and ease it off its
ket
tep 3: Disconnect all the appliances on the circuit, then
al
tep 1: Before testing the circuS
using the main switch on the consumer unit.
S
mounting box. Note the number of cables feeding the soc
- if three cables are connected, it is safe to upgrade the
socket. If two are fitted you should test the circuit.
S
remove the red-coloured live wires from the socket termin
and separate these wires. Attach a continuity tester between
the two live wires - if the tester glows, the socket can be
changed.
• If the tester fails to light, get a qualified electrician
• ack
to test the circuit before changing the socket.
Similarly, if only one cable is connected to the b
of your single socket, have that tested by an
qualified electrician to make sure it is safe to
3. convert.
4 - Converting - Surface-mounted sockets
This is one of the easiest ways to increase the number of
socket outlets in your home. No extra wiring is required and
little or no redecoration afterwards. Just swap the single
mounting box for a double box of the same depth, and
connect the new double socket to the existing circuit cable.
Step 1: Before starting work, turn off the electricity using
the main switch on the consumer unit - check that the power
is off with a proprietary plug-in socket tester.
Step 2: Remove the two securing screws and pull the old
faceplate away from its mounting box. Loosen the terminals
securing the wires and remove the faceplate.
Check that the bare earth wires are covered with
green/yellow earth sleeving - if not, cut a piece of sleeving
to length and thread it over the wires, leaving about 12mm
(1/2in) of each wire exposed.
Step 3: Remove the old
mounting box. Break the
plastic web covering the
appropriate 'entry hole' for
the cable in the new box.
Pass the cable through the
hole and screw the box to t
wall.
Use a spirit level to get your
mounting boxes horizontal.
Slotted holes allow you to adjust the position of each box as
you drive the fixing screws into the wall.
he
You may be able to use the existing screws and wall plugs. If
not, drill new fixing holes in the wall and insert wall plugs.
Step 4: Connect the existing wires to the terminals in the
new socket - red to the L-terminal, black to N-terminal and
green/yellow to E-terminal. Make sure all the wires are held
securely and that no bare wire is exposed.
When two or more identical wires are connected to a single
4. terminal, they should be twisted together with pliers to
ensure a good connection.
Step 5: Push the socket faceplate into the box, taking care
not to trap the wires, then tighten the faceplate screws.
Step 6: When all is secure, turn the electricity on and test
the socket by plugging in a lamp or a plug-in socket tester.
5 - Converting - Flush sockets
The simplest way to upgrade a flush socket is to use a
special mounting box that converts it to a double surface-
mounted socket. The conversion box is attached to the
existing metal box, using the two short screws provided.
Converting a single flush
socket to a double or triple
flush socket involves more
work but the result looks
neater. It is probably best to
leave this type of conversion
until you plan to redecorate.
Step 1: Having turned off the power at the consumer unit,
unscrew and remove the old faceplate and metal mounting
box. You may need to cut around the old box in order to
release it from the surrounding plaster.
Step 2: Hold the new metal box in the required position -
this is largely determined by the original hole in the wall, but
there is some leeway. Draw round the box to indicate how
much masonry needs to be removed.
Step 3: Using a cordless drill
fitted with a masonry bit, drill
a series of closely-space
holes in the masonry. Use a
depth stop or a piece of tape
wrapped around the drill to
ensure the holes are all the
same depth.
d
5. You can buy a drilling jig for boring out the recesses for
mounting boxes - it is comprised of rows of closely packed
tubes mounted on a backing plate that you attach to the
wall.
Step 4: Use a bolster or cold
chisel to chop out a neat
rectangular recess for the
new box. Drill fixing holes
and fit wall plugs.
Step 5: Knock out a convenient cable-entry hole in the box
and line the hole with a rubber grommet that will prevent
the metal chafing the cable. Pass the cable through the hole
and screw the box into its recess.
Use decorator's filler to make good any damaged plaster.
Step 6: Connect the existing wires to the terminals in the
new socket - red to the L-terminal, black to N-terminal and
green/yellow to E-terminal.
When two or more identical wires are connected to a single
terminal, they should be twisted together with pliers to
ensure a good connection.
Make sure all the wires are held securely and that no bare
wire is exposed.
Dealing with a hollow wall:
It is relatively easy to convert a flush socket that is set in a
plasterboard partition wall.
Step 1: Turn off the electricity using the main switch on the
consumer unit.
Step 2: Remove the old fitting and draw round the new
mounting box. You may need to reposition the box to one
side of the original opening to avoid cutting into wooden
6. studs that form the framework of the wall.
Step 3: Drill holes in the corners of the marked area and cut
out the waste with a padsaw.
Step 4: Punch out the cable-
entry hole and fit a grommet
in the new box, then feed in
the cable. Fit dry-wall flang
to the sides of the box.
es
he
e
d
• If your new spur has to run across the line of joists,
Step 5: Pass the box through the hole in the wall and
manoeuvre it until the flanges come up against the inside
face of the plasterboard.
Step 6: Wire the socket as described in Step 6 above and
screw it to the mounting box. As you tighten the screws, the
flanges grip the plasterboard and hold the box in place.
Special plastic mounting boxes with hinged flanges are
available for fitting sockets to hollow stud partitions.
6 - Fitting extra sockets
You can add a new socket to the circuit by connecting a
length of 2.5mm² two-core-and-earth cable to the terminals
of an existing socket, provided that the socket is not on a
spur itself or already feeding a spur.
To avoid long cable runs, mount the new socket on the wall
directly behind an existing socket
in the next room.
• If you want a new socket
on the opposite side of
the room, run the spur
cable under the floor. T
new cable can rest on th
floor or ceiling between
joists or it can be secure
to the side of a joist with plastic cable clips.
you will have to drill a series of 12mm(1/2in) holes
through the joists. These holes must be 50mm (2in)
7. below the tops of the joists to avoid floorboard nails.
tep 1: Before starting work, turn off the electricity using
tep 2: Remove the existing socket and box, then drill a
Step 3: Cut a recess for a
tep 4: Strip a short length of sheathing off both ends of
bout
tep 5: Connect the existing wires to the terminals in the
hen two or more identical wires are connected to a single
ake sure all the wires are held securely and that no bare
t the other end, twist the new wires together with the
e
.
S
the main switch on the consumer unit.
S
hole for a short length of cable through the wall.
flush box or fit a surface-
mounted box on the other
side. Punch out the cable-
entry hole for the cable (fit a
rubber grommet in a metal
box to prevent chafing the
cable) and screw the box in
place.
S
the spur cable, check that the bare earth wires are covered
with green/yellow earth sleeving - if not, cut a piece of
sleeving to length and thread it over the wires leaving a
12mm (1/2in) of each wire exposed.
S
new socket - red to the L-terminal, black to N-terminal and
green/yellow to E-terminal.
W
terminal, they should be twisted together with pliers to
ensure a good connection.
M
wire is exposed.
A
matching wires from the ring main, and insert them in th
terminals of the original socket on the other side of the wall
8. Run longer spur cables along
a wall inside plastic mini-
trunking and connect them to
surface-mounted sockets.
Whenever you are installing
new cable runs, make sure
you do not cut the cable too
short - instead push the
excess cable back into the
wall or below the floor after you have connected the wires to
their terminals.
Feeding a cable behind the skirting can be a problem. Decide
where you want to mount the new socket and use a cordless
drill fitted with an extra-long masonry bit to cut a channel
behind the skirting board. Rake out the debris from behind
the skirting with a cold chisel.