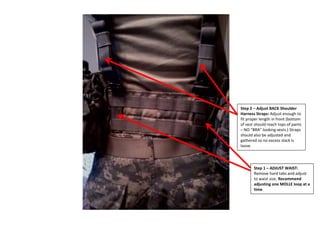
1. Step 2 – Adjust BACK Shoulder
Harness Straps: Adjust enough to
fit proper length in front (bottom
of vest should reach tops of pants
– NO “BRA” looking vests.) Straps
should also be adjusted and
gathered so no excess slack is
loose.
Step 1 – ADJUST WAIST:
Remove hard tabs and adjust
to waist size. Recommend
adjusting one MOLLE loop at a
time
2. Step 3 – Adjust CHEST Strap:
Adjust enough to fit proper
width and gather and secure
excess slack. May have to use
zip ties or 100 mph tape (OD
green) if elastic securing tape
is missing.
Step 4 – Secure Ammo
Pouches: Attach through load
bearing loops that are 3rd
from the bottom of the vest
(Just below from where the
loops sewn to the netting
start.) Ammo pouches should
be parallel to the zipper, at
about the 2nd loop over from
the zipper), and at equal
height. Button straps on the
ammo pouch should be
WEAVED in and out,
alternating between the
MOLLE loops and loops on
ammo pouch.
Canteens on each side.
3. Step 6 – Tuck Canteen
Pouch Flap In: When
canteen is placed in
pouch, top flap of pouch
must be tucked in behind
tin canteen holder. Use
straps to secure over top
of canteen lid and secure
with button snap.
Step 5 – Secure Canteen
Pouches: Placed starting at 3rd
MOLLE loop from the bottom of
vest. Attach through load
bearing loops that allow
canteens to be placed slightly
lateral posterior. (May be
different on some people
depending on what’s
comfortable) This way canteens
are still able to be accessed, but
keep them off hip bones for
comfort when walking. Canteen
pouches are placed on each
side, and should be at equal
height from the other canteen
pouch. Button straps on the
canteen pouch should be
WEAVED in and out, alternating
between the MOLLE loops and
loops on canteen pouch.cv
4. MOLLE
YELLOW duct tape on handle of
MOLLE. Identify your vest by
using a Sharpie to write your last
name on the duct tape. DO NOT
WRITE ON THE STRAP.
FRONT BACK
Last
Name
**Disregard pouches on the MOLLE shown here…follow standards from first three slides. No loose straps. Secure with 100
mph duct tape (OD) or use elastic bands on the vest. Nice and neat as shown **
5. ASSAULT PACK
Last
Name
YELLOW duct tape on handle of
Assault Pack. Identify your bag
by using a Sharpie to write your
last name on the duct tape. DO
NOT WRITE ON THE BAG.
**No loose straps. Secure with 100 mph duct tape (OD) or use elastic bands on the Assault Pack. Nice and neat as shown**
6. DUFFLE BAG
Last Name
YELLOW duct tape on handle of
Duffle Bag. Identify your bag by
using a Sharpie to write your last
name on the duct tape. DO NOT
WRITE ON THE BAG.
7. HELMET
YELLOW duct tape on opposite
side of clip. Identify your helmet
by using a Sharpie to write your
last name on the duct tape. DO
NOT WRITE ON THE STRAP.
CLIP
8. FINAL NOTES
• Beads will be issued out prior to the FTX or at the FTX site for those of you
who fall under one or more of these categories:
– Prior Heat Casualties
– Prior Cold-Injury Casualties
– Allergies
• You will be instructed by the FTX OIC/NCOIC on where to place these
beads (should be on your boot lace, but not quite sure which boot, right
or left, at this time). More to Follow (MTF)….
• Epi-Pens. Prior to the FTX, please do your best to have these on your
person. Otherwise if you do not have the opportunity to visit Sick Call, you
will have to wait until you reach the FTX site and visit the Aid Station.
Once at the Aid Station, notify CPT Adams (our Physician Assistant) and he
will get them for you from the TMC and deliver those once he returns to
the site. (LEADERSHIP: IF I CAN GET A NAME OF THOSE WHO DO NOT
ALREADY HAVE ONE, I MAY BE ABLE TO “PRE-ORDER” FROM CPT ADAMS
BY THE TIME FTX COMES AROUND. LET ME KNOW NLT MONDAY BY COB)