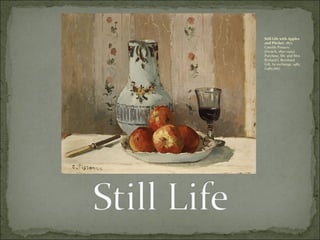
1. Still Life with Apples
and Pitcher, 1872
Camille Pissarro
(French, 1830–1903)
Purchase, Mr. and Mrs.
Richard J. Bernhard
Gift, by exchange, 1983
(1983.166)
2. A still life is a group of inanimate
objects
In (not) Animate (moving) = not
moving
These are objects that are chosen
for a specific reason and arranged
in a certain way.
Examples of objects that could be
included in a still life are:
Bowl of fruit
Vase of Flowers
Bottles, cups, plates, dishes
Books
Plants
Chair or furniture
Still Life with Jar, Cup, and Apples, ca. 1877
Paul Cézanne (French, 1839–1906)
H. O. Havemeyer Collection, Bequest of Mrs. H. O. Havemeyer, 1929
(29.100.66)
3. Composition is the
arrangement or placement of
objects. The composition is not
just how the objects of a still life
are put together but how you
put them on your paper.
How do you use the space on
your paper? Negative Space,
the blank or empty space, is just
as important as the space that is
drawn.
Flowers by a Stone Vase, 1786
Peter Faes (Flemish, 1750–1814)
Bequest of Catherine D. Wentworth, 1948
(48.187.737)
4. Step 1: Use a view finder or
your hands to help you
focus on the images you
want to include in your
drawing.
This helps to block out the
surrounding area and
really focus on the items
you are looking at.
5. Step 2: Decide if you want a
closed composition or an
open composition.
Closed compositions have all
elements completely contained
in your composition.
Open compositions have
items extending outside the
visual panel.
Both of these can make good
compositions it just depends
on the look you are going for.
So try them both out.
Example of
Closed
Composition
Still Life with Peaches,
1881
Auguste Renoir (French,
1841–1919)
Bequest of Stephen C.
Clark, 1960 (61.101.12)
Example of
Open
Composition
Pierre Auguste Renoir,
Peaches and Almonds,
1901, oil on canvas, 31.1
x 41.3 cm, Tate Gallery,
London.
6. Step 3: Balance your composition.
Symmetrical balance is when the
composition is even on both sides. If you
folded it in half both sides would be equal.
Symmetrical balance is more difficult
because it must be precise or the eye will
reject it.
Asymmetrical balance is when one side
dominates but balance is still achieved.
Asymmetrical balance can be easier to
arrange but still requires that you balance
the elements of your still life with the
negative space of the surrounding area.
Example of
Symmetrical
Balance
Still Life with Peaches,
1881
Auguste Renoir (French,
1841–1919)
Bequest of Stephen C.
Clark, 1960 (61.101.12)
Example of
Asymmetrical
Balance
Henri [Ignace-Henri-
Jean-Théodore] Fantin-
Latour (French, 1836-
1904), A Plate of Apples,
1861, oil on canvas, 21.0 x
26.4 cm, Tate Gallery,
London. See Batignolles
Group.
7. Rules for good composition
1. More on bottom than top
2. Objects are not separated
they overlap, touch and
interrelate
3. Don’t start at the bottom.
Use the whole paper and
figure out what is going to be
the best placement of
objects.
Édouard Manet (French, 1832-1883),
Peonies, 1864-65, oil on canvas, 23 3/8 x
13 7/8 inches (59.4 x 35.2 cm),
Metropolitan Museum of Art, NY.
8. If an object is
above the
horizon line or
eye level then
the object angles
downward.
If an object is
above the
horizon line or
eye level then it
angles upward.
Objects that are closer to
you are lower on the
paper.
Objects that are farther
away are higher on the
paper.
You can show space
better by overlapping
objects.
Perspective Space
Perspective and Space play an important part in drawing a still life.
9. Perspective Shapes
It’s important to remember
perspective when drawing a
still life. If the object is
above your eye level it will
look differently then if it is
below your eye level or on
your eye level.
Horizon line or Eye Level
10. Foreshortening
is a technique for
creating the
appearance that
the object you are
drawing is
extending into
space. This is
done by
shortening the
lines with which
that object is
drawn.
11. To Sight means to measure. It is often
referred to as sighting. This is another tool
that artists use to get accurate drawings.
To draw well, students need to learn to see
size relationships, angle relationships, and
the relationship of different negative space
sizes. We can teach this using sighting
devices and techniques. Students learn to
measure and compare lengths,
proportions, angles, and so on by sighting
by holding a pencil at arms length while
making comparison observations. These
measurements are transferred to the paper.
12.
13.
14.
15. One key to making
objects look
realistic is creating
shading. There are
several key things
you need to know
about shading:
Light
Source
Highlight
ShadeReflected Light
Cast Shadow
16. Shading Exercise: Recreate the shading on the sphere below.
After you are done label the highlight, shadow, cast shadow
and reflected light.