Configure iis to access your website using an ip address
•Download as DOCX, PDF•
0 likes•386 views

Configure iis to access your website using an ip address

Recommended
Recommended
More Related Content
What's hot
What's hot (20)
Similar to Configure iis to access your website using an ip address
Similar to Configure iis to access your website using an ip address (20)
Recently uploaded
Recently uploaded (20)
Configure iis to access your website using an ip address
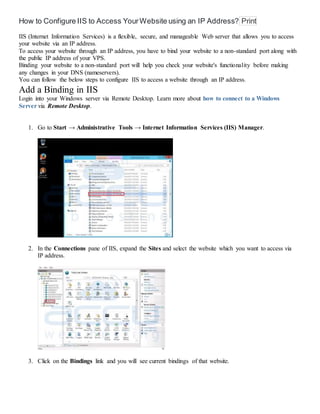
- 1. How to Configure IIS to Access YourWebsite using an IP Address? Print IIS (Internet Information Services) is a flexible, secure, and manageable Web server that allows you to access your website via an IP address. To access your website through an IP address, you have to bind your website to a non-standard port along with the public IP address of your VPS. Binding your website to a non-standard port will help you check your website's functionality before making any changes in your DNS (nameservers). You can follow the below steps to configure IIS to access a website through an IP address. Add a Binding in IIS Login into your Windows server via Remote Desktop. Learn more about how to connect to a Windows Server via Remote Desktop. 1. Go to Start → Administrative Tools → Internet Information Services (IIS) Manager. 2. In the Connections pane of IIS, expand the Sites and select the website which you want to access via IP address. 3. Click on the Bindings link and you will see current bindings of that website. GET WINDOWS VPS
- 2. 4. Click on Add button to add a new binding. 5. On the Add Site Binding window, keep website Type as 'http.' Select an IP address from the drop-down menu that you want to bind your website with. You won't bind this new website on port 80 without Host Header Value (Hostname) as other websites (along with their Host Header Values) are also bound on port 80. So, specify a port number (other than default port 80) that you wish to bind to this new website. Keep Hostname as blank, click OK, and then Close. Once the binding is added in IIS Manager, the next step is allowing a port in Windows Firewall.
- 3. GET WINDOWS VPS Open a Port in Windows Firewall 1. Go to Start → Administrative Tools → Windows Firewall with Advanced Security. 2. At Windows Firewall window, click on Inbound Rules.
- 4. 3. Under Actions pane, click on New Rule and New Inbound Rule Wizard will be opened. On this window, select the Port radio button and click on Next. GET WINDOWS VPS
- 5. 4. On the next screen, select TCP and Specific local ports radio button. Specify a port number (upon which you set binding in IIS) in Specific local ports field and click Next. 5. On the next screen, select Allow the connection and click Next.
- 6. 6. Select the profile where you want to apply this rule and click Next. 7. Specify Name and Description for the newly created rule & click Finish.
- 7. Once you allow the port number in Windows Firewall, you will be able to access your website via IP address like http://VPS-IP-Address:81.