1. What is a Storyboard?
Presenting information using a videotape usually involves putting together a number of
short segments that make up a scene. Several scenes are then joined to convey specific
messages. Videotape recordings, like any other medium, should be well planned if its
message is to be effective. In order to take advantage of this compelling form of
communication, designers such as yourself need to remember to appeal to both the aural
and visual senses of your audience. Your design process can be aided through the use of a
tool known as a storyboard.
What is a Storyboard?
Developed during the pre-production stage and used throughout the production and post-
production stages, a storyboard is a series of diagrams that are used to depict the
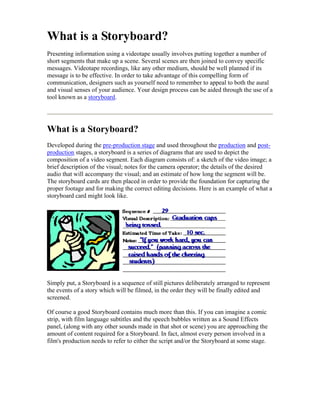
composition of a video segment. Each diagram consists of: a sketch of the video image; a
brief description of the visual; notes for the camera operator; the details of the desired
audio that will accompany the visual; and an estimate of how long the segment will be.
The storyboard cards are then placed in order to provide the foundation for capturing the
proper footage and for making the correct editing decisions. Here is an example of what a
storyboard card might look like.
Simply put, a Storyboard is a sequence of still pictures deliberately arranged to represent
the events of a story which will be filmed, in the order they will be finally edited and
screened.
Of course a good Storyboard contains much more than this. If you can imagine a comic
strip, with film language subtitles and the speech bubbles written as a Sound Effects
panel, (along with any other sounds made in that shot or scene) you are approaching the
amount of content required for a Storyboard. In fact, almost every person involved in a
film's production needs to refer to either the script and/or the Storyboard at some stage.
2. The Storyboard acts as a preview and as a visual script for camera angles, lighting,
montage, sound effects, actor arrangment, prop arrangement, and (most importantly) the
narrative
developm
ent and
continuity.
If a film
crew
arrived for
work on
the first
day of
filming,
and there
was no
such thing
as a
Storyboard, the following are just some of the problems that could be expected:
• Because the script would be in written form only there would be a danger of
misunderstanding the descriptions or film terms.
• There could be language differences. Pictures are the International story language.
• The Director would have to have incredible vision to be able to see how the story
flowed and if the Continuity was correct.There is a big difference between a
description of Montage or Mise-en-scene and the actual images arranged in visual
form to clearly show such things as object shape continuity, light or viewpoint,
frame design or Mise-en-scene.
There are actually several types of Storyboard, the main one being the Production
Storyboard.
1. The Production Storyboard.The example above is similar to a Production, or
Director's Storyboard, adapted for student use. Refer to the Conventions section
for an explanation of the Shot codes.
Another type of Storyboard is the
2. Conceptual Sheet or Painting. This is only a sequence of images, much like a
photo-essay. The purpose of this is simply to communicate the visual style of the
film.
3. TV storyboards are another type and are nearly always larger and more detailed.
This is because the narrative or concept is usually more dynamic and time-
compressed, requiring a lot of short shots, including overlays and voice-overs.
These storyboards are designed and produced by advertising agencies for their (
sometimes visually illiterate )clients.
4. The Animatic is a Storyboard type which goes a little further. This is produced by
transferring the images of a Production Storyboard or Concept storyboard to film
and dubbing a soundtrack.
5. The Digital or Rush Storyboard is a Production Storyboard which has been
compiled using digital images, either tableau-style posed images or actual stills
3. from rehearsals or exploratory shooting. There is Software available for this type
of storyboard. The advantage of this type is that non-linear editors can re-arrange
the shots or adjust various aspects of the storyboard instantly and this gives the
Director wider choice and a problem-solving facility.
Why is a Storyboard Necessary?
When sequenced, the storyboard diagrams should act as a guide for the production and
post production stages of producing a video. Without a well defined storyboard
collection, the director's job becomes unmanageable.
The storyboard becomes a valuable tool for everyone involved with the production.
When the director, camera operator, talent, and editing team all have the same
understanding of the goals of the video, a quality production becomes obtainable.
Creating a storyboard also allows the production team to experiment with different ideas
and sequences before taping any segments. Individuals can sketch and explain their
visions of what the flow of presentation should be. During the pre-production stage,
adjustments can be made to the projections of the completed video, which will save
valuable production and post production time. The production and editing teams do not
need to guess as to what type of footage might be needed and how it might all fit
together. If the proper segments are recorded, as called for by the storyboard, the editing
process should flow smoothly.
The other advantage of having individual storyboard
cards is that it can be re-shuffled into an order that
will facilitate the production stage. Once the desired
order of the segments are identified for the final
product, the director can then rearrange the order of
the cards to plan how to record each segment while
minimizing the number of equipment and set
changes.
What are the Main Conventions?
A lot of information is communicated through a storyboard and the industry has created
its own language and conventions . This allows producers to make their own shorthand
and everyone in the industry should be familiar with the technical terms and the codes
used. The following is a brief look at the main conventions, only as they relate to Film
Storyboards. Otherwise we could be here a long time if we had to cover the entire
industry. Many of these codes and conventions are transferrable, that is they hold a
similar meaning in another part of the industry.
4. Some Film Conventions
The story which is told is broken down into narrative elements. These are the
Characters, the Setting, the Conflicts, and the Resolution of the story. Most of these
elements are detailed in the script but are referred to in the storyboard.
The Characters perform the actions required to complete the narrative. In a given setting
the story moves from a state of equilibrium to situations which involve conflict and must
be resolved. These add drama and tension to the plot. They also allow for sub-plots and
interweaving or 'twists' in the plot.
What to film and How to film it
.Any one story, if filmed in real time would be tedious and time-consuming. To condense
this and inject interest, the plot is broken down further into important events or situations.
These are called Moments and the rule which surround this idea is called the
PRINCIPLE OF MOMENTS. This is a very important storyboarding tool. Now, every
event is not as important as each other. Some are critcally important whilst others are
simply required for the narrative or as atmosphere to t a more important event. For this
reason Moments are generally categorised as Atmospheric, Narrative and Critical
Imagine a firing squad. The notation of events could be:
1. The prisoner is walked to the wall.
2. The prisoner is tied to the pole and blindfolded.
3. The Chief Executioner reads the judgement.
4. The Chief raise his arm.
5. The firing squad raise their guns
6. The Chief yells 'fire!'
7. Bullets ring out, riddle the body.
8. The body slumps.
9. The firing squad leaves.
Not all of these are critical. I would classify 5,6 and 7 as critical, whilst 3,4 and 8 are
narrative. Shots 1,2 and 9 are definitely atmospheric.
OK, now that this principle is understood we now need to design our shots using
appropriate techniques to give the correct emphasis to the plot. Two of these techniques
are
Camera Angles and Frame Composition
The industry varies slightly in the exact code headings however most will be familiar
with the following:
• Establishing or Long Shot ( LS ) -generally used to establish a scene's setting or
atmosphere. Obviously then this shot could be employed for events 1, 2 and 9 in
the example above.
• Mid -Shot. (MS) This shot usually extends (on a person) from the foot to the
head. This could be an ideal shot for event 3 (above).
5. • Close-up (CU) traditionally extends from either the waist to the head (MCU) or
the shoulder blade to the hair.(CU) A good candidate for the shot for events5 and
7 (above).
• Big Close Up (BCU) Always a very tight close-up, usually of the face or a
section of the face only. Maximum expression possible. Normally a short shot.
Ideal for event 6 (above).
• High Camera Angle (HCA) The camera is higher than eye level, looking down -
this viewpoint can diminish a subject or give a panorama.
• Low Camera Angle (LCA) The camera is lower than eye level looking up. This
can make a subject monumental, or the character feel small in a tall environment.
How do I Start?
1. Write a Synopsis of the plot (narrative) of the film.
eg "A retired marathon runner who almost made it big sees his own struggle in a young
obnoxious protege. Both suffer (suffered) a traumatic rejection and self doubt. The elder
must find a way to use this cathartic coaching experience to also bring out the champion
he could not be. A terminal illness afflicting the coach eventually breaks the younger and
the two become a champion team, at least until near the end..."
For the purpose of this exercise, we will be working on a Production Storyboard.
2. Break up the plot into Moments and Scenes, then Shots.
This can be done in written form or as a 'thumbnail' grid.
THIS IS A VERY GOOD TIME TO WRITE A COMPLETED SCRIPT OR
SCREENPLAY. It is amazing how useful the 'thumbnail visual' exercise can be in the
production of a script or screenplay.
3. Pencil in the scenes and shots.
This is best done with 'stick'
figures and shorthand Shot
descriptions.eg. MS of boy
running L to R
4. Analyse.
Look for Mise-en-Scene, Montage, or Camera Angle shots required to enhance a scene.
6. 5. Flesh out the Draft
Use drawings, Clip Art or Digital photos and add more detail to the shot description and
SFX panels.
6. Analyse.
This time, because you have clearer images, look for Continuity and Theme
Development. Changes or additions can be referenced