Enhancing Worker Digital Experience: A Hands-on Workshop for Partners
Cara Penggunaan Aplikasi Kamera Qoocam
1. Maximize your creativity
How to use qooCam
qooCam is a very powerful camera app for your smartphone. Here’s a short introduction to
help you to understand the handling of qooCam.
Let´s start with the user interface of qooCam.
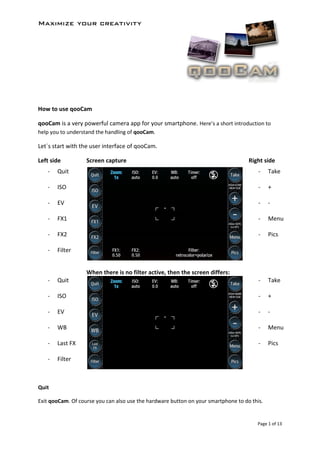
Left side Screen capture Right side
- Quit - Take
- ISO - +
- EV - -
- FX1 - Menu
- FX2 - Pics
- Filter
When there is no filter active, then the screen differs:
- Quit - Take
- ISO - +
- EV - -
- WB - Menu
- Last FX - Pics
- Filter
Quit
Exit qooCam. Of course you can also use the hardware button on your smartphone to do this.
Page 1 of 13
2. Maximize your creativity
ISO
Controls the ISO speed. Select a higher ISO by tapping on “+”. Press “-“ to decrease the ISO speed. If
you only have dimmed light, you will need a higher ISO to have an acceptable shutter speed.
Likewise, if you use a lower ISO, the shutter speed will be slower. Because of camera shake, your
photo will not be as sharp as it could be.
Be careful: A very high ISO could have a negative effect on the quality of your photo (noise).
WB
With this button you can set the white balance WB. This is necessary because artificial light in rooms
has other characteristics than natural light outdoors. Use “+” or “-“ to adjust the value.
EV
The exposure value directly influences the exposure time. If your photo looks too dark, simply extend
the exposure time. And of course, if your photo seems too bright, shorten it. Tap “+” or “-“.
FX
Each filter can be adjusted by two values.
For example, when using the frame filter, FX 1 will change the color of the frame while FX2 changes
the frame size.
Use “+” or “-“ to change the parameters.
Tapping FX will switch between zoom, FX1 and FX2.
ISO, WB, EV und FX
Instead of using the “+” or “-“ button you can also use the phone’s volume keys on the left side.
Page 2 of 13
3. Maximize your creativity
Filter
Touch this button to open the filter menu.
Left side Screen Capture Right side
- No FX - <
- Last FX - >
- Random - Cam
No FX
If you have activated several filters and you touch the button ”No FX“, then all current settings will
be reset. This button is only available, if there are active filters.
Last FX
Pushing this button will recall the last filters.
Random
Press this button and enjoy the surprise…
<
Go on the last side of the filter menu.
>
Go on the next side of the filter menu.
Page 3 of 13
4. Maximize your creativity
Cam
As soon as you have selected and set your filters, tap “Cam” to go back to the camera mode. Now
you see everything with your selected filters live.
Take
Tap the button ”Take“ to take a photo. Otherwise use the hardware button on your telephone.
On the top you can see “Zoom“, “ISO“, “EV“, „WB“, “Timer“ and the Flash symbol.
Touch those areas. You can also change the settings here, you can activate flash or delayed action
release.
Page 4 of 13
5. Maximize your creativity
Menu
Touch the button to enter the “Menu”.
+ and -
On the top you can set the resolution with “+“ and “-“. You can also use the front camera.
Save to SD-Card
“ON“ means, that all your pictures will be saved to your card. Otherwise you can find your
photos on the phone´s memory.
Sound
Activates or deactivates the sounds of the app.
Eco mode
When eco mode is set to “ON” you will get all possible resources of your telephone for
qooCam. It will react faster, but this mode needs much energy. You need to charge it soon.
Page 5 of 13
6. Maximize your creativity
Cam
Touch this button to enter the camera mode again.
Style
Load your own background into the app. Notice that only pictures with a resolution of 800 x
480 pixel will work. Another resolution will not take effect.
Text field
A comment “Hello” is written in the exif data of your photos.
Page 6 of 13
7. Maximize your creativity
A short introduction of the filters and its influence
Every filter has up to two parameters, called FX1 and FX2, which influences the filter.
Here you find a short introducion of those filters with an example photo.
Notice: The motif, colours and light will have different effects on the filters.
Gamma
FX1: Gamma
FX2: Saturation
Vignette
FX1: Width
FX2: Position
Page 7 of 13