SlideShare a Scribd company logo
1 of 536
Download to read offline
HOW TO USE THIS MANUAL
------"....
, .. _ . PH' ... _ _
...._---_.._~
.....- ...- ..---_..._._......_...-
CONTENTS
ir!; en.--......,........w:.
~ I sw.l~~ll..~wure~
~ ....TI_TOfI
"' 1= CflAHK~
~ 0IJMlI0N . VSTDI
1"-ELlcnooc: .TAATUI
~.1 ~ 55Xl5_
SYMBOLS
.....," _. ;<J ... _ _ _ _ _~~::.~.~-~!.~.~~.~.;-:.~.:.:::.:.~_::":_:...._.,,, ' '-" , ... , '.:',~ ......,_..._...,..,.'
el r ' ...._"1___1>1_ ... l
. G
-
~ .._.....,._~' .........-,._.-._,.".._,
""""""'" ...... _,-... .................:"..:,:.:.•, _ _ ~._.. , 'I.
....-."', ____-.p" __.,.. u, , •.
_ .... _1U ....' __ .... ·,', _eo.." ..... .,.
ho ',*. '"''
• 1IP4 ..... , MI" 0000 eoo-o U.OU.
~
•• ,,
...... 10:.2 •• ' u , .... .... '00._
~ _ ... , _ I ...., _ _ _ •••,.,__"eo.-, _., ..
,, '0.0_.0 ,
-_.,.....- ... .. 0000_aA,
_ _ a•• '. ",,_'-UOl
__".., ....""'-......~-
--_....._....'--_...........,."'- ---
--....00f. _ _ ................ _ _ _ ••••_ ....".
,~
1. GENERAL INFORMATION
SERVICE RULES ··..····..················......··..·..·· 1-2
MODEL IDENTIFICATION·········..················1-3
GENERAL SPECIFICATIONS ·..···················1 -5
LUBRICATION SYSTEM
SPECIFICATIONS········································1-7
FUEL SYSTEM (PGM-FI)
SPECIFICATIONS ····································..·1-7
COOLING SYSTEM SPECIFICATIONS ······1-7
CYLINDER HEADIVALVES
SPECIFICATIONS ········································ 1-8
CLUTCH/STARTER CLUTCH/GEARSHIFT
LlNKAGE SPECIFICATIONS ·······················1-8
CRANKCASE/TRANSMISSION
SPECIFICATIONS······································.. 1-9
CRANKSHAFT/PISTON/CYLINDER
SPECIFICATIONS········································ 1-9
FRONT WHEEL/SUSPENSION/STEERING
SPECIFICATIONS ·······························..·.. ··1-10
REAR WHEELISUSPENSION
SPECIFICATIONS ..................................... 1-10
HYDRAULIC BRAKE SPECIFICATIONS···1-11
BATIERY/CHARGING SYSTEM
SPECIFICATIONS ..................................... 1-11
IGNITION SYSTEM SPECIFICATIONS ····1-11
ELECTRIC STARTER
SPECIFICATIONS ..................................... 1-11
LIGHTS/METERS/SWITCHES
SPECIFICATIONS ..................................... 1-12
STANDARD TORQUE VALUES··············· 1-13
ENGINE & FRAME TORQUE VALUES ···· 1-13
LUBRICATION & SEAL POINTS ·············· 1-19
CABLE & HARNESS ROUTING ···············1-21
EMISSION CONTROL SYSTEMS ············ 1-36
1-1
GENERAL INFORMATION
SERVICE RULES
1. Use genuine Honda or Honda-recommended parts and lubricants or their equivalents. Parts that don't meet Honda's
design specifications may cause damage to the motorcycle.
2. Use the special tools designed tor thi s product to avoid damage and incorrect assembly.
3. Use only metrie tools when servicing the motorcycle. Metrie bolts, nuts and screws are not interchangeable with
English lasteners.
4. Install new gaskets, O-rings, cotter pins, and lock plates when reassembling.
5. When tightening bolts or nuts, begin with the larger diameter or inner bolt lirs!. Then tighten to the specilied torque
diagonally in incremental steps unless a particular sequence is specified.
6. Clean parts in cleaning solvent upon disassembly. Lubricate any sliding surfaces before reassembly.
7, After reassembly, check all parts tor proper installation and operation.
8. Route all electrical wires as shown in the Cable and Harness Routing (page 1-21).
ABBREVIATION
Throughout this manual, the following abbreviations are used to identify the respective parts or systems.
Abbrev. tenn Full term
CKP sensor Crankshaft Position sensor
CMP sensor Camshaft Position sensor
DLC Data Link Connector
DTC Diagnostic Trouble Code
ECM Engine Control Module
ECT sensor Engine Coolant Temperature sensor
EEPROM Electrically Erasable Programmabie Read Only Memory
EGCV Exhaust Gas Control Valve
EGCV POT Exhaust Gas Control Valve Potentiometer
EOP switch Engine Dil Pressure switch
EVAP Evaporative Emission
HDS Honda Diagnostic System
HESD Honda Electronic Steering Damper
IACV Idle Air Control Valve
lAT sensor Intake Air Temperature sensor
MAP sensor Manifold Absolute Pressure sensor
MIL Mallunction Indicator Lamp
PAIR Pulsed Secondary Air Injection
PGM-FI Programmed Fuel Injection
SCS connector Service Check Short connector
TP sensor Throttle Position sensor
VS sensor Vehicle Speed sensor
1-2
GENERAL INFORMATION
MODEL IDENTIFICATION
SERlAL NUMBERS
The Vehiele Identifieation Number (VIN) is stamped on the right side of , - - - - - - - - - - - - - - - - - ,
the steering head.
The engine serial number is stamped on the upper side of the ENGINE SERlAL NUMBER
crankcase as shown.
/
/
1-~
GENERAL INFORMATION
The throttle body identification number is stamped on the right side of
the throttle body as shown.
LABELS
The Safety Certification Label is located on lelt side of the frame. SAFETY CERTIFICATION LABEL
The color label is attached as shown. When ordering color-coded parts, COLOR LABEL
always specify the designated color code.
The Emission Control Information Label is located on the rear fender B EMISSION CONTROL INFORMATION LABEL
as shown.
1-4
GENERAL INFORMATION
GENERAL SPECIFICATIONS
ITEM SPECIFICATIONS
DIMENSIONS Overall length 2,010 mm (79.1 in)
Overall width 685 mm (27.0 in)
Overall height 1,105 mm (43.5 in)
Wheelbase 1,370 mm (53.9 in)
Seat height 820 mm (32.3 in)
Footpeg height 389 mm (15.3 in)
Ground clearance 135 mm (5.3 in)
Curb weight Except California type 186 kg (410 Ibs)
California type 187 kg (412 Ibs)
Maximum weight Except Canada type 166 kg (366 Ibs)
capacity Canada type 170 kg (375 Ibs)
FRAME Frame type ~iamond
Front suspension Telescopic fork
Front axle travel 110 mm (4.3 in)
Rear suspension Swingarm
Rear axle travel 129mm(5.1 in)
Front tire size 120nOZR17 M/C (58W)
Rear tire size 180/55ZR17 M/C (73W)
Front tire brand Bridgestone BT015F RADIAL E
Dunlop Qualifier PTG
Rear tire brand Bridgestone BT015R RADIAL E
Dunlop Qualifier PTG
Front brake Hydraulic double disc
Rear brake Hydraulic single disc
Caster angle 23" 55'
Trail length 98 mm (3.9 in)
Fuel tank capacity 18.0 liter (4.76 US gal, 3.96 Imp gal)
ENGINE Cylinder arrangement 4 cylinders in-line, inclined 38Q
trom ver-
tical
Bore and stroke 67.0 x 42.5 mm (2.64 x 1.67 in)
Displacement 599 cm' (36.5 cu-in)
Compression ratio 12.2 : 1
Valve train Chain driven, DOHC
Intake valve opens at 1 mm (0.04 in) lift 21 " BTDC
closes at 1 mm (0.04 in) lift 44" ABDC
Exhaust opens at 1 mm (0.04 in) lift 40" BBDC
valve closes at 1 mm (0.04 in) lift 5" ATDC
Lubrication system Forced pressure and wet sump
Oil pump type Trochoid
Cooling system Liquid cooled
Air filtration Paper element
Engine dry weight 57 kg (126 Ibs)
Firing order 1-2-4-3
FUEL DELIVERY Type PGM-FI
SYSTEM Throttle bore 40 mm (1.6 in)
DRIVE TRAIN Clutch system Multi-plate, wet
Clutch operation system Cable operating
Transmission Constant mesh, 6-speeds
Primary reduction 2.111 (76/36)
Final reduction 2.625 (42116)
Gear ratio lst 2.750 (33/12 )
2nd 2.000 (32116)
3rd 1.667 (30/18)
4th 1.444(26/18)
5th 1.304(30/23)
6th 1.208 (29/24)
Gearshift pattern Left foot operated return system,
1 -N-2-3- 4-5-6
1-5
GENERAL INFORMATION
ITEM SPECIFICATIONS
ELECTRICAL Ignition svstem Computer-controlled digita1 transistor-
ized with electric advance
Starting svstem Electric starter motor
Charging svstem Triple phase output altemator
Regulatorlrectifier FET shortedltriple phase, lull wave recti-
fication
Lighting svstem Battery
1-6
GENERAL INFORMATION
LUBRICATION SYSTEM SPECIFICATIONS
Unit· mm (in)
ITEM STANDARD SERVICE LIMIT
Engine oil capacity After draining 2.7 liter (2.9 US qt, 2.4 Imp qt) -
After oil filter change 2.8 liter (3.0 US qt, 2.5 Imp qt) -
After disassembly 3.5 liter (3.7 US qt, 3.1 Imp qt) -
Recommended engine ail Pro Honda GN4 4-stroke oil (U.SA and
Canada) or equivalent motor ail
API service classification: SG or Higher -
JASO T 903 standard: MA
Viscosity: SAE 1OW-30
Oil pressure at EOP switch 505 kPa (5.1 kgf/cm', 73 psi)
at 6,000 rpm/(80°C/176°F)
-
Oil pump Tip clearance 0.15 (0.006) 0.20 (0.008)
Body clearance 0.15 - 0.21 (0.006 0.008) 0.35 (0.014)
Side clearance 0.04 0.09 (0.002 0.004) 0.17 (0.007)
FUEL SYSTEM (PGM-FI) SPECIFICATIONS
ITEM SPECIFICATIONS
Throttle body identifica- ) Except Californ ia type GQ64C
tian number I California type GQ64B
Idle speed 1,400 + 100 rpm
Throttle grip freeplay 2 4 mm (1/16 3/16 in)
lAT sensor resistance (at 20°C/68°F) 1-4kl1
ECT sensor resistance (at 20°C/68°F) 2.3 - 2.6 kn
Fuet injector resistance ) Primary injector 11 13n
(at 20°C /68°F) I Secondary injector 11 13n
PAIR control solenaid valve resistance (at 20°C/68°F) 23 - 27 n
CMP sensor peak voltage (at 20°C/68°F) 0.7 V minimum
CKP sensor peak voltage (at 20°C/68°F) 0.7 V minimum
Fuel pressure at idle 343 kPa (3.5 kgf/cm' , 50 psi)
Fuel pump flow (at 12V) 167 cm' (5.6 US oz, 5.9 Imp oz) minimum/10 seconds
COOLING SYSTEM SPECIFICATIONS
ITEM SPECIFICATIONS
Coolant capacity I Radiator and engine 3.15 liter (3.33 US qt, 2.77 Imp qt)
I Reserve tank 0.30 liter (0.32 US qt, 0.26 Imp qt)
Radiator cap relief pressure 108 - 137 kPa (1.1 - 1.4 kgf/cm', 16 - 20 psi)
Thermostat Begin to open 80 - 84°C (176 -183°F)
Fullyopen 95°C (203°F)
Valve lift 8 mm (0.3 in) minimum
Recommended antifreeze Pro Honda HP Caolant or an equivalent high quality ethyl-
ene glycol antifreeze containing sllicate free corrosion
inhibitors
Standard coolant concentratien 1:1 (mixture with distilled water)
1-7
GENERAL INFORMATION
CYLINDER HEAD/VALVES SPECIFICATIONS
Unit· mm (in)
ITEM STANDARD SERVICE LIMIT
Cylinder compression 1,226 kPa (12.5 kgf/cm', 178psi)
-at 350 rpm
Valve clearance IN 0.20 ±0.03(0.008 + 0.001) -
EX 0.28 ±0.03 (0.011 ± 0.001)
Camshaft Cam lobe height IN 36.36 - 36.60 (1.431 - 1.441) 36.34(1.431 )
EX 35.34- 35.58(1.391 -1.401) 35.32 (1.391)
Runout - 0.05(0.002)
Oil clearance 0.020 0.062 (0.0008 0.0024) 0.10 (0.004)
Valve lifter Valve lifter O.D. IN 25.978 - 25.993(1.0228 - 1.0233) 25.97 (1.022)
EX 22.478 - 22.493 (0.8850 - 0.8855) 22.47 (0.885)
Valve lifter bore I.D. IN 26.010 26.026(1.0240 1.0246) 26.04(1.025)
EX 22.510 - 22.526(0.8862 - 0.8868) 22.54 (0.887)
Valve, valve Valve stem O.D. IN 3.975 - 3.990 (0.1565 - 0.1571) 3.965(0.1561 )
guide EX 3.965 - 3.980 (0. 1561 0.1 567) 3.955 (0.1557)
Valve guide I.D. IN/EX 4.000 4.012(0.1575 0.1580) 4.04(0.159)
Stem·to-guide clearance IN 0.010 - 0.037(0.0004 - 0.0015) 0.075(0.0030)
EX 0.020 - 0.047 (0.0008 0.0019) 0.085 (0.0033)
Valve guide projection IN 17.1 17.4(0.67 0.69)
above cylinder head EX 15.8 - 16.1 (0.62 - 0.63) -
Valve seat width IN/EX 0.90 - 1.10 (0.035 - 0.043) 1.5 (0.06)
Valve spring IN Inner 36.17 (1.424) 35.1 (1.38)
tree length Outer 40.38(1.590) 39.2(1.54)
EX 40.80 (1.606) 39.6(1.56)
Cylinder head warpage 0.10 (0.004)
CLUTCH/STARTER CLUTCH/GEARSHIFT LlNKAGE SPECIFICATIONS
Unit" mm (in)
ITEM STANDARD SERVICE LIMIT
Clutch lever treeplay 10 - 20 (3/8 13/16)
Clutch Spring tree length 46.7(1.84) 45.8 (1.80)
Disc thickness 2.92 - 3.08(0.115 - 0.121) 2.6 (0.10)
Plate warpage - 0.30 (0.012)
Clutch outer guide I.D. 24.993 25.003(0.9840 0.9844) 25.013(0.9848)
O.D. 34.996 - 35.004(1.3778 -1.378 1) 34.986(1.3774)
Primary driven gear I.D. 41.000 - 41.016(1.6142 - 1.6148) 41.026(1.6152)
Oil pump drive sprocket I I.D. 25.000 25.021 (0.9843 0.9851 ) 25.031 (0.9855)
guide O.D. 34.950 - 34.975(1.3760 - 1.3770) 34.940 (1.3756)
Oil pump drive sprocket I.D. 35.025 - 35.145(1.3789 -1.3837) 35.155 (1.3841 )
Mainshaft O.D. at clutch outer guide 24.980 - 24.990 (0.9835 0.9839) 24.960 (0.9827)
Mainshaft O.D. at oil pump drive sprocket guide 24.980 - 24.990 (0.9835 - 0.9839) 24.960 (0.9827)
Starter driven gear boss O.D. 45.657 - 45.673(1.7975 -1.7981) 45.642 (1.7969)
1-8
GENERAL INFORMATION
CRANKCASE/TRANSMISSION SPECIFICATIONS
Unit· mm (in)
ITEM STANDARD SERVICE LIMIT
Shift lork I I.O. 12.000 12.018 (0.4724 0.4731 ) 12.03 (0.474)
Claw thickness 5.93 - 6.00 (0.233 - 0.236) 5.9 (0.23)
Shift lork shaft O.O. 11.957 - 11.968 (0.4707 - 0.4712) 11.95 (0.470)
Transmission Gear I.O. M5,M6 28.000 - 28.021 (1.1024 1.1032) 28.04 (1.104)
Cl 24.000 24.021 (0.9449 0.9457) 24.04 (0.946)
C2, C3,C4 31.000 - 31.025 (1.2205 -1.2215) 31.04 (1.222)
Gear busing O.O. M5, M6 27.959 - 27.980 (1.1007 - 1.1016) 27.94 (1.100)
C2 30.955 - 30.980 (1.2187 1.2197) 30.94 (1.218)
C3,C4 30.950 - 30.975 (1.2 185 -1.2195) 30.93 (1.218)
Gear-to-bushing M5, M6 0.020 - 0.062 (0.0008 - 0.0024) 0.10 (0.004)
clearance C2 0.020 - 0.070 (0.0008 0.0028) 0.10 (0.004)
C3,C4 0.025 0.075 (0.0010 0.0030) 0.11 (0.004)
Gear bushing I.O. M5 24.985 - 25.006 (0.9837 - 0.9845) 25.016 (0.9849)
C2 27.985 - 28.006 (1.1018 -1.1026) 28.021 (1.1032)
Mainshaft O.O. at M5 24.967 24.980 (0.9830 - 0.9835) 24.96 (0.983)
Countershaft O.O. at C2 27.967 - 27.980 (1.1011 -1.1016) 27.96 (1. 101 )
Sushing to shaft M5 0.005 - 0.039 (0.0002 - 0.0015) 0.06 (0.002)
clearance C2 0.005 0.039 (0.0002 0.0015) 0.06 (0.002)
CRANKSHAFT/PISTON/CYLINDER SPECIFICATIONS
Unit· mm (in)
ITEM STANDARD SERVICE LIMIT
Crankshaft Connecting rad side clearance 0.15 0.30 (0.006 0.012) 0.35 (0.014)
Crankpin bearing all clearance 0.028 0.052 (0.0011 0.0020) 0.06 (0.002)
Main journal bearing Dil clearance 0.020 - 0.038 (0.0008 - 0.0015) 0.05 (0.002)
Runout 0.05 (0.002)
Piston, piston Piston O.O. at 6 mm (0.2 in) lrom
66.965 - 66.985 (2.6364 - 2.6372) 66.90 (2.634)
rings bottom
Piston pin bare I.O. 15.030 - 15.044 (0.5917 - 0.5923) 15.07 (0.593)
Piston pin O.O. 14.994 - 15.000 (0.5903 0.5906) 14.98 (0.590)
Piston-ta-piston pin clearance 0.03 0.05 (0.001 0.002) 0.09 (0.004)
Piston ring end Top 0.10 - 0.20 (0.004 - 0.008) 0.4 (0.02)
gap Second 0.21 - 0.31 (0.008 - 0.012) 0.5 (0.02 )
Oil
0.2 - 0.7 (0.01 - 0.03) 1.0 (0.04)
(side rail)
Piston ring-ta-ring Top 0.030 - 0.060 (0.0012 - 0.0024) 0.10 (0.004)
groove clearance Second 0.115 - 0.150 (0.0045 - 0.0059) 0.08 (0.003 )
Cylinder I.O. 67.000 67.015 (2.6378 2.6384) 67.10 (2.642)
Out ol round - 0.10 (0.004)
Taper - 0.10 (0.004)
Warpage - 0.10 (0.004)
Cylinder-ta-piston clearance 0.015 - 0.050 (0.0006 - 0.0020) 0.10 (0.004)
Connecting rad small e nd I.O. 15.030 - 15.044 (0.591 7 - 0.5923 ) 15.05 (0.593 )
Connecting rad-ta-piston pin clea rance 0.03 0.05 (0.001 0.002) 0.07 (0.003)
1-9
GENERAL INFORMATION
FRONT WHEEL/SUSPENSION/STEERING SPECIFICATIONS
Unit· mm (in)
ITEM STANDARD SERVICE LIMIT
Minimum tire tread depth - 1.5 (0.06)
Cold tire pres- ) Driver only 250 kPa (2.50 kgf/cm' , 36 psi) -
sure Driver and passenger 250 kPa (2.50 kgf/cm' , 36 psi) -
Axle runout 0.2 (0.01)
Wheel rim Radial - 2.0 (0.08)
runout ) Axial - 2.0 (0.08)
Wheel balance weight 60 g (2. lal )
- max.
Fork Spring free length 243.4 (9.58) 238.5 (9.39)
Pipe runout - 0.20 (0.008)
Recommended fork fluid Pro Honda Suspension Fluid SS-47
-(1OW)
Fluid level 93 (3.7) -
Fluid capacity 413 ± 2.5 cm' (14.0 ± 0.08 US Ol, 14.5 ±
-0.09 Imp Ol)
Pre-laad adjuster initial setting 5 turns from minimum
Rebound damping adjuster initial
2-1/2 turns out from full hard -setting
Compressien damping adjuster ini-
2 turns out from full hard -tial setting
Steering head bearing pre-laad 14.7 - 17.7 N (1.5 -1.8 kgf) -
REAR WHEEL/ SUSPENSION SPECIFICATIONS
Unit· mm (in)
ITEM STANDARD SERVICE LIMIT
Minimum tire tread depth - 2.0 (0.08)
Cold tire pres- I Driver only 290 kPa (2.90 kgf/cm', 42 psi)
sure Driver and passenger 290 kPa (2.90 kgf/cm' , 42 psi) -
Axle runout - 0.2 (0.01)
Wheel rim I Radial 2.0 (0.08)
runout ) Axial 2.0 (0.08)
Wheel balance weight 60 g (2.1 Ol)
-
max.
Drive chain Sile/link I OIO DID525HV KAI-11 2YB
I RK RK525ROZ6-112LJFZ
Slack 30 - 40 (1.2 - 1.6) -
Shock Spring pre-laad adjuster standard
Position 2 -absorber positien
Rebound damping adjuster initial
2-1/2 turns out from full hard -setting
Compression damping adjuster ini-
22 clicks out from full hard -
tial setting
1-10
GENERAL INFORMATION
HYDRAULIC BRAKE SPECIFICATIONS
Unit· mm (in)
ITEM STANDARD SERVICE LIMIT
Front Specified brake fluid DOT 4 -
Brake disc th ickness 4.3 4.5 (0.17 0.18) 3.5 (0.14)
Brake disc runout - 0.30 (0.012)
Master cylinder I.O. 17.460 - 17.503 (0.6874 - 0.6891) 17.515 (0.6896)
Master piston O.O. 17.321 17.367 (0.6819 0.6837) 17.309 (0.6815)
Caliper cylinder I.O. A 32.080 - 32.130 (1.2630 -1.2650) 32.140 (1.2654)
B 30.280 - 30.330 (1.1921 - 1.19411 30.340 (1. 1945)
Caliper piston O.O. A 31.967 - 32.000 (1.2585 1.2598) 31.957 (1.2581)
B 30.167 30.200 (1.1877 1.1890) 30.157 (1.1873)
Rear Specified brake fluid 00T4 -
Brake disc thickness 4.8 - 5.2 (0.19 - 0.20) 4.0 (0.16)
8rake disc runout 0.30 (0.012)
Master cylinder I.O. 14.000 14.043 (0.5512 0.5529) 14.055 (0.5533)
Master piston O.O. 13.957 - 13.984 (0.5495 - 0.5506) 13.945 (0.5490)
Caliper cylinder I.O. 30.230 30.280 (1.1902 1.1921) 30.290 (1.1925)
Caliper piston O.O. 30.082 30.115 (1.1843 1.1856) 30.140 (1.1866)
BATTERYICHARGING SYSTEM SPECIFICATIONS
ITEM SPECIFICATIONS
Battery Capacity 12V 8.6 Ah
Current leakage 2.0 mA max.
Voltage (20' C/68' F) Fully
13.0 - 13.2 V
charged
Needs
Below 12.4 V
charging
Charging current Normal 0.9 Al5 - 10 h
Ouick 4.5 All h
Alternator Capacity 0.342 kW/5.000 rpm
Charging caiI resistance (20' C/68' F) 0. 1 -1.0f!
IGNITION SYSTEM SPECIFICATIONS
ITEM SPECIFICATIONS
Spark plug (Iridium) I NGK IMR9C-9HES
I OENSO VUH270
Spark plug gap 0.80 0.90 mm (0.031 0.035 in)
CKP sensor peak voltage 0.7 V minimum
Ignition timing ("F"mark) 7.8' BTOC at idle
ELECTRIC STARTER SPECIFICATIONS
Unit: mm (in)
ITEM STANDARD SERVICE LIMIT
Starter motor brush length 12.0 (0.47) 6.5 (0.26)
1-11
GENERAL INFORMATION
LlGHTS/METERS/SWITCHES SPECIFICATIONS
ITEM SPECIFICATIONS
Bulbs Headlight I Hi 12V-55W
I Lo 12 V 55W
Position light LED
Brake/tail/license light LED
Front turn signallposition light 12 V - 23/8 W x 2
Rear turn signal light 12 V 21 Wx 2
Instrument light LED
Turn signal indicator LED
High beam indicator LED
Neutral indicator LED
MIL LED
HESD indicator LED
Engine oil pressure indicator LED
Engine coolant temperature indicator LED
Fuse Main fuse 30 A
Sub fuse 10 A x 4, 20 A x 3
Tachometer peak voltage 10.5 V minimum
EeT sensor resistance I 80°C (176°F) 2.1 - 2.6 kn
I 120' C (248°F) 0.6 0.7 kn
1-12
GENERAL INFORMATION
STANDARD TORQUE VALUES
FASTENER TVPE
TORQUE
FASTENER TVPE
N·m (kgf·m, IbHt)
5 mm bolt and nut 5.2 (0.5, 3.8) 5 mm screw
6 mm bolt and nut 10 (1.0, 7) 6 mm screw
8 mm bolt and nut 22 (2.2, 16) 6 mm flange bolt (8 mm head, large flange)
10 mm bolt and nut 34 (3.5, 25) 8 mm flange bolt and nut
12 mm bolt and nut 54 (5.5, 40) 10 mm flange bolt and nut
ENGINE & FRAME TORQUE VALUES
• Torque specifications listed below are for important fasteners.
• Others should be tightened to standard torque values listed above.
ENGINE
MAINTENANCE
Spark plug
Timing hole cap
Oil filter eartridge
Oil drain bolt
Oil filter boss
ITEM
LUBRICATION SYSTEM
ITEM
Oil pump assembly bolt
Oil pump driven spreeket bolt
Oil cooler bolt
Oil pipe A mounting bolt
FUEL SYSTEM (PGM-FI)
ITEM
ECT sensor
Primary fuel rail mounting bolt
Seeondary fuel rail mounting bolt
IACV setting plate torx serew
Knock sensor mounting bolt
COOLING SYSTEM
ITEM
Water pump assembly bolt
Thermostat housing cover bolt
ENGINE REMOVALIINSTALLATION
ITEM
Drive sproeket bolt
Q'TV
4
1
1
1
1
Q'TV
1
1
1
2
Q'TV
1
4
4
2
1
Q'TV
4
2
Q'TV
1
THREAD
DIA. (mm)
10
45
20
12
20
THREAD
DIA. (mm)
6
6
20
6
THREAD
DIA. (mm)
12
5
5
4
8
THREAD
DIA. (mm)
6
6
THREAD
DIA. (mm)
10
TORQUE
N·m (kgf·m, Ibf·ft)
16 (1.6, 12)
18 (1.8, 13)
26 (2.7,19)
30(3.1,22)
-
TORQUE
N·m (kgf·m, Ibf·ft)
12 (1.2, 9)
15 (1.5,11)
59 (6.0, 44)
12 (1.2, 9)
TORQUE
N·m (kgf·m, Ibf·ft)
23 (2.3, 17)
5.1 (0.5,3.8)
5.3 (0.5, 3.9)
2.1 (0.2, 1.5)
22 (2.2, 16)
TORQUE
N·m (kgf·m, Ibf·ft)
12 (1.2, 9)
12 (1.2, 9)
TORQUE
N·m (kgf·m, Ibf·ft)
54 (5.5, 40)
TORQUE
N·m (kgf·m, IbHt)
4.2 (0.4, 3.1 )
9.0 (1.0, 6.6)
12 (1.2, 9)
27 (2.8, 20)
39 (4.0, 29)
REMARKS
App[y,grease to the
threads
Apply oil to the
thrads and O,ring
See page 4-18
Apply loeking agent
to the crankcase
side threads
REMARKS
CT bolt
Apply loeking agent
to the threads
Apply oil to the
threads
Apply loeking agent
to the threads
REMARKS
REMARKS
CT bolt
CT bolt
REMARKS
1-13
GENERAL INFORMATION
CYLINDER HEADIVALVES
ITEM Q'TV
THREAD TORQUE
REMARKS
DIA, (mm) N'm (kgl·m, Ibl·ft)
Cylinder head bolt 10 9 47 (4.8, 35) Apply oil to the
threads and seating
surface
Camshaft holder bolt 20 6 12 (1.2, 9) Apply oil to the
threads and seating
surface
Cylinder head cover bolt 4 6 10 (1.0, 7)
PAIR check valve cover bolt 4 6 12 (1.2, 9) Apply locking agent
to the threads
Cam sprocket bolt 4 7 20 (2.0, 15) Apply locking agent
to the threads
CMP sensor rotor bolt 2 6 12 (1.2, 9) Apply locking agent
to the th reads
Cam chain tensioner A pivot bolt 1 6 12 (1.2, 9) Apply locking agent
to the threads
Cam chain tensioner B pivot bolt 1 10 20 (2.0, 15) Apply locking agent
to the threads
Cam chain guide A bolt 1 6 12 (1.2, 9)
Insulator mounting bolt 6 6 12(1.2, 9)
CLUTCH/ STARTER CLUTCH/ GEARSHIFT LlNKAGE
ITEM Q'TV
THREAD TORQUE
REMARKS
DIA. (mm ) N·m (kgl·m, Ibl·ft)
Clutch center lock nut 1 22 128 (13.1, 94) Apply oil to the
threads and seating
surface, stake
Clutch spring bolt 5 6 12 (1.2, 9)
Shift drum center bolt 1 8 23 (2.3, 17) Apply locking agent
to the threads
Shift drum stopper arm pivot bolt 1 6 12 (1.2, 9) Apply locking agent
to the threads
Gearshift spindie stopper pin 1 8 22 (2.2, 16)
Starter clutch mounting bolt 1 ~o 83 (8.5, 61) Apply oil to the
threads and seating
surface
ALTERNATOR
ITEM Q'TV
THREAD TORQUE
REMARKS
DIA. (mm ) N·m (kgl ·m, Ibl ·ft)
Stator mounting bolt 4 6 12 (1.2, 9)
Flywheel bolt 1 10 103 (10.5, 76) Apply oil to the
threads and seating
surface
Stator wire clamp bolt 1 6 12(1.2,9) CT bolt
CRANKCASE/TRANSMISSION
ITEM Q'TV
THREAD TORQUE
REMARKS
DIA. (mm) N·m (kgl·m, Ibl·ft)
Mainshaft bearing set plate bolt 3 6 12 (1.2, 9) Apply locking agent
to the threads
Shift drum bearing set bolt 2 6 12 (1.2,9) Apply locki ng agent
to the threads
Crankcase 6 mm bolt 10 6 12(1.2, 9)
8 mm bolt 6 8 24 (2.4, 18)
8 mm bolt (main journal bolt) 10 8 15 (1.5, 11 ) + 120" See page 12-1 7
Replace with a new
one
10 mm bolt 1 10 39 (4.0, 29)
1-14
GENERAL INFORMATION
CRANKSHAFT/ PISTON/ CYLINDER
ITEM Q'TV
THREAD TORQUE
REMARKS
DIA. (mm) N·m (kgf·m, Ibf·ft)
Crankpin bearing cap bolt (new) 8 7 20 (2.0, 15) + 90' Apply oil to the
threads and seating
surface
Crankpin bearing cap bolt (retightening) 8 7 1411.4, 10) + 90' Apply oil to the
threads and seating
surface
Oil iet pipe mounting bolt 2 6 12 (1.2, 9) Apply locking agent
to the threads
ELECTRIC STARTER
ITEM Q'TV
THREAD TORQUE
REMARKS
DIA. (mm) N·m Ikgf·m, Ibf·ft)
Starter motor terminal nut 1 6 1011.0, 7)
LlGHTS/METERS/SWITCHES
ITEM Q'TV
THREAD TORQUE
REMARKS
DIA. (mm) N·m (kgf·m, Ibf·ft)
EOP switch 1 PT 1/8 12 (1.2, 9) Apply sealant to the
threads
EOP switch wire terminal bolt 1 4 2.010.2, 1.5)
Neutral switch 1 10 1211.2,9)
1-15
GENERAL INFORMATION
FRAME
FRAME/ BODY PANELS/ EXHAUST SYSTEM
ITEM Q'TV
THREAD TORQUE
REMARKS
DIA. (mm) N·m (kgl·m, Ibf.ft)
Lower cowlMto-middle cowl screw 4 5 1.5 (0.2, 1.1)
Windscreen mounting screw 6 5 0.45 (0.05, 0.3)
Seat rail mounting nut 2 10 54 (5.5, 40)
Seat rail mounting bolt 2 10 44 (4.5, 32)
Seat rail assembly bolt 2 8 30 (3.1 , 22)
Muffler band bolt 1 8 17 (1.7, 13)
Exhau.st pipe joint nut 8 7 12( 1.2, 9)
Front fender mounting screw 6 6 12( 1.2,9)
Rearview mirror mounting bolt 4 6 7.0 (0.7,5.2)
Exhaust pipe mounting bolt 1 8 17 (1.7, 13)
Main step bracket mounting bolt 4 8 37 (3.8, 27)
Passenger step bracket mounting bolt 4 8 26 (2.7, 19)
Exhaust pipe stud 8 8 - See page 3-26
Position light mounting screw 2 5 1.8 (0.2, 1.3)
Rear lender bracket mounting bolt 4 6 12 (1.2, 9)
Air duet mounting bolt 4 6 12(1.2, 9) ALOC bolt; replace
with a new one
MAINTENANCE
ITEM Q'TY
THREAD TORQUE
REMARKS
DIA. (mm) N·m (kgl·m, Ibl·ft)
Air cleaner element mounting screw 3 5 4.2 (0.4, 3.1)
FUEL SYSTEM (PGM-FI)
ITEM Q'TV
THREAD TORQUE
REMARKS
DIA. (mm) N·m (kgl·m, Ibl·ft)
Fuel pump mounting nut 6 6 12( 1.2, 9)
EGCV pulley nut 1 6 5.0 (0.5, 3.7)
Bank angle sensor mounting screw 2 4 1.5 (0.2, 1.1 )
Fuel tank mounting bolt 2 8 30(3.1 , 22)
Air funnei/lower housing mounting screw 6 5 4.2 (0.4, 3.1)
lAT sensor mounting screw 2 5 1.1 (0.1, 0.8)
MAP sensor mounting screw 1 5 1.1 (0.1, 0.8)
ECM setting plate screw 2 4 0.7 (0.07, 0.5)
COOLING SYSTEM
ITEM Q'TV
THREAD TORQUE
REMARKS
DIA. (mm) N·m (kgl·m, Ibl·ft)
Fan motor nut 3 5 4.9 (0.5, 3.6)
Fan motor shroud mounting bolt 3 6 8.4 (0.9, 6.2)
ENGINE REMOVALlINSTALLATION
ITEM Q'TV
THREAD TORQUE
REMARKS
DIA. (mm) N·m (kgl·m, Ibl·ft)
Front engine hanger bolt 2 12 54 (5.5, 40)
Upper engine hanger adjusting bolt 1 20 10 (1.0, 7)
Upper engine hanger loek nut 1 20 54 (5.5, 40)
Upper engine hanger nut 1 12 59 (6.0, 44)
Lower engine hanger adjusting bolt 1 20 10 (1.0, 7)
Lower engine hanger loek nut 1 20 54 (5.5, 40)
Lower angine hanger nut 1 12 59 (6.0, 44)
1-16
GENERAL INFORMATION
FRONT WHEELISUSPENSION/STEERING
ITEM a'TV
THREAD TORaUE
REMARKS
DIA. (mm) N·m (kgf·m, IbHt)
Handlebar weight mounting screw 2 6 9.8 (1.0, 7) ALOC screw; replace
with a new one
Front brake disc bolt 12 6 20 (2.0, 15) ALOC screw; rep lace
with a new one
Front axle bolt 1 14 59 (6.0, 44)
Front axle holder bolt 4 8 22 (2.2, 16)
Fork socket bolt 2 10 34 (3.5, 25)
Fork damper rod loek nut 2 10 20 (2.0, 15)
Fork bolt 2 44 34 (3.5, 25)
Handlebar pinch bolt 2 8 27 (2.8, 20)
Top bridge pinch bolt 2 8 22 (2.2, 16)
Bottom bridge pinch bolt 2 8 27 (2.8, 20)
Steering stem adjusting nut 1 26 - See page 14-41
Steering stem adjusting loek nut 1 26 - See page 14-41
Steering stem nut 1 24 103 (10.5, 76)
Compression adjuster plug bolt 2 14 17 (1.7, 13)
Steering damper mounting bolt 4 6 10 (1.0, 7)
Second arm nut 2 6 12 (1.2, 9) U-nut
REAR WHEEL/SUSPENSION
ITEM a 'TV
THREAD TORaUE
REMARKS
DIA. (mm) N·m (kgf·m, Ibf·ft)
Rear brake disc bolt 4 8 42 (4.3, 31) ALOC bolt; replace
with a new one
Oriven sprocket nut 6 10 64 (6.5, 47) U-nut
Rear axle nut 1 22 113 (11.5, 83) U-nut
Rear shock absorber mounting nut 2 10 44 (4.5, 32) U-nut
Shock arm-to-swingarm nut 1 10 44 (4.5, 32) U-nut
Dri ve chain case bolt 3 6 12 (1.2, 9)
Drive chain slider bolt 3 6 9.0 (0.9, 6.6) ALOC bolt; replace
with a new one
Swingarm pivot adjusting bolt 1 30 12 (1.2, 9) Apply oil to the
threads
Swingarm pivot loek nut 1 30 64 (6.5, 47)
Swingarm pivot nut 1 18 93 (9.5, 69)
Shock link nut 2 10 44 (4.5, 32) U-nut
1-17
GENERAL INFORMATION
HYDRAULIC BRAKE
ITEM Q'TV
THREAD TORQUE
REMARKS
DIA. (mm) N·m (kgl·m, IbHt)
Front master cylinder reserve tank stopper
plate screw 1 4 1.2 (0.1 , 0.9)
Front brake lever pivot bolt 1 6 la (0. 1, 0.7) ApplV silicone
grease to the slid-
ing surface
Front brake lever pivot nut 1 6 6.0 (0.6, 4.4)
Front brake light switch screw 1 4 l2 (0.1, 0.9)
Front master cvlinder holder bolt 2 6 12 (l2, 9)
Front brake caliper assemblv torx bolt 8 8 22 (2.2, 16) ApplV locking agent
to the threads
Front brake caliper mounting bolt 4 10 45 (4.6, 33) ALOC bolt; replace
with a new one
Front brake reserve tank stav bolt 1 6 12 Il2,9)
Rear master cylinder push rad loek nut 1 8 18 11.8, 13)
Rear master cylinder reserve tank cap screw 2 4 l5 (0.2, 1.1)
Rear master cylinder mounting bolt 2 6 10 (la, 7)
Rear brake reserve tank mounting bolt 1 6 12 Il2,9)
Rear brake hose joint screw 1 4 l5 (0.2, 1.1) ApplV locking agent
to the threads
Front brake caliper pad pin 2 10 15 Il5, 11)
Rear brake caliper pad pin 1 10 18 (l8, 13)
Brake hose oil bolt 5 10 3413.5,25)
Front brake hose clamp bolt 1 6 9.0 10.9, 6.6)
Front brake hose clamp nut 1 6 10 IlO, 7)
Front brake hose 3-waV joint bolt 1 6 10 (1.0, 7)
Front brake caliper bleed valve 2 8 8.0 10.8, 5.9)
Rear brake caliper bleed valve 1 8 6.0 10.6, 4.4)
LlGHTS/METERS/SWITCHES
ITEM Q'TV
THREAD TORQUE
REMARKS
DIA. (mm) N·m (kgl·m, Ibl·ft)
Combination meter screw 9 5 la 10.1, 0.7)
Ignition switch mounting bolt 2 8 24 (2.4, 18) Replace with a new
one
Headlight mounting screw 2 5 l8 10.2, l3)
Sidestand switch mounting bolt 1 6 10 IlO, 7) ALOC bolt; replace
with a new one
Right handlebar switch housing screw 2 4 0.9 (0.09, 0.7)
Mirror stay mounting bolt 6 6 12 11.2, 9) ALOC bolt; replace
with a new one
OTHERS
ITEM Q'TV
THREAD TORQUE
REMARKS
DIA. (mm) N·m (kgl·m, Ibl·ft)
Sidestand pivot bolt 1 10 10 (1.0, 7)
Sidestand pivot nut 1 10 29 (3.0, 21)
1-18
LUBRICATION & SEAL POINTS
ENGINE
MATERlAL LOCATION
Liquid sealant (Three Crankcase mating surface
Bond 1207B or equiva- Dil pan mating surface
lent) Right crankcase cover mating surface
Alternator cover mating surface
EOP switch threads
Alternator cover wire grommet
Right crankcase cover wire grommet
Cylinder head semi-circular cut-out
Molybdenum disulfide Main journal bearing sliding surface
oil (a mixture of 1/2 Piston pin sliding surface
engine oil and 1/2 Crankpin bearing sliding surface
molybdenum disulfide Connecting rad small end inner surface
grease) Crankshaft thrust surface
Camshaft lobes and journals
Valve stem (valve guide sliding surface)
Valve lifter sliding surface
Dil pump drive sproeket guide sliding surface
Water pump shaft and thrust washer sliding surface
Cluteh outer sliding surface
Cluteh outer guide sliding surface
M3/4, C5, C6 shifter gear (shift fork grooves)
Starter reduction gear sliding surface
Starter idle gear shaft sliding surface
Cylinder head bolt threads and seating surface
Engine oil Piston and piston ring sliding surface
Cluteh dise surface
Starter one-way clutch sliding surface
Crankpin bearing cap bolt threads and seating surface
Flywheel bolt threads and seating surface
CJutch center loek nut threads and seating surface
Dil filter eartridge threads and O-ring
GENERAL INFORMATION
REMARKS
See page 12-16
See page 5-7
See page 10-26
See page 11-6
See page 9-34
Dil cooler bolt threads and sealing washer seating surface
Camshaft holder bolt threads and seating surface
Each gear teeth and ratating surface
Eaeh bearing
Eaeh O-ring
Eaeh sea I ring
Other ratating area and sliding surface
Starter cluteh mounting bolt threads and seating surface
Multi-purpose grease Timing hole cap threads
Eaeh oil seal lips
Loeking agent CMP sensor rotor bolt threads
Dil pump driven sproeket bolt threads Coating w idth: 6.5 ± 1 mm
Shift drum bearing set plate bolt threads Coating w idth: 6.5 ± 1 mm
Mainshaft bearing set plate bolt threads Coating width: 6.5 ± 1 mm
Cam sproeket bolt threads Coating width: 6.5 ± 1 rnm
Shift drum center bolt threads Coating width: 6.5 ± 1 mm
Cam ehain tensioner A pivot bolt threads Coating w idth: 6.5 ± 1 mm
Cam ehain tensioner B pivot bolt threads Coating width: 6.5 ± 1 mm
Shift drum stopper arm pivot bolt threads Coating width: 6.5 ± 1 mm
Dil pump drive ehain guide mounting bolt threads Coating w idth: 6.5 ± 1 mm
Shift spindie setting plate bolt threads Coating width: 6.5 ± 1 mm
Dil jet pipe mounting bolt threads Coating width: 6.5 ± 1 mm
Dil level plate bolt threads Coating w idth: 6.5 ± 1 mm
Dil pipe AlB mounting bolt threads Coating width: 6.5 ± 1 mm
PAIR check valve cover bolt threads
Dil filter boss threads (crankcase side) Coating width: 6.5 + 1 mm
1-19
GENERAL INFORMATION
FRAME
MATERlAL LOCATION REMARKS
Multi-purpose grease Passenger seat catch hook sliding area
Front wheel dust seal lips
Rear wheel dust seal lips
Throttle pipe sliding surface
Clutch lever pivot bolt sliding surface
Rear brake pedal pivot sliding surface
Gearshift pedaI link tie rod bali joints
Gearshift pedal pivot sliding surface
Sidestand pivot sliding surface
Axle surface
Swingarm pivot bolt surface
Urea based multi-pur- Steering head bearing sliding surface 3 5g
pose grease with Steering head dust seal lips 3-5g
extreme pressu re Steering stem adjusting nut threads 0.' - 0.3 g
(example: EXCELITE
EP2 manufactured by
KYODO YUSHI, Japan)
or equivalent
Multi-purpose grease Swingarm pivot bearings
(Shell Alvania EP2 or Swingarm pivot dust seallips
equivalent) Shock link needie bearings
Shock link dust seal lips
Shock absorber needie bearing
Shock absorber dust seal lips
Cable lubricant Throttle cable inside
Clutch cable inside
EGCV control cable inside
Honda bond A or Pro Handlebar grip rubber inner surface
Honda hand grip
cement (U.S.A. only)
Engine oil Swingarm pivot adjusting bolt threads
Each a -ring
Silicone grease Front brake push rod-tc-master piston contact surface
Front brake push red tip
Front brake lever pivot bolt sliding surface 0.' g
Rear brake master piston-ta-push rod contacting area 0.' g
Rear brake caliper pin sliding surface 0.4 g
Rear brake caliper pad pin a -ring
DOT 4 brake fluid 8rake master piston and cups
8rake caliper piston and piston saais
Fork fluid Fork a-ring
Fork dust seal and oil seal lips
Locking agent Front brake caliper assembly torx bolt threads
Cooling fan nut threads
'-20
GENERAL INFORMATION
CABLE & HARNESS ROUTING
COMBINATION METER 20P (Blaek) CONNECTOR
POSITION
LlGHTWIRE
BANK ANGLE SENSOR
3P (Blaek) CONNECTOR
HEADLIGHT 2P
(Natural) CONNECTOR
e e
LEFTTURN SIGNAL WIRE
BANKANGLE
SENSOR WIRE
HEADLIGHT 2P
(Natural) CONNECTOR
1-21
GENERAllNFORMATION
1-22
THROTILE CABLES
FRONT BRAKE LIGHT
SWITCH WIRE
FRONT BRAKE HOSE
CLUTCH CABLE
LEFT HANDLEBAR SWITCH WIRE
CLUTCH CABLE
HORNWIRE
SWITCH WIRE
HEADLIGHT/BANKANGLE
SENSOR WIRE
THROTILE CABLES
GENERAL INFORMATION
CLUTCH CABLE
LEFT HANDLE BAR
SWITCH WIRE
HEADLIGHT/BANKANGLE
SENSOR WIRE
FRONT BRAKE HOSE
'-23
GENERAL INFORMATION
'-24
MAINWIRE
HARNESS
THROTILE CABLES
CLUTCH CABLE
FRONT BRAKE HOSE
BANK ANGLE SENSOR
3P (Black) CONNECTOR .--""",__-
HEADLIGHT 2P (Natural)
CONNECTOR
IGNITION SWITCH 2P
(Brown) CONNECTOR
RIGHT SWITCH
8P (Gray) CONNECTOR
GENERAL INFORMATION
CLUTCH CABLE
LEFTHANDLEBAR SWITCH
12P (Gray) CONNECTOR
POSITION LIGHT 2P
(Black) CONNECTOR
HEADLIGHT 2P
(Natural) CONNECTOR
1-25
GENERAL INFORMATION
lAT SENSOR 2P (Gray) CONNECTOR ECM
ECM 33P (Gray) CONNECTOR
ECM 33P (Blaek) CONNECTOR
FUEL HOSE
Ij (
REGULATOR/RECTIFIER MAIN WIRE HARNESS
lAT SENSOR 2P (Gray) CONNECTOR
~0
IGNITION SWITCH WIRE
~~~~rtr RIGHT HANDLEBAR
-;; SWITCH W IRE
FUEL HOSE COVER MAIN WIRE HARNESS
1-26
HORNWIRE
FAN MOTER 2P (Blaek)
CONNECTOR
GENERAL INFORMATION
ALTERNATOR 3P (Natural)
CONNECTOR
CMP SENSOR WIRE
SIPHON HOSE
SIDESTAND SWITCH 2P
(Green) CONNECTOR
REGULATOR/RECTIFIER
2P (Natural) CONNECTOR
CLUTCH CABLE
'-27
GENERAL INFORMATION
FUEL TANK DRAIN HOSE
FUEL HOSE
FUEL TANK BREATHER HOSE
ICalilornia type: to EVAP eanister)
ALTERNATOR WIRE
SIDESTAND SWITCH WIRE
KNOCK SENSOR
3P IBlaek) CONNECTOR
~--,
LOWER COWL
'-28
FUEL PUMP 2P IBrow n) CONNECTOR
FUEL LEVEL SENSOR
2P IBlaek) CONNECTOR
GROUND CABLE
STARTER MOTOR CABLE
NEUTRAL SWITCH WIRE
FUEL TANK DRAIN HOSE
FUEL TANK BREATHER HOSE
IACV 4P (Blaek)
CONNECTOR
GROUND CABLE
PAINTMARK
KNOCK SENSOR
GENERAL INFORMATION
MAP SENSOR 3P
(Blaek) CONNECTOR
CKP SENSOR 2P
(Blaek) CONNECTOR
Max
22.5°
PAINTMARKS
'-29
GENERAL INFORMATION
HESD 2P IBrown) CONNECTOR
IGNITION SUB HARNESS
6P IBlaek) CONNECTOR
TP SENSOR 3P IBlaek)
CONNECTOR
IACV 4P IBlaek) CONNECTOR
TP SENSOR 3P
IBlaek) CONNECTOR
No. 1 PRIMARY INJECTOR
2P IGray) CONNECTOR
1-30
KNOCK SENSOR 3P
IBlaek) CONNECTOR
PAIR CONTROL SOLENOID
VALVE 2P IBlaek) CONNECTOR
PAIR CONTROL SOLENOID VALVE
THROTILE CABLES
IGNITION SUB HARNESS
DIRECT IGNITION COIL
2P IWhi!e) CONNECTOR
No. 2 PRIMARY INJECTOR
2P IGray) CONNECTOR
No. 4 PRIMARY INJECTOR
2P IGray) CONNECTOR
No. 3 PRI INJECTOR
2P IGray) CONNECTOR
FUSE/RELAY BOX
STARTER RELAY SWITCH
REAR BRAKE LIGHT SWITCH
2P (Blaek) CONNECTOR
REAR BRAKE LIGHT SWITCH WIRE
GENERAL INFORMATION
EGCV 6P (Natura l) CONNECTOR
DLC
TURN SIGNAL RELAY
EGCV CONTROL CABLES
1-31
GENERAL INFORMATION
'-32
REAR BRAKE HOSE ~-4~~ r-_-'"
REAR BRAKE LIGHT SWITCH
J'"
'
EGCV CONTROL CABLES
REAR BRAKE LIGHT
SWITCH WIRE
(
RIGHTTURN
SIGNAL LIGHT WIRE BRAKEfTAIULlCENSE
LlGHTWIRE
LEFTTURN SIGNAL
LIGHT WIRE
RIGHTTURN SIGNAL
LIGHT WIRE
GENERAL INFORMATION
LEFT TURN SIGNAL LIGHT WIRE
BRAKEfTAIULlCENSE -r~L-;;;;;;~~~~;:::-­
LlGHTWIRE
1-33
GENERAL INFORMATION
CALIFORNIA TYPE:
NOTE: Face the paint marks upward.
EVAP PURGE CONTROL SOLENOID VALVE
FUEL TANK BREATHER HOSE
(ta fuel tank)
PAINTMARK
CLAMP
'-34
EVAP CANISTER
EVAP CANISTER DRAIN HOSE
CANISTER-TO-PURGE CONTROL
SOLENOID VALVE HOSE
PAINTMARK
(
CALIFORNIA TYPE:
FUEL TANK BREATHER HOSE
Ito EVAP canister)
EVAPPURGECONTROL
SOLENOID VALVE
EVAP CANISTER DRAIN HOSE
GENERAL INFORMATION
VACUUM HOSES
5-WAY JOINT
EVAP PURGE CONTROL SOLENOID VALVE
2P IBlaek) CONN ECTOR
EVAP CANISTER
1-35
GENERAL INFORMATION
EMISSION CONTROL SYSTEMS
EXHAUST EMISSION REQUIREMENT
The U.S. Environmental Protection Agency (EPA), Calilornia Air Resources Board (CARB) and Transport Canada require
manufacturers to certify that their motorcycles comply with applicable exhaust emissions standards during their useful
life, when operated and maintained according to the instructions provided.
NOISE EMISSION REQUIREMENT
The EPA also requires that motorcycles built after January 1, 1983 comply with applicable noise emission standards lor
one year or 3,730 miles (6,000 km) after the time of sale to the ultimate purchaser, when operated and maintained
according to the instructions provided.
WARRANTY COMPLIANCE
Compliance with the terms of the Distributor's Limited Warranty for Honda Motorcycle Emission Control Systems is
necessary in order to keep the emissions system warranty in effect.
SOURCE OF EMISSIONS
The combustion process produces carbon monoxide (COl. oxides ol nitrogen (NOx) and hydrocarbons (HC). Control ol
carbon monoxide, oxides of nitrogen and hydrocarbons is very important because, under certain conditions, they react to
form photochemical smog when subject to sunlight. Carbon monoxide does not react in the same way, but it is toxic.
Honda Motor Co., Ltd. utilizes various systems to reduce carbon monoxide and hydrocarbons.
CRANKCASE EMISSION CONTROL SYSTEM
The engine is equipped with a closed crankcase system to prevent discharging crankcase emissions into the atmosphere.
Blow-by gas is returned to the combustion chamber through the air cleaner housing and throttle body.
AIR CLEANER HOUSING
<== FRESH AIR
• BLOW-BY GAS
'-36
(
GENERAL INFORMATION
EXHAUST EMISSION CONTROL SYSTEM
The exhaust emission contral system is composed of a pulse secondary air supply system, an oxidation catalytic converter
and PGM-FI system.
SECONDARY AIR SUPPLY SYSTEM
The pulse secondary air supply system introduces filtered air into the exhaust gases in the exhaust port. Fresh air is drawn
into the exhaust port by the function of the PAIR control valve.
This charge of fresh air promotes burning of the unburned exhaust gases and changes a considerable amount of
hydrocarbons and carbon monoxide into relatively harmiess carbon dioxide and water vapor.
The reed valve prevents reverse air flow through the system. The PAIR control valve is operated by the solenoid valve. The
solenaid valve is controlled by the PGM-FI unit, and the fresh air passage is opened/closed according to running conditions
(ECT/IATfTP/MAP sensor and engine revolution).
No adjustments to the secondary air supply system should be made, although periodic inspection of the components is
recommended.
AIR CLEANER HOUSING
BODY
PAIR CONTROL VALVE
PAIR CHECK VALVE
PORT
<== FRESH AIR
• EXHAUST GAS
OXIDATION CATALYTIC CONVERTER
This motorcycle is equipped with an oxidation catalytic converter.
The oxidation cataJytic converter is in the exhaust system. Through chemical reactions, it converts He and CO in the
engine's exhaust to carbon dioxide (CO,) and water vapor.
'-37
GENERAL INFORMATION
EVAPORATIVE EMISSION CONTROL SYSTEM (CALIFORNIA TYPE)
This model complies with California Air Resources Board (CARB) evaporative emission requirement. Fuel vapor trom the
fuel tank is routed into the evaporative emission (EVAP) canister where it is absorbed and stored while the engine is
stopped. When the engine is running and the evaporative emission (EVAP) purge contral solenaid valve is open, tuel vapor
in the EVAP canister is drawn into the engine through the throttle body.
THROTILE BODY
EVAPPURGECONTROL
SOLENOIO VALVE
NOISE EMISSION CONTROL SYSTEM
EVAP CANISTER
~FRESHAIR
• FUEL VAPOR
TAMPERING WITH THE NOISE CONTROL SYSTEM IS PROHIBITED: U.S. Federallaw prohibits, or Canadian provincial law
may prohibit the following acts or the causing there of: (1) The remaval or rendering inoperative by any person, other than
for purposes of maintenance, repair or replacement, of any device or element of design incorporated into any vehicle for
the purpose of noise contral prior to its sale or delivery to the ultimate customer or while it is in use; (2) the use of the
vehicle after such device or element of design has been removed or rendered inoperative by any person.
AMONG THOSE ACTS PRESUMED TO CONSTITUTE TAMPERING ARE THE ACTS L1STED BELOW:
1. Removal of, or puncturing of the muffler, baffles, header pipes or any other component which conducts exhaust gases.
2. Remaval of, or puncturing of anv part of the intake svstem.
3. Lack of proper maintenance.
4. Replacing anv moving parts of the vehicle, or parts of the exhaust or intake svstem, with parts other than those
specified bV the manufacturer.
1-38
2. TECHNICAL FEATURES
111
IACV·····························································2-2 KNOCK SENSOR ........................................ 2-4
2-1
TECHNICAL FEATURES
IACV
SUMMARY
This motorcycle adopts an electronic Idle Air Control system for the inline-four engine, this system is composed the IACV
and distribution hoses on the throttle body. The IACV consists of a step motor and a slide valve to control the amount of air
bypassed around the closed throttle valve. With the i9nition switch on, the amount of inlet air is determined trom informa·
tion detected by the ECT sensor. During engine start up or while maintaining idle (throttle valve closed). the amount of
1nlet air is corrected by various sensors' information.
This system eJiminates the need for manual idle speed adjustment and air screw adjustment for throttle body synchroniza-
tion.
DISTRIBUTION HOSES
IACV ------dLc
- -......~ Idle air flow
2-2
TECHNICAL FEATURES
OPERATION
The ECM contrals the IACV during engine idling, also the ECM stops controlling the IACV operation and closes the valve
when the ECM detects the following conditions:
• Throttle valve open
• Neutral switch OFF (in gear) and clutch switch OFF (release clutch lever)
During engine idling, from ignition switch ON to warming up, the ECM controls the IACV step motor as follows:
With the ignition switch ON
When the ignition switch is turned ON, the IACV activates initial func-
tion, idle - open - idle position. There wil! be a step motor operating
sound.
Engine start - warming up
This optimizes the bypass opening with the throttie valve closed, and
the correct amount of inlet air passes through, allowing proper engine
start up.
After the engine has started, the ECM controls the IACV slide valve
position and adjusts the amount of inlet air in response to the engine
coolant temperature.
After warming up - idling
When the ECM denotes the engine warming up by the engine coolant
temperature, it operates the step motor to move the slide valve to the
closed position. This results in a reduced amount of bypassed air com-
pared to the amount during engina warm-up, which allows proper
engina idle to be maintained,
STEP MOTOR
STEP MOTOR
VALVE
;1
c:>c:>~VALVE
2-3
TECHNICAL FEATURES
KNOCK SENSOR
SUMMARY
Under certain conditions the mixture in the perimeter of the combustion chamber can self-ignite due to the expansion of
the combusting gas ignited by the spark plug. At this point there are !wo flame-lronts colliding within the combustion
chamber.
As aresui!, the pressure and temperature În the cylinder increase at a time different trom normal-combustion conditions,
causing damage to the piston and/or the combustion chamber. Such a phenomenon is calied knocking.
Deteriorated or low-octane gasoline may cause the knocking more frequently, resulting in engine damage.
To detect knocking, the knock sensor is attached in the rear ol NO.3 cylinder block. Monitoring signals Irom the knock sen-
sor, the ECM detects knocking, and prevents engine damage by regulating ignition timing.
In this model, a non-resonating type knock sensor is employed. With the voltage signaIs tree of resanant characteristics
and the convergence period short, the responsiveness is superb, the knocking signals do not overlap in the high rpm zone,
allowing detection ol knocking.
The non-resonating type knock sensor consists of the base, which is mounted on the cylinder bloek, the weight, and the
piezoelectric element.
The vibrations lrom the cylinder block are directly transmitted to the base. The weight applies the pressure occurring Irom
its inertia force to the piezoelectric element. The pressure is converted to voltage by the piezoelectric element, and trans-
mitted to the ECM. The ECM modilies the voltage signaI wavelorm, separates knocking signals lrom engine naise signais,
and detects knocking.
WEIGHT
PIEZO ~rT",r ELEMENT
FROM CYLINDER
(1) Convecting motion ol the engine to the weight
(2) Pressure Irom the weight
(3) Converted voltage signaI by the piezo electric element
When the ECM determines that the voltage signaI is higher than the prescribed level (knock occurring), it retards the igni-
tion timing. When the ECM determines that the voltage signal is lower than the prescribed level (no knocking) during the
retarded ignition timing period, it gradually advances the ignition timing back to normal.
The ECM has self-diagnostic functions for the knock sensor circuit. It can detect a sensor output line short, failure of the
integrated circuit (IC) within the ECM, and a connector coming aft.
2-4
TECHNICAL FEATURES
IGNITION COILS
I ~ Adjusted ignition timing signal
I
-+- ECM
_. (7)
KNOCK
SENSOR KNOCK IC
ENGINE Cl
(8)
(2)
FILTER
- ,--- (9)
(1 ) (3)
ECM monitors engine condition
through PGM-FI sensors (ECT .MAP .TP sensor etc..,)
(1) Regulate the input voltage signal wave
(2) Noise signal piek up circuit
(3) Knock signal piek up circuit
(4) Detect the knock
(5) Calculate proper ignition timing
(6) Detect the fail safe
(7) Input voltage line (for open circuit detection)
(8) Open circuit detection line
(9) Output voltage line
I--
CPU
Y (4)
(5)
Y (6)
..
2-5
MEMO
(
3. FRAME/BODY PANELS/EXHAUST SYSTEM
..
BODY PANEL LOCATIONS ..···..........·....···· 3-2 REARVIEW MIRROR ·..·····························3-10
SERVICE INFORMATION ···························3-3 WINDSCREEN ·..·······································3-10
TROUBLESHOOTING ................................. 3-3 UPPER COWL/FRONT SPOILER ............. 3-11
SEAT····························································3-4 AIR DUCT ·················..···············..··············3-12
PASSENGER SEAT·....·......···············..·····..· 3-4 FRONT FENDER ....................................... 3-13
REAR COWL ..···..·······..················..············.. 3-5 REAR FENDER A·····....········..·······..·········· 3-13
LOWER COWL ···········..······..········..·············3-6 REAR FENDER B·······..·..········..·······..········ 3-14
UPPER INNER COWL/HEADLIGHT REAR FENDER C........·..·..·............·....·...... 3-16
COVER·..·....·....·......··..·........·....·................·· 3-7
SEAT RAIL ................................................ 3-16
MIDDLE COWL......·..·....·......................·...... 3-8
MUFFLER ....·..·......·..........................·....·..·3-19
FUEL TANK COVERISIDE COVER........·.... 3-9
EXHAUST PIPE ......................................... 3-24
3-1
FRAME/BODY PANELS/EXHAUST SYSTEM
BODY PANEL LOCATIONS
REARVIEW MIRROR
WINDSCREEN
UPPER COWL
HEADLIGHT COVER
FRONT FENDER
,
,--::::==~
,
UPPER INNER COWL
3-2

MIDDLE COWL
FUEL TANK COVER
LOWER COWL
PASSENGER SEAT
REAR FENDER B
REAR FENDER C
SIDE COVER
FRAME/BODY PANELS/EXHAUST SYSTEM
SERVICE INFORMATION
GENERAL
• This section covers remaval and installation of the body panels, exhaust system and seat rail.
• Serious burns may result if the exhaust system is not allowed to cool betore components are removed or servieed.
• Always replace the exhaust pipe gaskets with new ones after removing the exhaust pipe trom the engine.
• When installing the exhaust system, loosely install all of the exhaust pipe fasteners. Always tighten the exhaust clamps
tirst, then tighten the mounting fasteners.
• Always inspeet the exhaust system for [eaks after installation.
TORQUE VALUES
Lower cowl-to-middle cowl screw
Rearview mirror mounting bolt
Windscreen mounting screw
Front brake hose damp nut
Front brake hose 3-way joint bolt
Front fender mounting screw
Seat rail mounting nut
Seat rail mounting bolt
Seat rail assembly bolt
Exhaust pipe joint nut
Exhaust pipe mounting bolt
Main step bracket mounting bolt
Passenger step bracket mounting bolt
Rear master cylinder mounting bolt
Position light mounting screw
Rear fender bracket mounting bolt
MuIlIer band bolt
Air duet mounting bolt
TROUBLESHOOTING
Excessive exhaust noise
• Braken exhaust system
• Exhaust gas leak
Poor performance
• Deformed exhaust system
• Exhaust gas leak
• Clogged muIlIer
1.5 N·m 10.2 kgf·m, 1.1 Ibf.ft)
7.0 N'm 10.7 kgl·m, 5.2 Ibl·ft)
0.45 N'm 10.05 kgl·m, 0.3 Ibf·ft)
10 N'm 11.0 kgf·m, 7 Ibl·ft)
10 N·m 11.0 kgf·m, 7 Ibf·ft)
12 N·m 11.2 kgf·m, 9Ibf.ft)
54 N'm 15.5 kgl·m, 40 Ibf·ft)
44 N·m 14.5 kgf·m, 32 Ibf.ft)
30 N·m 13.1 kgf·m, 22 Ibf·ft)
12 N·m 11.2 kgf.m, 9 Ibf.ft)
17 N·m (1.7 kgf.m, 13 Ibl·ft)
37 N·m (3.8 kgf.m, 27 Ibl·ft)
26 N·m (2.7 kgf.m, 19 Ibl·ft)
12 N'm (1.2 kgf·m, 9Ibf·ft)
1.8 N'm (0.2 kgf·m, 1.3 Ibl·ft)
12 N·m (1.2 kgf.m, 9 Ibf·ft)
17 N·m (1.7 kgf.m, 13 Ibf·ft)
12 N·m (1.2 kgf·m, 9Ibf·ft) ALOC bolt; replace with a new one
3-3
FRAME/BODY PANELS/EXHAUST SYSTEM
SEAT
REMOVAL/INSTALLATION
Remove the screws, washers and seat rearward.
Install the seat by inserting the prang and aligning
its holes with the seat rail bosses.
Tighten the screws securely.
PASSENGER SEAT
REMOVAL/INSTALLATlON
3-4
Unhook the passenger seat loek using the ignition
key,
Remove the passenger seat by pulling it forward,
Install the passenger seat in the reverse order of
removal and push down it to loek.
SCREWS/WASHERS
IGNITION KEY PASSENGER SEAT
~
FRAME/BODY PANELS/EXHAUST SYSTEM
REAR COWL
REMOVALIINSTALLATION
Remave the lollowing:
- Seat (page 3-4)
- Passenger seat (page 3-4)
Remove the screws, special screws and rear cowl
upward.
Installation is in the reverse order of remaval.
SCREWS
1
3-5
FRAME/BODY PANELS/EXHAUST SYSTEM
LOWERCOWL
REMOVALlINSTALLATION
Remove the lower cowl-to-middle cowl screws.
Release the hoses from the lower cowl.
Be careful not to Aemove the lower cowl screw, collar and special
damage the tabs screws then remove the lower cowl downward.
and graoves.
Ca{ifornia type: Remove the lower cowl screw, col lar, special screws
and clamp then remove the lower cowl downward.
Installation is in the reverse order of removal.
• Align the middle cowl tabs with the lower cowl
grooves.
TORQUE:
Lower cowl-to-middle cowl screw:
1.5 N·m (0.2 kgf·m, 1.1Ibf.ft)
Route the hoses properly:
- Except California type (page 1-21)
- California type (page '-34)
COLLAR
SPECIAL SCREW
SCREW
RIGHT LOWER COWL
Align
3-6
NUT
UPPER INNER COWL/HEADLIGHT
COVER
REMOVALlINSTALLATION
Remave the middle cowl (page 3-8).
Remove the trim clips and upper inner cow!.
Remave the screw and headlight cover.
Route the wires Installation is in the reverse order of remaval.
properfy
(page 1-21!.
FRAME/BODY PANELS/EXHAUST SYSTEM
SCREW
TRIM CLIPS
HEA DLIGHT COVER UPPER INNER COWL
3-7
FRAME/BODY PANELS/EXHAUST SYSTEM
MIDDLE COWL
REMOVALlINSTALLATION
Be careful nor ra
damage the tabs.
Route the wires
properly
(page 1-21).
Be careful not ta
pinch the wires.
Remove the screws, trim clips and middle cowl.
Disconneet the turn signallight 3P connector.
Installation is in the reverse order of removal.
TORQUE:
Lower cowl-to-middle cowl screw:
1.5 N·m (0.2 kgf·m, 1.1Ibf.ft)
3P CONNECTOR
DISASSEMBLY/ ASSEMBLY
/
MIDDLE COVER B
MIDDLE COWL B
3-8
",/
MIDDLE COWL
SCREWS
MIDDLE COWL A
FRONT TURN SIGNAL LIGHT
INNER COWL
FRAME/BODY PANELS/EXHAUST SYSTEM
FUEL TANK COVER/SIDE COVER
REMOVALlINSTALLATION
Remove the following:
- Seat (page 3-4)
- Middle cowls (page 3-8)
- Upper inner cowls (page 3-7)
Remove the screws, grommets, trim clips, collars
and fuel tank cover/side cover assembly.
Be careful not to Installation is in the reverse order of removal.
pinch rhe wires.
DISASSEMBLY/ ASSEMBLY
FUEL TANK COVER
SCREWS
/
LEFT SIDE COVER
FUEL TAN K COVER!
SIOE COVER ASSEMBLY
TRIM CLIPS
COLLARS
RIGHT SIDE COVER
3-9
FRAME/BODY PANELS/EXHAUST SYSTEM
REARVIEW MIRROR
REMOVALlINSTALLATION
Remove the balts and rearview mirror.
Install the rearview mirror and tighten the bolts to
the specified torque.
TOROUE: 10 N·m (0.7 kgf·m, 5.2IbHt)
WINDSCREEN
REMOVALIINSTALLATION
3-10
Remove the rearview mirror (page 3-10).
Remove the screws, plastic washers, rubber wash-
ers, windscreen and nuts.
Installation is in the reverse order of removal.
TOROUE:
Windscreen mounting screw:
0.45 N·m (0.05 kgf·m, 0.3 IbHt)
BOLTS REARVIEW MIRROR
PLASTIC WASHER
SCREW j
RUBBER~~
WASH~~.. ~ "i~
,.,.. §
,:. .:::,:
WINDSCREEN
FRAME/BODY PANELS/EXHAUST SYSTEM
UPPER COWL/FRONT SPOILER
REMOVALlINSTALLATION
Remove the lollowing:
- Middle cowls (page 3-8)
- Headlight covers (page 3-7)
- Upper inner cowls (page 3-7)
- Windscreen (page 3-10)
Disconneet the position light 2P (Black) connector.
Remove the main wire harness 20P (Gray) connec-
tor trom the front spoiler.
Remove the screws and upper cowl/front spoiler ~=====~~~~~~~~==.
assembly.
Installation is in the reverse order of removal.
UPPER COWUFRONT
SPOILER ASSEMBLY
3-11
FRAME/BODY PANELS/EXHAUST SYSTEM
DISASSEMBLY/ASSEMBLY
Remove the screws and position light trom the
upper eow!.
Be careful not ra Remove the front spoiler trom the upper cowl.
damage the labs. Assembly is in the reverse order of disassembly.
AIR DUeT
3-12
TOROUE:
Position light mounting screw:
1.8 N·m (0.2 kgf·m, 1.3 IbHt)
REMOVAL/INSTALLATION
Remove the combination meter (page 20-8).
Remave the duet attachment and grill trom the air
duet.
Straighten the loek washer tabs.
Remove the balts, loek washers and air duet.
Install the air duet and new loek washers then
tighten new balts to the specified torque.
TOROUE: 12 N·m (1.2 kgf·m, 9 IbHt)
Bend the loek washer tabs up against the air duet
mounting balts securely.
Install the grill and duet attaehment seeurely.
Install the combination meter (page 20-10).
UPPER COWL
SCREWS f!1...,==~='l~
FRONT SPOILER
~
S BàLT
~
LOCK WASHER S
DUCT AITACHMENT
FRAME/BODY PANELS/EXHAUST SYSTEM
FRONT FENDER
REMOVALIINSTALLATION
Remave the front brake hose 3-way joint bolt and
hose clamp nut.
Remove the screws, grommets, collars, reflectors
and front fender from the fork legs.
NOTE:
o Pull the front fender up and then pull it forward
between the fork legs.
o Be careful not to damage the fork legs.
Installation is in the reverse order of removal.
TORQUE:
Front fender mounting screw:
12 N·m (1.2 kgf·m, 9 Ibf·ft)
Front brake hose clamp nut:
10 N·m (1.0 kgf·m, 7 Ibf·ft)
Front brake hose 3-way joint bolt:
10 N·m (1.0 kgf·m, 7 Ibf·ft)
REAR FENDER A
REMOVALlINSTAlLATION
Remave the rear cowl (page 3-5).
Disconneet the brakeltail and turn signal light con-
nectors.
Remave the balts, reflectors and rear fender A
assembly rearward.
InstaJlation is in the reverse order of removal.
NUT
FRONT FENDER
REFLECTOR
SCREWS/GROMMETS
REAR FENDER A ASSEMBLY
FRAME/BODY PANELS/EXHAUST SYSTEM
DISASSEMBLY/ ASSEMBLY
BRAKEfTAIULlCENSE LIGHT
HEAT GUARD
FENDER STAY
REAR FENDER B
REMOVAL
3-14
Remove the following:
- Rear cowl (page 3-5)
- Battery (page 17-6)
- Fuel tank (page 6-50)
- EGCV servomotor (page 6-80)
- Starter relay switch (page 19-14)
Remave the balts, passenger seat hooks and pas-
senger seat bracket.
Remove the heat guard mounting screw.
REAR FENDER A
REAR TURN SIGNAL LIGHT
SCREW
FRAME/BODY PANELS/EXHAUST SYSTEM
Release the rear brake light switch 2P (Black) con-
nector trom the rear fender 8.
Release the wire harnesses trom the rear fender 8.
Remave the trim clips, screw and rear fender B.
INSTALLATION
Route the wires Installation is in the reverse order of remaval.
properly
(page 1-21).
PASSENGER SEAT BRACKET
/SCREW
REAR FENDER B
3-15
FRAME/BODY PANELS/EXHAUST SYSTEM
REAR FENDER C
REMOVAL/INSTALLATlON
Remave Ihe special screws, rear fender C and brake ' S-P-E-C-IA- L-S-C-RE- W- S-------------,
hose guide trom the swingarm.
Inslall Ihe brake hase guide by aligning ils lab la Ihe ~
swingarm hole.
Inslall Ihe rear fender C and lighlen Ihe special
screws securely,
SEAT RAIL
REMOVAL
3-16
Remave Ihe fallawing:
- Fuel lank (page 6-50)
- Muftier (page 3-19)
- Rear fender A (page 3-13)
- Rear fender B (page 3-14)
Remave Ihe balls and left passenger slep bracket.
Remave Ihe baiIs, nuls and seal rail.
REAR FENDER C BRAKE HOSE GUlDE
LEFT PASSENGER STEP BRACKET
DISASSEMBLY
Remave the balts.
Remave the balts and rear fender bracket.
Separate the seat rail.
Remove the dowel pin from the seat rail.
FRAME/BODY PANELS/EXHAUST SYSTEM
BOLTS
REAR FENDER BRACKET BOLTS
DOWELPIN
3-17
FRAME/BODY PANELS/EXHAUST SYSTEM
ASSEMBLY
30 N'm (3.1 kgf.m, 22 IbHt)
REAR FENDER BRACKET
54 N·m (5.5 kgf·m, 40 IbHt)
3-18
12 N·m (1.2 kgf·m, 9 Ibf·ft)
Install the dowel pin onto the seat rail and assembie
the seat rail.
Tighten the seat rail assembly balts to the specified
torque.
TORQUE: 30 N·m (3.1 kgf·m, 22 Ibf·ft)
Install the rear fender bracket and balts temporarily.
lEFT PASSENGER
STEP BRACKET
44 N·m (4.5 kgf·m, 32 Ibf.ft)
BOlTS
DOWEl PIN
REAR FENDER BRACKET BOlTS
MUFFLER
FRAME/BODY PANELS/EXHAUST SYSTEM
INSTALLATION
Install the seat rail, balts and nuts.
Tighten the balts and nuts to the specified torque.
TORQUE:
Seat rail mounting bolt:
44 N·m (4.5 kgf·m, 32 Ibf·ft)
Seat rail mounting nut:
54 N·m (5.5 kgf·m, 40 Ibf·ft)
Tighten th e rear fender bracket mounting balts to
the specified torque.
TORQUE: 12 N·m (1.2 kgf·m, 9Ibf·ft)
Install the left passenger step bracket and tighten
the balts to the specified torque.
TORQUE: 26 N·m (2.7 kgf.m, 19 Ibf·ft)
Install th e following:
- Rear fender B (page 3-15)
- Rear fender A (page 3-13)
Muftier (page 3-22)
- Fuel tank (page 6-50)
REMOVAL
Remove the following:
- Rear fender A (page 3-13)
- Right passenger step bracket (page 16-19)
Unhook th e rear brake light switch spring from th e
brake pedal.
Remove the rea r brake light switch.
-
~ I
LEFT PASSENGER STEP BRACKET
SPRING BRAKE PEDAL
3-1 9
FRAME/BODY PANELS/EXHAUST SYSTEM
Keep the rear
reserve tank upright
to prevent air from
entering the
hydraufic system.
3-20
Remove the bolt and rear brake reserve tank.
Remove the heat guard mounting screw and
washer.
SCREW
RESERVE
Remove the bolts and right main step/heat guard TANK
assembly as shown.
Remave the screws, muffler rear cover, rubber
washers and collars.
Remove the screW5 and muffler rear cap.
BOlTS
REAR COVER
RIGHT MAIN STEP/HEAT
GUARD ASSEMBlY
FRAME/BODY PANELS/EXHAUST SYSTEM
leesen the muftier band belt.
Remeve the beits and muftier.
BOlTS
MUFFlER
Remove the screw, bolt and heat guard.
3-21
FRAME/BODY PANELS/EXHAUST SYSTEM
INSTALLATION
HEAT GUARD
REAR COVER
MUFFLER REAR CAP
26 N·m (2.7 kgl·m, 19Ibl·ft)
37 N·m (3.8 kgl·m, 27 Ibl·ft)
Install the heat guard and tighten the screw and bolt
securely.
MUFFLER
Install a new gasket onto the exhaust pipe and ~~;:;
install the muffler anto the exhaust pipe.
3-22
FRAME/BODY PANELS/EXHAUST SYSTEM
Install the muftier and bolts.
Tighten the bolts securely.
Tighten the muftier band bolt to the specified
torque.
TORQUE: 17 N·m (1.7 kgf·m, 13Ibf.ft)
Install the muftier rear cap and tighten the screws
securely.
Install the rubber washers and collars onto the muf-
fier rear cover.
Install the muffler rear cover and tighten the screws
securely.
BOLTS
REAR COVER
3-23
FRAME/BODY PANELS/EXHAUST SYSTEM
Route the wires
properly
(page 1-211.
Install the right main step/heat guard assembly as
shown and tighten the main step mounting balts to
the specified torque.
TOROUE: 37 N·m (3.8 kgf·m, 27 Ibf.ft)
Install the heat guard mounting screw and washer,
then tighten it securely.
Install the rear brake reserve tank and tighten the
bolt to the specified torque.
TOROUE: 12 N·m (1.2 kgf·m, 9 Ibf·tt)
Install the rear brake light switch.
Hook the rear brake light switch spring to the brake
pedal.
Install the following:
- Right passenger step bracket (page ' 6-24)
- Rear fende r A (page 3-'3)
EXHAUST PIPE
REMOVAL
Remove the following:
- l ower cowl (page 3-6)
- Middle cowls (page 3-8)
_ Right main step/heat guard assembly (page 3-19)
Lift and support the fuel tank (page 4-5).
Remove the nut, bolt and washer.
Move the radiator forward.
3-24
BOlTS
SPRING
SCREW/WASHER
RIGHTMAIN STEP/HEAT
GUARD ASSEMBlY
BRAKE PEDAl
FRAME/BODY PANELS/EXHAUST SYSTEM
Loosen the muffler band bolt.
Remove the exhaust pipe joint nuts.
Remove the nuts, bolts and EGCV cover.
Loosen the loek nuts tully and disconneet the EGCV '. .;;j
control cables trom the pulley.
COVER CONTROL CABLES
Remove the bolt, washer, collar and exhaust pipe.
3-25
FRAME/BODY PANELS/EXHAUST SYSTEM
3-26
Remove the exhaust pipe gaskets.
INSTALLATION
17 N'm (1.7 kgf·m, 13 Ibf·ft)
Check the exhaust pipe stud protrusion from th e
exhaust port.
SPECIFIED LENGTH: 45.0 - 46.0 mm (1.77 - 1.81 in)
EXHAUST PIPE
12 N·m (1.2 kgf·m, 9 IbHt)
EXHAUST PIPE STUD
~ r
I I 1 I 11 1 ~
l
45.0 - 46.0 mm
(1.77 -1.81 in)
-
FRAME/BODY PANELS/EXHAUST SYSTEM
A/ways replace the Install new exhaust pipe gaskets anto the exhaust
exhaust pipe ports of the cylinder head.
gaskets with new
ones.
Install a new gasket onto the exhaust pipe and
install the exhaust pipe into the muffler and cylinder
head.
Loosely install the exhaust pipe, collar and mount-
ing bolt/washer.
Tighten the exhaust pipe joint nuts to the specified
torque.
TORQUE: 12 N·m (1.2 kgf·m, 9 IbHt)
3-27
FRAME/BODY PANELS/EXHAUST SYSTEM
3-28
Tighten the exhaust pipe mounting bolt to the spec-
ilied torque.
TORQUE: 17 N·m (1.7 kgf·m, 13 Ibf·ft)
Tighten the muIlIer band bolt to the specilied
torque.
TORQUE: 17 N·m (1.7 kgf·m, 13 Ibf·ft)
Conneet the EGCV control cables to the pulley and
tighten the loek nuts securely.
Adjust the EGCV control cable (page 4-23).
Install the EGCV cover, balts and tighten the nuts
securely.
Install the radiator lower mounting bolt, washer and
nut.
Tighten the nut securely.
Remave the suitable support and close the luel tank
(page 4-6).
Install the lollowing:
- Middle cowls (page 3-8)
- Lower cowl (page 3-6)
- Right main step/heat guard assembly (page 3-24)
PULLEY CONTROL CABLES COVER
4. MAINTENANCE
•
SERVICE INFORMATION ···························4·2 EGCV CABLE ............................................ 4·22
MAINTENANCE SCHEDULE ...................... 4·4 DRIVE CHAIN ..·········································· 4·23
FUEL LlNE ................................................... 4·5 BRAKE FLUID ........................................... 4·28
THROTTLE OPERATION·..·························· 4·8 BRAKE PADS WEAR ................................ 4·29
AIR CLEANER·············································· 4·8 BRAKE SYSTEM ....................................... 4·30
SPARK PLUG ··············································4·9 BRAKE LIGHT SWITCH ............................ 4·31
VALVE CLEARANCE································· 4·13 HEADLIGHT AlM ...................................... 4·31
ENGINE OIL/OIL FILTER ··························4·17 CLUTCH SYSTEM ····································4·31
RADIATOR COOLANT .............................. 4·19 SIDESTAND .............................................. 4·32
COOLING SYSTEM..································· 4·20 SUSPENSION ........................................... 4·32
SECONDARY AIR SUPPLY SYSTEM·······4·20 NUTS, BOLTS, FASTENERS·..················· 4·35
EVAPORATIVE EMISSION CONTROL WHEELS/TIRES ........................................ 4·35
SYSTEM (CALIFORNIA TYPE) ................. 4·21
STEERING HEAO BEARINGS .................. 4·36
4-1
MAINTENANCE
SERVICE INFORMATION
GENERAL
• Place the motorcycle on level ground befere starting any work.
• The exhaust contains poisonous carbon monoxide gas that may cause 1055 of consciousness and may lead to death.
Run the engine in an open area or with an exhaust evacuation system in and enclosed area.
SPECIFICATIONS
ITEM SPECIFICATIONS
Throttle grip freeplay 2 4mm(1 /16 3/16 in)
Spark plug ) NGK IMR9C-9HES
) OENSO VUH270
Spark plug gap 0.80 0.90 mm (0.03 1 0.035 in)
Valve clearance IN 0.20 ± 0.03 mm (0.008 + 0.001 in)
EX 0.28 ± 0.03 mm (0.011 + 0.001 in)
Engine Dil capacity After draining 2.7 liter (2.9 US qt, 204 Imp qt)
After oil filter change 2.8 liter (3.0 US qt, 2.5 Imp qt)
Recommended engine oi!
Recommended antifreeze
Drive chain Size/link
Slack
Recommended brake fluid
Clutch lever freeplay
Tire slze
Tire brand Bridgestone
Ounlop
eold tire pressure Driver only
Driver and
passenger
Minimum tire tread depth
TORQUE VALUES
Spark plug
Timing hole cap
Oil drain bolt
Oil filter cartridge
Rear axle nut
Drive sprocket bolt
DrÎven sproeket nut
Rear master cylinder push rod loek nut
Fuel tank mounting bolt
Air cleaner element mounting screw
Sidestand pivot bolt
Sidestand pivot nut
ECM setting plate screw
4-2
)
Pro Honda GN4 4-stroke oil (U.S.A. and Canada) or equiv-
alent motor Dil
APr service classification: SG or Higher
JASO T 903 standard: MA
Viscosity: SAE 1OW-30
Pro Honda HP Coolant or an equivalent high quality ethyl-
ene glycol antifreeze containing silicate free corrosion
inhibitors
OIO OIO 525HV KAI- 112YB
RK RK 525ROZ6 - 112LJFZ
30 - 40 mm (1.2 1.6 in)
DOT4
10 - 20 mm (3/8 - 13/16 in)
Front 120/70 ZR 17 M/C (58W)
Rear 180/55 ZR 17 M/C (73W)
Front BT015F RADIAL E
Rear BT015R RADIAL E
Front Oualifier PTG
Rear Oualifier PTG
Front 250 kPa (2.50 kgf/cm', 36 psi)
Rear 290 kPa (2.90 kgf/cm', 42 psi)
Front 250 kPa (2.50 kgf/cm' , 36 psi)
Rear 290 kPa (2.90 kgf/cm' , 42 psi)
Front 1.5 mm (0.06 in)
Rear 2.0 mm (0.08 in)
16 N'm (1.6 kgfm, 12Ibf·ft)
18 N·m (1.8 kgfm, 13 Ibfft)
30 N·m (3. 1 kgf·m, 22 Ibf·ft)
26 N'm (2.7 kgfm, 19 Ibf·ft)
113 N·m (11.5 kgf·m, 83 Ibf·ft)
54 N·m (5.5 kgf·m, 40 Ibf·ft)
64 N'm (6.5 kgfm, 47 Ibf·ft)
18 N·m (1.8 kgfm, 13 Ibfft)
30 N·m (3. 1 kgf·m, 22 Ibf·ft)
4.2 N·m (004 kgfm, 3.1 Ibf·ft)
10 N'm (1.0 kgfm, 7 Ibf·ft)
Apply grease to the threads
Apply oil to the a-ring
U-nut
U-nut
29 N·m (3.0 kgf·m, 21 Ibf·ft)
0.7 N·m (0.07 kgf'm, 0.5 Ibf·ft)
TOOLS
Oil filter wrench
07HAA-PJ70101
or 07AAA-PLCA100 (U.S.A. only)
Dri ve chain tooi set
07HMH-MR10l03
or 07HMH-MR101OC (U.S.A. only)
SCS connector
070PZ-ZY30100
MAINTENANCE
4-3
MAINTENANCE
MAINTENANCE SCHEDULE
Perform the Pre-ride inspection in the Owner's ManuaJ at each scheduled maintenance periad.
I: Inspeet and Clean, Adjust, lubricate or Replace if necessary. C: Clean. R: Replace. A: Adjust. l: lubricate.
The following items require some mechanica! knowiedge. Certain items (particularly those marked * and **) may require
more technical information and tools. Consult an authorized Honda dealer.
FREQUENCY WHICHEVER
q ODOMETER READING (NOTE 1)COMES FIRST REFERTO
0 Xl,OOO mi 0.6 4 8 12 16 20 24 PAGE
ITEMS Xl00 km 10 64 128 192 256 320 384
* FUEl LlNE I I I 4-5
* THROTTlE OPERATION I I I 4-8
* AIR CLEANER NOTE2 I I 4-8
Ul
* SPARK PLUG EVERY 16,000 mi (25,600 km)l,
~ 4-9
LJ.J EVERY 32,000 mi (51,200 km) R
t:: * VAlVE CLEARANCE I 1 4-13
0
ENGINE Oll INITIAl =600 mi (1,000 km) orLJ.J
~ 1 month: R,
4-17
LJ.J REGUlAR =EVERY 8,000 mi
a: (12,800 km) or 12 months: R
z ENGINE Oll FilTER R R R R 4-170
Ul RADIATOR COOLANT NOTE4 I I R 4-19
Ul
* COOLING SYSTEM I I I 4-20
~
* SECONDARY AIR SUPPlY SYSTEM I I I 4-20LJ.J
* EVAPORATIVE EMISSION
CONTROL SYSTEM
NOTE3 I I 4-21
** EGCV CABlE EVERY 16,000 mi (25,600 km)1 4-22
Ul DRIVE CHAIN EVERY 500 mi (800 km)l, l 4-23
~ BRAKE FlUID NOTE4 I I R I I R 4-28
~ BRAKE PADS WEAR I I I I I I 4-29
0
~
BRAKE SYSTEM I I I I 4-30
* BRAKE LIGHT SWITCH I I I 4-31
LJ.J
* HEADLIGHT AlM I I I 4-31a:
Z ClUTCH SYSTEM I I I I I I I 4-31
0
SIDESTAND I I I 4-32üi
Ul
* SUSPENSION I I I 4-32:;,
"I * NUTS, BOlTS, FASTENERS I I I I 4-35
z ** WHEElSfTlRES I I I 4-350
z •• STEERING HEAD BEARINGS I I I I 4-36
* Should be serviced by an authorized Honda dealer, unless th e owner has proper tools and service data and is
mechanically qualified.
** In the interest of safety, we recommended these items be servi ced only by an authorized Honda dealer
NOTES:
1. At higher odometer reading, repeat at the frequency interval established here.
2. Service more frequently when riding in unusually wet or dusty areas.
3. California type only.
4. Replace every 2 years, or at indicated odometer interval, whichever comes fjrst. Replacement requires mechanical skilI.
4-4
FUEL L1NE
FUEL TANK LlFTING
Remove the fuel tank cover (page 3-9).
Except cafifornia Release the tuel tank breather and drain hoses.
type:
Ca/ifornia type: Release the tuel tank drain hose.
Remove the tuel tank mounting balts and washers.
MAINTENANCE
DRAIN HOSE
Ca/ilorni. type: Disconnect the fuel tank breather hose (to EVAP r--:______----------------,
canister) from the hose joint. California type shown:
BREATHER HOSE
HOSE JOINT
4-5
MAINTENANCE
Guide the breather
hose and drain
hose 50 as not to
be kinked or bound.
4-6
Lift the lront end ol the luel tank and support it
using a suitable support as shown.
INSPECTION
Check the luel lines lor deterioration, damage or
leakage. Replace the luel line il necessary.
Check the luel rails and luel line joint lor damage or
leakage. Replace them il necessary.
Check the luel pump mounting area lor leakage.
Replace the luel pump packings il necessary.
Check the primary/secondary injectors lor damage
or leakage. Replace them il necessary.
FUEL TANK LOWERING
Remave a suitable support.
Lower the luel tank, leading the breather hose and
drain hose to downward. Then close the luel tank
and route the breather and drain hoses.
NOTE:
• Route the hoses properly Ipage 1-21).
• Be careful not to damage the harness and hoses.
• After installing the luel tank, make sure the
breather, drain and fuel hoses are not kinked or
bound.
FUEL RAIL
FUEL HOSE
California type: Conneet the tuel tank breather hose (to EVA? canis-
ter) to the hose joint securely.
Install the washers and fuel tank mounting bolts.
Tighten the bolts to the specified torque.
TORQUE: 30 N·m (3.1 kgf'm, 22 Ibf·ft)
Route the hoses Install the removed parts in the reverse order of
properly removal.
(page 1-27).
MAINTENANCE
California type shown:
BREATHER HOSE
HOSE JOINT
BREATHER HOSE
DRAIN HOSE
4-7
MAINTENANCE
THROTTLE OPERATION
Check for smooth throttle grip full opening and
automatic full dasing in all steering positions.
Check the throttle cables and replace them if they
are deteriorated, kinked or damaged.
Lubricate the throttle cables, if throttle operation is
not smooth.
Measure the freeplay at the throttle grip flange.
FREEPLAY: 2 - 4 mm (1 / 16 - 3116 in)
Throttle grip freeplay can be adjusted at either end
of the throttle cabie.
Minor adjustment is made with the upper adjuster.
Adjust the freeplay by loosening the loek nut and
turning the adjuster.
After adjustment, tighten the loek nut securely.
Major adjustment is made with the lower adjuster.
Remove the air cleaner housing (page 6-52).
Adjust the freeplay by loosening the loek nut and
turning the adjuster.
After adjustment, tighten the loek nut securely.
Recheek the throttl e operation.
Replace any damaged parts, if necessary.
Install the removed parts in the reverse order of
removal.
AIR CLEANER
4-8
Remove the fuel tank cove r (page 3-9).
Disconneet the lAT sensor 2P (Gray) connector.
Remove the screws and ECM setting plate.
Be careful not to Remave the screws and air cleaner housing upper
damage 'he ECM cover by pulling up the ECM with connectors con-
and wires. nected.
Loasen the screws and remove the air cleaner ele-
ment as shown.
Clean the air cleaner element using compressed air
trom the throttle body side any time it is excessively
dirty.
Installation is in th e reverse order of remaval.
TORQUE:
Air cleaner element mounting screw:
4.2 N·m (0.4 kgf·m. 3.1 Ibf·ft)
ECM setting plate screw:
0.7 N·m (0.07 kgf·m. 0.5 Ibf·ft)
SPARK PLUG
REMOVAL
Remove the middle eowls (page 3-8).
Remave the screw and water pipe guard.
Remave the hom wire clamp and disconnect the fan
motor 2P (Blaek) connector.
MAINTENANCE
AIR CLEANER ELEMENT SCREWS
4-9
MAINTENANCE
Remove the radiator lower mounting bolt, washer
and nut.
Remave the radiator upper mounting bolt and
washer.
8e careful not to Release the radiator grommet trom the frame boss
damage the radiator by moving the radiator to the right, then move the
fins and radiator radiator downward.
hOSBS.
Disconneet the direct ig nition coil 2P (White) con-
nectors.
Remove the direct ignition coils trom the spark
plugs.
Clean around the Remove the spark plug using the equipped spark
spark plug bases plug wrench or an equivalent.
with compressed
air betore Inspeet or replace as described in the maintenance
schedule (page 4-4).
removing, and be
sure thar no debris
is allowed to enter
the combustion
chamber.
4-10
MAINTENANCE
INSPECTION
Check the following and replace if necessary Irec- ~C-E-N-T-E-R-----------S-ID-E---~
ommended spark plug: page 4-2) ELECTRODE ---";;:1)..."'- ELECTRODE
• Insulator tor damage
• Electrodes tor wear
• Burning condition, coloration
This motorcycle's If the electrodes are contaminated with accumu-
spark plug is lated objects or dirt, replace the spark plug. INSULATOR
equipped wirh an
iridium center
electrode. Rep/ace
the spark plug if the
e/ectrodes are
conraminared.
A/ways USB
specified spark
plugs on this
motorcycle.
To prevent
damaging the
iridium center
electrode, use a
wirs type fee/er
gauge to check the
spark plug gap.
Replace the plug if the center electrode is rounded
as shown in the illustration.
SPECIFIED SPARK PLUG:
NGK: IMR9C-9HES
DENSO: VUH27D
Check the spark plug gap between the center and
side electrodes with a wire type teeier gauge.
Make sure that the $ 1.0 mm 10.04 in) plug gauge
does not insert between the gap.
Do not adjust the If the gauge can be inserted ;nto the gap, replace the
spark plug gap. If plug with a new one.
the gap is out of
specificarion,
rep/ace with a new
one.
INSTALLATION
Install and hand tighten the spark plug to the cylin-
der head, then tighten the spark plug to the speci-
fied torque.
TORQUE: 16 N·m (1.6 kgf·m, 12Ibf.ft)
ROUNDED ELECTRODE
WIRE TYPE FEELER GAUGE
o x
,
4-11
MAINTENANCE
Install the direct ignition coils.
Connect the direct ignition coil 2P (White) connec-
tors correctly.
Be carefuJnot to Install the radiator by aligning the grommet and
damage the radiator frame boss.
fins.
4-12
Install the washer and radiator upper mounting bolt.
Install the radiator lower mounting bolt, washer and
nut.
Tighten the nut securely.
Install the water pipe guard and tighten the screw ~~~~ii~i~securely.
Install the horn wire clamp and connect the fan
motor 2P (Black) connector.
Install the middle cowls (page 3-8).
VALVE CLEARANCE
INSPECTION
Inspeet and adjust
the va/ve clearance
while the engine is
co/d (be/ow 35"C/
95°F).
NOTE:
Check the engine idle speed (page 6-67) after the
valve clearance inspection.
Remave the cylinder head cover (page 9-7).
Remave the timing hole cap and O-ring .
Turn the crankshaft clockwise, align the "T" mark
with the index mark on the right crankcase cover.
The timing marks ("IN" and "EX") on the cam
sprockets must be Ilush with the cylinder head
upper surface and facing outward as shown,
If the timing marks on the cam sprockets are facing
inward, turn the crankshaft clockwise one tuil turn
(360°) and realign the timing marks with the cylin-
der head surface sa they are facing outward.
Insert the Ieeier gauge between the valve lifter and
cam lobe.
Record the Check the valve clearance lor the NO.1 and NO.3 cyl-
clearance for eacll inder intake valves using a teeier gauge.
va/ve for reference
in shim se/ection if VALVE CLEARANCE:
adjustment is IN: 0.20 ± 0.03 mm (0.008 ± 0.001 in)
required.
MAINTENANCE
CYLINDER HEAO UPPER SURFACE
TIMING MARKS
NO.3 INTAKE VALVES
4-1 3
MAINTENANCE
Turn the crankshaft clockwise 1/2 turn (180' ). align
the index line sa that it is facing up as shown.
Record the Check the valve clearance fo r the NO.2 and NO.4 cyl-
clearance foreach inder exhaust valves using a teeier gauge.
va/ve for reference
in shim selection if VALVE CLEARANCE:
adjustment is EX: 0.28 ± 0.03 mm (0.011 ± 0.001 in)
required.
Turn the crankshaft clockwise 1/2 turn (180' ). align
th e "T" mark with the index mark on the right crank-
case cover.
Record rhe Check the valve clearance for the NO.2 and NO.4 cyl-
cfearance foreach inder intake valves using teeier gauge.
vafve for reference
in shim selection if VALVE CLEARANCE:
adjustment is IN: 0.20 ± 0.03 mm (0.008 ± 0.001 in)
required.
4-14
NO.2 EXHAUST VALVES
Turn the crankshaft clockwise 1/2 turn (180' !. align
the index !ine 50 that it is facing up as shown.
MAINTENANCE
Rocord the Check the valve clearance tor the NO.1 and NO.3 cyl- ~~~~~~~~~~~~~~~~~~~~
clearance foreach inder exhaust valves using a teeier gauge.
va/va for reference
in shim seloc/lon if VALVE CLEARANCE:
adjustment is EX: 0.28 ± 0.03 mm (0.011 ± 0.001 in)
required.
ADJUSTMENT
It is not necessary Remove the camshafts (page 9-9).
ra remove the cam
sprocket (rom the
camshah except
when replacing the
camshafr and/or
cam sprocket.
Remove the valve lifters and shims.
• The shim may stick to the inside of the valve
lifter. Do not allow the shims to tall into the
crankcase.
• Mark all valve lifters and shims to ensure correct
reassembly in their original locations.
• The valve lifter can be easily removed with a
valve lapping taal or magnet.
• The shims can be easily removed with a twee-
zers or magnet.
Clean the valve shim contact area in the valve lifter
with compressed air.
NO.1 EXHAUST VALVES
VALVE LIFTER
I
4-15
MAINTENANCE
Sixty·nine different
thickness shims are
avaiJable trom the
thinnest 1.200 mm
thickness shim ta
the thickest 2.900
mm thickness shim
in increments of
0.025 mmo
Measure the shim thickness and record it.
Calculate the new shim thickness using the equa-
tion below.
A~(B-CI+D
A: New shim thickness
B: Recorded valve clearance
C: Specified valve clearance
D: aid shim thickness
• Make sure of the correct shim thickness by mea-
suri ng the shim by micrometer.
• Reface the valve seat if carbon deposit result in a
calculated dimension of over 2.900 mmo
Insta!! rhe shims Install the newJy selected shim on the valve spring
and va/ve lifters in retainer.
theiroriginal Apply molybdenum disulfide Dil to the valve lifters
4-16
loeations. sliding surface.
Instal! the valve lifters into the valve lifter holes.
Instal! the camshafts (page 9-28).
Rotate the camshafts by rotating the crankshaft
clockwise several times.
Recheek the valve clearance.
Apply oil to a new a-ring and instal! it to the timing
hole cap.
Apply grease to the timing hole cap threads.
Tighten the timing hole cap to the specified torque.
TORQUE: 18 N·m (1.8 kgf·m, 13 Ibl·ft)
Instal! the removed parts in the reverse order of
removal.
SHIM
eeee1.80 mm 1.825 m m 1.85 mm 1.875 mm
ENGINE Oll/Oll FilTER
Other viscosities
shown in the chart
may be used when
the average
temperature in your
riding Brea is within
the indicated range.
Dil lEVEL INSPECTIDN
Start the engine and let it idle for 3 - 5 minutes.
Stop the engine and wait 2 - 3 minutes.
Hold the motorcycle in an upright position.
Check the oillevel through the inspection window.
If the level is below the lower level line, remove the
oil filler cap and fill the crankcase with the recom-
mended oil up to the upper level line as following
procedures:
Remove the oil filler cap and fill the recommended
engine oil up to the upper level line.
RECOMMENDED ENGINE Oll:
Pro Honda GN4 4-stroke oil (U.S.A. and Canada) or
equivalent motor oil
API service classification: SG or Higher
JASO T 903 standard: MA
Viscosity: SAE 10W-30
Reinstall the oil filler cap.
ENGINE Dil & FilTER CHANGE
Remove the lower cowl (page 3-6).
Hold the motorcycle in an upright position.
Remove the oil filler cap.
Remave the drain bolt and sealing washer, drain the
oil completely.
UPPER lEVEL L1NE
ij'/
Oll FlllER CAP
SEALING WASHER
MAINTENANCE
120·F
DRAIN BOLT
4-17
MAINTENANCE
4-18
Remove the Dil filter cartridge using the special taal.
TOOl:
Dil filter wrench 07HAA-PJ70101 or
07AAA·PLCA100
(U.S.A. only)
Install a new sealing washer onto the drain bolt.
Tighten the drain bolt to the specilied torque.
TORQUE: 30 N·m (3.1 kgl·m, 22 Ibl·ft)
~~
....SEALING WASHER DRAIN BOLT
Check that the oil lilter boss protrusion Irom the ,-O-Il- F-Il-T-E-R-B-O- S- S-------n------,
crankcase is specified length as shown. ~
SPECIFIED LENGTH: 16.0 -17.0 mm (0.63 - 0.67 in)
16.0-17.0mm
(0.63 - 0.67 in)
Apply oil to new oil lilter cartridge threads and 0- ~:::;;:----:;;;;;::=:;=::::::::::~~:;:,
ring.
Install the oil lilter cartridge and tighten it to the
specified torque.
TOOl:
Oil lilter wrench 07HAA-PJ70101 or
07AAA-PlCA100
(U.S.A. only)
TORQUE: 26 N·m (2.7 kgl·m, 19 Ibl·ft)
Fill the crankcase with recommended engine oil.
ENGINE Oll CAPACITY:
2.7 liter (2.9 US qt, 2.41mp qt) after draining
2.8 liter (3.0 US qt, 2.51mp qt) after oil lilter change
Check that the O-ring on the oil lil Ier cap is in good
condition, and replace it if necessary.
Install the oil lil Ier cap.
Start the engine and let it idle lor 3 - 5 minutes.
Stop th e engine and wait 2 - 3 m inutes and recheek
the oil level.
Check that there are no oil leaks.
Install the lower cowl (page 3-6).
RADIATOR COOLANT
Check the coolant level ol the reserve tank with the
engine running at narmal operating temperature.
The level should be between the "UPPER" and
"LOWER " level !ines.
If necessary, add recommended coolant.
RECOMMENDED ANTIFREEZE:
Pro Honda HP Coolant or an equivalent high qual-
ity ethylene glycol antifreeze containing silicate
tree corrosion inhibitors
Remave the lower cowl (page 3-6).
Remave the reserve tank filler cap and lill to the
"UPPER" levelline with 1:1 mixture of distilled water FllLER CAP
MAINTENANCE
Left side:
l OWER lEVEL lINE
and antifreeze. " - - - - - - - - - - - -- - - - - - - '
Reinstall the lilier cap.
Install the lower cowl (page 3-6).
4-19
MAINTENANCE
COOLING SYSTEM
Remave the following:
- Lower cowl (page 3-6)
- Middle cowls (page 3-8)
Check the radiator air passages for clogging or dam-
age.
Straighten bent fins, and remove insects, mud or
other obstructions with compressed air or low
water pressure.
Replace the radiator if the air flow is restricted over
more than 20 % ot the radiating surface.
Inspect the water hoses tor cracks or deterioration,
and replace them it necessary.
Check the tightness of all hose clamps and fasten-
ers.
SECONDARY AIR SUPPLY SYSTEM
• This model is equipped with a built-in secondary
air supply system. The pulse secondary air sup- CYLINDER HEAO COVER
ply system is located on the cylinder head cover. PAIR CHECK VALVE
• The secondary air supply system introduces fil-
tered air inta exhaust gases in the exhaust port.
The secondary air is drawn into the exhaust port
whenever there is negative pressure pulse in the
exhaust system. This charged secondary air pro-
motes burning of the unburned exhaust gases
and changes a considerable amount of hydrocar-
bons and carbon monoxide inta relatively harm-
less carbon dioxide and water.
Remave the air cleaner housing (page 6-52).
11 ,he hoses show Check the PAIR hoses between the PAIR control
any signs of heat solenaid valve and cylinder head cover for deterio-
damage, inspeet ration, damage or loose connections. Make sure
the PAIR check that the hoses are not cracked.
vafves for damage.
4-20
EXHAUST PORT
Check the air suction hose between th e air cleaner
housing and PAIR control solenaid valve for deterio-
ration, damage or loose connections.
Check that the hoses are not kinked, pinched or
cracked.
EVAPORATIVE EMISSION CONTROL
SYSTEM (CALIFORNIA TYPE)
Check the hoses between the luel tank, EVAP canis-
ter, EVAP purge control solenoid valve for deteriora-
tion, damage or loase connection.
Check the EVAP canister lor clacks or other damage.
Reler to the Cable & Harness Routing lor hose con-
nections (page 1-34).
MAINTENANCE
SOLENOID VALVE
EVAP CANISTER
4-21
MAINTENANCE
EGCV CABLE
OPERATING INSPECTION
Remave the lollowing:
- Seat (page 3-4)
- lower cowl (page 3-6)
Remave the balts, nuts and EGCV cover.
Remave the dummy connector and short the DlC ,-- - - - - - - -- - - ----:--- ---,
4-22
terminals using the special taal.
TOOL:
SCS connector 070PZ-ZY30100
~~SCONNECTOR
Turn the ignition switch ON and make sure th at the ~=================~
pulley index line is aligned with the EGCV housing
projecting portien as shown.
II the pulley index line is not within the toleranee,
adjust the EGCV control cable (page 4-23).
Turn the i9nition switch OFF and remave the SCS
connector.
Install the EGCV cover, balts and tighten the nuts
securely.
BEARING INSPECTION
Move the exhaust valve pulley to ths rotative direc-
tian with your hand, check the exhaust valve shaft
tor excessive play.
If there is excessive play to the rotative direction,
replace the exhaust pipe (page 3-24).
o
--.l 2.0 mm
.T(0.08 in)
PUllEY
CABLE ADJUSTMENT
1. Short the DLC using the special tooi (page 6-15).
2. Loosen the adjusting nut and adjust the pulley
position by turning the adjusting nut.
3. Tighten the loek nut securely.
4. Remove the SCS connector trom the DLC, then
reinstall it.
Make sure that the pulley index line is aligned
w ith the EGCV housing toleranee as shown.
DRIVE CHAIN
Never inspeerand
adjust the drive
chain whife the
angina is running.
DRIVE CHAIN SLACK INSPECTION
Turn the ignition switch OFF, plaee the motoreycle
on lts sidestand and shift the transmission into neu-
tral.
Check the slack in the drive chain lower run midway
between the sprockets.
DRIVE CHAIN SLACK: 30 - 40 mm (1.2 - 1.6 in)
I NOTICE I
Exeessive ehain slaek, 50 mm (2.0 in) or more, may
damage the frame.
Lubrieate the drive ehain with #80 - 90 gear oil or
chain lubricant designed specifically tor use with D-
ring chains. Wipe aft the excess Dil or chain lubri-
cant.
MAINTENANCE
I--'- 2.0 mm
T(0.08 in)
4-23
MAINTENANCE
4-24
ADJUSTMENT
Laasen the rear axle nut.
loosen the loek nuts and turn the adjusting bolts
until the correct drive chain slack is obtained.
Make sure the index marks on both adjusting plates
are aligned with the swingarm index mark.
Tighten the rear axle nut to the speeilied torque.
TORQUE: 113 N·m (11.5 kgl·m, 83 Ibl·ft)
Hold the adjusting bolts and tighten the loek nuts.
Recheek the drive chain slack and tree wheel rota·
tion.
Lubricate the drive chain with #80 - 90 gear Dil or
drive chain lubricant designed specifically for use
with O-ring chains. Wipe off the excess oil or chain
lubricant.
Check the drive ehain wear indicator label attaehed
on the left swingarm.
If the drive chain adjusting plate index mark reaches
red zone ol the indicator label, replaee the drive
ehain with a new one (page 4-26).
CLEANING AND LUBRICATION
Clean the ehain with non-flammable or high Ilash
point solvent and wipe 1t dry.
Be sure the ehain has dried eompletelv belore lubri-
cating.
Inspeet the drive chain for possible damage or wear.
Replaee anv ehain that has damaged rollers, loose
fitting links, or otherwise appears unserviceable.
Installing a new ehain on badlV worn sproekets will
cause the new chain to wear quickly.
Inspeet and replace sprocket as necessary.
Lubricate the drive chain with #80 - 90 gear oil or
drive chain lubricant designed specifically for use
with O-ring chains. Wipe aft the excess oil or chain
lubricant.
SOLVENT SOFT BRUSH
ClEANINJ(G~~~~~~~~~;~;~::§l@;:~ oo ~ 0000000000
~
WIPE ANDDRY ~
::@: ~.2..- 0 0
o
o
lUBRICATE 0
:@~~
lUBRICATE
#80 - 90 GEAR Oll OR
DRIVE CHAIN LUBRICANT
SPROCKET INSPECTION
Remave the drive spracket cover (page 8-5).
Inspeet the drive and driven sprocket teeth tor wear
or damage, replace if necessary.
Never use a new drive chain on wern sprockets.
Bath chain and sprockets must be in good condi-
tion, or the new replacement chain will wear rap-
idly.
Check the attaching balts and nuts on the drive and
driven sprockets.
If any are loose, torque them.
TORQUE:
Drive sprocket bolt: 54 N·m (5.5 kgf·m, 40 Ibl·ft)
Driven sprocket nut: 64 N·m 16.5 kgl·m, 47 Ibl·ft)
MAINTENANCE
NORMAL
4-25
MAINTENANCE
When using the
special roof. fol/ow
rhe manufacturer's
instruction.
REPLACEMENT
This motorcycle uses a drive chain w ith a staked
master link.
Loosen the drive ehain (page 4-24).
Assembie the special taal as shown.
TOOl:
Drive chain tooi set 07HMH-MR10103 or
07HMH-MR1010C
(U.S.A. only)
Locate the crimped pin ends of th e master link trom
the outside of the chain, and remove the link w ith
t he drive chain taal set.
TOOl:
Drive chain tooi set
Remave the drive chain.
07HMH-MR10103 or
07HMH-MR1010C
(U.S.A. only)
DRIVE CHAIN TOOL SET
MASTER LINK
DRIVE CHAIN TOOL SET
Include the master Remave the excess drive chain links trom the new ~=================~
link when you d rive chain with the drive chain taal set.
counc the drive
eh.in links. STANOARO liNKS: 112 LINKS
4-26
REPLACEMENT CHAIN
OIO: 0 10525HV KAI-112YB
RK: RK525ROZ6-112WFZ
1 LINK
... f---- - - 11 2 LINKS -----~..
• Never reuse the cid drive chain, master link,
master link plate and O-rings.
(nsen the master Assembie the new master link, O-rings and plate.
link. trom the inside
of the drive chain,
and Înstall the plate
with the
identification mark
facing the outside.
Assembie and set the drive ehain taal set.
TOOl:
Drive chain tooI set 07HMH-MR10l03 or
07HMH-MR10l0C
IU.S.A. only)
Make sure that the master link pins are installed
properly.
Measure the master link pin length projected trom
the plate.
STANOARO LENGTH:
OIO: 1.15 - 1.55 mm 10.045 - 0.061 in)
RK: 1.2 - 1.4 mm 10.05 - 0.06 in)
Stake the master link pins.
Make sure that the pins are staked properly by mea-
suring th e diameter of the staked area using a slide
caliper.
DIAMETER OF THE STAKEO AREA:
OIO: 5.50 - 5.80 mm 10.217- 0.228 in)
RK: 5.30 - 5.70 mm 10.209 - 0.224 in)
MAINTENANCE
MASTER LINK
DRIVE CHA IN TOOl SET
MASTER LINK PINS
SLiDE CALIPER
4-27
MAINTENANCE
A drive chain with a After staking, check the staked area of the master
cli{Hype master link link tor cracks.
must nor be used. If there is any cracking, replace the master link, 0-
rings and plate.
DRIVE CHAIN SLiDER
GOOD NO GOOD
~vCRACKED
Inspeet the drive chain slider tor excessive wear or , - - - - - - - - - - - - - - - - - - - ,
damage.
If it is warn to the wear indicator, replace the drive
ehain slider (page 15-22).
BRAKE FLUID
I NOTICE
Spil/ed fluid can damage painted, plastic or rubber
parts. Place a rag over these pans whenever the
system ;s servieed.
• Do not mix different types of fluid, as they are
not compatible with each other.
• Do not allow foreign material to enter the system
when filling the reserve tank.
When the fluid level is low, check the brake pads for
wear (page 4-29). A low fluid level may be due to
wear of the brake pads.
If the brake pads are wam, the ealiper piston is
pushed out, and this accounts for a low fluid level.
If the brake pads are not wam and the fluid level is
low, check entire system for leaks (page 4-30).
FRONT BRAKE
WEAR INDICATOR
Turn the handlebar sa that the reserve tank is level 1------=:;;:;;;:;;:;;;;;---- -----1
and check the front brake fluid level.
If the level is near the lower level line, check the
brake pad wear (page 4-29).
4-28
MAINTENANCE
REAR BRAKE
Place the motorcycle on a level surface, and support r----------------~
it an upright position. LOWEA LEVEL LlNE
Check the rear brake fluid level.
If the level is near the lower level line, check the
brake pad wear (page 4-29).
BRAKE PADS WEAR
FRONT BRAKE PADS
Check the brake pads for wear.
Aeplace the brake pads if either pad is worn to the
bettam of wear limit groove.
For brake pad replacement (page 16-9).
REAR BRAKE PADS
Check the brake pads for wear.
Aeplace the brake pads if either pad is worn to the
bettam of wear limit groove.
For brake pad replacement (page 16-11).
WEAA LIMIT GAOOVE
I;-,
WEAA LIMIT GAOOVE
4-29
MAINTENANCE
BRAKE SYSTEM
INSPECTION
Firmly apply the brake lever or pedaI, and check that
no air has entered the system.
If the lever or peda I feels soft or spongy when oper-
ated, bleed the air from the system (page 16-8).
Inspeet the brake hose and fittings tor deterioration,
cracks and signs of leakage.
Tighten any loose fittings.
Replace hoses and fittings as required.
For brake air bleeding (page 16-8).
BRAKE LEVER ADJUSTMENT
Align the •t:::: mark The distance between the brake lever and the grip
on the brake {ever can be adjusted by turning the adjuster.
with rhe index
number on the
adjuster.
4-30
BRAKE PEDAL HEIGHT ADJUSTMENT
Loosen the loek nut and turn the push rad until the
correct pedaI height is obtained.
• When adjusting the push rod length, do not
extend it more than 5.5 mm (0.22 in).
After adjustment, tighten the loek nut to the speci-
fied torque.
TORQUE: 18 N·m (1.8 kgf·m, 13Ibf.ft)
LoeK NUT
5.5 mm (0.22 in)
MAXIMUM
BRAKE LIGHT SWITCH
The front brake Adjust the brake light switch so that the brake light
light switch does cames on just prior to the brake actually being
not (equire engaged.
adjustment. If the light fails to come on, adjust the switch so that
the light comes on at the proper time.
Hold the switch body and turn the adjuster. Do not
turn the switch body.
HEADLIGHT AlM
Place the motorcycle on a levelsurface.
Adjust the headlight Adjust the headlight aim vertically by turning the
aim as specified by vertical bearn adjusting screw.
locallaws and A clockwise rotatian moves the bearn up and coun-
regufations. terclockwise rotatien moves the bearn down.
Adjust the headlight aim horizontally by turning the
horizontal bearn adjusting screw.
Left Headlight: A clockwise rotatien moves the bearn toward the
right and counterclockwise rotatian moves the
beam toward the left side of the rider.
Right Headfight: A clockwise rotatian moves the bearn toward the
left and counterclockwise rotatian moves the bearn
loward the right side of the riaer.
CLUTCH SYSTEM
MAINTENANCE
ADJUSTER
VERTICAL BEAM ADJUSTING SCREWS
HORIZONTAL BEAM ADJUSTING SCREWS
Measure the clutch lever freeplay at the end of the , - - - - - - - - - - - - - - - - - - - ,
clutch lever. 10 - 20 mm (3/8 - 13/16 in)
The adjuster may
be damaged if it is
positioned too far
out, leaving minÎmal
rhread
engagement.
FREEPLAY: 10 - 20 mm (3/8 - 13/16 in)
Minor adjustment is made with the upper adjuster ~L=O=C=K=N=U=T===============
at the clutch lever.
Loosen the lock nut and turn the adjuster.
If the adjuster is threaded out near its limit and the
correct freeplay cannot be obtained, turn the
adjuster all the way in and back out one turn.
Tighten the loek nut while holding the adjuster and
make a major adjustment as described as follows:
ADJUSTER
4-31
MAINTENANCE
Major adjustment is performed at the clutch lifter
lever.
Loosen the lock nut and turn the adjusting nut to
adjust the Ireeplay.
Tighten the lock nut while holding the adjusting nut.
Il proper Ireeplay cannot be obtained, or the clutch
slips during test ride, disassembie and inspeet the
clutch (page 10-7).
SIDESTAND
Support the motorcycle on a level ground.
Check the sidestand spring lor damage or loss ol
ten sion.
Check the sidestand assembly lor Ireedom ol move-
ment and lubricate the sidestand pivot jf necessary.
TORQUE:
Sidestand pivot bolt: 10 N·m (1.0 kgl·m, 7Ibl·ft)
Sidestand pivot nut: 29 N·m (3.0 kgl·m, 21 Ibl·ft)
Check the sidestand ignition cut-aft system:
- Sit astride the motorcycle and raise the
sidestand.
- Start the engine with the transmission into neu-
tral, then shift the transmission ;nto gear, with
the clutch lever squeezed.
- Move the sidestand lull down.
- The engine should stop as the sidestand is low-
ered.
Il there is a problem with the system, check the
sidestand switch (page 20-20).
SUSPENSION
Loase. wom or
damaged
suspension parts
impair motorcycles
stabifityand
control.
4-32
FRONT SUSPENSION INSPECTION
Check the action ol the lorks by operating the Iront
brakes and compressing the front suspension sev-
eral times.
Check the entire assembly lor signs olleaks, dam-
age or loose fasteners.
Replace damaged components which cannot be
repaired.
Tighten all nuts and bolts.
For lork service (page 14-22).
LOCK NUT
~
ADJUSTING NUT
2007 owner manual honda cbr600rr

More Related Content

What's hot

MANUAL ENGINE 1/2KD-FTV TOYOTA SISTEMA COMNON RAIL
MANUAL ENGINE 1/2KD-FTV TOYOTA SISTEMA COMNON RAILMANUAL ENGINE 1/2KD-FTV TOYOTA SISTEMA COMNON RAIL
MANUAL ENGINE 1/2KD-FTV TOYOTA SISTEMA COMNON RAILInês Krug
 
Manual de mecánica Caterpillar 320d MOTOR C4.2, C6.4 ESPAÑOL.pdf
Manual   de mecánica Caterpillar 320d MOTOR  C4.2, C6.4 ESPAÑOL.pdfManual   de mecánica Caterpillar 320d MOTOR  C4.2, C6.4 ESPAÑOL.pdf
Manual de mecánica Caterpillar 320d MOTOR C4.2, C6.4 ESPAÑOL.pdfElectromecanicaLator
 
Toyota 1KD-FTV Common Rail Diesel Injector Installation Manual
Toyota 1KD-FTV Common Rail Diesel Injector Installation Manual Toyota 1KD-FTV Common Rail Diesel Injector Installation Manual
Toyota 1KD-FTV Common Rail Diesel Injector Installation Manual BaileysDieselGroup
 
Denso hp-3 servis manual
Denso hp-3 servis manualDenso hp-3 servis manual
Denso hp-3 servis manualViktor
 
Common rail system for nissan
Common rail system for nissanCommon rail system for nissan
Common rail system for nissanDarcats
 
Modelado Computacional Del Flujo En El Interior De Una Tobera Mono-orificio D...
Modelado Computacional Del Flujo En El Interior De Una Tobera Mono-orificio D...Modelado Computacional Del Flujo En El Interior De Una Tobera Mono-orificio D...
Modelado Computacional Del Flujo En El Interior De Una Tobera Mono-orificio D...edalgonzalez
 
Manual de servicio toyota / KIJYANG INNOVA / ONNOVA 1KD/2KD
Manual de servicio toyota / KIJYANG INNOVA / ONNOVA 1KD/2KDManual de servicio toyota / KIJYANG INNOVA / ONNOVA 1KD/2KD
Manual de servicio toyota / KIJYANG INNOVA / ONNOVA 1KD/2KDJordan Felipe Cabrera Nuñez
 
HINO J05D J08E Engine (1).pdf
HINO J05D J08E Engine (1).pdfHINO J05D J08E Engine (1).pdf
HINO J05D J08E Engine (1).pdfAutotronicaCax
 
400553S BOMBA HP3 REPARACION COMOON RAIL.PDF
400553S BOMBA HP3 REPARACION COMOON RAIL.PDF400553S BOMBA HP3 REPARACION COMOON RAIL.PDF
400553S BOMBA HP3 REPARACION COMOON RAIL.PDFDEMETRIO JANAMPA
 
Manual service 250
Manual service 250Manual service 250
Manual service 250Eko Kiswanto
 
D4GA engine
D4GA engine D4GA engine
D4GA engine Viktor
 
Manual conductores-camiones-fh-fm-volvo
Manual conductores-camiones-fh-fm-volvoManual conductores-camiones-fh-fm-volvo
Manual conductores-camiones-fh-fm-volvoluis Esquivel
 
Torx Bit And E Torx Socket Sizes Chart
Torx Bit And E Torx Socket Sizes ChartTorx Bit And E Torx Socket Sizes Chart
Torx Bit And E Torx Socket Sizes ChartTim Miller
 
284 Cambio automatico de 6 relaciones 09E en el Audi A8 2003 Parte 2.pdf
284 Cambio automatico de 6 relaciones 09E en el Audi A8 2003 Parte 2.pdf284 Cambio automatico de 6 relaciones 09E en el Audi A8 2003 Parte 2.pdf
284 Cambio automatico de 6 relaciones 09E en el Audi A8 2003 Parte 2.pdfjcarrey
 

What's hot (20)

MANUAL ENGINE 1/2KD-FTV TOYOTA SISTEMA COMNON RAIL
MANUAL ENGINE 1/2KD-FTV TOYOTA SISTEMA COMNON RAILMANUAL ENGINE 1/2KD-FTV TOYOTA SISTEMA COMNON RAIL
MANUAL ENGINE 1/2KD-FTV TOYOTA SISTEMA COMNON RAIL
 
Manual de mecánica Caterpillar 320d MOTOR C4.2, C6.4 ESPAÑOL.pdf
Manual   de mecánica Caterpillar 320d MOTOR  C4.2, C6.4 ESPAÑOL.pdfManual   de mecánica Caterpillar 320d MOTOR  C4.2, C6.4 ESPAÑOL.pdf
Manual de mecánica Caterpillar 320d MOTOR C4.2, C6.4 ESPAÑOL.pdf
 
Toyota 1KD-FTV Common Rail Diesel Injector Installation Manual
Toyota 1KD-FTV Common Rail Diesel Injector Installation Manual Toyota 1KD-FTV Common Rail Diesel Injector Installation Manual
Toyota 1KD-FTV Common Rail Diesel Injector Installation Manual
 
Denso hp-3 servis manual
Denso hp-3 servis manualDenso hp-3 servis manual
Denso hp-3 servis manual
 
Common rail system for nissan
Common rail system for nissanCommon rail system for nissan
Common rail system for nissan
 
Modelado Computacional Del Flujo En El Interior De Una Tobera Mono-orificio D...
Modelado Computacional Del Flujo En El Interior De Una Tobera Mono-orificio D...Modelado Computacional Del Flujo En El Interior De Una Tobera Mono-orificio D...
Modelado Computacional Del Flujo En El Interior De Una Tobera Mono-orificio D...
 
Maxxforce Euro v Agrale
Maxxforce Euro v Agrale Maxxforce Euro v Agrale
Maxxforce Euro v Agrale
 
Manual de servicio toyota / KIJYANG INNOVA / ONNOVA 1KD/2KD
Manual de servicio toyota / KIJYANG INNOVA / ONNOVA 1KD/2KDManual de servicio toyota / KIJYANG INNOVA / ONNOVA 1KD/2KD
Manual de servicio toyota / KIJYANG INNOVA / ONNOVA 1KD/2KD
 
HINO J05D J08E Engine (1).pdf
HINO J05D J08E Engine (1).pdfHINO J05D J08E Engine (1).pdf
HINO J05D J08E Engine (1).pdf
 
Plugin nkr 4-jb1
Plugin nkr 4-jb1Plugin nkr 4-jb1
Plugin nkr 4-jb1
 
400553S BOMBA HP3 REPARACION COMOON RAIL.PDF
400553S BOMBA HP3 REPARACION COMOON RAIL.PDF400553S BOMBA HP3 REPARACION COMOON RAIL.PDF
400553S BOMBA HP3 REPARACION COMOON RAIL.PDF
 
Manual service 250
Manual service 250Manual service 250
Manual service 250
 
HAMM - 3411.pdf
HAMM - 3411.pdfHAMM - 3411.pdf
HAMM - 3411.pdf
 
D4GA engine
D4GA engine D4GA engine
D4GA engine
 
Tablas de torque
Tablas de torqueTablas de torque
Tablas de torque
 
Manual conductores-camiones-fh-fm-volvo
Manual conductores-camiones-fh-fm-volvoManual conductores-camiones-fh-fm-volvo
Manual conductores-camiones-fh-fm-volvo
 
Doc motor volvo fh d13 c 3
Doc motor volvo fh d13 c 3Doc motor volvo fh d13 c 3
Doc motor volvo fh d13 c 3
 
Torx Bit And E Torx Socket Sizes Chart
Torx Bit And E Torx Socket Sizes ChartTorx Bit And E Torx Socket Sizes Chart
Torx Bit And E Torx Socket Sizes Chart
 
284 Cambio automatico de 6 relaciones 09E en el Audi A8 2003 Parte 2.pdf
284 Cambio automatico de 6 relaciones 09E en el Audi A8 2003 Parte 2.pdf284 Cambio automatico de 6 relaciones 09E en el Audi A8 2003 Parte 2.pdf
284 Cambio automatico de 6 relaciones 09E en el Audi A8 2003 Parte 2.pdf
 
K+motor+isuzu
K+motor+isuzuK+motor+isuzu
K+motor+isuzu
 

Viewers also liked

2012 owner manual honda cbr600rr
2012 owner manual honda cbr600rr2012 owner manual honda cbr600rr
2012 owner manual honda cbr600rrandonis-artist
 
Honda cbr600 f history of the marque uk models
Honda cbr600 f history of the marque   uk modelsHonda cbr600 f history of the marque   uk models
Honda cbr600 f history of the marque uk modelsnathjza
 
Sensus Pollucom E Heat Meter - Spec Sheet
Sensus Pollucom E Heat Meter - Spec SheetSensus Pollucom E Heat Meter - Spec Sheet
Sensus Pollucom E Heat Meter - Spec SheetThorne & Derrick UK
 
Yamaha MT 09 Specs
Yamaha MT 09 SpecsYamaha MT 09 Specs
Yamaha MT 09 SpecsRushLane
 
Honda sh --pantheon-dylan_125-150_manuale_tecnico
Honda sh --pantheon-dylan_125-150_manuale_tecnicoHonda sh --pantheon-dylan_125-150_manuale_tecnico
Honda sh --pantheon-dylan_125-150_manuale_tecnicopolman79
 
Honda Sh Pantheon Dylan 125 150 Manuale Tecnico
Honda Sh   Pantheon Dylan 125 150 Manuale TecnicoHonda Sh   Pantheon Dylan 125 150 Manuale Tecnico
Honda Sh Pantheon Dylan 125 150 Manuale Tecnicoguest9a8b4d
 
Compare yamaha r15 vs honda cbr 150 -review at Choosemybike.in
Compare yamaha r15 vs honda cbr 150 -review at Choosemybike.inCompare yamaha r15 vs honda cbr 150 -review at Choosemybike.in
Compare yamaha r15 vs honda cbr 150 -review at Choosemybike.inCMB
 
Manual de serviço cb400 (1980) ms.001 05-80 carcaca
Manual de serviço cb400 (1980)   ms.001 05-80 carcacaManual de serviço cb400 (1980)   ms.001 05-80 carcaca
Manual de serviço cb400 (1980) ms.001 05-80 carcacaThiago Huari
 
Honda wave innova supra 125 service manual
Honda wave innova supra 125 service manualHonda wave innova supra 125 service manual
Honda wave innova supra 125 service manualAidanpp
 
Honda wave s 110 2012 2013
Honda wave s 110 2012  2013Honda wave s 110 2012  2013
Honda wave s 110 2012 2013vinagas
 
2017 Harley Davidson line-up for India - Press Release
2017 Harley Davidson line-up for India - Press Release2017 Harley Davidson line-up for India - Press Release
2017 Harley Davidson line-up for India - Press ReleaseRushLane
 
Manual de serviço cb400 (1980) ms.001 05-80 motor
Manual de serviço cb400 (1980)   ms.001 05-80 motorManual de serviço cb400 (1980)   ms.001 05-80 motor
Manual de serviço cb400 (1980) ms.001 05-80 motorThiago Huari
 

Viewers also liked (14)

2012 owner manual honda cbr600rr
2012 owner manual honda cbr600rr2012 owner manual honda cbr600rr
2012 owner manual honda cbr600rr
 
Honda cbr600 f history of the marque uk models
Honda cbr600 f history of the marque   uk modelsHonda cbr600 f history of the marque   uk models
Honda cbr600 f history of the marque uk models
 
Sensus Pollucom E Heat Meter - Spec Sheet
Sensus Pollucom E Heat Meter - Spec SheetSensus Pollucom E Heat Meter - Spec Sheet
Sensus Pollucom E Heat Meter - Spec Sheet
 
Yamaha MT 09 Specs
Yamaha MT 09 SpecsYamaha MT 09 Specs
Yamaha MT 09 Specs
 
Sh300 07
Sh300 07Sh300 07
Sh300 07
 
Honda sh --pantheon-dylan_125-150_manuale_tecnico
Honda sh --pantheon-dylan_125-150_manuale_tecnicoHonda sh --pantheon-dylan_125-150_manuale_tecnico
Honda sh --pantheon-dylan_125-150_manuale_tecnico
 
Honda Sh Pantheon Dylan 125 150 Manuale Tecnico
Honda Sh   Pantheon Dylan 125 150 Manuale TecnicoHonda Sh   Pantheon Dylan 125 150 Manuale Tecnico
Honda Sh Pantheon Dylan 125 150 Manuale Tecnico
 
Compare yamaha r15 vs honda cbr 150 -review at Choosemybike.in
Compare yamaha r15 vs honda cbr 150 -review at Choosemybike.inCompare yamaha r15 vs honda cbr 150 -review at Choosemybike.in
Compare yamaha r15 vs honda cbr 150 -review at Choosemybike.in
 
Manual de serviço cb400 (1980) ms.001 05-80 carcaca
Manual de serviço cb400 (1980)   ms.001 05-80 carcacaManual de serviço cb400 (1980)   ms.001 05-80 carcaca
Manual de serviço cb400 (1980) ms.001 05-80 carcaca
 
Honda wave innova supra 125 service manual
Honda wave innova supra 125 service manualHonda wave innova supra 125 service manual
Honda wave innova supra 125 service manual
 
Honda wave s 110 2012 2013
Honda wave s 110 2012  2013Honda wave s 110 2012  2013
Honda wave s 110 2012 2013
 
2017 Harley Davidson line-up for India - Press Release
2017 Harley Davidson line-up for India - Press Release2017 Harley Davidson line-up for India - Press Release
2017 Harley Davidson line-up for India - Press Release
 
Honda
HondaHonda
Honda
 
Manual de serviço cb400 (1980) ms.001 05-80 motor
Manual de serviço cb400 (1980)   ms.001 05-80 motorManual de serviço cb400 (1980)   ms.001 05-80 motor
Manual de serviço cb400 (1980) ms.001 05-80 motor
 

Similar to 2007 owner manual honda cbr600rr

manuel cbr 929.pdf
manuel cbr 929.pdfmanuel cbr 929.pdf
manuel cbr 929.pdfGrgoryTETU
 
2011 Nissan 370Z Service Repair Manual.pdf
2011 Nissan 370Z Service Repair Manual.pdf2011 Nissan 370Z Service Repair Manual.pdf
2011 Nissan 370Z Service Repair Manual.pdfkgo7715345
 
2011 Nissan 370Z Service Repair Manual.pdf
2011 Nissan 370Z Service Repair Manual.pdf2011 Nissan 370Z Service Repair Manual.pdf
2011 Nissan 370Z Service Repair Manual.pdff7sueudjidjdkm
 
2011 Nissan 370Z Service Repair Manual.pdf
2011 Nissan 370Z Service Repair Manual.pdf2011 Nissan 370Z Service Repair Manual.pdf
2011 Nissan 370Z Service Repair Manual.pdff8useudkdkmdm
 
2011 Nissan 370Z Service Repair Manual.pdf
2011 Nissan 370Z Service Repair Manual.pdf2011 Nissan 370Z Service Repair Manual.pdf
2011 Nissan 370Z Service Repair Manual.pdffujskekdmmd1
 
2011 Nissan 370Z Service Repair Manual.pdf
2011 Nissan 370Z Service Repair Manual.pdf2011 Nissan 370Z Service Repair Manual.pdf
2011 Nissan 370Z Service Repair Manual.pdffujskmdmdmd3e
 
2011 Nissan 370Z Service Repair Manual.pdf
2011 Nissan 370Z Service Repair Manual.pdf2011 Nissan 370Z Service Repair Manual.pdf
2011 Nissan 370Z Service Repair Manual.pdffjkemd9idok
 
2011 Nissan 370Z Service Repair Manual.pdf
2011 Nissan 370Z Service Repair Manual.pdf2011 Nissan 370Z Service Repair Manual.pdf
2011 Nissan 370Z Service Repair Manual.pdffujsekmdmdm2
 
2011 Nissan 370Z Service Repair Manual.pdf
2011 Nissan 370Z Service Repair Manual.pdf2011 Nissan 370Z Service Repair Manual.pdf
2011 Nissan 370Z Service Repair Manual.pdfhuanwrj0196
 
2007 infiniti fx35 fx45 service repair manual
2007 infiniti fx35 fx45 service repair manual2007 infiniti fx35 fx45 service repair manual
2007 infiniti fx35 fx45 service repair manualfjskekfseik
 
2006 INFINITI FX35 FX45 Service Repair Manual.pdf
2006 INFINITI FX35 FX45 Service Repair Manual.pdf2006 INFINITI FX35 FX45 Service Repair Manual.pdf
2006 INFINITI FX35 FX45 Service Repair Manual.pdfpwck778415
 
2010 Nissan 370Z Service Repair Manual.pdf
2010 Nissan 370Z Service Repair Manual.pdf2010 Nissan 370Z Service Repair Manual.pdf
2010 Nissan 370Z Service Repair Manual.pdfjjkdmsmmd
 
2006 INFINITI G35 SEDAN Service Repair Manual.pdf
2006 INFINITI G35 SEDAN Service Repair Manual.pdf2006 INFINITI G35 SEDAN Service Repair Manual.pdf
2006 INFINITI G35 SEDAN Service Repair Manual.pdfpwck778415
 
2006 infiniti g35 sedan service repair manual
2006 infiniti g35 sedan service repair manual2006 infiniti g35 sedan service repair manual
2006 infiniti g35 sedan service repair manualolfjsekdmmes
 
2012 Nissan 370Z Coupe Service Repair Manual.pdf
2012 Nissan 370Z Coupe Service Repair Manual.pdf2012 Nissan 370Z Coupe Service Repair Manual.pdf
2012 Nissan 370Z Coupe Service Repair Manual.pdff7sueudjidjdkm
 
2012 Nissan 370Z Coupe Service Repair Manual.pdf
2012 Nissan 370Z Coupe Service Repair Manual.pdf2012 Nissan 370Z Coupe Service Repair Manual.pdf
2012 Nissan 370Z Coupe Service Repair Manual.pdff8useudkdkmdm
 
2012 Nissan 370Z Coupe Service Repair Manual.pdf
2012 Nissan 370Z Coupe Service Repair Manual.pdf2012 Nissan 370Z Coupe Service Repair Manual.pdf
2012 Nissan 370Z Coupe Service Repair Manual.pdfqzje6212365
 
2012 Nissan 370Z Coupe Service Repair Manual.pdf
2012 Nissan 370Z Coupe Service Repair Manual.pdf2012 Nissan 370Z Coupe Service Repair Manual.pdf
2012 Nissan 370Z Coupe Service Repair Manual.pdffujsekmdmdm2
 
2012 Nissan 370Z Coupe Service Repair Manual.pdf
2012 Nissan 370Z Coupe Service Repair Manual.pdf2012 Nissan 370Z Coupe Service Repair Manual.pdf
2012 Nissan 370Z Coupe Service Repair Manual.pdffujskekdmmd1
 
2012 Nissan 370Z Coupe Service Repair Manual.pdf
2012 Nissan 370Z Coupe Service Repair Manual.pdf2012 Nissan 370Z Coupe Service Repair Manual.pdf
2012 Nissan 370Z Coupe Service Repair Manual.pdffujskmdmdmd3e
 

Similar to 2007 owner manual honda cbr600rr (20)

manuel cbr 929.pdf
manuel cbr 929.pdfmanuel cbr 929.pdf
manuel cbr 929.pdf
 
2011 Nissan 370Z Service Repair Manual.pdf
2011 Nissan 370Z Service Repair Manual.pdf2011 Nissan 370Z Service Repair Manual.pdf
2011 Nissan 370Z Service Repair Manual.pdf
 
2011 Nissan 370Z Service Repair Manual.pdf
2011 Nissan 370Z Service Repair Manual.pdf2011 Nissan 370Z Service Repair Manual.pdf
2011 Nissan 370Z Service Repair Manual.pdf
 
2011 Nissan 370Z Service Repair Manual.pdf
2011 Nissan 370Z Service Repair Manual.pdf2011 Nissan 370Z Service Repair Manual.pdf
2011 Nissan 370Z Service Repair Manual.pdf
 
2011 Nissan 370Z Service Repair Manual.pdf
2011 Nissan 370Z Service Repair Manual.pdf2011 Nissan 370Z Service Repair Manual.pdf
2011 Nissan 370Z Service Repair Manual.pdf
 
2011 Nissan 370Z Service Repair Manual.pdf
2011 Nissan 370Z Service Repair Manual.pdf2011 Nissan 370Z Service Repair Manual.pdf
2011 Nissan 370Z Service Repair Manual.pdf
 
2011 Nissan 370Z Service Repair Manual.pdf
2011 Nissan 370Z Service Repair Manual.pdf2011 Nissan 370Z Service Repair Manual.pdf
2011 Nissan 370Z Service Repair Manual.pdf
 
2011 Nissan 370Z Service Repair Manual.pdf
2011 Nissan 370Z Service Repair Manual.pdf2011 Nissan 370Z Service Repair Manual.pdf
2011 Nissan 370Z Service Repair Manual.pdf
 
2011 Nissan 370Z Service Repair Manual.pdf
2011 Nissan 370Z Service Repair Manual.pdf2011 Nissan 370Z Service Repair Manual.pdf
2011 Nissan 370Z Service Repair Manual.pdf
 
2007 infiniti fx35 fx45 service repair manual
2007 infiniti fx35 fx45 service repair manual2007 infiniti fx35 fx45 service repair manual
2007 infiniti fx35 fx45 service repair manual
 
2006 INFINITI FX35 FX45 Service Repair Manual.pdf
2006 INFINITI FX35 FX45 Service Repair Manual.pdf2006 INFINITI FX35 FX45 Service Repair Manual.pdf
2006 INFINITI FX35 FX45 Service Repair Manual.pdf
 
2010 Nissan 370Z Service Repair Manual.pdf
2010 Nissan 370Z Service Repair Manual.pdf2010 Nissan 370Z Service Repair Manual.pdf
2010 Nissan 370Z Service Repair Manual.pdf
 
2006 INFINITI G35 SEDAN Service Repair Manual.pdf
2006 INFINITI G35 SEDAN Service Repair Manual.pdf2006 INFINITI G35 SEDAN Service Repair Manual.pdf
2006 INFINITI G35 SEDAN Service Repair Manual.pdf
 
2006 infiniti g35 sedan service repair manual
2006 infiniti g35 sedan service repair manual2006 infiniti g35 sedan service repair manual
2006 infiniti g35 sedan service repair manual
 
2012 Nissan 370Z Coupe Service Repair Manual.pdf
2012 Nissan 370Z Coupe Service Repair Manual.pdf2012 Nissan 370Z Coupe Service Repair Manual.pdf
2012 Nissan 370Z Coupe Service Repair Manual.pdf
 
2012 Nissan 370Z Coupe Service Repair Manual.pdf
2012 Nissan 370Z Coupe Service Repair Manual.pdf2012 Nissan 370Z Coupe Service Repair Manual.pdf
2012 Nissan 370Z Coupe Service Repair Manual.pdf
 
2012 Nissan 370Z Coupe Service Repair Manual.pdf
2012 Nissan 370Z Coupe Service Repair Manual.pdf2012 Nissan 370Z Coupe Service Repair Manual.pdf
2012 Nissan 370Z Coupe Service Repair Manual.pdf
 
2012 Nissan 370Z Coupe Service Repair Manual.pdf
2012 Nissan 370Z Coupe Service Repair Manual.pdf2012 Nissan 370Z Coupe Service Repair Manual.pdf
2012 Nissan 370Z Coupe Service Repair Manual.pdf
 
2012 Nissan 370Z Coupe Service Repair Manual.pdf
2012 Nissan 370Z Coupe Service Repair Manual.pdf2012 Nissan 370Z Coupe Service Repair Manual.pdf
2012 Nissan 370Z Coupe Service Repair Manual.pdf
 
2012 Nissan 370Z Coupe Service Repair Manual.pdf
2012 Nissan 370Z Coupe Service Repair Manual.pdf2012 Nissan 370Z Coupe Service Repair Manual.pdf
2012 Nissan 370Z Coupe Service Repair Manual.pdf
 

More from andonis-artist

OM-BRIVIS-SP4-SP5-SP6-BX5-CC3-2PWN-BX3-ISSUE-A-MARCH-2020 gas heater manual i...
OM-BRIVIS-SP4-SP5-SP6-BX5-CC3-2PWN-BX3-ISSUE-A-MARCH-2020 gas heater manual i...OM-BRIVIS-SP4-SP5-SP6-BX5-CC3-2PWN-BX3-ISSUE-A-MARCH-2020 gas heater manual i...
OM-BRIVIS-SP4-SP5-SP6-BX5-CC3-2PWN-BX3-ISSUE-A-MARCH-2020 gas heater manual i...andonis-artist
 
Miele hub 5000 oven user guide manual english
Miele hub 5000 oven user guide manual englishMiele hub 5000 oven user guide manual english
Miele hub 5000 oven user guide manual englishandonis-artist
 
netgear-WN2500G_IG_6Nov2012 manual english
netgear-WN2500G_IG_6Nov2012 manual englishnetgear-WN2500G_IG_6Nov2012 manual english
netgear-WN2500G_IG_6Nov2012 manual englishandonis-artist
 
pfaff sewing machine 132 manual ENglish language
pfaff sewing machine 132 manual ENglish languagepfaff sewing machine 132 manual ENglish language
pfaff sewing machine 132 manual ENglish languageandonis-artist
 
Pfaff_sewing machine 138-139-manual-ES-DE-FR-ES.
Pfaff_sewing machine 138-139-manual-ES-DE-FR-ES.Pfaff_sewing machine 138-139-manual-ES-DE-FR-ES.
Pfaff_sewing machine 138-139-manual-ES-DE-FR-ES.andonis-artist
 
Canon powershot G7X III camera manual
Canon powershot G7X III camera manualCanon powershot G7X III camera manual
Canon powershot G7X III camera manualandonis-artist
 
Casio gshock gx56bb1 manual
Casio gshock gx56bb1 manualCasio gshock gx56bb1 manual
Casio gshock gx56bb1 manualandonis-artist
 
Ducati 848-evo-2011-owners-manual
Ducati 848-evo-2011-owners-manualDucati 848-evo-2011-owners-manual
Ducati 848-evo-2011-owners-manualandonis-artist
 
Shimano SL-4S35 cartridge 3 speed bicycle shifter
Shimano SL-4S35 cartridge 3 speed bicycle shifterShimano SL-4S35 cartridge 3 speed bicycle shifter
Shimano SL-4S35 cartridge 3 speed bicycle shifterandonis-artist
 
Anthony Coundouris Introspection 2013-16
Anthony Coundouris Introspection 2013-16Anthony Coundouris Introspection 2013-16
Anthony Coundouris Introspection 2013-16andonis-artist
 
Honda Vfr400 r nc30 model info
Honda Vfr400 r nc30 model infoHonda Vfr400 r nc30 model info
Honda Vfr400 r nc30 model infoandonis-artist
 
Honda vfr 400 nc30 checklist buyer guide
Honda vfr 400 nc30 checklist buyer guideHonda vfr 400 nc30 checklist buyer guide
Honda vfr 400 nc30 checklist buyer guideandonis-artist
 
YoloPay corporate rebrand
YoloPay corporate rebrandYoloPay corporate rebrand
YoloPay corporate rebrandandonis-artist
 
Sport Motorcycle Riding Techniques
Sport Motorcycle Riding TechniquesSport Motorcycle Riding Techniques
Sport Motorcycle Riding Techniquesandonis-artist
 
Honda vfr400 nc30 vfr 400 rr carburetor needle diagrams
Honda vfr400 nc30 vfr 400 rr carburetor needle diagramsHonda vfr400 nc30 vfr 400 rr carburetor needle diagrams
Honda vfr400 nc30 vfr 400 rr carburetor needle diagramsandonis-artist
 
Honda VFR 400 nc30 parts manual
Honda VFR 400 nc30 parts manualHonda VFR 400 nc30 parts manual
Honda VFR 400 nc30 parts manualandonis-artist
 
Honda VFR400 nc30 service manual
Honda VFR400 nc30  service manualHonda VFR400 nc30  service manual
Honda VFR400 nc30 service manualandonis-artist
 
Templates for soft toys
Templates for soft toysTemplates for soft toys
Templates for soft toysandonis-artist
 
Motorcycle electrics jerry skene
Motorcycle electrics jerry skeneMotorcycle electrics jerry skene
Motorcycle electrics jerry skeneandonis-artist
 
Driving in-thailand.com test-eng3
Driving in-thailand.com test-eng3Driving in-thailand.com test-eng3
Driving in-thailand.com test-eng3andonis-artist
 

More from andonis-artist (20)

OM-BRIVIS-SP4-SP5-SP6-BX5-CC3-2PWN-BX3-ISSUE-A-MARCH-2020 gas heater manual i...
OM-BRIVIS-SP4-SP5-SP6-BX5-CC3-2PWN-BX3-ISSUE-A-MARCH-2020 gas heater manual i...OM-BRIVIS-SP4-SP5-SP6-BX5-CC3-2PWN-BX3-ISSUE-A-MARCH-2020 gas heater manual i...
OM-BRIVIS-SP4-SP5-SP6-BX5-CC3-2PWN-BX3-ISSUE-A-MARCH-2020 gas heater manual i...
 
Miele hub 5000 oven user guide manual english
Miele hub 5000 oven user guide manual englishMiele hub 5000 oven user guide manual english
Miele hub 5000 oven user guide manual english
 
netgear-WN2500G_IG_6Nov2012 manual english
netgear-WN2500G_IG_6Nov2012 manual englishnetgear-WN2500G_IG_6Nov2012 manual english
netgear-WN2500G_IG_6Nov2012 manual english
 
pfaff sewing machine 132 manual ENglish language
pfaff sewing machine 132 manual ENglish languagepfaff sewing machine 132 manual ENglish language
pfaff sewing machine 132 manual ENglish language
 
Pfaff_sewing machine 138-139-manual-ES-DE-FR-ES.
Pfaff_sewing machine 138-139-manual-ES-DE-FR-ES.Pfaff_sewing machine 138-139-manual-ES-DE-FR-ES.
Pfaff_sewing machine 138-139-manual-ES-DE-FR-ES.
 
Canon powershot G7X III camera manual
Canon powershot G7X III camera manualCanon powershot G7X III camera manual
Canon powershot G7X III camera manual
 
Casio gshock gx56bb1 manual
Casio gshock gx56bb1 manualCasio gshock gx56bb1 manual
Casio gshock gx56bb1 manual
 
Ducati 848-evo-2011-owners-manual
Ducati 848-evo-2011-owners-manualDucati 848-evo-2011-owners-manual
Ducati 848-evo-2011-owners-manual
 
Shimano SL-4S35 cartridge 3 speed bicycle shifter
Shimano SL-4S35 cartridge 3 speed bicycle shifterShimano SL-4S35 cartridge 3 speed bicycle shifter
Shimano SL-4S35 cartridge 3 speed bicycle shifter
 
Anthony Coundouris Introspection 2013-16
Anthony Coundouris Introspection 2013-16Anthony Coundouris Introspection 2013-16
Anthony Coundouris Introspection 2013-16
 
Honda Vfr400 r nc30 model info
Honda Vfr400 r nc30 model infoHonda Vfr400 r nc30 model info
Honda Vfr400 r nc30 model info
 
Honda vfr 400 nc30 checklist buyer guide
Honda vfr 400 nc30 checklist buyer guideHonda vfr 400 nc30 checklist buyer guide
Honda vfr 400 nc30 checklist buyer guide
 
YoloPay corporate rebrand
YoloPay corporate rebrandYoloPay corporate rebrand
YoloPay corporate rebrand
 
Sport Motorcycle Riding Techniques
Sport Motorcycle Riding TechniquesSport Motorcycle Riding Techniques
Sport Motorcycle Riding Techniques
 
Honda vfr400 nc30 vfr 400 rr carburetor needle diagrams
Honda vfr400 nc30 vfr 400 rr carburetor needle diagramsHonda vfr400 nc30 vfr 400 rr carburetor needle diagrams
Honda vfr400 nc30 vfr 400 rr carburetor needle diagrams
 
Honda VFR 400 nc30 parts manual
Honda VFR 400 nc30 parts manualHonda VFR 400 nc30 parts manual
Honda VFR 400 nc30 parts manual
 
Honda VFR400 nc30 service manual
Honda VFR400 nc30  service manualHonda VFR400 nc30  service manual
Honda VFR400 nc30 service manual
 
Templates for soft toys
Templates for soft toysTemplates for soft toys
Templates for soft toys
 
Motorcycle electrics jerry skene
Motorcycle electrics jerry skeneMotorcycle electrics jerry skene
Motorcycle electrics jerry skene
 
Driving in-thailand.com test-eng3
Driving in-thailand.com test-eng3Driving in-thailand.com test-eng3
Driving in-thailand.com test-eng3
 

Recently uploaded

Equity & Freight Electrification by Jose Miguel Acosta Cordova
Equity & Freight Electrification by Jose Miguel Acosta CordovaEquity & Freight Electrification by Jose Miguel Acosta Cordova
Equity & Freight Electrification by Jose Miguel Acosta CordovaForth
 
UNIT-1-VEHICLE STRUCTURE AND ENGINES.ppt
UNIT-1-VEHICLE STRUCTURE AND ENGINES.pptUNIT-1-VEHICLE STRUCTURE AND ENGINES.ppt
UNIT-1-VEHICLE STRUCTURE AND ENGINES.pptDineshKumar4165
 
UNIT-IV-STEERING, BRAKES AND SUSPENSION SYSTEMS.pptx
UNIT-IV-STEERING, BRAKES AND SUSPENSION SYSTEMS.pptxUNIT-IV-STEERING, BRAKES AND SUSPENSION SYSTEMS.pptx
UNIT-IV-STEERING, BRAKES AND SUSPENSION SYSTEMS.pptxDineshKumar4165
 
原版工艺美国普林斯顿大学毕业证Princeton毕业证成绩单修改留信学历认证
原版工艺美国普林斯顿大学毕业证Princeton毕业证成绩单修改留信学历认证原版工艺美国普林斯顿大学毕业证Princeton毕业证成绩单修改留信学历认证
原版工艺美国普林斯顿大学毕业证Princeton毕业证成绩单修改留信学历认证jjrehjwj11gg
 
Call Girls in Karachi | +923081633338 | Karachi Call Girls
Call Girls in Karachi  | +923081633338 | Karachi Call GirlsCall Girls in Karachi  | +923081633338 | Karachi Call Girls
Call Girls in Karachi | +923081633338 | Karachi Call GirlsAyesha Khan
 
Independent Andheri Call Girls 9833363713
Independent Andheri Call Girls 9833363713Independent Andheri Call Girls 9833363713
Independent Andheri Call Girls 9833363713Komal Khan
 
办理(PITT毕业证书)美国匹兹堡大学毕业证成绩单原版一比一
办理(PITT毕业证书)美国匹兹堡大学毕业证成绩单原版一比一办理(PITT毕业证书)美国匹兹堡大学毕业证成绩单原版一比一
办理(PITT毕业证书)美国匹兹堡大学毕业证成绩单原版一比一F La
 
907MTAMount Coventry University Bachelor's Diploma in Engineering
907MTAMount Coventry University Bachelor's Diploma in Engineering907MTAMount Coventry University Bachelor's Diploma in Engineering
907MTAMount Coventry University Bachelor's Diploma in EngineeringFi sss
 
(办理学位证)(Toledo毕业证)托莱多大学毕业证成绩单修改留信学历认证原版一模一样
(办理学位证)(Toledo毕业证)托莱多大学毕业证成绩单修改留信学历认证原版一模一样(办理学位证)(Toledo毕业证)托莱多大学毕业证成绩单修改留信学历认证原版一模一样
(办理学位证)(Toledo毕业证)托莱多大学毕业证成绩单修改留信学历认证原版一模一样gfghbihg
 
Digamma - CertiCon Team Skills and Qualifications
Digamma - CertiCon Team Skills and QualificationsDigamma - CertiCon Team Skills and Qualifications
Digamma - CertiCon Team Skills and QualificationsMihajloManjak
 
Digamma / CertiCon Company Presentation
Digamma / CertiCon Company  PresentationDigamma / CertiCon Company  Presentation
Digamma / CertiCon Company PresentationMihajloManjak
 
原版1:1定制宾州州立大学毕业证(PSU毕业证)#文凭成绩单#真实留信学历认证永久存档
原版1:1定制宾州州立大学毕业证(PSU毕业证)#文凭成绩单#真实留信学历认证永久存档原版1:1定制宾州州立大学毕业证(PSU毕业证)#文凭成绩单#真实留信学历认证永久存档
原版1:1定制宾州州立大学毕业证(PSU毕业证)#文凭成绩单#真实留信学历认证永久存档208367051
 
原版1:1定制阳光海岸大学毕业证(JCU毕业证)#文凭成绩单#真实留信学历认证永久存档
原版1:1定制阳光海岸大学毕业证(JCU毕业证)#文凭成绩单#真实留信学历认证永久存档原版1:1定制阳光海岸大学毕业证(JCU毕业证)#文凭成绩单#真实留信学历认证永久存档
原版1:1定制阳光海岸大学毕业证(JCU毕业证)#文凭成绩单#真实留信学历认证永久存档208367051
 
2024 TOP 10 most fuel-efficient vehicles according to the US agency
2024 TOP 10 most fuel-efficient vehicles according to the US agency2024 TOP 10 most fuel-efficient vehicles according to the US agency
2024 TOP 10 most fuel-efficient vehicles according to the US agencyHyundai Motor Group
 
办理克莱姆森大学毕业证成绩单|购买美国文凭证书
办理克莱姆森大学毕业证成绩单|购买美国文凭证书办理克莱姆森大学毕业证成绩单|购买美国文凭证书
办理克莱姆森大学毕业证成绩单|购买美国文凭证书zdzoqco
 
15 Disadvantages of Automated Farming: Balancing Efficiency with Environment ...
15 Disadvantages of Automated Farming: Balancing Efficiency with Environment ...15 Disadvantages of Automated Farming: Balancing Efficiency with Environment ...
15 Disadvantages of Automated Farming: Balancing Efficiency with Environment ...CIOWomenMagazine
 
原版1:1复刻俄亥俄州立大学毕业证OSU毕业证留信学历认证
原版1:1复刻俄亥俄州立大学毕业证OSU毕业证留信学历认证原版1:1复刻俄亥俄州立大学毕业证OSU毕业证留信学历认证
原版1:1复刻俄亥俄州立大学毕业证OSU毕业证留信学历认证jdkhjh
 
Not Sure About VW EGR Valve Health Look For These Symptoms
Not Sure About VW EGR Valve Health Look For These SymptomsNot Sure About VW EGR Valve Health Look For These Symptoms
Not Sure About VW EGR Valve Health Look For These SymptomsFifth Gear Automotive
 

Recently uploaded (20)

Equity & Freight Electrification by Jose Miguel Acosta Cordova
Equity & Freight Electrification by Jose Miguel Acosta CordovaEquity & Freight Electrification by Jose Miguel Acosta Cordova
Equity & Freight Electrification by Jose Miguel Acosta Cordova
 
UNIT-1-VEHICLE STRUCTURE AND ENGINES.ppt
UNIT-1-VEHICLE STRUCTURE AND ENGINES.pptUNIT-1-VEHICLE STRUCTURE AND ENGINES.ppt
UNIT-1-VEHICLE STRUCTURE AND ENGINES.ppt
 
UNIT-IV-STEERING, BRAKES AND SUSPENSION SYSTEMS.pptx
UNIT-IV-STEERING, BRAKES AND SUSPENSION SYSTEMS.pptxUNIT-IV-STEERING, BRAKES AND SUSPENSION SYSTEMS.pptx
UNIT-IV-STEERING, BRAKES AND SUSPENSION SYSTEMS.pptx
 
原版工艺美国普林斯顿大学毕业证Princeton毕业证成绩单修改留信学历认证
原版工艺美国普林斯顿大学毕业证Princeton毕业证成绩单修改留信学历认证原版工艺美国普林斯顿大学毕业证Princeton毕业证成绩单修改留信学历认证
原版工艺美国普林斯顿大学毕业证Princeton毕业证成绩单修改留信学历认证
 
sauth delhi call girls in Connaught Place🔝 9953056974 🔝 escort Service
sauth delhi call girls in  Connaught Place🔝 9953056974 🔝 escort Servicesauth delhi call girls in  Connaught Place🔝 9953056974 🔝 escort Service
sauth delhi call girls in Connaught Place🔝 9953056974 🔝 escort Service
 
Call Girls in Karachi | +923081633338 | Karachi Call Girls
Call Girls in Karachi  | +923081633338 | Karachi Call GirlsCall Girls in Karachi  | +923081633338 | Karachi Call Girls
Call Girls in Karachi | +923081633338 | Karachi Call Girls
 
Independent Andheri Call Girls 9833363713
Independent Andheri Call Girls 9833363713Independent Andheri Call Girls 9833363713
Independent Andheri Call Girls 9833363713
 
办理(PITT毕业证书)美国匹兹堡大学毕业证成绩单原版一比一
办理(PITT毕业证书)美国匹兹堡大学毕业证成绩单原版一比一办理(PITT毕业证书)美国匹兹堡大学毕业证成绩单原版一比一
办理(PITT毕业证书)美国匹兹堡大学毕业证成绩单原版一比一
 
907MTAMount Coventry University Bachelor's Diploma in Engineering
907MTAMount Coventry University Bachelor's Diploma in Engineering907MTAMount Coventry University Bachelor's Diploma in Engineering
907MTAMount Coventry University Bachelor's Diploma in Engineering
 
(办理学位证)(Toledo毕业证)托莱多大学毕业证成绩单修改留信学历认证原版一模一样
(办理学位证)(Toledo毕业证)托莱多大学毕业证成绩单修改留信学历认证原版一模一样(办理学位证)(Toledo毕业证)托莱多大学毕业证成绩单修改留信学历认证原版一模一样
(办理学位证)(Toledo毕业证)托莱多大学毕业证成绩单修改留信学历认证原版一模一样
 
Digamma - CertiCon Team Skills and Qualifications
Digamma - CertiCon Team Skills and QualificationsDigamma - CertiCon Team Skills and Qualifications
Digamma - CertiCon Team Skills and Qualifications
 
Digamma / CertiCon Company Presentation
Digamma / CertiCon Company  PresentationDigamma / CertiCon Company  Presentation
Digamma / CertiCon Company Presentation
 
原版1:1定制宾州州立大学毕业证(PSU毕业证)#文凭成绩单#真实留信学历认证永久存档
原版1:1定制宾州州立大学毕业证(PSU毕业证)#文凭成绩单#真实留信学历认证永久存档原版1:1定制宾州州立大学毕业证(PSU毕业证)#文凭成绩单#真实留信学历认证永久存档
原版1:1定制宾州州立大学毕业证(PSU毕业证)#文凭成绩单#真实留信学历认证永久存档
 
Hot Sexy call girls in Pira Garhi🔝 9953056974 🔝 escort Service
Hot Sexy call girls in Pira Garhi🔝 9953056974 🔝 escort ServiceHot Sexy call girls in Pira Garhi🔝 9953056974 🔝 escort Service
Hot Sexy call girls in Pira Garhi🔝 9953056974 🔝 escort Service
 
原版1:1定制阳光海岸大学毕业证(JCU毕业证)#文凭成绩单#真实留信学历认证永久存档
原版1:1定制阳光海岸大学毕业证(JCU毕业证)#文凭成绩单#真实留信学历认证永久存档原版1:1定制阳光海岸大学毕业证(JCU毕业证)#文凭成绩单#真实留信学历认证永久存档
原版1:1定制阳光海岸大学毕业证(JCU毕业证)#文凭成绩单#真实留信学历认证永久存档
 
2024 TOP 10 most fuel-efficient vehicles according to the US agency
2024 TOP 10 most fuel-efficient vehicles according to the US agency2024 TOP 10 most fuel-efficient vehicles according to the US agency
2024 TOP 10 most fuel-efficient vehicles according to the US agency
 
办理克莱姆森大学毕业证成绩单|购买美国文凭证书
办理克莱姆森大学毕业证成绩单|购买美国文凭证书办理克莱姆森大学毕业证成绩单|购买美国文凭证书
办理克莱姆森大学毕业证成绩单|购买美国文凭证书
 
15 Disadvantages of Automated Farming: Balancing Efficiency with Environment ...
15 Disadvantages of Automated Farming: Balancing Efficiency with Environment ...15 Disadvantages of Automated Farming: Balancing Efficiency with Environment ...
15 Disadvantages of Automated Farming: Balancing Efficiency with Environment ...
 
原版1:1复刻俄亥俄州立大学毕业证OSU毕业证留信学历认证
原版1:1复刻俄亥俄州立大学毕业证OSU毕业证留信学历认证原版1:1复刻俄亥俄州立大学毕业证OSU毕业证留信学历认证
原版1:1复刻俄亥俄州立大学毕业证OSU毕业证留信学历认证
 
Not Sure About VW EGR Valve Health Look For These Symptoms
Not Sure About VW EGR Valve Health Look For These SymptomsNot Sure About VW EGR Valve Health Look For These Symptoms
Not Sure About VW EGR Valve Health Look For These Symptoms
 

2007 owner manual honda cbr600rr

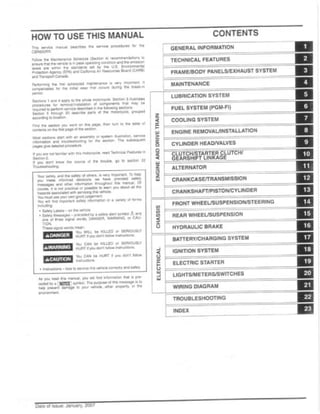
  • 1. HOW TO USE THIS MANUAL ------".... , .. _ . PH' ... _ _ ...._---_.._~ .....- ...- ..---_..._._......_...- CONTENTS ir!; en.--......,........w:. ~ I sw.l~~ll..~wure~ ~ ....TI_TOfI "' 1= CflAHK~ ~ 0IJMlI0N . VSTDI 1"-ELlcnooc: .TAATUI ~.1 ~ 55Xl5_
  • 2. SYMBOLS .....," _. ;<J ... _ _ _ _ _~~::.~.~-~!.~.~~.~.;-:.~.:.:::.:.~_::":_:...._.,,, ' '-" , ... , '.:',~ ......,_..._...,..,.' el r ' ...._"1___1>1_ ... l . G - ~ .._.....,._~' .........-,._.-._,.".._, """"""'" ...... _,-... .................:"..:,:.:.•, _ _ ~._.. , 'I. ....-."', ____-.p" __.,.. u, , •. _ .... _1U ....' __ .... ·,', _eo.." ..... .,. ho ',*. '"'' • 1IP4 ..... , MI" 0000 eoo-o U.OU. ~ •• ,, ...... 10:.2 •• ' u , .... .... '00._ ~ _ ... , _ I ...., _ _ _ •••,.,__"eo.-, _., .. ,, '0.0_.0 , -_.,.....- ... .. 0000_aA, _ _ a•• '. ",,_'-UOl __".., ....""'-......~- --_....._....'--_...........,."'- --- --....00f. _ _ ................ _ _ _ ••••_ ....". ,~
  • 3. 1. GENERAL INFORMATION SERVICE RULES ··..····..················......··..·..·· 1-2 MODEL IDENTIFICATION·········..················1-3 GENERAL SPECIFICATIONS ·..···················1 -5 LUBRICATION SYSTEM SPECIFICATIONS········································1-7 FUEL SYSTEM (PGM-FI) SPECIFICATIONS ····································..·1-7 COOLING SYSTEM SPECIFICATIONS ······1-7 CYLINDER HEADIVALVES SPECIFICATIONS ········································ 1-8 CLUTCH/STARTER CLUTCH/GEARSHIFT LlNKAGE SPECIFICATIONS ·······················1-8 CRANKCASE/TRANSMISSION SPECIFICATIONS······································.. 1-9 CRANKSHAFT/PISTON/CYLINDER SPECIFICATIONS········································ 1-9 FRONT WHEEL/SUSPENSION/STEERING SPECIFICATIONS ·······························..·.. ··1-10 REAR WHEELISUSPENSION SPECIFICATIONS ..................................... 1-10 HYDRAULIC BRAKE SPECIFICATIONS···1-11 BATIERY/CHARGING SYSTEM SPECIFICATIONS ..................................... 1-11 IGNITION SYSTEM SPECIFICATIONS ····1-11 ELECTRIC STARTER SPECIFICATIONS ..................................... 1-11 LIGHTS/METERS/SWITCHES SPECIFICATIONS ..................................... 1-12 STANDARD TORQUE VALUES··············· 1-13 ENGINE & FRAME TORQUE VALUES ···· 1-13 LUBRICATION & SEAL POINTS ·············· 1-19 CABLE & HARNESS ROUTING ···············1-21 EMISSION CONTROL SYSTEMS ············ 1-36 1-1
  • 4. GENERAL INFORMATION SERVICE RULES 1. Use genuine Honda or Honda-recommended parts and lubricants or their equivalents. Parts that don't meet Honda's design specifications may cause damage to the motorcycle. 2. Use the special tools designed tor thi s product to avoid damage and incorrect assembly. 3. Use only metrie tools when servicing the motorcycle. Metrie bolts, nuts and screws are not interchangeable with English lasteners. 4. Install new gaskets, O-rings, cotter pins, and lock plates when reassembling. 5. When tightening bolts or nuts, begin with the larger diameter or inner bolt lirs!. Then tighten to the specilied torque diagonally in incremental steps unless a particular sequence is specified. 6. Clean parts in cleaning solvent upon disassembly. Lubricate any sliding surfaces before reassembly. 7, After reassembly, check all parts tor proper installation and operation. 8. Route all electrical wires as shown in the Cable and Harness Routing (page 1-21). ABBREVIATION Throughout this manual, the following abbreviations are used to identify the respective parts or systems. Abbrev. tenn Full term CKP sensor Crankshaft Position sensor CMP sensor Camshaft Position sensor DLC Data Link Connector DTC Diagnostic Trouble Code ECM Engine Control Module ECT sensor Engine Coolant Temperature sensor EEPROM Electrically Erasable Programmabie Read Only Memory EGCV Exhaust Gas Control Valve EGCV POT Exhaust Gas Control Valve Potentiometer EOP switch Engine Dil Pressure switch EVAP Evaporative Emission HDS Honda Diagnostic System HESD Honda Electronic Steering Damper IACV Idle Air Control Valve lAT sensor Intake Air Temperature sensor MAP sensor Manifold Absolute Pressure sensor MIL Mallunction Indicator Lamp PAIR Pulsed Secondary Air Injection PGM-FI Programmed Fuel Injection SCS connector Service Check Short connector TP sensor Throttle Position sensor VS sensor Vehicle Speed sensor 1-2
  • 5. GENERAL INFORMATION MODEL IDENTIFICATION SERlAL NUMBERS The Vehiele Identifieation Number (VIN) is stamped on the right side of , - - - - - - - - - - - - - - - - - , the steering head. The engine serial number is stamped on the upper side of the ENGINE SERlAL NUMBER crankcase as shown. / / 1-~
  • 6. GENERAL INFORMATION The throttle body identification number is stamped on the right side of the throttle body as shown. LABELS The Safety Certification Label is located on lelt side of the frame. SAFETY CERTIFICATION LABEL The color label is attached as shown. When ordering color-coded parts, COLOR LABEL always specify the designated color code. The Emission Control Information Label is located on the rear fender B EMISSION CONTROL INFORMATION LABEL as shown. 1-4
  • 7. GENERAL INFORMATION GENERAL SPECIFICATIONS ITEM SPECIFICATIONS DIMENSIONS Overall length 2,010 mm (79.1 in) Overall width 685 mm (27.0 in) Overall height 1,105 mm (43.5 in) Wheelbase 1,370 mm (53.9 in) Seat height 820 mm (32.3 in) Footpeg height 389 mm (15.3 in) Ground clearance 135 mm (5.3 in) Curb weight Except California type 186 kg (410 Ibs) California type 187 kg (412 Ibs) Maximum weight Except Canada type 166 kg (366 Ibs) capacity Canada type 170 kg (375 Ibs) FRAME Frame type ~iamond Front suspension Telescopic fork Front axle travel 110 mm (4.3 in) Rear suspension Swingarm Rear axle travel 129mm(5.1 in) Front tire size 120nOZR17 M/C (58W) Rear tire size 180/55ZR17 M/C (73W) Front tire brand Bridgestone BT015F RADIAL E Dunlop Qualifier PTG Rear tire brand Bridgestone BT015R RADIAL E Dunlop Qualifier PTG Front brake Hydraulic double disc Rear brake Hydraulic single disc Caster angle 23" 55' Trail length 98 mm (3.9 in) Fuel tank capacity 18.0 liter (4.76 US gal, 3.96 Imp gal) ENGINE Cylinder arrangement 4 cylinders in-line, inclined 38Q trom ver- tical Bore and stroke 67.0 x 42.5 mm (2.64 x 1.67 in) Displacement 599 cm' (36.5 cu-in) Compression ratio 12.2 : 1 Valve train Chain driven, DOHC Intake valve opens at 1 mm (0.04 in) lift 21 " BTDC closes at 1 mm (0.04 in) lift 44" ABDC Exhaust opens at 1 mm (0.04 in) lift 40" BBDC valve closes at 1 mm (0.04 in) lift 5" ATDC Lubrication system Forced pressure and wet sump Oil pump type Trochoid Cooling system Liquid cooled Air filtration Paper element Engine dry weight 57 kg (126 Ibs) Firing order 1-2-4-3 FUEL DELIVERY Type PGM-FI SYSTEM Throttle bore 40 mm (1.6 in) DRIVE TRAIN Clutch system Multi-plate, wet Clutch operation system Cable operating Transmission Constant mesh, 6-speeds Primary reduction 2.111 (76/36) Final reduction 2.625 (42116) Gear ratio lst 2.750 (33/12 ) 2nd 2.000 (32116) 3rd 1.667 (30/18) 4th 1.444(26/18) 5th 1.304(30/23) 6th 1.208 (29/24) Gearshift pattern Left foot operated return system, 1 -N-2-3- 4-5-6 1-5
  • 8. GENERAL INFORMATION ITEM SPECIFICATIONS ELECTRICAL Ignition svstem Computer-controlled digita1 transistor- ized with electric advance Starting svstem Electric starter motor Charging svstem Triple phase output altemator Regulatorlrectifier FET shortedltriple phase, lull wave recti- fication Lighting svstem Battery 1-6
  • 9. GENERAL INFORMATION LUBRICATION SYSTEM SPECIFICATIONS Unit· mm (in) ITEM STANDARD SERVICE LIMIT Engine oil capacity After draining 2.7 liter (2.9 US qt, 2.4 Imp qt) - After oil filter change 2.8 liter (3.0 US qt, 2.5 Imp qt) - After disassembly 3.5 liter (3.7 US qt, 3.1 Imp qt) - Recommended engine ail Pro Honda GN4 4-stroke oil (U.SA and Canada) or equivalent motor ail API service classification: SG or Higher - JASO T 903 standard: MA Viscosity: SAE 1OW-30 Oil pressure at EOP switch 505 kPa (5.1 kgf/cm', 73 psi) at 6,000 rpm/(80°C/176°F) - Oil pump Tip clearance 0.15 (0.006) 0.20 (0.008) Body clearance 0.15 - 0.21 (0.006 0.008) 0.35 (0.014) Side clearance 0.04 0.09 (0.002 0.004) 0.17 (0.007) FUEL SYSTEM (PGM-FI) SPECIFICATIONS ITEM SPECIFICATIONS Throttle body identifica- ) Except Californ ia type GQ64C tian number I California type GQ64B Idle speed 1,400 + 100 rpm Throttle grip freeplay 2 4 mm (1/16 3/16 in) lAT sensor resistance (at 20°C/68°F) 1-4kl1 ECT sensor resistance (at 20°C/68°F) 2.3 - 2.6 kn Fuet injector resistance ) Primary injector 11 13n (at 20°C /68°F) I Secondary injector 11 13n PAIR control solenaid valve resistance (at 20°C/68°F) 23 - 27 n CMP sensor peak voltage (at 20°C/68°F) 0.7 V minimum CKP sensor peak voltage (at 20°C/68°F) 0.7 V minimum Fuel pressure at idle 343 kPa (3.5 kgf/cm' , 50 psi) Fuel pump flow (at 12V) 167 cm' (5.6 US oz, 5.9 Imp oz) minimum/10 seconds COOLING SYSTEM SPECIFICATIONS ITEM SPECIFICATIONS Coolant capacity I Radiator and engine 3.15 liter (3.33 US qt, 2.77 Imp qt) I Reserve tank 0.30 liter (0.32 US qt, 0.26 Imp qt) Radiator cap relief pressure 108 - 137 kPa (1.1 - 1.4 kgf/cm', 16 - 20 psi) Thermostat Begin to open 80 - 84°C (176 -183°F) Fullyopen 95°C (203°F) Valve lift 8 mm (0.3 in) minimum Recommended antifreeze Pro Honda HP Caolant or an equivalent high quality ethyl- ene glycol antifreeze containing sllicate free corrosion inhibitors Standard coolant concentratien 1:1 (mixture with distilled water) 1-7
  • 10. GENERAL INFORMATION CYLINDER HEAD/VALVES SPECIFICATIONS Unit· mm (in) ITEM STANDARD SERVICE LIMIT Cylinder compression 1,226 kPa (12.5 kgf/cm', 178psi) -at 350 rpm Valve clearance IN 0.20 ±0.03(0.008 + 0.001) - EX 0.28 ±0.03 (0.011 ± 0.001) Camshaft Cam lobe height IN 36.36 - 36.60 (1.431 - 1.441) 36.34(1.431 ) EX 35.34- 35.58(1.391 -1.401) 35.32 (1.391) Runout - 0.05(0.002) Oil clearance 0.020 0.062 (0.0008 0.0024) 0.10 (0.004) Valve lifter Valve lifter O.D. IN 25.978 - 25.993(1.0228 - 1.0233) 25.97 (1.022) EX 22.478 - 22.493 (0.8850 - 0.8855) 22.47 (0.885) Valve lifter bore I.D. IN 26.010 26.026(1.0240 1.0246) 26.04(1.025) EX 22.510 - 22.526(0.8862 - 0.8868) 22.54 (0.887) Valve, valve Valve stem O.D. IN 3.975 - 3.990 (0.1565 - 0.1571) 3.965(0.1561 ) guide EX 3.965 - 3.980 (0. 1561 0.1 567) 3.955 (0.1557) Valve guide I.D. IN/EX 4.000 4.012(0.1575 0.1580) 4.04(0.159) Stem·to-guide clearance IN 0.010 - 0.037(0.0004 - 0.0015) 0.075(0.0030) EX 0.020 - 0.047 (0.0008 0.0019) 0.085 (0.0033) Valve guide projection IN 17.1 17.4(0.67 0.69) above cylinder head EX 15.8 - 16.1 (0.62 - 0.63) - Valve seat width IN/EX 0.90 - 1.10 (0.035 - 0.043) 1.5 (0.06) Valve spring IN Inner 36.17 (1.424) 35.1 (1.38) tree length Outer 40.38(1.590) 39.2(1.54) EX 40.80 (1.606) 39.6(1.56) Cylinder head warpage 0.10 (0.004) CLUTCH/STARTER CLUTCH/GEARSHIFT LlNKAGE SPECIFICATIONS Unit" mm (in) ITEM STANDARD SERVICE LIMIT Clutch lever treeplay 10 - 20 (3/8 13/16) Clutch Spring tree length 46.7(1.84) 45.8 (1.80) Disc thickness 2.92 - 3.08(0.115 - 0.121) 2.6 (0.10) Plate warpage - 0.30 (0.012) Clutch outer guide I.D. 24.993 25.003(0.9840 0.9844) 25.013(0.9848) O.D. 34.996 - 35.004(1.3778 -1.378 1) 34.986(1.3774) Primary driven gear I.D. 41.000 - 41.016(1.6142 - 1.6148) 41.026(1.6152) Oil pump drive sprocket I I.D. 25.000 25.021 (0.9843 0.9851 ) 25.031 (0.9855) guide O.D. 34.950 - 34.975(1.3760 - 1.3770) 34.940 (1.3756) Oil pump drive sprocket I.D. 35.025 - 35.145(1.3789 -1.3837) 35.155 (1.3841 ) Mainshaft O.D. at clutch outer guide 24.980 - 24.990 (0.9835 0.9839) 24.960 (0.9827) Mainshaft O.D. at oil pump drive sprocket guide 24.980 - 24.990 (0.9835 - 0.9839) 24.960 (0.9827) Starter driven gear boss O.D. 45.657 - 45.673(1.7975 -1.7981) 45.642 (1.7969) 1-8
  • 11. GENERAL INFORMATION CRANKCASE/TRANSMISSION SPECIFICATIONS Unit· mm (in) ITEM STANDARD SERVICE LIMIT Shift lork I I.O. 12.000 12.018 (0.4724 0.4731 ) 12.03 (0.474) Claw thickness 5.93 - 6.00 (0.233 - 0.236) 5.9 (0.23) Shift lork shaft O.O. 11.957 - 11.968 (0.4707 - 0.4712) 11.95 (0.470) Transmission Gear I.O. M5,M6 28.000 - 28.021 (1.1024 1.1032) 28.04 (1.104) Cl 24.000 24.021 (0.9449 0.9457) 24.04 (0.946) C2, C3,C4 31.000 - 31.025 (1.2205 -1.2215) 31.04 (1.222) Gear busing O.O. M5, M6 27.959 - 27.980 (1.1007 - 1.1016) 27.94 (1.100) C2 30.955 - 30.980 (1.2187 1.2197) 30.94 (1.218) C3,C4 30.950 - 30.975 (1.2 185 -1.2195) 30.93 (1.218) Gear-to-bushing M5, M6 0.020 - 0.062 (0.0008 - 0.0024) 0.10 (0.004) clearance C2 0.020 - 0.070 (0.0008 0.0028) 0.10 (0.004) C3,C4 0.025 0.075 (0.0010 0.0030) 0.11 (0.004) Gear bushing I.O. M5 24.985 - 25.006 (0.9837 - 0.9845) 25.016 (0.9849) C2 27.985 - 28.006 (1.1018 -1.1026) 28.021 (1.1032) Mainshaft O.O. at M5 24.967 24.980 (0.9830 - 0.9835) 24.96 (0.983) Countershaft O.O. at C2 27.967 - 27.980 (1.1011 -1.1016) 27.96 (1. 101 ) Sushing to shaft M5 0.005 - 0.039 (0.0002 - 0.0015) 0.06 (0.002) clearance C2 0.005 0.039 (0.0002 0.0015) 0.06 (0.002) CRANKSHAFT/PISTON/CYLINDER SPECIFICATIONS Unit· mm (in) ITEM STANDARD SERVICE LIMIT Crankshaft Connecting rad side clearance 0.15 0.30 (0.006 0.012) 0.35 (0.014) Crankpin bearing all clearance 0.028 0.052 (0.0011 0.0020) 0.06 (0.002) Main journal bearing Dil clearance 0.020 - 0.038 (0.0008 - 0.0015) 0.05 (0.002) Runout 0.05 (0.002) Piston, piston Piston O.O. at 6 mm (0.2 in) lrom 66.965 - 66.985 (2.6364 - 2.6372) 66.90 (2.634) rings bottom Piston pin bare I.O. 15.030 - 15.044 (0.5917 - 0.5923) 15.07 (0.593) Piston pin O.O. 14.994 - 15.000 (0.5903 0.5906) 14.98 (0.590) Piston-ta-piston pin clearance 0.03 0.05 (0.001 0.002) 0.09 (0.004) Piston ring end Top 0.10 - 0.20 (0.004 - 0.008) 0.4 (0.02) gap Second 0.21 - 0.31 (0.008 - 0.012) 0.5 (0.02 ) Oil 0.2 - 0.7 (0.01 - 0.03) 1.0 (0.04) (side rail) Piston ring-ta-ring Top 0.030 - 0.060 (0.0012 - 0.0024) 0.10 (0.004) groove clearance Second 0.115 - 0.150 (0.0045 - 0.0059) 0.08 (0.003 ) Cylinder I.O. 67.000 67.015 (2.6378 2.6384) 67.10 (2.642) Out ol round - 0.10 (0.004) Taper - 0.10 (0.004) Warpage - 0.10 (0.004) Cylinder-ta-piston clearance 0.015 - 0.050 (0.0006 - 0.0020) 0.10 (0.004) Connecting rad small e nd I.O. 15.030 - 15.044 (0.591 7 - 0.5923 ) 15.05 (0.593 ) Connecting rad-ta-piston pin clea rance 0.03 0.05 (0.001 0.002) 0.07 (0.003) 1-9
  • 12. GENERAL INFORMATION FRONT WHEEL/SUSPENSION/STEERING SPECIFICATIONS Unit· mm (in) ITEM STANDARD SERVICE LIMIT Minimum tire tread depth - 1.5 (0.06) Cold tire pres- ) Driver only 250 kPa (2.50 kgf/cm' , 36 psi) - sure Driver and passenger 250 kPa (2.50 kgf/cm' , 36 psi) - Axle runout 0.2 (0.01) Wheel rim Radial - 2.0 (0.08) runout ) Axial - 2.0 (0.08) Wheel balance weight 60 g (2. lal ) - max. Fork Spring free length 243.4 (9.58) 238.5 (9.39) Pipe runout - 0.20 (0.008) Recommended fork fluid Pro Honda Suspension Fluid SS-47 -(1OW) Fluid level 93 (3.7) - Fluid capacity 413 ± 2.5 cm' (14.0 ± 0.08 US Ol, 14.5 ± -0.09 Imp Ol) Pre-laad adjuster initial setting 5 turns from minimum Rebound damping adjuster initial 2-1/2 turns out from full hard -setting Compressien damping adjuster ini- 2 turns out from full hard -tial setting Steering head bearing pre-laad 14.7 - 17.7 N (1.5 -1.8 kgf) - REAR WHEEL/ SUSPENSION SPECIFICATIONS Unit· mm (in) ITEM STANDARD SERVICE LIMIT Minimum tire tread depth - 2.0 (0.08) Cold tire pres- I Driver only 290 kPa (2.90 kgf/cm', 42 psi) sure Driver and passenger 290 kPa (2.90 kgf/cm' , 42 psi) - Axle runout - 0.2 (0.01) Wheel rim I Radial 2.0 (0.08) runout ) Axial 2.0 (0.08) Wheel balance weight 60 g (2.1 Ol) - max. Drive chain Sile/link I OIO DID525HV KAI-11 2YB I RK RK525ROZ6-112LJFZ Slack 30 - 40 (1.2 - 1.6) - Shock Spring pre-laad adjuster standard Position 2 -absorber positien Rebound damping adjuster initial 2-1/2 turns out from full hard -setting Compression damping adjuster ini- 22 clicks out from full hard - tial setting 1-10
  • 13. GENERAL INFORMATION HYDRAULIC BRAKE SPECIFICATIONS Unit· mm (in) ITEM STANDARD SERVICE LIMIT Front Specified brake fluid DOT 4 - Brake disc th ickness 4.3 4.5 (0.17 0.18) 3.5 (0.14) Brake disc runout - 0.30 (0.012) Master cylinder I.O. 17.460 - 17.503 (0.6874 - 0.6891) 17.515 (0.6896) Master piston O.O. 17.321 17.367 (0.6819 0.6837) 17.309 (0.6815) Caliper cylinder I.O. A 32.080 - 32.130 (1.2630 -1.2650) 32.140 (1.2654) B 30.280 - 30.330 (1.1921 - 1.19411 30.340 (1. 1945) Caliper piston O.O. A 31.967 - 32.000 (1.2585 1.2598) 31.957 (1.2581) B 30.167 30.200 (1.1877 1.1890) 30.157 (1.1873) Rear Specified brake fluid 00T4 - Brake disc thickness 4.8 - 5.2 (0.19 - 0.20) 4.0 (0.16) 8rake disc runout 0.30 (0.012) Master cylinder I.O. 14.000 14.043 (0.5512 0.5529) 14.055 (0.5533) Master piston O.O. 13.957 - 13.984 (0.5495 - 0.5506) 13.945 (0.5490) Caliper cylinder I.O. 30.230 30.280 (1.1902 1.1921) 30.290 (1.1925) Caliper piston O.O. 30.082 30.115 (1.1843 1.1856) 30.140 (1.1866) BATTERYICHARGING SYSTEM SPECIFICATIONS ITEM SPECIFICATIONS Battery Capacity 12V 8.6 Ah Current leakage 2.0 mA max. Voltage (20' C/68' F) Fully 13.0 - 13.2 V charged Needs Below 12.4 V charging Charging current Normal 0.9 Al5 - 10 h Ouick 4.5 All h Alternator Capacity 0.342 kW/5.000 rpm Charging caiI resistance (20' C/68' F) 0. 1 -1.0f! IGNITION SYSTEM SPECIFICATIONS ITEM SPECIFICATIONS Spark plug (Iridium) I NGK IMR9C-9HES I OENSO VUH270 Spark plug gap 0.80 0.90 mm (0.031 0.035 in) CKP sensor peak voltage 0.7 V minimum Ignition timing ("F"mark) 7.8' BTOC at idle ELECTRIC STARTER SPECIFICATIONS Unit: mm (in) ITEM STANDARD SERVICE LIMIT Starter motor brush length 12.0 (0.47) 6.5 (0.26) 1-11
  • 14. GENERAL INFORMATION LlGHTS/METERS/SWITCHES SPECIFICATIONS ITEM SPECIFICATIONS Bulbs Headlight I Hi 12V-55W I Lo 12 V 55W Position light LED Brake/tail/license light LED Front turn signallposition light 12 V - 23/8 W x 2 Rear turn signal light 12 V 21 Wx 2 Instrument light LED Turn signal indicator LED High beam indicator LED Neutral indicator LED MIL LED HESD indicator LED Engine oil pressure indicator LED Engine coolant temperature indicator LED Fuse Main fuse 30 A Sub fuse 10 A x 4, 20 A x 3 Tachometer peak voltage 10.5 V minimum EeT sensor resistance I 80°C (176°F) 2.1 - 2.6 kn I 120' C (248°F) 0.6 0.7 kn 1-12
  • 15. GENERAL INFORMATION STANDARD TORQUE VALUES FASTENER TVPE TORQUE FASTENER TVPE N·m (kgf·m, IbHt) 5 mm bolt and nut 5.2 (0.5, 3.8) 5 mm screw 6 mm bolt and nut 10 (1.0, 7) 6 mm screw 8 mm bolt and nut 22 (2.2, 16) 6 mm flange bolt (8 mm head, large flange) 10 mm bolt and nut 34 (3.5, 25) 8 mm flange bolt and nut 12 mm bolt and nut 54 (5.5, 40) 10 mm flange bolt and nut ENGINE & FRAME TORQUE VALUES • Torque specifications listed below are for important fasteners. • Others should be tightened to standard torque values listed above. ENGINE MAINTENANCE Spark plug Timing hole cap Oil filter eartridge Oil drain bolt Oil filter boss ITEM LUBRICATION SYSTEM ITEM Oil pump assembly bolt Oil pump driven spreeket bolt Oil cooler bolt Oil pipe A mounting bolt FUEL SYSTEM (PGM-FI) ITEM ECT sensor Primary fuel rail mounting bolt Seeondary fuel rail mounting bolt IACV setting plate torx serew Knock sensor mounting bolt COOLING SYSTEM ITEM Water pump assembly bolt Thermostat housing cover bolt ENGINE REMOVALIINSTALLATION ITEM Drive sproeket bolt Q'TV 4 1 1 1 1 Q'TV 1 1 1 2 Q'TV 1 4 4 2 1 Q'TV 4 2 Q'TV 1 THREAD DIA. (mm) 10 45 20 12 20 THREAD DIA. (mm) 6 6 20 6 THREAD DIA. (mm) 12 5 5 4 8 THREAD DIA. (mm) 6 6 THREAD DIA. (mm) 10 TORQUE N·m (kgf·m, Ibf·ft) 16 (1.6, 12) 18 (1.8, 13) 26 (2.7,19) 30(3.1,22) - TORQUE N·m (kgf·m, Ibf·ft) 12 (1.2, 9) 15 (1.5,11) 59 (6.0, 44) 12 (1.2, 9) TORQUE N·m (kgf·m, Ibf·ft) 23 (2.3, 17) 5.1 (0.5,3.8) 5.3 (0.5, 3.9) 2.1 (0.2, 1.5) 22 (2.2, 16) TORQUE N·m (kgf·m, Ibf·ft) 12 (1.2, 9) 12 (1.2, 9) TORQUE N·m (kgf·m, Ibf·ft) 54 (5.5, 40) TORQUE N·m (kgf·m, IbHt) 4.2 (0.4, 3.1 ) 9.0 (1.0, 6.6) 12 (1.2, 9) 27 (2.8, 20) 39 (4.0, 29) REMARKS App[y,grease to the threads Apply oil to the thrads and O,ring See page 4-18 Apply loeking agent to the crankcase side threads REMARKS CT bolt Apply loeking agent to the threads Apply oil to the threads Apply loeking agent to the threads REMARKS REMARKS CT bolt CT bolt REMARKS 1-13
  • 16. GENERAL INFORMATION CYLINDER HEADIVALVES ITEM Q'TV THREAD TORQUE REMARKS DIA, (mm) N'm (kgl·m, Ibl·ft) Cylinder head bolt 10 9 47 (4.8, 35) Apply oil to the threads and seating surface Camshaft holder bolt 20 6 12 (1.2, 9) Apply oil to the threads and seating surface Cylinder head cover bolt 4 6 10 (1.0, 7) PAIR check valve cover bolt 4 6 12 (1.2, 9) Apply locking agent to the threads Cam sprocket bolt 4 7 20 (2.0, 15) Apply locking agent to the threads CMP sensor rotor bolt 2 6 12 (1.2, 9) Apply locking agent to the th reads Cam chain tensioner A pivot bolt 1 6 12 (1.2, 9) Apply locking agent to the threads Cam chain tensioner B pivot bolt 1 10 20 (2.0, 15) Apply locking agent to the threads Cam chain guide A bolt 1 6 12 (1.2, 9) Insulator mounting bolt 6 6 12(1.2, 9) CLUTCH/ STARTER CLUTCH/ GEARSHIFT LlNKAGE ITEM Q'TV THREAD TORQUE REMARKS DIA. (mm ) N·m (kgl·m, Ibl·ft) Clutch center lock nut 1 22 128 (13.1, 94) Apply oil to the threads and seating surface, stake Clutch spring bolt 5 6 12 (1.2, 9) Shift drum center bolt 1 8 23 (2.3, 17) Apply locking agent to the threads Shift drum stopper arm pivot bolt 1 6 12 (1.2, 9) Apply locking agent to the threads Gearshift spindie stopper pin 1 8 22 (2.2, 16) Starter clutch mounting bolt 1 ~o 83 (8.5, 61) Apply oil to the threads and seating surface ALTERNATOR ITEM Q'TV THREAD TORQUE REMARKS DIA. (mm ) N·m (kgl ·m, Ibl ·ft) Stator mounting bolt 4 6 12 (1.2, 9) Flywheel bolt 1 10 103 (10.5, 76) Apply oil to the threads and seating surface Stator wire clamp bolt 1 6 12(1.2,9) CT bolt CRANKCASE/TRANSMISSION ITEM Q'TV THREAD TORQUE REMARKS DIA. (mm) N·m (kgl·m, Ibl·ft) Mainshaft bearing set plate bolt 3 6 12 (1.2, 9) Apply locking agent to the threads Shift drum bearing set bolt 2 6 12 (1.2,9) Apply locki ng agent to the threads Crankcase 6 mm bolt 10 6 12(1.2, 9) 8 mm bolt 6 8 24 (2.4, 18) 8 mm bolt (main journal bolt) 10 8 15 (1.5, 11 ) + 120" See page 12-1 7 Replace with a new one 10 mm bolt 1 10 39 (4.0, 29) 1-14
  • 17. GENERAL INFORMATION CRANKSHAFT/ PISTON/ CYLINDER ITEM Q'TV THREAD TORQUE REMARKS DIA. (mm) N·m (kgf·m, Ibf·ft) Crankpin bearing cap bolt (new) 8 7 20 (2.0, 15) + 90' Apply oil to the threads and seating surface Crankpin bearing cap bolt (retightening) 8 7 1411.4, 10) + 90' Apply oil to the threads and seating surface Oil iet pipe mounting bolt 2 6 12 (1.2, 9) Apply locking agent to the threads ELECTRIC STARTER ITEM Q'TV THREAD TORQUE REMARKS DIA. (mm) N·m Ikgf·m, Ibf·ft) Starter motor terminal nut 1 6 1011.0, 7) LlGHTS/METERS/SWITCHES ITEM Q'TV THREAD TORQUE REMARKS DIA. (mm) N·m (kgf·m, Ibf·ft) EOP switch 1 PT 1/8 12 (1.2, 9) Apply sealant to the threads EOP switch wire terminal bolt 1 4 2.010.2, 1.5) Neutral switch 1 10 1211.2,9) 1-15
  • 18. GENERAL INFORMATION FRAME FRAME/ BODY PANELS/ EXHAUST SYSTEM ITEM Q'TV THREAD TORQUE REMARKS DIA. (mm) N·m (kgl·m, Ibf.ft) Lower cowlMto-middle cowl screw 4 5 1.5 (0.2, 1.1) Windscreen mounting screw 6 5 0.45 (0.05, 0.3) Seat rail mounting nut 2 10 54 (5.5, 40) Seat rail mounting bolt 2 10 44 (4.5, 32) Seat rail assembly bolt 2 8 30 (3.1 , 22) Muffler band bolt 1 8 17 (1.7, 13) Exhau.st pipe joint nut 8 7 12( 1.2, 9) Front fender mounting screw 6 6 12( 1.2,9) Rearview mirror mounting bolt 4 6 7.0 (0.7,5.2) Exhaust pipe mounting bolt 1 8 17 (1.7, 13) Main step bracket mounting bolt 4 8 37 (3.8, 27) Passenger step bracket mounting bolt 4 8 26 (2.7, 19) Exhaust pipe stud 8 8 - See page 3-26 Position light mounting screw 2 5 1.8 (0.2, 1.3) Rear lender bracket mounting bolt 4 6 12 (1.2, 9) Air duet mounting bolt 4 6 12(1.2, 9) ALOC bolt; replace with a new one MAINTENANCE ITEM Q'TY THREAD TORQUE REMARKS DIA. (mm) N·m (kgl·m, Ibl·ft) Air cleaner element mounting screw 3 5 4.2 (0.4, 3.1) FUEL SYSTEM (PGM-FI) ITEM Q'TV THREAD TORQUE REMARKS DIA. (mm) N·m (kgl·m, Ibl·ft) Fuel pump mounting nut 6 6 12( 1.2, 9) EGCV pulley nut 1 6 5.0 (0.5, 3.7) Bank angle sensor mounting screw 2 4 1.5 (0.2, 1.1 ) Fuel tank mounting bolt 2 8 30(3.1 , 22) Air funnei/lower housing mounting screw 6 5 4.2 (0.4, 3.1) lAT sensor mounting screw 2 5 1.1 (0.1, 0.8) MAP sensor mounting screw 1 5 1.1 (0.1, 0.8) ECM setting plate screw 2 4 0.7 (0.07, 0.5) COOLING SYSTEM ITEM Q'TV THREAD TORQUE REMARKS DIA. (mm) N·m (kgl·m, Ibl·ft) Fan motor nut 3 5 4.9 (0.5, 3.6) Fan motor shroud mounting bolt 3 6 8.4 (0.9, 6.2) ENGINE REMOVALlINSTALLATION ITEM Q'TV THREAD TORQUE REMARKS DIA. (mm) N·m (kgl·m, Ibl·ft) Front engine hanger bolt 2 12 54 (5.5, 40) Upper engine hanger adjusting bolt 1 20 10 (1.0, 7) Upper engine hanger loek nut 1 20 54 (5.5, 40) Upper engine hanger nut 1 12 59 (6.0, 44) Lower engine hanger adjusting bolt 1 20 10 (1.0, 7) Lower engine hanger loek nut 1 20 54 (5.5, 40) Lower angine hanger nut 1 12 59 (6.0, 44) 1-16
  • 19. GENERAL INFORMATION FRONT WHEELISUSPENSION/STEERING ITEM a'TV THREAD TORaUE REMARKS DIA. (mm) N·m (kgf·m, IbHt) Handlebar weight mounting screw 2 6 9.8 (1.0, 7) ALOC screw; replace with a new one Front brake disc bolt 12 6 20 (2.0, 15) ALOC screw; rep lace with a new one Front axle bolt 1 14 59 (6.0, 44) Front axle holder bolt 4 8 22 (2.2, 16) Fork socket bolt 2 10 34 (3.5, 25) Fork damper rod loek nut 2 10 20 (2.0, 15) Fork bolt 2 44 34 (3.5, 25) Handlebar pinch bolt 2 8 27 (2.8, 20) Top bridge pinch bolt 2 8 22 (2.2, 16) Bottom bridge pinch bolt 2 8 27 (2.8, 20) Steering stem adjusting nut 1 26 - See page 14-41 Steering stem adjusting loek nut 1 26 - See page 14-41 Steering stem nut 1 24 103 (10.5, 76) Compression adjuster plug bolt 2 14 17 (1.7, 13) Steering damper mounting bolt 4 6 10 (1.0, 7) Second arm nut 2 6 12 (1.2, 9) U-nut REAR WHEEL/SUSPENSION ITEM a 'TV THREAD TORaUE REMARKS DIA. (mm) N·m (kgf·m, Ibf·ft) Rear brake disc bolt 4 8 42 (4.3, 31) ALOC bolt; replace with a new one Oriven sprocket nut 6 10 64 (6.5, 47) U-nut Rear axle nut 1 22 113 (11.5, 83) U-nut Rear shock absorber mounting nut 2 10 44 (4.5, 32) U-nut Shock arm-to-swingarm nut 1 10 44 (4.5, 32) U-nut Dri ve chain case bolt 3 6 12 (1.2, 9) Drive chain slider bolt 3 6 9.0 (0.9, 6.6) ALOC bolt; replace with a new one Swingarm pivot adjusting bolt 1 30 12 (1.2, 9) Apply oil to the threads Swingarm pivot loek nut 1 30 64 (6.5, 47) Swingarm pivot nut 1 18 93 (9.5, 69) Shock link nut 2 10 44 (4.5, 32) U-nut 1-17
  • 20. GENERAL INFORMATION HYDRAULIC BRAKE ITEM Q'TV THREAD TORQUE REMARKS DIA. (mm) N·m (kgl·m, IbHt) Front master cylinder reserve tank stopper plate screw 1 4 1.2 (0.1 , 0.9) Front brake lever pivot bolt 1 6 la (0. 1, 0.7) ApplV silicone grease to the slid- ing surface Front brake lever pivot nut 1 6 6.0 (0.6, 4.4) Front brake light switch screw 1 4 l2 (0.1, 0.9) Front master cvlinder holder bolt 2 6 12 (l2, 9) Front brake caliper assemblv torx bolt 8 8 22 (2.2, 16) ApplV locking agent to the threads Front brake caliper mounting bolt 4 10 45 (4.6, 33) ALOC bolt; replace with a new one Front brake reserve tank stav bolt 1 6 12 Il2,9) Rear master cylinder push rad loek nut 1 8 18 11.8, 13) Rear master cylinder reserve tank cap screw 2 4 l5 (0.2, 1.1) Rear master cylinder mounting bolt 2 6 10 (la, 7) Rear brake reserve tank mounting bolt 1 6 12 Il2,9) Rear brake hose joint screw 1 4 l5 (0.2, 1.1) ApplV locking agent to the threads Front brake caliper pad pin 2 10 15 Il5, 11) Rear brake caliper pad pin 1 10 18 (l8, 13) Brake hose oil bolt 5 10 3413.5,25) Front brake hose clamp bolt 1 6 9.0 10.9, 6.6) Front brake hose clamp nut 1 6 10 IlO, 7) Front brake hose 3-waV joint bolt 1 6 10 (1.0, 7) Front brake caliper bleed valve 2 8 8.0 10.8, 5.9) Rear brake caliper bleed valve 1 8 6.0 10.6, 4.4) LlGHTS/METERS/SWITCHES ITEM Q'TV THREAD TORQUE REMARKS DIA. (mm) N·m (kgl·m, Ibl·ft) Combination meter screw 9 5 la 10.1, 0.7) Ignition switch mounting bolt 2 8 24 (2.4, 18) Replace with a new one Headlight mounting screw 2 5 l8 10.2, l3) Sidestand switch mounting bolt 1 6 10 IlO, 7) ALOC bolt; replace with a new one Right handlebar switch housing screw 2 4 0.9 (0.09, 0.7) Mirror stay mounting bolt 6 6 12 11.2, 9) ALOC bolt; replace with a new one OTHERS ITEM Q'TV THREAD TORQUE REMARKS DIA. (mm) N·m (kgl·m, Ibl·ft) Sidestand pivot bolt 1 10 10 (1.0, 7) Sidestand pivot nut 1 10 29 (3.0, 21) 1-18
  • 21. LUBRICATION & SEAL POINTS ENGINE MATERlAL LOCATION Liquid sealant (Three Crankcase mating surface Bond 1207B or equiva- Dil pan mating surface lent) Right crankcase cover mating surface Alternator cover mating surface EOP switch threads Alternator cover wire grommet Right crankcase cover wire grommet Cylinder head semi-circular cut-out Molybdenum disulfide Main journal bearing sliding surface oil (a mixture of 1/2 Piston pin sliding surface engine oil and 1/2 Crankpin bearing sliding surface molybdenum disulfide Connecting rad small end inner surface grease) Crankshaft thrust surface Camshaft lobes and journals Valve stem (valve guide sliding surface) Valve lifter sliding surface Dil pump drive sproeket guide sliding surface Water pump shaft and thrust washer sliding surface Cluteh outer sliding surface Cluteh outer guide sliding surface M3/4, C5, C6 shifter gear (shift fork grooves) Starter reduction gear sliding surface Starter idle gear shaft sliding surface Cylinder head bolt threads and seating surface Engine oil Piston and piston ring sliding surface Cluteh dise surface Starter one-way clutch sliding surface Crankpin bearing cap bolt threads and seating surface Flywheel bolt threads and seating surface CJutch center loek nut threads and seating surface Dil filter eartridge threads and O-ring GENERAL INFORMATION REMARKS See page 12-16 See page 5-7 See page 10-26 See page 11-6 See page 9-34 Dil cooler bolt threads and sealing washer seating surface Camshaft holder bolt threads and seating surface Each gear teeth and ratating surface Eaeh bearing Eaeh O-ring Eaeh sea I ring Other ratating area and sliding surface Starter cluteh mounting bolt threads and seating surface Multi-purpose grease Timing hole cap threads Eaeh oil seal lips Loeking agent CMP sensor rotor bolt threads Dil pump driven sproeket bolt threads Coating w idth: 6.5 ± 1 mm Shift drum bearing set plate bolt threads Coating w idth: 6.5 ± 1 mm Mainshaft bearing set plate bolt threads Coating width: 6.5 ± 1 mm Cam sproeket bolt threads Coating width: 6.5 ± 1 rnm Shift drum center bolt threads Coating width: 6.5 ± 1 mm Cam ehain tensioner A pivot bolt threads Coating w idth: 6.5 ± 1 mm Cam ehain tensioner B pivot bolt threads Coating width: 6.5 ± 1 mm Shift drum stopper arm pivot bolt threads Coating width: 6.5 ± 1 mm Dil pump drive ehain guide mounting bolt threads Coating w idth: 6.5 ± 1 mm Shift spindie setting plate bolt threads Coating width: 6.5 ± 1 mm Dil jet pipe mounting bolt threads Coating width: 6.5 ± 1 mm Dil level plate bolt threads Coating w idth: 6.5 ± 1 mm Dil pipe AlB mounting bolt threads Coating width: 6.5 ± 1 mm PAIR check valve cover bolt threads Dil filter boss threads (crankcase side) Coating width: 6.5 + 1 mm 1-19
  • 22. GENERAL INFORMATION FRAME MATERlAL LOCATION REMARKS Multi-purpose grease Passenger seat catch hook sliding area Front wheel dust seal lips Rear wheel dust seal lips Throttle pipe sliding surface Clutch lever pivot bolt sliding surface Rear brake pedal pivot sliding surface Gearshift pedaI link tie rod bali joints Gearshift pedal pivot sliding surface Sidestand pivot sliding surface Axle surface Swingarm pivot bolt surface Urea based multi-pur- Steering head bearing sliding surface 3 5g pose grease with Steering head dust seal lips 3-5g extreme pressu re Steering stem adjusting nut threads 0.' - 0.3 g (example: EXCELITE EP2 manufactured by KYODO YUSHI, Japan) or equivalent Multi-purpose grease Swingarm pivot bearings (Shell Alvania EP2 or Swingarm pivot dust seallips equivalent) Shock link needie bearings Shock link dust seal lips Shock absorber needie bearing Shock absorber dust seal lips Cable lubricant Throttle cable inside Clutch cable inside EGCV control cable inside Honda bond A or Pro Handlebar grip rubber inner surface Honda hand grip cement (U.S.A. only) Engine oil Swingarm pivot adjusting bolt threads Each a -ring Silicone grease Front brake push rod-tc-master piston contact surface Front brake push red tip Front brake lever pivot bolt sliding surface 0.' g Rear brake master piston-ta-push rod contacting area 0.' g Rear brake caliper pin sliding surface 0.4 g Rear brake caliper pad pin a -ring DOT 4 brake fluid 8rake master piston and cups 8rake caliper piston and piston saais Fork fluid Fork a-ring Fork dust seal and oil seal lips Locking agent Front brake caliper assembly torx bolt threads Cooling fan nut threads '-20
  • 23. GENERAL INFORMATION CABLE & HARNESS ROUTING COMBINATION METER 20P (Blaek) CONNECTOR POSITION LlGHTWIRE BANK ANGLE SENSOR 3P (Blaek) CONNECTOR HEADLIGHT 2P (Natural) CONNECTOR e e LEFTTURN SIGNAL WIRE BANKANGLE SENSOR WIRE HEADLIGHT 2P (Natural) CONNECTOR 1-21
  • 24. GENERAllNFORMATION 1-22 THROTILE CABLES FRONT BRAKE LIGHT SWITCH WIRE FRONT BRAKE HOSE CLUTCH CABLE LEFT HANDLEBAR SWITCH WIRE CLUTCH CABLE HORNWIRE SWITCH WIRE HEADLIGHT/BANKANGLE SENSOR WIRE THROTILE CABLES
  • 25. GENERAL INFORMATION CLUTCH CABLE LEFT HANDLE BAR SWITCH WIRE HEADLIGHT/BANKANGLE SENSOR WIRE FRONT BRAKE HOSE '-23
  • 27. BANK ANGLE SENSOR 3P (Black) CONNECTOR .--""",__- HEADLIGHT 2P (Natural) CONNECTOR IGNITION SWITCH 2P (Brown) CONNECTOR RIGHT SWITCH 8P (Gray) CONNECTOR GENERAL INFORMATION CLUTCH CABLE LEFTHANDLEBAR SWITCH 12P (Gray) CONNECTOR POSITION LIGHT 2P (Black) CONNECTOR HEADLIGHT 2P (Natural) CONNECTOR 1-25
  • 28. GENERAL INFORMATION lAT SENSOR 2P (Gray) CONNECTOR ECM ECM 33P (Gray) CONNECTOR ECM 33P (Blaek) CONNECTOR FUEL HOSE Ij ( REGULATOR/RECTIFIER MAIN WIRE HARNESS lAT SENSOR 2P (Gray) CONNECTOR ~0 IGNITION SWITCH WIRE ~~~~rtr RIGHT HANDLEBAR -;; SWITCH W IRE FUEL HOSE COVER MAIN WIRE HARNESS 1-26
  • 29. HORNWIRE FAN MOTER 2P (Blaek) CONNECTOR GENERAL INFORMATION ALTERNATOR 3P (Natural) CONNECTOR CMP SENSOR WIRE SIPHON HOSE SIDESTAND SWITCH 2P (Green) CONNECTOR REGULATOR/RECTIFIER 2P (Natural) CONNECTOR CLUTCH CABLE '-27
  • 30. GENERAL INFORMATION FUEL TANK DRAIN HOSE FUEL HOSE FUEL TANK BREATHER HOSE ICalilornia type: to EVAP eanister) ALTERNATOR WIRE SIDESTAND SWITCH WIRE KNOCK SENSOR 3P IBlaek) CONNECTOR ~--, LOWER COWL '-28 FUEL PUMP 2P IBrow n) CONNECTOR FUEL LEVEL SENSOR 2P IBlaek) CONNECTOR GROUND CABLE STARTER MOTOR CABLE NEUTRAL SWITCH WIRE FUEL TANK DRAIN HOSE FUEL TANK BREATHER HOSE
  • 31. IACV 4P (Blaek) CONNECTOR GROUND CABLE PAINTMARK KNOCK SENSOR GENERAL INFORMATION MAP SENSOR 3P (Blaek) CONNECTOR CKP SENSOR 2P (Blaek) CONNECTOR Max 22.5° PAINTMARKS '-29
  • 32. GENERAL INFORMATION HESD 2P IBrown) CONNECTOR IGNITION SUB HARNESS 6P IBlaek) CONNECTOR TP SENSOR 3P IBlaek) CONNECTOR IACV 4P IBlaek) CONNECTOR IACV 4P IBlaek) CONNECTOR TP SENSOR 3P IBlaek) CONNECTOR No. 1 PRIMARY INJECTOR 2P IGray) CONNECTOR 1-30 KNOCK SENSOR 3P IBlaek) CONNECTOR PAIR CONTROL SOLENOID VALVE 2P IBlaek) CONNECTOR PAIR CONTROL SOLENOID VALVE THROTILE CABLES IGNITION SUB HARNESS DIRECT IGNITION COIL DIRECT IGNITION COIL 2P IWhi!e) CONNECTOR No. 2 PRIMARY INJECTOR 2P IGray) CONNECTOR No. 4 PRIMARY INJECTOR 2P IGray) CONNECTOR No. 3 PRI INJECTOR 2P IGray) CONNECTOR
  • 33. FUSE/RELAY BOX STARTER RELAY SWITCH REAR BRAKE LIGHT SWITCH 2P (Blaek) CONNECTOR REAR BRAKE LIGHT SWITCH WIRE GENERAL INFORMATION EGCV 6P (Natura l) CONNECTOR DLC TURN SIGNAL RELAY EGCV CONTROL CABLES 1-31
  • 34. GENERAL INFORMATION '-32 REAR BRAKE HOSE ~-4~~ r-_-'" REAR BRAKE LIGHT SWITCH J'" ' EGCV CONTROL CABLES REAR BRAKE LIGHT SWITCH WIRE (
  • 35. RIGHTTURN SIGNAL LIGHT WIRE BRAKEfTAIULlCENSE LlGHTWIRE LEFTTURN SIGNAL LIGHT WIRE RIGHTTURN SIGNAL LIGHT WIRE GENERAL INFORMATION LEFT TURN SIGNAL LIGHT WIRE BRAKEfTAIULlCENSE -r~L-;;;;;;~~~~;:::-­ LlGHTWIRE 1-33
  • 36. GENERAL INFORMATION CALIFORNIA TYPE: NOTE: Face the paint marks upward. EVAP PURGE CONTROL SOLENOID VALVE FUEL TANK BREATHER HOSE (ta fuel tank) PAINTMARK CLAMP '-34 EVAP CANISTER EVAP CANISTER DRAIN HOSE CANISTER-TO-PURGE CONTROL SOLENOID VALVE HOSE PAINTMARK (
  • 37. CALIFORNIA TYPE: FUEL TANK BREATHER HOSE Ito EVAP canister) EVAPPURGECONTROL SOLENOID VALVE EVAP CANISTER DRAIN HOSE GENERAL INFORMATION VACUUM HOSES 5-WAY JOINT EVAP PURGE CONTROL SOLENOID VALVE 2P IBlaek) CONN ECTOR EVAP CANISTER 1-35
  • 38. GENERAL INFORMATION EMISSION CONTROL SYSTEMS EXHAUST EMISSION REQUIREMENT The U.S. Environmental Protection Agency (EPA), Calilornia Air Resources Board (CARB) and Transport Canada require manufacturers to certify that their motorcycles comply with applicable exhaust emissions standards during their useful life, when operated and maintained according to the instructions provided. NOISE EMISSION REQUIREMENT The EPA also requires that motorcycles built after January 1, 1983 comply with applicable noise emission standards lor one year or 3,730 miles (6,000 km) after the time of sale to the ultimate purchaser, when operated and maintained according to the instructions provided. WARRANTY COMPLIANCE Compliance with the terms of the Distributor's Limited Warranty for Honda Motorcycle Emission Control Systems is necessary in order to keep the emissions system warranty in effect. SOURCE OF EMISSIONS The combustion process produces carbon monoxide (COl. oxides ol nitrogen (NOx) and hydrocarbons (HC). Control ol carbon monoxide, oxides of nitrogen and hydrocarbons is very important because, under certain conditions, they react to form photochemical smog when subject to sunlight. Carbon monoxide does not react in the same way, but it is toxic. Honda Motor Co., Ltd. utilizes various systems to reduce carbon monoxide and hydrocarbons. CRANKCASE EMISSION CONTROL SYSTEM The engine is equipped with a closed crankcase system to prevent discharging crankcase emissions into the atmosphere. Blow-by gas is returned to the combustion chamber through the air cleaner housing and throttle body. AIR CLEANER HOUSING <== FRESH AIR • BLOW-BY GAS '-36 (
  • 39. GENERAL INFORMATION EXHAUST EMISSION CONTROL SYSTEM The exhaust emission contral system is composed of a pulse secondary air supply system, an oxidation catalytic converter and PGM-FI system. SECONDARY AIR SUPPLY SYSTEM The pulse secondary air supply system introduces filtered air into the exhaust gases in the exhaust port. Fresh air is drawn into the exhaust port by the function of the PAIR control valve. This charge of fresh air promotes burning of the unburned exhaust gases and changes a considerable amount of hydrocarbons and carbon monoxide into relatively harmiess carbon dioxide and water vapor. The reed valve prevents reverse air flow through the system. The PAIR control valve is operated by the solenoid valve. The solenaid valve is controlled by the PGM-FI unit, and the fresh air passage is opened/closed according to running conditions (ECT/IATfTP/MAP sensor and engine revolution). No adjustments to the secondary air supply system should be made, although periodic inspection of the components is recommended. AIR CLEANER HOUSING BODY PAIR CONTROL VALVE PAIR CHECK VALVE PORT <== FRESH AIR • EXHAUST GAS OXIDATION CATALYTIC CONVERTER This motorcycle is equipped with an oxidation catalytic converter. The oxidation cataJytic converter is in the exhaust system. Through chemical reactions, it converts He and CO in the engine's exhaust to carbon dioxide (CO,) and water vapor. '-37
  • 40. GENERAL INFORMATION EVAPORATIVE EMISSION CONTROL SYSTEM (CALIFORNIA TYPE) This model complies with California Air Resources Board (CARB) evaporative emission requirement. Fuel vapor trom the fuel tank is routed into the evaporative emission (EVAP) canister where it is absorbed and stored while the engine is stopped. When the engine is running and the evaporative emission (EVAP) purge contral solenaid valve is open, tuel vapor in the EVAP canister is drawn into the engine through the throttle body. THROTILE BODY EVAPPURGECONTROL SOLENOIO VALVE NOISE EMISSION CONTROL SYSTEM EVAP CANISTER ~FRESHAIR • FUEL VAPOR TAMPERING WITH THE NOISE CONTROL SYSTEM IS PROHIBITED: U.S. Federallaw prohibits, or Canadian provincial law may prohibit the following acts or the causing there of: (1) The remaval or rendering inoperative by any person, other than for purposes of maintenance, repair or replacement, of any device or element of design incorporated into any vehicle for the purpose of noise contral prior to its sale or delivery to the ultimate customer or while it is in use; (2) the use of the vehicle after such device or element of design has been removed or rendered inoperative by any person. AMONG THOSE ACTS PRESUMED TO CONSTITUTE TAMPERING ARE THE ACTS L1STED BELOW: 1. Removal of, or puncturing of the muffler, baffles, header pipes or any other component which conducts exhaust gases. 2. Remaval of, or puncturing of anv part of the intake svstem. 3. Lack of proper maintenance. 4. Replacing anv moving parts of the vehicle, or parts of the exhaust or intake svstem, with parts other than those specified bV the manufacturer. 1-38
  • 42. TECHNICAL FEATURES IACV SUMMARY This motorcycle adopts an electronic Idle Air Control system for the inline-four engine, this system is composed the IACV and distribution hoses on the throttle body. The IACV consists of a step motor and a slide valve to control the amount of air bypassed around the closed throttle valve. With the i9nition switch on, the amount of inlet air is determined trom informa· tion detected by the ECT sensor. During engine start up or while maintaining idle (throttle valve closed). the amount of 1nlet air is corrected by various sensors' information. This system eJiminates the need for manual idle speed adjustment and air screw adjustment for throttle body synchroniza- tion. DISTRIBUTION HOSES IACV ------dLc - -......~ Idle air flow 2-2
  • 43. TECHNICAL FEATURES OPERATION The ECM contrals the IACV during engine idling, also the ECM stops controlling the IACV operation and closes the valve when the ECM detects the following conditions: • Throttle valve open • Neutral switch OFF (in gear) and clutch switch OFF (release clutch lever) During engine idling, from ignition switch ON to warming up, the ECM controls the IACV step motor as follows: With the ignition switch ON When the ignition switch is turned ON, the IACV activates initial func- tion, idle - open - idle position. There wil! be a step motor operating sound. Engine start - warming up This optimizes the bypass opening with the throttie valve closed, and the correct amount of inlet air passes through, allowing proper engine start up. After the engine has started, the ECM controls the IACV slide valve position and adjusts the amount of inlet air in response to the engine coolant temperature. After warming up - idling When the ECM denotes the engine warming up by the engine coolant temperature, it operates the step motor to move the slide valve to the closed position. This results in a reduced amount of bypassed air com- pared to the amount during engina warm-up, which allows proper engina idle to be maintained, STEP MOTOR STEP MOTOR VALVE ;1 c:>c:>~VALVE 2-3
  • 44. TECHNICAL FEATURES KNOCK SENSOR SUMMARY Under certain conditions the mixture in the perimeter of the combustion chamber can self-ignite due to the expansion of the combusting gas ignited by the spark plug. At this point there are !wo flame-lronts colliding within the combustion chamber. As aresui!, the pressure and temperature În the cylinder increase at a time different trom normal-combustion conditions, causing damage to the piston and/or the combustion chamber. Such a phenomenon is calied knocking. Deteriorated or low-octane gasoline may cause the knocking more frequently, resulting in engine damage. To detect knocking, the knock sensor is attached in the rear ol NO.3 cylinder block. Monitoring signals Irom the knock sen- sor, the ECM detects knocking, and prevents engine damage by regulating ignition timing. In this model, a non-resonating type knock sensor is employed. With the voltage signaIs tree of resanant characteristics and the convergence period short, the responsiveness is superb, the knocking signals do not overlap in the high rpm zone, allowing detection ol knocking. The non-resonating type knock sensor consists of the base, which is mounted on the cylinder bloek, the weight, and the piezoelectric element. The vibrations lrom the cylinder block are directly transmitted to the base. The weight applies the pressure occurring Irom its inertia force to the piezoelectric element. The pressure is converted to voltage by the piezoelectric element, and trans- mitted to the ECM. The ECM modilies the voltage signaI wavelorm, separates knocking signals lrom engine naise signais, and detects knocking. WEIGHT PIEZO ~rT",r ELEMENT FROM CYLINDER (1) Convecting motion ol the engine to the weight (2) Pressure Irom the weight (3) Converted voltage signaI by the piezo electric element When the ECM determines that the voltage signaI is higher than the prescribed level (knock occurring), it retards the igni- tion timing. When the ECM determines that the voltage signal is lower than the prescribed level (no knocking) during the retarded ignition timing period, it gradually advances the ignition timing back to normal. The ECM has self-diagnostic functions for the knock sensor circuit. It can detect a sensor output line short, failure of the integrated circuit (IC) within the ECM, and a connector coming aft. 2-4
  • 45. TECHNICAL FEATURES IGNITION COILS I ~ Adjusted ignition timing signal I -+- ECM _. (7) KNOCK SENSOR KNOCK IC ENGINE Cl (8) (2) FILTER - ,--- (9) (1 ) (3) ECM monitors engine condition through PGM-FI sensors (ECT .MAP .TP sensor etc..,) (1) Regulate the input voltage signal wave (2) Noise signal piek up circuit (3) Knock signal piek up circuit (4) Detect the knock (5) Calculate proper ignition timing (6) Detect the fail safe (7) Input voltage line (for open circuit detection) (8) Open circuit detection line (9) Output voltage line I-- CPU Y (4) (5) Y (6) .. 2-5
  • 47. 3. FRAME/BODY PANELS/EXHAUST SYSTEM .. BODY PANEL LOCATIONS ..···..........·....···· 3-2 REARVIEW MIRROR ·..·····························3-10 SERVICE INFORMATION ···························3-3 WINDSCREEN ·..·······································3-10 TROUBLESHOOTING ................................. 3-3 UPPER COWL/FRONT SPOILER ............. 3-11 SEAT····························································3-4 AIR DUCT ·················..···············..··············3-12 PASSENGER SEAT·....·......···············..·····..· 3-4 FRONT FENDER ....................................... 3-13 REAR COWL ..···..·······..················..············.. 3-5 REAR FENDER A·····....········..·······..·········· 3-13 LOWER COWL ···········..······..········..·············3-6 REAR FENDER B·······..·..········..·······..········ 3-14 UPPER INNER COWL/HEADLIGHT REAR FENDER C........·..·..·............·....·...... 3-16 COVER·..·....·....·......··..·........·....·................·· 3-7 SEAT RAIL ................................................ 3-16 MIDDLE COWL......·..·....·......................·...... 3-8 MUFFLER ....·..·......·..........................·....·..·3-19 FUEL TANK COVERISIDE COVER........·.... 3-9 EXHAUST PIPE ......................................... 3-24 3-1
  • 48. FRAME/BODY PANELS/EXHAUST SYSTEM BODY PANEL LOCATIONS REARVIEW MIRROR WINDSCREEN UPPER COWL HEADLIGHT COVER FRONT FENDER , ,--::::==~ , UPPER INNER COWL 3-2 MIDDLE COWL FUEL TANK COVER LOWER COWL PASSENGER SEAT REAR FENDER B REAR FENDER C SIDE COVER
  • 49. FRAME/BODY PANELS/EXHAUST SYSTEM SERVICE INFORMATION GENERAL • This section covers remaval and installation of the body panels, exhaust system and seat rail. • Serious burns may result if the exhaust system is not allowed to cool betore components are removed or servieed. • Always replace the exhaust pipe gaskets with new ones after removing the exhaust pipe trom the engine. • When installing the exhaust system, loosely install all of the exhaust pipe fasteners. Always tighten the exhaust clamps tirst, then tighten the mounting fasteners. • Always inspeet the exhaust system for [eaks after installation. TORQUE VALUES Lower cowl-to-middle cowl screw Rearview mirror mounting bolt Windscreen mounting screw Front brake hose damp nut Front brake hose 3-way joint bolt Front fender mounting screw Seat rail mounting nut Seat rail mounting bolt Seat rail assembly bolt Exhaust pipe joint nut Exhaust pipe mounting bolt Main step bracket mounting bolt Passenger step bracket mounting bolt Rear master cylinder mounting bolt Position light mounting screw Rear fender bracket mounting bolt MuIlIer band bolt Air duet mounting bolt TROUBLESHOOTING Excessive exhaust noise • Braken exhaust system • Exhaust gas leak Poor performance • Deformed exhaust system • Exhaust gas leak • Clogged muIlIer 1.5 N·m 10.2 kgf·m, 1.1 Ibf.ft) 7.0 N'm 10.7 kgl·m, 5.2 Ibl·ft) 0.45 N'm 10.05 kgl·m, 0.3 Ibf·ft) 10 N'm 11.0 kgf·m, 7 Ibl·ft) 10 N·m 11.0 kgf·m, 7 Ibf·ft) 12 N·m 11.2 kgf·m, 9Ibf.ft) 54 N'm 15.5 kgl·m, 40 Ibf·ft) 44 N·m 14.5 kgf·m, 32 Ibf.ft) 30 N·m 13.1 kgf·m, 22 Ibf·ft) 12 N·m 11.2 kgf.m, 9 Ibf.ft) 17 N·m (1.7 kgf.m, 13 Ibl·ft) 37 N·m (3.8 kgf.m, 27 Ibl·ft) 26 N·m (2.7 kgf.m, 19 Ibl·ft) 12 N'm (1.2 kgf·m, 9Ibf·ft) 1.8 N'm (0.2 kgf·m, 1.3 Ibl·ft) 12 N·m (1.2 kgf.m, 9 Ibf·ft) 17 N·m (1.7 kgf.m, 13 Ibf·ft) 12 N·m (1.2 kgf·m, 9Ibf·ft) ALOC bolt; replace with a new one 3-3
  • 50. FRAME/BODY PANELS/EXHAUST SYSTEM SEAT REMOVAL/INSTALLATION Remove the screws, washers and seat rearward. Install the seat by inserting the prang and aligning its holes with the seat rail bosses. Tighten the screws securely. PASSENGER SEAT REMOVAL/INSTALLATlON 3-4 Unhook the passenger seat loek using the ignition key, Remove the passenger seat by pulling it forward, Install the passenger seat in the reverse order of removal and push down it to loek. SCREWS/WASHERS IGNITION KEY PASSENGER SEAT ~
  • 51. FRAME/BODY PANELS/EXHAUST SYSTEM REAR COWL REMOVALIINSTALLATION Remave the lollowing: - Seat (page 3-4) - Passenger seat (page 3-4) Remove the screws, special screws and rear cowl upward. Installation is in the reverse order of remaval. SCREWS 1 3-5
  • 52. FRAME/BODY PANELS/EXHAUST SYSTEM LOWERCOWL REMOVALlINSTALLATION Remove the lower cowl-to-middle cowl screws. Release the hoses from the lower cowl. Be careful not to Aemove the lower cowl screw, collar and special damage the tabs screws then remove the lower cowl downward. and graoves. Ca{ifornia type: Remove the lower cowl screw, col lar, special screws and clamp then remove the lower cowl downward. Installation is in the reverse order of removal. • Align the middle cowl tabs with the lower cowl grooves. TORQUE: Lower cowl-to-middle cowl screw: 1.5 N·m (0.2 kgf·m, 1.1Ibf.ft) Route the hoses properly: - Except California type (page 1-21) - California type (page '-34) COLLAR SPECIAL SCREW SCREW RIGHT LOWER COWL Align 3-6 NUT
  • 53. UPPER INNER COWL/HEADLIGHT COVER REMOVALlINSTALLATION Remave the middle cowl (page 3-8). Remove the trim clips and upper inner cow!. Remave the screw and headlight cover. Route the wires Installation is in the reverse order of remaval. properfy (page 1-21!. FRAME/BODY PANELS/EXHAUST SYSTEM SCREW TRIM CLIPS HEA DLIGHT COVER UPPER INNER COWL 3-7
  • 54. FRAME/BODY PANELS/EXHAUST SYSTEM MIDDLE COWL REMOVALlINSTALLATION Be careful nor ra damage the tabs. Route the wires properly (page 1-21). Be careful not ta pinch the wires. Remove the screws, trim clips and middle cowl. Disconneet the turn signallight 3P connector. Installation is in the reverse order of removal. TORQUE: Lower cowl-to-middle cowl screw: 1.5 N·m (0.2 kgf·m, 1.1Ibf.ft) 3P CONNECTOR DISASSEMBLY/ ASSEMBLY / MIDDLE COVER B MIDDLE COWL B 3-8 ",/ MIDDLE COWL SCREWS MIDDLE COWL A FRONT TURN SIGNAL LIGHT INNER COWL
  • 55. FRAME/BODY PANELS/EXHAUST SYSTEM FUEL TANK COVER/SIDE COVER REMOVALlINSTALLATION Remove the following: - Seat (page 3-4) - Middle cowls (page 3-8) - Upper inner cowls (page 3-7) Remove the screws, grommets, trim clips, collars and fuel tank cover/side cover assembly. Be careful not to Installation is in the reverse order of removal. pinch rhe wires. DISASSEMBLY/ ASSEMBLY FUEL TANK COVER SCREWS / LEFT SIDE COVER FUEL TAN K COVER! SIOE COVER ASSEMBLY TRIM CLIPS COLLARS RIGHT SIDE COVER 3-9
  • 56. FRAME/BODY PANELS/EXHAUST SYSTEM REARVIEW MIRROR REMOVALlINSTALLATION Remove the balts and rearview mirror. Install the rearview mirror and tighten the bolts to the specified torque. TOROUE: 10 N·m (0.7 kgf·m, 5.2IbHt) WINDSCREEN REMOVALIINSTALLATION 3-10 Remove the rearview mirror (page 3-10). Remove the screws, plastic washers, rubber wash- ers, windscreen and nuts. Installation is in the reverse order of removal. TOROUE: Windscreen mounting screw: 0.45 N·m (0.05 kgf·m, 0.3 IbHt) BOLTS REARVIEW MIRROR PLASTIC WASHER SCREW j RUBBER~~ WASH~~.. ~ "i~ ,.,.. § ,:. .:::,: WINDSCREEN
  • 57. FRAME/BODY PANELS/EXHAUST SYSTEM UPPER COWL/FRONT SPOILER REMOVALlINSTALLATION Remove the lollowing: - Middle cowls (page 3-8) - Headlight covers (page 3-7) - Upper inner cowls (page 3-7) - Windscreen (page 3-10) Disconneet the position light 2P (Black) connector. Remove the main wire harness 20P (Gray) connec- tor trom the front spoiler. Remove the screws and upper cowl/front spoiler ~=====~~~~~~~~==. assembly. Installation is in the reverse order of removal. UPPER COWUFRONT SPOILER ASSEMBLY 3-11
  • 58. FRAME/BODY PANELS/EXHAUST SYSTEM DISASSEMBLY/ASSEMBLY Remove the screws and position light trom the upper eow!. Be careful not ra Remove the front spoiler trom the upper cowl. damage the labs. Assembly is in the reverse order of disassembly. AIR DUeT 3-12 TOROUE: Position light mounting screw: 1.8 N·m (0.2 kgf·m, 1.3 IbHt) REMOVAL/INSTALLATION Remove the combination meter (page 20-8). Remave the duet attachment and grill trom the air duet. Straighten the loek washer tabs. Remove the balts, loek washers and air duet. Install the air duet and new loek washers then tighten new balts to the specified torque. TOROUE: 12 N·m (1.2 kgf·m, 9 IbHt) Bend the loek washer tabs up against the air duet mounting balts securely. Install the grill and duet attaehment seeurely. Install the combination meter (page 20-10). UPPER COWL SCREWS f!1...,==~='l~ FRONT SPOILER ~ S BàLT ~ LOCK WASHER S DUCT AITACHMENT
  • 59. FRAME/BODY PANELS/EXHAUST SYSTEM FRONT FENDER REMOVALIINSTALLATION Remave the front brake hose 3-way joint bolt and hose clamp nut. Remove the screws, grommets, collars, reflectors and front fender from the fork legs. NOTE: o Pull the front fender up and then pull it forward between the fork legs. o Be careful not to damage the fork legs. Installation is in the reverse order of removal. TORQUE: Front fender mounting screw: 12 N·m (1.2 kgf·m, 9 Ibf·ft) Front brake hose clamp nut: 10 N·m (1.0 kgf·m, 7 Ibf·ft) Front brake hose 3-way joint bolt: 10 N·m (1.0 kgf·m, 7 Ibf·ft) REAR FENDER A REMOVALlINSTAlLATION Remave the rear cowl (page 3-5). Disconneet the brakeltail and turn signal light con- nectors. Remave the balts, reflectors and rear fender A assembly rearward. InstaJlation is in the reverse order of removal. NUT FRONT FENDER REFLECTOR SCREWS/GROMMETS REAR FENDER A ASSEMBLY
  • 60. FRAME/BODY PANELS/EXHAUST SYSTEM DISASSEMBLY/ ASSEMBLY BRAKEfTAIULlCENSE LIGHT HEAT GUARD FENDER STAY REAR FENDER B REMOVAL 3-14 Remove the following: - Rear cowl (page 3-5) - Battery (page 17-6) - Fuel tank (page 6-50) - EGCV servomotor (page 6-80) - Starter relay switch (page 19-14) Remave the balts, passenger seat hooks and pas- senger seat bracket. Remove the heat guard mounting screw. REAR FENDER A REAR TURN SIGNAL LIGHT SCREW
  • 61. FRAME/BODY PANELS/EXHAUST SYSTEM Release the rear brake light switch 2P (Black) con- nector trom the rear fender 8. Release the wire harnesses trom the rear fender 8. Remave the trim clips, screw and rear fender B. INSTALLATION Route the wires Installation is in the reverse order of remaval. properly (page 1-21). PASSENGER SEAT BRACKET /SCREW REAR FENDER B 3-15
  • 62. FRAME/BODY PANELS/EXHAUST SYSTEM REAR FENDER C REMOVAL/INSTALLATlON Remave Ihe special screws, rear fender C and brake ' S-P-E-C-IA- L-S-C-RE- W- S-------------, hose guide trom the swingarm. Inslall Ihe brake hase guide by aligning ils lab la Ihe ~ swingarm hole. Inslall Ihe rear fender C and lighlen Ihe special screws securely, SEAT RAIL REMOVAL 3-16 Remave Ihe fallawing: - Fuel lank (page 6-50) - Muftier (page 3-19) - Rear fender A (page 3-13) - Rear fender B (page 3-14) Remave Ihe balls and left passenger slep bracket. Remave Ihe baiIs, nuls and seal rail. REAR FENDER C BRAKE HOSE GUlDE LEFT PASSENGER STEP BRACKET
  • 63. DISASSEMBLY Remave the balts. Remave the balts and rear fender bracket. Separate the seat rail. Remove the dowel pin from the seat rail. FRAME/BODY PANELS/EXHAUST SYSTEM BOLTS REAR FENDER BRACKET BOLTS DOWELPIN 3-17
  • 64. FRAME/BODY PANELS/EXHAUST SYSTEM ASSEMBLY 30 N'm (3.1 kgf.m, 22 IbHt) REAR FENDER BRACKET 54 N·m (5.5 kgf·m, 40 IbHt) 3-18 12 N·m (1.2 kgf·m, 9 Ibf·ft) Install the dowel pin onto the seat rail and assembie the seat rail. Tighten the seat rail assembly balts to the specified torque. TORQUE: 30 N·m (3.1 kgf·m, 22 Ibf·ft) Install the rear fender bracket and balts temporarily. lEFT PASSENGER STEP BRACKET 44 N·m (4.5 kgf·m, 32 Ibf.ft) BOlTS DOWEl PIN REAR FENDER BRACKET BOlTS
  • 65. MUFFLER FRAME/BODY PANELS/EXHAUST SYSTEM INSTALLATION Install the seat rail, balts and nuts. Tighten the balts and nuts to the specified torque. TORQUE: Seat rail mounting bolt: 44 N·m (4.5 kgf·m, 32 Ibf·ft) Seat rail mounting nut: 54 N·m (5.5 kgf·m, 40 Ibf·ft) Tighten th e rear fender bracket mounting balts to the specified torque. TORQUE: 12 N·m (1.2 kgf·m, 9Ibf·ft) Install the left passenger step bracket and tighten the balts to the specified torque. TORQUE: 26 N·m (2.7 kgf.m, 19 Ibf·ft) Install th e following: - Rear fender B (page 3-15) - Rear fender A (page 3-13) Muftier (page 3-22) - Fuel tank (page 6-50) REMOVAL Remove the following: - Rear fender A (page 3-13) - Right passenger step bracket (page 16-19) Unhook th e rear brake light switch spring from th e brake pedal. Remove the rea r brake light switch. - ~ I LEFT PASSENGER STEP BRACKET SPRING BRAKE PEDAL 3-1 9
  • 66. FRAME/BODY PANELS/EXHAUST SYSTEM Keep the rear reserve tank upright to prevent air from entering the hydraufic system. 3-20 Remove the bolt and rear brake reserve tank. Remove the heat guard mounting screw and washer. SCREW RESERVE Remove the bolts and right main step/heat guard TANK assembly as shown. Remave the screws, muffler rear cover, rubber washers and collars. Remove the screW5 and muffler rear cap. BOlTS REAR COVER RIGHT MAIN STEP/HEAT GUARD ASSEMBlY
  • 67. FRAME/BODY PANELS/EXHAUST SYSTEM leesen the muftier band belt. Remeve the beits and muftier. BOlTS MUFFlER Remove the screw, bolt and heat guard. 3-21
  • 68. FRAME/BODY PANELS/EXHAUST SYSTEM INSTALLATION HEAT GUARD REAR COVER MUFFLER REAR CAP 26 N·m (2.7 kgl·m, 19Ibl·ft) 37 N·m (3.8 kgl·m, 27 Ibl·ft) Install the heat guard and tighten the screw and bolt securely. MUFFLER Install a new gasket onto the exhaust pipe and ~~;:; install the muffler anto the exhaust pipe. 3-22
  • 69. FRAME/BODY PANELS/EXHAUST SYSTEM Install the muftier and bolts. Tighten the bolts securely. Tighten the muftier band bolt to the specified torque. TORQUE: 17 N·m (1.7 kgf·m, 13Ibf.ft) Install the muftier rear cap and tighten the screws securely. Install the rubber washers and collars onto the muf- fier rear cover. Install the muffler rear cover and tighten the screws securely. BOLTS REAR COVER 3-23
  • 70. FRAME/BODY PANELS/EXHAUST SYSTEM Route the wires properly (page 1-211. Install the right main step/heat guard assembly as shown and tighten the main step mounting balts to the specified torque. TOROUE: 37 N·m (3.8 kgf·m, 27 Ibf.ft) Install the heat guard mounting screw and washer, then tighten it securely. Install the rear brake reserve tank and tighten the bolt to the specified torque. TOROUE: 12 N·m (1.2 kgf·m, 9 Ibf·tt) Install the rear brake light switch. Hook the rear brake light switch spring to the brake pedal. Install the following: - Right passenger step bracket (page ' 6-24) - Rear fende r A (page 3-'3) EXHAUST PIPE REMOVAL Remove the following: - l ower cowl (page 3-6) - Middle cowls (page 3-8) _ Right main step/heat guard assembly (page 3-19) Lift and support the fuel tank (page 4-5). Remove the nut, bolt and washer. Move the radiator forward. 3-24 BOlTS SPRING SCREW/WASHER RIGHTMAIN STEP/HEAT GUARD ASSEMBlY BRAKE PEDAl
  • 71. FRAME/BODY PANELS/EXHAUST SYSTEM Loosen the muffler band bolt. Remove the exhaust pipe joint nuts. Remove the nuts, bolts and EGCV cover. Loosen the loek nuts tully and disconneet the EGCV '. .;;j control cables trom the pulley. COVER CONTROL CABLES Remove the bolt, washer, collar and exhaust pipe. 3-25
  • 72. FRAME/BODY PANELS/EXHAUST SYSTEM 3-26 Remove the exhaust pipe gaskets. INSTALLATION 17 N'm (1.7 kgf·m, 13 Ibf·ft) Check the exhaust pipe stud protrusion from th e exhaust port. SPECIFIED LENGTH: 45.0 - 46.0 mm (1.77 - 1.81 in) EXHAUST PIPE 12 N·m (1.2 kgf·m, 9 IbHt) EXHAUST PIPE STUD ~ r I I 1 I 11 1 ~ l 45.0 - 46.0 mm (1.77 -1.81 in) -
  • 73. FRAME/BODY PANELS/EXHAUST SYSTEM A/ways replace the Install new exhaust pipe gaskets anto the exhaust exhaust pipe ports of the cylinder head. gaskets with new ones. Install a new gasket onto the exhaust pipe and install the exhaust pipe into the muffler and cylinder head. Loosely install the exhaust pipe, collar and mount- ing bolt/washer. Tighten the exhaust pipe joint nuts to the specified torque. TORQUE: 12 N·m (1.2 kgf·m, 9 IbHt) 3-27
  • 74. FRAME/BODY PANELS/EXHAUST SYSTEM 3-28 Tighten the exhaust pipe mounting bolt to the spec- ilied torque. TORQUE: 17 N·m (1.7 kgf·m, 13 Ibf·ft) Tighten the muIlIer band bolt to the specilied torque. TORQUE: 17 N·m (1.7 kgf·m, 13 Ibf·ft) Conneet the EGCV control cables to the pulley and tighten the loek nuts securely. Adjust the EGCV control cable (page 4-23). Install the EGCV cover, balts and tighten the nuts securely. Install the radiator lower mounting bolt, washer and nut. Tighten the nut securely. Remave the suitable support and close the luel tank (page 4-6). Install the lollowing: - Middle cowls (page 3-8) - Lower cowl (page 3-6) - Right main step/heat guard assembly (page 3-24) PULLEY CONTROL CABLES COVER
  • 75. 4. MAINTENANCE • SERVICE INFORMATION ···························4·2 EGCV CABLE ............................................ 4·22 MAINTENANCE SCHEDULE ...................... 4·4 DRIVE CHAIN ..·········································· 4·23 FUEL LlNE ................................................... 4·5 BRAKE FLUID ........................................... 4·28 THROTTLE OPERATION·..·························· 4·8 BRAKE PADS WEAR ................................ 4·29 AIR CLEANER·············································· 4·8 BRAKE SYSTEM ....................................... 4·30 SPARK PLUG ··············································4·9 BRAKE LIGHT SWITCH ............................ 4·31 VALVE CLEARANCE································· 4·13 HEADLIGHT AlM ...................................... 4·31 ENGINE OIL/OIL FILTER ··························4·17 CLUTCH SYSTEM ····································4·31 RADIATOR COOLANT .............................. 4·19 SIDESTAND .............................................. 4·32 COOLING SYSTEM..································· 4·20 SUSPENSION ........................................... 4·32 SECONDARY AIR SUPPLY SYSTEM·······4·20 NUTS, BOLTS, FASTENERS·..················· 4·35 EVAPORATIVE EMISSION CONTROL WHEELS/TIRES ........................................ 4·35 SYSTEM (CALIFORNIA TYPE) ................. 4·21 STEERING HEAO BEARINGS .................. 4·36 4-1
  • 76. MAINTENANCE SERVICE INFORMATION GENERAL • Place the motorcycle on level ground befere starting any work. • The exhaust contains poisonous carbon monoxide gas that may cause 1055 of consciousness and may lead to death. Run the engine in an open area or with an exhaust evacuation system in and enclosed area. SPECIFICATIONS ITEM SPECIFICATIONS Throttle grip freeplay 2 4mm(1 /16 3/16 in) Spark plug ) NGK IMR9C-9HES ) OENSO VUH270 Spark plug gap 0.80 0.90 mm (0.03 1 0.035 in) Valve clearance IN 0.20 ± 0.03 mm (0.008 + 0.001 in) EX 0.28 ± 0.03 mm (0.011 + 0.001 in) Engine Dil capacity After draining 2.7 liter (2.9 US qt, 204 Imp qt) After oil filter change 2.8 liter (3.0 US qt, 2.5 Imp qt) Recommended engine oi! Recommended antifreeze Drive chain Size/link Slack Recommended brake fluid Clutch lever freeplay Tire slze Tire brand Bridgestone Ounlop eold tire pressure Driver only Driver and passenger Minimum tire tread depth TORQUE VALUES Spark plug Timing hole cap Oil drain bolt Oil filter cartridge Rear axle nut Drive sprocket bolt DrÎven sproeket nut Rear master cylinder push rod loek nut Fuel tank mounting bolt Air cleaner element mounting screw Sidestand pivot bolt Sidestand pivot nut ECM setting plate screw 4-2 ) Pro Honda GN4 4-stroke oil (U.S.A. and Canada) or equiv- alent motor Dil APr service classification: SG or Higher JASO T 903 standard: MA Viscosity: SAE 1OW-30 Pro Honda HP Coolant or an equivalent high quality ethyl- ene glycol antifreeze containing silicate free corrosion inhibitors OIO OIO 525HV KAI- 112YB RK RK 525ROZ6 - 112LJFZ 30 - 40 mm (1.2 1.6 in) DOT4 10 - 20 mm (3/8 - 13/16 in) Front 120/70 ZR 17 M/C (58W) Rear 180/55 ZR 17 M/C (73W) Front BT015F RADIAL E Rear BT015R RADIAL E Front Oualifier PTG Rear Oualifier PTG Front 250 kPa (2.50 kgf/cm', 36 psi) Rear 290 kPa (2.90 kgf/cm', 42 psi) Front 250 kPa (2.50 kgf/cm' , 36 psi) Rear 290 kPa (2.90 kgf/cm' , 42 psi) Front 1.5 mm (0.06 in) Rear 2.0 mm (0.08 in) 16 N'm (1.6 kgfm, 12Ibf·ft) 18 N·m (1.8 kgfm, 13 Ibfft) 30 N·m (3. 1 kgf·m, 22 Ibf·ft) 26 N'm (2.7 kgfm, 19 Ibf·ft) 113 N·m (11.5 kgf·m, 83 Ibf·ft) 54 N·m (5.5 kgf·m, 40 Ibf·ft) 64 N'm (6.5 kgfm, 47 Ibf·ft) 18 N·m (1.8 kgfm, 13 Ibfft) 30 N·m (3. 1 kgf·m, 22 Ibf·ft) 4.2 N·m (004 kgfm, 3.1 Ibf·ft) 10 N'm (1.0 kgfm, 7 Ibf·ft) Apply grease to the threads Apply oil to the a-ring U-nut U-nut 29 N·m (3.0 kgf·m, 21 Ibf·ft) 0.7 N·m (0.07 kgf'm, 0.5 Ibf·ft)
  • 77. TOOLS Oil filter wrench 07HAA-PJ70101 or 07AAA-PLCA100 (U.S.A. only) Dri ve chain tooi set 07HMH-MR10l03 or 07HMH-MR101OC (U.S.A. only) SCS connector 070PZ-ZY30100 MAINTENANCE 4-3
  • 78. MAINTENANCE MAINTENANCE SCHEDULE Perform the Pre-ride inspection in the Owner's ManuaJ at each scheduled maintenance periad. I: Inspeet and Clean, Adjust, lubricate or Replace if necessary. C: Clean. R: Replace. A: Adjust. l: lubricate. The following items require some mechanica! knowiedge. Certain items (particularly those marked * and **) may require more technical information and tools. Consult an authorized Honda dealer. FREQUENCY WHICHEVER q ODOMETER READING (NOTE 1)COMES FIRST REFERTO 0 Xl,OOO mi 0.6 4 8 12 16 20 24 PAGE ITEMS Xl00 km 10 64 128 192 256 320 384 * FUEl LlNE I I I 4-5 * THROTTlE OPERATION I I I 4-8 * AIR CLEANER NOTE2 I I 4-8 Ul * SPARK PLUG EVERY 16,000 mi (25,600 km)l, ~ 4-9 LJ.J EVERY 32,000 mi (51,200 km) R t:: * VAlVE CLEARANCE I 1 4-13 0 ENGINE Oll INITIAl =600 mi (1,000 km) orLJ.J ~ 1 month: R, 4-17 LJ.J REGUlAR =EVERY 8,000 mi a: (12,800 km) or 12 months: R z ENGINE Oll FilTER R R R R 4-170 Ul RADIATOR COOLANT NOTE4 I I R 4-19 Ul * COOLING SYSTEM I I I 4-20 ~ * SECONDARY AIR SUPPlY SYSTEM I I I 4-20LJ.J * EVAPORATIVE EMISSION CONTROL SYSTEM NOTE3 I I 4-21 ** EGCV CABlE EVERY 16,000 mi (25,600 km)1 4-22 Ul DRIVE CHAIN EVERY 500 mi (800 km)l, l 4-23 ~ BRAKE FlUID NOTE4 I I R I I R 4-28 ~ BRAKE PADS WEAR I I I I I I 4-29 0 ~ BRAKE SYSTEM I I I I 4-30 * BRAKE LIGHT SWITCH I I I 4-31 LJ.J * HEADLIGHT AlM I I I 4-31a: Z ClUTCH SYSTEM I I I I I I I 4-31 0 SIDESTAND I I I 4-32üi Ul * SUSPENSION I I I 4-32:;, "I * NUTS, BOlTS, FASTENERS I I I I 4-35 z ** WHEElSfTlRES I I I 4-350 z •• STEERING HEAD BEARINGS I I I I 4-36 * Should be serviced by an authorized Honda dealer, unless th e owner has proper tools and service data and is mechanically qualified. ** In the interest of safety, we recommended these items be servi ced only by an authorized Honda dealer NOTES: 1. At higher odometer reading, repeat at the frequency interval established here. 2. Service more frequently when riding in unusually wet or dusty areas. 3. California type only. 4. Replace every 2 years, or at indicated odometer interval, whichever comes fjrst. Replacement requires mechanical skilI. 4-4
  • 79. FUEL L1NE FUEL TANK LlFTING Remove the fuel tank cover (page 3-9). Except cafifornia Release the tuel tank breather and drain hoses. type: Ca/ifornia type: Release the tuel tank drain hose. Remove the tuel tank mounting balts and washers. MAINTENANCE DRAIN HOSE Ca/ilorni. type: Disconnect the fuel tank breather hose (to EVAP r--:______----------------, canister) from the hose joint. California type shown: BREATHER HOSE HOSE JOINT 4-5
  • 80. MAINTENANCE Guide the breather hose and drain hose 50 as not to be kinked or bound. 4-6 Lift the lront end ol the luel tank and support it using a suitable support as shown. INSPECTION Check the luel lines lor deterioration, damage or leakage. Replace the luel line il necessary. Check the luel rails and luel line joint lor damage or leakage. Replace them il necessary. Check the luel pump mounting area lor leakage. Replace the luel pump packings il necessary. Check the primary/secondary injectors lor damage or leakage. Replace them il necessary. FUEL TANK LOWERING Remave a suitable support. Lower the luel tank, leading the breather hose and drain hose to downward. Then close the luel tank and route the breather and drain hoses. NOTE: • Route the hoses properly Ipage 1-21). • Be careful not to damage the harness and hoses. • After installing the luel tank, make sure the breather, drain and fuel hoses are not kinked or bound. FUEL RAIL FUEL HOSE
  • 81. California type: Conneet the tuel tank breather hose (to EVA? canis- ter) to the hose joint securely. Install the washers and fuel tank mounting bolts. Tighten the bolts to the specified torque. TORQUE: 30 N·m (3.1 kgf'm, 22 Ibf·ft) Route the hoses Install the removed parts in the reverse order of properly removal. (page 1-27). MAINTENANCE California type shown: BREATHER HOSE HOSE JOINT BREATHER HOSE DRAIN HOSE 4-7
  • 82. MAINTENANCE THROTTLE OPERATION Check for smooth throttle grip full opening and automatic full dasing in all steering positions. Check the throttle cables and replace them if they are deteriorated, kinked or damaged. Lubricate the throttle cables, if throttle operation is not smooth. Measure the freeplay at the throttle grip flange. FREEPLAY: 2 - 4 mm (1 / 16 - 3116 in) Throttle grip freeplay can be adjusted at either end of the throttle cabie. Minor adjustment is made with the upper adjuster. Adjust the freeplay by loosening the loek nut and turning the adjuster. After adjustment, tighten the loek nut securely. Major adjustment is made with the lower adjuster. Remove the air cleaner housing (page 6-52). Adjust the freeplay by loosening the loek nut and turning the adjuster. After adjustment, tighten the loek nut securely. Recheek the throttl e operation. Replace any damaged parts, if necessary. Install the removed parts in the reverse order of removal. AIR CLEANER 4-8 Remove the fuel tank cove r (page 3-9). Disconneet the lAT sensor 2P (Gray) connector. Remove the screws and ECM setting plate.
  • 83. Be careful not to Remave the screws and air cleaner housing upper damage 'he ECM cover by pulling up the ECM with connectors con- and wires. nected. Loasen the screws and remove the air cleaner ele- ment as shown. Clean the air cleaner element using compressed air trom the throttle body side any time it is excessively dirty. Installation is in th e reverse order of remaval. TORQUE: Air cleaner element mounting screw: 4.2 N·m (0.4 kgf·m. 3.1 Ibf·ft) ECM setting plate screw: 0.7 N·m (0.07 kgf·m. 0.5 Ibf·ft) SPARK PLUG REMOVAL Remove the middle eowls (page 3-8). Remave the screw and water pipe guard. Remave the hom wire clamp and disconnect the fan motor 2P (Blaek) connector. MAINTENANCE AIR CLEANER ELEMENT SCREWS 4-9
  • 84. MAINTENANCE Remove the radiator lower mounting bolt, washer and nut. Remave the radiator upper mounting bolt and washer. 8e careful not to Release the radiator grommet trom the frame boss damage the radiator by moving the radiator to the right, then move the fins and radiator radiator downward. hOSBS. Disconneet the direct ig nition coil 2P (White) con- nectors. Remove the direct ignition coils trom the spark plugs. Clean around the Remove the spark plug using the equipped spark spark plug bases plug wrench or an equivalent. with compressed air betore Inspeet or replace as described in the maintenance schedule (page 4-4). removing, and be sure thar no debris is allowed to enter the combustion chamber. 4-10
  • 85. MAINTENANCE INSPECTION Check the following and replace if necessary Irec- ~C-E-N-T-E-R-----------S-ID-E---~ ommended spark plug: page 4-2) ELECTRODE ---";;:1)..."'- ELECTRODE • Insulator tor damage • Electrodes tor wear • Burning condition, coloration This motorcycle's If the electrodes are contaminated with accumu- spark plug is lated objects or dirt, replace the spark plug. INSULATOR equipped wirh an iridium center electrode. Rep/ace the spark plug if the e/ectrodes are conraminared. A/ways USB specified spark plugs on this motorcycle. To prevent damaging the iridium center electrode, use a wirs type fee/er gauge to check the spark plug gap. Replace the plug if the center electrode is rounded as shown in the illustration. SPECIFIED SPARK PLUG: NGK: IMR9C-9HES DENSO: VUH27D Check the spark plug gap between the center and side electrodes with a wire type teeier gauge. Make sure that the $ 1.0 mm 10.04 in) plug gauge does not insert between the gap. Do not adjust the If the gauge can be inserted ;nto the gap, replace the spark plug gap. If plug with a new one. the gap is out of specificarion, rep/ace with a new one. INSTALLATION Install and hand tighten the spark plug to the cylin- der head, then tighten the spark plug to the speci- fied torque. TORQUE: 16 N·m (1.6 kgf·m, 12Ibf.ft) ROUNDED ELECTRODE WIRE TYPE FEELER GAUGE o x , 4-11
  • 86. MAINTENANCE Install the direct ignition coils. Connect the direct ignition coil 2P (White) connec- tors correctly. Be carefuJnot to Install the radiator by aligning the grommet and damage the radiator frame boss. fins. 4-12 Install the washer and radiator upper mounting bolt. Install the radiator lower mounting bolt, washer and nut. Tighten the nut securely. Install the water pipe guard and tighten the screw ~~~~ii~i~securely. Install the horn wire clamp and connect the fan motor 2P (Black) connector. Install the middle cowls (page 3-8).
  • 87. VALVE CLEARANCE INSPECTION Inspeet and adjust the va/ve clearance while the engine is co/d (be/ow 35"C/ 95°F). NOTE: Check the engine idle speed (page 6-67) after the valve clearance inspection. Remave the cylinder head cover (page 9-7). Remave the timing hole cap and O-ring . Turn the crankshaft clockwise, align the "T" mark with the index mark on the right crankcase cover. The timing marks ("IN" and "EX") on the cam sprockets must be Ilush with the cylinder head upper surface and facing outward as shown, If the timing marks on the cam sprockets are facing inward, turn the crankshaft clockwise one tuil turn (360°) and realign the timing marks with the cylin- der head surface sa they are facing outward. Insert the Ieeier gauge between the valve lifter and cam lobe. Record the Check the valve clearance lor the NO.1 and NO.3 cyl- clearance for eacll inder intake valves using a teeier gauge. va/ve for reference in shim se/ection if VALVE CLEARANCE: adjustment is IN: 0.20 ± 0.03 mm (0.008 ± 0.001 in) required. MAINTENANCE CYLINDER HEAO UPPER SURFACE TIMING MARKS NO.3 INTAKE VALVES 4-1 3
  • 88. MAINTENANCE Turn the crankshaft clockwise 1/2 turn (180' ). align the index line sa that it is facing up as shown. Record the Check the valve clearance fo r the NO.2 and NO.4 cyl- clearance foreach inder exhaust valves using a teeier gauge. va/ve for reference in shim selection if VALVE CLEARANCE: adjustment is EX: 0.28 ± 0.03 mm (0.011 ± 0.001 in) required. Turn the crankshaft clockwise 1/2 turn (180' ). align th e "T" mark with the index mark on the right crank- case cover. Record rhe Check the valve clearance for the NO.2 and NO.4 cyl- cfearance foreach inder intake valves using teeier gauge. vafve for reference in shim selection if VALVE CLEARANCE: adjustment is IN: 0.20 ± 0.03 mm (0.008 ± 0.001 in) required. 4-14 NO.2 EXHAUST VALVES
  • 89. Turn the crankshaft clockwise 1/2 turn (180' !. align the index !ine 50 that it is facing up as shown. MAINTENANCE Rocord the Check the valve clearance tor the NO.1 and NO.3 cyl- ~~~~~~~~~~~~~~~~~~~~ clearance foreach inder exhaust valves using a teeier gauge. va/va for reference in shim seloc/lon if VALVE CLEARANCE: adjustment is EX: 0.28 ± 0.03 mm (0.011 ± 0.001 in) required. ADJUSTMENT It is not necessary Remove the camshafts (page 9-9). ra remove the cam sprocket (rom the camshah except when replacing the camshafr and/or cam sprocket. Remove the valve lifters and shims. • The shim may stick to the inside of the valve lifter. Do not allow the shims to tall into the crankcase. • Mark all valve lifters and shims to ensure correct reassembly in their original locations. • The valve lifter can be easily removed with a valve lapping taal or magnet. • The shims can be easily removed with a twee- zers or magnet. Clean the valve shim contact area in the valve lifter with compressed air. NO.1 EXHAUST VALVES VALVE LIFTER I 4-15
  • 90. MAINTENANCE Sixty·nine different thickness shims are avaiJable trom the thinnest 1.200 mm thickness shim ta the thickest 2.900 mm thickness shim in increments of 0.025 mmo Measure the shim thickness and record it. Calculate the new shim thickness using the equa- tion below. A~(B-CI+D A: New shim thickness B: Recorded valve clearance C: Specified valve clearance D: aid shim thickness • Make sure of the correct shim thickness by mea- suri ng the shim by micrometer. • Reface the valve seat if carbon deposit result in a calculated dimension of over 2.900 mmo Insta!! rhe shims Install the newJy selected shim on the valve spring and va/ve lifters in retainer. theiroriginal Apply molybdenum disulfide Dil to the valve lifters 4-16 loeations. sliding surface. Instal! the valve lifters into the valve lifter holes. Instal! the camshafts (page 9-28). Rotate the camshafts by rotating the crankshaft clockwise several times. Recheek the valve clearance. Apply oil to a new a-ring and instal! it to the timing hole cap. Apply grease to the timing hole cap threads. Tighten the timing hole cap to the specified torque. TORQUE: 18 N·m (1.8 kgf·m, 13 Ibl·ft) Instal! the removed parts in the reverse order of removal. SHIM eeee1.80 mm 1.825 m m 1.85 mm 1.875 mm
  • 91. ENGINE Oll/Oll FilTER Other viscosities shown in the chart may be used when the average temperature in your riding Brea is within the indicated range. Dil lEVEL INSPECTIDN Start the engine and let it idle for 3 - 5 minutes. Stop the engine and wait 2 - 3 minutes. Hold the motorcycle in an upright position. Check the oillevel through the inspection window. If the level is below the lower level line, remove the oil filler cap and fill the crankcase with the recom- mended oil up to the upper level line as following procedures: Remove the oil filler cap and fill the recommended engine oil up to the upper level line. RECOMMENDED ENGINE Oll: Pro Honda GN4 4-stroke oil (U.S.A. and Canada) or equivalent motor oil API service classification: SG or Higher JASO T 903 standard: MA Viscosity: SAE 10W-30 Reinstall the oil filler cap. ENGINE Dil & FilTER CHANGE Remove the lower cowl (page 3-6). Hold the motorcycle in an upright position. Remove the oil filler cap. Remave the drain bolt and sealing washer, drain the oil completely. UPPER lEVEL L1NE ij'/ Oll FlllER CAP SEALING WASHER MAINTENANCE 120·F DRAIN BOLT 4-17
  • 92. MAINTENANCE 4-18 Remove the Dil filter cartridge using the special taal. TOOl: Dil filter wrench 07HAA-PJ70101 or 07AAA·PLCA100 (U.S.A. only) Install a new sealing washer onto the drain bolt. Tighten the drain bolt to the specilied torque. TORQUE: 30 N·m (3.1 kgl·m, 22 Ibl·ft) ~~ ....SEALING WASHER DRAIN BOLT Check that the oil lilter boss protrusion Irom the ,-O-Il- F-Il-T-E-R-B-O- S- S-------n------, crankcase is specified length as shown. ~ SPECIFIED LENGTH: 16.0 -17.0 mm (0.63 - 0.67 in) 16.0-17.0mm (0.63 - 0.67 in) Apply oil to new oil lilter cartridge threads and 0- ~:::;;:----:;;;;;::=:;=::::::::::~~:;:, ring.
  • 93. Install the oil lilter cartridge and tighten it to the specified torque. TOOl: Oil lilter wrench 07HAA-PJ70101 or 07AAA-PlCA100 (U.S.A. only) TORQUE: 26 N·m (2.7 kgl·m, 19 Ibl·ft) Fill the crankcase with recommended engine oil. ENGINE Oll CAPACITY: 2.7 liter (2.9 US qt, 2.41mp qt) after draining 2.8 liter (3.0 US qt, 2.51mp qt) after oil lilter change Check that the O-ring on the oil lil Ier cap is in good condition, and replace it if necessary. Install the oil lil Ier cap. Start the engine and let it idle lor 3 - 5 minutes. Stop th e engine and wait 2 - 3 m inutes and recheek the oil level. Check that there are no oil leaks. Install the lower cowl (page 3-6). RADIATOR COOLANT Check the coolant level ol the reserve tank with the engine running at narmal operating temperature. The level should be between the "UPPER" and "LOWER " level !ines. If necessary, add recommended coolant. RECOMMENDED ANTIFREEZE: Pro Honda HP Coolant or an equivalent high qual- ity ethylene glycol antifreeze containing silicate tree corrosion inhibitors Remave the lower cowl (page 3-6). Remave the reserve tank filler cap and lill to the "UPPER" levelline with 1:1 mixture of distilled water FllLER CAP MAINTENANCE Left side: l OWER lEVEL lINE and antifreeze. " - - - - - - - - - - - -- - - - - - - ' Reinstall the lilier cap. Install the lower cowl (page 3-6). 4-19
  • 94. MAINTENANCE COOLING SYSTEM Remave the following: - Lower cowl (page 3-6) - Middle cowls (page 3-8) Check the radiator air passages for clogging or dam- age. Straighten bent fins, and remove insects, mud or other obstructions with compressed air or low water pressure. Replace the radiator if the air flow is restricted over more than 20 % ot the radiating surface. Inspect the water hoses tor cracks or deterioration, and replace them it necessary. Check the tightness of all hose clamps and fasten- ers. SECONDARY AIR SUPPLY SYSTEM • This model is equipped with a built-in secondary air supply system. The pulse secondary air sup- CYLINDER HEAO COVER ply system is located on the cylinder head cover. PAIR CHECK VALVE • The secondary air supply system introduces fil- tered air inta exhaust gases in the exhaust port. The secondary air is drawn into the exhaust port whenever there is negative pressure pulse in the exhaust system. This charged secondary air pro- motes burning of the unburned exhaust gases and changes a considerable amount of hydrocar- bons and carbon monoxide inta relatively harm- less carbon dioxide and water. Remave the air cleaner housing (page 6-52). 11 ,he hoses show Check the PAIR hoses between the PAIR control any signs of heat solenaid valve and cylinder head cover for deterio- damage, inspeet ration, damage or loose connections. Make sure the PAIR check that the hoses are not cracked. vafves for damage. 4-20 EXHAUST PORT
  • 95. Check the air suction hose between th e air cleaner housing and PAIR control solenaid valve for deterio- ration, damage or loose connections. Check that the hoses are not kinked, pinched or cracked. EVAPORATIVE EMISSION CONTROL SYSTEM (CALIFORNIA TYPE) Check the hoses between the luel tank, EVAP canis- ter, EVAP purge control solenoid valve for deteriora- tion, damage or loase connection. Check the EVAP canister lor clacks or other damage. Reler to the Cable & Harness Routing lor hose con- nections (page 1-34). MAINTENANCE SOLENOID VALVE EVAP CANISTER 4-21
  • 96. MAINTENANCE EGCV CABLE OPERATING INSPECTION Remave the lollowing: - Seat (page 3-4) - lower cowl (page 3-6) Remave the balts, nuts and EGCV cover. Remave the dummy connector and short the DlC ,-- - - - - - - -- - - ----:--- ---, 4-22 terminals using the special taal. TOOL: SCS connector 070PZ-ZY30100 ~~SCONNECTOR Turn the ignition switch ON and make sure th at the ~=================~ pulley index line is aligned with the EGCV housing projecting portien as shown. II the pulley index line is not within the toleranee, adjust the EGCV control cable (page 4-23). Turn the i9nition switch OFF and remave the SCS connector. Install the EGCV cover, balts and tighten the nuts securely. BEARING INSPECTION Move the exhaust valve pulley to ths rotative direc- tian with your hand, check the exhaust valve shaft tor excessive play. If there is excessive play to the rotative direction, replace the exhaust pipe (page 3-24). o --.l 2.0 mm .T(0.08 in) PUllEY
  • 97. CABLE ADJUSTMENT 1. Short the DLC using the special tooi (page 6-15). 2. Loosen the adjusting nut and adjust the pulley position by turning the adjusting nut. 3. Tighten the loek nut securely. 4. Remove the SCS connector trom the DLC, then reinstall it. Make sure that the pulley index line is aligned w ith the EGCV housing toleranee as shown. DRIVE CHAIN Never inspeerand adjust the drive chain whife the angina is running. DRIVE CHAIN SLACK INSPECTION Turn the ignition switch OFF, plaee the motoreycle on lts sidestand and shift the transmission into neu- tral. Check the slack in the drive chain lower run midway between the sprockets. DRIVE CHAIN SLACK: 30 - 40 mm (1.2 - 1.6 in) I NOTICE I Exeessive ehain slaek, 50 mm (2.0 in) or more, may damage the frame. Lubrieate the drive ehain with #80 - 90 gear oil or chain lubricant designed specifically tor use with D- ring chains. Wipe aft the excess Dil or chain lubri- cant. MAINTENANCE I--'- 2.0 mm T(0.08 in) 4-23
  • 98. MAINTENANCE 4-24 ADJUSTMENT Laasen the rear axle nut. loosen the loek nuts and turn the adjusting bolts until the correct drive chain slack is obtained. Make sure the index marks on both adjusting plates are aligned with the swingarm index mark. Tighten the rear axle nut to the speeilied torque. TORQUE: 113 N·m (11.5 kgl·m, 83 Ibl·ft) Hold the adjusting bolts and tighten the loek nuts. Recheek the drive chain slack and tree wheel rota· tion. Lubricate the drive chain with #80 - 90 gear Dil or drive chain lubricant designed specifically for use with O-ring chains. Wipe off the excess oil or chain lubricant. Check the drive ehain wear indicator label attaehed on the left swingarm. If the drive chain adjusting plate index mark reaches red zone ol the indicator label, replaee the drive ehain with a new one (page 4-26). CLEANING AND LUBRICATION Clean the ehain with non-flammable or high Ilash point solvent and wipe 1t dry. Be sure the ehain has dried eompletelv belore lubri- cating. Inspeet the drive chain for possible damage or wear. Replaee anv ehain that has damaged rollers, loose fitting links, or otherwise appears unserviceable. Installing a new ehain on badlV worn sproekets will cause the new chain to wear quickly. Inspeet and replace sprocket as necessary. Lubricate the drive chain with #80 - 90 gear oil or drive chain lubricant designed specifically for use with O-ring chains. Wipe aft the excess oil or chain lubricant. SOLVENT SOFT BRUSH ClEANINJ(G~~~~~~~~~;~;~::§l@;:~ oo ~ 0000000000 ~ WIPE ANDDRY ~ ::@: ~.2..- 0 0 o o lUBRICATE 0 :@~~ lUBRICATE #80 - 90 GEAR Oll OR DRIVE CHAIN LUBRICANT
  • 99. SPROCKET INSPECTION Remave the drive spracket cover (page 8-5). Inspeet the drive and driven sprocket teeth tor wear or damage, replace if necessary. Never use a new drive chain on wern sprockets. Bath chain and sprockets must be in good condi- tion, or the new replacement chain will wear rap- idly. Check the attaching balts and nuts on the drive and driven sprockets. If any are loose, torque them. TORQUE: Drive sprocket bolt: 54 N·m (5.5 kgf·m, 40 Ibl·ft) Driven sprocket nut: 64 N·m 16.5 kgl·m, 47 Ibl·ft) MAINTENANCE NORMAL 4-25
  • 100. MAINTENANCE When using the special roof. fol/ow rhe manufacturer's instruction. REPLACEMENT This motorcycle uses a drive chain w ith a staked master link. Loosen the drive ehain (page 4-24). Assembie the special taal as shown. TOOl: Drive chain tooi set 07HMH-MR10103 or 07HMH-MR1010C (U.S.A. only) Locate the crimped pin ends of th e master link trom the outside of the chain, and remove the link w ith t he drive chain taal set. TOOl: Drive chain tooi set Remave the drive chain. 07HMH-MR10103 or 07HMH-MR1010C (U.S.A. only) DRIVE CHAIN TOOL SET MASTER LINK DRIVE CHAIN TOOL SET Include the master Remave the excess drive chain links trom the new ~=================~ link when you d rive chain with the drive chain taal set. counc the drive eh.in links. STANOARO liNKS: 112 LINKS 4-26 REPLACEMENT CHAIN OIO: 0 10525HV KAI-112YB RK: RK525ROZ6-112WFZ 1 LINK ... f---- - - 11 2 LINKS -----~..
  • 101. • Never reuse the cid drive chain, master link, master link plate and O-rings. (nsen the master Assembie the new master link, O-rings and plate. link. trom the inside of the drive chain, and Înstall the plate with the identification mark facing the outside. Assembie and set the drive ehain taal set. TOOl: Drive chain tooI set 07HMH-MR10l03 or 07HMH-MR10l0C IU.S.A. only) Make sure that the master link pins are installed properly. Measure the master link pin length projected trom the plate. STANOARO LENGTH: OIO: 1.15 - 1.55 mm 10.045 - 0.061 in) RK: 1.2 - 1.4 mm 10.05 - 0.06 in) Stake the master link pins. Make sure that the pins are staked properly by mea- suring th e diameter of the staked area using a slide caliper. DIAMETER OF THE STAKEO AREA: OIO: 5.50 - 5.80 mm 10.217- 0.228 in) RK: 5.30 - 5.70 mm 10.209 - 0.224 in) MAINTENANCE MASTER LINK DRIVE CHA IN TOOl SET MASTER LINK PINS SLiDE CALIPER 4-27
  • 102. MAINTENANCE A drive chain with a After staking, check the staked area of the master cli{Hype master link link tor cracks. must nor be used. If there is any cracking, replace the master link, 0- rings and plate. DRIVE CHAIN SLiDER GOOD NO GOOD ~vCRACKED Inspeet the drive chain slider tor excessive wear or , - - - - - - - - - - - - - - - - - - - , damage. If it is warn to the wear indicator, replace the drive ehain slider (page 15-22). BRAKE FLUID I NOTICE Spil/ed fluid can damage painted, plastic or rubber parts. Place a rag over these pans whenever the system ;s servieed. • Do not mix different types of fluid, as they are not compatible with each other. • Do not allow foreign material to enter the system when filling the reserve tank. When the fluid level is low, check the brake pads for wear (page 4-29). A low fluid level may be due to wear of the brake pads. If the brake pads are wam, the ealiper piston is pushed out, and this accounts for a low fluid level. If the brake pads are not wam and the fluid level is low, check entire system for leaks (page 4-30). FRONT BRAKE WEAR INDICATOR Turn the handlebar sa that the reserve tank is level 1------=:;;:;;;:;;:;;;;;---- -----1 and check the front brake fluid level. If the level is near the lower level line, check the brake pad wear (page 4-29). 4-28
  • 103. MAINTENANCE REAR BRAKE Place the motorcycle on a level surface, and support r----------------~ it an upright position. LOWEA LEVEL LlNE Check the rear brake fluid level. If the level is near the lower level line, check the brake pad wear (page 4-29). BRAKE PADS WEAR FRONT BRAKE PADS Check the brake pads for wear. Aeplace the brake pads if either pad is worn to the bettam of wear limit groove. For brake pad replacement (page 16-9). REAR BRAKE PADS Check the brake pads for wear. Aeplace the brake pads if either pad is worn to the bettam of wear limit groove. For brake pad replacement (page 16-11). WEAA LIMIT GAOOVE I;-, WEAA LIMIT GAOOVE 4-29
  • 104. MAINTENANCE BRAKE SYSTEM INSPECTION Firmly apply the brake lever or pedaI, and check that no air has entered the system. If the lever or peda I feels soft or spongy when oper- ated, bleed the air from the system (page 16-8). Inspeet the brake hose and fittings tor deterioration, cracks and signs of leakage. Tighten any loose fittings. Replace hoses and fittings as required. For brake air bleeding (page 16-8). BRAKE LEVER ADJUSTMENT Align the •t:::: mark The distance between the brake lever and the grip on the brake {ever can be adjusted by turning the adjuster. with rhe index number on the adjuster. 4-30 BRAKE PEDAL HEIGHT ADJUSTMENT Loosen the loek nut and turn the push rad until the correct pedaI height is obtained. • When adjusting the push rod length, do not extend it more than 5.5 mm (0.22 in). After adjustment, tighten the loek nut to the speci- fied torque. TORQUE: 18 N·m (1.8 kgf·m, 13Ibf.ft) LoeK NUT 5.5 mm (0.22 in) MAXIMUM
  • 105. BRAKE LIGHT SWITCH The front brake Adjust the brake light switch so that the brake light light switch does cames on just prior to the brake actually being not (equire engaged. adjustment. If the light fails to come on, adjust the switch so that the light comes on at the proper time. Hold the switch body and turn the adjuster. Do not turn the switch body. HEADLIGHT AlM Place the motorcycle on a levelsurface. Adjust the headlight Adjust the headlight aim vertically by turning the aim as specified by vertical bearn adjusting screw. locallaws and A clockwise rotatian moves the bearn up and coun- regufations. terclockwise rotatien moves the bearn down. Adjust the headlight aim horizontally by turning the horizontal bearn adjusting screw. Left Headlight: A clockwise rotatien moves the bearn toward the right and counterclockwise rotatian moves the beam toward the left side of the rider. Right Headfight: A clockwise rotatian moves the bearn toward the left and counterclockwise rotatian moves the bearn loward the right side of the riaer. CLUTCH SYSTEM MAINTENANCE ADJUSTER VERTICAL BEAM ADJUSTING SCREWS HORIZONTAL BEAM ADJUSTING SCREWS Measure the clutch lever freeplay at the end of the , - - - - - - - - - - - - - - - - - - - , clutch lever. 10 - 20 mm (3/8 - 13/16 in) The adjuster may be damaged if it is positioned too far out, leaving minÎmal rhread engagement. FREEPLAY: 10 - 20 mm (3/8 - 13/16 in) Minor adjustment is made with the upper adjuster ~L=O=C=K=N=U=T=============== at the clutch lever. Loosen the lock nut and turn the adjuster. If the adjuster is threaded out near its limit and the correct freeplay cannot be obtained, turn the adjuster all the way in and back out one turn. Tighten the loek nut while holding the adjuster and make a major adjustment as described as follows: ADJUSTER 4-31
  • 106. MAINTENANCE Major adjustment is performed at the clutch lifter lever. Loosen the lock nut and turn the adjusting nut to adjust the Ireeplay. Tighten the lock nut while holding the adjusting nut. Il proper Ireeplay cannot be obtained, or the clutch slips during test ride, disassembie and inspeet the clutch (page 10-7). SIDESTAND Support the motorcycle on a level ground. Check the sidestand spring lor damage or loss ol ten sion. Check the sidestand assembly lor Ireedom ol move- ment and lubricate the sidestand pivot jf necessary. TORQUE: Sidestand pivot bolt: 10 N·m (1.0 kgl·m, 7Ibl·ft) Sidestand pivot nut: 29 N·m (3.0 kgl·m, 21 Ibl·ft) Check the sidestand ignition cut-aft system: - Sit astride the motorcycle and raise the sidestand. - Start the engine with the transmission into neu- tral, then shift the transmission ;nto gear, with the clutch lever squeezed. - Move the sidestand lull down. - The engine should stop as the sidestand is low- ered. Il there is a problem with the system, check the sidestand switch (page 20-20). SUSPENSION Loase. wom or damaged suspension parts impair motorcycles stabifityand control. 4-32 FRONT SUSPENSION INSPECTION Check the action ol the lorks by operating the Iront brakes and compressing the front suspension sev- eral times. Check the entire assembly lor signs olleaks, dam- age or loose fasteners. Replace damaged components which cannot be repaired. Tighten all nuts and bolts. For lork service (page 14-22). LOCK NUT ~ ADJUSTING NUT