
Recommended
Recommended
More Related Content
Similar to SAP 3-Tier Architecture in 40 Characters
Similar to SAP 3-Tier Architecture in 40 Characters (20)
Recently uploaded
Recently uploaded (20)
SAP 3-Tier Architecture in 40 Characters
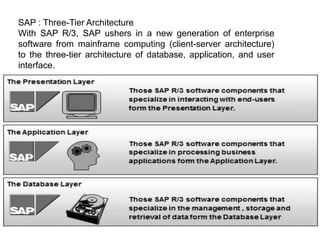
- 1. SAP : Three-Tier Architecture With SAP R/3, SAP ushers in a new generation of enterprise software from mainframe computing (client-server architecture) to the three-tier architecture of database, application, and user interface.
- 2. Three-Tier Architecture of SAP R/3 Presentation Servers Presentation servers contain systems capable of providing a graphical interface. •Presentation Layer is also known as client Layer •Presentation Layer is a user interaction •In SAP-User interaction purpose we use GUI •GUI stands for Graphical user interface •Example − Desktop, Mobile Devices, laptops
- 3. Application Servers Application servers include specialized systems with multiple CPUs and a vast amount of RAM. •Application Layer is also known as Kernel Layer and Basic Layer. •SAP application programs are executed in Application Layer. •Application Layer serves as a purpose of a communicator between Presentation and Database Layer. •Application server is where the dispatcher distributes the work load to the different work processes makes the job done.
- 4. Database Servers Database servers contain specialized systems with fast and large hard- drives. •Database layer stores the data •Data store can be Business data, SAP system data, SAP tables, Programs. •Examples − Oracle, Microsoft SQL Server, IBM DB/2, Siebel, Sybase, etc.
- 6. Three-Tier Architecture What is a Client? A client is a logical portion of an SAP R/3 physical database. From a business standpoint, a client can be interpreted as a logical group of companies.
- 7. Points to Remember − •All customizing (configuration) and development (ABAP) work in SAP R/3 is performed in a client. •However, the data from both customizing and development work may be stored within an individual client (client dependent data) or among all clients (client independent data) in the system
- 8. SAP - GUI Installation Now we should learn how to install SAP R3 on our systems. Minimum System Requirements To install the latest SAP GUI 730 version, MSU machines must meet the following minimum system requirements − •Windows-based PC running Windows 7, Vista, or Windows XP with Service Pack 3 •Apple Mac with Virtual Machine software (VMWare, Fusion, Parallels) running Windows 7, Vista, or XP (Service Pack 3) System Memory (RAM) •Windows XP − Minimum of 1 GB; 2 GB recommended •Windows 7 − Minimum of 2 GB; 4 GB recommended •Mac with Virtual Windows Environment − Minimum of 2 GB; 4 GB recommended Disk Space •45 MB of available disk space for the SAP GUI installer program •250 MB of available disk space for the fully-installed application
- 9. Preliminary Installation Activities Increase Virtual Memory My computer (Right click) → Properties → Advanced System settings → Performance → Setting → Advanced → Virtual Memory → Change The following screenshot shows the steps.
- 10. SAP - Logging onto SAP System • SAP Logon • SAP logon is used to create icons to logon to SAP R/3. However, the icons created with SAP logon are not placed in the SAP R/3 Windows group; they are instead shown via the SAP logon menu. The SAP logon pad is available once the SAP GUI is installed at the workstation.
- 11. SAP Logon Icon
- 13. •The SAP logon menu can be thought of as a one-stop shopping store, where end- •users can choose from logon icons, logon groups, or create new logon icons. Logon icons will log a user onto one specific application server. A logon group will log the user onto one of several applications servers depending on which one has the best performance statistics Adding a New SAP Application Server To create a shortcut for connecting to a new SAP application server, follow the procedure below − Click on the shortcut icon SAP Logon from the desktop and the Logon pad will open as shown in the following screenshot. Click the ‘New’ button
- 15. •Click on the “Next” button as shown here. Fill in the following details in the “System Entry Properties” screen. •Description − Provide a meaningful short text for identifying the server. The server will be available in the SAP Logon pad with this name. •Application server − Provide the IP/Address of the application server, provided by the basis administrator. •System number and System ID − Give the system number provided by the basis administrator. It should be kept as 00, if nothing is specified. SAP router string − Provide the SAP Router String, if provided by the basis administrator. Sometimes it may be left blank.
- 16. •Click on Finish to complete the configuration. The newly created SAP application server will now be available in the SAP logon pad.
- 18. Logging onto SAP R/3 SAP Logon pad is used to configure the SAP server. The SAP GUI is used to connect the computer to the SAP system. SAP GUI Types A SAP GUI can be of the following three categories − •SAP GUI for Windows environment •SAP GUI for Java environment •SAP GUI for HTML Follow the procedure given below to log onto the SAP server − •Launch the SAP logon pad. •Double-click on the Application Server (which you need to connect), from the SAP logon pad. The SAP logon screen appears. •On the SAP logon screen, The value of the default client appears automatically. If you want to logon to a different client, then change it with the new client number. Next, enter the User ID and password assigned to you. Enter ‘EN’ in language to logon to English settings. Generally the language is defaulted to ‘EN’ or any other language depending on the country/users and installed languages. So, for English as the logon language, you need not have to enter it in the SAP logon screen, as it takes its values from the default settings. After filling up the four fields, press the Enter button to logon to the SAP system.
- 19. NOTE − During the first logon to the system with your ID, you will be prompted to change your initial password.
- 21. Logging Off from SAP •Click on System (from Menu Bar) and choose “Logoff”.
- 22. •You can also logoff by clicking the button at the upper-right corner of the screen. When you log off, a message pops up stating, “Unsaved data will be lost. Do you want to log off?” Click “Yes” if you have already safely posted (or saved) the transactions you were working on.
- 23. • To customize the SAP layout based on user preferences and local requirements. You can customize the following settings based on your preferences − • Visual Settings like SAP Theme, Color, Fonts and size, etc. • Interaction Design like Keyboard settings, Sound and Control setting, etc. • In addition, you can customize various other attributes which will directly affect your interaction with SAP. • The Layout Customize option can be accessed either through the application toolbar or through the SAP logon pad. SAP - GUI Customization
- 24. Customizing through the Application Toolbar Click the “Customize Local Layout” Button on the application toolbar, a drop-down menu will open. Click the menu “Options”, it will take you to the Local layout optimization screen. On the SAP GUI, you can make the following adjustments − •Options •New Visual Design •General Settings under Customizing Local Layout •Other General Settings under Customizing Local Layout •Internationalization Settings under Customizing Local Layout •Switching the Visual Design
- 26. Customizing through the Logon Pad You can customize the Local Layout by accessing the option from the SAP Logon Pad. Click the Icon at the extreme top left-hand side corner. A drop-down menu will appear. Select “Options” from the menu item and it will take you to the SAP GUI customization screen shown in the next screenshot.