
Recommended
More Related Content
Similar to Compound Microscope..pptx
Similar to Compound Microscope..pptx (20)
Recently uploaded
Recently uploaded (20)
Compound Microscope..pptx
- 2. What is microscope? Amicroscope is an instrument used to see objects that are too small for the naked eye.
- 3. Properties of a microscope A good microscope should have at least three properties: • Good Resolution • Good Contrast • Good Magnification
- 4. Good Resolution :- Resolution power refers to the ability to produce separate images of closely placed objects. • So that they can be distinguished as two separate entities.
- 5. Good Contrast: • Contrast is improved by staining the specimen. When the stain bind to the cells, the contrast is increased.
- 6. Good Magnification: • Ocular lens with a magnification power of 10X. • Objective lens- • Scanning (4X) • Low power (10X) • High power (40X) • Oil immersion (100X)
- 7. Total magnification of a field is the product of the magnification of objective and ocular lens: • Scanning field (40X) • Low power field (100X) • High power field (400X) • Oil immersion field (1000X)
- 8. TYPES OF MICROSCOPE The following types of microscopes are in use now- • Bright field or light microscope • Dark field microscope • Phase contrast microscope • Fluorescence microscope • Electron microscope
- 9. Bright field or light microscope Light microscope forms a dark image against a brighter background, hence the name bright field. Structure: • The parts of light microscope is divided into three groups- • Mechanical part • Magnifying part • Illuminating part
- 10. viewing. Mechanical part: Base: It holds various part of microscope, such as the light source, the fine and coarse adjustment knobs. C- shaped arm: It hold the microscope, and it connects the ocular lens to the objective lens. Mechanical stage: The arm bears a stage with stage clips to hold the slides and the stage control knobs to move the slide. It has an aperture at the center that permit light to reach the object from the bottom.
- 11. Magnifying part: Ocular lens: The arm contains an eye piece that bears an ocular lens of 10X magnification power. • Microscope with two eye pieces are called binocular microscopes. Objective lens: The arm also contains a revolving nose piece that bears three to five objectives with lenses of differing magnifying power (4X,10X,40X, and 100X).
- 12. They Illuminating parts: Condenser: It is mounted beneath the stage which focuses a cone of light on the slide. Iris diaphragm: it control the light pass through the condenser. • Light source: it may be a mirror or an electric bulb. • Fine and coarse adjustment knob: sharpen the image.
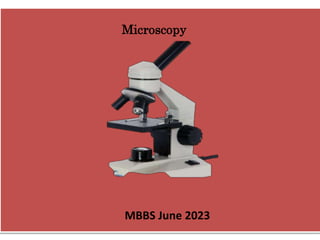
- 13. MICROSCOPE
- 14. virtual Principle : The rays emitted from the light source pass through the iris diaphragm and fall on the specimen. The rays passing through the specimen is gathered by the objective and a magnified image is formed. This image is further magnified by the ocular lens to produce the final magnified image.
- 15. Compound microscope Dark-field microscope
- 16. How to Use a Compound Microscope. 1.Turn the revolving nose piece so that the lowest power objective lens (eg. 4x) is clicked into position. 2.Place the microscope slide on the stage and fasten it with the stage clips. 3.Look at the objective lens and the stage from the side and turn the focus knob so the stage moves upward. Move it up as far as it will go without letting the objective touch the coverslip. 4.Look through the eyepiece and move the focus knob until the image comes into focus. 5.Adjust the condenser and light intensity for the greatest amount of light. 6.Move the microscope slide around until the sample is in the Centre of the field of view (what you see). 7.Use the focus knob to place the sample into focus and readjust the condenser and light intensity for the clearest image (with low power objectives you might need to reduce the light intensity or shut the condenser). 8.When you have a clear image of your sample with the lowest power objective, you can change to the next objective lenses. 9.You might need to readjust the sample into focus and/or readjust the condenser and light intensity. 10.If you cannot focus on your specimen, repeat steps 3 through 5 with the higher power objective lens in place. 11.Do not let the objective lens touch the slide!(when using x4, x10 and x40). 12.For stained films allow the objective lens to torch the immersion oil. 13.When finished, lower the stage, click the low power lens into position and remove the slide.
- 17. • Always carry with 2 hands • Only use lens paper for cleaning • Do not force knobs • Always store covered • Be careful of the cords Rules of using a microscope