SlideShare a Scribd company logo
1 of 30
Download to read offline
Introduction to Teradata RDBMS


Teradata RDBMS is a complete relational database management system. The system is based on
off-the-shelf Symmetric Multiprocessing (SMP) technology combined with a communication
network connecting the SMP systems to form a Massively Parallel Processing (MMP) system.
BYNET is a hardware inter-processor network to link SMP nodes. All processors in a same SMP
node are connected by a virtual BYNET. We use the following figure to explain how each
component in this DBMS works together.


               SQL query                        Result Table


                                    CLI


                                    TDP
                                                                          Client

                                                                           Server
            Parsing Engine         Parser                       PEs
                                 Dispatcher

                           Inter-Processor Network
     PDE                                        BYNET
                         Database Management System             AMPs
           Database
            Engine
                                Teradata File System


                                 Disk Subsystem


PDE (Parallel Database Extensions):
       This component is an interface layer on the top of operating system. Its functions
       include: executing vprocs (virtualprocessors), providing a parallel environment,
       scheduling sessions, debugging, etc.


                                                                                         1
Teradata File System:
       It allows Teradata RDBMS to store and retrieve data regardless of low-level operating
       system interface.

PE (Parsing Engine):
       Communicate with client
       Manage sessions
       Parse SQL statements
       Communicate with AMPs
       Return result to the client

AMP (Access Module Processor):
       BYNET interface
       Manage database
       Interface to disk subsystem


CLI (Call Level Interface):
       A SQL query is submitted and transferred in CLI packet format

TDP (Teradata Director Program):
       Route the packets to the specified Teradata RDBMS server


Teradata RDBMS has the following components that support all data communication
management:
       „ Call Level Interface ( CLI )
       „ WinCLI & ODBC
       „ Teradata Director Program ( TDP for channel attached client )
       „ Micro TDP ( TDP for network attached client )


                                     Introduction to Teradata Client Software

Teradata Client Software components include:

       „    BTEQ
            Basic Teradata Query is a general-purpose program that you can use to submit data,
            commands and SQL statements to Teradata RDBMS.


                                                                                            2
„    C / COBOL / PL/I preprocessors
           If you use embedded SQL to develop client applications, you need these tools to pre-
           compile your programs.

       „     CLI

       „     ODBC

       „     TDP/MTDP/MOSI

       „     Achieve/Restore data to/from tape (ASF2)

       „     Queryman
             Queryman is based on ODBC, you can logon through a DSN and enter any SQL
             statement to manipulate the data in database.

       „     FastLoad

       „     MultiLoad

       „     FastExport

       „     Open Teradata Backup (OTB)

       „     Tpump

       „     Teradata Manager

       „     WinDDI


All client components are based on CLI or ODBC or Both of them. So, once you install the client
software, you should configure these two components appropriately before you execute these
client utilities.

Teradata RDBMS is able to support JDBC programs in both forms of application and applet. The
client installation manual mentions that we need to install JDBC driver on client computers, and
we also need to start a JDBC Gateway and Web server on database server. Teradata supports at
least two types of JDBC drivers. The first type can be loaded locally and the second one should
be downloadable. In either of two ways, to support your development, you need local JDBC
driver or Web server / JDBC Gateway running on the same node on which Query Manager is
running. But in the setup CD we received, there is no JDBC driver and any Java Development
Tools. Moreover, Web server is not started on tour system yet.


                                                                                              3
Installation and Configuration
Because the installation is easy, we just give some tips:

    You need one floppy disk which contains licenses for all components you could install. Each
    component has one entry in the license txt file.

    If you are asked to choose ODBC or Teradata ODBC with DBQM enhanced version to
    install. Just forget it. In this case, you can not install DBQM_Admin, DBQM_Client, and
    DBQM_Server. These three components are used to optimize the processing of your SQL
    queries. Fortunately, your client software still works smoothly without them.

    Because CLI and ODBC are the infrastructures of other components, you may not delete
    either one of them from the installation list if there is any component based on it.

    After ODBC installation, you will be asked to run ODBC administrator to configure a Data
    Source Name (DSN). You may cancel it simply because you can do this job later. After
    Teradata Manager installation, you will be asked to run Start RDBMS Setup. You also can do
    it later.

For more information, please visit www.info.ncr.com and download Teradata Client for Windows
Installation Guide.

Configuration includes several steps:

    Setting Network Parameters
    For Windows 2000, do the following step: Start -> Search -> For Files or Folders. You can
    find the file: hosts


    Use Notepad to edit the hosts file as follows:


                                                                                             4
Add one line into your hosts file: “ 130.108.5.57 teradatacop1 ”. Here, 130.108.5.57 is the
IP address of the top node of the system on which Query Manager is running. “teradata” will
be the TDPID which is used in many client components you installed. “cop” is a fixed suffix
string and “1” indicate that there is one RDBMS.


Setting System Environment Parameters
For Windows 2000, do the following step: Start -> Settings -> Control Panel


Find the icon “System”, double click it, get the following window, then choose “Advanced”
sub-window


                                                                                         5
click “Environment Variables…” button


                                        6
Then you can click button “New…” to create some System Variables as follows:
    COPLIB = the directory which contains the file clispb.dat
This file is copied to your computer when you install Teradata Client Software. It contains
some default settings for CLI.

    COPANOMLOG = the full path and the log file name
You can set it as you want. If the file doesn’t exist, when an error occurs, the client software
will create the file to record the log information.

    TDMSTPORT = 1025
Because our server is listening the connect request on port 1025, you should set it as 1025.
This is also the default port number used by those client components. If you don’t set it,
perhaps you will not have any problem now. But we still suggest you add this system
environment variable for the future usage. You shouldn’t insert a line
    tdmst    1025/TCP
into the file C:WINNTSystem32driversetcservices directly without correct the setting on
environment variable TDMSTPORT. According to our test, that doesn’t work.


Setting CLI System Parameter Block
You can find the file clispb.dat after you install the client software. In our computer, it is
under the directory C:Program FilesNCRTeradata Client. Please use Notepad to open it.
You will see


                                                                                              7
Originally, i_dbcpath was set as dbc. That is not the same as what I set in the file hosts. So
I modify it as teradata. When you use some components based on CLI and do not specify the
TDPID or RDBMS, the components will open this file to find this default setting. So we
suggest you to set it as what you set in your file hosts.

For other entries in this file, you can just keep them as original settings.

To use utilities such as Queryman and WinDDI, you still need to configure a Data Source
Name (DSN) for yourself. We will discuss how to configure a DSN in the section
“Developing ODBC applications”.


                                                                                            8
BTEQ

BTEQ is like a RDBMS console. This utility enables you to connect to Teradata RDBMS server
as any valid database user, set the session environment and execute SQL statement as long as you
have such privileges. BTEQWin is a Windows version of BTEQ. Both of them work on two
components: CLI and TDP/MTDP. BTEQ commands or SQL statements entered into the BTEQ
are packed into CLI packets, then TDP/MTDP transfers them to RDBMS. BTEQ supports 55
commands which fall into four groups:
        o Session Control Commands
        o File Control Commands
        o Sequence Control Commands
        o Format Control Commands

Here, we do not introduce each command. But, some usage tips and examples for the frequently
used commands are given here.

Usage Tips:

o   BTEQ commands consist of a dot character followed by a command keyword, command
    options, and parameters.
        .LOGON teradata/john

o   Teradata SQL statement doesn’t begin with a dot character, but it must end with a ‘;’
    character.
        SELECT * FROM students Where name = “Jack”;

o   You can enter both BTEQ commands and SQL statements in any combination of uppercase
    and lowercase and mixed-case formats.
        .Logoff

o   If you want to submit a transaction which includes several SQL statements, do as the
    following example:
        Select * from students
        ;insert into table students Values(‘00001’, ‘Jack’,’M’,25 )
        ;select * from students;

    After you enter the last ‘;’ and hit the [enter] key, these SQL requests will be submitted as a
    transaction. If anyone of them has an error, the whole transaction will be rolled back.


Frequently Used Commands :

o   LOGON
      .logon teradata/john
      PASSWORD:johnpass

    In the above example, we connect to RDBMS called “teradata”. “teradata” is the TDPID of
    the server. “john” is the userid and “johnpass” is the password of the user.


                                                                                                 9
o   LOGOFF
        .logoff
    Just logoff from the current user account without exiting from BTEQ.


o   EXIT or QUIT
       .exit
       .quit

    These two commands are the same. After execute them, you will exit from BTEQ.


o   SHOW VERSIONS
      .show versions

    check the version of the BTEQ you are using.


o   SECURITY
       .set security passwords
       .set security all
       .set security none

    specify the security level of messages sent from network-attached systems to the Teradata
    RDBMS. By the first one, only messages containing user passwords, such as CREATE
    USER statement, will be encrypted. By the second one, all messages will be encrypted.


o   SESSIONS
       .sessions 5
       .repeat 3
       select * from students;

    After executing the above commands one by one, you will create 5 sessions running in
    parallel. Then we will execute select request three times. In this situation, three out of the five
    sessions will execute the select statement one time in parallel.


o   QUIET
       .set quiet on
       .set quiet off

    If switched off, the result of your command or SQL statement will not be displayed.


o   SHOW CONTROLS
       .show controls
       .show control


                                                                                                    10
Show the current settings for BTEQ software.

o   RETLIMIT
       .set retlimit 4
       select * from dbase;

    Just display the first 4 rows of the result table and ignore the rest.

        .set retlimit 0
        select * from dbase;

    Display all rows of the result table.


o   RECORDMODE
       .set recordmode               on
       .set recordmode               off

    If switched on, all result rows will be displayed in binary mode.


o   SUPPRESS
       .set suppress on 3
       select * from students;

    If the third column of the students table is Department Name, then the same department
    names will be display only once on the terminal screen.


o   SKIPLINE/SKIPDOUBLE
       .set skipline on 1
       .set skipdouble on 3
       select * from students;

    During displaying the result table, if the value in column 1 changes, skip one blank line to
    display the next row. If the value in column 3 changes, skip two blank lines to display the
    next row.


o   FORMAT
       .set       format on
       .set       heading “Result:“
       .set       rtitle “Report Title:“
       .set       footing “Result Finished”

    Add the heading line, report title, and footing line to the result displayed on the terminal
    screen.


                                                                                             11
o   OS
         .os command
         c:progra~1ncrterada~bin> dir

    The first command let you enter the Windows/Dos command prompt status. Then you can
    enter OS commands such as dir, del, copy, etc.

         .os dir
         .os copy sample1.txt sample.old

    Another way to execute the OS command is entering the command after the .os keyword.


o   RUN
    You can run a script file which contains several BTEQ commands and SQL requests. See the
    following example:
    1) To edit a txt file, runfile.txt, using Notepad, the file contains:

                .set defaults
                .set separator “$”
                select * from dbase;
                .set defaults

    2) RUN
                .run      file = runfile.txt

         If the working directory of BTEQ is not same as the directory containing the file, you
         must specify the full path.


o   SYSIN & SYSOUT
    SYSIN and SYSOUT are standard input and output streams of BTEQ. You can redirect them
    as the following example:

         Start -> programs -> accessories -> command prompt

         c:>cd c:program filesncrteradata clientbin
         c:program filesncrteradata clientbin> bteq > result.txt
         .logon teradata/john
         johnpass
         select * from students;
         .exit
         c:program filesncrteradata clientbin > bteq >


    In the above example, all output will be written into result.txt file but not to the terminal
    screen. If runfile.txt file is placed in the root directory C:, we can redirect the standard input
    stream of BTEQ as the following example:


                                                                                                    12
c:>cd c:program filesncrteradata clientbin
        c:program filesncrteradata clientbin>bteq < c:runfile.txt


o   EXPORT
        .export report file = export
        select * from students;
        .os edit export

    The command produces a report like


    Command keyword “report” specifies the format of output. “file” specifies the name of
    output file. If you want export the data to a file for backup, use the following command:

        .export data file = exdata
        select * from students;

    you will get all data from the select statement and store them into the file, exdata, in a special
    format.

    After exporting what you want, you should reset the export options.
        . export reset


o   IMPORT
    As mentioned above, we already store all data of the students table into the file exdata. Now,
    we want to restore them into database. See the following example:

        .delete from students;
        .import data file = exdata


                                                                                                   13
.repeat 5
        using(studentId char(5),name char(20),sex char(1),age integer )
        insert into students ( studentId, name, sex, age )
        values( :studentId, :name, :sex, :age );

    The third command requires BTEQ to execute the following command five times.
    The last command has three lines. It will insert one row into the students table each time.


o   MACRO
    You can use the SQL statements to create a macro and execute this macro at any time. See
    the following example:

        create macro MyMacro1 as (
              ECHO ‘.set separator “#”’
              ; select * from students;
        );

    This macro executes one BTEQ command and one SQL request.

        execute MyMacro1;

    This SQL statement executes the macro.

    In this brief tutorial, we do not introduce many BTEQ commands used in writing BTEQ
    scripts and SQL syntax. For more information, you can download the Teradata BTEQ
    reference guide and Teradata SQL reference from the NCR web site
    (http://www.info.ncr.com). Next, we will give an example showing how to create
    database/user/table, manipulate data of a table, and build a client/server database application.


                                                                                                  14
Developing ODBC Applications
In the following demo, we will describe each step of using Teradata DBMS to develop a DB
application. In the example, there are two users: John and Mike. John is the administrator of the
application database. Mike works for John and he is the person who manipulates the table
students in the database every day.

Step 1. John create user Mike and the database student_info by using BTEQ.
    Running the BTEQ
    Logon the Teradata DBMS server.
    create a user and a database
    create tables
    use SQL commands: insert, select, delete, update
    Logoff and Quit BTEQ

Step 2. Create one ODBC Data Source Name (DSN) to develop an application
Step 3. Develop an application by using ODBC interface
Step 4. Running the demo


Step 1. John create user Mike and the database student_info by using BTEQ.

     Running BTEQ
start -> program -> Teradata Client -> BTEQ


    Logon Teradata DBMS server


                                                                                              15
John was created by the Teradata DBMS administrator and was granted the privileges to create a
USER and a DATABASE. In Teradata DBMS, the owner automatically has all privileges on the
database he/she creates.


   Create a User and a Database


The above figure shows how to create a user. In Teradata DBMS, you should see a user as a
special database. The difference between user and database is that a user has a password and can


                                                                                             16
logon to the DBMS, while a database is just a passive object in DBMS. Next, we see how to
create a database:


John is the owner of user Mike and database student_info. Of course, John has all privileges on
this database such as creating table, executing select, insert, update and delete statements. But we
notice that Mike doesn’t have any privilege on this database now. So John needs to grant some
privileges to Mike for his daily work. See the next figure:


    Create Table


                                                                                                 17
After granting appropriate privileges to Mike, John needs to create a table for storing the
information of all students. First, he must specify the database containing the table.


Then he creates the table students


    Using SQL statements such as Select, Insert, Delete and Update


                                                                                        18
Now, Mike can logon and insert some data into the table students.


                                                                    19
In the figure below, Mike inserts a new row whose first field is “00003”. We notice that there are
two rows whose first fields have the same value. So, Mike decides to delete one of them.


                                                                                               20
Logoff and Quit BTEQ

Mike uses the following command

       .exit

to logoff and quit BTEQ.


Step 2. Create one ODBC Data Source Name (DSN) to develop an application


               Architecture of DB Application Based on ODBC


                                                                           21
In the figure above, the Data source modules refer to physical databases with different DBMSs.
The term Data Source Name (DSN) is just like a profile which is a link between the first level,
Application, and the second level, ODBC Driver Manager. We use the profile, DSN, to describe
which ODBC driver will be used in the application and the application will logon which account
on which database.

The following figures show each step of creating the DSN used in our application:
1. start -> settings -> control panel


2. click the icon “Administrative Tools”


                                                                                            22
3. click the icon “Data Sources (ODBC)”


4. The ODBC Data Source Administrator window lists all DSN already created on your
computer. Now, click the button “Add…”


                                                                               23
5. You will be asked to choose one ODBC driver for your Data Source. You should choose
Teradata.


   6.   Then, you need to type in all information about your DSN, such as IP address of server,
        username, password, and default database you will use.


                                                                                            24
Step 3. Develop an application by using ODBC interface

The demo was developed on Windows NT/2000 by using VC++ 6.0. We can access the table
students via ODBC interface. You need to include the following files:

                        #include    <sql.h>
                        #include    <sqlext.h>
                        #include    <odbcinst.h>
                        #include    <odbcss.h>
                        #include    <odbcver.h>

You also need to link odbc32.lib. In VC++ 6.0 developing studio, you can set the link option to
finish the appropriate compiling and link. Another way to avoid the subtle job of setting link and
compiling options is directly adding this lib file into your project.

The ODBC program scheme is shown below, which is a code segment of executing select SQL
statement:

        SQLAllocEnv(&DSNhenv);
        SQLAllocConnect(ODBChenv, &ODBChdbc);
        SQLConnect(ODBChdbc, DataSourceNname, DBusername, DBuserpassword
        );
        SQLAllocStmt(ODBChdbc, &ODBChstmt);
        Construct the SQL command string
        SQLExecDirect(ODBChstmt, (UCHAR *)command, SQL_NTS);
        if (ODBC_SUCCESS)
        {
              SQLFetch(ODBChstmt);
              while (ODBC_SUCCESS)&&(data set is not empty)
              {
                    processing the data
                    SQLFetch(ODBChstmt);
              }
        }
        SQLFreeStmt(ODBChstmt, SQL_DROP);
        SQLDisconnect(ODBChdbc);
        SQLFreeConnect(ODBChdbc);
        SQLFreeEnv(DSNhenv);

When ODBC function SQLConnect() is called in your program, you need to specify the Data
Source Name created in step 2. Our demo is just a simple example, though it has invoked almost
all functions often used in general applications. For more details about ODBC programming,
please see related ODBC references and VC++ references.


Step 4. Running the demo

Copy all files of the project to your PC and double click the file ODBCexample.dsw . VC++ 6.0
developing studio will load the Win32 project automatically. Then you can choose menu item
“build” or “execute ODBCexample”.


                                                                                               25
In the next window, you can see all DSN defined on your PC. We can choose TeradataExample
created in step 2. We don’t need to provide the user name mike and the password mikepass,
because they were already set in DSN. Then we click the button “Connect To Database” to
connect to the Teradata DBMS server.


                                                                                      26
Click “>>” button to enter next window sheet. Now, after pressing “Get Information of All
Tables In The Database”, you can see all tables in the database including students created in step
1. Then we can choose one table from the leftmost listbox and enter the next window sheet by
clicking “>>”.


Click the button “Get Scheme of the Table” to see the definition of the table. And if the table you
have chosen is students, you can press “Run SQL on This Table” to execute a SQL statement on
the table.


                                                                                                27
28
After typing the SQL statement in the edit box, you can press button “Get Information” to
execute it. If you want to add a student, please click “Add Student”.


                                                                                      29
30

More Related Content

What's hot

LOT-926 Managing and Maintaining IBM Lotus Notes and Domino 8.5 Environments
LOT-926 Managing and Maintaining IBM Lotus Notes and Domino 8.5 EnvironmentsLOT-926 Managing and Maintaining IBM Lotus Notes and Domino 8.5 Environments
LOT-926 Managing and Maintaining IBM Lotus Notes and Domino 8.5 EnvironmentsMarek Zawadzki
 
Upgrading from Windows Server 2008 / 2008 R2 to Windows Server 2012
Upgrading from Windows Server 2008 / 2008 R2 to Windows Server 2012Upgrading from Windows Server 2008 / 2008 R2 to Windows Server 2012
Upgrading from Windows Server 2008 / 2008 R2 to Windows Server 2012Harold Wong
 
Dell 3-2-1 Reference Configurations: High available and scalable performance ...
Dell 3-2-1 Reference Configurations: High available and scalable performance ...Dell 3-2-1 Reference Configurations: High available and scalable performance ...
Dell 3-2-1 Reference Configurations: High available and scalable performance ...Principled Technologies
 
JMP105 - "How Stuff Works" - Domino Style!
JMP105 - "How Stuff Works" - Domino Style!JMP105 - "How Stuff Works" - Domino Style!
JMP105 - "How Stuff Works" - Domino Style!NerdGirlJess
 
Systemd for administrators
Systemd for administratorsSystemd for administrators
Systemd for administratorsSusant Sahani
 
Dell PowerEdge M520 server solution: Energy efficiency and database performance
Dell PowerEdge M520 server solution: Energy efficiency and database performanceDell PowerEdge M520 server solution: Energy efficiency and database performance
Dell PowerEdge M520 server solution: Energy efficiency and database performancePrincipled Technologies
 
New Exchange Server 2013 Architecture
New Exchange Server 2013 ArchitectureNew Exchange Server 2013 Architecture
New Exchange Server 2013 ArchitectureKhalid Al-Ghamdi
 
Chapter01 Introduction To Windows Server 2003
Chapter01     Introduction To  Windows  Server 2003Chapter01     Introduction To  Windows  Server 2003
Chapter01 Introduction To Windows Server 2003Raja Waseem Akhtar
 
Data Warehousing Practical for T.Y.I.T.
Data Warehousing Practical for T.Y.I.T.Data Warehousing Practical for T.Y.I.T.
Data Warehousing Practical for T.Y.I.T.Niraj Bharambe
 
Lotus 190-980 Domino 8.5 System Administration Fundamentals
Lotus 190-980 Domino 8.5 System Administration FundamentalsLotus 190-980 Domino 8.5 System Administration Fundamentals
Lotus 190-980 Domino 8.5 System Administration FundamentalsMarek Zawadzki
 
0505 Windows Server 2008 一日精華營 PartI
0505 Windows Server 2008 一日精華營 PartI0505 Windows Server 2008 一日精華營 PartI
0505 Windows Server 2008 一日精華營 PartITimothy Chen
 

What's hot (14)

LOT-926 Managing and Maintaining IBM Lotus Notes and Domino 8.5 Environments
LOT-926 Managing and Maintaining IBM Lotus Notes and Domino 8.5 EnvironmentsLOT-926 Managing and Maintaining IBM Lotus Notes and Domino 8.5 Environments
LOT-926 Managing and Maintaining IBM Lotus Notes and Domino 8.5 Environments
 
Upgrading from Windows Server 2008 / 2008 R2 to Windows Server 2012
Upgrading from Windows Server 2008 / 2008 R2 to Windows Server 2012Upgrading from Windows Server 2008 / 2008 R2 to Windows Server 2012
Upgrading from Windows Server 2008 / 2008 R2 to Windows Server 2012
 
WCE031_WH06
WCE031_WH06WCE031_WH06
WCE031_WH06
 
Dell 3-2-1 Reference Configurations: High available and scalable performance ...
Dell 3-2-1 Reference Configurations: High available and scalable performance ...Dell 3-2-1 Reference Configurations: High available and scalable performance ...
Dell 3-2-1 Reference Configurations: High available and scalable performance ...
 
JMP105 - "How Stuff Works" - Domino Style!
JMP105 - "How Stuff Works" - Domino Style!JMP105 - "How Stuff Works" - Domino Style!
JMP105 - "How Stuff Works" - Domino Style!
 
Systemd for administrators
Systemd for administratorsSystemd for administrators
Systemd for administrators
 
Dell PowerEdge M520 server solution: Energy efficiency and database performance
Dell PowerEdge M520 server solution: Energy efficiency and database performanceDell PowerEdge M520 server solution: Energy efficiency and database performance
Dell PowerEdge M520 server solution: Energy efficiency and database performance
 
New Exchange Server 2013 Architecture
New Exchange Server 2013 ArchitectureNew Exchange Server 2013 Architecture
New Exchange Server 2013 Architecture
 
Chapter01 Introduction To Windows Server 2003
Chapter01     Introduction To  Windows  Server 2003Chapter01     Introduction To  Windows  Server 2003
Chapter01 Introduction To Windows Server 2003
 
Mcse 2012
Mcse 2012Mcse 2012
Mcse 2012
 
Data Warehousing Practical for T.Y.I.T.
Data Warehousing Practical for T.Y.I.T.Data Warehousing Practical for T.Y.I.T.
Data Warehousing Practical for T.Y.I.T.
 
Lotus 190-980 Domino 8.5 System Administration Fundamentals
Lotus 190-980 Domino 8.5 System Administration FundamentalsLotus 190-980 Domino 8.5 System Administration Fundamentals
Lotus 190-980 Domino 8.5 System Administration Fundamentals
 
Less05 Network
Less05 NetworkLess05 Network
Less05 Network
 
0505 Windows Server 2008 一日精華營 PartI
0505 Windows Server 2008 一日精華營 PartI0505 Windows Server 2008 一日精華營 PartI
0505 Windows Server 2008 一日精華營 PartI
 

Similar to Teradata client4

The best Teradata RDBMS introduction a quick refresher
The best Teradata RDBMS introduction a quick refresherThe best Teradata RDBMS introduction a quick refresher
The best Teradata RDBMS introduction a quick refresherSrinimf-Slides
 
DBA, LEVEL III TTLM Monitoring and Administering Database.docx
DBA, LEVEL III TTLM Monitoring and Administering Database.docxDBA, LEVEL III TTLM Monitoring and Administering Database.docx
DBA, LEVEL III TTLM Monitoring and Administering Database.docxseifusisay06
 
Sql server lesson13
Sql server lesson13Sql server lesson13
Sql server lesson13Ala Qunaibi
 
Data warehousing labs maunal
Data warehousing labs maunalData warehousing labs maunal
Data warehousing labs maunalEducation
 
Ibm db2 analytics accelerator high availability and disaster recovery
Ibm db2 analytics accelerator  high availability and disaster recoveryIbm db2 analytics accelerator  high availability and disaster recovery
Ibm db2 analytics accelerator high availability and disaster recoverybupbechanhgmail
 
Configuring sql server - SQL Saturday, Athens Oct 2014
Configuring sql server - SQL Saturday, Athens Oct 2014Configuring sql server - SQL Saturday, Athens Oct 2014
Configuring sql server - SQL Saturday, Athens Oct 2014Antonios Chatzipavlis
 
Install, configure and customize TFS 2013
Install, configure and customize TFS 2013Install, configure and customize TFS 2013
Install, configure and customize TFS 2013Davide Benvegnù
 
Informatica Power Center 7.1
Informatica Power Center 7.1Informatica Power Center 7.1
Informatica Power Center 7.1ganblues
 
DataStage_Whitepaper
DataStage_WhitepaperDataStage_Whitepaper
DataStage_WhitepaperSourav Maity
 
TechEd Africa 2011 - OFC308: SharePoint Security in an Insecure World: Unders...
TechEd Africa 2011 - OFC308: SharePoint Security in an Insecure World: Unders...TechEd Africa 2011 - OFC308: SharePoint Security in an Insecure World: Unders...
TechEd Africa 2011 - OFC308: SharePoint Security in an Insecure World: Unders...Michael Noel
 
Under the Hood 11g Identity Management
Under the Hood  11g Identity ManagementUnder the Hood  11g Identity Management
Under the Hood 11g Identity ManagementInSync Conference
 
11g Identity Management - InSync10
11g Identity Management - InSync1011g Identity Management - InSync10
11g Identity Management - InSync10Peter McLarty
 
Java Database Connectivity
Java Database ConnectivityJava Database Connectivity
Java Database Connectivitybackdoor
 
Project Presentation
Project PresentationProject Presentation
Project PresentationShariffAyesha
 
How to scale your web app
How to scale your web appHow to scale your web app
How to scale your web appGeorgio_1999
 

Similar to Teradata client4 (20)

The best Teradata RDBMS introduction a quick refresher
The best Teradata RDBMS introduction a quick refresherThe best Teradata RDBMS introduction a quick refresher
The best Teradata RDBMS introduction a quick refresher
 
td1.ppt
td1.ppttd1.ppt
td1.ppt
 
DBA, LEVEL III TTLM Monitoring and Administering Database.docx
DBA, LEVEL III TTLM Monitoring and Administering Database.docxDBA, LEVEL III TTLM Monitoring and Administering Database.docx
DBA, LEVEL III TTLM Monitoring and Administering Database.docx
 
Sql server lesson13
Sql server lesson13Sql server lesson13
Sql server lesson13
 
Data warehousing labs maunal
Data warehousing labs maunalData warehousing labs maunal
Data warehousing labs maunal
 
Ibm db2 analytics accelerator high availability and disaster recovery
Ibm db2 analytics accelerator  high availability and disaster recoveryIbm db2 analytics accelerator  high availability and disaster recovery
Ibm db2 analytics accelerator high availability and disaster recovery
 
Configuring sql server - SQL Saturday, Athens Oct 2014
Configuring sql server - SQL Saturday, Athens Oct 2014Configuring sql server - SQL Saturday, Athens Oct 2014
Configuring sql server - SQL Saturday, Athens Oct 2014
 
Install, configure and customize TFS 2013
Install, configure and customize TFS 2013Install, configure and customize TFS 2013
Install, configure and customize TFS 2013
 
Informatica Power Center 7.1
Informatica Power Center 7.1Informatica Power Center 7.1
Informatica Power Center 7.1
 
Windows server Interview question and answers
Windows server Interview question and answersWindows server Interview question and answers
Windows server Interview question and answers
 
DataStage_Whitepaper
DataStage_WhitepaperDataStage_Whitepaper
DataStage_Whitepaper
 
TechEd Africa 2011 - OFC308: SharePoint Security in an Insecure World: Unders...
TechEd Africa 2011 - OFC308: SharePoint Security in an Insecure World: Unders...TechEd Africa 2011 - OFC308: SharePoint Security in an Insecure World: Unders...
TechEd Africa 2011 - OFC308: SharePoint Security in an Insecure World: Unders...
 
Sql Server
Sql ServerSql Server
Sql Server
 
Under the Hood 11g Identity Management
Under the Hood  11g Identity ManagementUnder the Hood  11g Identity Management
Under the Hood 11g Identity Management
 
11g Identity Management - InSync10
11g Identity Management - InSync1011g Identity Management - InSync10
11g Identity Management - InSync10
 
How To Scale v2
How To Scale v2How To Scale v2
How To Scale v2
 
John
JohnJohn
John
 
Java Database Connectivity
Java Database ConnectivityJava Database Connectivity
Java Database Connectivity
 
Project Presentation
Project PresentationProject Presentation
Project Presentation
 
How to scale your web app
How to scale your web appHow to scale your web app
How to scale your web app
 

Recently uploaded

Incoming and Outgoing Shipments in 1 STEP Using Odoo 17
Incoming and Outgoing Shipments in 1 STEP Using Odoo 17Incoming and Outgoing Shipments in 1 STEP Using Odoo 17
Incoming and Outgoing Shipments in 1 STEP Using Odoo 17Celine George
 
Biting mechanism of poisonous snakes.pdf
Biting mechanism of poisonous snakes.pdfBiting mechanism of poisonous snakes.pdf
Biting mechanism of poisonous snakes.pdfadityarao40181
 
History Class XII Ch. 3 Kinship, Caste and Class (1).pptx
History Class XII Ch. 3 Kinship, Caste and Class (1).pptxHistory Class XII Ch. 3 Kinship, Caste and Class (1).pptx
History Class XII Ch. 3 Kinship, Caste and Class (1).pptxsocialsciencegdgrohi
 
MARGINALIZATION (Different learners in Marginalized Group
MARGINALIZATION (Different learners in Marginalized GroupMARGINALIZATION (Different learners in Marginalized Group
MARGINALIZATION (Different learners in Marginalized GroupJonathanParaisoCruz
 
Painted Grey Ware.pptx, PGW Culture of India
Painted Grey Ware.pptx, PGW Culture of IndiaPainted Grey Ware.pptx, PGW Culture of India
Painted Grey Ware.pptx, PGW Culture of IndiaVirag Sontakke
 
Software Engineering Methodologies (overview)
Software Engineering Methodologies (overview)Software Engineering Methodologies (overview)
Software Engineering Methodologies (overview)eniolaolutunde
 
ECONOMIC CONTEXT - LONG FORM TV DRAMA - PPT
ECONOMIC CONTEXT - LONG FORM TV DRAMA - PPTECONOMIC CONTEXT - LONG FORM TV DRAMA - PPT
ECONOMIC CONTEXT - LONG FORM TV DRAMA - PPTiammrhaywood
 
Interactive Powerpoint_How to Master effective communication
Interactive Powerpoint_How to Master effective communicationInteractive Powerpoint_How to Master effective communication
Interactive Powerpoint_How to Master effective communicationnomboosow
 
Proudly South Africa powerpoint Thorisha.pptx
Proudly South Africa powerpoint Thorisha.pptxProudly South Africa powerpoint Thorisha.pptx
Proudly South Africa powerpoint Thorisha.pptxthorishapillay1
 
Enzyme, Pharmaceutical Aids, Miscellaneous Last Part of Chapter no 5th.pdf
Enzyme, Pharmaceutical Aids, Miscellaneous Last Part of Chapter no 5th.pdfEnzyme, Pharmaceutical Aids, Miscellaneous Last Part of Chapter no 5th.pdf
Enzyme, Pharmaceutical Aids, Miscellaneous Last Part of Chapter no 5th.pdfSumit Tiwari
 
Framing an Appropriate Research Question 6b9b26d93da94caf993c038d9efcdedb.pdf
Framing an Appropriate Research Question 6b9b26d93da94caf993c038d9efcdedb.pdfFraming an Appropriate Research Question 6b9b26d93da94caf993c038d9efcdedb.pdf
Framing an Appropriate Research Question 6b9b26d93da94caf993c038d9efcdedb.pdfUjwalaBharambe
 
Roles & Responsibilities in Pharmacovigilance
Roles & Responsibilities in PharmacovigilanceRoles & Responsibilities in Pharmacovigilance
Roles & Responsibilities in PharmacovigilanceSamikshaHamane
 
Organic Name Reactions for the students and aspirants of Chemistry12th.pptx
Organic Name Reactions  for the students and aspirants of Chemistry12th.pptxOrganic Name Reactions  for the students and aspirants of Chemistry12th.pptx
Organic Name Reactions for the students and aspirants of Chemistry12th.pptxVS Mahajan Coaching Centre
 
Earth Day Presentation wow hello nice great
Earth Day Presentation wow hello nice greatEarth Day Presentation wow hello nice great
Earth Day Presentation wow hello nice greatYousafMalik24
 
Final demo Grade 9 for demo Plan dessert.pptx
Final demo Grade 9 for demo Plan dessert.pptxFinal demo Grade 9 for demo Plan dessert.pptx
Final demo Grade 9 for demo Plan dessert.pptxAvyJaneVismanos
 
Crayon Activity Handout For the Crayon A
Crayon Activity Handout For the Crayon ACrayon Activity Handout For the Crayon A
Crayon Activity Handout For the Crayon AUnboundStockton
 
EPANDING THE CONTENT OF AN OUTLINE using notes.pptx
EPANDING THE CONTENT OF AN OUTLINE using notes.pptxEPANDING THE CONTENT OF AN OUTLINE using notes.pptx
EPANDING THE CONTENT OF AN OUTLINE using notes.pptxRaymartEstabillo3
 
internship ppt on smartinternz platform as salesforce developer
internship ppt on smartinternz platform as salesforce developerinternship ppt on smartinternz platform as salesforce developer
internship ppt on smartinternz platform as salesforce developerunnathinaik
 

Recently uploaded (20)

Incoming and Outgoing Shipments in 1 STEP Using Odoo 17
Incoming and Outgoing Shipments in 1 STEP Using Odoo 17Incoming and Outgoing Shipments in 1 STEP Using Odoo 17
Incoming and Outgoing Shipments in 1 STEP Using Odoo 17
 
Biting mechanism of poisonous snakes.pdf
Biting mechanism of poisonous snakes.pdfBiting mechanism of poisonous snakes.pdf
Biting mechanism of poisonous snakes.pdf
 
History Class XII Ch. 3 Kinship, Caste and Class (1).pptx
History Class XII Ch. 3 Kinship, Caste and Class (1).pptxHistory Class XII Ch. 3 Kinship, Caste and Class (1).pptx
History Class XII Ch. 3 Kinship, Caste and Class (1).pptx
 
MARGINALIZATION (Different learners in Marginalized Group
MARGINALIZATION (Different learners in Marginalized GroupMARGINALIZATION (Different learners in Marginalized Group
MARGINALIZATION (Different learners in Marginalized Group
 
Painted Grey Ware.pptx, PGW Culture of India
Painted Grey Ware.pptx, PGW Culture of IndiaPainted Grey Ware.pptx, PGW Culture of India
Painted Grey Ware.pptx, PGW Culture of India
 
Software Engineering Methodologies (overview)
Software Engineering Methodologies (overview)Software Engineering Methodologies (overview)
Software Engineering Methodologies (overview)
 
ECONOMIC CONTEXT - LONG FORM TV DRAMA - PPT
ECONOMIC CONTEXT - LONG FORM TV DRAMA - PPTECONOMIC CONTEXT - LONG FORM TV DRAMA - PPT
ECONOMIC CONTEXT - LONG FORM TV DRAMA - PPT
 
Interactive Powerpoint_How to Master effective communication
Interactive Powerpoint_How to Master effective communicationInteractive Powerpoint_How to Master effective communication
Interactive Powerpoint_How to Master effective communication
 
Proudly South Africa powerpoint Thorisha.pptx
Proudly South Africa powerpoint Thorisha.pptxProudly South Africa powerpoint Thorisha.pptx
Proudly South Africa powerpoint Thorisha.pptx
 
Enzyme, Pharmaceutical Aids, Miscellaneous Last Part of Chapter no 5th.pdf
Enzyme, Pharmaceutical Aids, Miscellaneous Last Part of Chapter no 5th.pdfEnzyme, Pharmaceutical Aids, Miscellaneous Last Part of Chapter no 5th.pdf
Enzyme, Pharmaceutical Aids, Miscellaneous Last Part of Chapter no 5th.pdf
 
Model Call Girl in Bikash Puri Delhi reach out to us at 🔝9953056974🔝
Model Call Girl in Bikash Puri  Delhi reach out to us at 🔝9953056974🔝Model Call Girl in Bikash Puri  Delhi reach out to us at 🔝9953056974🔝
Model Call Girl in Bikash Puri Delhi reach out to us at 🔝9953056974🔝
 
Framing an Appropriate Research Question 6b9b26d93da94caf993c038d9efcdedb.pdf
Framing an Appropriate Research Question 6b9b26d93da94caf993c038d9efcdedb.pdfFraming an Appropriate Research Question 6b9b26d93da94caf993c038d9efcdedb.pdf
Framing an Appropriate Research Question 6b9b26d93da94caf993c038d9efcdedb.pdf
 
Roles & Responsibilities in Pharmacovigilance
Roles & Responsibilities in PharmacovigilanceRoles & Responsibilities in Pharmacovigilance
Roles & Responsibilities in Pharmacovigilance
 
Organic Name Reactions for the students and aspirants of Chemistry12th.pptx
Organic Name Reactions  for the students and aspirants of Chemistry12th.pptxOrganic Name Reactions  for the students and aspirants of Chemistry12th.pptx
Organic Name Reactions for the students and aspirants of Chemistry12th.pptx
 
Earth Day Presentation wow hello nice great
Earth Day Presentation wow hello nice greatEarth Day Presentation wow hello nice great
Earth Day Presentation wow hello nice great
 
Final demo Grade 9 for demo Plan dessert.pptx
Final demo Grade 9 for demo Plan dessert.pptxFinal demo Grade 9 for demo Plan dessert.pptx
Final demo Grade 9 for demo Plan dessert.pptx
 
9953330565 Low Rate Call Girls In Rohini Delhi NCR
9953330565 Low Rate Call Girls In Rohini  Delhi NCR9953330565 Low Rate Call Girls In Rohini  Delhi NCR
9953330565 Low Rate Call Girls In Rohini Delhi NCR
 
Crayon Activity Handout For the Crayon A
Crayon Activity Handout For the Crayon ACrayon Activity Handout For the Crayon A
Crayon Activity Handout For the Crayon A
 
EPANDING THE CONTENT OF AN OUTLINE using notes.pptx
EPANDING THE CONTENT OF AN OUTLINE using notes.pptxEPANDING THE CONTENT OF AN OUTLINE using notes.pptx
EPANDING THE CONTENT OF AN OUTLINE using notes.pptx
 
internship ppt on smartinternz platform as salesforce developer
internship ppt on smartinternz platform as salesforce developerinternship ppt on smartinternz platform as salesforce developer
internship ppt on smartinternz platform as salesforce developer
 

Teradata client4

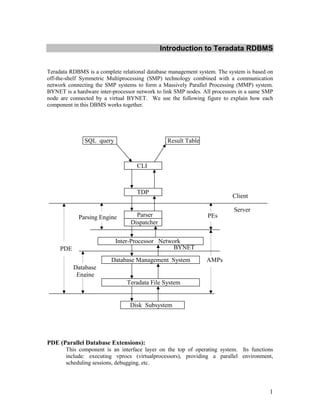
  • 1. Introduction to Teradata RDBMS Teradata RDBMS is a complete relational database management system. The system is based on off-the-shelf Symmetric Multiprocessing (SMP) technology combined with a communication network connecting the SMP systems to form a Massively Parallel Processing (MMP) system. BYNET is a hardware inter-processor network to link SMP nodes. All processors in a same SMP node are connected by a virtual BYNET. We use the following figure to explain how each component in this DBMS works together. SQL query Result Table CLI TDP Client Server Parsing Engine Parser PEs Dispatcher Inter-Processor Network PDE BYNET Database Management System AMPs Database Engine Teradata File System Disk Subsystem PDE (Parallel Database Extensions): This component is an interface layer on the top of operating system. Its functions include: executing vprocs (virtualprocessors), providing a parallel environment, scheduling sessions, debugging, etc. 1
  • 2. Teradata File System: It allows Teradata RDBMS to store and retrieve data regardless of low-level operating system interface. PE (Parsing Engine): Communicate with client Manage sessions Parse SQL statements Communicate with AMPs Return result to the client AMP (Access Module Processor): BYNET interface Manage database Interface to disk subsystem CLI (Call Level Interface): A SQL query is submitted and transferred in CLI packet format TDP (Teradata Director Program): Route the packets to the specified Teradata RDBMS server Teradata RDBMS has the following components that support all data communication management: „ Call Level Interface ( CLI ) „ WinCLI & ODBC „ Teradata Director Program ( TDP for channel attached client ) „ Micro TDP ( TDP for network attached client ) Introduction to Teradata Client Software Teradata Client Software components include: „ BTEQ Basic Teradata Query is a general-purpose program that you can use to submit data, commands and SQL statements to Teradata RDBMS. 2
  • 3. C / COBOL / PL/I preprocessors If you use embedded SQL to develop client applications, you need these tools to pre- compile your programs. „ CLI „ ODBC „ TDP/MTDP/MOSI „ Achieve/Restore data to/from tape (ASF2) „ Queryman Queryman is based on ODBC, you can logon through a DSN and enter any SQL statement to manipulate the data in database. „ FastLoad „ MultiLoad „ FastExport „ Open Teradata Backup (OTB) „ Tpump „ Teradata Manager „ WinDDI All client components are based on CLI or ODBC or Both of them. So, once you install the client software, you should configure these two components appropriately before you execute these client utilities. Teradata RDBMS is able to support JDBC programs in both forms of application and applet. The client installation manual mentions that we need to install JDBC driver on client computers, and we also need to start a JDBC Gateway and Web server on database server. Teradata supports at least two types of JDBC drivers. The first type can be loaded locally and the second one should be downloadable. In either of two ways, to support your development, you need local JDBC driver or Web server / JDBC Gateway running on the same node on which Query Manager is running. But in the setup CD we received, there is no JDBC driver and any Java Development Tools. Moreover, Web server is not started on tour system yet. 3
  • 4. Installation and Configuration Because the installation is easy, we just give some tips: You need one floppy disk which contains licenses for all components you could install. Each component has one entry in the license txt file. If you are asked to choose ODBC or Teradata ODBC with DBQM enhanced version to install. Just forget it. In this case, you can not install DBQM_Admin, DBQM_Client, and DBQM_Server. These three components are used to optimize the processing of your SQL queries. Fortunately, your client software still works smoothly without them. Because CLI and ODBC are the infrastructures of other components, you may not delete either one of them from the installation list if there is any component based on it. After ODBC installation, you will be asked to run ODBC administrator to configure a Data Source Name (DSN). You may cancel it simply because you can do this job later. After Teradata Manager installation, you will be asked to run Start RDBMS Setup. You also can do it later. For more information, please visit www.info.ncr.com and download Teradata Client for Windows Installation Guide. Configuration includes several steps: Setting Network Parameters For Windows 2000, do the following step: Start -> Search -> For Files or Folders. You can find the file: hosts Use Notepad to edit the hosts file as follows: 4
  • 5. Add one line into your hosts file: “ 130.108.5.57 teradatacop1 ”. Here, 130.108.5.57 is the IP address of the top node of the system on which Query Manager is running. “teradata” will be the TDPID which is used in many client components you installed. “cop” is a fixed suffix string and “1” indicate that there is one RDBMS. Setting System Environment Parameters For Windows 2000, do the following step: Start -> Settings -> Control Panel Find the icon “System”, double click it, get the following window, then choose “Advanced” sub-window 5
  • 7. Then you can click button “New…” to create some System Variables as follows: COPLIB = the directory which contains the file clispb.dat This file is copied to your computer when you install Teradata Client Software. It contains some default settings for CLI. COPANOMLOG = the full path and the log file name You can set it as you want. If the file doesn’t exist, when an error occurs, the client software will create the file to record the log information. TDMSTPORT = 1025 Because our server is listening the connect request on port 1025, you should set it as 1025. This is also the default port number used by those client components. If you don’t set it, perhaps you will not have any problem now. But we still suggest you add this system environment variable for the future usage. You shouldn’t insert a line tdmst 1025/TCP into the file C:WINNTSystem32driversetcservices directly without correct the setting on environment variable TDMSTPORT. According to our test, that doesn’t work. Setting CLI System Parameter Block You can find the file clispb.dat after you install the client software. In our computer, it is under the directory C:Program FilesNCRTeradata Client. Please use Notepad to open it. You will see 7
  • 8. Originally, i_dbcpath was set as dbc. That is not the same as what I set in the file hosts. So I modify it as teradata. When you use some components based on CLI and do not specify the TDPID or RDBMS, the components will open this file to find this default setting. So we suggest you to set it as what you set in your file hosts. For other entries in this file, you can just keep them as original settings. To use utilities such as Queryman and WinDDI, you still need to configure a Data Source Name (DSN) for yourself. We will discuss how to configure a DSN in the section “Developing ODBC applications”. 8
  • 9. BTEQ BTEQ is like a RDBMS console. This utility enables you to connect to Teradata RDBMS server as any valid database user, set the session environment and execute SQL statement as long as you have such privileges. BTEQWin is a Windows version of BTEQ. Both of them work on two components: CLI and TDP/MTDP. BTEQ commands or SQL statements entered into the BTEQ are packed into CLI packets, then TDP/MTDP transfers them to RDBMS. BTEQ supports 55 commands which fall into four groups: o Session Control Commands o File Control Commands o Sequence Control Commands o Format Control Commands Here, we do not introduce each command. But, some usage tips and examples for the frequently used commands are given here. Usage Tips: o BTEQ commands consist of a dot character followed by a command keyword, command options, and parameters. .LOGON teradata/john o Teradata SQL statement doesn’t begin with a dot character, but it must end with a ‘;’ character. SELECT * FROM students Where name = “Jack”; o You can enter both BTEQ commands and SQL statements in any combination of uppercase and lowercase and mixed-case formats. .Logoff o If you want to submit a transaction which includes several SQL statements, do as the following example: Select * from students ;insert into table students Values(‘00001’, ‘Jack’,’M’,25 ) ;select * from students; After you enter the last ‘;’ and hit the [enter] key, these SQL requests will be submitted as a transaction. If anyone of them has an error, the whole transaction will be rolled back. Frequently Used Commands : o LOGON .logon teradata/john PASSWORD:johnpass In the above example, we connect to RDBMS called “teradata”. “teradata” is the TDPID of the server. “john” is the userid and “johnpass” is the password of the user. 9
  • 10. o LOGOFF .logoff Just logoff from the current user account without exiting from BTEQ. o EXIT or QUIT .exit .quit These two commands are the same. After execute them, you will exit from BTEQ. o SHOW VERSIONS .show versions check the version of the BTEQ you are using. o SECURITY .set security passwords .set security all .set security none specify the security level of messages sent from network-attached systems to the Teradata RDBMS. By the first one, only messages containing user passwords, such as CREATE USER statement, will be encrypted. By the second one, all messages will be encrypted. o SESSIONS .sessions 5 .repeat 3 select * from students; After executing the above commands one by one, you will create 5 sessions running in parallel. Then we will execute select request three times. In this situation, three out of the five sessions will execute the select statement one time in parallel. o QUIET .set quiet on .set quiet off If switched off, the result of your command or SQL statement will not be displayed. o SHOW CONTROLS .show controls .show control 10
  • 11. Show the current settings for BTEQ software. o RETLIMIT .set retlimit 4 select * from dbase; Just display the first 4 rows of the result table and ignore the rest. .set retlimit 0 select * from dbase; Display all rows of the result table. o RECORDMODE .set recordmode on .set recordmode off If switched on, all result rows will be displayed in binary mode. o SUPPRESS .set suppress on 3 select * from students; If the third column of the students table is Department Name, then the same department names will be display only once on the terminal screen. o SKIPLINE/SKIPDOUBLE .set skipline on 1 .set skipdouble on 3 select * from students; During displaying the result table, if the value in column 1 changes, skip one blank line to display the next row. If the value in column 3 changes, skip two blank lines to display the next row. o FORMAT .set format on .set heading “Result:“ .set rtitle “Report Title:“ .set footing “Result Finished” Add the heading line, report title, and footing line to the result displayed on the terminal screen. 11
  • 12. o OS .os command c:progra~1ncrterada~bin> dir The first command let you enter the Windows/Dos command prompt status. Then you can enter OS commands such as dir, del, copy, etc. .os dir .os copy sample1.txt sample.old Another way to execute the OS command is entering the command after the .os keyword. o RUN You can run a script file which contains several BTEQ commands and SQL requests. See the following example: 1) To edit a txt file, runfile.txt, using Notepad, the file contains: .set defaults .set separator “$” select * from dbase; .set defaults 2) RUN .run file = runfile.txt If the working directory of BTEQ is not same as the directory containing the file, you must specify the full path. o SYSIN & SYSOUT SYSIN and SYSOUT are standard input and output streams of BTEQ. You can redirect them as the following example: Start -> programs -> accessories -> command prompt c:>cd c:program filesncrteradata clientbin c:program filesncrteradata clientbin> bteq > result.txt .logon teradata/john johnpass select * from students; .exit c:program filesncrteradata clientbin > bteq > In the above example, all output will be written into result.txt file but not to the terminal screen. If runfile.txt file is placed in the root directory C:, we can redirect the standard input stream of BTEQ as the following example: 12
  • 13. c:>cd c:program filesncrteradata clientbin c:program filesncrteradata clientbin>bteq < c:runfile.txt o EXPORT .export report file = export select * from students; .os edit export The command produces a report like Command keyword “report” specifies the format of output. “file” specifies the name of output file. If you want export the data to a file for backup, use the following command: .export data file = exdata select * from students; you will get all data from the select statement and store them into the file, exdata, in a special format. After exporting what you want, you should reset the export options. . export reset o IMPORT As mentioned above, we already store all data of the students table into the file exdata. Now, we want to restore them into database. See the following example: .delete from students; .import data file = exdata 13
  • 14. .repeat 5 using(studentId char(5),name char(20),sex char(1),age integer ) insert into students ( studentId, name, sex, age ) values( :studentId, :name, :sex, :age ); The third command requires BTEQ to execute the following command five times. The last command has three lines. It will insert one row into the students table each time. o MACRO You can use the SQL statements to create a macro and execute this macro at any time. See the following example: create macro MyMacro1 as ( ECHO ‘.set separator “#”’ ; select * from students; ); This macro executes one BTEQ command and one SQL request. execute MyMacro1; This SQL statement executes the macro. In this brief tutorial, we do not introduce many BTEQ commands used in writing BTEQ scripts and SQL syntax. For more information, you can download the Teradata BTEQ reference guide and Teradata SQL reference from the NCR web site (http://www.info.ncr.com). Next, we will give an example showing how to create database/user/table, manipulate data of a table, and build a client/server database application. 14
  • 15. Developing ODBC Applications In the following demo, we will describe each step of using Teradata DBMS to develop a DB application. In the example, there are two users: John and Mike. John is the administrator of the application database. Mike works for John and he is the person who manipulates the table students in the database every day. Step 1. John create user Mike and the database student_info by using BTEQ. Running the BTEQ Logon the Teradata DBMS server. create a user and a database create tables use SQL commands: insert, select, delete, update Logoff and Quit BTEQ Step 2. Create one ODBC Data Source Name (DSN) to develop an application Step 3. Develop an application by using ODBC interface Step 4. Running the demo Step 1. John create user Mike and the database student_info by using BTEQ. Running BTEQ start -> program -> Teradata Client -> BTEQ Logon Teradata DBMS server 15
  • 16. John was created by the Teradata DBMS administrator and was granted the privileges to create a USER and a DATABASE. In Teradata DBMS, the owner automatically has all privileges on the database he/she creates. Create a User and a Database The above figure shows how to create a user. In Teradata DBMS, you should see a user as a special database. The difference between user and database is that a user has a password and can 16
  • 17. logon to the DBMS, while a database is just a passive object in DBMS. Next, we see how to create a database: John is the owner of user Mike and database student_info. Of course, John has all privileges on this database such as creating table, executing select, insert, update and delete statements. But we notice that Mike doesn’t have any privilege on this database now. So John needs to grant some privileges to Mike for his daily work. See the next figure: Create Table 17
  • 18. After granting appropriate privileges to Mike, John needs to create a table for storing the information of all students. First, he must specify the database containing the table. Then he creates the table students Using SQL statements such as Select, Insert, Delete and Update 18
  • 19. Now, Mike can logon and insert some data into the table students. 19
  • 20. In the figure below, Mike inserts a new row whose first field is “00003”. We notice that there are two rows whose first fields have the same value. So, Mike decides to delete one of them. 20
  • 21. Logoff and Quit BTEQ Mike uses the following command .exit to logoff and quit BTEQ. Step 2. Create one ODBC Data Source Name (DSN) to develop an application Architecture of DB Application Based on ODBC 21
  • 22. In the figure above, the Data source modules refer to physical databases with different DBMSs. The term Data Source Name (DSN) is just like a profile which is a link between the first level, Application, and the second level, ODBC Driver Manager. We use the profile, DSN, to describe which ODBC driver will be used in the application and the application will logon which account on which database. The following figures show each step of creating the DSN used in our application: 1. start -> settings -> control panel 2. click the icon “Administrative Tools” 22
  • 23. 3. click the icon “Data Sources (ODBC)” 4. The ODBC Data Source Administrator window lists all DSN already created on your computer. Now, click the button “Add…” 23
  • 24. 5. You will be asked to choose one ODBC driver for your Data Source. You should choose Teradata. 6. Then, you need to type in all information about your DSN, such as IP address of server, username, password, and default database you will use. 24
  • 25. Step 3. Develop an application by using ODBC interface The demo was developed on Windows NT/2000 by using VC++ 6.0. We can access the table students via ODBC interface. You need to include the following files: #include <sql.h> #include <sqlext.h> #include <odbcinst.h> #include <odbcss.h> #include <odbcver.h> You also need to link odbc32.lib. In VC++ 6.0 developing studio, you can set the link option to finish the appropriate compiling and link. Another way to avoid the subtle job of setting link and compiling options is directly adding this lib file into your project. The ODBC program scheme is shown below, which is a code segment of executing select SQL statement: SQLAllocEnv(&DSNhenv); SQLAllocConnect(ODBChenv, &ODBChdbc); SQLConnect(ODBChdbc, DataSourceNname, DBusername, DBuserpassword ); SQLAllocStmt(ODBChdbc, &ODBChstmt); Construct the SQL command string SQLExecDirect(ODBChstmt, (UCHAR *)command, SQL_NTS); if (ODBC_SUCCESS) { SQLFetch(ODBChstmt); while (ODBC_SUCCESS)&&(data set is not empty) { processing the data SQLFetch(ODBChstmt); } } SQLFreeStmt(ODBChstmt, SQL_DROP); SQLDisconnect(ODBChdbc); SQLFreeConnect(ODBChdbc); SQLFreeEnv(DSNhenv); When ODBC function SQLConnect() is called in your program, you need to specify the Data Source Name created in step 2. Our demo is just a simple example, though it has invoked almost all functions often used in general applications. For more details about ODBC programming, please see related ODBC references and VC++ references. Step 4. Running the demo Copy all files of the project to your PC and double click the file ODBCexample.dsw . VC++ 6.0 developing studio will load the Win32 project automatically. Then you can choose menu item “build” or “execute ODBCexample”. 25
  • 26. In the next window, you can see all DSN defined on your PC. We can choose TeradataExample created in step 2. We don’t need to provide the user name mike and the password mikepass, because they were already set in DSN. Then we click the button “Connect To Database” to connect to the Teradata DBMS server. 26
  • 27. Click “>>” button to enter next window sheet. Now, after pressing “Get Information of All Tables In The Database”, you can see all tables in the database including students created in step 1. Then we can choose one table from the leftmost listbox and enter the next window sheet by clicking “>>”. Click the button “Get Scheme of the Table” to see the definition of the table. And if the table you have chosen is students, you can press “Run SQL on This Table” to execute a SQL statement on the table. 27
  • 28. 28
  • 29. After typing the SQL statement in the edit box, you can press button “Get Information” to execute it. If you want to add a student, please click “Add Student”. 29
  • 30. 30