Model Call Girl in Narela Delhi reach out to us at 🔝8264348440🔝
BB_HowTo.pdf
1. Schematics and Breadboards: A First-Circuit Build
Please use the Notes margin on the right for both notes to yourself about the experiment as well as for feedback to your TA on
the quality or clarity of the lab procedure. Thanks!
Learning Objectives
• Discern the difference between a circuit schematic and a physical diagram/breadboard implementation.
• Identify the underlying connections within a solderless breadboard.
• Construct a circuit by tracing loops from the positive to the negative terminal of the battery.
• Explain why the choice of wire color matters when building a circuit and other best practices in breadboarding.
• Use a circuit schematic to build a breadboard circuit using best practices.
Preliminaries
The Role of Schematics in Electronic Circuits
There are three main ways in which you are likely to encounter a circuit design in the ECE110 lab. Since this lab is hands-on, you
will build prototype circuits. A prototype is a preliminary version of a product that can be easily tested and modified before a
final design is mass produced. In the ECE110 laboratory, we construct prototype circuits on a breadboard (a construction base
for connecting circuit elements without the use of solder; might also be known as a protoboard, although this latter term often
refers to a board where a circuit can be quickly laid out and soldered). To build a prototype, you would require a diagram.
A physical diagram (Figure 1 (b)) might be a photograph or detailed drawings or images depicting the rough physical appearance
of the components comprising a circuit. A physical diagram is suggestive of the real physical layout of the circuit and leaves little
room for error for the novice experimenter. Tools at https://fritzing.org provide a popular means of generating physical
diagrams of circuits that can even be made into printed circuit boards (PCBs). However, the most-concise method of providing a
written guide is the circuit schematic.
A circuit schematic (Figure 1 (a)) is an abstraction of a circuit that generalizes the specific components as symbols. The circuit
schematic does not necessarily suggest the physical locations of the components as they may be physically arranged in the final
prototype. There is, however, a one-to-one relationship between the components described in the circuit schematic, the
physical diagram, and the prototype. It is important that an aspiring engineer learn to map one representation to another!
2. Notes:
Pro Tip:
Best Practices in
Breadboarding…
Use red wires for
component
connections going
directly to the positive
side of the battery.
Use black wires for
component
connections going
directly to the
negative side of the
battery.
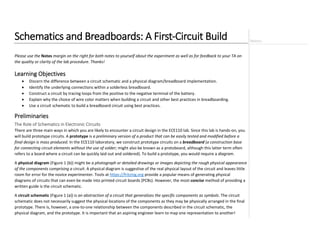
Figure 1 shows the relationship between one circuit schematic and a physical diagram for the same simple circuit. The
schematic uses abstract symbols to represent items like an ideal voltage source and an ideal resistor connected by nodes
(which may model perfect wires, but rarely represent their physical layout). Alternately, the physical diagram shows the voltage
source being implemented by a (non-ideal) benchtop “power supply” and a physical resistor with a breadboard and physical
wires used to make the interconnections between them.
(a) (b)
Figure 1: (a) A circuit schematic and (b) a physical diagram for the same circuit.
This semester, you will build simple circuits using the equipment available. It is important that you learn to read a circuit
schematic and use it to build a physical prototype of the circuit. Sometimes, this task can be more difficult than you would think,
especially when there are many components, several test points to measure, and wires going everywhere in what may appear to
be a jumbled mess! If you can learn to properly interpret physical diagrams and circuit schematics as well as keep your
breadboard neat and tidy, this task will become much easier for you.
While the choice of wire color does not make a functional difference in the operation of your circuit, it makes a big difference
when debugging! As a general rule of thumb, use red wires for any connections to the positive side of your power supply/battery
and use black wires for any connections to the negative side and DO NOT use red or black anywhere else. Some engineers like
using a certain colored-wire for wires that carry a signal from one functional unit to the next (say, from an amplifier to a filter)
and maybe a different color for wires that represent feedback in a circuit (like the feedback used in the frequency-selection of an
“active” filter). Basically, use the colors you have as best you can to differentiate what you expect to measure at different
locations in your circuit. Whatever you do, please do not use red and black wires randomly throughout your circuit or your TA
will be slowed in aiding you when the time comes!
3. Notes:
The Breadboard
The breadboard is a series of clips designed to hold wires together in a temporary connection. These clips are held together by
an injection molding to prevent the clips from making contact with each other and shorting and also to provide some
organization to the circuit layout, including a space optimized for the insertion of integrated circuit packages. The internal
construction of the breadboard is shown in the diagram of Figure 2 below.
Figure 2: An expanded view of the breadboard showing the configuration of the underlying metal clips.
In Figure 2, the underlying metal clips are highlighted by gray, blue, and red “bars” (the actual clips are all silver in color, the
color coding is just here to help visualization). Although your kit has both a small and a large composite breadboard, much of the
work we will do can be easily contained on the small breadboard shown in Figure 2. Before continuing, watch the “Breadboard
Intro” video provided in the weekly playlist on ECE 110’s MediaSpace Channel accessible from Canvas.
Power (positive voltage rail)
The “positive rail” makes the positive battery
terminal available along this vertical column.
The “negative rail” makes the negative battery
terminal available along this vertical column.
Each of the rows numbered 1-30 have two sets of 5
holes (abcde and fghij) running horizontally separated
by a trench down the center of the board. In each
row, abcde are connected and fghij are connected, but
there is no connection across the trench.
Ground (negative voltage rail) –
Horizontal lines
4. Notes:
Color Code for Resistors:
All About Circuits has a
useful page to help you
become fluent at reading
resistor values. There are
many such sites, but this one
may provide other resources
of interest to you as well!
https://www.allaboutcircuits
.com/tools/resistor-color-
code-calculator/
Procedures
In this exercise, we will systematically build a circuit while following the “plan” outlined by a circuit schematic. While there is not
a single way to map a schematic to a breadboard implementation, we will be very explicit in this build so that you can learn
about methodologies and “best practices”. Figure 3 shows the schematic of the circuit we will build.
Figure 3: Circuit schematic to be implemented for this exercise and the 9-volt battery assembly.
Follow the instructions that follow. At the end of this exercise, we’ll ask you to make a few-second video of the working circuit
and upload it on GradeScope. Be careful to always disconnect your battery by removing the plug from the jack and transport it in
a separate compartment of your electronics kit.
In Figure 3, the symbol labeled 9 𝑉𝑉 signifies a (multi-cell) battery. You have a 9-volt battery in the small-parts box of your kit
(Figure 4) as well as the plug and jack for connecting it to your circuit. For the labeled resistors of Figure 3, let’s use 𝑅𝑅1 = 𝑅𝑅2 =
1 𝑘𝑘Ω so that these two resistors happen to have the same value of resistance. You can find these resistors by looking for the
colored line patterns on the resistors in your kit (Figure 5); you are looking for paint stripes of brown, black, red, gold, in that
order. More about how to interpret these colored lines can be found in the box to the right. The triangular symbol with arrows
pointing away labeled 𝐷𝐷1 is a light-emitting diode (LED). Let’s use a red-colored LED for this prelab exercise. Locate these
materials in your kit to be ready to start your build.
“Jack” and “Plug”
5. Notes:
Figure 4: The ECE 110 Electronics Kit small-parts box.
Figure 5: Parts needed for this procedure. The resistors are in the lower-left corner.
6. Notes:
Assembly of the Barrel Adaptor (if not already assembled)
Once you have found the parts of Figure 5, open the box of wires and select a medium sized wire. Place this wire through the
hole on the “ring terminal” and give it a few twists, essentially creating a kind of “key ring” for it. The ring terminal will be used
in ECE 110 as a low-cost, light-duty screwdriver. The key ring will make it both easier to locate in your kit as well as easier to pick
up from your table. If you have a better screwdriver at home, feel free to substitute it but don’t “over crank” on any device as
damage is likely to occur.
Figure 6: The wires (bag is now replaced by a box) and ring terminal to be used as a screwdriver.
Use the screwdriver to attach the 9-volt adaptor to the barrel plug as shown in Figure 7. You may need to loosen the terminal
screws on the barrel jack adapter by turning them counterclockwise until the wires will slide into the terminal space. Gently
tighten the terminal connectors by turning the screws clockwise. Do not overtighten or you will bend your screwdriver. Be sure
that the terminals are holding the bare wire and not the insulation on the wires. It is critical that you attach the red wire to the
positive (+) terminal and the black wire to the negative (-) terminal.
7. Notes:
Figure 7: The assembled 9-volt plug.
Now use the screwdriver to attach one red and one black wire to the complementary barrel “jack” as shown in Figure 8. Again,
attach the red wire to the positive terminal and the black wire to the negative terminal. Note that using two different length
wires will reduce the likelihood of accidentally shorting your battery.
It is relatively easy to damage this assembly and break wires such that it is not easy to repair. You will find a video on our weekly
playlist on MediaSpace about not only how to fix a broken wire, but more importantly, how to prevent breakage in the first
place! The video suggests using a little well-placed tape and always connecting and disconnecting at the barrel connectors and
never at the battery terminals. Please watch that video now.
8. Notes:
Figure 8: Assembled barrel-to-wire adaptor.
Figure 9: A 9-volt battery prepared for breadboard usage.
9. Notes:
Attaching the battery
You can now attach the 9-volt battery to your breadboard’s “power rails” as shown in Figure 10. The red and blue lines on your
breadboard outline the available spaces now connected to the positive and negative sides of your battery, respectively.
Figure 10: Attaching the battery to the breadboard’s “power rails.”
On your circuit schematic, you might consider color-coding your nodes so that they are easier to identify while building your
circuit. In Figure 11, the nodes corresponding to the positive and negative sides of the battery have been highlighted with red
and black colors.
What is a node? The answer might not be as simple as you might think. First, you need to understand that our circuit schematics
are based on something called “lumped circuit models”. This means that all the interesting stuff has been lumped into circuit
symbols representing real-life devices (dry cell batteries, carbon-composition resistors, silicon LEDs, etc.) but with behavior
modeled by a simpler math. These lumped components are joined by what we call nodes which may be thought of as wires with
no resistance. However, it is misleading to think of them as physical wires as nodes don’t necessarily represent how the
connections between elements might be accomplished. In Figure 11, the node we have colored red, for instance, is available
along the entire power rail. The circuit schematic fails to imply anything about this.
Power rails
Always disconnect your battery from the
circuit by pulling the barrel connectors apart
and never remove the connector at the
battery terminals which are prone to damage.
10. Notes:
Figure 11: Using color coding to identify elements connected to nodes.
But enough about the abstract nature of schematics, let’s get back to the build! Disconnect your battery by separating the barrel
connection. The red and blue power rails represent the battery for the remainder of our build. Removing the battery reduces the
potential for catastrophic failure due to a miswired circuit. By “catastrophic”, we mean failure of a device caused by, say, short
circuiting your battery. Figure 11 shows the battery still connected to barrel adaptor, but please disconnect at the barrel junction
for now so that your circuit is not powered yet.
Building Loop 1
Now we can continue our circuit construction by focusing on a single loop, which is a path through the circuit that starts at one
node and then, after traveling through two or more components [read the insert on the right], returns to the same node. In
Figure 12, we will focus on “loop 1” that goes from, say, the black node at the negative side of the battery, through the battery
to the red node and then through 𝑅𝑅2 before returning to the black node. Since the red and black nodes are already physically
represented on our breadboard, all that remains to complete this loop is to add 𝑅𝑅2 to the circuit between the red and black
nodes.
Think about it! Why should a
loop always travel through two
or more components?
Couldn’t it travel through just
one component? In practice,
yes, but that would imply that
both leads/terminals of that
device are connected to the
same node. We would say that
the device is “shorted” in
which case it would have no
voltage across it and would be
rendered useless in the circuit!
Example of a “short-circuited”
battery. The battery and circuit
would become hot, melt, or
even ignite. Even if shorted for
a few minutes, your battery
energy would become mostly
depleted.
11. Notes:
Figure 12: Defining a loop for implementation on the breadboard.
Locate the 1 𝑘𝑘Ω resistors in your kit and remove one for use as 𝑅𝑅2. These resistors will easily pull from the ribbon, however you
may wish to cut one free (see Figure 14) to avoid any residual glue that could affect getting a good connection in the
breadboard. The wires (leads) of the resistor are thin enough to be cut by an ordinary scissors.
12. Notes:
Figure 13: Remove a resistor by pulling or cutting it free of the ribbon.
Now, we’ll add the resistor to the circuit. In Figure 14, you can see that a red wire was used to extend the “red node” to another
location on the breadboard and a black wire similarly extends the black node. The resistor is then placed on the breadboard in
available holes on those two rows of the breadboard completing loop 1. The battery is shown connected in Figure 15, but it is
appropriate not to have it connected until the circuit is complete.
Figure 14: Completion of the loop containing 𝑅𝑅2.
13. Notes:
Building Loop 2
Returning our attention to the circuit schematic, we see that there are two more components not yet accounted for on our
breadboard implementation, 𝑅𝑅1 and 𝐷𝐷1. There is also a third node that connects these two elements. In Figure 16, we have
color-coded that node in green.
Figure 15: Identifying a third node on our schematic.
Now, we form another loop. See Figure 16. Loop 2 starts at the black node, goes through the battery to the red node, through
𝑅𝑅1 to the green node, and through 𝐷𝐷1 back to the black node. This second loop has touched all the remaining elements of our
circuit. Once loop 2 has been mapped to the breadboard, our circuit will be complete.
14. Notes:
Figure 16: A second loop has touched all the remaining elements.
In consideration of the LED, we need to realize that this diode, like all diodes, is directional and will only work as intended when
placed in the right orientation. Close inspection of the LED will reveal that one of its leads is slightly longer than the other. The
shorter lead will need to be placed towards the negative side of the battery (the black node) as shown in Figure 17.
Figure 17: The shorter LED lead (wire) needs to be placed towards the negative side of the battery.
15. Notes:
Bending the longer lead into a “dog leg” can help you identify it more quickly and help you place it properly into the circuit.
See Figure 18. Just remember that the dog lifts its leg to urinate on the top of the hydrant and you will remember that the
longer leg of the LED needs to be raised to the higher voltage to be illuminated.
Figure 18: A dog leg can help you remember how to insert a directional element like the LED.
In implementing loop 2, we again note that the battery is already present and the black and red nodes are already implemented
by the power rails. In this implementation of Figure 19, we have chosen to connect 𝑅𝑅1 directly to the red power rail and into an
isolated region of the breadboard. In another location on that same row, we used a green wire (representative of the green
node) to extend the green node across the center of the board (normally, the row is not connected through the center). Now,
we have added the LED from the green node to another isolated position in the breadboard and then used another black wire to
complete the connection to the negative end of the battery. Reinsertion of the battery should cause the LED to illuminate.
17. Notes:
Simplifying the build
While the completed build is functional, we might also recognize that it could have been made using fewer wires and less space.
(a) (b)
Figure 20: (a) The first build and (b) a cleaner version.
Figure 21 shows a close-up view of the cleaner circuit of Figure 20 (b) using less space and fewer wires. In ECE 110, it is generally
better to have a circuit that is easily to troubleshoot than one that uses the fewest components, yet, you do not want to be
sloppy. Notice that the green wire was left in the circuit to serve as a flag noting the location of the green node. It serves no
function, but flags can make debugging easier by speeding your interpretation of the breadboard and mapping it back to your
schematic!
19. Notes:
As a final note, we should mention that circuit schematics are not unique either. Note how Figure 22 is the exact same circuit
implementation as that of Figure 3. To confirm this, just note that the two loops used to construct your circuit are identical
here.
Figure 22: An alternate circuit schematic matching the circuit you built today.
Congratulations, you have now used a circuit schematic to perform a build on a solderless breadboard! You will want to
• Disconnect your battery. Leaving it attached will likely drain it dead after some amount of time.
• Place your battery in its own compartment to limit the possibility of accidental shorts. See Figure 24. A short-circuited
battery can easily overheat and possibly ignite!
• You can disassemble your circuit and store the components back in your small-parts box.
• Put the lid on correctly so that wires and other devices cannot migrate into the battery compartment. (Figure 24)
20. Notes:
Figure 23: Give the battery its own compartment to avoid short-circuits and fire!
Figure 24: Place the lid so that the compartments are covered properly, and wires and devices cannot migrate
between compartments.
21. Notes:
Review
In this prelab you have learnt to implement a circuit schematic onto a breadboard. Bear in mind:
• Red wires highlight the positive node of the battery, black wires connect to the negative node of the battery
• Different colored wires can be assigned to other nodes to help with quick identification
• The longer lead of the LED goes towards the positive (red) side
• Store the kit properly to avoid damage
_________________________________________________________________________________________________________
Take a video, just about 15-30 seconds long. Give your name and lab section, then demonstrate the
connecting of your battery to the breadboard to light the LED. Highlight both current paths through the
breadboard using a pen as a pointer, upload this on GradeScope before your lab meeting.