More Related Content
Similar to 2579 microsoft powerpoint2010_rtm_wsg_external
Similar to 2579 microsoft powerpoint2010_rtm_wsg_external (20)
2579 microsoft powerpoint2010_rtm_wsg_external
- 1. More Work Smart Content: http://microsoft.com/itshowcase
This guide is for informational purposes only. MICROSOFT MAKES NO WARRANTIES, EXPRESS, IMPLIED, OR STATUTORY, AS TO THE INFORMATION IN THIS
DOCUMENT. © 2012 Microsoft Corporation. All rights reserved.
Page 1 of 10
Work Smart: Microsoft PowerPoint 2010
Get Started
About Microsoft PowerPoint 2010
Use this guide to learn about the new features of Microsoft®
PowerPoint®
2010. For more detailed information about the new features
of PowerPoint 2010, go to http://office.microsoft.com/en-us/.
Topics in this guide include:
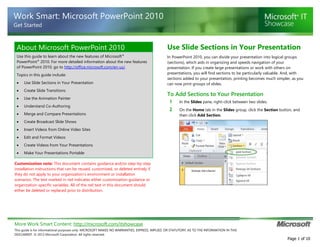
Use Slide Sections in Your Presentation
Create Slide Transitions
Use the Animation Painter
Understand Co-Authoring
Merge and Compare Presentations
Create Broadcast Slide Shows
Insert Videos from Online Video Sites
Edit and Format Videos
Create Videos from Your Presentations
Make Your Presentations Portable
Customization note: This document contains guidance and/or step-by-step
installation instructions that can be reused, customized, or deleted entirely if
they do not apply to your organization’s environment or installation
scenarios. The text marked in red indicates either customization guidance or
organization-specific variables. All of the red text in this document should
either be deleted or replaced prior to distribution.
Use Slide Sections in Your Presentation
In PowerPoint 2010, you can divide your presentation into logical groups
(sections), which aids in organizing and speeds navigation of your
presentation. If you create large presentations or work with others on
presentations, you will find sections to be particularly valuable. And, with
sections added to your presentation, printing becomes much simpler, as you
can now print groups of slides.
To Add Sections to Your Presentation
1 In the Slides pane, right-click between two slides.
2 On the Home tab in the Slides group, click the Section button, and
then click Add Section.
- 2. More Work Smart Content: http://microsoft.com/itshowcase
This guide is for informational purposes only. MICROSOFT MAKES NO WARRANTIES, EXPRESS, IMPLIED, OR STATUTORY, AS TO THE INFORMATION IN THIS
DOCUMENT. © 2012 Microsoft Corporation. All rights reserved.
Page 2 of 10
Work Smart: Microsoft PowerPoint 2010
Get Started
3 In the Slides pane, right-click the section label, click Rename Section,
and in the Section name text box, type your section title, and then
click Rename.
To Collapse and Expand Sections
By default, sections are expanded.
• To collapse sections, click the arrow next to the section name. The
slides are not displayed, only the section titles.
• To expand sections, click the arrow next to a collapsed section name.
The slides in that section are now visible.
The following images show the expanded section and a collapsed section:
To Print Sections
1 Click the File tab in the upper-left corner, next to the Home tab to
display the Backstage™
view.
2 Click the Print tab, under Settings, click the Print All Slides list to expand
your selection, under Sections select the section you want to print, and
then click Print.
Create Slide Transitions
With PowerPoint 2010, you can use transitions between slides that now
include motion paths and rotations in a true 3-D space. You can use the new
PowerPoint 2010 UI gallery to make appropriate choices, with transitions for
general purpose, emphasis, or special use as well as in making modifications
to transitions in use. You can also choose from a range of new sounds to
complement transitions.
To Create a Slide Transition
On the Transitions tab, in the Transition to This Slide group:
• Click a transition to apply to your slide.
-OR-
• Click Effect Options to select additional variations for the selected
transition.
- 3. More Work Smart Content: http://microsoft.com/itshowcase
This guide is for informational purposes only. MICROSOFT MAKES NO WARRANTIES, EXPRESS, IMPLIED, OR STATUTORY, AS TO THE INFORMATION IN THIS
DOCUMENT. © 2012 Microsoft Corporation. All rights reserved.
Page 3 of 10
Work Smart: Microsoft PowerPoint 2010
Get Started
Use the Animation Painter
The Animation Painter in PowerPoint 2010 allows you to format multiple
animations just as you would use the Format Painter to format text. You can
copy animations from one slide to another, to multiple slides within a
presentation, to the slide master, or from different presentations.
Tip
In PowerPoint 2010, you can use the Animations tab to hover over an
animation in the gallery to see how it will look, apply animations, and modify
or replace animations.
To Use the Animation Painter
1 Select an image or object that has an existing animation in your
presentation.
2 On the Animations tab, in the Advanced Animation group, click
Animation Painter.
3 Click on the image or object to which you want to apply the
animation.
Understand Co-Authoring
With co-authoring, you can allow multiple people to work on your
presentation at the same time.
To Share Your Document Using SharePoint Services
1 Click the File tab in the upper-left corner, next to the Home tab to
display the Backstage view.
2 Click the Save & Send tab, and in the Save & Send section, click Save
to SharePoint.
3 Click to select the SharePoint location in which you wish to save your
presentation, enter the File name, and click Save.
- 4. More Work Smart Content: http://microsoft.com/itshowcase
This guide is for informational purposes only. MICROSOFT MAKES NO WARRANTIES, EXPRESS, IMPLIED, OR STATUTORY, AS TO THE INFORMATION IN THIS
DOCUMENT. © 2012 Microsoft Corporation. All rights reserved.
Page 4 of 10
Work Smart: Microsoft PowerPoint 2010
Get Started
Notes
• Co-authoring features require Microsoft SharePoint®
Server 2010 or
Microsoft Windows Live™ Skydrive®
.
• Content synchronization is controlled by the user. Your changes are
available to others when you save your presentation. Other people get
your changes when they save their presentation.
• You must have rights to the SharePoint 2010 site to be able to save
your presentation to it.
• If you have created a SharePoint Workspace 2010, you can use the
Save to SharePoint Workspace option in the Backstage view to share
your presentations.
Merge and Compare Presentations
You can compare your current presentation with another one and combine
them by using the Merge and Compare feature in PowerPoint 2010. You can
manage and choose which changes or edits you would like to incorporate for
the final presentation.
To Compare Presentations
1 On the Review tab, in the Compare group, click Compare.
2 In the Choose File to Merge with Current Presentation dialog box,
select the presentation you want to combine with yours, and then
click Merge.
The presentation displays changes that were made, similar to the way
Track Changes works in Microsoft Word.
• Click Show Markup to turn on and off the display of changes.
• Click the icon next to the change, and then select the check box
next to a change to see it applied to your slide.
• On the Review tab, in the Compare group, click Previous or
Next to see other changes to your presentation.
• On the Review tab, in the Compare group, click Accept, and
then choose how you want to accept changes, such as a single
change or to accept all the changes on a slide or in the presentation.
- 5. More Work Smart Content: http://microsoft.com/itshowcase
This guide is for informational purposes only. MICROSOFT MAKES NO WARRANTIES, EXPRESS, IMPLIED, OR STATUTORY, AS TO THE INFORMATION IN THIS
DOCUMENT. © 2012 Microsoft Corporation. All rights reserved.
Page 5 of 10
Work Smart: Microsoft PowerPoint 2010
Get Started
Create Broadcast Slide Shows
With Broadcast Slide Show, you can broadcast your slides to remote
audience members. Your audience can view the presentation in their browser
windows even if they do not have PowerPoint 2010 installed on their
computer.
To Create a Broadcast Slide Show
1 On the Slide Show tab, in the Start Slide Show group, click
Broadcast Slide Show.
2 In the Broadcast Slide Show dialog box, select from the list of
broadcast services, and then click Create Broadcast.
3 Provide the URL to attendees using an automatically generated e-mail
message, or through instant messaging (IM).
Note
During the broadcast, you can pause the slide show at any time, resend the
broadcast URL to any attendees, or switch to another application without
interrupting the broadcast or showing your desktop to attendees.
Insert Videos from Online Video Sites
Previous versions of PowerPoint allowed users to add video from files saved
locally. In PowerPoint 2010, you can now add an embedded link to a video
posted on social media sites such as YouTube or MSN®
Video. Once added,
you can associate a picture with that video object.
To Insert a Video from an Online Site into Your
Presentation
1 Browse to the video you want to include using Microsoft Internet
Explorer®
.
2 Click on the video; select the entire Embed field, and then press
CTRL+C.
3 Pause the video and then, in the PowerPoint 2010 presentation, go to
the slide where you want to insert the video.
4 On the Insert tab, in the Media group, click Video, and then select
Video from Web Site….
- 6. More Work Smart Content: http://microsoft.com/itshowcase
This guide is for informational purposes only. MICROSOFT MAKES NO WARRANTIES, EXPRESS, IMPLIED, OR STATUTORY, AS TO THE INFORMATION IN THIS
DOCUMENT. © 2012 Microsoft Corporation. All rights reserved.
Page 6 of 10
Work Smart: Microsoft PowerPoint 2010
Get Started
5 In the Insert Video from Web Site dialog box, press CTRL+V to paste
the embedded video link, and then click Insert.
6 Right-click the new video object, click Change Picture, and then select
the picture you want to show for the video.
7 Double-click the new video object in the slide, and click the Play
button to view the video.
Edit and Format Videos
You can edit and format your photos and videos directly within
PowerPoint 2010.
To Format a Video
1 On the Insert tab, in the Media group, click Video, and then select
Video from File….
2 In the Insert Video dialog box, browse to select the video you want to
use, and then select Insert.
3 New video and editing tools are found in both the Format and Edit
tabs under Video Tools.
4 On the Format tab, in the Video Styles gallery, use your pointer to
pause on the different style options to see them applied to your video,
and then click the style you want to apply to your video; for example,
select Beveled Oval, Black to frame your video in an oval.
5 On the Format tab, select other formatting to apply to your video such as:
• In the Video Styles group, select Video Effects, and then select
an effect such as Reflection or 3-D Rotation.
- 7. More Work Smart Content: http://microsoft.com/itshowcase
This guide is for informational purposes only. MICROSOFT MAKES NO WARRANTIES, EXPRESS, IMPLIED, OR STATUTORY, AS TO THE INFORMATION IN THIS
DOCUMENT. © 2012 Microsoft Corporation. All rights reserved.
Page 7 of 10
Work Smart: Microsoft PowerPoint 2010
Get Started
• In the Size group, click Crop to show only a portion of your
original video.
• In the Adjust group, click Corrections to sharpen your video by
adjusting brightness or contrast.
• In the Adjust group, click Color to apply interesting color
effects to your video.
To Edit a Video
Under Video Tools, on the Playback tab, you can adjust the length of your
video, add bookmarks, and add animations.
• Click Trim Video in the Editing group, and in the Trim Video dialog
box, drag the start time and end time sliders to trim time off the video,
and then click OK.
• In the Bookmarks group on the Playback tab under Video Tools, click
Add Bookmark to mark a place in the video to trigger another action,
such as causing text to appear or pausing the video so you can
provide some additional narration.
• On the Animations tab, in the Animation gallery, click an animation,
such as Pause.
• On the Animations tab, in the Advanced Animation group, click
Trigger, and then select a trigger such as your bookmark.
Create Videos from Your Presentation
With PowerPoint 2010 you can share a video by sending it by email, posting
it on the Web, or saving it to a DVD. The final video can contain narrations as
well as laser pointers.
To Create a Video of Your Presentation
1 Click the File tab in the upper-left corner, next to the Home tab to
display the Backstage view.
2 Click the Save & Send tab, and then under File Types, click Create a
Video.
- 8. More Work Smart Content: http://microsoft.com/itshowcase
This guide is for informational purposes only. MICROSOFT MAKES NO WARRANTIES, EXPRESS, IMPLIED, OR STATUTORY, AS TO THE INFORMATION IN THIS
DOCUMENT. © 2012 Microsoft Corporation. All rights reserved.
Page 8 of 10
Work Smart: Microsoft PowerPoint 2010
Get Started
3 Select the quality and timing options that you want, and click Create Video.
4 In the Save As dialog box, provide a file name and location for your
video, and then click Save.
5 A progress bar will display in the bottom of your presentation screen
so you can see when the video has been created.
Note
You can use the default timings to advance the slides in the video or you can
record specific timings along with narration for the slide show in the video by
selecting Record Timings and Narrations, and then selecting Use Recorded
Timings and Narrations for your video.
Make Your Presentations Portable
You can make your presentations more portable by embedding audio and
video files directly into the presentation. Embedded files eliminate the need
to send more than one file.
Note
If your presentation contains rich media, such as videos, you should optimize
it for compatibility and reduce the size of any media files in your presentation
before you create your presentation package to share with others.
To Optimize Media Compatibility
1 Click the File tab in the upper-left corner, next to the Home tab to
display the Backstage view.
2 Click the Info tab, then click on the Check for Issues button, and
select Check Compatibility.
3 In the Microsoft PowerPoint Compatibility Checker dialog box, click
OK after the optimization process has completed on your media files.
- 9. More Work Smart Content: http://microsoft.com/itshowcase
This guide is for informational purposes only. MICROSOFT MAKES NO WARRANTIES, EXPRESS, IMPLIED, OR STATUTORY, AS TO THE INFORMATION IN THIS
DOCUMENT. © 2012 Microsoft Corporation. All rights reserved.
Page 9 of 10
Work Smart: Microsoft PowerPoint 2010
Get Started
To Reduce the Size of Media Files
1 Click the File tab in the upper-left corner, next to the Home tab to
display the Backstage view.
2 Click the Info tab, click the Compress Media button, and select the
quality you wish the media files to have.
Note
The quality of the video specifies the size of the video. Video quality
options include:
• Presentation Quality. Saves space while maintaining overall
audio and video quality
• Internet Quality. Quality will be comparable to media which is
streamed over the Internet
• Low Quality. Use when space is limited, such as when you are
sending presentations via e-mail
To Package Your Presentation for CD
1 Click the File tab in the upper-left corner, next to the Home tab to
display the Backstage view.
2 Click the Save & Send tab, and then under File Types, click Package
Presentation for CD, and then click Package for CD.
3 In the Package for CD dialog box, provide a name for your CD, select
the files to be copied, and then:
• Click Copy to Folder…
to create the CD image
on your computer.
-OR-
• Click Copy to CD to
burn a CD of the
image.
4
- 10. More Work Smart Content: http://microsoft.com/itshowcase
This guide is for informational purposes only. MICROSOFT MAKES NO WARRANTIES, EXPRESS, IMPLIED, OR STATUTORY, AS TO THE INFORMATION IN THIS
DOCUMENT. © 2012 Microsoft Corporation. All rights reserved.
Page 10 of 10
Work Smart: Microsoft PowerPoint 2010
Get Started
4 Also in the Package for CD window, you can click the Options…
button to refine which files will be copied and to set security for the
presentation.
For More Information
Getting Started with Office 2010
http://office.microsoft.com/en-us/help/fx100646671033.aspx