3. Executive Summary
The Calvin College Engineering Program’s senior capstone course is divided into two semester-long
classes. The first semester’s focus is on researching the feasibility of a design project of the team’s
choice. One of the main deliverables of this course is the project proposal and feasibility study (PPFS),
which has been completed. The second semester course is focused on the further development,
prototyping, and implementation of the project. The final deliverable for this course is this design
report.
This report details the research and design of the TEC-Pro, the design project chosen by Team 05.
TEC-Pro is short for thermoelectrically cooled prosthetic. The goal of Team 05 was to design a prosthetic
socket with thermal regulation in order to provide the user with unparalleled comfort in a daily-use
prosthetic socket. The TEC-Pro incorporates battery-operated thermoelectric elements and a
microcontroller in order to move heat from the user’s leg outward to a heat sink and employs a fan to
help send excess heat from the heat sink into the environment. The rest of the prosthesis development,
including the foot, ankle, and shaft are outside the scope of this project. The TEC-Pro will meet the need
for a lightweight, cooled socket for Stephen Lander, one of the members of Team 05 and a transtibial
amputee.
The final product is a functional prototype created by Team 05. This final prototype is the result of
development work spanning three other prototypes, and incorporates the lessons the team learned
through the incremental development performed throughout the second semester. We believe that our
final prototype accomplishes the goals we set out to achieve at the project outset, and thus consider
this project to be a success.
4. i
Table of Contents
Executive Summary....................................................................................................................................... iii
Table of Figures............................................................................................................................................. iv
Table of Tables.............................................................................................................................................. iv
1 Introduction..........................................................................................................................................1
1.1 The Class .......................................................................................................................................1
1.2 Context..........................................................................................................................................1
1.3 The Project....................................................................................................................................1
1.4 Reason for Selection .....................................................................................................................1
1.5 Team Members.............................................................................................................................2
1.6 Design Norms................................................................................................................................3
1.6.1 Caring ....................................................................................................................................3
1.6.2 Trust ......................................................................................................................................3
1.6.3 Integrity.................................................................................................................................3
2 Project Management.............................................................................................................................3
2.1 Project Breakdown........................................................................................................................3
2.2 Schedule........................................................................................................................................4
2.3 Budget...........................................................................................................................................4
2.4 Task List.........................................................................................................................................7
3 Requirements........................................................................................................................................9
3.1 Product Operation Requirements.................................................................................................9
3.1.1 Thermal Control Targets .......................................................................................................9
3.1.2 Fit and Comfort.....................................................................................................................9
3.1.3 Aesthetics............................................................................................................................10
3.1.4 User Interface......................................................................................................................10
3.1.5 Durability.............................................................................................................................10
3.1.6 Sound ..................................................................................................................................10
3.1.7 Weight.................................................................................................................................11
3.2 Safety Requirements...................................................................................................................11
3.2.1 Water Resistant...................................................................................................................11
3.2.2 Shock Protection.................................................................................................................11
3.2.3 Sharp Edges and Abrasive Surfaces ....................................................................................11
3.2.4 Frostbite..............................................................................................................................12
5. ii
3.2.5 Burns ...................................................................................................................................12
3.2.6 Cost Requirements..............................................................................................................12
3.2.7 Contingent Goals.................................................................................................................12
4 Project Specifications..........................................................................................................................12
4.1 Design Alternatives .....................................................................................................................12
4.1.1 Evaporative Cooling ............................................................................................................12
4.1.2 Refrigeration Cycle..............................................................................................................13
4.1.3 Air Cooling...........................................................................................................................13
4.1.4 Helical Piping.......................................................................................................................13
4.1.5 Thermoelectric Cooling.......................................................................................................13
4.2 Design Criteria.............................................................................................................................13
4.3 Design Decisions .........................................................................................................................14
5 Project Design.....................................................................................................................................14
5.1 Electronics System Research.......................................................................................................14
5.1.1 Thermoelectrics ..................................................................................................................15
5.1.2 Batteries..............................................................................................................................16
5.1.3 Control System....................................................................................................................17
5.1.4 User Interface......................................................................................................................17
5.2 Heat Transfer Research...............................................................................................................17
5.3 Materials Research .....................................................................................................................22
5.4 Overall System Qualities/Parameters/Targets ...........................................................................23
6 Prototyping and Development ............................................................................................................23
6.1 Prototype 1 .................................................................................................................................23
6.2 Prototype 2 .................................................................................................................................24
6.3 Prototype 3 .................................................................................................................................25
7 Final Design.........................................................................................................................................27
7.1 Socket Creation...........................................................................................................................27
7.2 Electrical System .........................................................................................................................32
7.3 Performance ...............................................................................................................................34
8 Business Plan.......................................................................................................................................34
8.1 Marketing Study..........................................................................................................................34
8.1.1 Competition ........................................................................................................................34
8.1.2 Market Survey.....................................................................................................................35
7. iv
Table of Figures
Figure 1: Left to right: Stephen Lander, Andrew Bouma, Nathan Slager, Lance Jensen ..............................2
Figure 2: Team roles and responsibilities .....................................................................................................4
Figure 3: Example applications with required 𝑑𝑇 and heat load [1] ..........................................................15
Figure 4: Thermoelectric Modules Schematic ............................................................................................16
Figure 5: Top level representation of the temperature control system.....................................................17
Figure 6: Autodesk Inventor model of prosethesis for simple simulation purposes..................................18
Figure 7: Exterior heat sink temperature map from Simulation Mechanical thermal simulation .............19
Figure 8: Inner view of the exterior heat sink temperature map from Simulation Mechanical.................19
Figure 9: Heat map showing the inside of the inner heat sink at subzero temperatures ..........................20
Figure 10: Heat map of improved thermal model......................................................................................21
Figure 11: Skin temperature contours of the left residual limb and prosthetic socket [2] ........................22
Figure 12: Prototype 1 being prepared for testing.....................................................................................24
Figure 13: Prototype 2 in the process of testing.........................................................................................25
Figure 14: Prototype 3 in the process of testing.........................................................................................26
Figure 15: Positive of a fitted socket that was used to create the final socket..........................................27
Figure 16: First layer of carbon fiber weave applied to the positive..........................................................28
Figure 17: First two layers of the final socket with the thermoelectrics wired..........................................29
Figure 18: Final socket with the aluminum plates where the heat sinks and fans were attached ............30
Figure 19: Final product with the LCD displaying power level and socket temperature............................31
Figure 20: Thermoelectric Modules Configuration.....................................................................................32
Figure 21: High Side Driver Circuit ..............................................................................................................33
Table of Tables
Table 1: Product cost breakdown.................................................................................................................6
Table 2: Residual limb skin temperature during different activities ............................................................9
Table 3: Decision matrix for determination of heat removal method .......................................................14
Table 4: Temperature Ratings of the Components.....................................................................................33
Table 5: Comparison of the competition....................................................................................................35
8. 1
1 Introduction
1.1 The Class
The Calvin College Engineering Program’s senior capstone project is composed of two courses.
ENGR-339 and ENGR-340 combine to create a six credit-hour course that all graduating seniors must
complete. The first semester course, ENGR-339, is focused on team formation, project identification and
definition, a feasibility study, and the beginnings of the design work. The second semester course,
ENGR-340, focuses on more in-depth design and analysis, often times accompanied by the production of
a prototype. At the end of the year, senior design teams deliver their final design reports, prototypes,
and a presentation to family, friends, and engineering department staff at Senior Design Night in May.
These courses are also accompanied by lectures focused on transitioning students from the world of
academia into the world of industry and full-time engineering careers.
1.2 Context
There are currently approximately 2 million amputees in North America alone, with that number
expected to grow to 3.6 million amputees by 2050 [3]. The majority of these amputees are transtibial
(below the knee) amputees. One common challenge faced by amputees is the problem of excess heat
inside the socket portion of prosthetic legs. Amputees commonly wear a silicone liner, multiple socks,
and a plastic socket around their residual limb. All of these elements trap heat, leading to multiple
problems such as sweating and discomfort. Sweat trapped inside of the silicone liner can lead to sores,
rashes, and skin breakdown, which causes the prosthetic leg user to not be able to wear their leg or to
suffer through serious discomfort. Sweat can also lead to loss of function of the leg as the liner and
socket slide out of place more easily, occasionally even leading to prosthetic legs falling off during
vigorous exercise. According to multiple studies and surveys of amputees [4], over half of all amputees
report heat and perspiration discomfort inside their prosthetic devices.
1.3 The Project
In order to combat this problem of thermal discomfort and sweat buildup at the interface of residual
limb and socket, Team 05 worked to develop a thermally regulated prosthetic socket called the TEC-Pro,
short for thermoelectrically cooled prosthetic. Team 05 has developed a thermal regulation system for
the socket portion of the prosthesis using thermoelectric coolers, heat sinks, and fans molded in an
innovative fashion. Power, weight, cost, manufacturability, and durability were all considered
throughout the design process in order to produce an optimal design for the TEC-Pro.
1.4 Reason for Selection
When searching for a project, Team 05 brainstormed many possible project topics, from vehicles to
animal capture systems to a folding bike. While there were many projects that sounded like they would
be interesting or would make for cool prototypes, Team 05 did not initially find any projects that utilized
the abilities and interests of all team members. Towards the end of the brainstorming and topic
selection process, Stephen Lander made some suggestions having to do with his prosthetic leg, including
a pressure-sensing socket and a socket with a cooling element in it. Team 05 zeroed in on the idea of a
cooling socket for multiple reasons, including the ability to use the mechanical engineers’ expertise in
thermal system design and heat transfer along with Nathan Slager’s expertise with electronics and
controls. Team 05 was also drawn to the project because it allowed the team to work on a project with
larger implications for people outside of the team. The potential to tackle a real problem that was faced
9. 2
by many disabled or disadvantaged people while also potentially providing renewed comfort and
function for a teammate also gave the team a sense of purpose.
1.5 Team Members
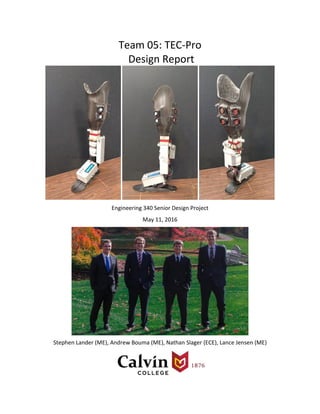
Figure 1: Left to right: Stephen Lander, Andrew Bouma, Nathan Slager, Lance Jensen
Team 5 consists of Andrew Bouma, Lance Jensen, Stephen Lander, and Nathan Slager. All team members
are senior engineering students at Calvin College. Nathan Slager is pursuing a degree in the electrical
and computer concentration, while the other three team members are pursuing degrees in the
mechanical concentration. Stephen Lander is pursuing a double major in both the mechanical
engineering and biochemistry degree programs. The team’s collective passion for helping those in need
and curiosity for the intersection of biology and engineering steered them towards choosing TEC-Pro as
their senior design project.
Stephen Lander: A Denver native, Stephen brings biological expertise to the team with his medical
research experience and dual major in biochemistry and mechanical engineering. Stephen is looking
forward to attending medical school and becoming a doctor. He had his lower left leg amputated in
2014 after an unfortunate incident with a forklift, and his experience as an amputee has provided the
team with invaluable insights and feedback throughout the design process.
Andrew Bouma: Growing up in Grandville, Michigan, Andrew began his engineering career at Gentex
Corporation and acquired a strong foundation in CAD and computational simulations. This background
was refined and expanded on during a summer research internship at Carnegie Mellon University where
he gained experience in tribology, powder flows, and metal 3D printing.
10. 3
Nathan Slager: From Elmhurst, Illinois, Nathan brings expertise and skills relating to all things electronic
to the team. Having experiences in industry with Epiq Solutions and research experience at Carnegie
Mellon University, Nathan brings superior coding and programming skills, along with knowledge of
electronic hardware and adept research skills to the team. Nathan’s experience with app development
in his free time has also contributed to his analytical problem-solving skills.
Lance Jensen: Originally from Tiskilwa, Illinois, Lance has acquired many skills and valuable engineering
experiences from growing up on a farm. His multiple international experiences, including studying
engineering in China and working on brakes at ZF TRW in Germany, have made him a culturally
conscious teammate with exceptional problem solving skills. His hands-on experience and analytical
mind also bring spectacular value to the team.
1.6 Design Norms
In light of our shared Christian faith and our desire to incorporate our love for God and for others into
everything we do, our group has chosen to incorporate three design norms into our project. These
design norms guided our decisions and choices throughout the design process.
1.6.1 Caring
We strive to care for those who are marginalized by society. One way we can do this is by providing a
product that allows a disadvantaged person, such as an amputee, with comfort and performance in their
prosthetic socket. Although this product may not be accessible to everyone, we believe that the fact it
exists shows that we care for its potential customers.
1.6.2 Trust
We strive to develop and design our product in such a way that its users can trust the socket to perform
flawlessly all the time. With any manufactured product, there is the potential for problems,
malfunctions, and failures. By rigorously testing our product, considering all possible failure modes, and
designing for longevity, durability, and quality, we can gain the trust of our product users and build
rapport with our customer base.
1.6.3 Integrity
We strive to develop a product that is complete in both form and function. We want to develop a
product that is easy and intuitive to use. The controls should be simple and the operation should be
consistent and repeatable. It is also important to us that the design of the product is complete,
beautiful, and does not add additional hassle or complexity to the user.
2 Project Management
2.1 Project Breakdown
Before beginning research and design work, the project was broken down into more manageable focus
areas. Each team member was placed in charge of one aspect of the project having to do with the
physical project itself and at least one aspect of the project having to do with the operational aspects of
the team. A visual representation of the project breakdown can be seen in Figure 1. Andrew Bouma took
on team leader responsibilities as well as tackling thermal modelling and heat transfer. Nathan Slager,
the team’s electrical engineer, used his expertise to design electrical systems, while also taking
responsibility for the team’s finances and materials and parts acquisition duties. Lance Jensen research
11. 4
materials and fabrication. He also took control of the team’s website and publicity as he took the role of
the website developer. Finally, Stephen Lander used his contacts and connections with doctors and
prosthetists as our customer and industrial contact liaison. He also used his knowledge as a pre-medical
student to handle biological systems.
Figure 2: Team roles and responsibilities
2.2 Schedule
It was important to the team to keep on or ahead of the schedule. For this reason, the schedule was
kept using a Gantt chart, which was updated weekly by Lance. By using a Gantt chart, the tasks for each
week were laid out in an easy-to-read way. When schedule issues arose, such as falling behind, the
issues were resolved by bringing the team together and fixing it as soon as possible. This involved
staying late on campus to get the work done.
2.3 Budget
Team 05 was able to apply for additional funding beyond the original $500 budget cap, which allowed
the team to improve on the initial design as the prototype process was carried out. The final budget for
12. 5
the TEC-Pro development and prototypes was $792.27. Nathan Slager was assigned to manage the
budget. Whenever the team required more parts, he would file the order forms and update a Google
document, which was shared with the entire team. Several parts were ordered by the team members
themselves. For these components, the costs were accounted for and the team was reimbursed for
them by the school. The parts are found in Table 1.
14. 7
To be stewards for the Lord, the Christian team did their best to use the provided budget without
wasting money. Some initial ideas that required some investment did not work out, but this reduced the
cost of the final product to a minimal, since the final product does work. The team has learned the
wisdom that those who can be trusted with very little can also be trusted with very much. We look
forward to taking this wisdom with us to our future work.
2.4 Task List
For the fall and spring semesters, several deadlines were created to keep the team on track to ensure
the final project was completed by May. A task list was created using the Method of Approach to give
the team a schedule to follow. The estimated hours are shown next to each task as this is important
later for the cost analysis.
Determine Project (16): Narrow down project ideas and decide on final choice
o Brainstorm Project Ideas (8)
o Brainstorm Project Solutions (8)
Budgeting (6): Determine money available and cost of the project, tracking costs
Research (116): Learning about the project and determining what needs to be done
o Electrical Components (20)
o Patent Search (6)
o Thermoelectrics (20)
o Batteries (20)
o Socket Fit (8)
o Materials (16)
o Merging Electrical Components with Construction (15)
o Academic Papers Research (10)
o Meeting with Glenn Remelts (1)
Design (61): Thermal Design of the Socket
o Create Thermal Model: Model the Heat Flow of the Leg and Socket (50)
Measure Leg and Existing Socket (4)
Drawing in Inventor (6)
Inventor Simulation Drawing and Analysis (40)
o Selection of Materials (5): Selecting the Materials for Each Component
o Selection of Parts (6): Choosing the Correct Size for Each Part
Presentables (35)
o Presentation I (4)
o Fridays at Calvin Student Presentation (1)
o Poster (2)
o PPFS Draft (23)
o Presentation II (5)
A task list was created for the spring semester in a similar fashion. Most of these tasks involved
experimentation through prototyping and testing. The estimated hours are displayed after each task.
Research (122)
o Thermoelectrics (25)
15. 8
o Batteries (27)
o Materials (30)
o Manufacturing Process (40)
Prototypes (132)
o Prototype 1 (25)
Manufacturing using fiberglass (15)
Testing: heat transfer capability of single thermoelectric (10)
o Prototype 2 (52)
Manufacturing using fiberglass (18)
Electrical Adjustments to prototype (10)
Testing: multiple thermoelectric modules and electronics (24)
o Prototype 3 (55)
Manufacturing using existing carbon fiber prosthesis (20)
Testing: integration of modules with socket and placement of TE’s (35)
Presentables (76)
o Presentation III (8)
o CEAC Summary (4)
o CEAC Presentation (12)
o Presentation IV (12)
o Design Report (30)
o Senior Design Night Presentation and Slideshow (10)
Final Product (330)
o Research on manufacturing process (30)
o Safety training and research (15)
o Obtaining required materials (25)
Carbon fiber weave
Epoxy
Hardener
Personal Protective Equipment (PPE)
o Creating leg positives (27)
Making the plaster molds (12)
Sanding down to adjust for leg changes (15)
o Final socket manufacturing (233)
Creating inner carbon fiber layers (8)
Inner layer cleanup and adjustment (10)
Machining aluminum plates, heat sinks, fans (25)
Integrating thermoelectric modules (20)
Outer layer carbon fiber manufacturing (15)
Outer layer cleanup (20)
Final assembly with heat sinks and fans (30)
Designing and machining the 3D printed battery and electronics cases (30)
Final electronics wiring and coding (70)
Foot and ankle adjustments (5)
16. 9
3 Requirements
Stephen Lander served as an invaluable resource at the beginning of the project when Team 05 began to
work through defining the problem at hand and developing the product requirements that would help
us meet the needs of amputees while keeping our product safe, effective, user-friendly, and
environmentally friendly. The product requirements described below are split into the categories of
product operation, safety, environmental, and cost requirements.
3.1 Product Operation Requirements
3.1.1 Thermal Control Targets
Residual limb skin temperatures located on different areas of the limb were recorded in a study of
amputees [7]. The temperatures were measured before donning of the silicon liner, during resting with
the prosthesis attached, the initial transition to walking, and the steady state temperature during
walking after fifteen minutes. The resulting temperatures are summarized below in Table 2 [7].
Table 2: Residual limb skin temperature during different activities
Activity Level Temperature [℃]
Donning 31.4 ± 1.3
Steady-State Resting 32.2 ± 1.7
Initial Walking 32.3 ± 1.7
Steady-State Walking 33.1 ± 1.8
As seen in Table 2, the temperature of the residual limb climbed 1.7 C from resting to walking [7].
Although this appears to be a very small increase in temperature, this temperature change is enough to
trigger temperature response mechanisms by the body to work to compensate for this change. One
mechanism used by the body to compensate for this change is perspiration. Any addition of moisture
into the prosthetic liner remains trapped and can lead to skin breakdown or decreasing performance of
the prosthesis.
The target skin temperature was chosen to be the same as the donning skin temperature of 31.4℃. By
keeping the residual limb at the resting temperature outside of a prosthetic liner, perspiration and heat
buildup within the socket will be minimized. The dynamic addition of heat by muscles contractions,
depending on activity level, as well as blood flow from the body will need to be removed by the cooling
system to keep the skin at the desired temperature.
The cold side of the thermoelectric will need to be at a temperature low enough to draw the heat
generation from muscles and addition from the blood away from the residual limb and ultimately
release the heat into the environment. The prosthetic cooling system was designed to remove the extra
heat from the residual limb to maintain a skin temperature of 31.4℃ with environmental temperatures
up to 37℃.
3.1.2 Fit and Comfort
Fit and comfort of a prosthetic socket are imperative for good function. The most common reason for
amputees to not wear their prosthesis is poor fit of the socket. The cooling system must not disrupt the
fit of the socket. The necessary componentry for the cooling system must be able to be added without
adding pressure points or lack of adaptation to the uniqueness of individuals’ residual limbs shape.
17. 10
Newly fabricated prosthetic sockets are adjusted for pressure points felt within the socket. The cooling
system must allow for small variations from the initial model so a proper fit can be obtained between
the residual limb and prosthetic socket. A well-fitting prosthetic socket is one of the most critical aspects
of a prosthesis so the comfort and fit of the socket was analyzed in every aspect of design of the cooling
system.
3.1.3 Aesthetics
It was important for us to design our prosthetic socket to be aesthetically pleasing and look similar to
other prosthetic legs. One initial goal was to create our prosthetic socket in such a way that the ability of
the end user to wear their prosthesis with a variety of clothing options was not impeded. This goal was
set while the team was under the impression that the final socket design would not require the use of
fans on the exterior surface. However, with a design that required fans to help dissipate heat, the team
relaxed its goal of the user being able to wear pants with the socket. The scope of the project changed
slightly, and the TEC-Pro was developed more targeted for use during rigorous activities. The team
decided that most people wear shorts during these activities, so the user will most likely be wearing
shorts if they wanted to use the TEC-Pro anyways.
We also wanted to design the prosthesis in such a way that the socket can be worn without attracting
unwanted attention to the prosthetic leg. Since we have heat sinks and fans protruding from of the
socket, this was a challenge. In order to accomplish this, the team manufactured the socket in a very
similar manner to how prosthetists manufacture sockets for their patients, using carbon fiber and a
positive of the residual leg. We also hid the wires between layers of carbon fiber to make the socket
look more pleasing.
3.1.4 User Interface
The user interface of the system is easy to use and learn. If the customer were to accidentally over-cool
the leg they might possibly never wear the prosthesis again. Therefore it was crucial that we established
a system where the set point and leg temperature are clearly communicated to the user, with obvious
physical controls for changing the set point and shutting down the system.
3.1.5 Durability
Another important aspect of the socket performance was its durability. Most transtibial prostheses have
a working life 3-5 years. It was important to our team that the TEC-Pro be able to last and function
properly for at least that amount of time. The prosthesis will have to endure a number of challenges
such as constant rubbing and contact with clothing, impact and drops, being splashed, and general dirt,
dust, and mud contamination from everyday use. By using carbon fiber and high quality resin mixed with
hardener, the team believes the socket is a highly durable alternative to similar sockets available.
3.1.6 Sound
The sound of the prosthesis and cooling system should be kept to a minimum and if possible, completely
unnoticeable during normal walking. Although some amputees will sacrifice quiet for an added benefit
such as powered propulsion with a BIOM foot, many would rather have a quiet leg than one with an
added feature. Therefore, to allow the cooling system to be targeted for a broad customer base, a quiet
cooling system is necessary. The initial fan-less design was ideal for sound management. However, even
though the design now incorporates many fans, the socket is still very quiet, which was very pleasing to
the team and the customer. By incorporating low-noise computer fans, the team was able to minimize
any annoyance due to sound.
18. 11
3.1.7 Weight
The weight of a prosthesis is critical for performance. The lower the overall weight of the leg, the less
energy the amputee has to expend for walking or running, and ultimately, the farther the amputee can
travel without becoming exhausted. The weight of the cooling system should add no more than three
pounds to the overall weight of the prosthesis. However, the less weight added to the prosthesis by the
cooling system, the better. The weight addition will be minimized in all possible ways, with a total
weight not to exceed three pounds. The final product, including the socket, leg, cases, batteries, and
electronics, weighed in at 6.05 lbs. Since the average prosthetic leg weighs approximately 5 lbs, the
added weight is just over 1 lb. The team hit their weight requirement target.
3.2 Safety Requirements
3.2.1 Water Resistant
One of the main purposes of cooling a prosthetic leg was to prevent the buildup of moisture between
the leg and the inside of the prosthesis. Therefore, it was especially important to keep the product
resistant to water in order to avoid water penetrating into the leg and into the electronics. This was
accomplished by covering all of the electronics with 3-D printed enclosures and protecting the wires
within carbon fiber layers.
3.2.2 Shock Protection
In order to maintain a safe product, all electronics were sufficiently covered so that no wires were
exposed. In the case that the housing for the electronics falls apart and someone comes into contact
with a live wire, the highest voltages seen will be no more than 12.6 Volts. The resistance of the human
skin ranges from 10,000 Ohms to 1,000 Ohms, depending on whether or not the skin is dry or wet,
respectively [8]. A quick calculation of the worst case scenario gives:
12.6 [𝑉]
1000 [𝑂ℎ𝑚𝑠]
= 0.0126 [𝐴] 𝑜𝑟 12.6 [𝑚𝐴] Eq. 1
which is less than the “let go” current of 15 mA. This calculation doesn’t take into account the extra
resistance of the inside of the human body, which depends on the path of the electricity through the
body. This extra resistance may vary from 100 to 1000 extra Ohms and the result would only decrease
the current. There is extra protection from the silicone liner as well. Due to these factors, the team is
confident that the final prototype is shock proof.
3.2.3 Sharp Edges and Abrasive Surfaces
Prostheses are in close proximity to other body parts and commonly rub against the other leg and
various surfaces such as normal clothes or couches. The cooling system componentry does not have
sharp edges or abrasive surfaces that could damage the other body parts or objects such as couches or
clothing. This was especially important once the team decided to use square heat sinks to dissipate heat
from the residual limb. The placement and design of all surfaces were safe for the amputee and surfaces
that might come into contact with the prosthesis. In addition, the heat sink edges were rounded off,
producing less scrapes and snags to the user. The thermoelectric modules were placed on the back side
and outside surface of the socket because these were the areas with the most heat production. In
addition, placing the modules away from his other leg removed the need for Stephen to worry about his
right leg rubbing against any of the modules sticking off of the socket.
19. 12
3.2.4 Frostbite
Thermoelectrics are capable of developing a temperature difference of 70℃. Therefore, they are
capable of dropping well below the temperature needed to cause frostbite. Depending on the
temperature, frostbite takes various amount of time to develop, with the general rule, the colder the
temperature the less time it takes to develop. For a given limb, frostbite development time for is
36 minutes for 4℃, 27 minutes for 0℃, and 15 minutes for -5℃ [9]. The temperature of the skin must
not drop below 15℃ to remain above the temperature where frostbite can occur. The cooling system
must have the ability to have a safety shut-off if the temperature drops below 15℃ in order to avoid
frostbite.
3.2.5 Burns
The temperature difference generated by thermoelectrics could also cause burns to develop on the skin.
Skin temperature must remain below 40℃. Depending on the temperature of the skin, burns develop
more quickly for higher temperatures. For 45℃, burns develop in 2 hours, for 49℃, burns develop in 8
minutes, and for 55℃, burns develop in 17 seconds [10]. Therefore, the cooling system is equipped with
the ability to sense if the socket temperature rises above 40℃ and shut off the thermoelectrics if this
does occur. This requirement will protect the amputee from developing any burns due to high
temperatures created within the socket. In addition, the battery must be properly charged and
discharged at the proper rating in order to avoid any explosions and or fires.
3.2.6 Cost Requirements
The cost of the project initially intended not to exceed the budget of $500. However, extra expenditures
were necessary in order to complete the project to specifications and complete our development
process, and so the team requested for extra funding from the Engineering Department Senior Design
Fund. The cost of the final prototype itself was $423.42, and the cost of extra components and
development costs was $368.85, coming to a grand total of $792.27, exceeding the budget by $292.27.
3.2.7 Contingent Goals
If we had more time and a bigger budget, the team would have liked to include some additional features
on the TEC-Pro, such as a smartphone interface, complete thermal regulation (heating as well as
cooling), and an LED indicator (red for heating, blue for cooling, green for reaching set point
temperature). Due to time and budget constraints, the team has left these features for the next
prototype.
4 Project Specifications
Once the team had identified the requirements for a thermally regulated prosthetic leg socket, the team
brainstormed different methods of attacking the problem, ultimately coming up with five possible
solutions to the problem. These methods were researched and evaluated with different design criteria.
In the end, Team 05 chose thermoelectric cooling as the best method for this application.
4.1 Design Alternatives
4.1.1 Evaporative Cooling
One of the first methods of cooling a socket evaluated was evaporative cooling. In this method, a liquid
such as water, acetone, or alcohol would be applied around the socket or the surface of the leg and
allowed to evaporate, thus cooling the leg. The positive qualities of this method are that it is simple and
20. 13
does not require many components. The downsides are that the system could potentially require a large
liquid storage system and could easily go above the maximum weight requirement in order to have a
satisfactory operating time.
4.1.2 Refrigeration Cycle
Another method evaluated was a standard refrigeration cycle with a compressor, condenser,
evaporator, and expansion valve. The positives for this system were that the technology is mature and
the system is well understood by the mechanical engineers on the team. The downsides are that the
system would potentially be very large and bulky, have many moving parts, and be very heavy.
4.1.3 Air Cooling
The next system evaluated was an air cooled solution. For this system, we proposed a pump that would
be operated by the weight of the user as their foot strikes the ground during the walking motion. This
pump would shoot air through a series of vents near the user’s leg, increasing the prosthesis’ ability to
evacuate heat and moisture from the leg. The benefits of this system are that it is simple, durable, and
has the potential to be very lightweight. The downsides are that the system would not be operable
when the user is not running or walking, and would provide no benefits when the user is stationary.
4.1.4 Helical Piping
A study was performed to model the effects of incorporating a helical cooling channel into a prosthetic
socket [11]. The study used 3-D printed socket with a normal socket as a control, and another with a
helical cooling channel. The study found incorporating a helical cooling channel increased the
temperature difference across the socket from 4.55℃ for a computer model, 5.9℃ for the benchtop
simulation, to 8.2℃ for a computer model, and 6.55℃ for the benchtop simulation [11]. There is a
thermodynamic benefit to adding a helical cooling channel in a prosthetic socket. However, there would
need to be additional components to create the fluid flow throughout the helical coils that were not
analyzed. The downside to this model is there would be moving componentry such as a pump and fluid
flow, and added weight by each component as well as a power source needed for the flow.
4.1.5 Thermoelectric Cooling
The final system evaluated by Team 05 was a thermoelectric cooling system. Thermoelectric coolers
operate on the thermoelectric effect, an effect observed in some materials (Bismuth Telluride for
instance) where a temperature gradient across the device generates an electrical voltage, and vice versa
[12]. This is the principle behind the operation of both thermocouples and thermoelectric heaters and
coolers. By applying a voltage across a thermoelectric element, the element develops a hot side and a
cold side. The cold side can be placed nearer to the user’s skin to draw heat away from the leg, and the
hot side can be connected to a heat sink to dissipate the heat into the atmosphere. Although
thermoelectric coolers are a relatively new and immature technology, they have the benefit of having
no moving parts, being lightweight, and being relatively inexpensive. The negative qualities of
thermoelectrics are that they require significant electrical power to operate, which translates to a large
and heavy battery. Thermoelectrics are also thermally inefficient, requiring 2 to 3 times as much heat to
be dissipated from the hot side as is drawn away from the leg.
4.2 Design Criteria
The design alternatives were evaluated based on weighted design criteria. The most important criteria
for our design were determined to be system weight and cooling power, with system durability and
21. 14
simplicity being the second most important criteria, and system cost and size being our least important
design criteria. Team 05 decided that this design criterion accurately reflected the priorities of most
amputees. Of course, if the system does not have adequate cooling power, customers will not be willing
to spend the extra cost and carry the extra weight of a cooling system, and so cooling power was
deemed to be of utmost importance. Similarly, added weight in a prosthesis is very undesirable.
Prosthesis customers already spend extra money on high-grade materials such as carbon fiber and
titanium to reduce the weight of their prostheses, so adding too much extra weight was determined to
be a factor that would seriously limit desirability. Only slightly less important is the durability of the
socket. Prosthesis can be subjected to many forms of abuse, but are typically only in operation for 3-5
years. Product simplicity also contributes to durability, as well as limits the chances of parts breaking.
The size of the product, although important to keep within a reasonable limit, was not deemed to be
one of the most important factors when buying a prosthetic leg, as many users will be willing to sacrifice
some aspect of beauty of form for enhanced function, although increased function and beauty of form
are both desired in our product. Finally, the cost of the system was not seen as prohibitive, as many
potential customers have their prostheses covered by insurance, and the added cost of our system will
not be significant when compared to the already expensive nature of purchasing prosthetic legs.
4.3 Design Decisions
The criteria were ranked using the design criteria described above with the use of a decision matrix.
After each design alternative was ranked, the results were added up. As shown below in Table 3,
thermoelectric cooling methods excelled in nearly every design criteria. Thermoelectric cooling was the
clear choice for Team 05, and thus development on a thermoelectrically cooled leg began.
Table 3: Decision matrix for determination of heat removal method
5 Project Design
The proposed thermoelectrically cooled prosthetic socket (TEC-Pro) is composed of an inner heat sink in
contact with the user’s skin or silicone liner, a middle composite thermal insulation layer, an exterior
heat sink and dissipation sleeve, thermoelectric cooling elements, and an electrical control and
processing system. This section describes the research and design work done thus far on these systems.
5.1 Electronics System Research
The general function of the electrical system in the prosthesis is to provide power to the thermoelectrics
with a battery. In addition to this, the system should appropriately control the power to the
22. 15
thermoelectrics based on the temperature sensed inside the socket, hence creating a control system. In
order to implement this electrical control system, the team decided that four different components
within the system were necessary: batteries, thermoelectrics, temperature control circuitry, and a user
interface.
5.1.1 Thermoelectrics
At max load, the thermoelectrics are expected to draw a total of 50 W of heat from the cold sides to the
hot sides. In order to evenly distribute the thermal load, multiple thermoelectrics will be positioned
within the socket (See Section 5.2 Heat Transfer Research for more information on this). In order to
discuss the process of choosing the right thermoelectrics, one must understand a few key system
parameters: 𝑑𝑇 𝑚𝑎𝑥, 𝑄 𝑚𝑎𝑥, 𝐼 𝑚𝑎𝑥, and 𝑈 𝑚𝑎𝑥. The term 𝑑𝑇 𝑚𝑎𝑥 refers to the maximum temperature
possible across the thermoelectric (when Q = 0); 𝑄 𝑚𝑎𝑥 is the maximum heat being moved across the
thermoelectric (when 𝑑𝑇 = 0); finally, 𝐼 𝑚𝑎𝑥 and 𝑈 𝑚𝑎𝑥 are the current and voltage necessary for the
thermoelectric to achieve maximum performance. Figure 3 below depicts the relationship between
these parameters.
Figure 3: Example applications with required 𝑑𝑇 and heat load [1]
From Figure 3, one can observe that thermoelectrics are current regulated devices; the thermal output
is proportional to the input current. In order to calculate the sufficient 𝑄 𝑚𝑎𝑥 needed, Eq. 2 below was
used [1].
𝑄 𝑚𝑎𝑥 =
𝑄
1−
𝑑𝑇
𝑑𝑇 𝑚𝑎𝑥
Eq. 2
Inserting the desired 𝑄 = 50 𝑊, 𝑑𝑇 = 12 𝐾, and 𝑑𝑇 𝑚𝑎𝑥 = 70 𝐾 (for single stage thermoelectrics)
produces a required 𝑄 𝑚𝑎𝑥 of 60 W. While researching thermoelectric modules, the team discovered
that they run most efficiently when a DC voltage is applied. Thus, a low-pass filter should convert PWM
signals into DC voltage levels. Given the inherently curved shape of a prosthetic limb, the team elected
to use many thermoelectric modules distributed around the socket in order to draw heat away
23. 16
uniformly. The team considered using thermoelectrics from manufacturers such as RMT, TETECH, and
Mouser Electronics. Because the contacts from RMT and TETECH were unwilling to provide quotes at the
quantity specified, the team decided to purchase CUI Inc. thermoelectric modules from Mouser
Electronics. As stated previously, the thermoelectric modules were estimated to need a lower limit of at
least 60 W of heat transfer with a temperature difference of 12 K. Each thermoelectric module
purchased has the capability to move 5 W of heat at 1.2 A and 2 V of power at a temperature difference
of 12 K. According to the CUI datasheet [15], twelve of these modules are capable of pulling 60 W of
heat at a temperature difference of 12 K if each is supplied with 1.2 A at 2 V. Figure 4 containing the
schematic for this design shows the thermoelectrics modules modeled as 2 Ohm resistors. Given this
assumption, the equivalent resistance of the thermoelectric modules is 1.5 Ohms. Choosing a 7.4 V,
5200 mAh, battery gives a total current of 4.93 A (7.4 V / 1.5 Ohms). This allows each of the modules to
see 1.64 A (4.93 A / 3 parallel sections) at 2.47 V (7.4 V / 3 resistors in series), which satisfies the design
requirement of 1.2 A at 2 V.
Figure 4: Thermoelectric Modules Schematic
5.1.2 Batteries
The team decided to use two 7.4V 5200mAh rechargeable Lion-Ion battery packs with a max continuous
discharge rate of 5A each to drive the thermoelectrics. Each battery has protection circuitry that
disconnects the battery terminals when the current reaches 11 A +/- 3A. Extra protection includes a
cutoff for when the voltage of either cell (two cells per pack) rises to 4.35 +/- 0.025V or falls to 2.40 +/-
0.08V. This prevents the battery from being overcharged or over-discharged [13]. With the
thermoelectrics drawing nearly 4.93 A, this will give each battery a battery life of about an hour (5.2
mAh / 4.93 A = 1.05 h). In addition to this, two smaller 11.1 V batteries will power the fans. These also
contain PCB protection circuits with similar characteristics as the batteries mentioned previously.
24. 17
The customer theoretically can recharge one battery pack while they use the other, or they have the
option to use both for double the capacity at the cost of added weight. Battery holders will be designed
to allow for easy attachment and removal of the batteries.
5.1.3 Control System
In order to control the thermoelectrics, an Arduino reads the voltage level of a temperature sensor PID
control on the Arduino processor. In order to drive the thermoelectrics, the output PWM signal coming
from the Arduino is filtered into a DC signal using a low pass filter. This is then fed to a MOSFET which
will act as a valve for the main source of power coming from the batteries. Below in Figure 5 is a top
level block diagram of the control system to be implemented in the prosthesis.
Figure 5: Top level representation of the temperature control system
5.1.4 User Interface
Initially, the team has elected to implement an on/off switch that will turn the control system on or off
with no functionality to alter the temperature set point. However, the team has decided to include an
LCD screen and buttons to allow for temperature control and display of temperature measurements.
5.2 Heat Transfer Research
One of the major problems faced in the feasibility study and design of the system was the problem of
moving the excess heat from the leg and the heat generated by the thermoelectric away from the user.
In order to ensure that we are able to successfully remove all excess heat and provide cooling power
under extreme conditions, Team 05 attempted to create a computational thermal model. After
beginning to create a thermal model based on heat transfer equations and parameters from online
references, the team decided to abandon complex paper and pencil or EES models and develop an
Autodesk Inventor and Autodesk Simulation Mechanical model. This model allowed for the precise
calculation of heat flows throughout various components of the system and allowed for the simulation
of complex geometries and heat flow regimes. The Inventor model, as shown in Figure 6, was composed
of an exterior finned heat sink, a composite woven insulating shell with integrated thermoelectric
coolers, an interior aluminum heat sink, a silicone liner, and the residual limb.
25. 18
Figure 6: Autodesk Inventor model of prosethesis for simple simulation purposes
This model was analyzed using Autodesk Simulation Mechanical’s thermal solver. This first-order
approximation was used only to confirm that we could indeed dissipate the required amount of heat
while keeping the exterior heat sink at an acceptable temperature. All physical approximations were
approximated and the geometry was simplified for ease of simulation and to save computation time.
This model was simulated in the worst conditions we expected to face, with the user going for a run,
generating approximately 45W of heat that need to be removed. Because of the inefficiencies in the
thermoelectric element, in order to keep the user’s skin at a comfortable temperature in the steady
state, the system was estimated to have to be capable of dissipating nearly 130W of heat. This large
amount of heat generated by the thermoelectric cooler could be dissipated by a simple block heat sink,
but would require a more complex heat sink with very efficient fin design. It was later determined that
fans would be required as the team did not have the capabilities to manufacture the required heat sink.
For the initial simulation, a heat sink with relatively inefficient fins was used as a fast first-order
approximation. The amount of heat dissipated by the heat sink is a function of the surface area of the
heat sink in contact with the air, the airspeed around the heat sink, and the difference in temperature
between the heat sink and the surrounding air. In Figures 7 and 8, a temperature map of the exterior
heat sink at steady state conditions is shown. The map is shown such that the hottest spot on the heat
sink is about 120℉ while the coolest spot is just under 100℉.
26. 19
Figure 7: Exterior heat sink temperature map from Simulation Mechanical thermal simulation
Figure 8: Inner view of the exterior heat sink temperature map from Simulation Mechanical
27. 20
These two figures showed that the temperature is very unevenly distributed to the location of the
thermoelectric element. This simulation also showed the team that the exterior temperatures with only
one thermoelectric element and large blocky find would not adequately dissipate the required heat.
However, the simulation also showed us that the temperature of the rest of the heat sink would be
adequately low. By adding more and smaller thermoelectric cooling elements, dispersing them more
evenly throughout the socket, and enlarging the heat sink, the team created an improved thermal
model which is shown in Figure 10.
Figure 9: Heat map showing the inside of the inner heat sink at subzero temperatures
Figure 9 shows another heat map of the initial thermal simulation, this time showing the inside of the
inner heat sink for the initial simulation, which is closest to the user’s skin. In this temperature map, the
lowest temperature near the skin was near -60℉, while the hottest temperature was again near 120℉.
This again gave us reason to believe that by moving the thermoelectrics around, adjusting the power,
and increasing the heat dissipated in the heat exchanger, we would be able to develop a system that
28. 21
draws the correct amount of heat from the user’s leg. The improved model, shown in Figure 10, shows
our first attempt at further spreading out the heat. We began by getting a more realistic picture of the
geometry of a residual limb by taking measurements on Stephen’s leg. In order to increase model
accuracy, we also added the silicone liner layer, which was not incorporated in the initial model.
Figure 10: Heat map of improved thermal model
By increasing the number and decreasing the size of the thermoelectric coolers and revising the
locations and heat flux parameters, we were able to distribute the heat more evenly. Although this
model was an improvement, there were still hot spots that could be uncomfortably hot and potentially
dangerous on the exterior. The lessons that were learned from these simulations were mainly that we
needed many thermoelectric elements in order to distribute the heat and the cooling evenly. We did not
place too much value on the temperatures we observed in the simulations because of the large
uncertainty in the inputs to the simulations. Any simulation is only as good as the numbers provided to
the simulation, and because there were so many uncertainties in the convection coefficients for our
simulations, the team determined that the proper course of action was to use incremental development
during the course of the second semester in order to get experimental results and reduce the
uncertainty as we developed the final product. Because of the complexities of computational modelling
and the high level of uncertainty, the team also decided it would not be prudent to go into an in depth
simulation of the strength of the socket where holes were being cut out. Because the team had no
29. 22
experience in modelling soft bodies such as muscle and skin and their interactions with a hard carbon
fiber or Kevlar socket, it was determined that overbuilding the socket was the best course of action for
our situation.
5.3 Materials Research
The temperature generation within the residual limb is dependent on location [2]. The skin
temperatures were elevated near muscles such as the tibialis anterior, peroneus brevis and longus, and
the medial and lateral heads of the gastrocnemius [2]. The skin temperatures near bony regions, such as
the anterior regions along the surface of the Tibia, and end of the residual limb were decreased [2]. This
is visually shown below in Figure 11.
Figure 11: Skin temperature contours of the left residual limb and prosthetic socket [2]
Since temperatures on the surface of the skin vary with location, Aluminum was initially chosen for an
internal heat sink material due to its high thermal conductivity and light weight, as well as its
machinability considerations. However, due to the issues encountered in attempting to manufacture a
thin and irregularly contoured internal sleeve, the idea for an internal heat sink was eventually
abandoned in favor of putting the thermoelectric elements in direct contact with the silicone liner.
Aluminum was still used as the heat sink material of choice for exterior heat sinks for all the reasons
listed above. For the structural portion of the socket, the team considered Kevlar and carbon fiber for
their high strengths, and ended up choosing to utilize carbon fiber because it was easier to acquire and
was recommended by our industrial mentor.
30. 23
5.4 Overall System Qualities/Parameters/Targets
After our initial feasibility study, we found that we were able to meet or exceed most of the
requirements, with a few areas of our design requiring further development. The weight of the
proposed model along with the weight of the batteries and electronics came to roughly 3 pounds,
including some wiggle room for additional improvements. This exceeded our goal of keeping the weight
below 3 pounds of added weight, as the original socket itself weighed roughly 1.5 pounds. Thermal
simulations with one thermoelectric element and a small heat sink have given the team reason enough
to believe that with some modifications and tweaking a system could be developed with the correct
cooling power, low enough exterior temperatures, and a low enough weight.
6 Prototyping and Development
After developing the basic operating principles for the TEC-PRO during the first semester of ENGR
339/340, we moved on to the prototyping and development phase during the second semester.
Throughout the first semester, we realized that there were many sources of uncertainty in our
calculations. These included the uncertainty in our original estimate of the required heat flux away from
the leg, the uncertainty in watts of cooling from our thermoelectric modules, uncertainty in the heat
transfer coefficient on the outside of the heat sink, and uncertainty in the number of modules and
optimal placement of the modules on the socket itself. The team decided that the best approach for us
to take in order to produce a final product that met all our targets and goals was one of incremental
development, building several prototypes, each of increasing complexity, until we arrived at a final
prototype that was representative of our final product. We ended up creating three prototypes, along
with a fourth, final prototype.
6.1 Prototype 1
The first prototype was created for the purpose of testing our Arduino-based control system and
determining how close to expected cooling values we could get. A fiberglass bowl was created to
represent the carbon fiber shell for the final design, a hole was cut into the bottom of the bowl, and a
thermoelectric module and heat sink were glued and sealed into the bottom of the bowl. This bowl was
filled with warm water, rigged with thermocouples, as shown in Figure 12, and tested with the
thermoelectric module on and with the module off. The thermocouples were placed in the water, on the
base of the heat sink, and near the end of a fin on the heat sink in order to ensure that the heat sink
would not get hot enough to burn the skin of the user.
31. 24
Figure 12: Prototype 1 being prepared for testing
The results of these tests, as well as other prototyping tests, can be found in the Appendix. After
performing this first test, the team was disappointed to discover that the thermoelectric module and
heat sink had been unable to dissipate heat from the hot side as well as we had hoped, and the heat was
actually flowing back into the water, resulting in the water actually heating up with the thermoelectric
module on when compared to natural convection with all electronics off. This was determined to be due
to the low convection coefficient between the ambient air and the heat sink. Because there was little to
no air movement, heat was not dissipated from the heat sink, which resulted in the hot side of the
thermoelectric increasing, and eventually the cold side of the thermoelectric increasing as well,
releasing heat back into the water instead of pulling heat out. This test showed the team that we were
indeed going to have to use fans to help remove the heat from the heat sink and the hot side of the
thermoelectric modules. The team considered not using fans and requiring that the user be running or
in a windy environment when using the full functionality of the TEC-Pro, but determined that in order to
provide a comfortable and consistent experience for the user, we would have to be able to provide
cooling operation when the user was not moving. The testing was repeated, this time with a fan blowing
across the fins of the heat sink, and we were able to see much improved performance. The major
takeaway from this testing was that fans would be required, and that our control system's function was
validated.
6.2 Prototype 2
The second prototype was created for the purpose of testing the thermoelectric elements, heat sinks,
and fans that we selected for our final prototype, as well as to ensure that our electronics system,
batteries, and control system were capable of handling the cooling loads that we required. The second
prototype, like the first, was made out of fiberglass. This prototype was made by forming fiberglass
around a quasi-residual limb shaped piece of Styrofoam. Holes were cut in the fiberglass socket, and 8
32. 25
thermoelectric modules, heat sinks, and fans were secured in place. Once completed, tests similar to the
tests performed on prototype 1 were run. Thermocouples were attached to the heat sink, the cold side
of a thermoelectric element, and a third was placed in the water. Again, warm water was poured into
the socket and the thermocouples were monitored every 20 seconds to keep track of the data. The
testing setup for prototype 2 is shown in Figure 13.
Figure 13: Prototype 2 in the process of testing
The data, which is shown in the Appendix, was used with specific heat equations in order to determine
the amount of heat removed from the water. These tests lasted for 8 minutes each, which was long
enough to understand how the thermoelectric modules would act over an extended period of time.
Tests were performed with no electronics on in order to estimate the heat lost due to natural
convection. Throughout testing, the team determined that running the fans and thermoelectrics both at
5 Volts was not going to produce enough cooling power to hit our targets. The settings of our power
supplies were tweaked until we achieved satisfactory performance, with the fans running at 12 Volts
and the thermoelectric modules running at 6.7 Volts. Although we were satisfied with the performance
at these conditions, this meant that we would need a higher voltage battery to be able to power the
fans when running off of battery power.
6.3 Prototype 3
The third prototype was the last one before our final iteration. This prototype was a complete carbon
fiber socket with a pin-lock attachment mechanism built by professionals. This socket was an old one
that was no longer in use by Stephen, and was donated to our team in order to do fit testing. The goal of
this prototype was to ensure that our cooling power estimates would be satisfactory to cool off an
actual amputee and to determine the number of thermoelectric modules required, as well as the
optimal placement for the thermal and physical comfort of the user. This prototype, shown in Figure 14,
33. 26
was built by cutting holes in the existing socket and sealing in thermoelectric modules, heat sinks, and
fans.
Figure 14: Prototype 3 in the process of testing
Instead of using thermocouples and water to test this prototype, testing was performed by Stephen. He
wore a silicone liner similar to the one he would be wearing with our final product. He then donned the
prototype socket, and gave us feedback to help us improve the design. Throughout the course of this
testing, we found that our design had adequate cooling power to keep Stephen cool. Although there
was a lag of about 30 seconds right when the thermoelectric modules turned on before cooling could be
34. 27
felt through the liner, there was enough cooling power that the skin on the back of the leg, where many
of the return veins are, was significantly cooler to the touch than skin on the front of the leg, where
much of the blood flowing to the leg is. The team also learned that two of the modules that were
originally placed on the inside and front of the leg would not be necessary for the final design, as the
muscle mass in Stephen's leg in that location was less than that of other transtibial amputees. This lower
muscle mass led to lower heat generation and less cooling requirements. We concluded from this
testing that the best places for us to place thermoelectric modules were on the calf and on the lateral
side of the socket. Using the lessons learned from three rounds of prototyping, the team then moved on
to developing the final product.
7 Final Design
7.1 Socket Creation
The beginning of the lamination process was completed through the normal fabrication techniques. A
positive mold was created using a check socket from a previous prosthesis. The positive mold, shown in
Figure 15, was poured using plaster and a metal rod was inserted into the plaster to act as a stand for
the future lamination steps. After the plaster had hardened, measurements were made around the
current residual limb and prosthetic liner, and modification were made using a sander to form the
positive model into a shape, which would allow a tight fit to the current volume and shape of the
residual limb.
Figure 15: Positive of a fitted socket that was used to create the final socket
35. 28
The adjusted plaster mold was then laminated using a braided carbon biaxial sleeve, generously
provided by A&P technologies, and Ear1 acrylic epoxy resin as well as 617P37 hardening powder. The
lamination process was performed using an interior close-topped poly vinyl alcohol (PVA) lamination bag
slid over the positive model. Two layers of carbon fiber sleeve laid over the positive, as shown in
Figure 16, followed by an open ended PVA lamination bag. The resin and hardener were mixed and
poured into the top of the open PVA and drawn into the carbon weave under 20-25 psi of vacuum. The
resin was messaged into the weave and wetted out, using a cord, to remove any unneeded weight that
extra epoxy would add to the socket. The socket was allowed to harden in the PVA bags for three hours.
After the epoxy was determined to be set, the plaster was broken out of the socket using pneumatic air
tools. The top of the socket was cut appropriately around the knee line and sanded to a smooth surface.
Figure 16: First layer of carbon fiber weave applied to the positive
After this step, the regular process for socket preparation was complete. The final components of the
socket included a pyramidal adapter, height adjusting shims, and a prosthetic foot. The components
were attached to the socket through hexagonal set screws. The alignment of the socket was then
adjusted to allow for a correct ambulation. With the alignment correct, the fit of the socket was tested
and modifications were done on any hot-spots by sanding down those spots. Once a good fit was
obtained, the electronic components were introduced through a novel lamination technique.
36. 29
The novel lamination method started with careful placement of eight thermoelectric elements within
the two layers of carbon fiber. An expandable foam was poured into the socket, after Vaseline had been
applied to prevent bonding. The foam held the shape of the limb within the socket. Eight squares were
cut out of the prosthetic socket, with two horizontal rows of three thermoelectric modules in the back,
and two thermoelectric modules placed vertically over the tibialis anterior muscles in the front of the
leg. The placement of these thermoelectrics mimicked the natural heat generation within a residual limb
as shown above in Figure 11. Care was taken to avoid the fibular head as well as the front of the tibia so
if future adjustments were necessary, modifications to relieve these typical hot spots could be made.
Once the squares were cut from the carbon fiber to accommodate the placement of thermoelectrics,
the thermoelectrics were epoxied in place using the same mixture as for the carbon lamination, shown
in Figure 17. Thin aluminum spacers were machined to allow direct heat transfer from the
thermoelectrics to the heat sinks without the heat passing through any carbon, which can be seen in
Figure 18. The aluminum spacers had a thinner edge that protruded past the needed area of the
thermoelectrics. This edge allowed for the third and fourth layers of carbon fiber, applied in the second
lamination step, to hold the aluminum spacers and thermoelectrics in place. The aluminum spaces also
contained threaded hole locations in each of the four corners for screws to hold in the heat sinks and
fans in the future. The aluminum spacers were super glued along the sides to hold them in place until
the final carbon fiber layers were laminated to provide the final securing of the components.
Figure 17: First two layers of the final socket with the thermoelectrics wired
37. 30
The thermoelectrics were wired, as well as a wire to power the fans on the back of the leg and a wire for
the fans on the front. The wires were taped in place on the socket and a long rubber tubing was placed
over the end leading from the socket to the leg. Two additional layers of carbon fiber were laid over the
electrical components and the aluminum spacers. Vaseline was applied to the exterior of the aluminum
spacers to allow the carbon to be easily removed from the spacers after the lamination step was
complete. The wires were fed through the carbon fiber at the appropriate locations, at the very bottom
for run to the battery and control system, and to one location for the fans on the back of the socket, in
addition to one location for the fans on the front. Vaseline was applied to the threads and tops of 32
screws to hold keep epoxy from entering the screw holes in the aluminum spacers. The tops of the
screws were fed through the carbon fiber at the appropriate locations to hold the carbon in place, and
give reference points after the carbon had been hardened with the epoxy. Vaseline was applied to four
screws and placed in the bottom of the socket to hold the spots for attachment of the baseplate of the
socket to the foot.
Figure 18: Final socket with the aluminum plates where the heat sinks and fans were attached
38. 31
Before the epoxy was poured, an outer PVA lamination bag was placed over the carbon fiber, and
vacuum was applied to pull the epoxy through the carbon. The rubber tubing which held all of the wire
components was fed out the top of the PVA lamination bag and past the funnel where the epoxy was
poured. Extra care was taken feeding the lamination bag over the head of the screws to prevent the bag
from ripping. The same epoxy and hardener were used as in the first lamination process. Once the epoxy
set, the socket was broken out with the same process as the first two layers of carbon. However,
additional care was taken to avoid cutting the tubing which contained the wires. Squares were cut out of
the carbon fiber over the aluminum spacers, using a dremel, to make sure heat would not be passed
through the carbon. A rotary sander was used to sand the carbon flat over the exposed aluminum
squares so the heat sinks would sit flush with the aluminum.
The wires to each of the fans were connected to the wire feed in the front and the back of the socket,
with minimal exposure of the wires to the fans by feeding the wires through the heat sinks. The fans and
heat sinks were attached to the aluminum spacers by four screws in each corner. The rubber tubing was
cut away to allow the correct wires to attach to the control system, located on the foot, and the
batteries to run the fans and thermoelectrics, attached the pylon of the leg. The torque lock and height
adjusting pylons were bolted together to allow for the correct height of the leg. Adjustments were then
made to orient the foot accurately for normal ambulation. The final product is shown in Figure 19.
Figure 19: Final product with the LCD displaying power level and socket temperature
39. 32
7.2 Electrical System
A perforated board, Arduino, switches, buttons, and LCD display were placed within a plastic and
aluminum (for heat dissipation) water-resistant case. The perforated board contained the electronics
necessary to facilitate control of the thermoelectrics and fans, while the Arduino handled all of the
sensor input and data output (temperature sensors, LCD display, MOSFETS control voltage). The team
decided to use only one 7.4 V 5200 mAh battery at a time on the leg to limit the total weight of the
battery case. In addition, an 800 mAh 11.1V battery was added in order to power the fans. The outside
of the electronics case features an LCD display, an ON/OFF switch, temperature increase and decrease
buttons, as well as a menu button to control the display.
The final rendition of the prosthesis features 8 thermoelectric modules, instead of 12, as explained
earlier. Despite having fewer thermoelectric modules, using less increased the power delivered to each
thermoelectric. The devices were configured into three parallel sections. One section contained two
modules in series, while the other two sections had three modules in parallel, as seen below in
Figure 20.
Figure 20: Thermoelectric Modules Configuration
In order to ensure reliable operation, the components were chosen for the prosthetic socket to function
within reasonable temperatures. Looking at the maximum and minimum ratings for each component
below in Table 4, the overall temperature range for the socket spanned from -10 to +60 degrees Celsius,
or about +14 to +140 degrees Fahrenheit. Assuming the user will not need to cool their leg at
temperatures below freezing, the system’s temperature range satisfies desired temperature constraints.
40. 33
Table 4: Temperature Ratings of the Components
Component Operating Temperature
Range (°C)
Storage Temperature
Range (°C)
Power Rating at
70 °C (W)
Maximum Actual
Power (W)
NTE2371
MOSFET -55 to +175 -55 to +175 NA NA
10K Resistor NA NA 0.25 0.016
7.4K Resistor NA NA 0.25 0.003
LCD Display -10 to +60 -20 to +70 NA NA
Arduino (ATMega
2560) -55 to +125 -65 to +150 NA NA
Li-Ion Batteries -20 to +60 -40 to +50 NA NA
CP60233 TEs No higher than +80 NA NA NA
Finally, high side driver circuits were used to drive the fans and thermoelectric modules as seen below in
Figure 21.
Figure 21: High Side Driver Circuit
Originally, the team designed for a low side driver circuit, which uses fewer components. However, the
grounds of the fans, thermoelectric modules and temperature sensors were all accidentally connected
underneath the carbon fiber during the fabrication of the socket. This also forced the team to drive the
Thermoelectrics with PWM, which contradicts our previous research. Despite this, the MOSFET now
41. 34
dissipates significantly less heat due to the nature of PWM allowing the MOSFET to quickly switch
between its ON and OFF states.
In addition to an electronics case, a battery holder was designed to hold the two different batteries.
7.3 Performance
Although Stephen has not run with the TEC-Pro on yet, because we didn’t want something to go wrong
for Senior Design night, stationary and walking testing has been completed with successful results. After
putting the socket on and powering up, Stephen could feel cooled areas produced by the thermoelectric
modules within 30 seconds. He also said that it was a consistent feeling – it wasn’t a quick chill and then
warm again. Instead, his leg stayed cold until the socket was powered down. This also speaks to the
success of the electrical system. With the flick of a switch and the push of a button, the socket can be
powered up within 5 seconds, with an almost instantaneous transfer of heat on the thermoelectrics. The
extra time required for Stephen to feel the temperature difference is due to the low thermal
conductivity of the silicone liner he must wear on his residual limb. The LCD screen on the electrical box
displays the power percentage and temperature of the socket on a readable screen. The control system
has a limit on the high and low temperatures that can be experienced before the socket shuts itself
down to prevent burn and frostbite risks. The electrical components are sealed in watertight cases or
integrated into the carbon fiber socket, making the socket almost completely waterproof, although
there is a small risk that if submerged, the fans could short, which would also power down the system.
The team minimized the risk of snagging any components or accidentally cutting anyone by sanding the
thermoelectrics until there were rounded edges and making the stack up of the cooling system modules
as small as possible. With four layers of carbon fiber, the team believes the socket will be durable
enough to last long past its expected life. The socket fit itself was better than the team could have
hoped for, and provides a high level of comfort to the user with little to no disruption to the smooth
interior surface from the thermoelectric cooling modules. The fan operation is also extremely quiet, and
there is no disruption to the user at all. In addition to hitting all of the initial product operation and
safety requirements, the team feels that the design norms are embodied in the TEC-Pro. Our product
provides care for a disadvantaged and often overlooked group of people by improving the overall
experience of amputees. Our product is built in such a way that it will stand the test of time, and we
believe that the durability built into the socket will allow the user to trust the electrical, structural, and
thermal reliability of the TEC-Pro. Finally, the simple operation and delightful harmony of the TEC-Pro
speaks to the final prototype's integrity. Overall, the team feels that the TEC-Pro’s performance
accomplishes the original goals, embodies several Christian design norms, and we hope that the
prototype will be a blessing to the user for years to come.
8 Business Plan
8.1 Marketing Study
8.1.1 Competition
There is only one other company who makes a product similar to the one Team 05 has designed. This
company is Leto Solutions, with their product called the Aquilonix™ Prosthesis Cooling System. This
product “provides a thermoelectrically cooled environment within the prosthesis socket that cools the
space and removes heat.” The product has some features such as being lightweight (less than 2 pounds),
is powered by rechargeable batteries, and is turned on and off with a switch. The product is not
42. 35
commercially available yet, so no pricing data is available [14]. A comparison between the TEC-Pro and
Leto Solutions’ product is shown in Table 5.
Table 5: Comparison of the competition
Features TEC-Pro Leto Solutions
Thermoelectrically Cooled Yes Yes
Rechargeable batteries Yes Yes
Lightweight Yes Yes
Integrated into socket Yes Yes
Quiet Yes Yes
Water resistant Yes ?
Self-regulating temperature Yes ?
Aesthetically pleasing Yes ?
Temperature adjustability Yes ?
8.1.2 Market Survey
There is quite a demand for the TEC-Pro. According to the United States Department of Veteran's
Affairs, “The United States had nearly 1.6 million people with amputation based on 2005 reports. In the
United States, it could be estimated that the population with amputation will increase to 3.6 million by
2050” [7]. Currently, there are no products available that solve the issue of discomfort inside the
prostheses due to heat and/or perspiration. The team’s client, Stephen, was the main source for
features desired by prospective customers, and the "customer" for our final product. These features are
broken down in Section 3: Requirements.
8.2 Cost Estimate
8.2.1 Development
The cost to develop this product is seen in Section 2.3. To summarize, the development and extra parts
cost $368.85. The production of the final product was $423.42. The grand total for our project was
$792.27.
8.2.2 Production
For this product, mass production is not the most viable way to distribute our product. Each product
would have to be specially designed for its customer because socket fit is one of the most important
features for an amputee. Therefore, mass production on an assembly line is not practical. However,
many components could be produced on a line separate from the parts that are custom fit. We envision
producing the thermoelectric, heat sink, and fan as an integrated module as well as a control system and
integrated electronics that would be proprietary. These pieces would be sold or licensed to the
prosthetists who are making the sockets themselves. Our hypothetical company would also provide
training to prosthetists on how to integrate our technology into their sockets. If large enough quantities
were being sold, the TEC-Pro modules would be able to be integrated, streamlined, and manufactured
more cheaply, leading to higher profit margins and reduced costs for the end user.
43. 36
8.2.3 Fixed Costs
Fixed costs are expenses that are present no matter how many products are created and sold. Fixed
costs of this project include $100/hour for design time and material for the prototypes and development
including a carbon fiber socket, heat sinks, thermoelectrics, batteries, wiring, and epoxy.
8.2.4 Variable Costs
Variable costs are expenses that depend on the amount of production of a company. The amount of
products that could be produced will depend on assembly time and production costs, which would have
to be calculated if we were to sell our product for mass production.
8.2.5 Summary Financials
Not including parts donated to the team, the total cost of parts purchased was $792.27. If the socket
were to be produced again, this cost would theoretically decrease significantly because many of the
parts purchased were not included in the final socket. However, because it does not reflect the carbon
fiber and other donated materials, it stands as a decent estimate of what the material costs. The
engineering hours put into the project, 894 hours, would cost around $89,400 (Total hours x
salary/hour).
The team will need to know the final costs of producing the TEC-Pro. With this information, it will be
possible to calculate the price at which the product should be sold, which takes into account the labor,
materials, production tooling, and other expenses. Since Stephen, Lance, and Nathan were in
Business 357, they were able to perform an analysis of the cost of the project and apply that knowledge
in the feasibility study. In addition, Andrew has taken multiple business classes so his knowledge also
contributed in this business analysis.
8.3 Future Outlook
As technology advances, integration of cooling componentry to prosthetic sockets will become more
seamless. Future prospects include curved thermoelectrics, which would allow for more interior
surfaces of the prosthetic socket, that are from the thermoelectrics, to process the correct features to fit
the patients residual limb. The final prototype featured an Arduino and perforated board to facilitate
control of the thermoelectric modules and fans. Ideally these two boards would be simplified into a
single board with processing, I/O, and analog circuitry to drive the fans, thermoelectric modules, and a
higher resolution screen. This would reduce cost, weight, complexity and size in order to create a more
aesthetically pleasing prosthesis. Battery life weight with respects to its life are areas of heavy research.
Advancements in battery technology will allow for future sockets to have less additional weight for
extended duration of cooling. As technology advances, the technology will allow for the heat transfer
from the residual limb to the environment to become more efficient and seamless, allowing for the
prosthetic sockets to support the desired functions of the patient, without many of the negative side
effects of trapping heat.
44. 37
9 Conclusion
In conclusion, Team 05 has studied the feasibility of a thermoelectrically cooled prosthetic leg socket for
transtibial amputees, created a design, and executed the design by producing a functional prototype.
The final design is composed of a carbon fiber socket, thermoelectric cooling elements, heat sinks, fans,
batteries, an Arduino, and several other electrical and mechanical elements to support the system. After
preliminary studies into the heat transfer, materials, biological considerations, and electrical controls,
Team 05 has designed, developed, and created a functional prototype that was presented at Senior
Design Night on May 7, 2016. The prototype has been tested by our customer and team member
Stephen Lander. After about 30 seconds, Stephen could feel the cold, which means that heat buildup
will take much longer and the amount of sweat produced through work will be much less. Although
development of the TEC-Pro cannot move forward into mass production or further development
because of patent infringement issues, Team 05 considers this project a resounding success.
45. 38
10 Acknowledgements
We would like to thank the Calvin College Engineering Department for sponsoring our project, and we
would also like to thank the following people who helped us in this accomplishment:
Professor Nielsen, for being our advisor and providing us with suggestions, encouragement, and
wisdom throughout the year
Professor Heun, for all his help with the thermodynamic and modelling aspects of the project we
faced first semester
Zach Harvey, board certified prosthetist, for being our industrial mentor
Stephen Lander, for being our teammate and customer, and allowing us to use the trials he has
faced with his amputation for our senior project
Zachary Hagen, for contributing to our team’s business model and providing us with moral
support
A&P Technologies for donating the carbon fiber weave for our project and helping us to keep
our costs down
Bob DeKraker, for getting us everything we needed when we needed it
Phil Jasperse, for helping us to find the best way to make all our components and using his years
of manufacturing experience to minimize our headaches
Chemistry Department, for allowing us to use the fume hood when laminating the socket
Professor Tatko, for advising us on the use of the epoxy and hardener
Jennifer Ambrose, for providing safety equipment and training
Professor Yoon Kim, for providing electrical engineering expertise
Professor Mark Michmerhuizen, for providing battery advice
46. 39
11 References
[1] http://www.rmtltd.ru/downloads/TEC_FAQ_2014_EN.pdf
[2] A Three-Dimensional Finite Element Model of Transibial [sic] Residual Limb and Prosthetic Socket to
Predict Skin Temperatures
[3] http://www.ncbi.nlm.nih.gov/pubmed/18295618
[4] Prevalence of heat and perspiration discomfort inside prostheses: Literature review. Kamiar Ghoseiri,
PhD Candidate; Mohammad Reza Safari, PhD* Department of Orthotics and Prosthetics, University of
Social Welfare and Rehabilitation Sciences, Tehran, Iran
[5] http://www.all-battery.com/SetofTwoTenergyLi-ion7.4V_4400mAhReplacementBatteryforNeatoXV-
series-34084.aspx
[6] http://www.amazon.com/arduino-org-A000066-Arduino-Uno-Rev/dp/B008GRTSV6
[7] http://www.rehab.research.va.gov/jour/2014/516/JRRD-2013-06-0133.html
[8] https://www.physics.ohio-state.edu/~p616/safety/fatal_current.html
[9] http://www.businessinsider.com/how-long-does-it-take-to-get-frostbite-or-hypothermia-2014-1
[10] http://www.antiscald.com/prevention/general_info/table.php
[11] Design of a Novel Prosthetic Socket: Assessment of thermal performance
[12] https://en.wikipedia.org/wiki/Thermoelectric_cooling
[13] http://www.all-battery.com/Li-Ion186507.4V5200mAhFlatRechargeableBatterywithPCBandBearLea
ds.aspx
[14] http://www.letosolutions.net/our-solution.html
[15] http://www.mouser.com/ds/2/670/cp60-515756.pdf
52. 45
// TEC-Pro
// Nathan Slager
// Calvin College 5/7/2016
// This software provides an interface between a TEC-Pro user and their socket
// Sources:
// arduino.com
// http://www.pjrc.com/teensy/td_libs_OneWire.html
#include <LiquidCrystal.h>
#include <OneWire.h>
// Input Pin Definitions
#define BUTTON1PIN 52
#define BUTTON2PIN 51
#define BUTTON3PIN 48
#define TEMPPIN 13
LiquidCrystal lcd(2, 3, 6, 7, 10, 11); // lcd uses these pin numbers
OneWire ds(TEMPPIN);
// Output Pin Definitions
#define TEPIN 5
#define FANPIN 4
// Button Variables
int button1 = 0;
int button2 = 0;
int button3 = 0;
int button_press;
unsigned long now1;
53. 46
unsigned long last_push = 0;
// Menu Variable
int menu_toggle = 0;
int total_menus = 1; // number of menus
unsigned long now3;
unsigned long last_menu = 0;
// Temperature variables
byte i;
byte data[12];
byte addr[8];
byte present = 0;
byte type_s;
unsigned long now2;
unsigned long last_read = 0;
int converting = 0;
float celsius, fahrenheit;
// TE and fan power
int power = 0;
bool emergency_off = false;
void setup() {
// Initialize pins as off
analogWrite(TEPIN, 0);
analogWrite(FANPIN, 0);
pin_setup();
lcd_setup();
temp_sensor_setup();
}
void loop() {
poll_temp();
menu();
}
void menu() {
button_press = poll_buttons();
if (button_press > 0) {
set_power();
}
if (button_press == 3) { // Toggle menu
menu_toggle = (menu_toggle + 1) % total_menus;
}
// Menu 1
if (menu_toggle == 0) {
54. 47
now3 = millis();
if (now3 - last_menu > 1000) {
last_menu = millis();
// Display Menu 1
lcd.clear();
lcd.setCursor(0, 0);
lcd.print("Temp: ");
int t = fahrenheit;
lcd.print(t);
lcd.write(byte(0)); // Prints degrees symbol
lcd.print(" F");
lcd.setCursor(0, 1);
lcd.print("Power: ");
for (int i = 0; i < 5; i++) {
if (i < power) {
lcd.write(byte(1)); // Prints block
lcd.setCursor((8+i), 1);
} else {
lcd.print(" ");
}
}
lcd.print(power*20);
lcd.print("%");
}
}
}
void set_power() {
if (emergency_off) {
power = 0;
return
}
}
if (button_press == 1) {
power = power + 1;
} else if (button_press == 2) {
power = power -1;
}
if (power > 5) { // Keep power between 0 and 5
power = 5;
}
if (power <= 0) { // Fan power should be either off or higher than (170/255);
power = 0;
analogWrite(FANPIN, 0);
} else {
analogWrite(FANPIN, (power * 17 + 170));
}
analogWrite(TEPIN, (power * 51));
button_press = 0;
}
int poll_buttons() {
now1 = millis();
55. 48
if (now1 - last_push > 500) { // At most one button press every half second
last_push = millis();
// Measure voltage of pins 1-3
button1 = digitalRead(BUTTON1PIN);
button2 = digitalRead(BUTTON2PIN);
button3 = digitalRead(BUTTON3PIN);
if (button1 + button2 + button3 > 1) {
return -1;
} else if (button1 == HIGH) {
return 1;
} else if (button2 == HIGH) {
return 2;
} else if (button3 == HIGH) {
return 3;
} else {
return 0;
}
}
}
void temp_sensor_setup() {
if ( !ds.search(addr)) {
// Display to lcd that temp sensor not found
ds.reset_search();
delay(500);
}
}
void poll_temp() { // Measures the temperature of the socket, not the leg skin
temperature
if (converting == 0) { // Don't restart conversion before the previous finishes
converting = 1;
if (OneWire::crc8(addr, 7) != addr[7]) {
return;
}
ds.reset();
ds.select(addr);
ds.write(0x44, 1); // start conversion, with parasite power on at the end
}
now2 = millis();
if ( now2 - last_read > 1500) {
converting = 0;
last_read = millis();
present = ds.reset();