Beyond Boundaries: Leveraging No-Code Solutions for Industry Innovation
Set the exposure triangle
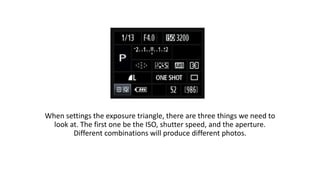
1. When settings the exposure triangle, there are three things we need to
look at. The first one be the ISO, shutter speed, and the aperture.
Different combinations will produce different photos.
2. Step 1: Set Suitable ISO Value
Go into the settings menu on the back and choose the camera icon from the
column at left. Then scroll down to ISO Sensitivity Settings
3. Step 2: Set Shutter Speed
Use minimum shutter speed to reduce the risk of camera shake when you're shooting hand-
held. If the shutter speed is too slow when you're shooting by hand (as opposed to using a
tripod), you risk getting camera shake that makes the image blurry. Different photographers can
naturally hold the camera more still than others, and if you're shooting in cold or breezy
conditions or some other kind of movement then it's even harder to hold the camera perfectly
still. So even if you can get tack-sharp photos at 1/30 in some conditions, you might need to
crank that up to 1/125 if you're shooting with cold hands
4. Step 3: Set Aperture Value
You can adjust it by entering your camera’s aperture-priority mode or manual mode, both of
which give you free rein to pick whatever aperture you like. For large aperture, it is
recommended an f-stop like f/1.4, f/2, or f/2.8. While for small aperture, it is recommended
an f-stop like f/11, f/16, or f/22.