Download to read offline


![Individual action.js and saga.js file for the
Register and Login Page (which we will see
in the coming sections)
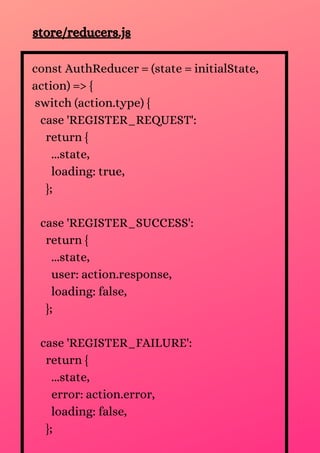
A folder named store having three files –
index.js, reducers.js, and sagas.js
So, now the store is accessible through our
entire application. It’s time to use the store in
our app. For that, we will need to do two things-
store/index. js
import createSagaMiddleware from 'redux-
saga';
import {createStore, applyMiddleware}
from 'redux';
import {combinedReducers} from
'./reducers';
import rootSaga from './sagas';
const sagaMiddleware =
createSagaMiddleware();
const middlewares = [sagaMiddleware];](https://image.slidesharecdn.com/beginnerstutorialpart-2howtointegrateredux-sagainreactnativeapp-210903073452/85/Beginner-s-tutorial-part-2-how-to-integrate-redux-saga-in-react-native-app-10-320.jpg)
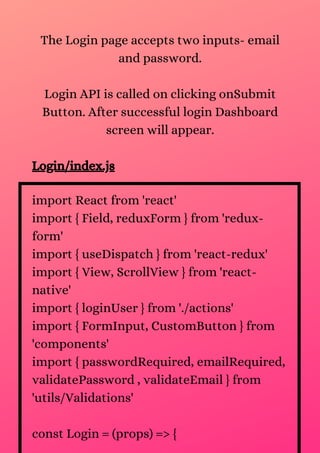
![store/sagas.js
import {all} from 'redux-saga/effects';
import loginScreenSaga from
'screens/Login/saga';
import signupScreenSaga from
'screens/Register/saga';
function* rootSaga() {
yield all([loginScreenSaga(),
signupScreenSaga()]);
}
export default rootSaga;](https://image.slidesharecdn.com/beginnerstutorialpart-2howtointegrateredux-sagainreactnativeapp-210903073452/85/Beginner-s-tutorial-part-2-how-to-integrate-redux-saga-in-react-native-app-12-320.jpg)


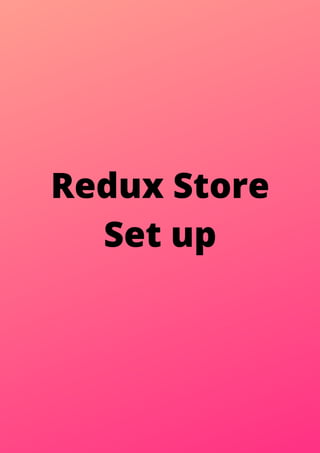
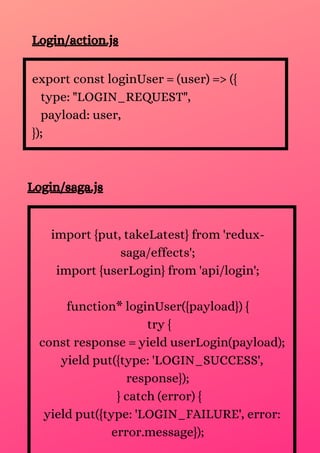
![import RegisterPageThree from
'./RegisterPageThree'
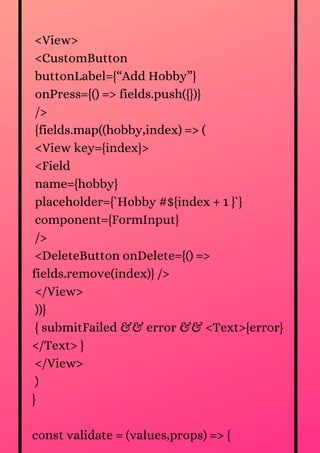
const Register = (props) => {
const [page,setPage] = useState(1)
const onSubmit = (Values) => console.log(Values)
const goToNextPage = () => setPage( page =>
page + 1 )
const goToPrevPage = () => setPage( page =>
page - 1 )
return (
<ScrollView>
{page === 1 && <RegisterPageOne nextPage=
{goToNextPage} />}
{page === 2 && <RegisterPageTwo nextPage=
{goToNextPage} prevPage={goToPrevPage} />}
{page === 3 && <RegisterPageThree onSubmit=
{onSubmit} prevPage={goToPrevPage} />}
</ScrollView>
)
}
export default Register](https://image.slidesharecdn.com/beginnerstutorialpart-2howtointegrateredux-sagainreactnativeapp-210903073452/85/Beginner-s-tutorial-part-2-how-to-integrate-redux-saga-in-react-native-app-15-320.jpg)
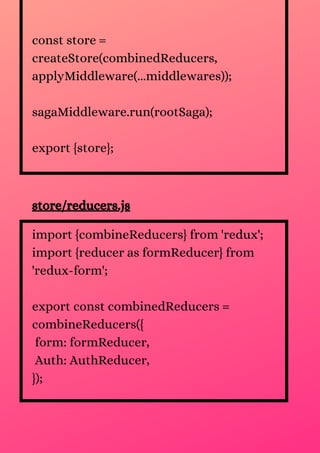
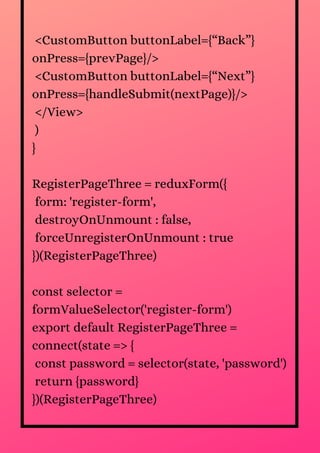
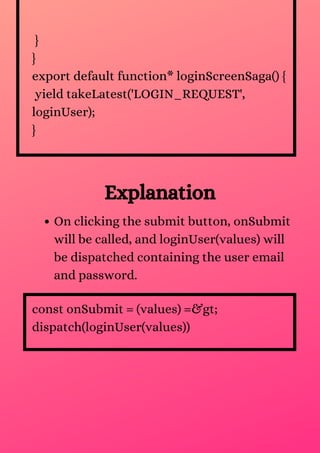
![Register/RegisterPageOne.js
RegisterPageOne is our first component
which will have two fields : Full Name and
User Name.
import React from 'react'
import { View } from 'react-native'
import { Field, reduxForm } from 'redux-
form'
import { FormInput , CustomButton } from
'components'
import { usernameRequired ,
fullnameRequired } from 'utils/Validations'
const RegisterPageOne =
({handleSubmit,nextPage}) => {
return (
<View>
<Field
name="fullName"
component={FormInput}
validate={[fullnameRequired]}](https://image.slidesharecdn.com/beginnerstutorialpart-2howtointegrateredux-sagainreactnativeapp-210903073452/85/Beginner-s-tutorial-part-2-how-to-integrate-redux-saga-in-react-native-app-16-320.jpg)
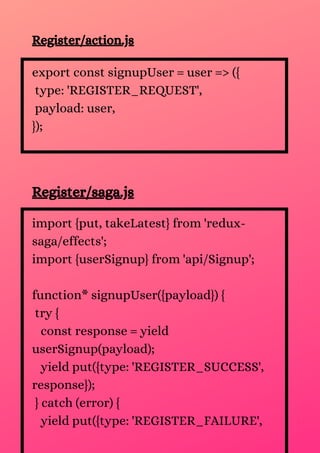
![placeholder="Enter Full Name"
/>
<Field
name="userName"
component={FormInput}
validate={[usernameRequired]}
placeholder="Enter User Name"
onSubmitEditing = {handleSubmit(nextPage)}
/>
<CustomButton
buttonLabel="Next"
onPress={handleSubmit(nextPage)}
/>
</View>
)
}
export default reduxForm({
form: 'register-form',
destroyOnUnmount: false,
forceUnregisterOnUnmount: true
})(RegisterPageOne)](https://image.slidesharecdn.com/beginnerstutorialpart-2howtointegrateredux-sagainreactnativeapp-210903073452/85/Beginner-s-tutorial-part-2-how-to-integrate-redux-saga-in-react-native-app-17-320.jpg)

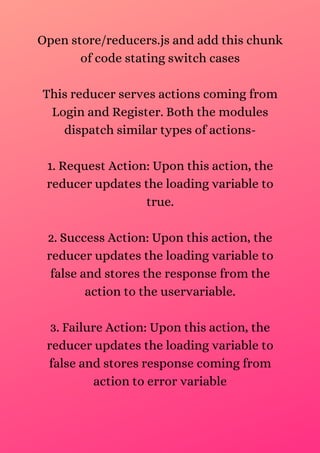
![const errors = {}
if (!values.hobbies ||
!values.hobbies.length) errors.hobbies = {
_error : “Add at least One hobby” }
else{
const hobbiesArrayErrors = []
values.hobbies.forEach((hobby,index)=>{
if (!hobby || !hobby.length)
hobbiesArrayErrors[index] =
HOBBY_REQUIRED
})
if(hobbiesArrayErrors.length)
errors.hobbies = hobbiesArrayErrors
}
return errors
}
const RegisterPageTwo =
({prevPage,handleSubmit,nextPage}) => {
return (](https://image.slidesharecdn.com/beginnerstutorialpart-2howtointegrateredux-sagainreactnativeapp-210903073452/85/Beginner-s-tutorial-part-2-how-to-integrate-redux-saga-in-react-native-app-20-320.jpg)
![<View>
<Field
name="mobileNo"
component={FormInput}
placeholder={“Enter Mobile Number”}
validate=
{[mobileNoRequired,validateMobileno]}
/>
<Field
name="email"
component={FormInput}
placeholder={“Enter email”}
validate={[emailRequired,validateEmail]}
/>
<FieldArray name="hobbies" component=
{renderHobbies}/>
<CustomButton buttonLabel={“Back”}
onPress={prevPage}/>
<CustomButton
buttonLabel={“Next”}
onPress={handleSubmit(nextPage)}
/>](https://image.slidesharecdn.com/beginnerstutorialpart-2howtointegrateredux-sagainreactnativeapp-210903073452/85/Beginner-s-tutorial-part-2-how-to-integrate-redux-saga-in-react-native-app-21-320.jpg)


![password && password !==
props.password
? VALIDATE_CONFIRM_PASSWORD
: undefined
return (
<View>
<Field
name="password"
component={FormInput}
placeholder={“Enter Password”}
validate=
{[passwordRequired,validatePassword]}
/>
<Field
name="confirmPassword"
component={FormInput}
placeholder={“Re Enter Password”}
validate=
{[passwordRequired,validateConfirmPassw
ord]}
/>](https://image.slidesharecdn.com/beginnerstutorialpart-2howtointegrateredux-sagainreactnativeapp-210903073452/85/Beginner-s-tutorial-part-2-how-to-integrate-redux-saga-in-react-native-app-24-320.jpg)


![const dispatch = useDispatch()
const onSubmit = (values) =>
dispatch(loginUser(values))
return (
<ScrollView>
<Field
name="email"
component={FormInput}
placeholder={“Enter Email”}
validate={[emailRequired,validateEmail]}
/>
<Field
name="password"
component={FormInput}
placeholder={“Enter Password”}
validate={[passwordRequired,validatePassword]}
/>
<CustomButton
buttonLabel={“Login”}
onPress={props.handleSubmit(onSubmit)}
/>
</ScrollView>
)
}
export default reduxForm({
form: 'login-form'
})(Login)](https://image.slidesharecdn.com/beginnerstutorialpart-2howtointegrateredux-sagainreactnativeapp-210903073452/85/Beginner-s-tutorial-part-2-how-to-integrate-redux-saga-in-react-native-app-35-320.jpg)


This document is a tutorial on integrating redux-saga with redux-form in a React Native application, focusing on building an authentication module. It details the steps to set up the Redux store, implement user registration and login functionalities, and use features like field arrays and wizard forms. The tutorial aims to provide a comprehensive guide for developers seeking to enhance their application with Redux middleware and includes a complete source code repository for hands-on experimentation.